Manage Accounts
Updated
Once you add an account within Sprinklr, you can view and edit your account details, add web analytics to your saved account, and deactivate/reactivate or remove the account permanently. Sprinklr supports over twenty-eight social channels. You can add an account from Account Settings using the credentials of that particular account.
Relevant personas
To whom is this feature relevant?
Admins / Account Owners who have the credential brands' official social media and messaging accounts and are authorized to add/remove these accounts in Sprinklr and control permissions to other users for various use cases like publishing / engaging / reporting.
Social Media Managers who, along with their teams, extensively access these social media and messaging accounts - require them to know how these accounts and their permissions are managed in Sprinklr.
Use cases
What business problems does it solve, and what can it achieve?
Adding accounts in Sprinklr allows you to view, engage with, publish to, and manage the inbound and outbound messages for various social channels.
Single users can add multiple accounts across the same as well as different channels on Sprinklr.
Different types of accounts for a single channel can be added with the correct access to perform actions as per the user’s requirement.
Any account in Sprinklr remains active as long as the access token is valid. If the token is invalid, the account becomes inactive (deactivated). To make the account active, re-add the account, and a new link will be created.
Deleting/deactivating all unwanted accounts is also possible in Sprinklr.
Value
Why is it beneficial?
Account management in Sprinklr lets you:
Manage all your activity across social media and messaging accounts from a single platform.
Safe and controlled access to users to perform specific actions for each channel/account.
Create Sprinklr entity for each social media/messaging account of the brand.
Availability
How to access the feature?
General Availability for all the users if the following account permissions are given to them.
Exception: Workspace users can add accounts only if it is enabled.
![]() Note: To enable this feature in your environment, please work with your Success Manager.
Note: To enable this feature in your environment, please work with your Success Manager.
Use this DP to add and manage accounts: ADMIN_ASSETS_PERMISSIONS_ENABLED. Enablement of this feature requires additional setup.
Details captured in the Accounts window
Term | Description |
Account Name | View the unique name of different accounts added to the environment. |
Account Type | View the type of account added. |
User ID | View the user ID of the user who had added the account. |
Owner | View the details about the user who had added the account. The account owner in Sprinklr serves two primary functions:
|
Status | View the status of the account, if it's Active or Inactive. |
Groups | View the group details, if the account is a part of any account group. |
Reach | View the reach details for the added account. |
Following | View the follower details for the added account. |
Posts | View the post details for the added account. |
Cover Photo | View the cover photo for the added account. |
Actions available in the Accounts window
Term | Description |
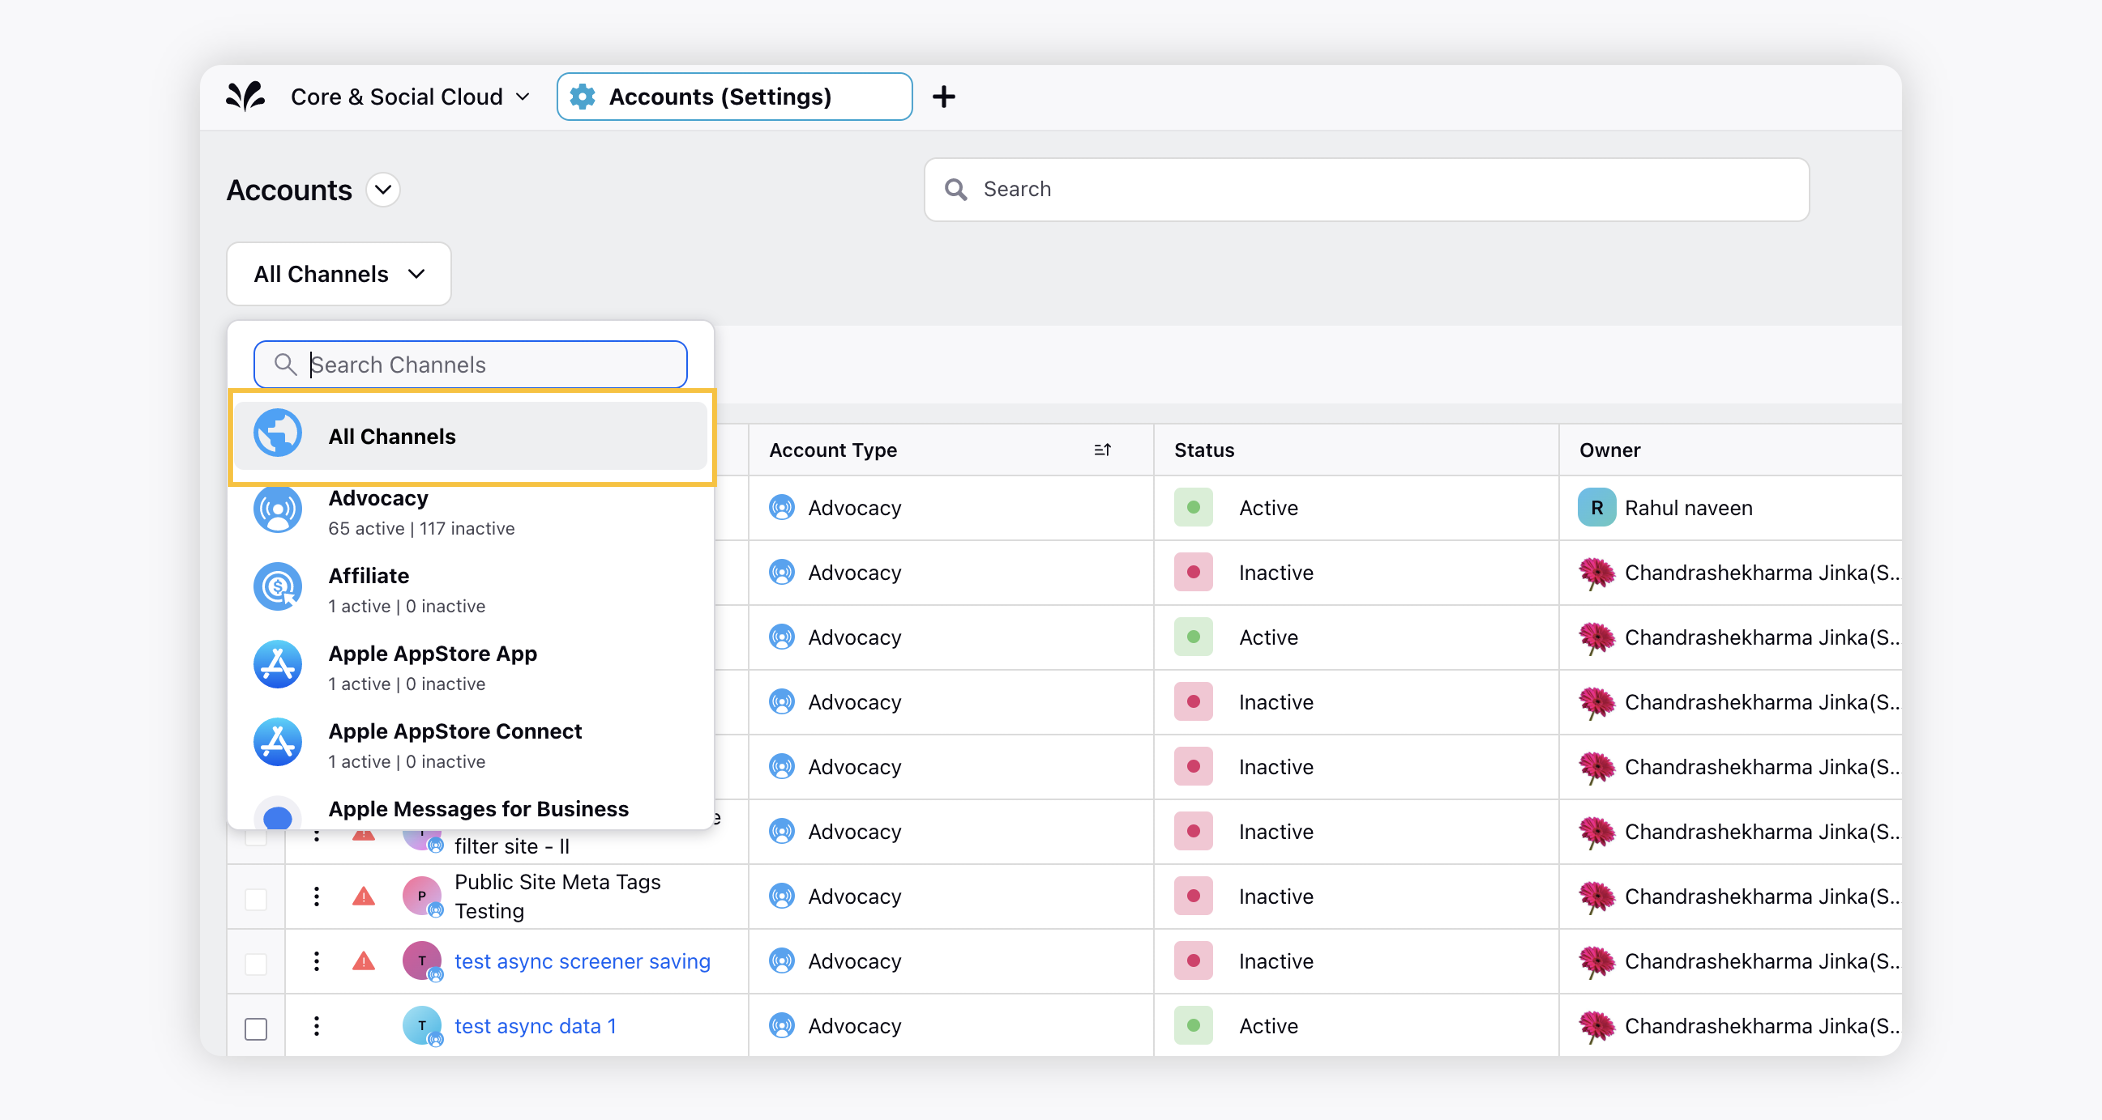
All Channels | Click the dropdown next to All Channels to select the desired channel. |
Quick Filter | Click to access the following quick filter for the account window:
|
Add Filter | You can apply a new filter by clicking Add Filter and apply your desired parameters. You can also view the number of total values selected out of all filter values. If you wish to exclude a particular value of any parameter, select the value and click the minus icon on the top of the Add Filter list. The accounts will be automatically filtered excluding the selected value. |
Search | Click to search for the desired account by entering the related keyword. |
Refresh | Click to refresh the accounts window. |
Click to add a new account. | |
Manage Columns | Slide the Toggle icon alongside the desired entity. If you wish to set the default columns on the accounts window, click Reset in the bottom left corner of the Manage Columns pop-up window. |
Export Accounts | Click to export the accounts window. |
For managing existing accounts
To view account details
Click the New Tab icon
. Under the Sprinklr Social tab, click Owned Social Accounts within Listen.
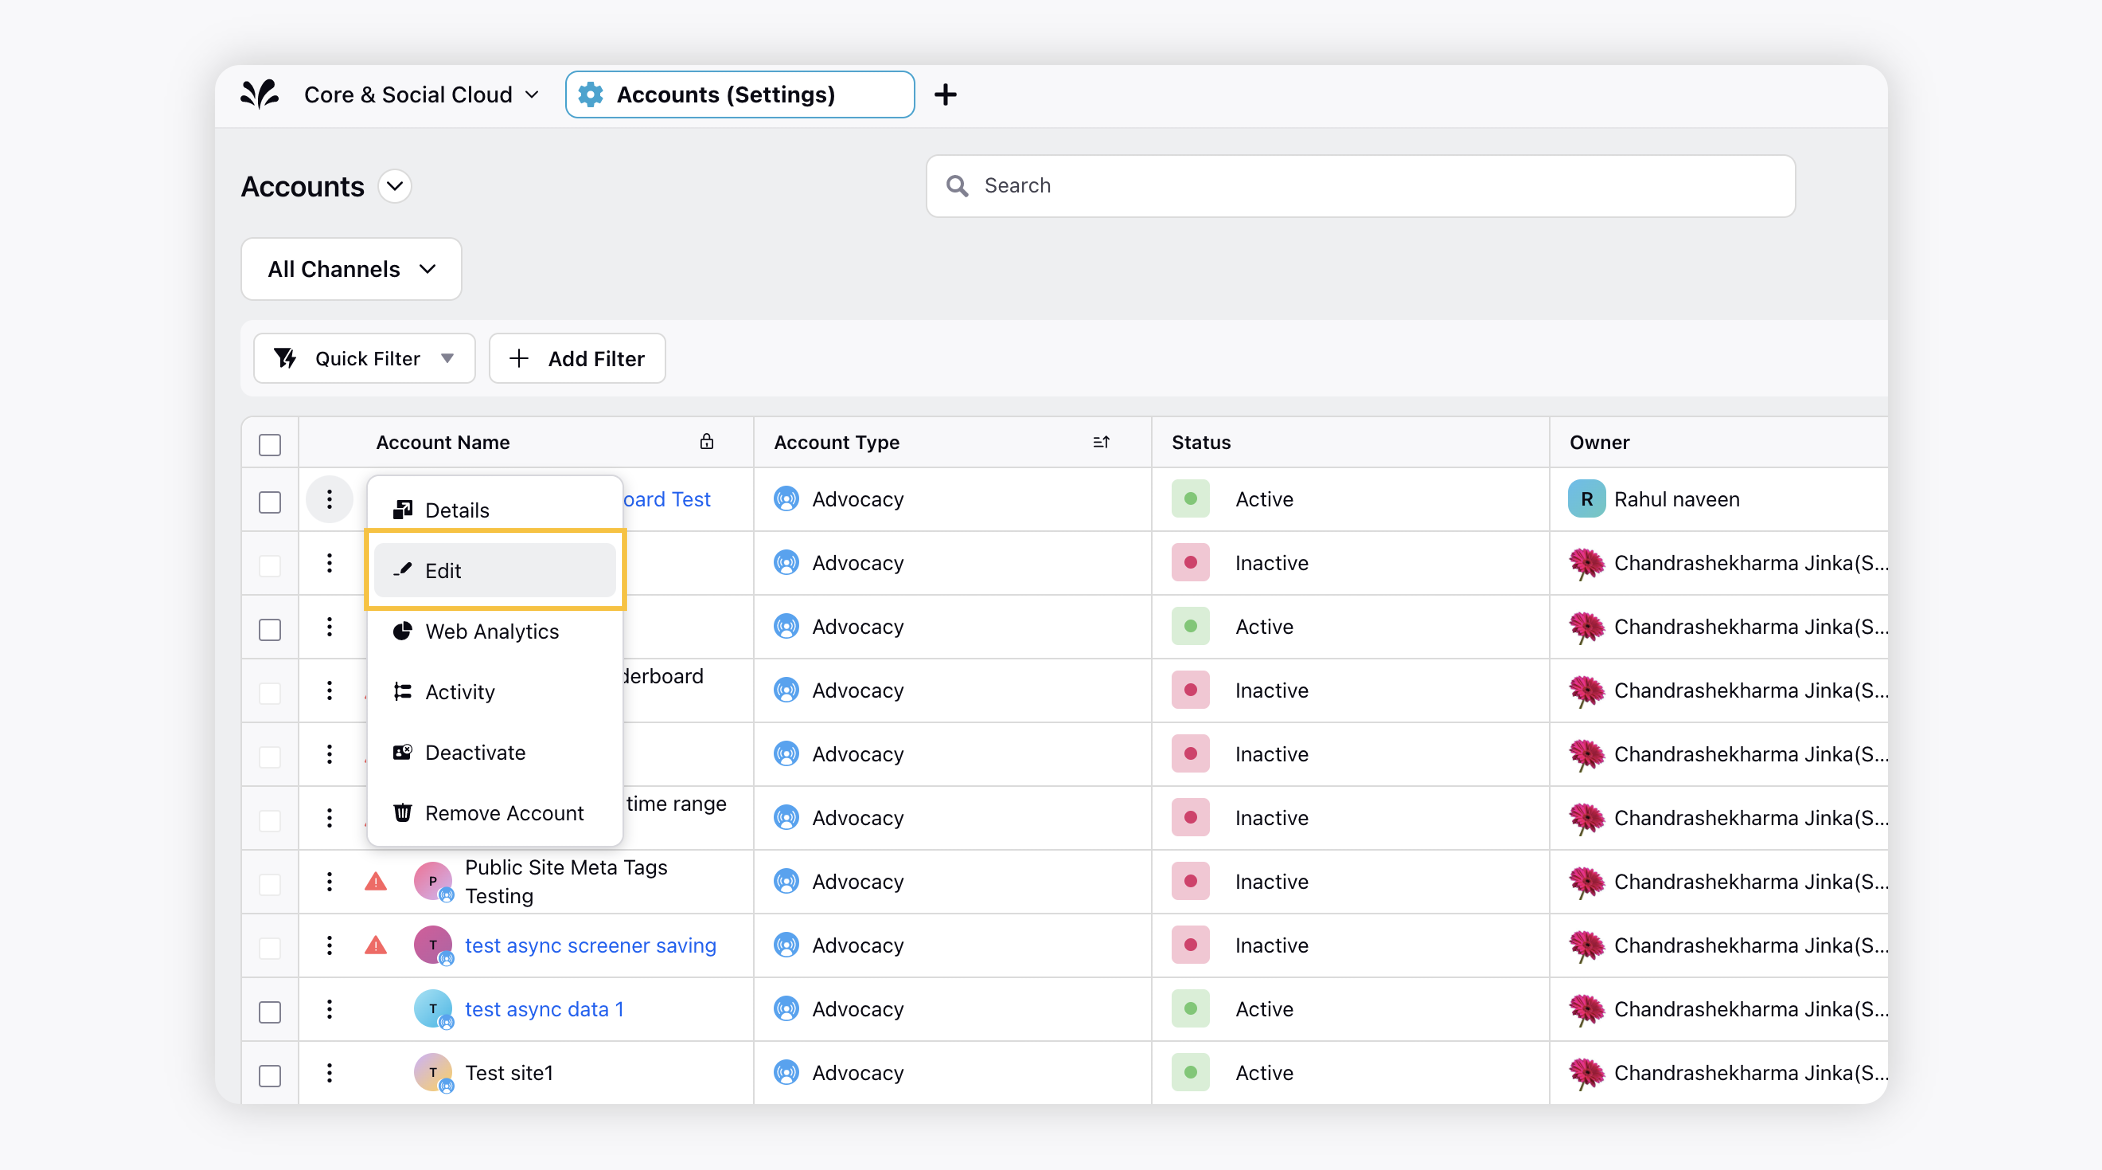
On the Account (Settings) window, hover over the desired account's Options icon and select Details.
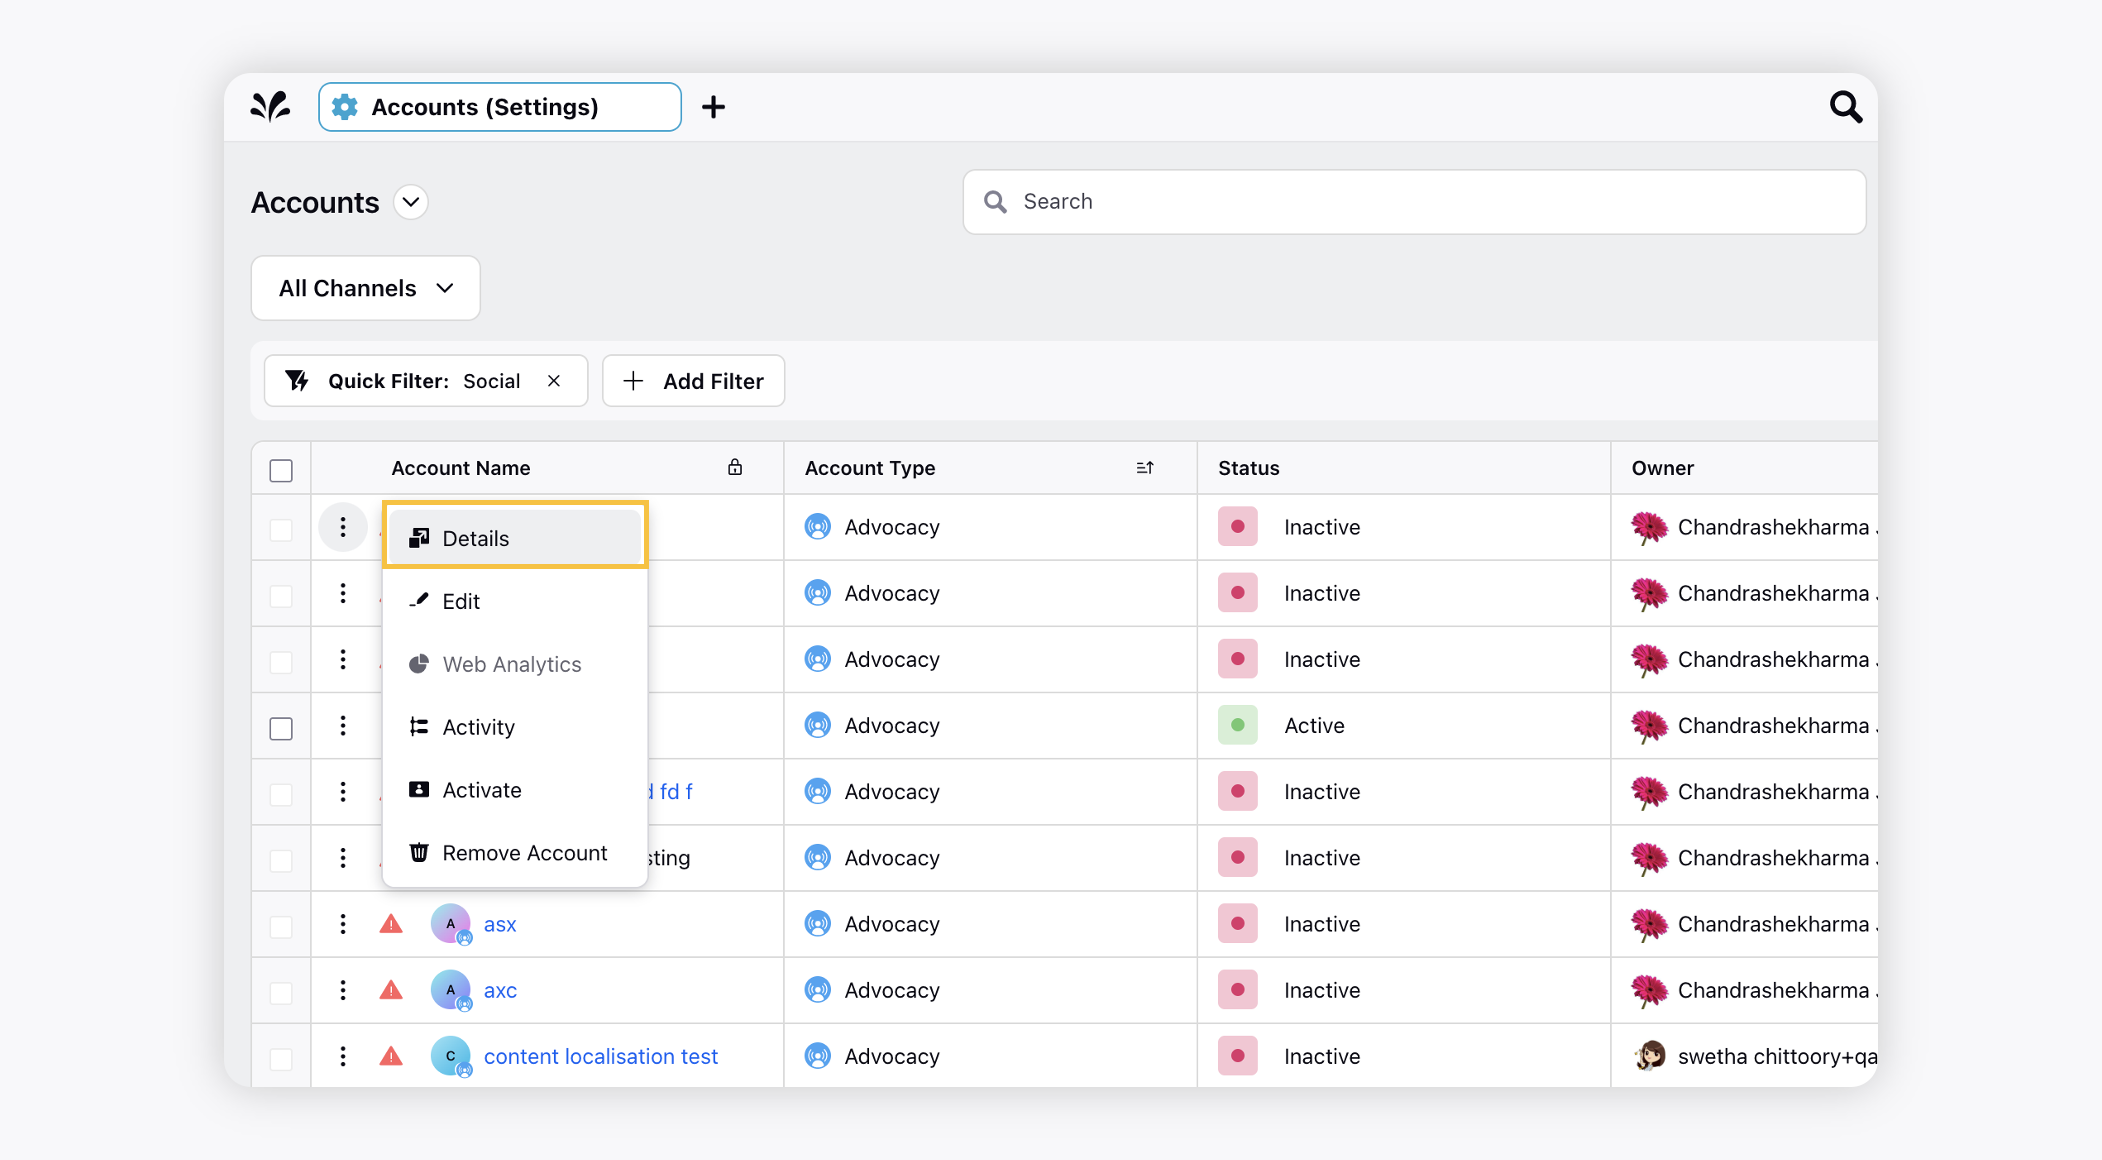
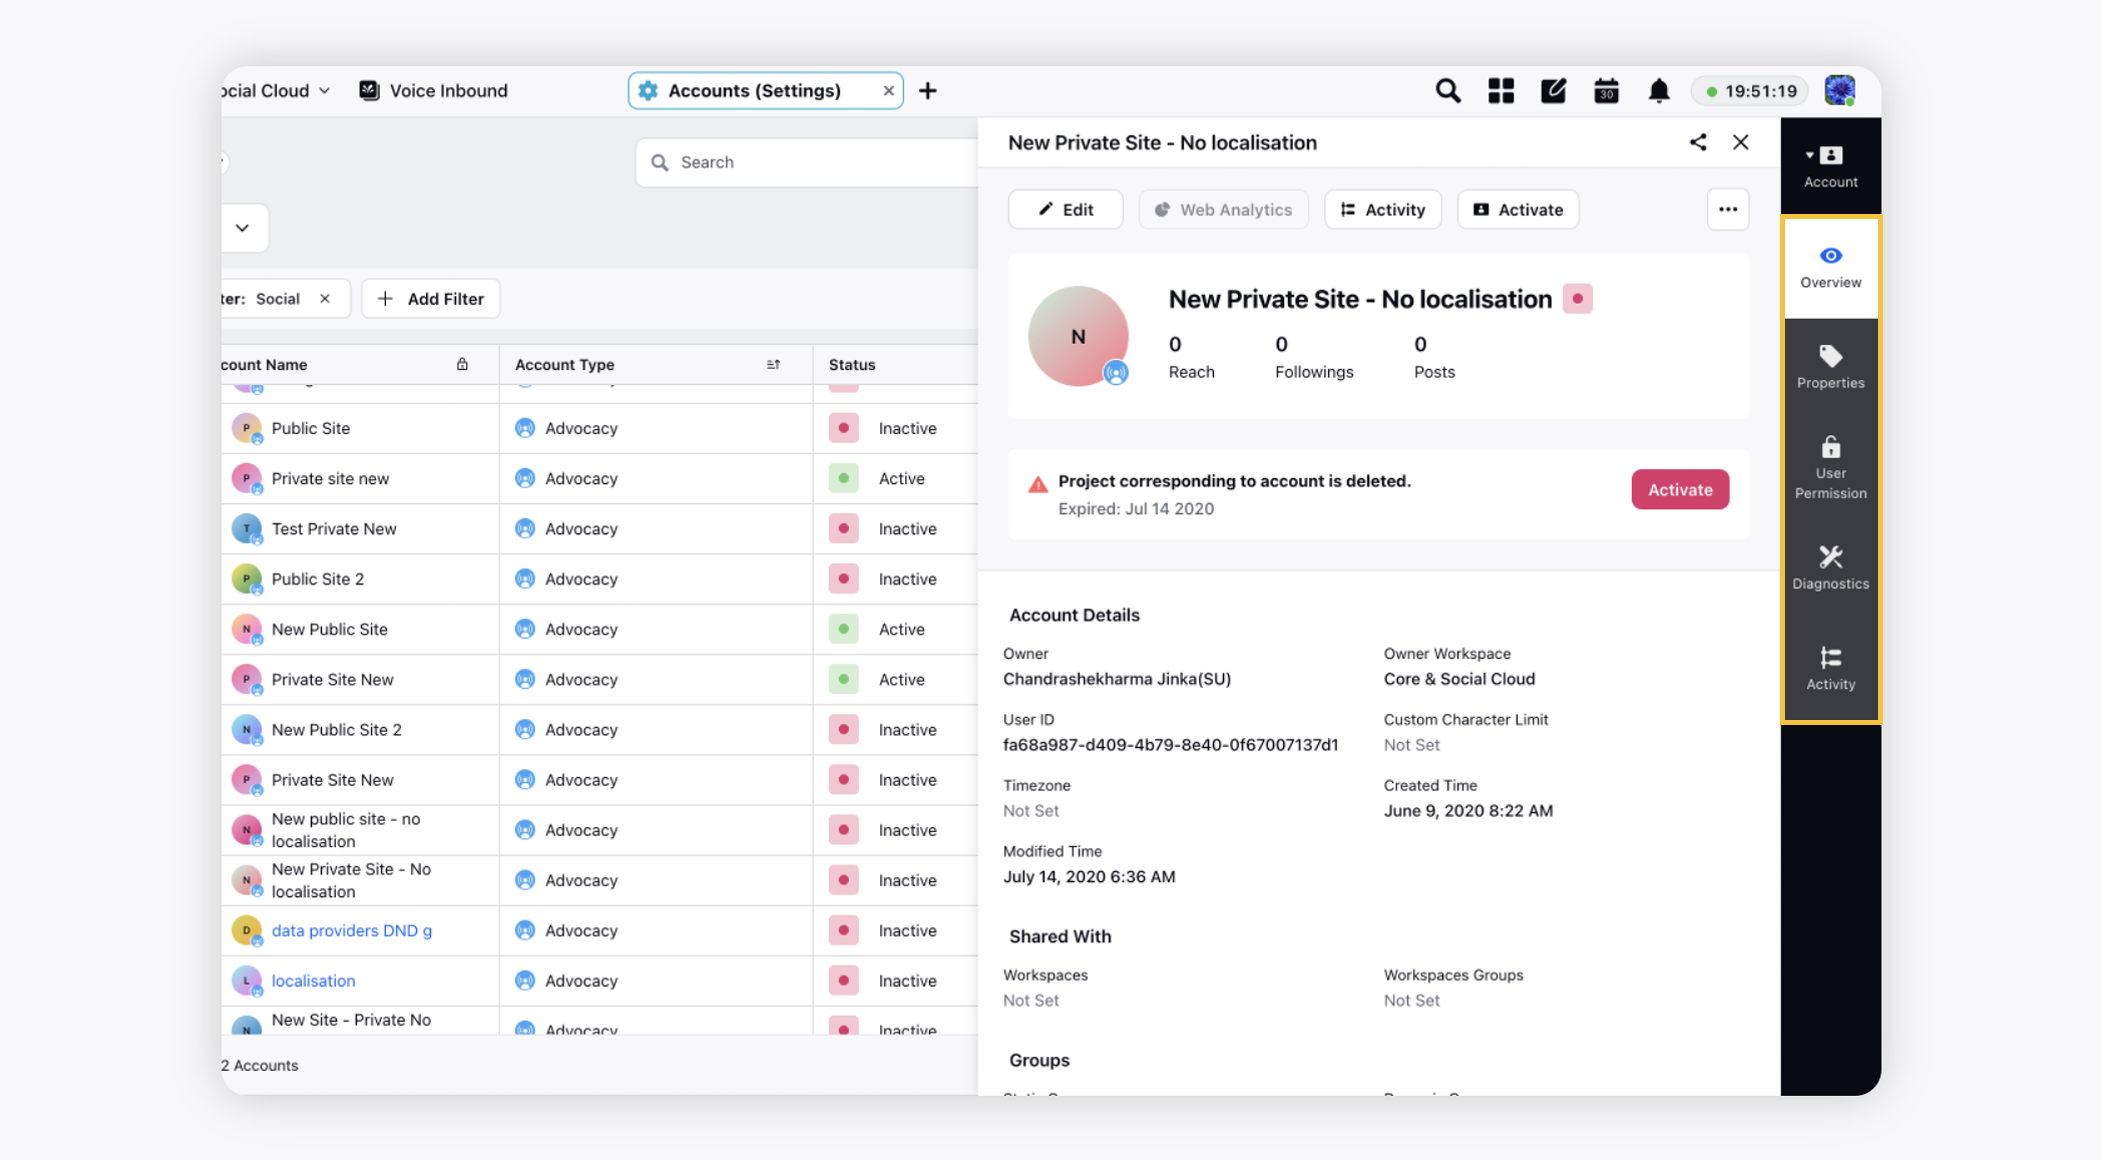
The account details will open in the Third Pane.
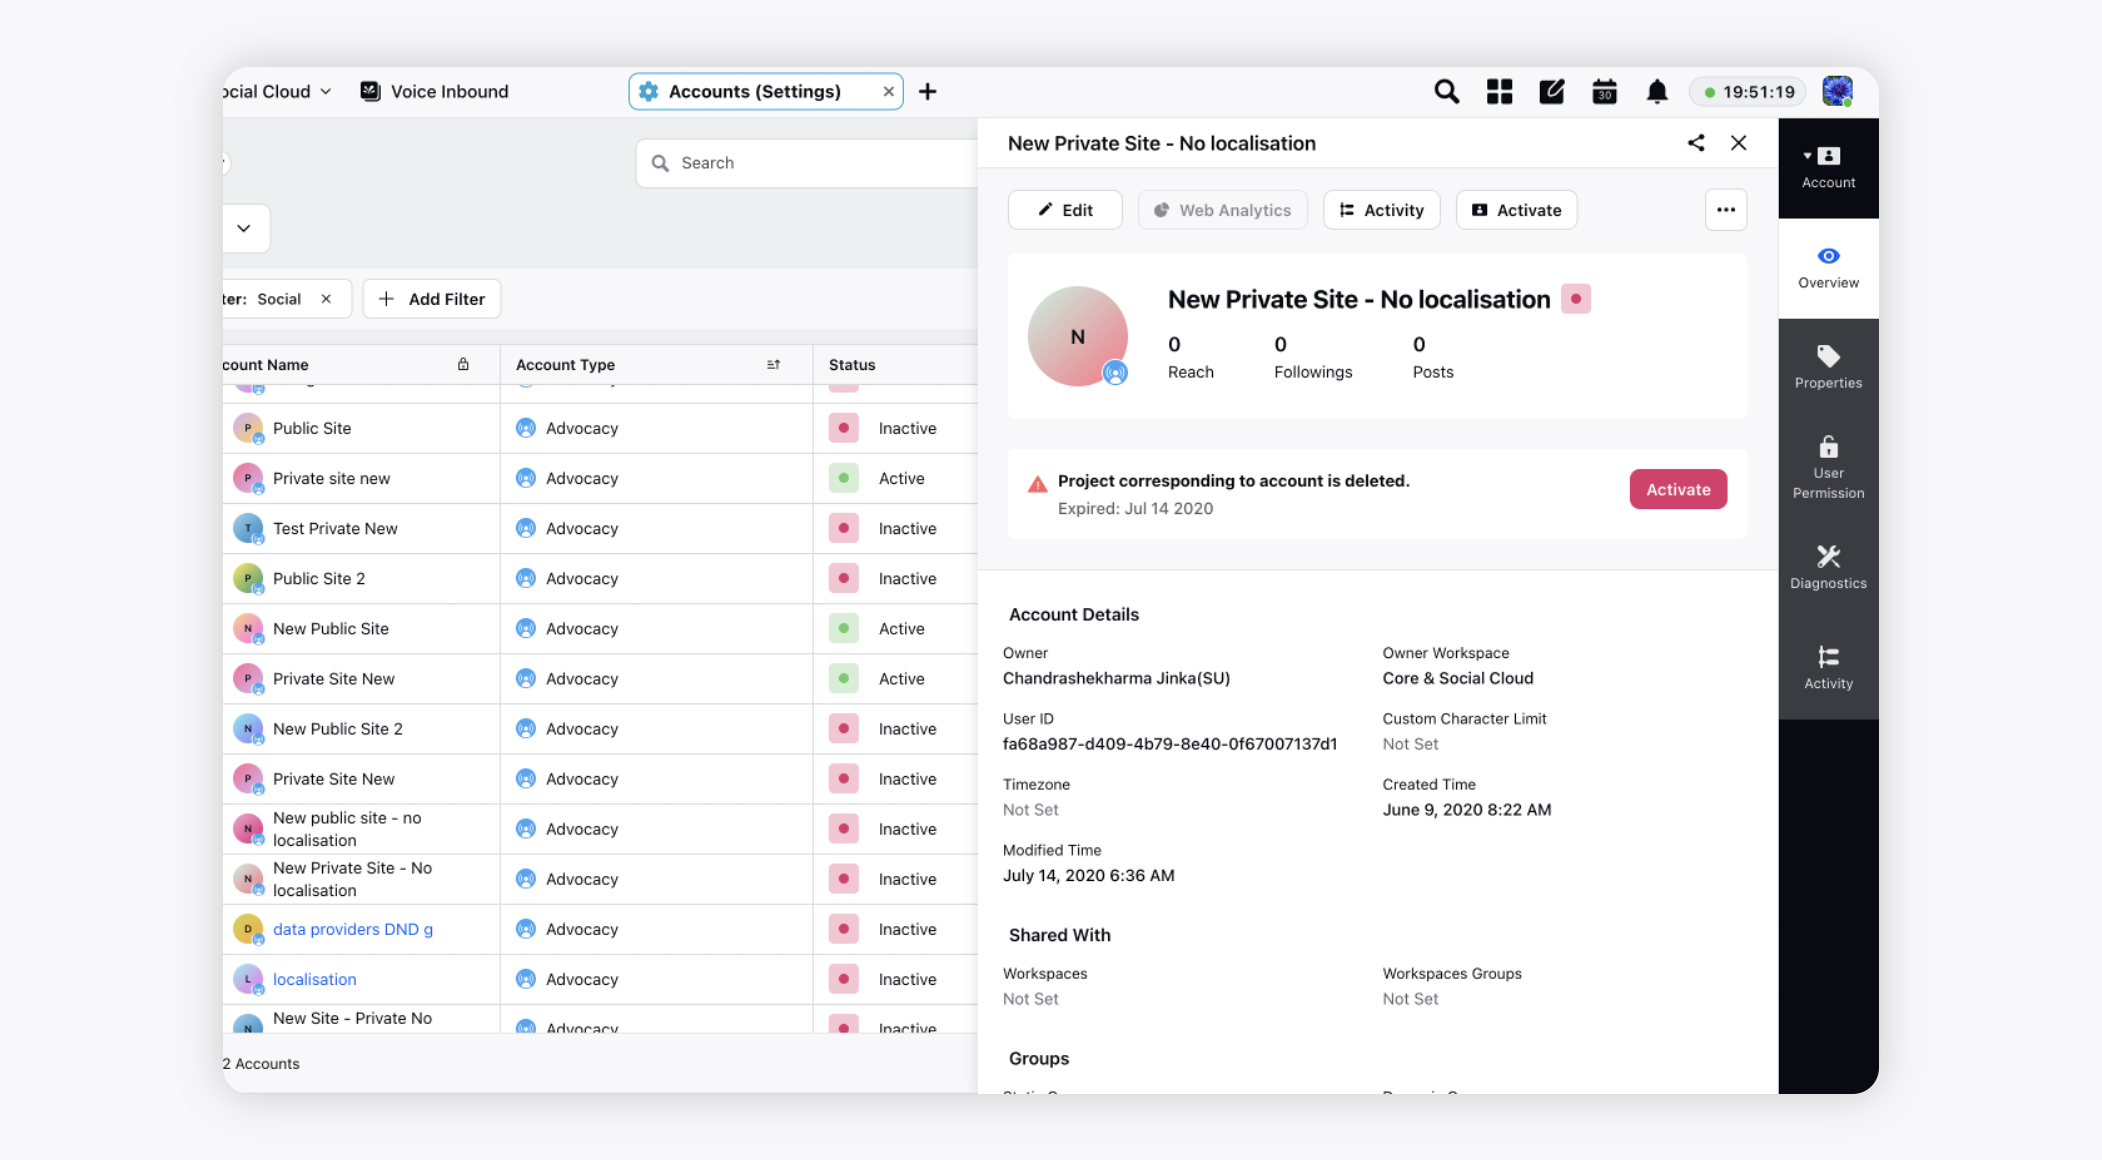
Toggle between Overview, Properties, User Permissions, Diagnostics, and Activity tab to view account details.
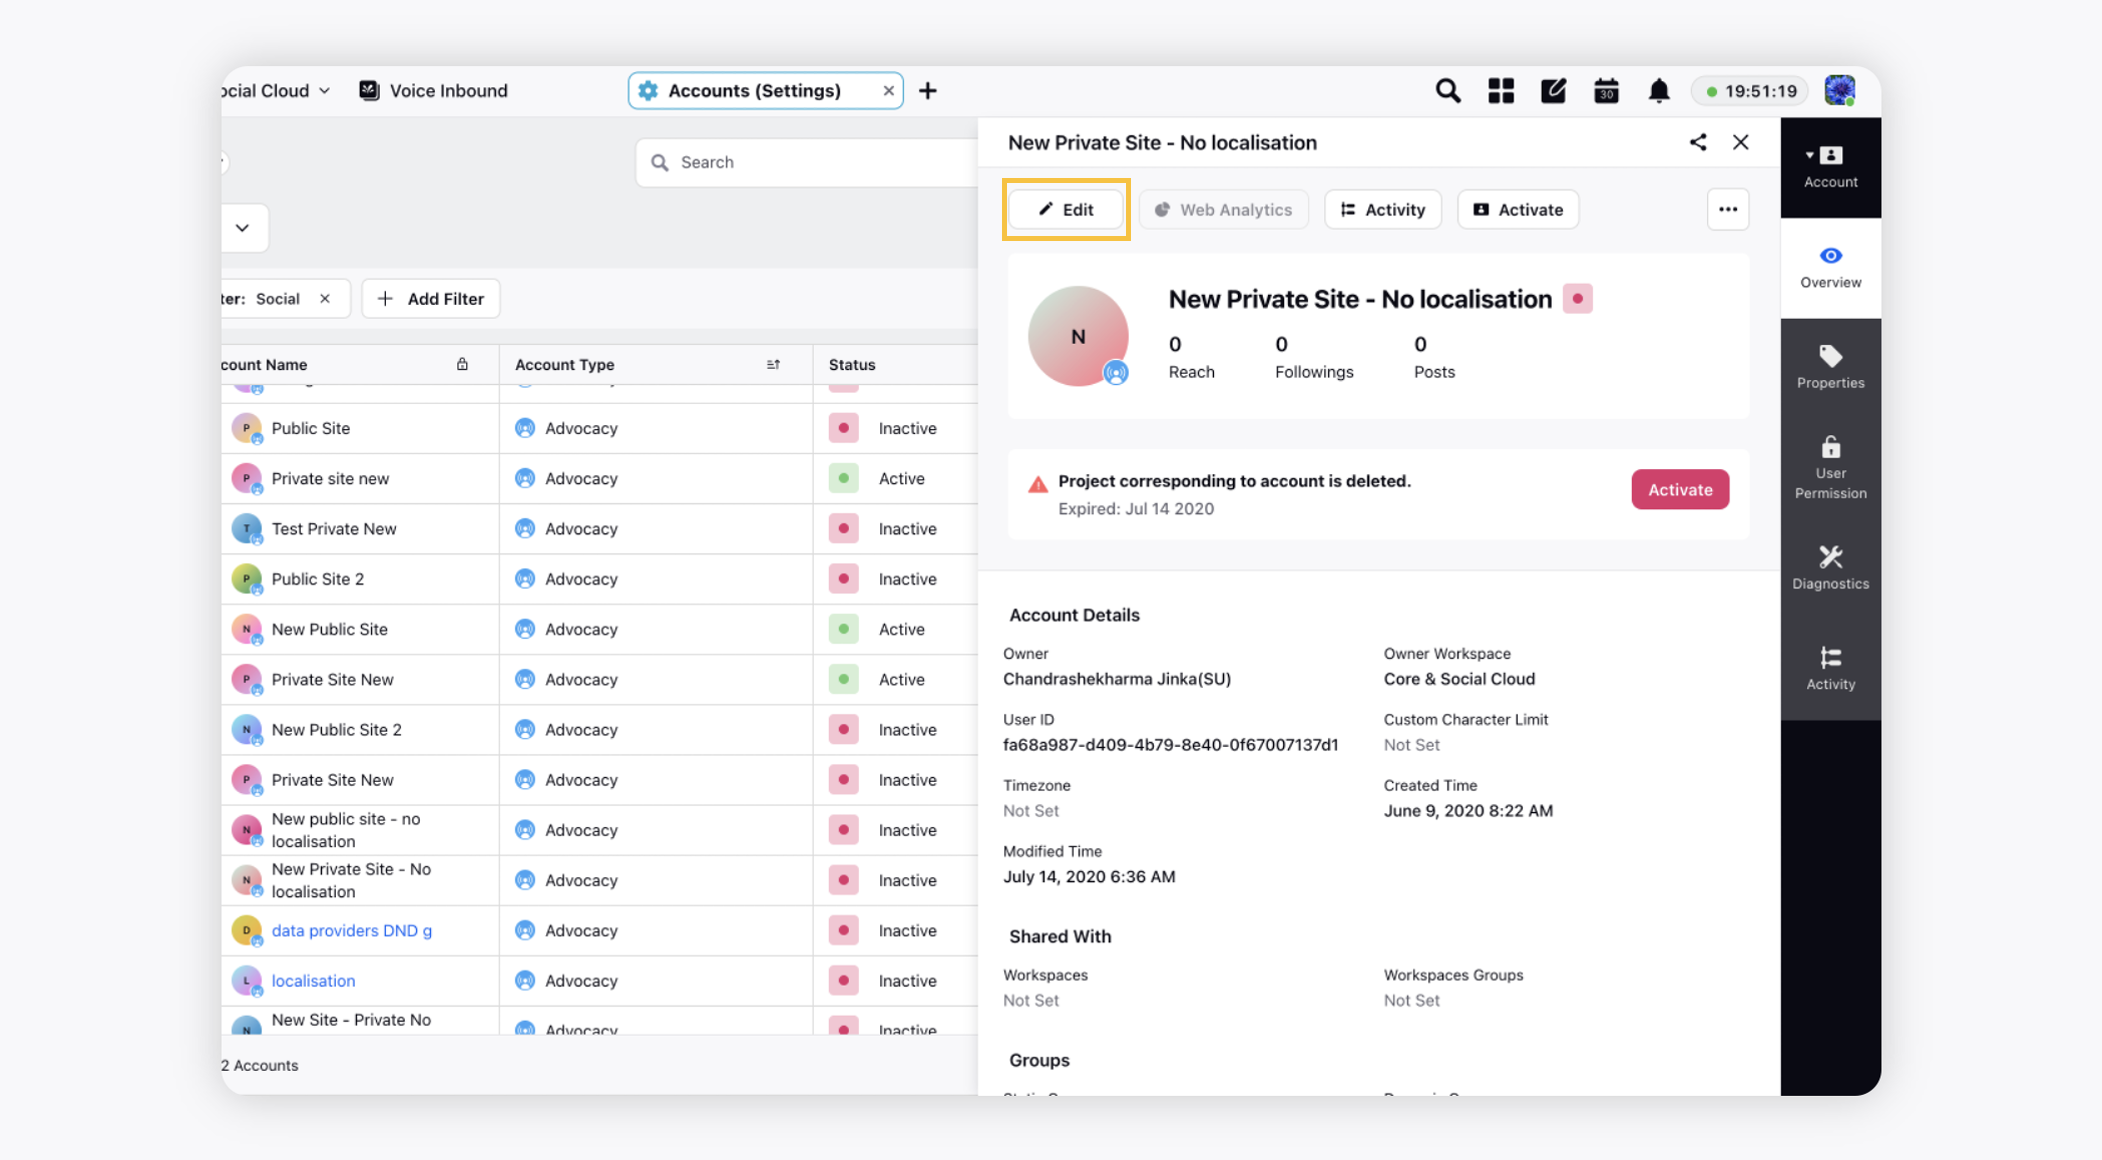
If you wish to edit the account's basic details, click Edit in the top left corner of the third pane.
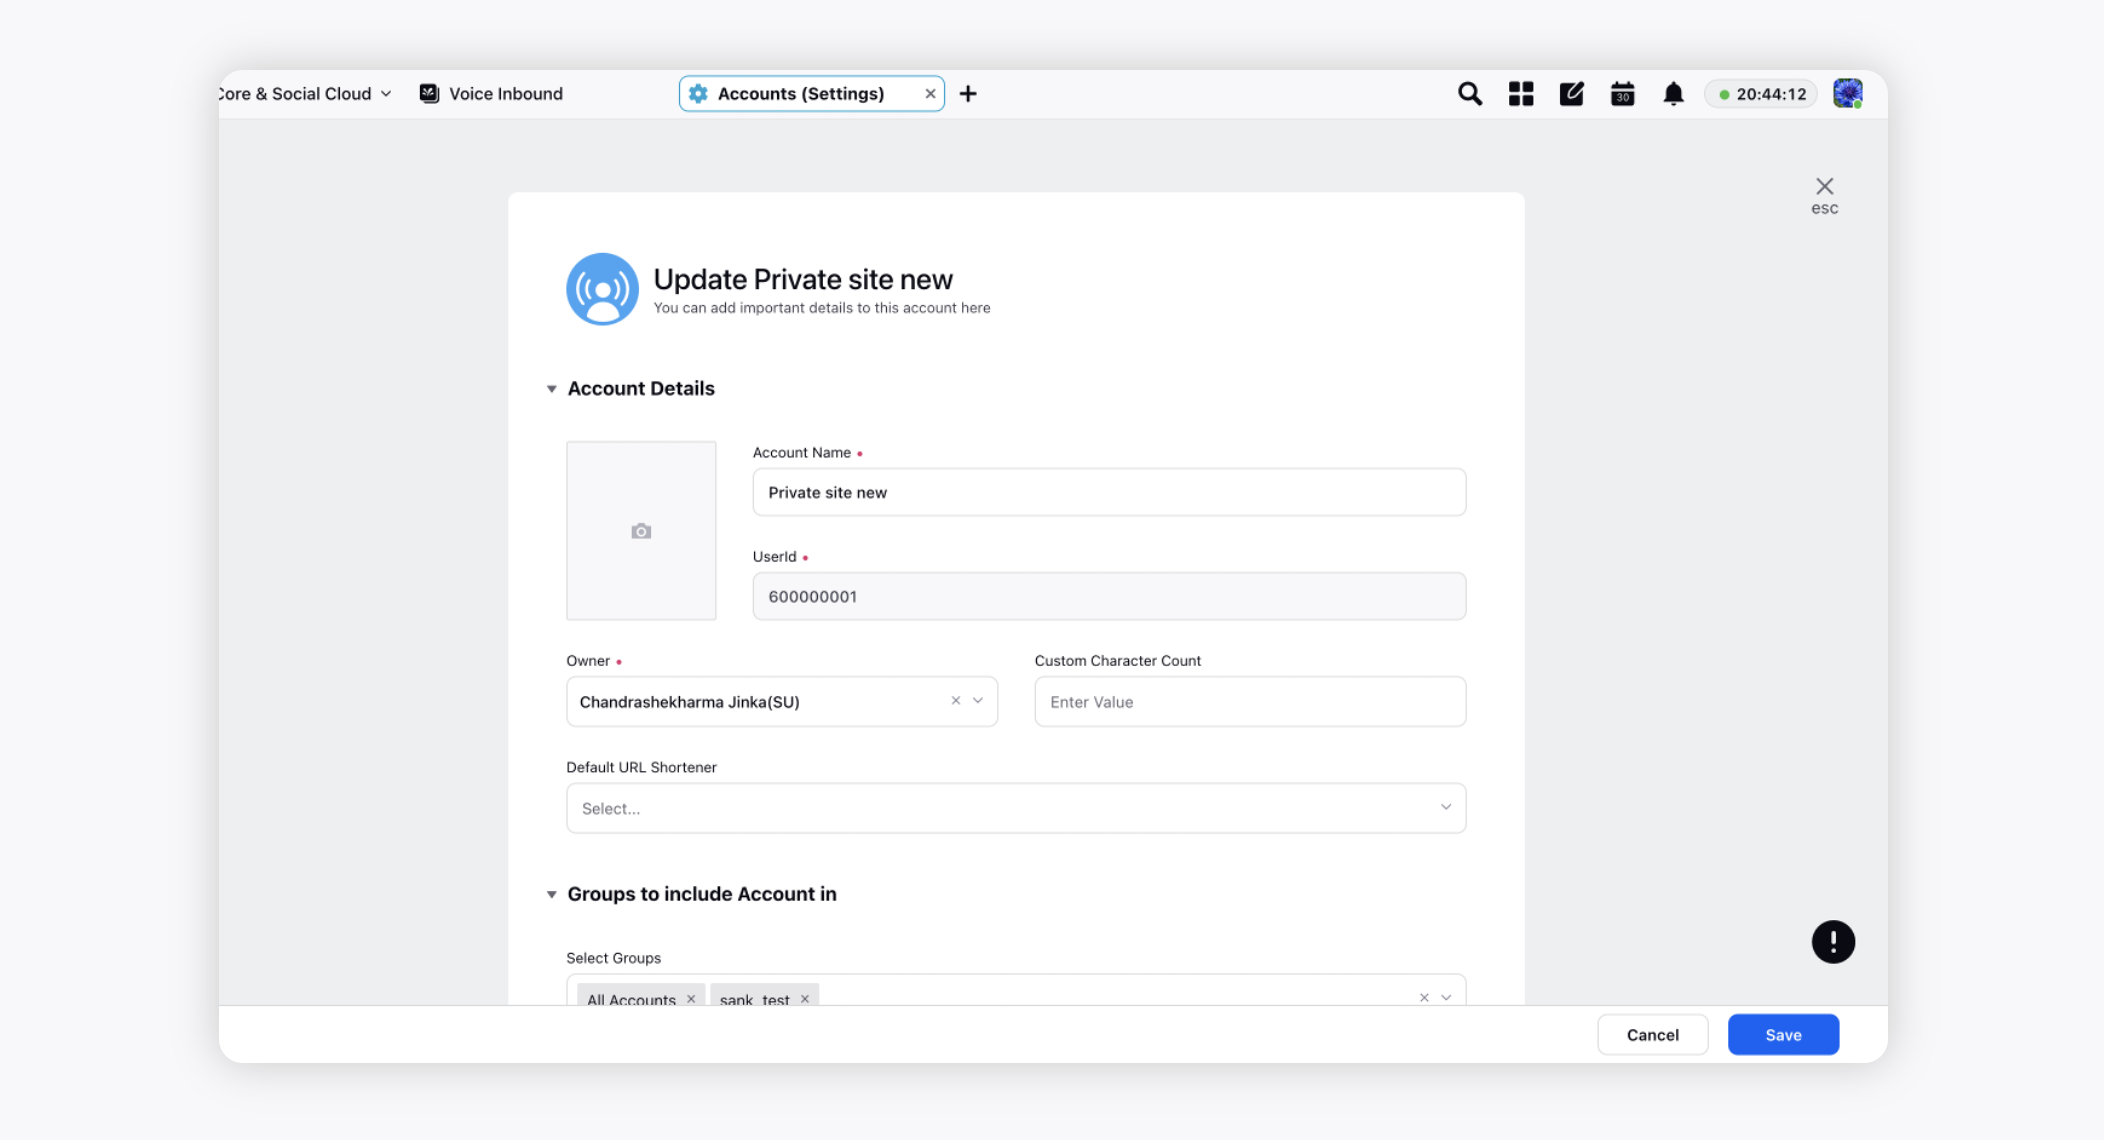
To edit account details
Click the New Tab icon
. Under the Sprinklr Social tab, click Owned Social Accounts within Listen.
On the Account (Settings) window, hover over the account's Options icon
and select Edit.
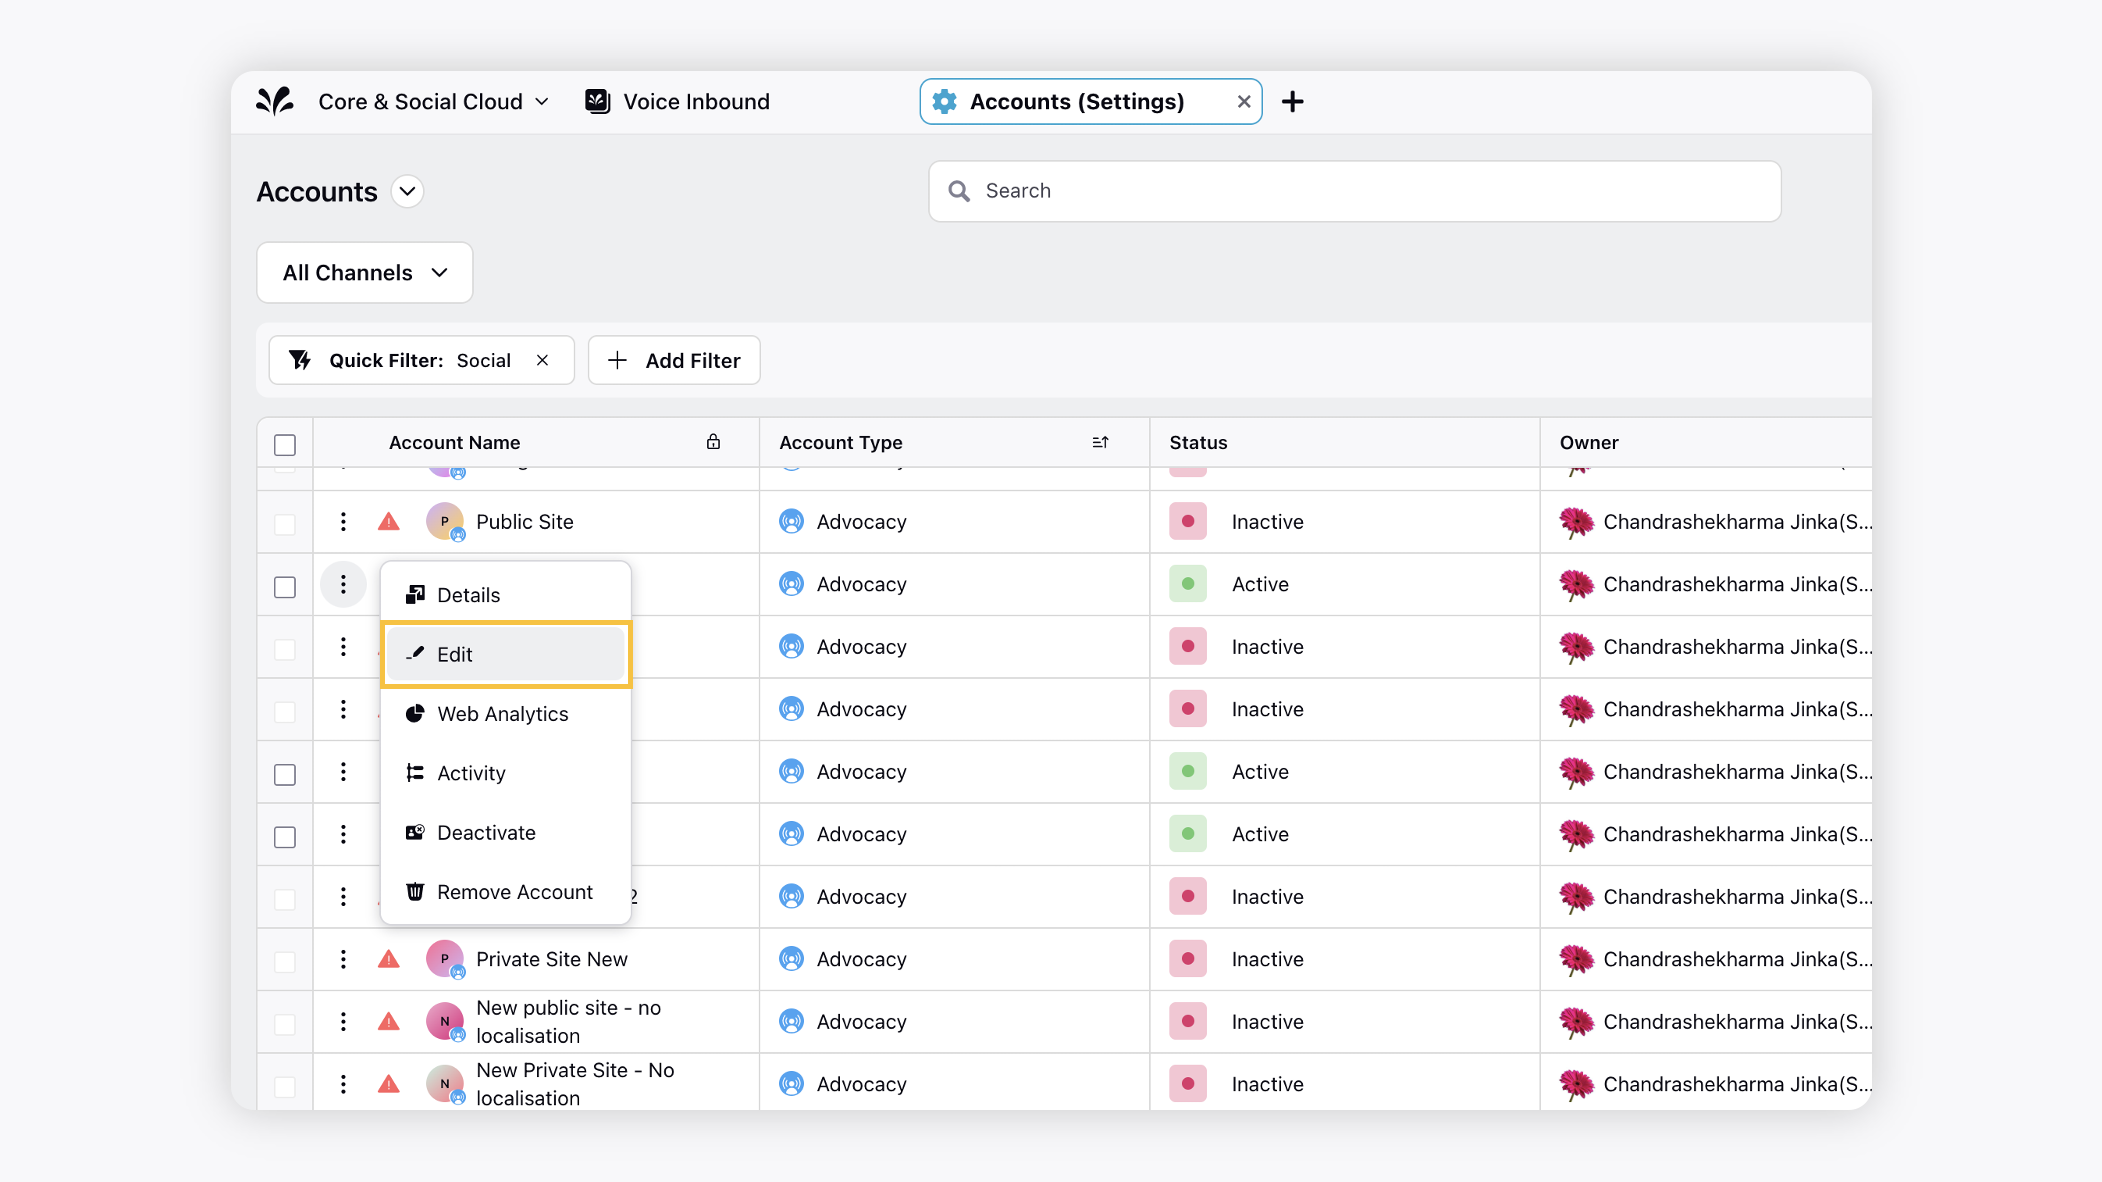
Make the desired changes to the account and click Save in the bottom right corner to update the account details.
To apply web analytics
Click the New Tab icon
. Under the Sprinklr Social tab, click Owned Social Accounts within Listen.
On the Account (Settings) window, hover over the account's Options icon
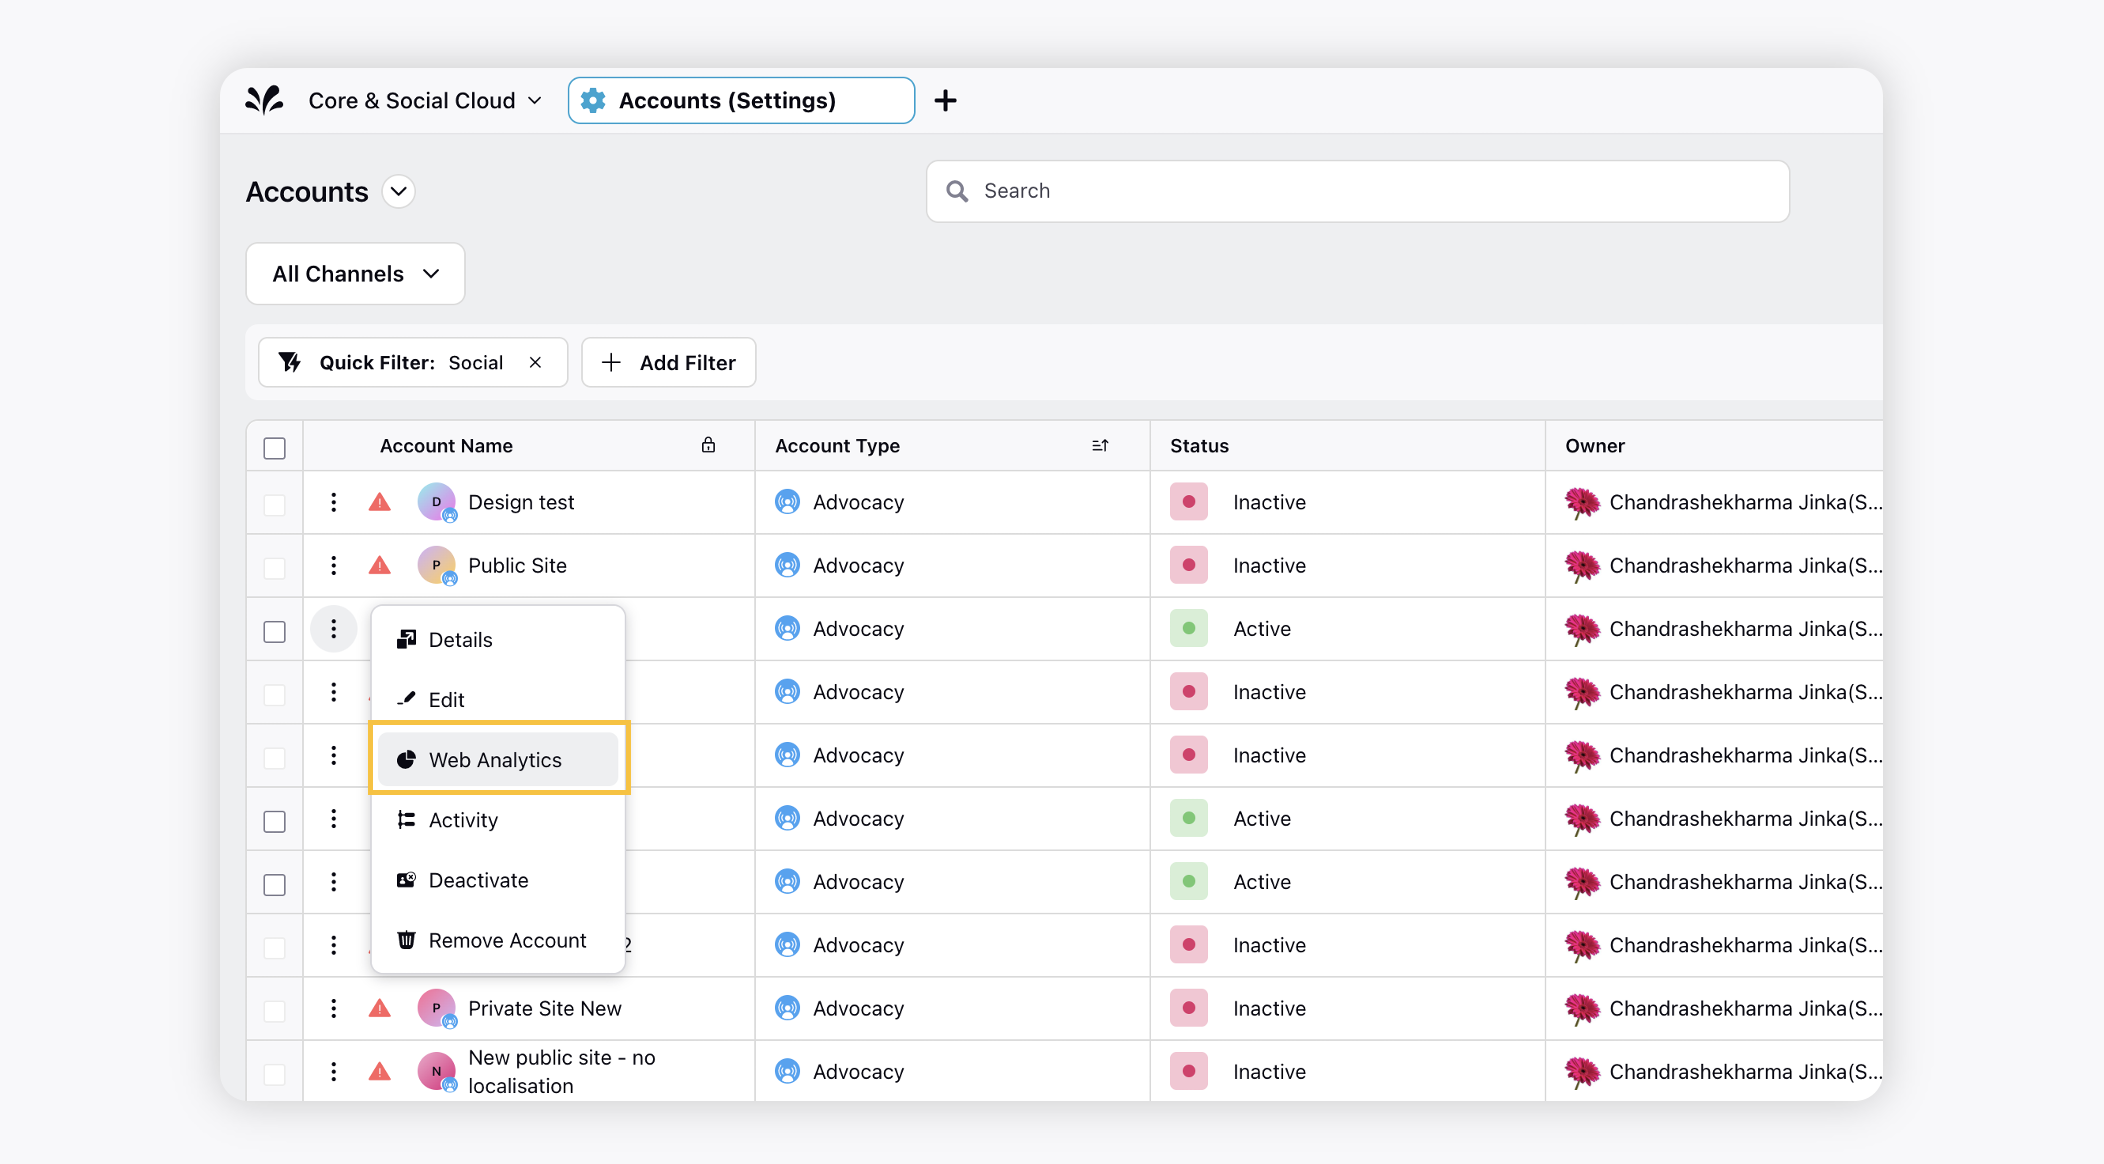
Enter a Domain and a corresponding Analytics Profile from the drop-down menu.
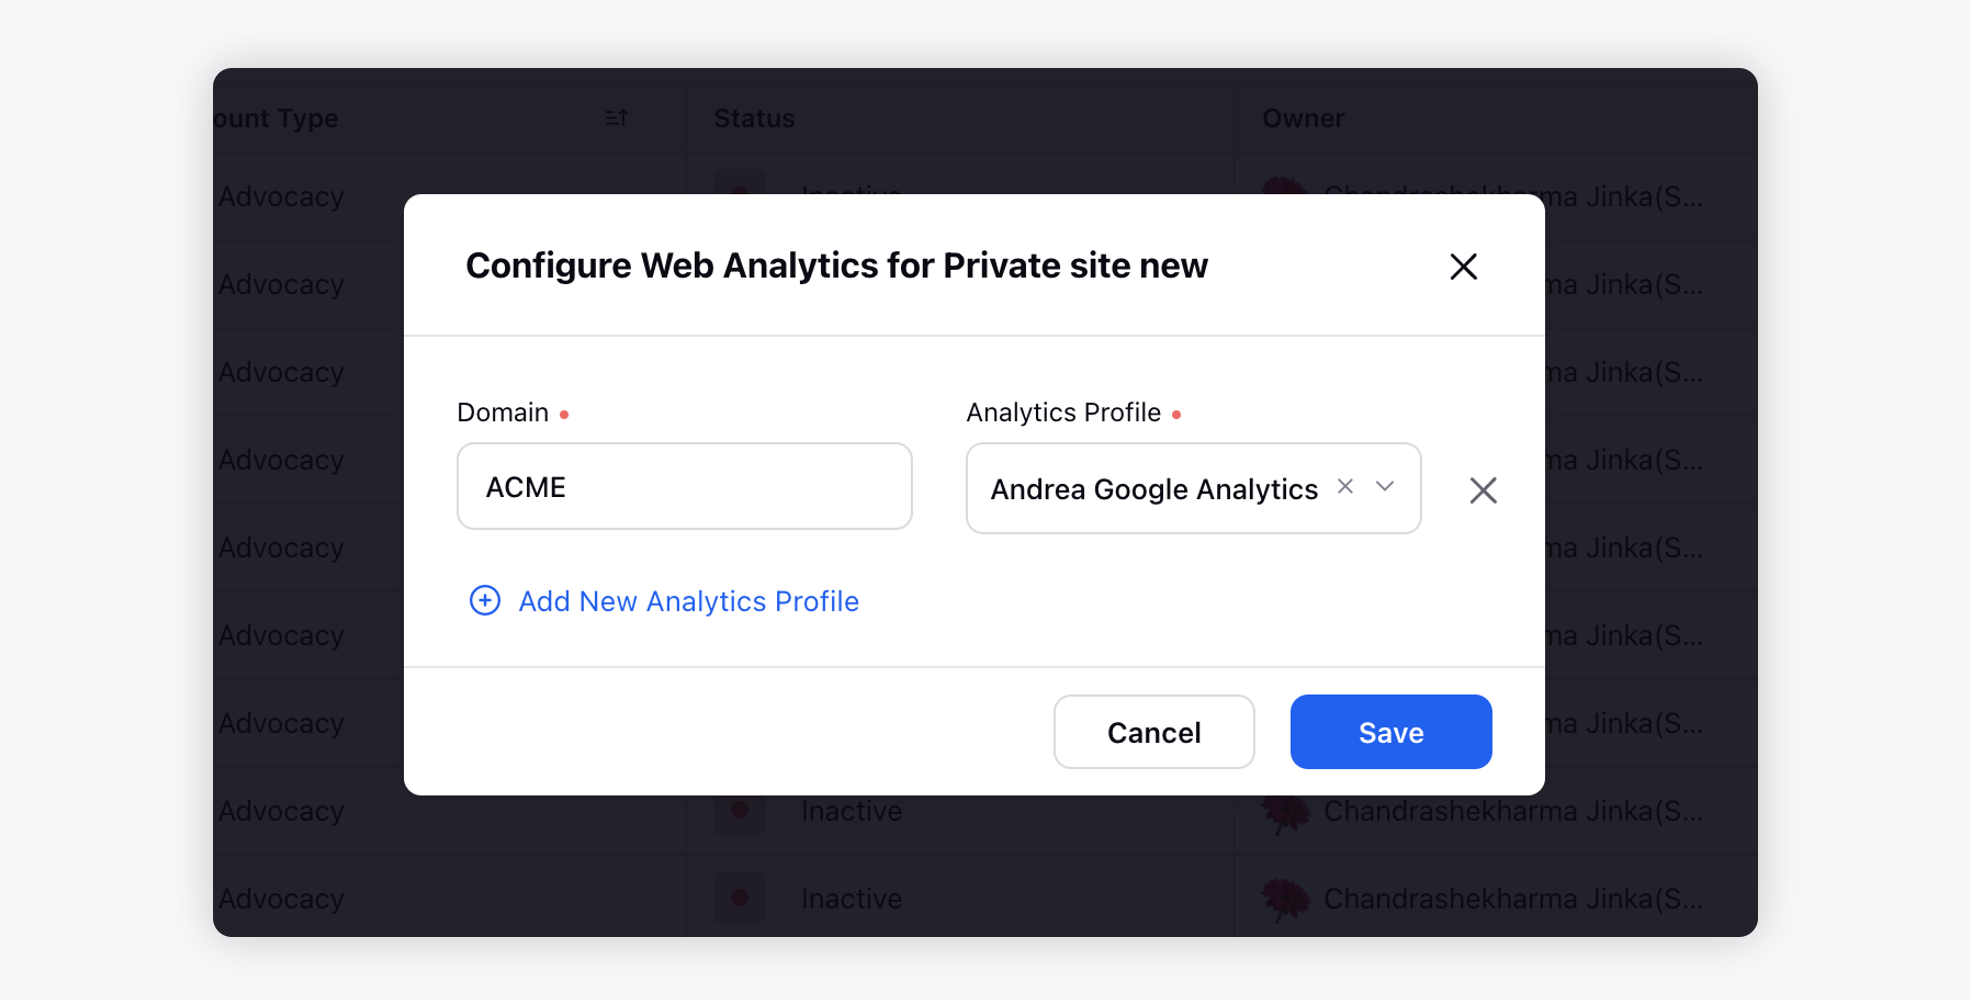
Click Save in the bottom right corner of the pop-up window to save your web analytics configuration.
To notify admin to add an account
After your brand’s social media accounts have been connected to Sprinklr, there are a number of reasons that they could be deactivated. When an account is deactivated you aren’t able to see new messages or publish or send replies.
In this scenario of deactivation, navigate to the account manager window and locate the deactivated account. This account should have a warning icon  that allows you to notify the admin of the issue. If you have the right level of permissions you might be able to re-add the account.
Once you notify the admin, they will receive an in-platform notification or email letting them know of the actions needed. Similarly, if you have access to an engagement dashboard, you will see another notification that allows you to notify the admin or re-add the accounts if you have the correct permissions.
For more information on how to notify an admin to add an account, click here.
Note:
|
Enablement note: To learn more about getting this capability enabled in your environment, please work with your Success Manager. |
To view activity for an account
Click the New Tab icon
. Under the Sprinklr Social tab, click Owned Social Accounts within Listen.
On the Account (Settings) window, hover over the account's Options icon
and select Activity. You will be redirected to the third pane.
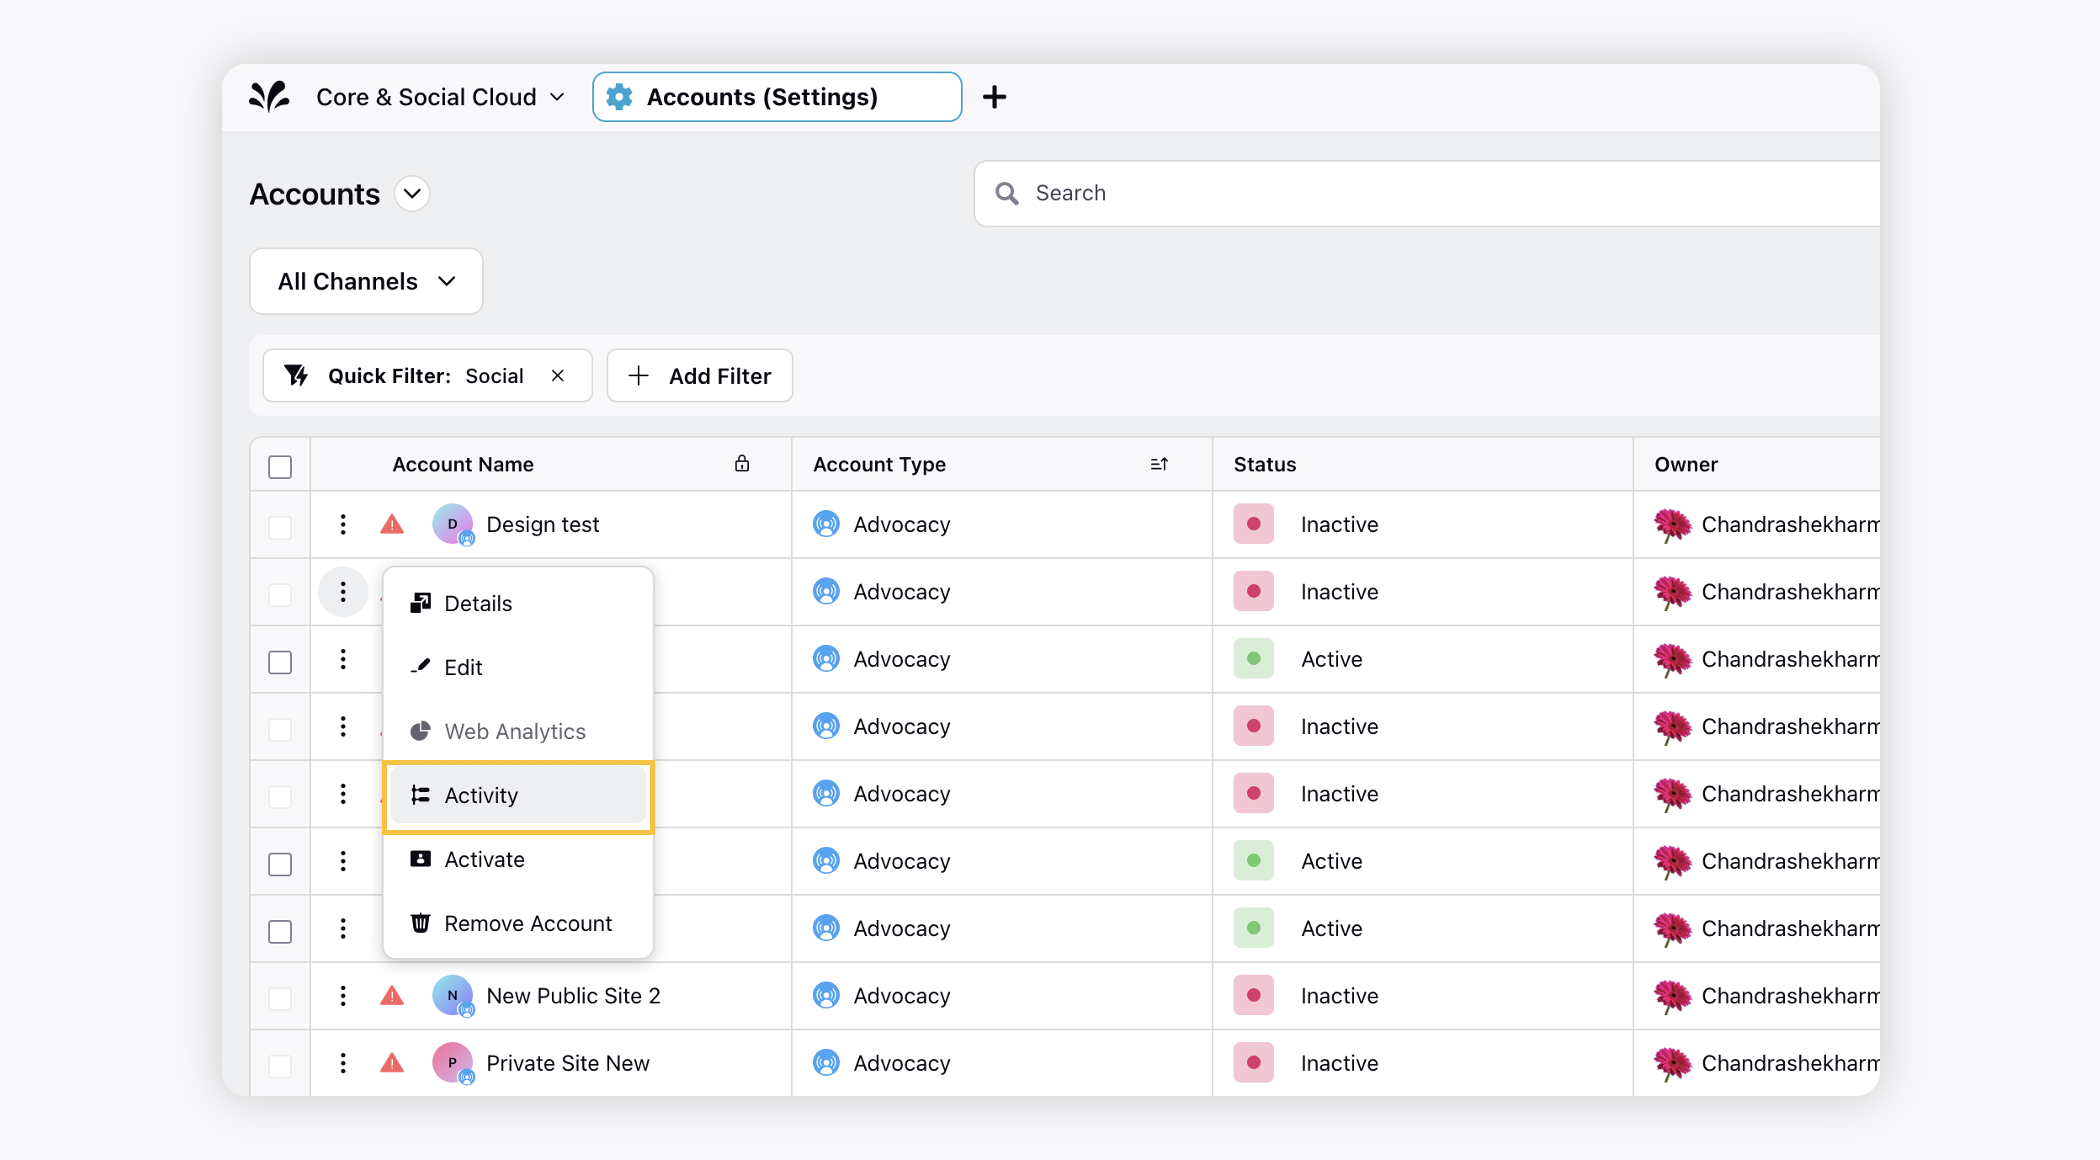
In the Activity tab of the third pane, you can see the users who made changes to the account, the type of change that was made, and the date on which the change was made.
To view diagnostic for an account
Click the New Tab icon
On the Account (Settings) window, hover over the account's Options icon
In the Diagnostic tab within the third pane, you can view the Health Status of social media accounts that are active or inactive.
The health status report consists of the percentage of posts or replies that failed to publish in the last 24h. This gives you an idea of the amount of content that users were unable to publish.

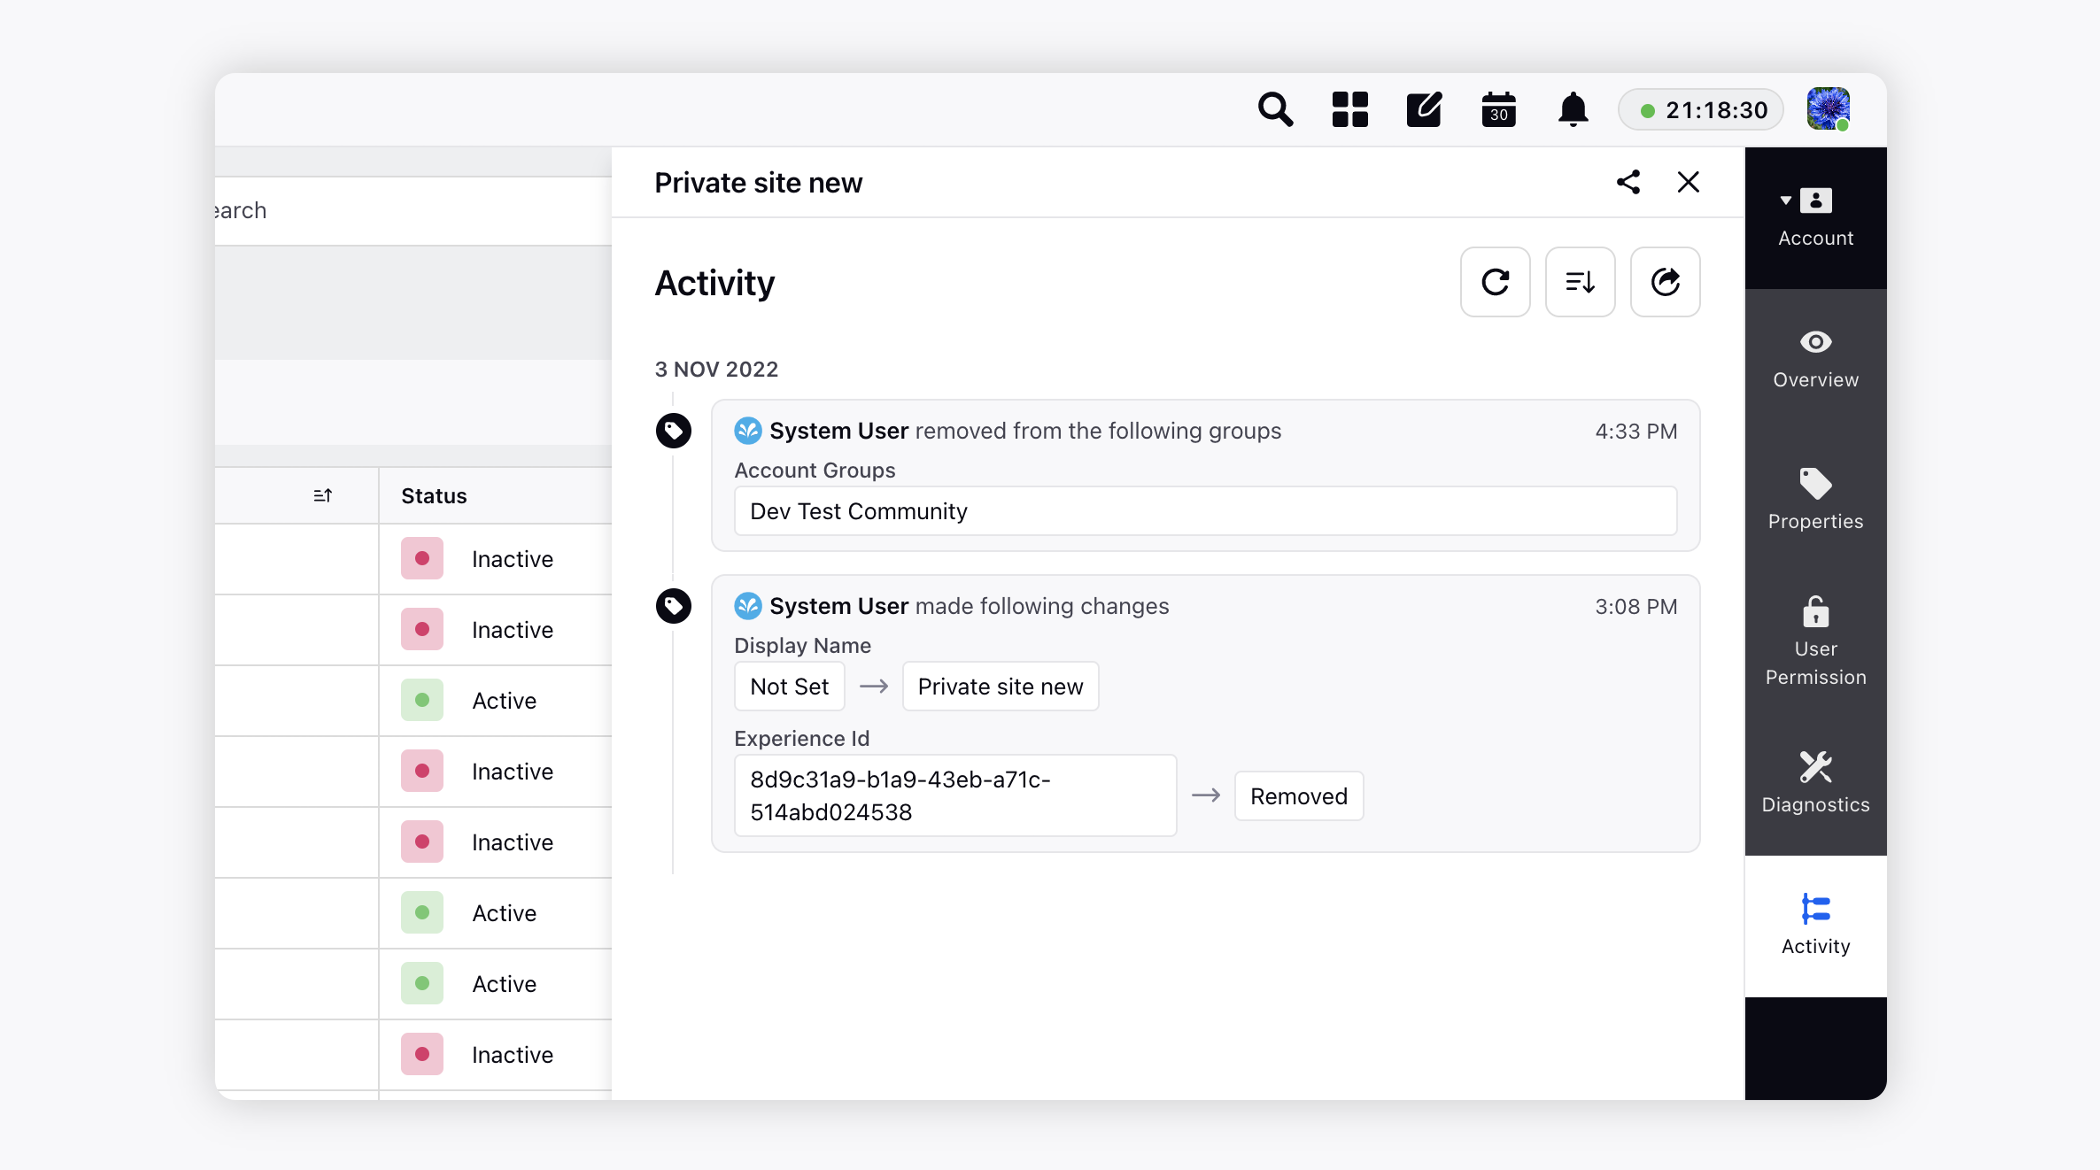
To deactivate an account
Click the New Tab icon
. Under the Sprinklr Social tab, click Owned Social Accounts within Listen.
On the Account (Settings) window, hover over the account's Options icon
The deactivation will happen immediately and will require activation & authentication if the account is to be added back.
To re-activate or re-add an account
If you have deactivated an account in Sprinklr, you will later have the option to reactivate in Account Settings. The activate option will not appear if the user changes the social media account password natively causing the expiry of the access token. In that case, you must re-add an account.
Click the New Tab icon
. Under the Sprinklr Social tab, click Owned Social Accounts within Listen.
If you have deactivated an account in Sprinklr, you will later have the option to reactivate in Account Settings.
On the Account (Settings) window, hover over the account's Options icon
and select Activate.
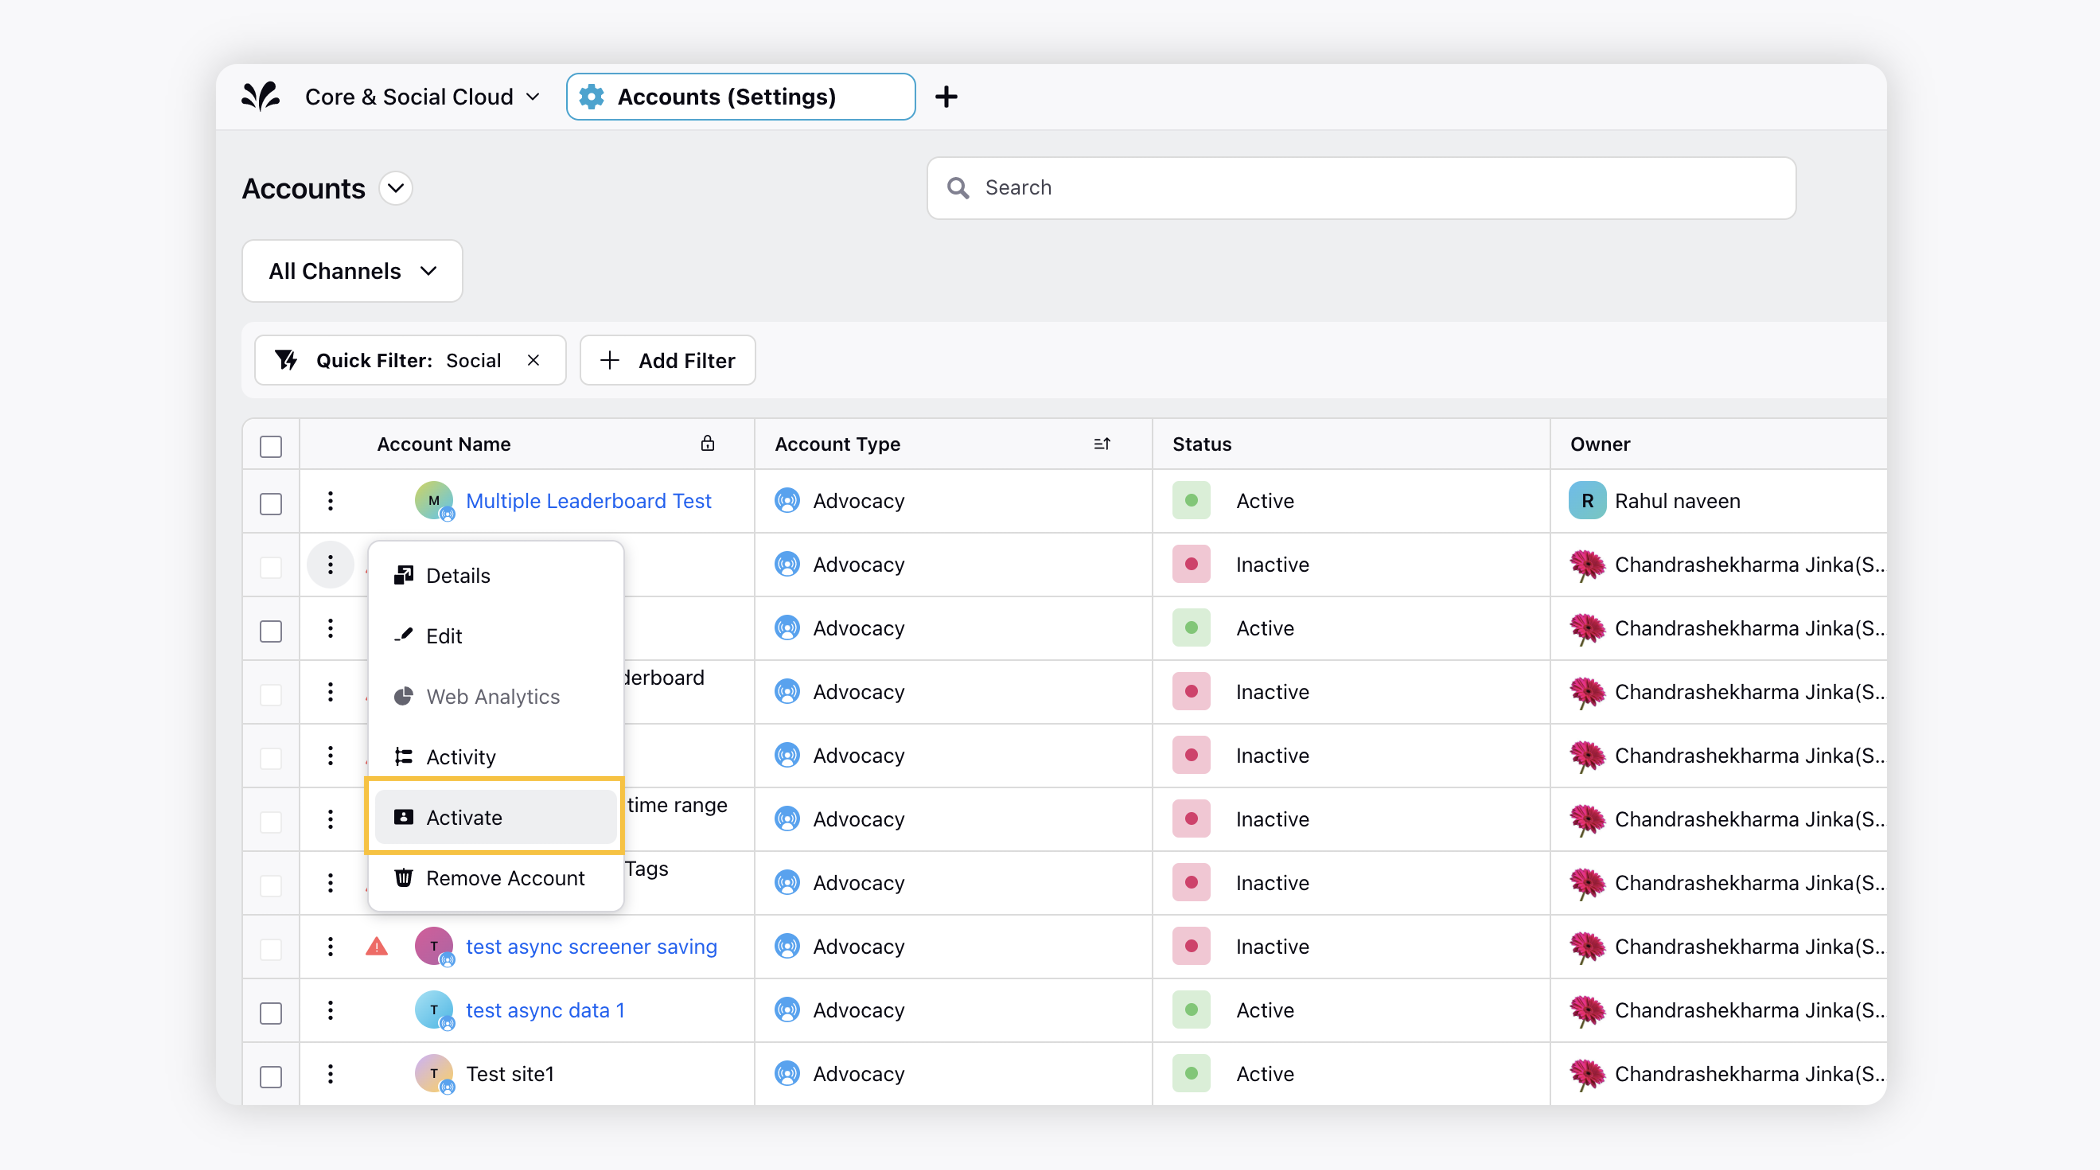
The activate option will not appear if the user changes the social media account password natively causing the expiry of the access token. In that case, you must re-add an account.
If an account is deactivated due to the invalid access token, the admin can send a reminder to the account owner to re-add the account. For more information, see To notify admin to add an account.
Loss of data when re-adding an account
Whether Twitter, Facebook, YouTube, or any other social channel — re-adding or re-authorizing an account will not affect the data associated with it. It enables the system to refresh the API connection.
To remove an account
Note:
|
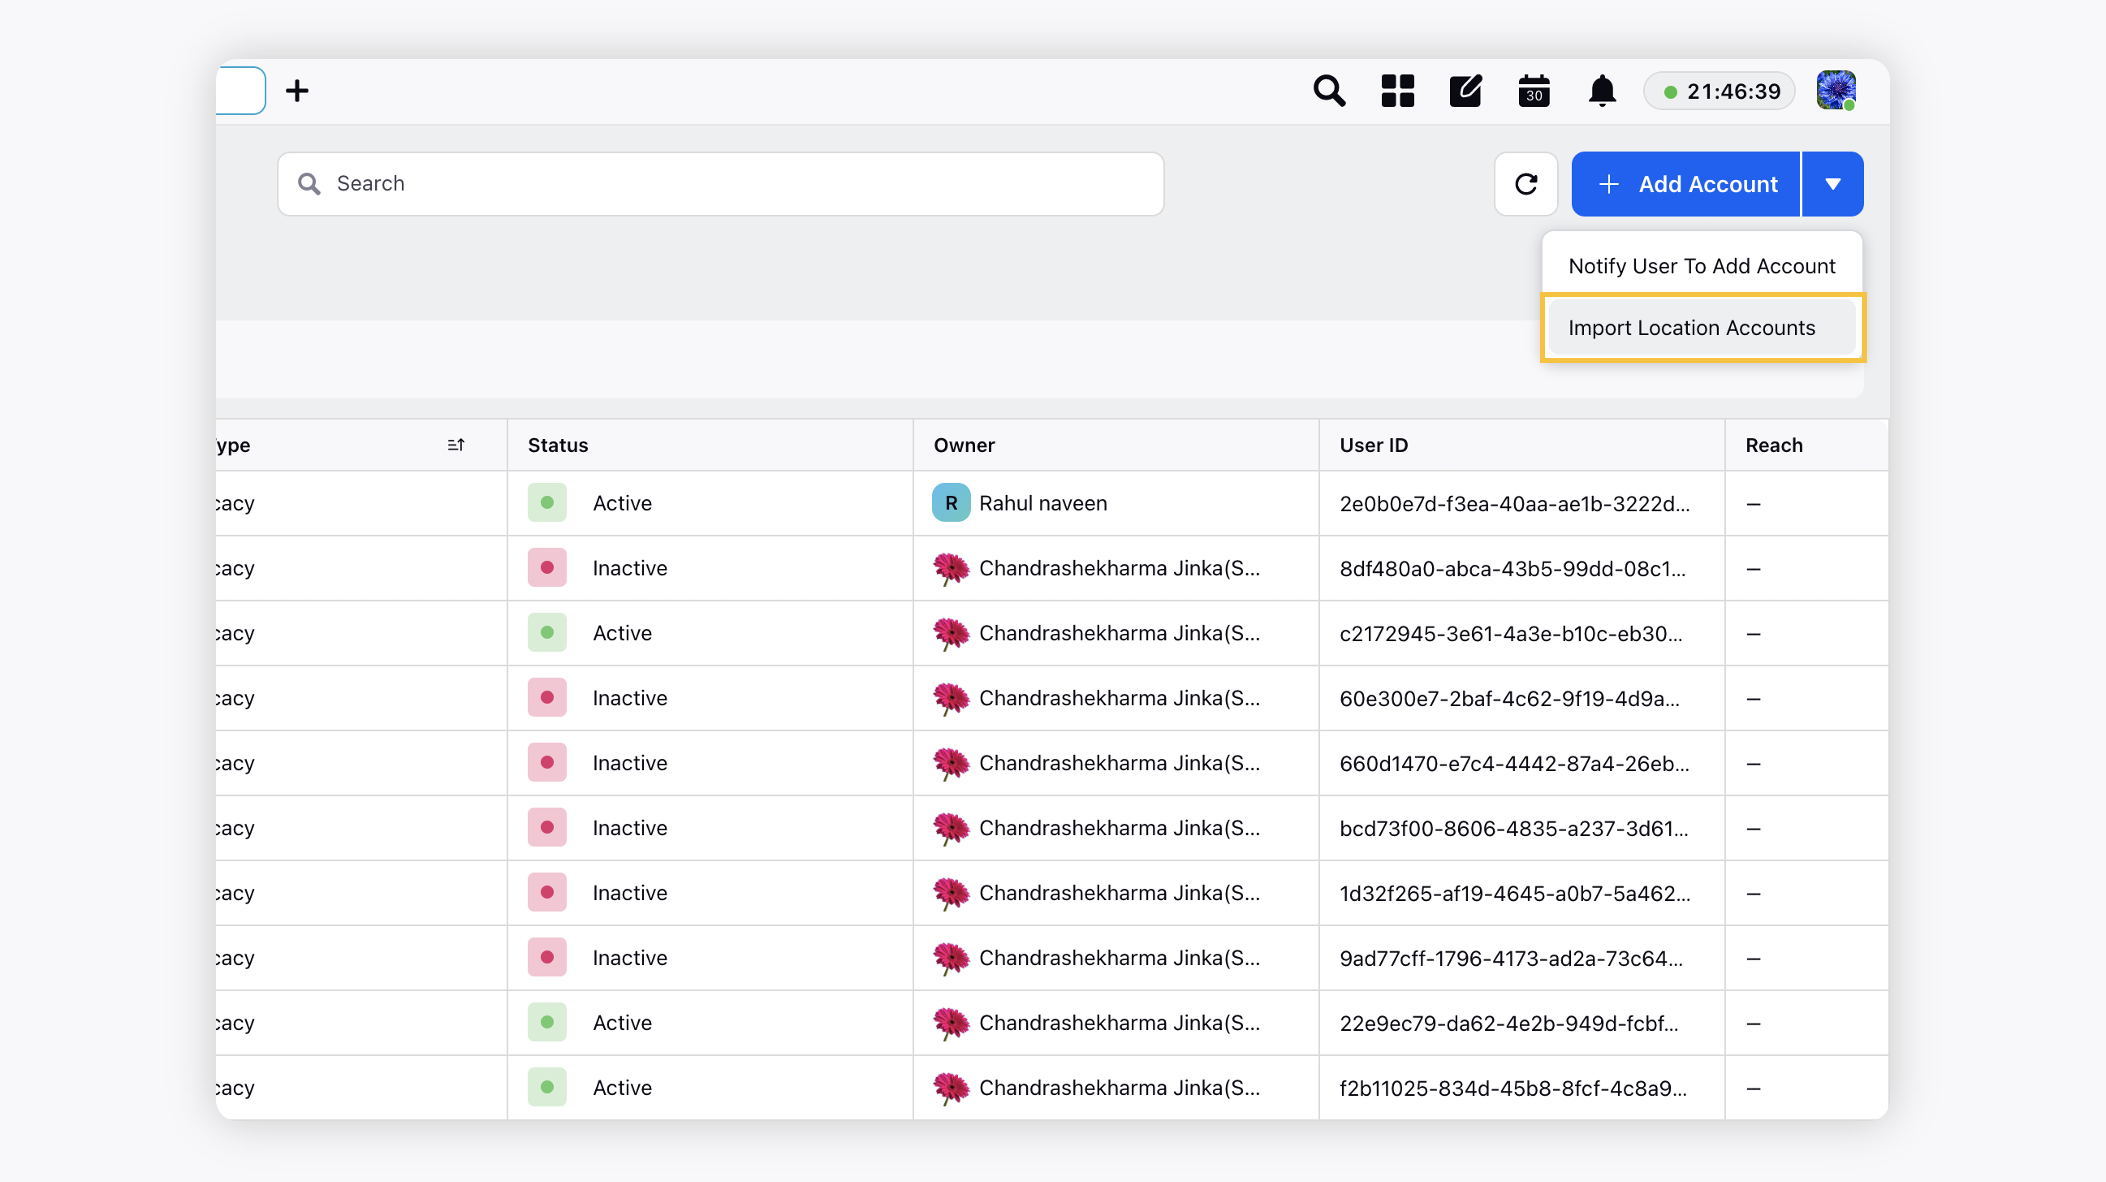
To import location accounts
Click the New Tab icon
In the top right corner of the Accounts window, click the drop-down icon and select Import Location Accounts.
On the Import Location Accounts window, drag and drop your excel file into the upload window or click Upload and select a file from your device.
Note:
Click Download Excel Template in the top right corner to download a template that can be used for your import.
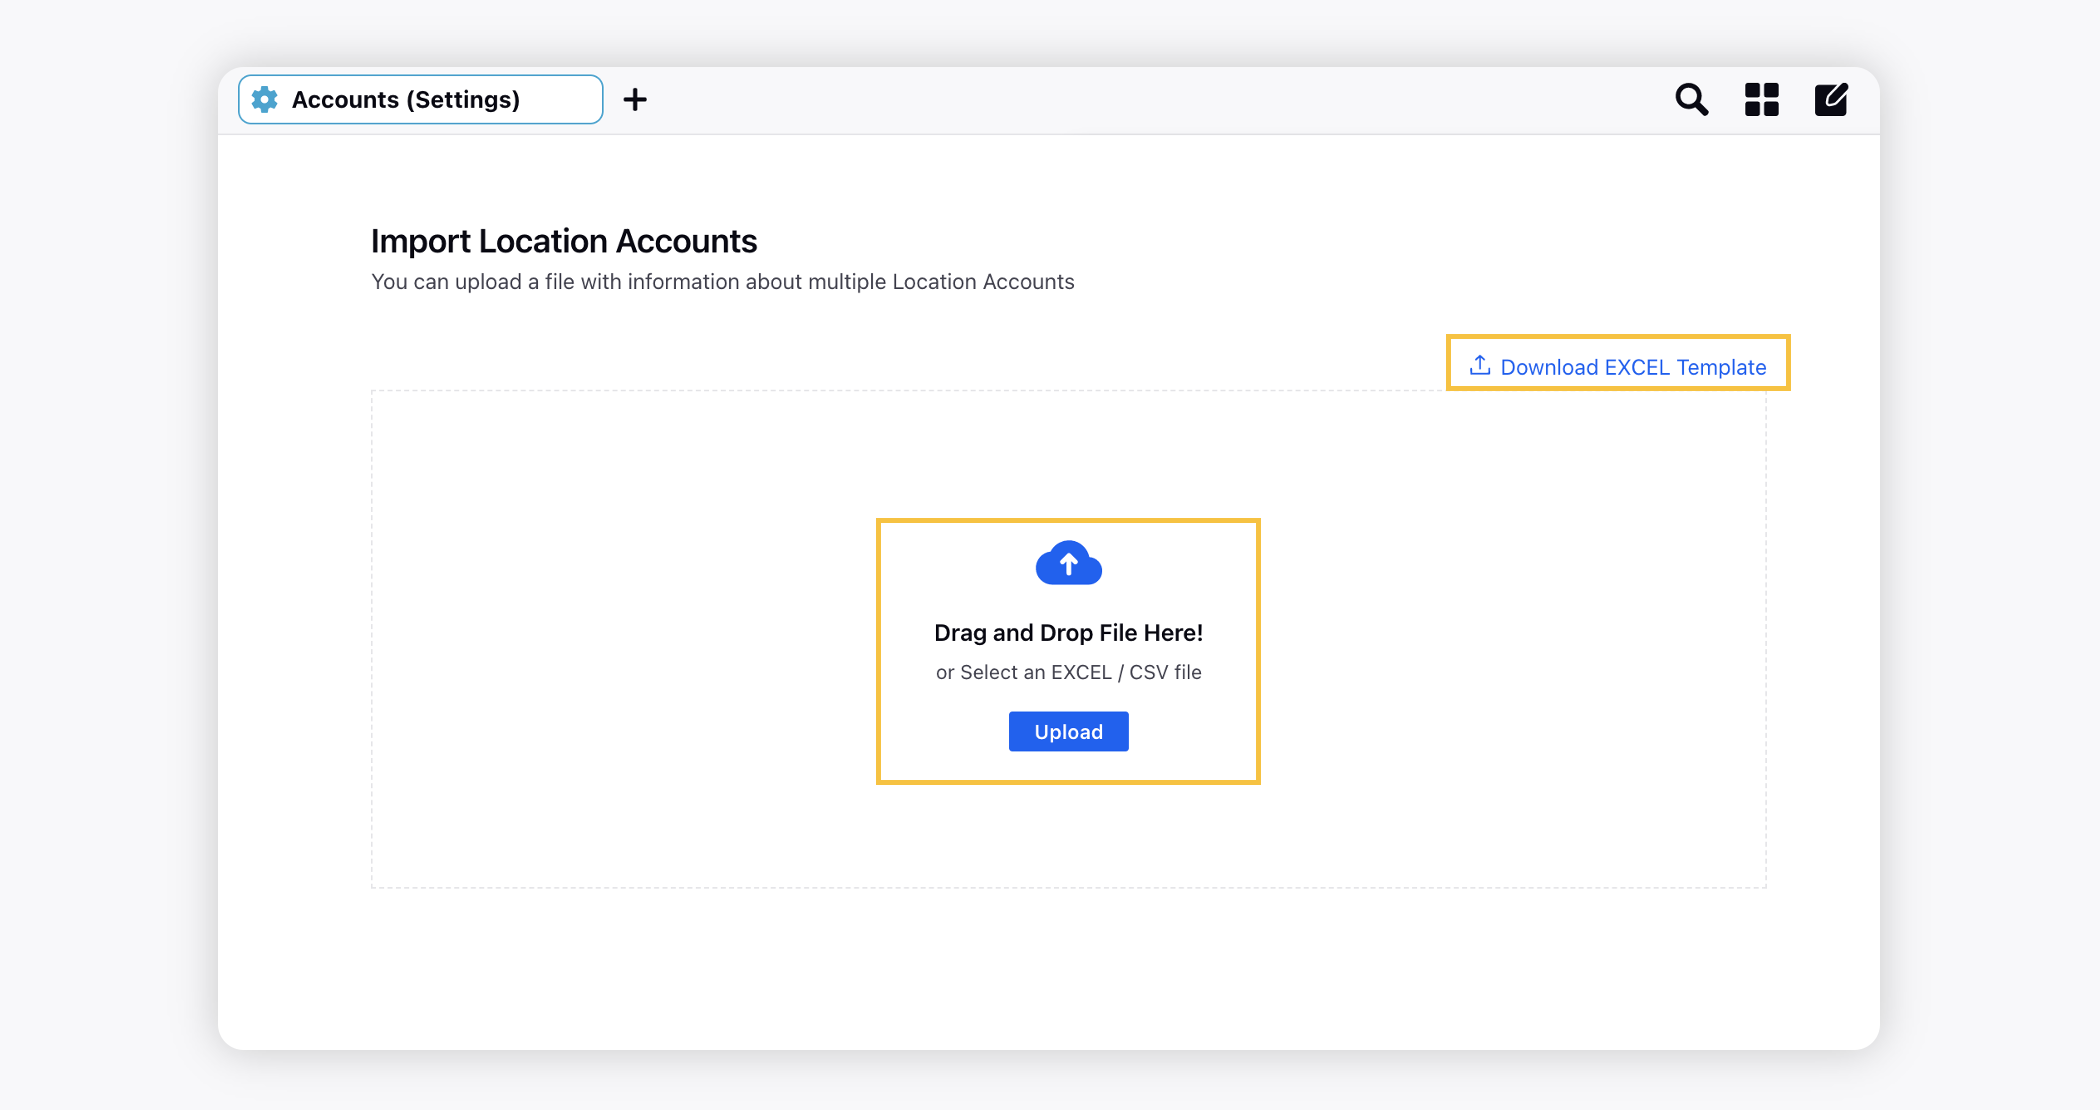
Click Import in the bottom right corner to initiate your location accounts upload. You will receive a notification when your import is complete.
Adding properties to accounts
Click the New Tab icon. Under Govrnance Console, click All Settings within Listen.
On the Settings Home window, select Accounts from the list of options to open your Account Settings.
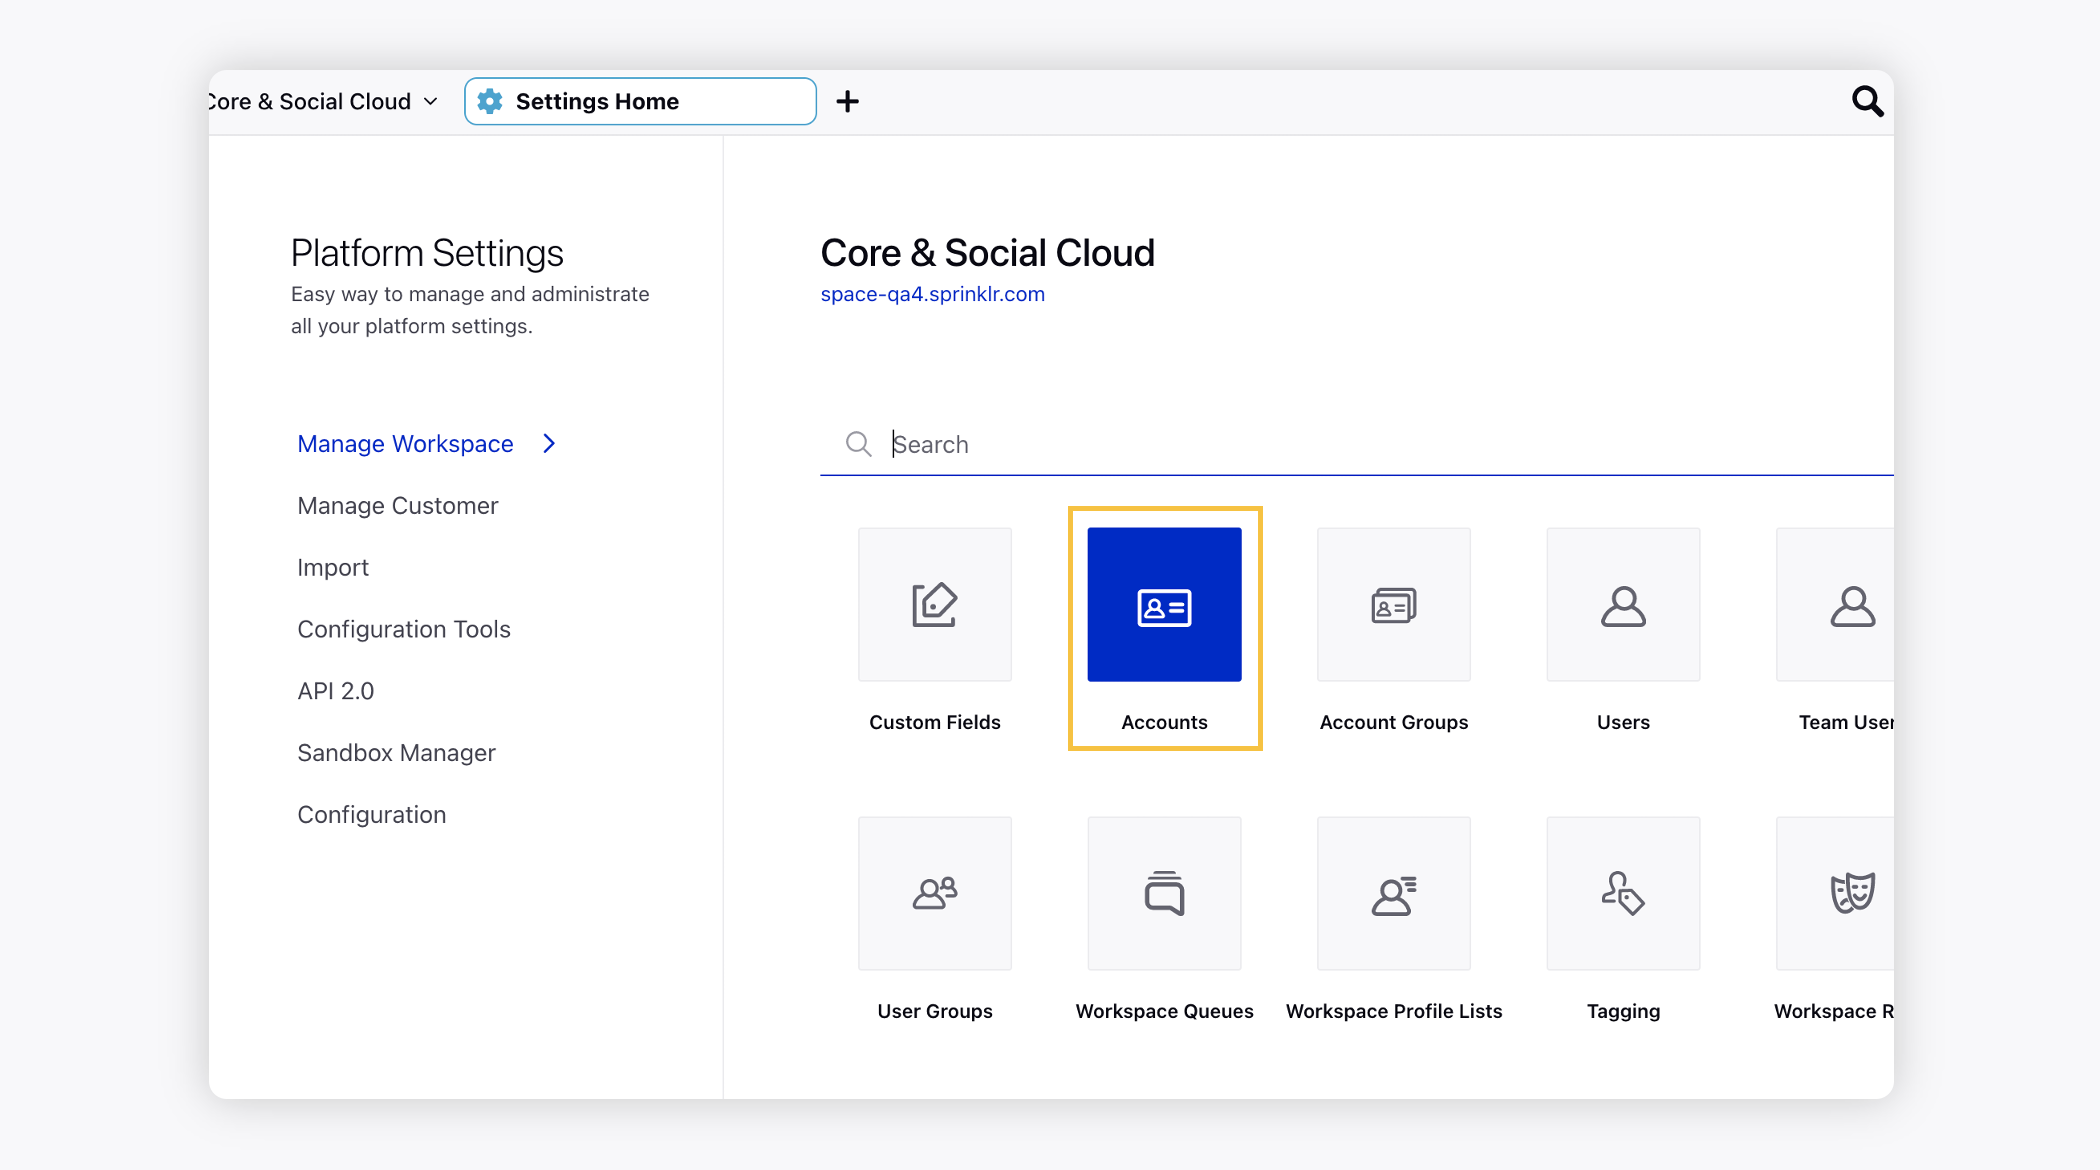
In the top-left corner of the Section bar, click All Channels and select the type of channel you want to access.
Hover over the Options icon alongside the account to which you want to add custom properties and select Edit from the drop-down menu.
On the Update Account window, scroll down to the Properties section and enter the properties you wish to apply to the account.
Click Save in the bottom-right corner to confirm your changes.
Add subscribers to an account
Click the New Tab icon. Under Governance Console, click All Settings within Listen.
On the Settings Home window, click Manage Workspace in the left pane and select Account in the right pane.
To edit an existing account, hover over the desired account's Options icon and select Edit from the list of options. You can add subscribers to an account while adding a new account or editing an existing account. For more information on adding a new account, see Add an Account.
On the Update Account window, scroll down to the subscribers section.
Under the Subscribers section, select Users/User Groups from the drop-down menu whom you want to add as subscribers to receive email notifications regarding the deactivation or deletion of the subscribed account group.
Note that when an account is deactivated due to password or any other changes natively, then system will send an alert to all account subscribers. However, this functionality will not work when an account is manually deactivated.
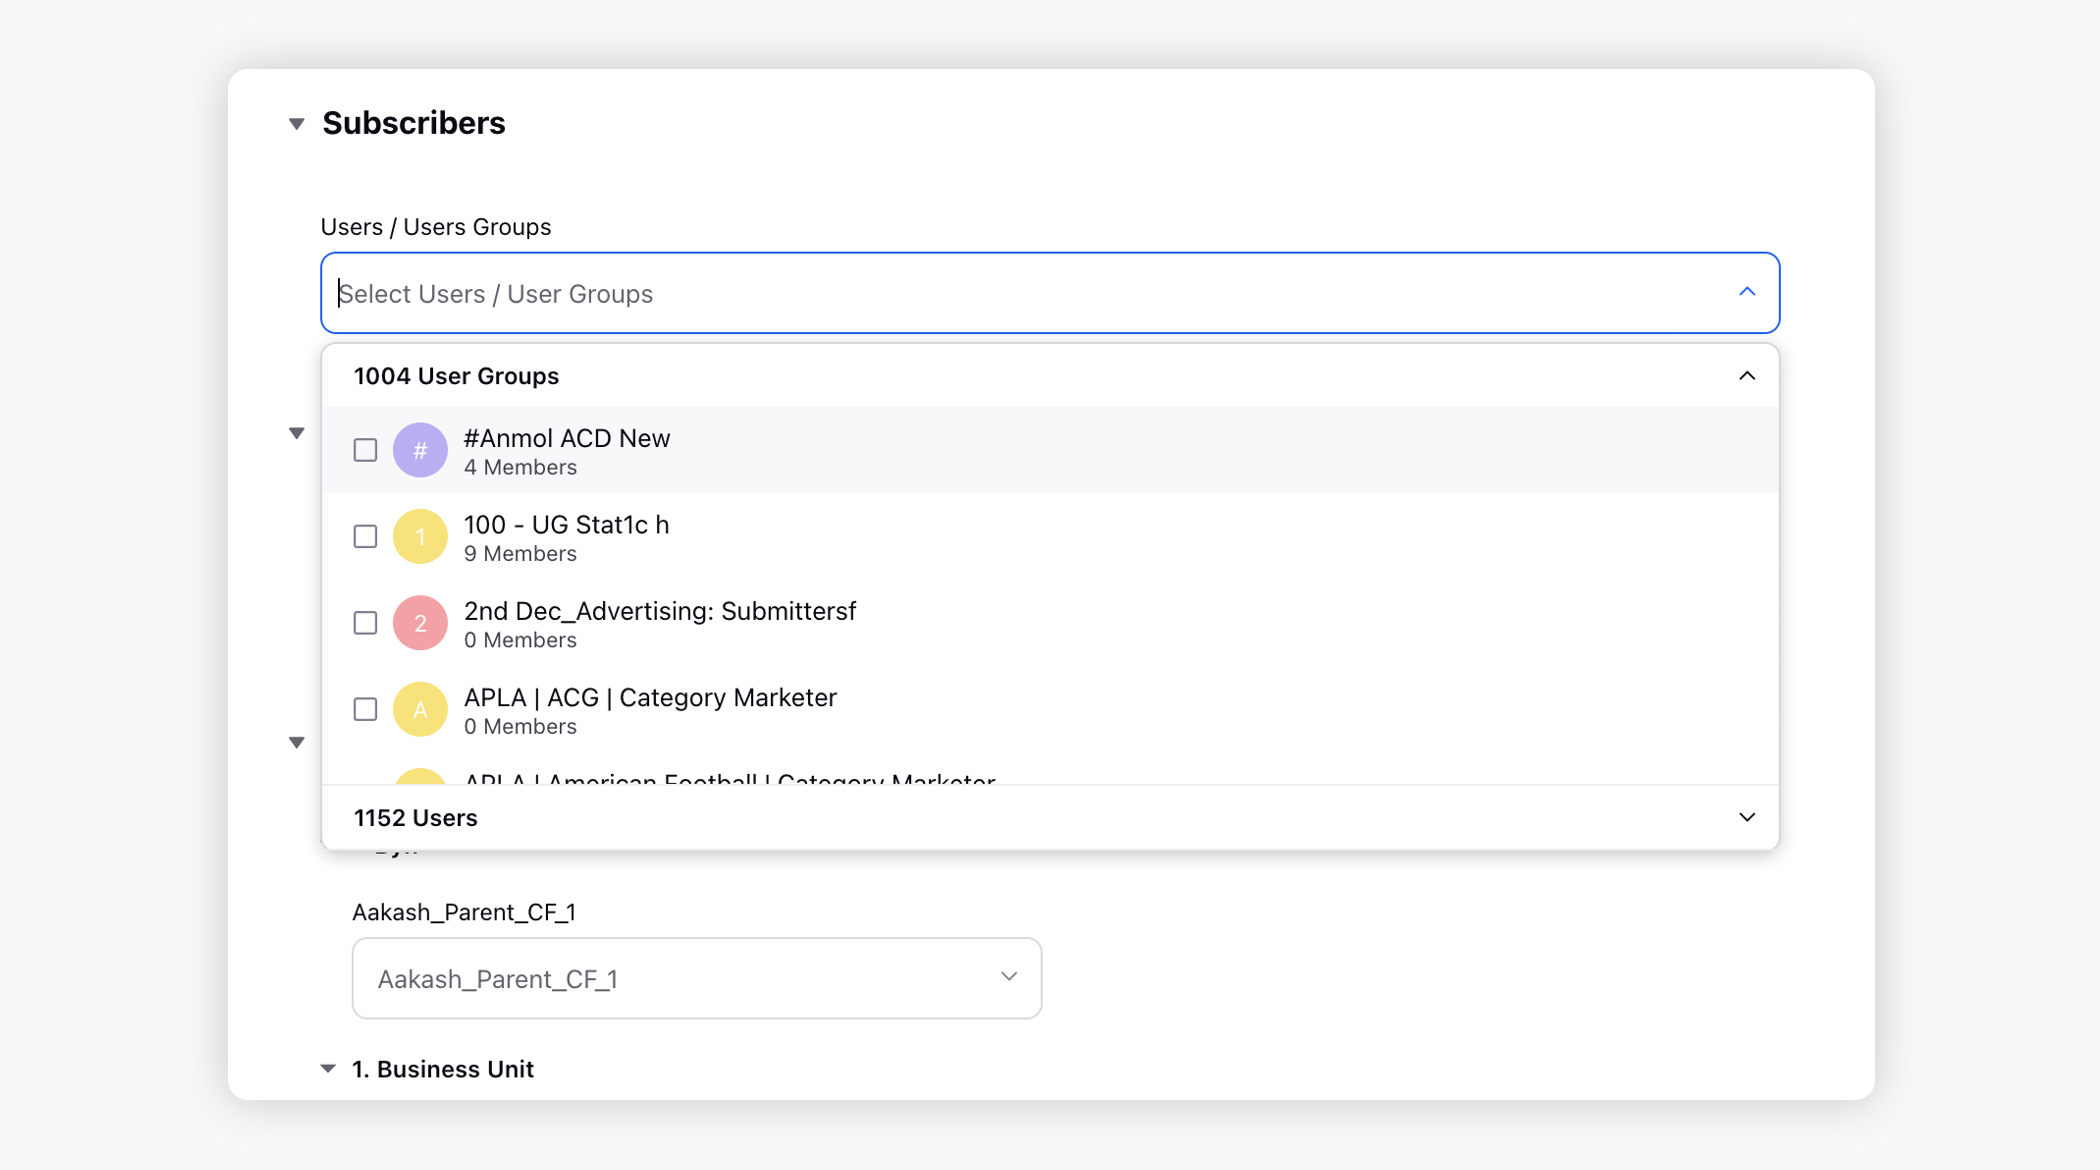
Click Save in the bottom right corner of the window.
Sharing an account
Note:
|
Click the New Tab icon. Under the Sprinklr Social tab, click Owned Social Accounts within Listen.
On the Account (Settings) window, hover over the account's Options icon
On the Update Account window, under the Share this account across workspaces section, selct Visible in all workspaces checkbox or choose the workspaces/workspace groups from the drop-down menu that you would like the account to be visible in.
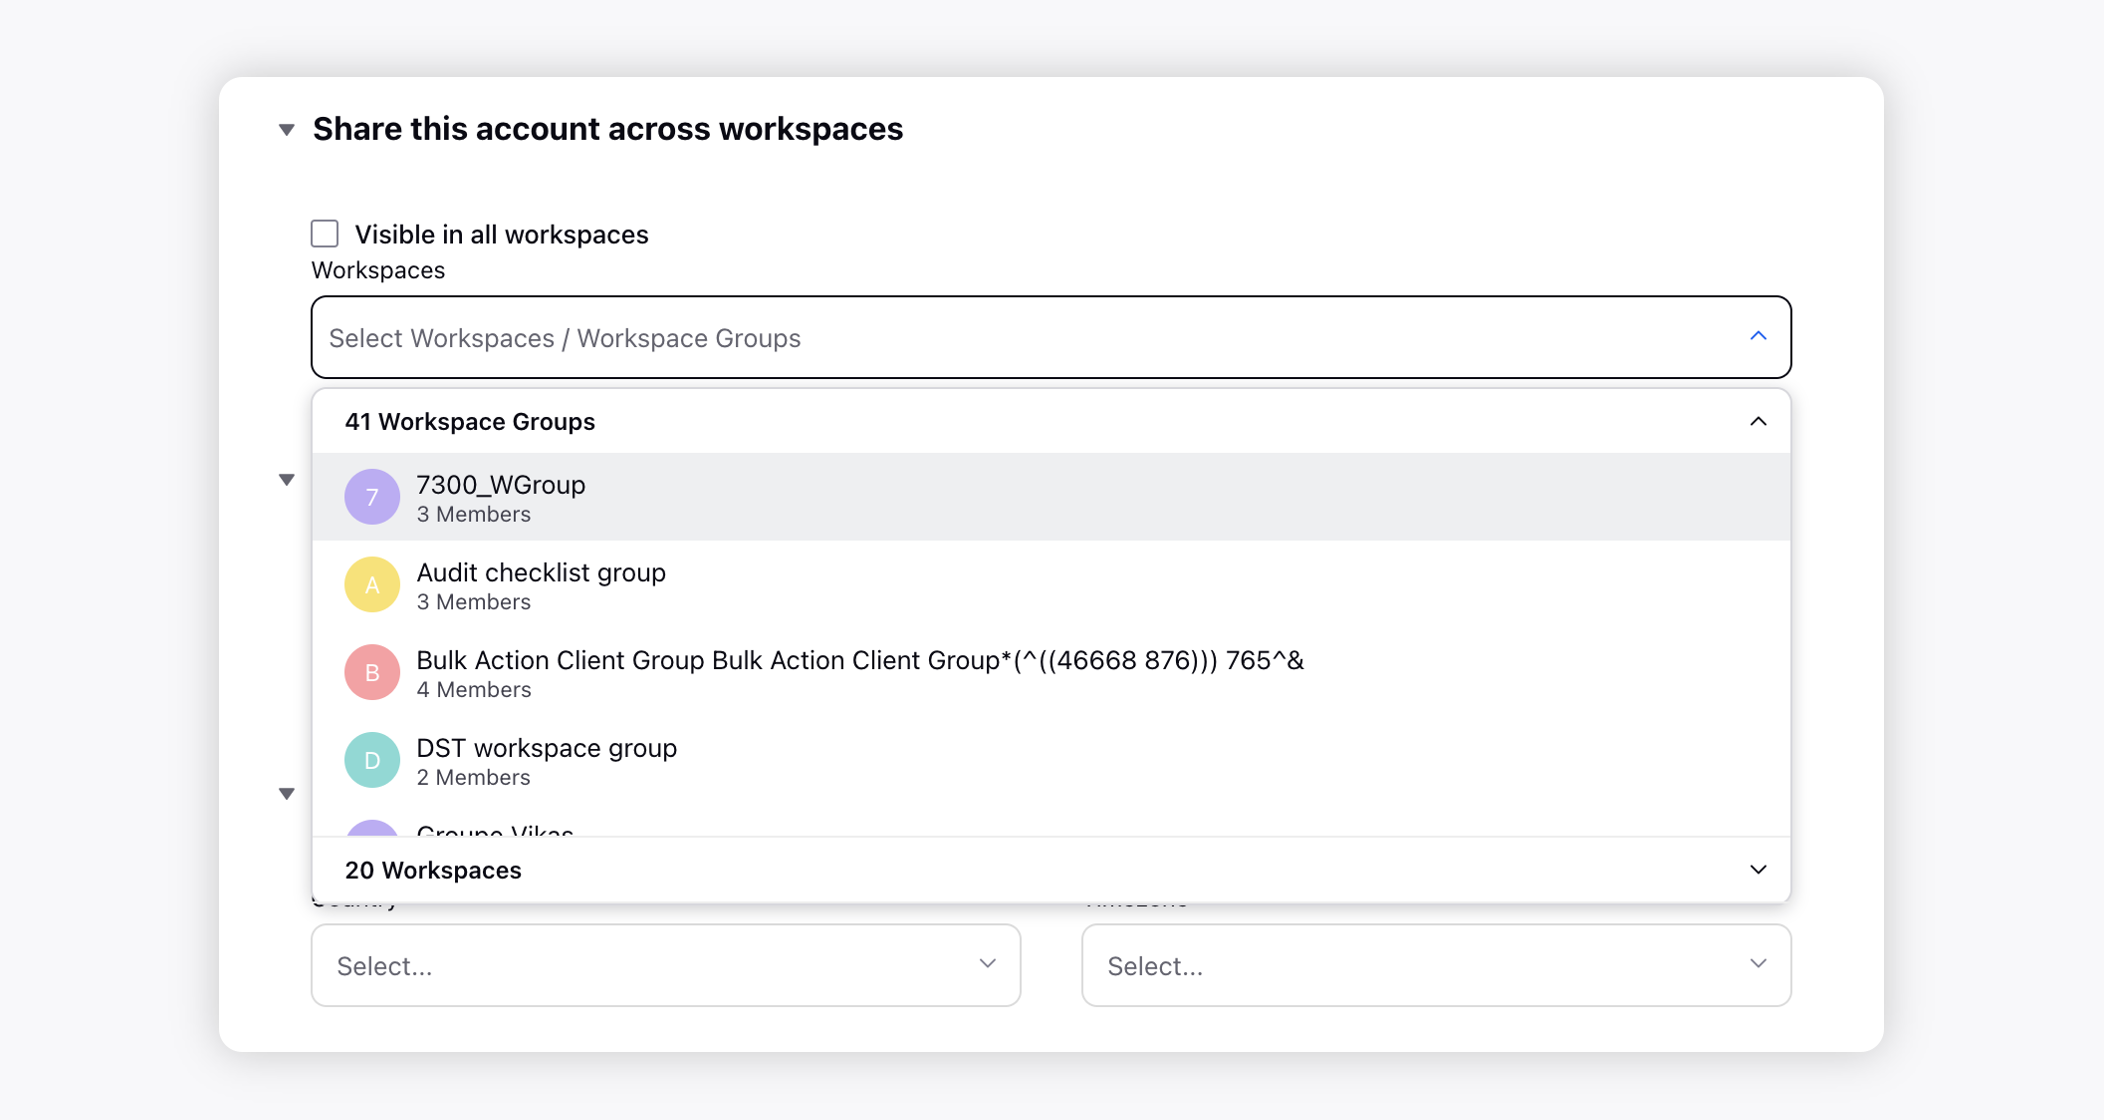
Click Save in the bottom right corner to share the account.
Migration of accounts
Account migration refers to the transfer of accounts and account information between client environments. Account migration copies inbound and outbound messages as well as account-level reporting data to a selected destination client environment.
Note:
|
Specifically, only the following will be migrated:
Outbound - Scheduled, Approval, and Sent Messages will be copied over to the destination client.
Inbound - All messages will be available in the destination client.
Reporting - All Account level and Post level reporting data will be visible in the destination client.
The following will not be copied:
Outbound - Draft messages will not be copied to the new client.
Known issues and limitations
Posts that are published or scheduled to be published during the migration may fail.
Approval messages which are in the middle of a tiered approval will still continue on the same approval path, even though that same tiered approval will not exist in the destination client. If the message is rejected and sent for approval again, only the tiered approvals in the destination client will be available.
Dependent capabilities
The migration does not move all configurations and other assets. You may have to recreate or share these with the destination client. This list is not exhaustive and only includes some of the most commonly related settings around accounts.
For example:
Users Settings: Users that previously had permissions in the source client may not exist in the destination client. The users will need to be added to the destination client.
Account Sharing: If you want publishing to be available in the source client after the migration, please share the account with the source client.
Engagement/Reporting Dashboards: Dashboards will need to be recreated or shared with the destination client.
Social Apps: Templates are not copied over. If a page is migrated, you will be unable to reinstall or take a snapshot until the template exists in the destination client.
Rule Engine: Client Level rules with account message source conditions will need to be recreated in the destination client.
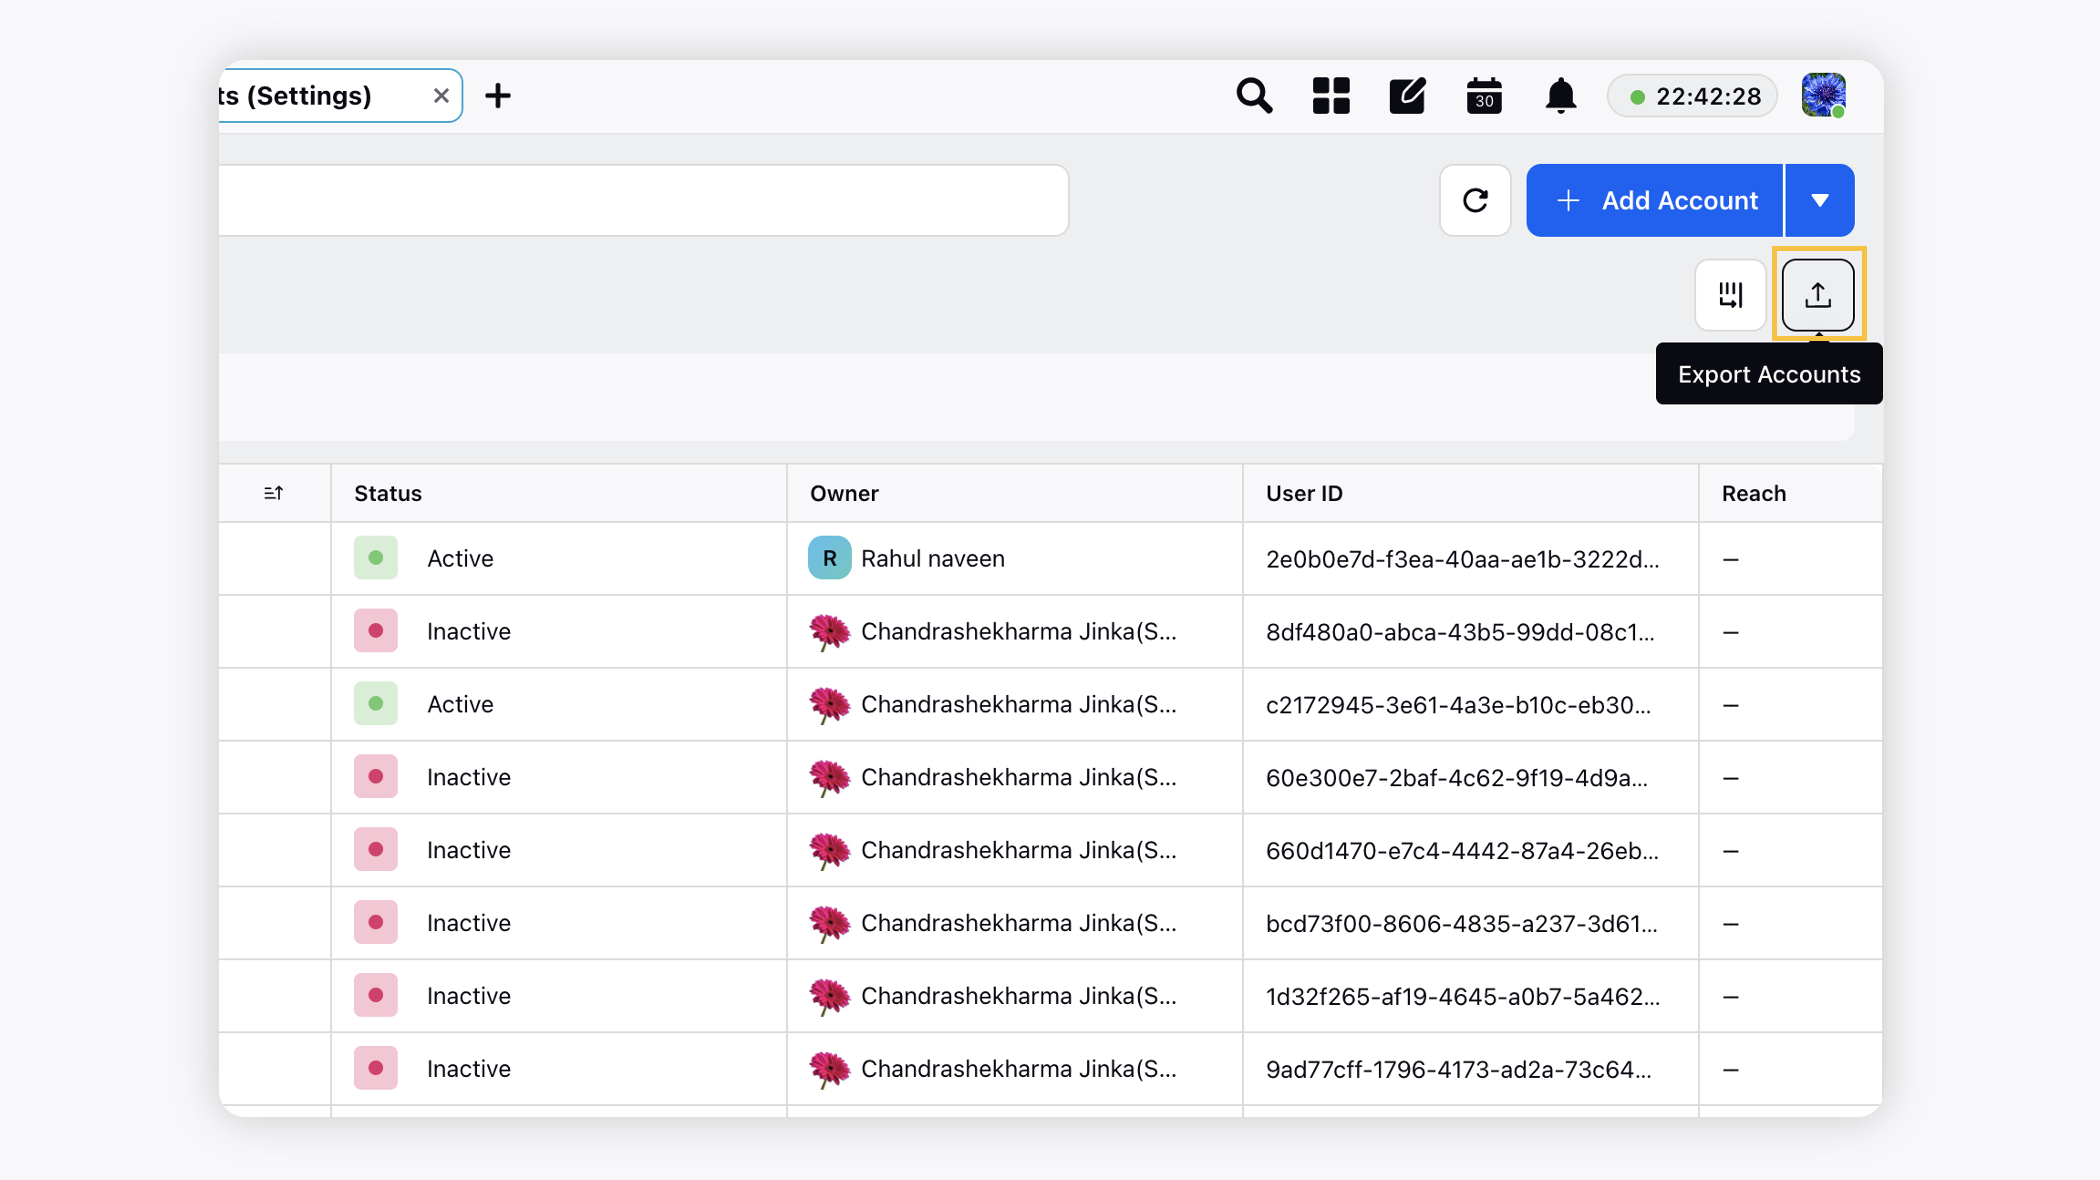
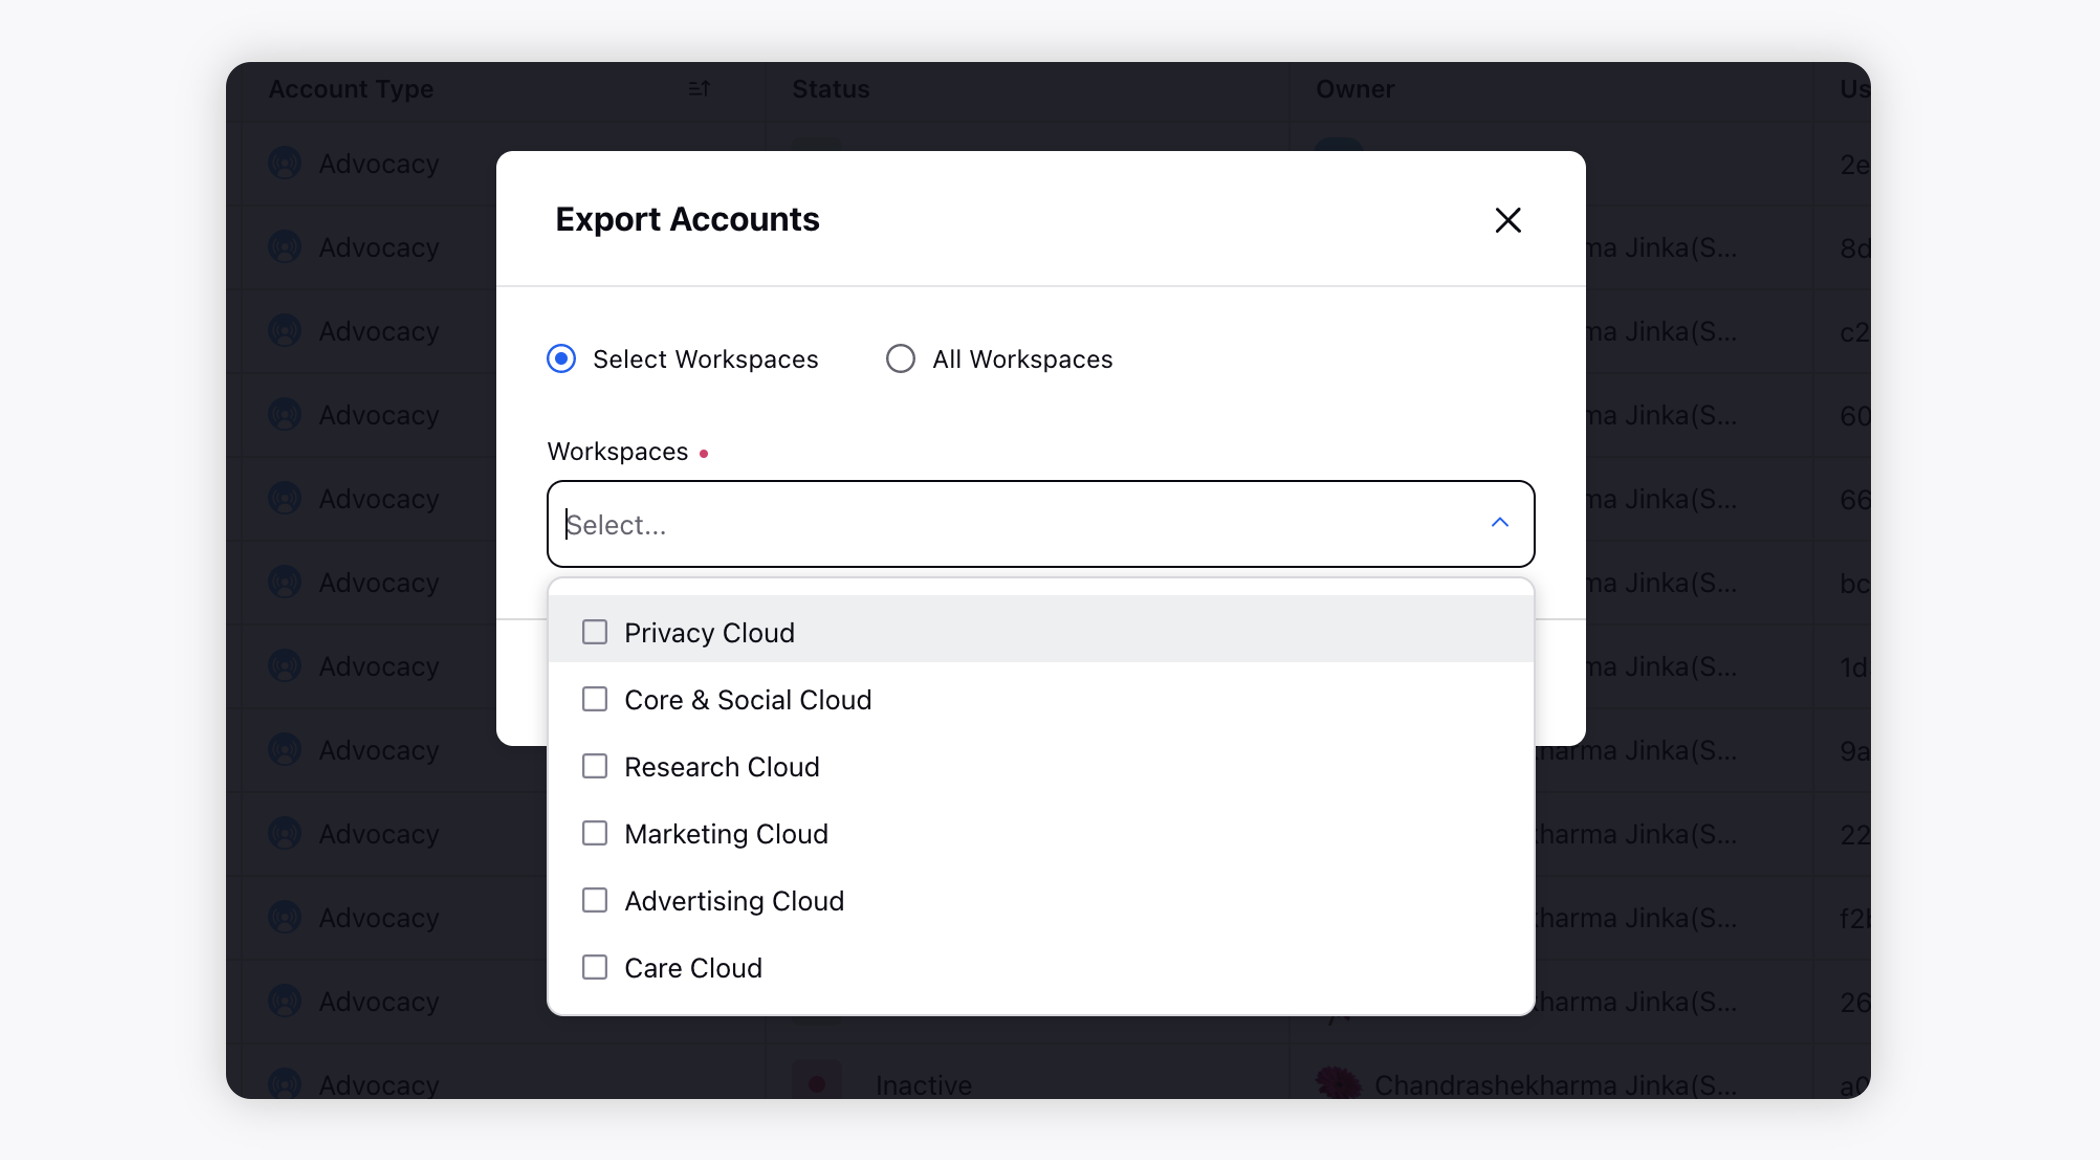
Export accounts to an excel file
Click the New Tab icon. Under Governance Console, click Social Accounts within Listen.
In the top right corner of the Account Settings window, click the Export Accounts option.
On the Export Accounts pop-up window, select workspaces for which you want to generate the export.
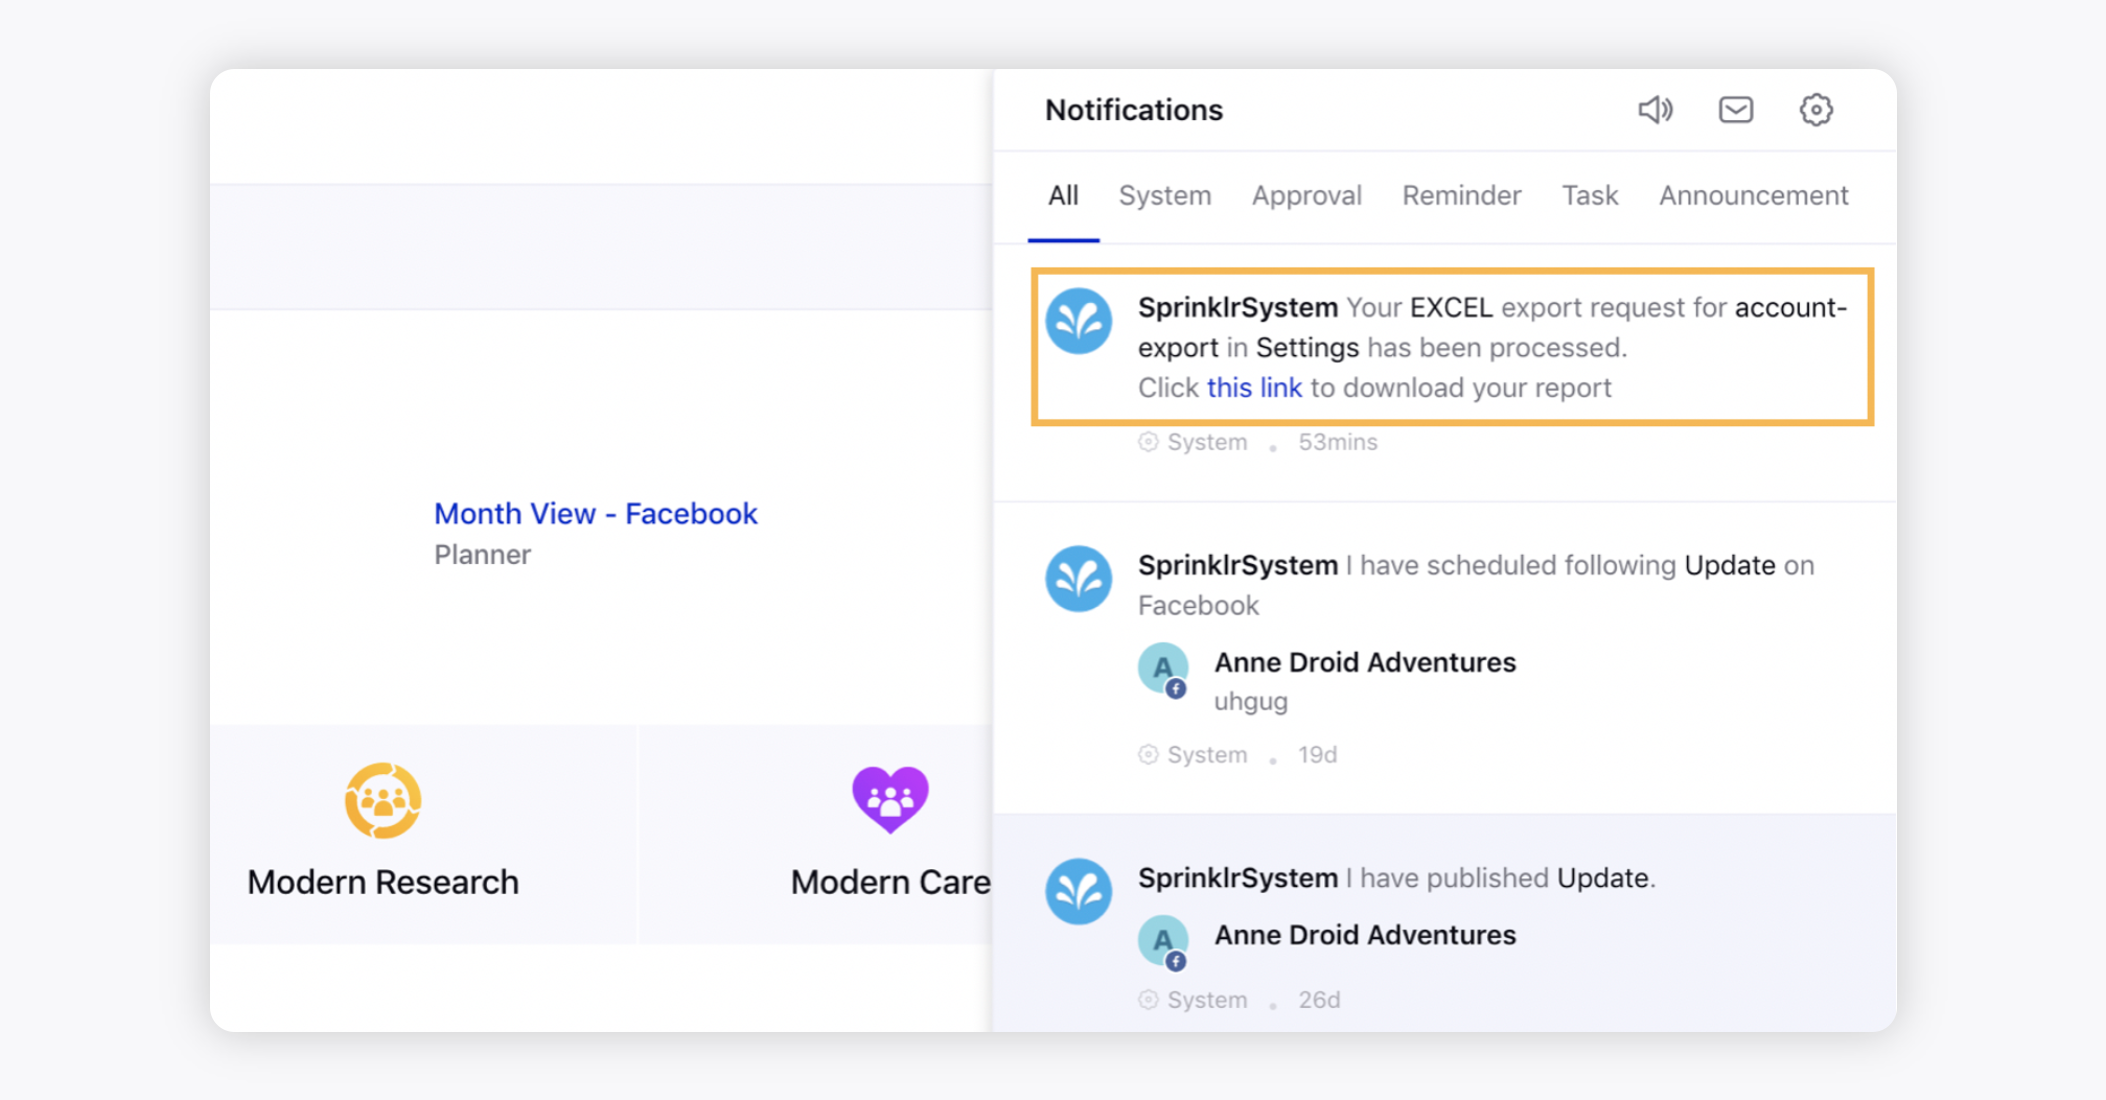
You will receive an in-platform notification when your export is ready for download. You will also receive an email with the option to download the report in .xslx format.
Best practices
As best practices, please ensure the following:
For any social account to be added/re-added into sprinklr, the user should have the utmost access to the account/accounts. Example: Super Admin in case of LinkedIn.
Make sure to always check the users/user groups to whom you want to provide the respective permissions of the account while adding. Also check the user groups in which you want to include the accounts.
Make sure to add relevant users/user groups to the subscribers list to send them notifications for all activities on the account.
Admins should keep a periodic check on - if the account is going to expire, are the permissions still relevant to the users, are the users with account still authorized to Sprinklr, etc.
Related links
|