Migrating record pages from Sandbox to production environment
Updated
Care console is one stop solution for the agents to work on their cases, and solve the customer queries with a unified customer 360 view. Admins can customize and configure the care console layout based on their requirements.
Business Use Case
During the UAT phase of any client, care console record pages are configured in the Sandbox environment. As currently, record pages can not be migrated through changesets, teams need to find a way to migrate these to the production environment.
Solution
We can use the Postman application to migrate the sandbox configuration of a record page to the production environment.
Configuration Steps
We need to open the record page which is present in the sandbox environment
Go to Sprinklr Care Console Manager or open https://<env>.sprinklr.com/care/console-manager.
Open the record page which you want to migrate.
Copy the record page id, which you can find in the browser URL. Example-
https://space-qa4.sprinklr.com/care/console-manager/62b04b0dfe4f4419105fb28a
Here 62b04b0dfe4f4419105fb28a is the record page id.
Right click to open the inspect element.
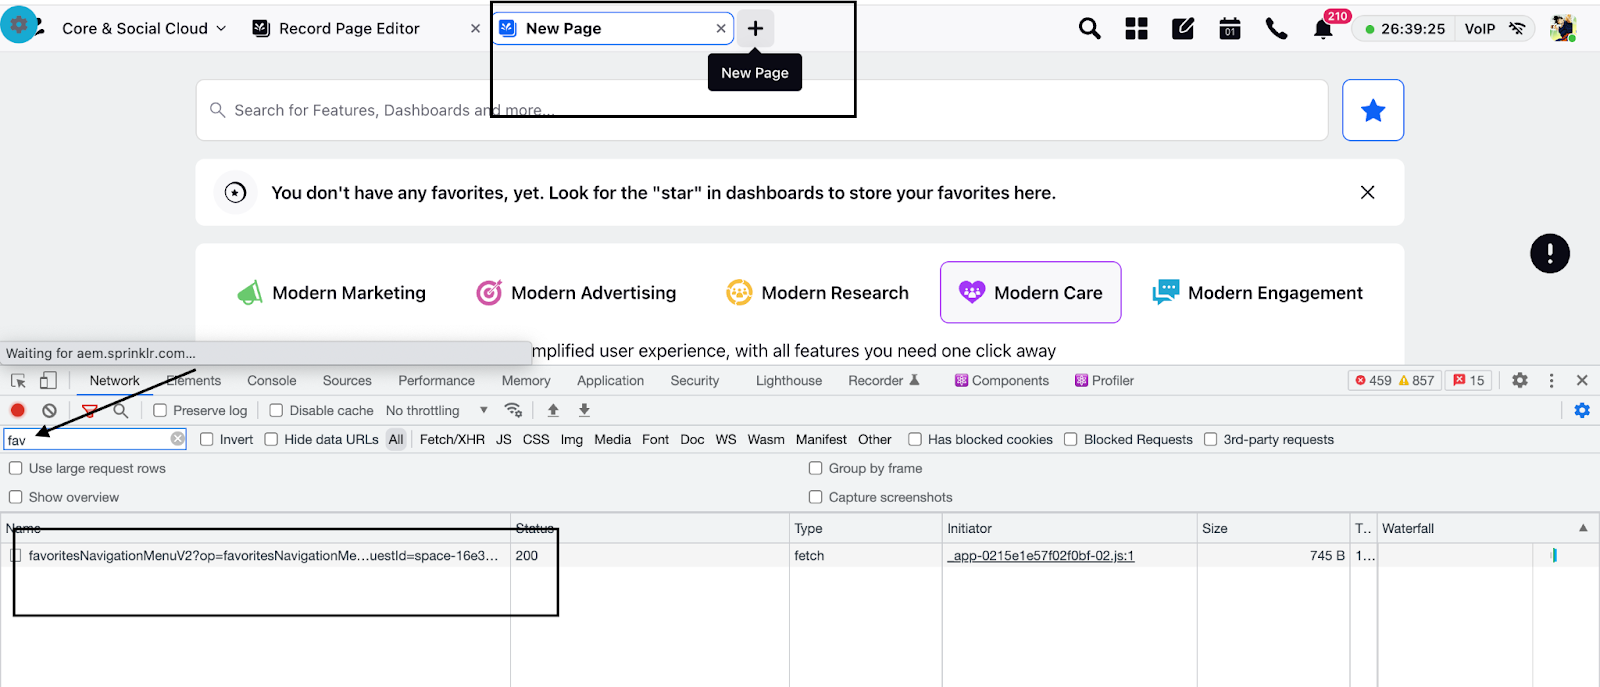
Open a new sprinklr tab, you will see a “favorites” call in the network tab.
Right click on the call and select the copy as curl.
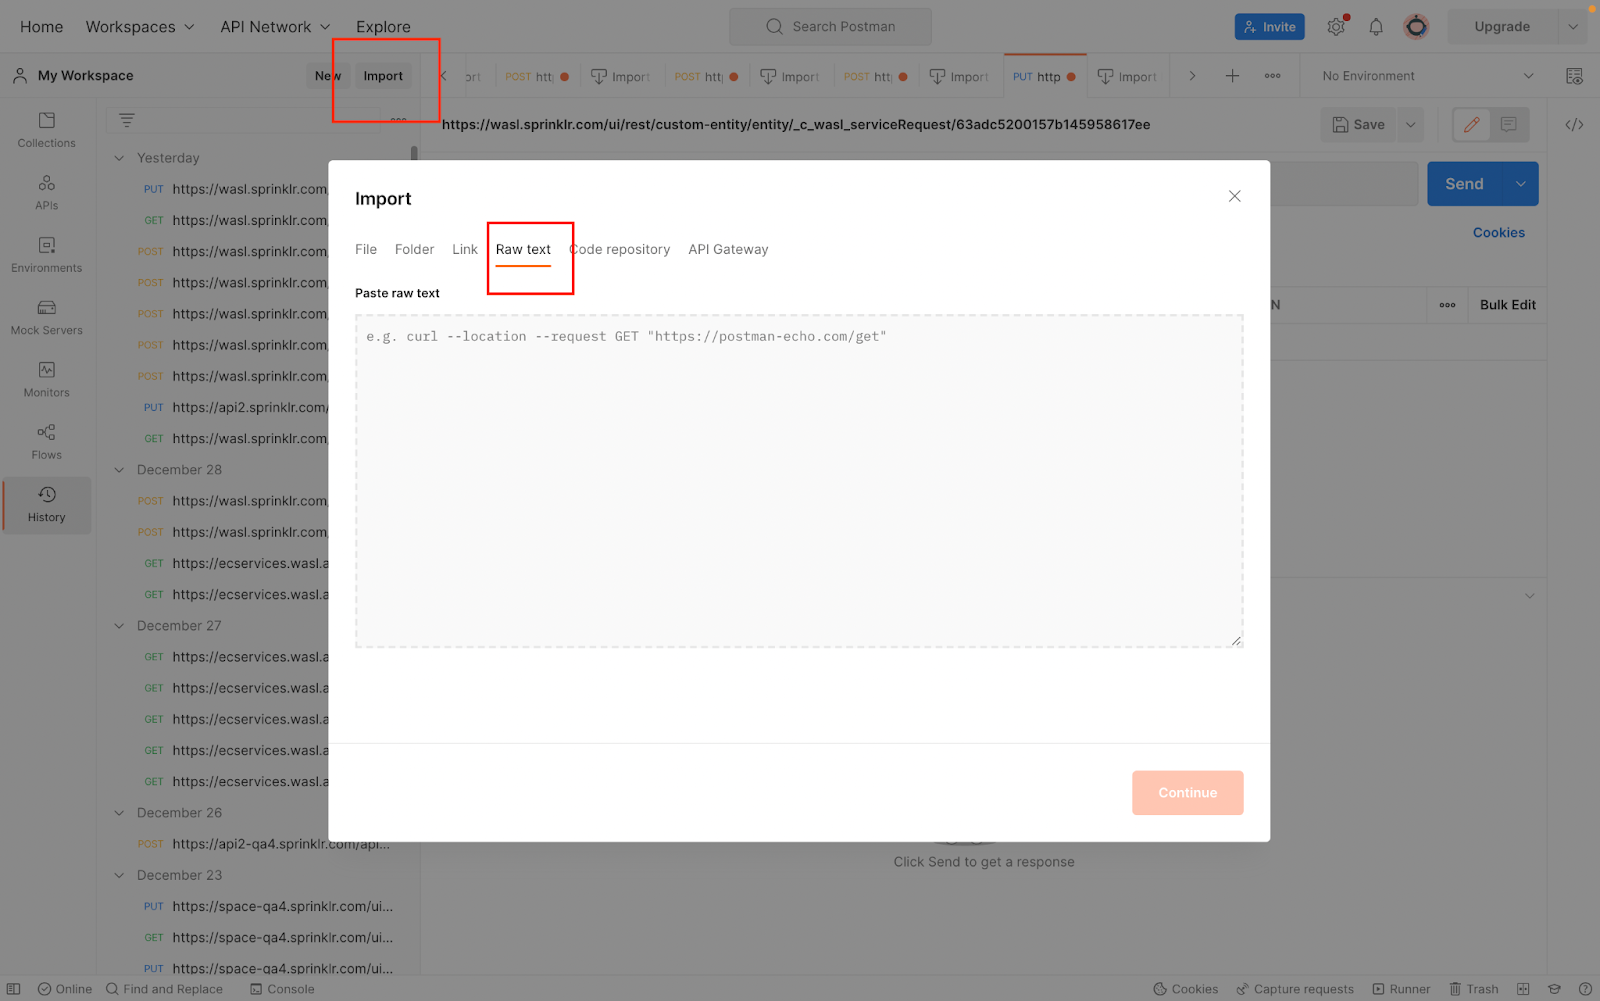
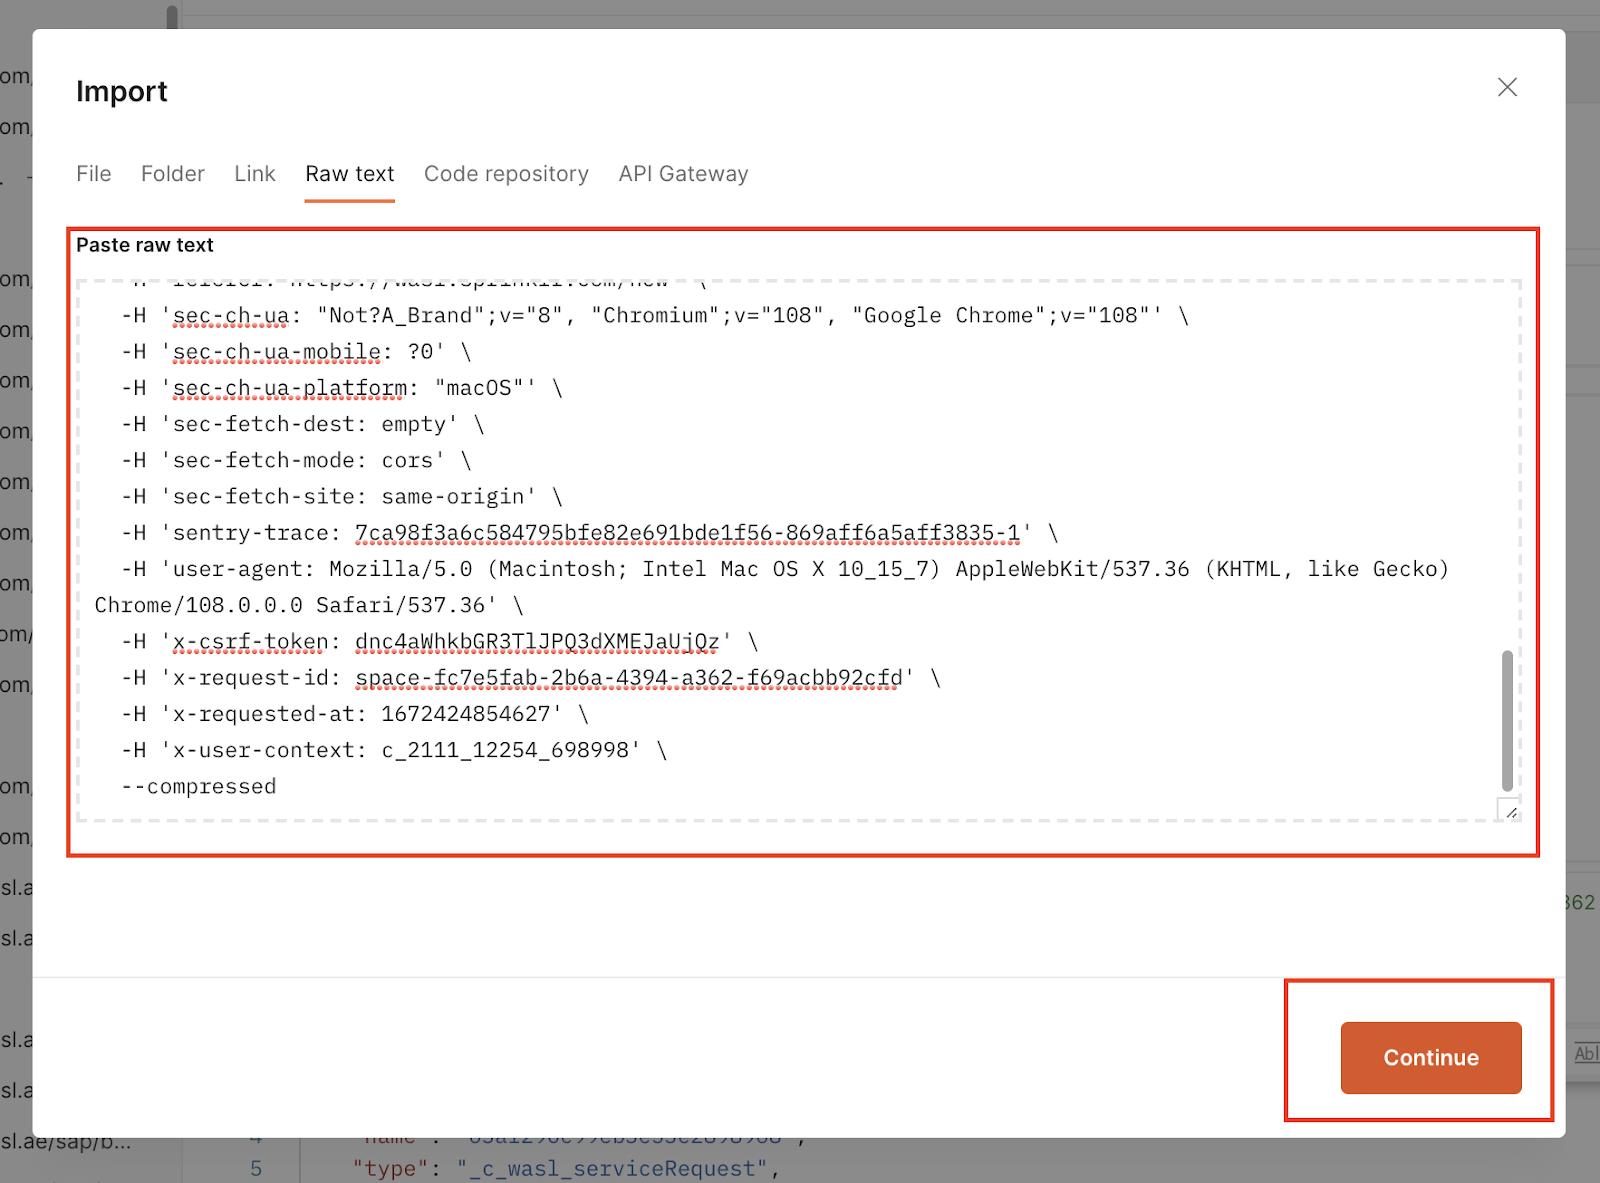
Go to the Postman application and click on import and select Raw text.
Paste the copied curl into the text box, and click on continue and further click on Import.
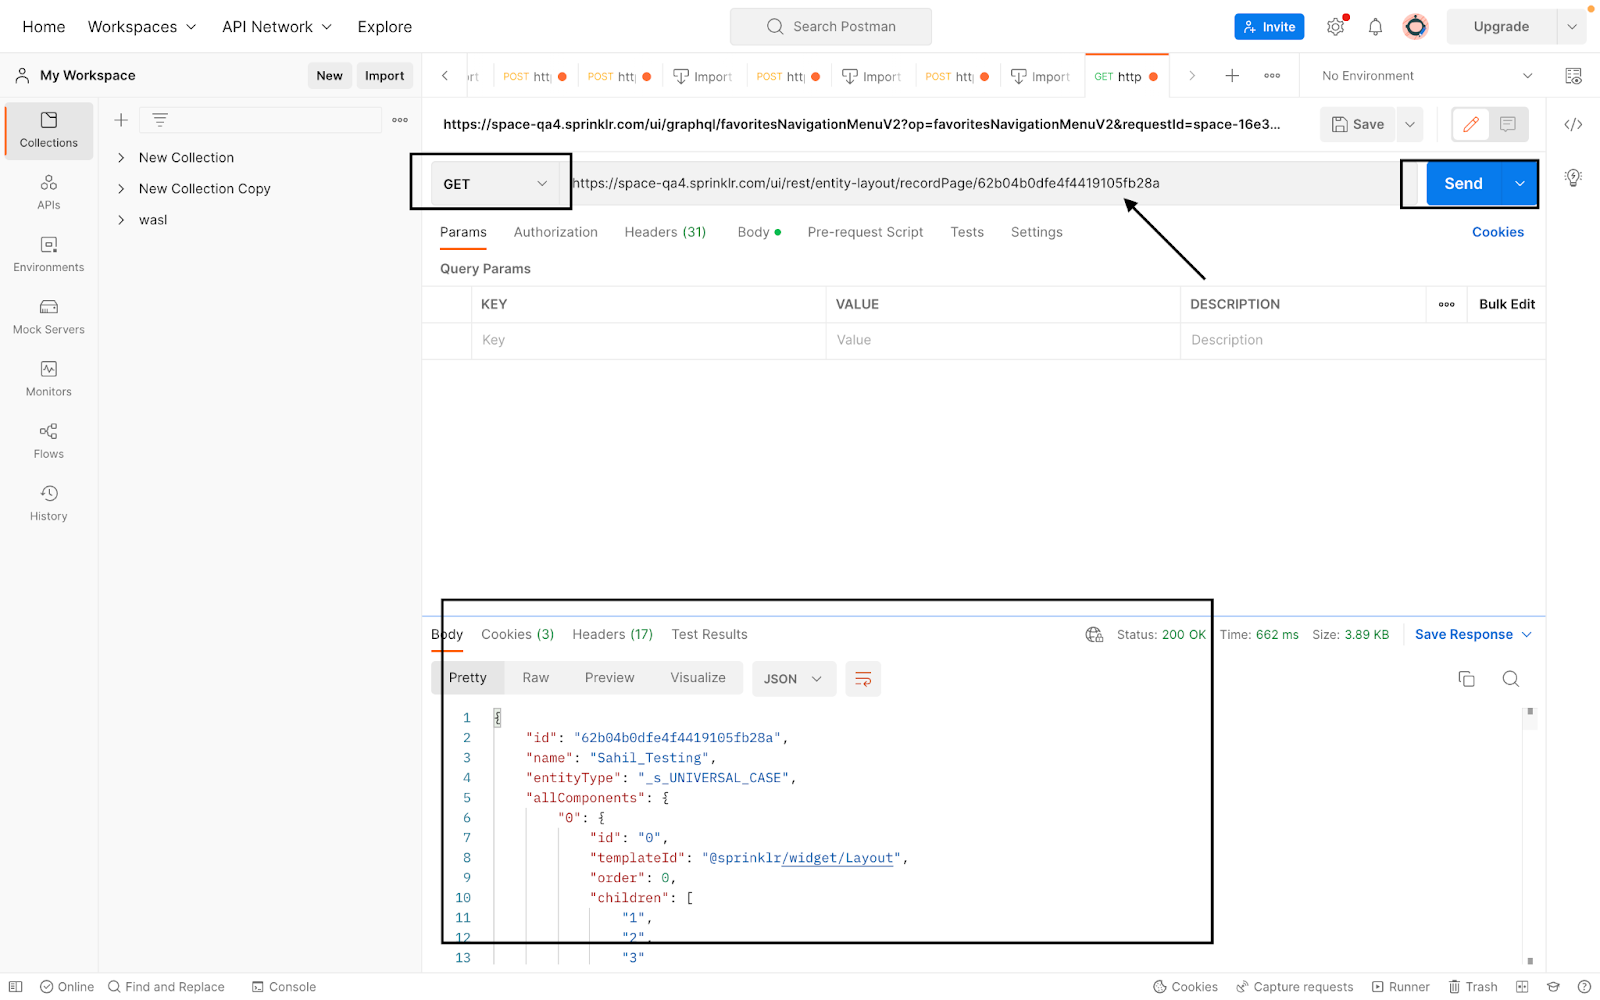
You will see the following screen in the postman, with a URL similar to- https://space-qa4.sprinklr.com/ui/graphql/favoritesNavigationMenuV2?op=favoritesNavigationMenuV2&requestId=space-16e33288-f8a7-4aa6-8908-9471d5934630
Now change this URL to- https://<env>.sprinklr.com/ui/rest/entity-layout/recordPage/<record-page-id> .
Use GET method and click on the Send button to get the complete configuration of the sandbox partner record page.
Now copy the response which we have got.
Repeat steps d) to i) for the Production Sprinklr creds.
Change the postman URL to https://<env>.sprinklr.com/ui/rest/entity-layout/recordPage
Paste the response copied in step l) in body.
Select POST method and click on Send Button, a successful response will indicate that the record page has been migrated in the Production environment.
Points to Note:
If we didn't change the “id” field in step p), the record page created in production will have the same record page id as that of sandbox.
If we remove the “id” field from body itself, backend will create a new record page id for the production environment.
Make sure you are using correct role ids in the record page once it is created in Production. As it may happen that sandbox and production role ids are different, and you may not get the correct care console in the production environment, as the roles ids were different.
"roleIds": [
"6194b2c181bead6198ca8b02",
"6391b7f588dc424f3b323097",
"63a582dfd54fdd2ee2e16302"
]
Click on Apply Changes, if you get any JSON error message, please validate your complete JSON code at https://jsonformatter.org/
Once you click on the Save button, your roleids are configured for the record page.


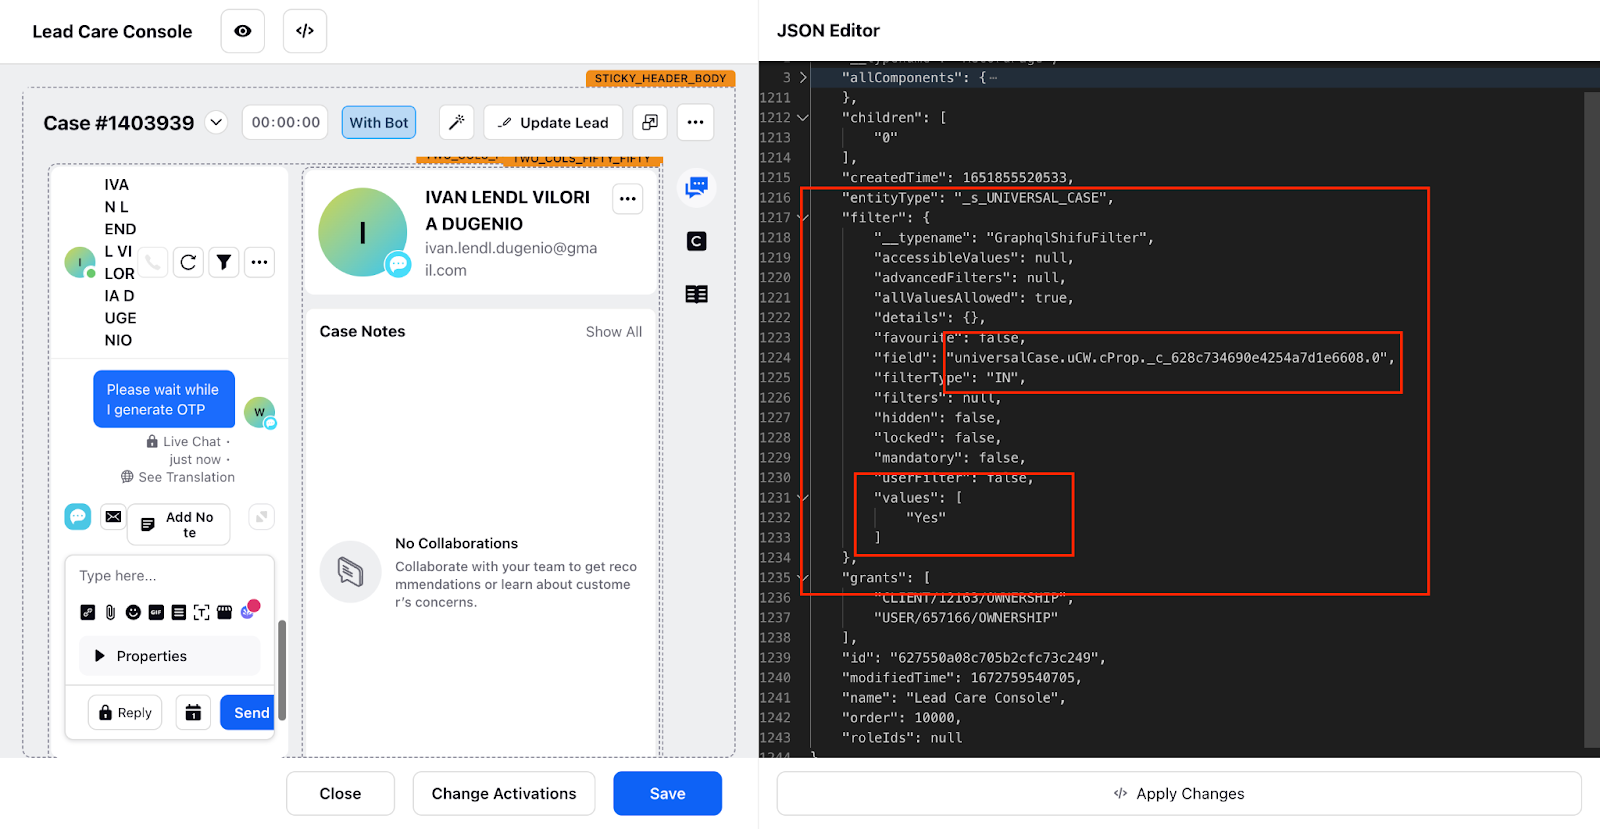
Care Console based on Case Custom Field
We can have multiple care consoles for a single case. In case a certain custom field changes its value, the care console can also be changed to a different layout.
Go to JSON editor, look for the filter object, change your custom field name in the “field” parameter as universalCase.uCW.cProp.<custom_field_name>.0 , put the value of the custom field in the “values” parameter as ["<custom_field_value"] You can refer to following code which can be used in the record page editor.
"filter": {
"__typename": "GraphqlShifuFilter",
"accessibleValues": null,
"advancedFilters": null,
"allValuesAllowed": true,
"details": {},
"favourite": false,
"field": "universalCase.uCW.cProp._c_628c734690e4254a7d1e6608.0",
"filterType": "IN",
"filters": null,
"hidden": false,
"locked": false,
"mandatory": false,
"userFilter": false,
"values": [
"Yes"
]
}
Click on Apply Changes, if you get any JSON error message, please validate your complete JSON code at https://jsonformatter.org/
Once you click on the Save button, your custom field filters are configured for the record page.

Order of Record Pages
A single user can have multiple record pages shared with them based on their role ids and case custom field values. However, the agent can see only one care console layout while handling the case. Hence, in case of multiple record pages, we can use the order field present in the record page which you can as shown:
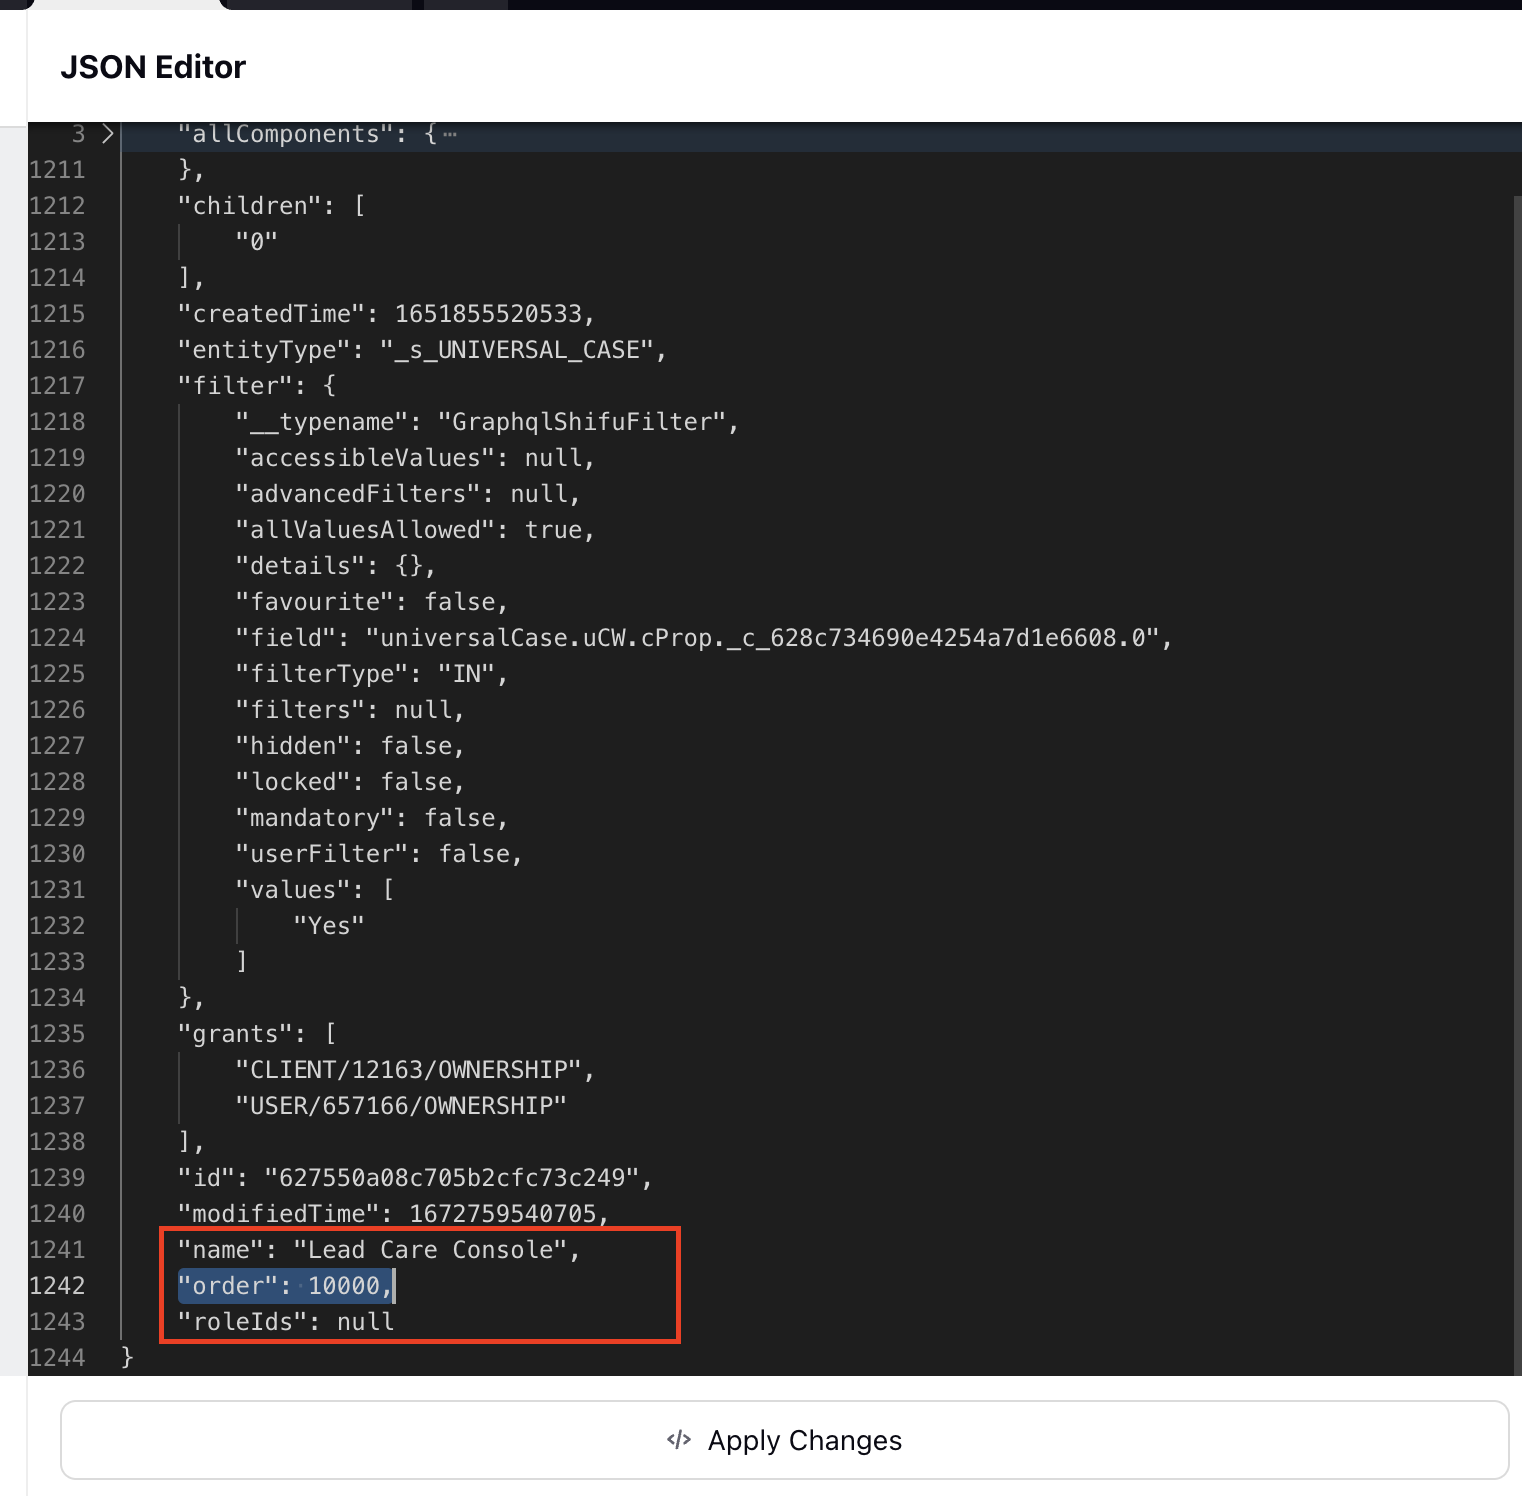
If we increase the order of the record page- it reduces the priority of that record page.
For ex- Record Page 1 has order equal to 100, and Record Page 2 has order equal to 10, and if both record pages are shared with the Agent. Record page 2 will be shown to the agent as it has less order meaning high priority.
Note that order is NUMBER field, hence it needs to be written without quotes(“”) in the record page
Troubleshooting
How to find the currently selected record page from UI? -
Open browser developer tools
Go to Elements tab and ctrl + F
Search for - data-record-page-id
Id of the current record page that user is seeing will appear here.
Copy the id and search it in the care console manager.
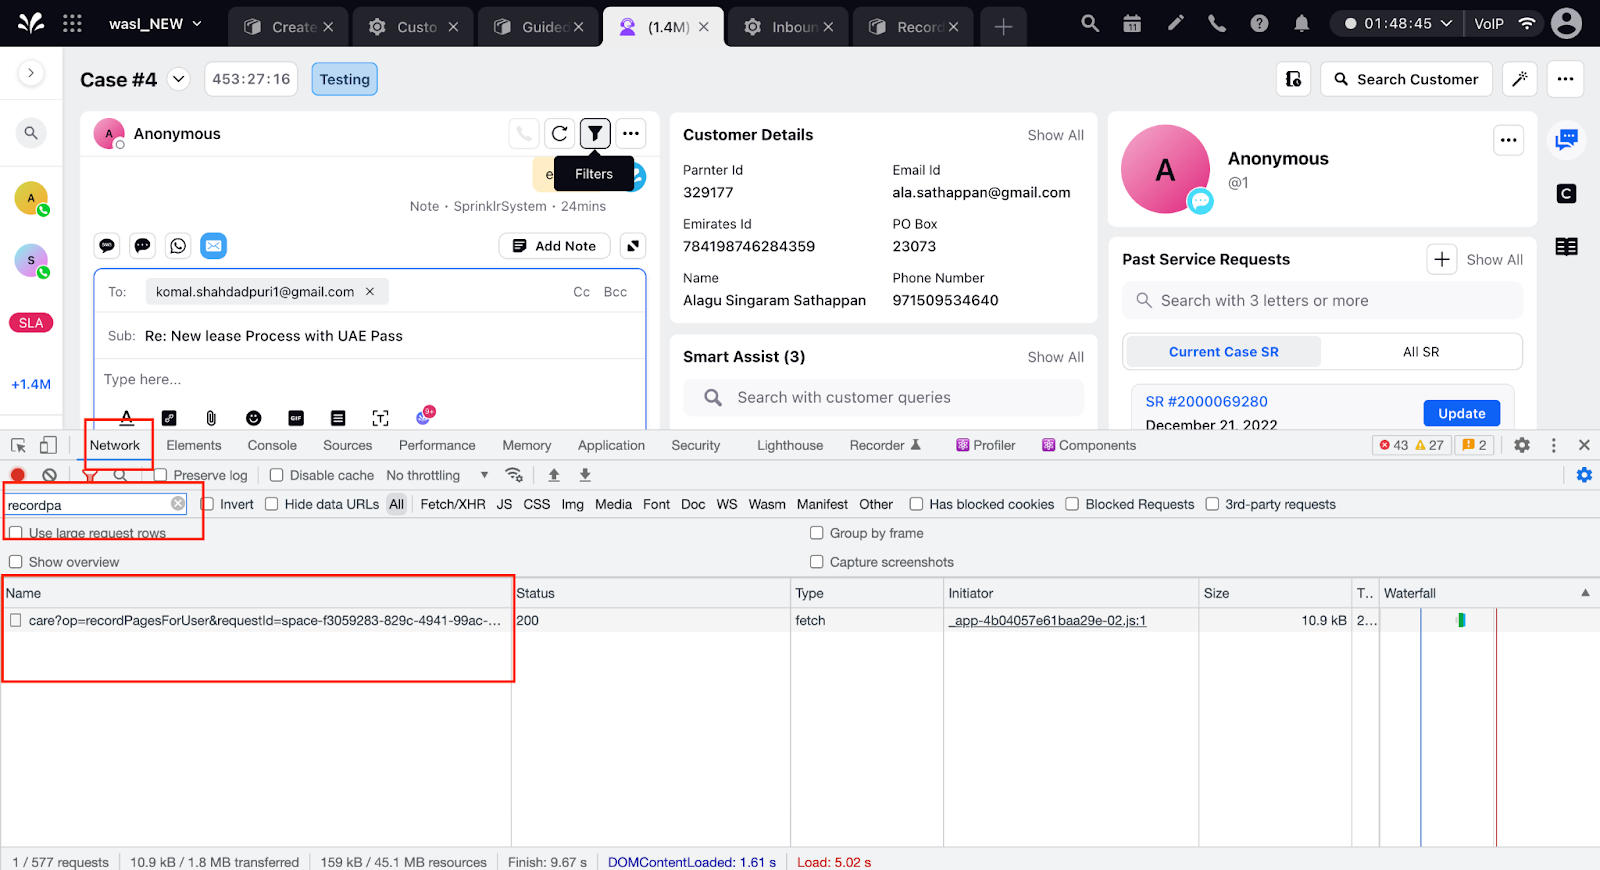
How to see all record pages eligible for user?
Right click and Open the Inspect element of the browser
Go to the network tab, refresh the browser, and search for recordPage, you will see a network call of recordPagesForUser.
Click on that to open, and go to Preview, and open the “data”.
You can see all the record pages which are shared with the user, and cross check the order that needs to be assigned to any record pages.