How to Navigate the Ads Creative Library

Updated 

Leverage the Ads Creative Library to select from existing or create new ad creatives for your ad campaigns.

The Ad Creatives repository within the Asset Manager houses all your existing and new assets used for advertising efforts and provides a unified view of your social media practice. In this article, you will learn more about the Ads Creative Library (Paid Assets) and the various functionalities it has to offer.

To navigate to the Creative Library

Open a new tab and navigate to Sprinklr Marketing > Advertising > Creative Library.

Overview of the Ads Creative Library: Grid view
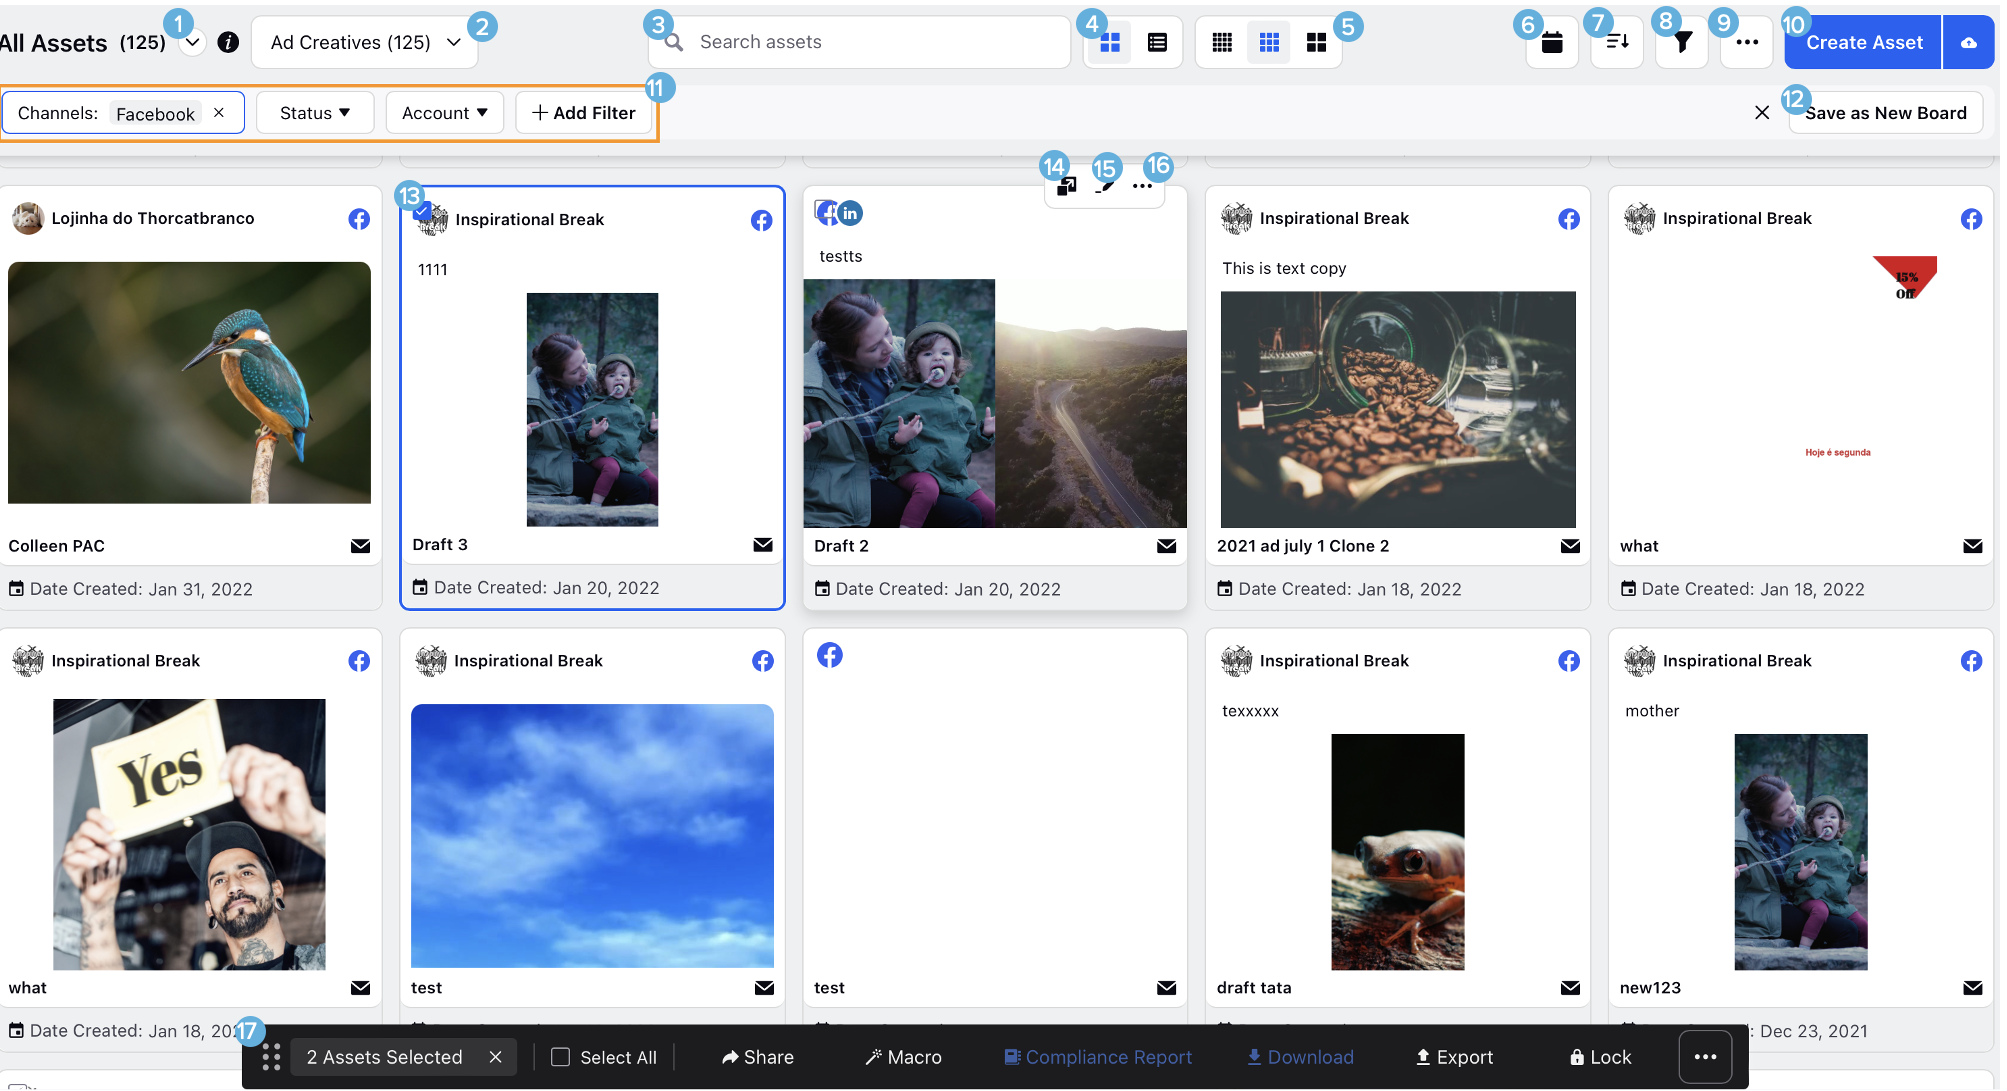
#

Term

Description

1

Asset Boards Menu

Click the dropdown icon to switch between different asset boards. To create a new board, click Add Board within the menu to create a new board with the current configuration. Learn more in Manage Asset Boards.

2

Ad Creatives

View all your existing and new Paid assets.

3

Search

Search assets based on name, type, and description keywords. You can use the Video Post Id to search for your desired Facebook video post.

4

Asset Manager Views

Grid view is the default display in the Ads Creative Library. You can toggle between views by selecting the Grid View icon or List View icon.

5

Asset Card Size

Switch and select between small, medium and large asset card size.

6

Date Range Filter

Set a predefined or a custom date range for your asset preview.

7

Sort by

Sort assets by a specific order such as creation date, modification date, date of expiration and more.

8

Hide/Show Filters

Hide or show the filter options in the asset manager.

9

Asset Manager Options

Access the following Asset Manager options -

  • Refresh: Refresh the asset manager to view the most recent asset uploads.

  • DAM Notifications: Set up your asset manager notification preferences.

  • Import: Import assets in bulk into the asset manager. For Facebook and Twitter, you can bulk import images and videos in a zip folder along with a spreadsheet containing the media details.

  • Export: Export assets from the asset manager.

  • Asset Card Properties: Select the asset properties you want to see upfront in the asset card.

  • Folder: Access asset folders.

10

Create Asset

Upload assets into the asset manager and view the different media formats supported in the asset manager. You can create/upload Ad Creatives, X Cards, Dynamic Image Templates, and more. For more details, refer to Creative Library.

11

Apply Filters

Filter assets by specific properties such as Channel, Status, Account and more. Click +Add Filter to access more filters. Learn more in Apply Filters in Creative Library.

12

Save as New Board

Save the applied filters as a new board for quick and easy access. Learn more in Manage Asset Boards.

13

Asset Card

Click on the asset card to select the asset. To select multiple assets, hover over other assets and check the box in the top left corner of the asset card and perform bulk actions on the selected assets.

14

Asset Details

Access the third pane and view detailed asset information.

15

Edit

Edit the creative properties such as channel, account, objectives and creative details.

16

Asset Options

Access the options specific to the asset such as clone, delete, lock, view associated campaigns and more.

17

Bulk Actions Panel

You can access bulk actions like Export, Share, Macros, Download and more.

Overview of the Ads Creative Library: List View
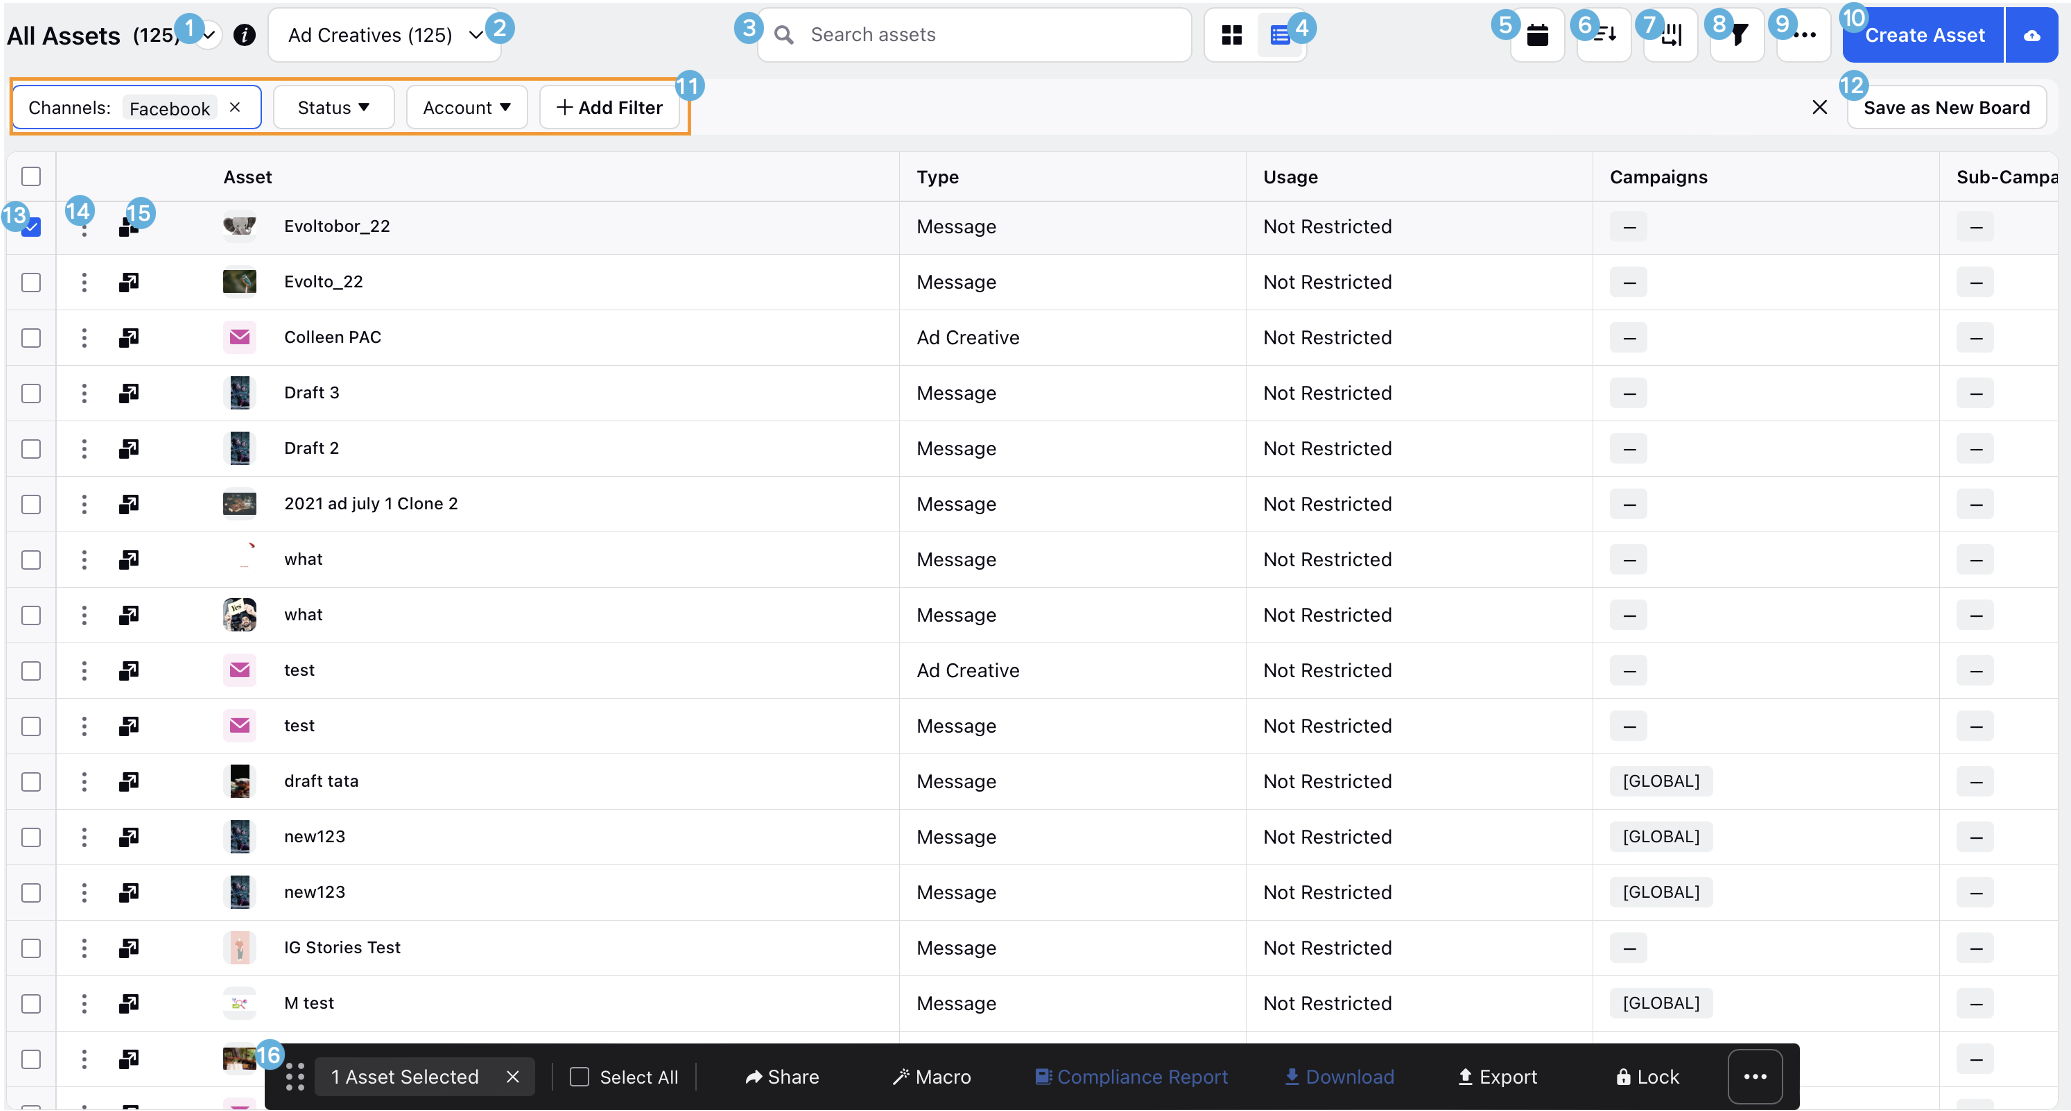
#

Term

Description

1

Asset Boards Menu

Click the dropdown icon to switch between different asset boards. To create a new asset board, click Add Board within the menu to create a new board with the current configuration. Learn more in Manage Asset Boards.

2

Ad Creatives

View all your existing and new Paid assets within this section.

3

Search

Search assets based on name, type, and description keywords. You can use the Video Post Id to search for your desired Facebook video post.

4

Asset Manager Views

Grid view is the default display in the Ads Creative Library. You can toggle between views by selecting the Grid View icon or List View icon.

5

Date Range Filter

Set a predefined or a custom date range for your asset preview.

6

Sort by

Sort assets by a specific order such as creation date, modification date, date of expiration and more.

7

Column Configuration

Manage the paid assets columns in the list view.

8

Hide/Show Filters

Hide or show the filter options in the asset manager.

9

Asset Manager Options

Access the following Asset Manager options -

  • Refresh: Refresh the asset manager to view the most recent asset uploads.

  • DAM Notifications: Set up your asset manager notification preferences.

  • Import: Import assets in bulk into the asset manager. For Facebook and Twitter, you can bulk import images and videos in a zip folder along with a spreadsheet containing the media details.

  • Export: Export assets from the asset manager.

  • Asset Card Properties: Select the asset properties you want to see upfront in the asset card.

  • Folders: Access asset folders.

10

Create Asset

Upload assets into the asset manager and view the different media formats supported in the asset manager.

11

Apply Filters

Filter assets by specific properties such as Channel, Status, Account and more. Click +Add Filter to access more filters. Learn more in Apply filters in Creative Library.

12

Save as New Board

Save the applied filters and view configuration as a new board for quick and easy access. Learn more in Manage Asset Boards.

13

Checkbox(es)

Select the checkbox(es) next to individual assets to select them.

14

Asset Options Icon

Click to see actions that can be performed on an individual asset.

15

Asset Details

Access the third pane and view details asset information.

16

Bulk Actions Panel

You can access bulk actions like Export, Share, Macros, Download and more.

Ad Creatives Third Pane

The Ad Creatives third pane contains detailed information of a creative including asset id, name, type and status. You can quickly update asset details from the third pane. You can collaborate on assets with your team members using notes and tasks on the asset to streamline content creation and usage. Below is a list of the tabs available in the third pane with its descriptions.
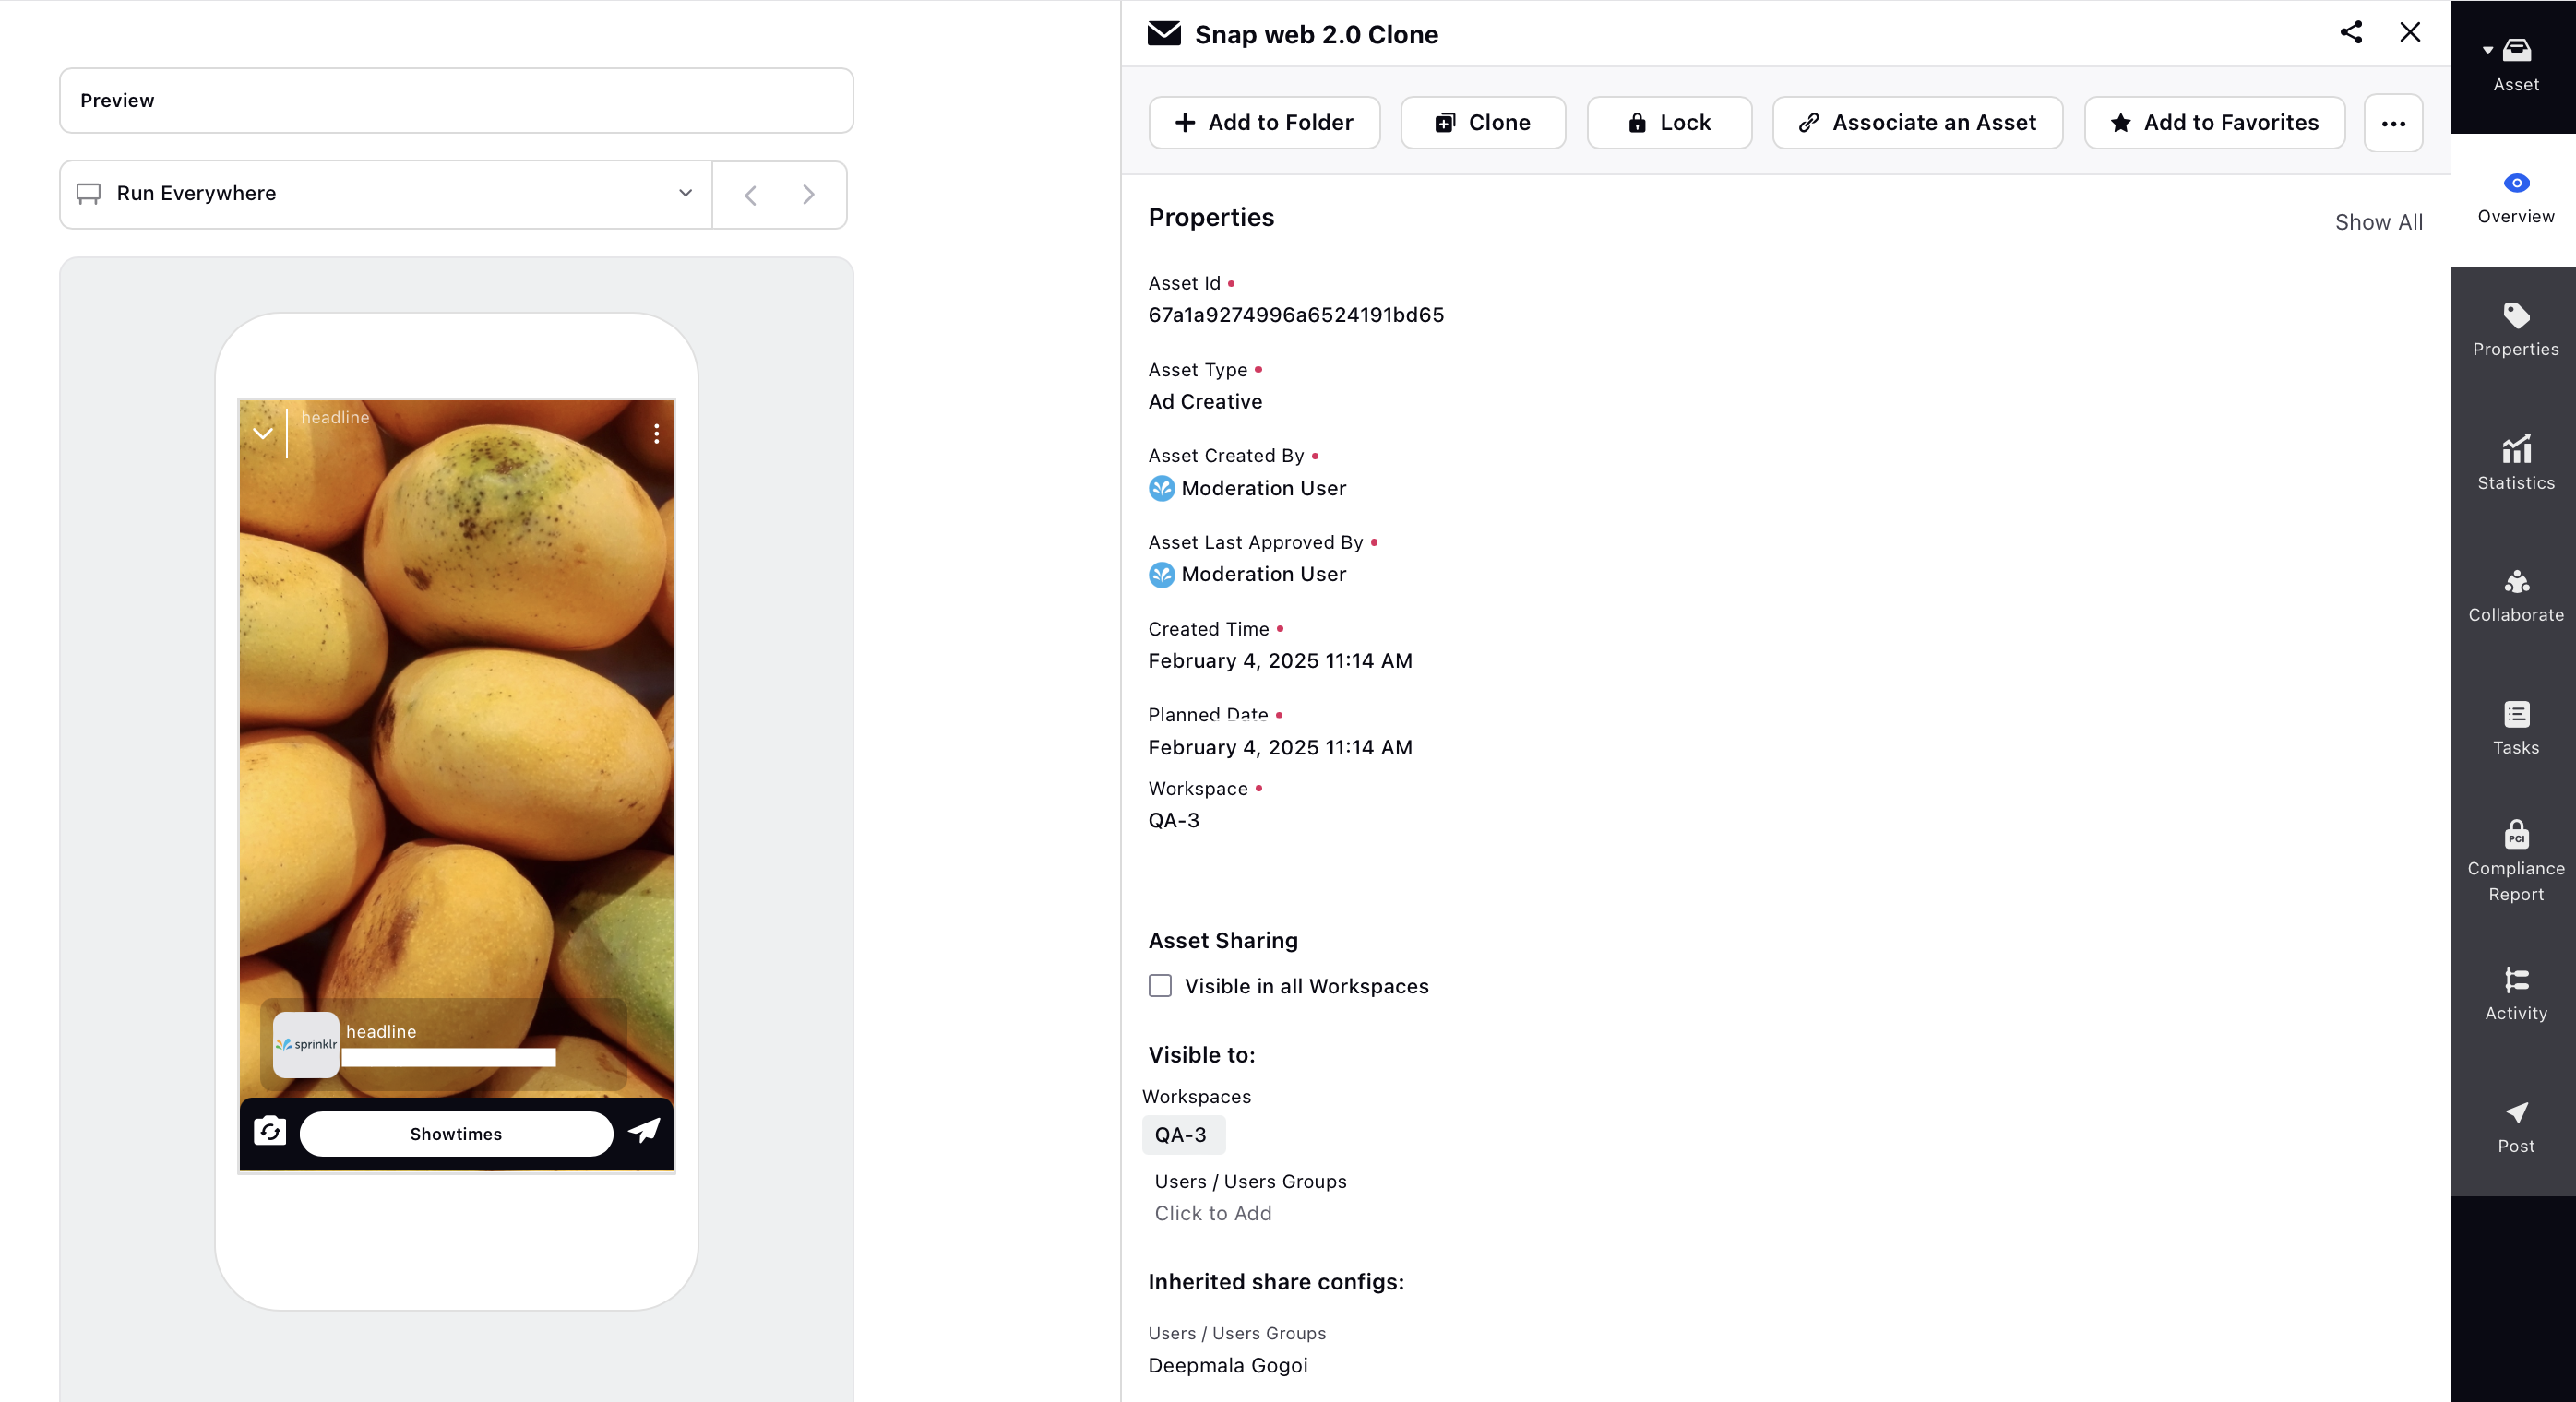
Tab
Description
Overview
View all properties associated with the asset. You can also view any creative publishing errors in this tab.
Properties
View and edit all the properties including system and general properties.
Statistics
View all engagement and performance analytics associated with the asset.
Collaborate
Collaborate with other team members through messages and attachments. While collaborating via notes, messages, and attachments, the notes field will expand on adding a long text. Additionally, you can address other users within the platform using an @mention.
Tasks
View a record of tasks assigned to the asset. New tasks for the asset can be created from this tab.
Compliance Report
View the brand compliance score for your asset to ensure the creative adheres to brand guidelines. The compliance score is based on the brand guidelines specified in the Creative Management App. For more details, refer to Create Brands in Creative Management App.
Activity
View any changes or updates that are made to the asset.
Post
The posts tab provides details for all the posts at various social channels associated with the image asset.

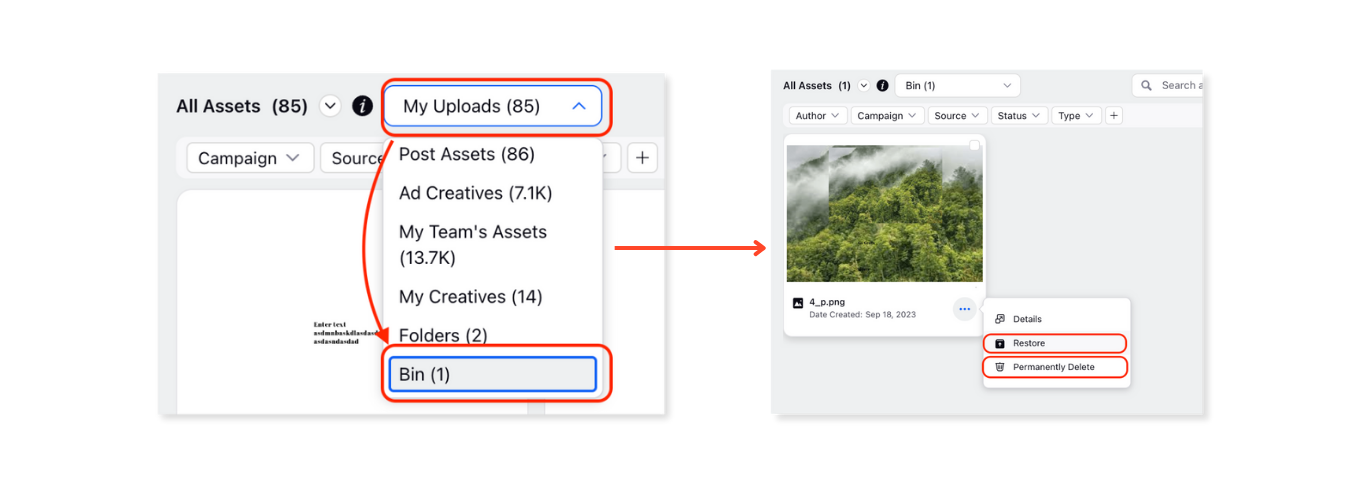
Recycle Bin: Recycle bin is a DP enabled feature (To get Recycle bin feature enabled in yout workspace, please contact the support team), you can access recycle bin in the ad creatives section from the Ads Creative Library.

  • Recycle bin enables the user to restore deleted assets from DAM.

  • If the user wish to permanenty delete any asset, they can do so by deleteting it from the Recycle Bin Folder.

  • Any asset stored in the Recycle Bin will be permanently deleted after 100 days.
Related articles