Compose Nextdoor Ads
Updated
![]() Note: In Sprinklr, the "channel-nextdoor" is now deprecated, and reporting for this channel will no longer be available. However, portal data and campaign information remain accessible. Please adjust your processes accordingly.
Note: In Sprinklr, the "channel-nextdoor" is now deprecated, and reporting for this channel will no longer be available. However, portal data and campaign information remain accessible. Please adjust your processes accordingly.
Nextdoor is a social channel that lets local residents and neighborhoods connect and converse about their communities. The site is active in over 160,000 neighborhoods and the United States, Netherlands, UK, Germany, and France. Local and corporate businesses offering services, discounts, or promotions with their neighbors can create and run ad campaigns on Nextdoor using Sprinklr Ads Composer to grow their business.
You can also perform reporting on your Nextdoor Ads within Ads Reporting. Refer to the in-platform Sprinklr Reporting Glossary to view all metrics and dimensions details.
Enablement Note | The use of this feature requires that Sprinklr Marketing (Ads) be enabled in your environment. To learn more about Sprinklr Marketing (Ads), please work with your Success Manager. |
Before You Begin
Ensure that you have added your Nextdoor Ad Account into Sprinklr. Please work with your Success Manager to add your Nextdoor Ad Account in Sprinklr. Please refer to the Add Nextdoor Ad Account article (add link).
Select Account and Objective
Click the New Tab icon. Under the Sprinklr Marketing tab, click the Advertising tab, and click on Ads Composer within Execute.
On the Ads Composer window, select your Nextdoor Ad account.
In the Campaign Details section, choose your campaign Objective from Select Objective for your Campaign. For more information, see Nextdoor Objectives.
Under Campaign Name, enter a name for your campaign or use a naming convention.
Under Choose Placements, select one from the below placements for your ads. You can add multiple placements by clicking Add New Placement. This will create promoted objects within your ad campaign.
News Feed
For Sales and Free
Select a campaign from the Sprinklr Campaign drop-down menu to measure your Organic and Paid Reach.
Select the custom properties under Define Custom Properties and click Next.
Nextdoor Objectives
Select the Campaign Objective |
Awareness | Reach people and increase awareness of your brand. |
Consideration | Reach people and increase awareness of your brand. |
Conversion | Reach people and increase awareness of your brand. |
Apply Targeting
In the Target Audience section, select from an existing target audience, or click Create New Audience to create a new target audience for your Ad. For more information, see Nextdoor Ads Targeting — Field Descriptions.
Note
If you have multiple Promoted Objects selected in the Campaign Details section, they will appear in the left pane.
Click Add Targeting to apply targeting to each promoted object individually.
Click Save Target Audience to confirm your changes or click Segment & Save to create different variations of your target audience.
Nextdoor Ads Targeting — Field Descriptions
Term | Description |
Name | Provide a name for your Nextdoor Targeting. You can also use a predefined naming convention. |
Location | Include a location filter to target users in a specific country, region, or postal code. Click the Import icon Note that you can input a maximum of 700 postal codes for importing in bulk. |
Gender | Select for gender-specific targeting. |
User Operating System | Select an operating system to target users using that operating system. |
Age Range | Select a specific age range(s) to target users of a certain age. You can select from — 18-24, 25-34, 35-44, 45-54, 55-64, and 65+. Leave the field empty to provide no age range limit. |
Neighborhood Homeownership | Select a neighborhood ownership percentage to target your ads. |
Household Income | Select a household income amount range to target your ads. |
Interests | Select from specific interest categories to target your ads. Your ads will not be delivered on placements that do not support interest targeting. |
Budget and Schedule
Enter the details for the respective fields. For more details, see Budget and Schedule — Field Descriptions.

Click Next.
Budget and Schedule — Field Descriptions
Terms | Description |
Configure all Ad Sets individually | Select to apply individual configuration for your Ad Sets, if you have applied multiple targeting selections. |
Enter the Budget details for Campaign | |
Margin Entry Type | Select Automatic or Manual Entry as the Agency Margin entry type from the drop-down. |
Automatic | Select an Agency Margin from the drop-down if the automatic margin entry type is selected. |
Manual Entry | Enter a manual agency margin if the manual entry type is selected. |
Enter the Budget & Schedule details for all Ad Groups | |
Daily Budget | Set the daily budget for your Ad Group. |
Start Date | Set a start date and start time for your Ad Group. |
End Date | Set an end date and end time for your Ad Group. |
Enter the Placement details for all Ad Groups | |
Select Placement | This will show the selected placement in the Campaign Details section. |
Enter the Bidding Details for all Ad Groups | |
Bid Type | Select a bid type to optimize towards from the drop-down menu. |
Pricing Strategy | Specify a non-zero bid amount, i.e. the most that you are willing to pay per click (if CPC bid type is selected) or per 1,000 impressions (if CPM bid type is selected). |
Enter the Dayparting details for all Ad Groups | |
Run ads all the time | Select to run your Ads every time. |
Run ads on a schedule | Select to run your Ads on a specific schedule. For more information on dayparting, see Dayparting in Sprinklr Marketing (Ads). |
Select Creatives
In the Creatives section, select from the saved creatives by clicking Select from existing Creatives (selected by default), or click Create new creative to create a new ad creative.
Note |
|
Select the Post Type for your creative. The post type will be pre-populated with one of the following based on the placement selected in the Campaign Details section:
News Feed Image
Sales and Free Image
Under the Creative Details section, enter the field details. For more information, see Creative Details — Field Descriptions.
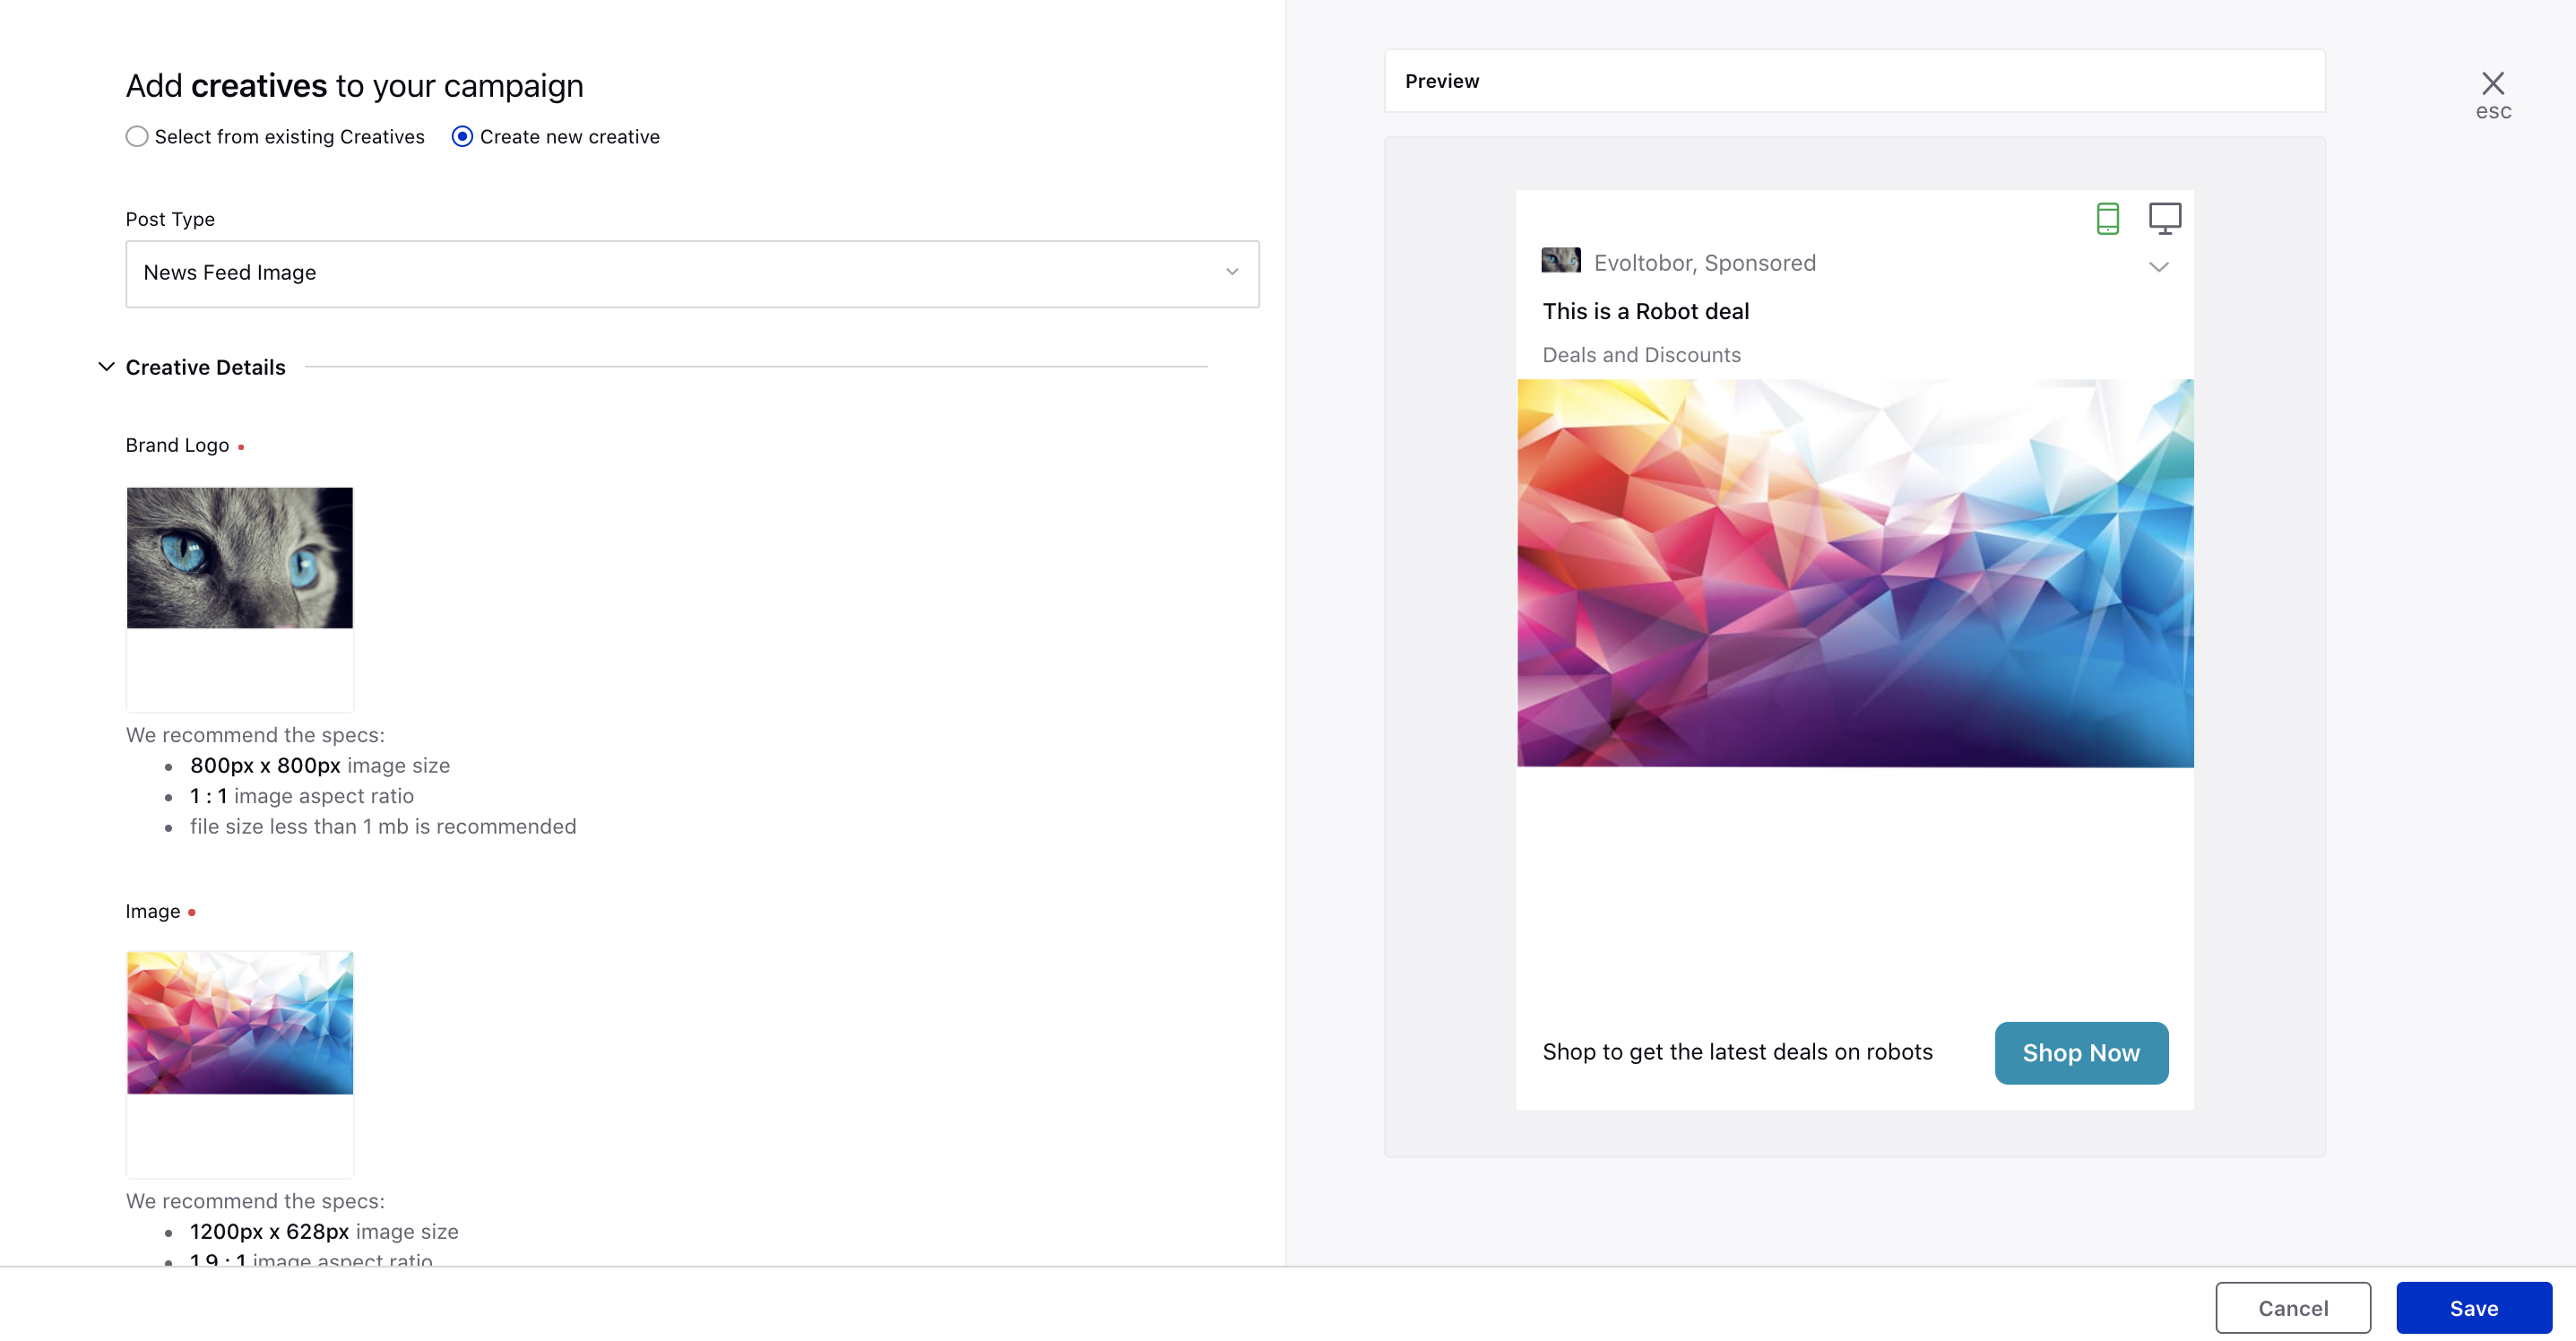
Click Save in the bottom right corner to save your changes. In the preview screen to the right, all the Ad Variants will be displayed.
You can individually add or remove creatives from each Ad Set by checking the box alongside Configure creatives for each Ad Set individually.
Click Next.
Creative Details — Field Descriptions
Term | Description |
Brand Logo | Click to add a brand logo to your creative. We recommend the following specifications:
|
Image | Click to add an image to your creative. We recommend the following specifications:
|
Business Name | Enter the name of your business. Click Add another Business Name to add multiple businesses to your creative. Character Limit: 100 |
Headline | Enter a short and catchy headline for your ad creative. Click Add another Headline to add multiple headlines to your creative. Character Limit: 70 |
Web Analytics | Select a web analytics profile from the drop-down menu for tracking purposes. |
Business URL | Enter the website URL you want to promote. Ex: http://www.example.com/page. |
News Feed Image | |
Body Text | Enter a text that clearly tells people about what you are promoting or offering. Click Add another Body Text to add multiple texts to your creative. Character Limit: 90 |
Call to Action | Select a call to action from the drop-down for your ad. This will be the action you want a user to take when they view your ad. |
Offer Text | Enter a special offer that you want to show alongside the Call to Action button. Click Add another Offer Text to add multiple offer texts to your creative. Character Limit: 50 |
Sales and Free Image | |
Price or Discount | Enter the price/discount of the advertised item. Nextdoor members expect discounts and deals in For Sale and Free ads. To drive better ad performance, we recommend adding a price or a discount. Click Add another Price or Discount to add multiple deals to your creative. Character Limit: 20 |
Perform Advanced Configuration
In the Advanced Configuration section, you can view the Ad Groups in the left-side pane and make changes to individual ads. Click an Ad to view details and make changes to the properties as desired.
At the Ad level, enter your Ad Name, URLs Parameters, and Define Custom Properties as per your needs.
Click Next.
Review
In the Review section, you can review all the details for the Campaign, Ad Sets, and Ad Variants, including the basic details for your Campaign, Ad Set targeting, Duration & Pricing, and Creatives.
Tip Click Back in the Ads Composer to make any changes to Campaign Details, Targeting, Budget & Scheduling, or Creative. |
Hover over Publish in the bottom right corner and select Publish to immediately publish your campaign on Nextdoor, select Publish as Paused to publish without activating it, or select Send for Approval to send your newly composed campaign to a reviewer.