Advanced Approvals for Automated Ads
Updated
Introduction
Automated Ads Advanced Approvals are designed for Automated Campaigns. Automated Campaigns manage numerous campaign. Sometimes up to thousands of ads under a single automated campaign. This feature provides a quick method for reviewing and approving entities while publishing and editing them using an automated campaign.
Automated Ads Advanced Approval is a dual-layer approval system for automated campaigns and ad creatives. It offers customizable configurations, allowing users to choose between ad-level, shell-level, or a combination of both approvals. The process is independent for each layer: first the shell (Automated Campaign Form) is approved, followed by the creatives.
We will now take a deeper look at how to configure approvals for the shell and the creatives. Beggining from where are the settings for configuring approvals located.
Approval Settings
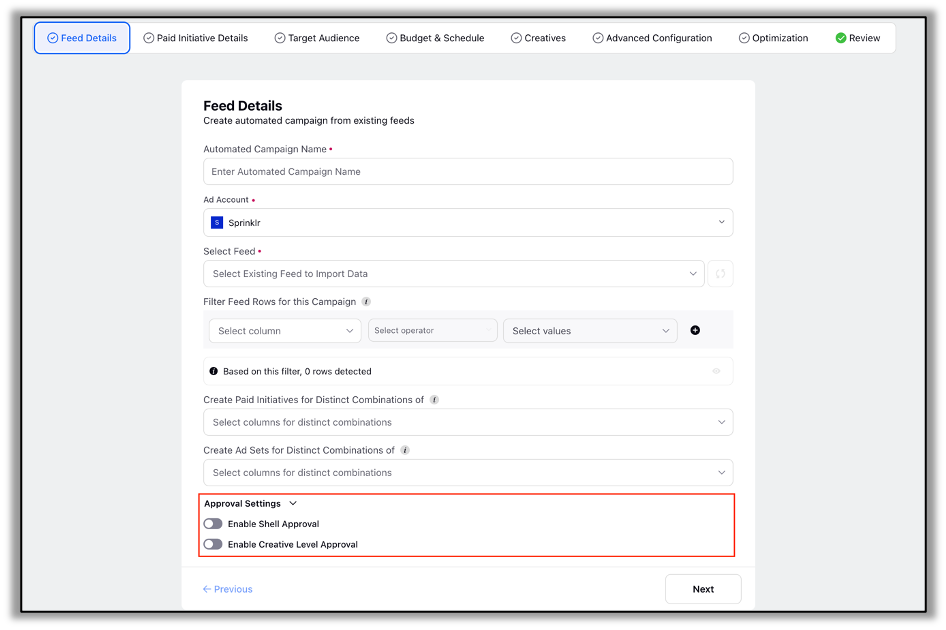
Approval settings for Automated Ads are located on the Feed Details Screen of an Automated Campaign. Shell Approval or Creative Approval can be turned on by using the respective toggle switches.
Note:
Approval Settings for an Automated Campaign can not be changed after publishing
Only one User can be set as a Shell Approver for an Automated Campaign
Only one User can be set as a Creatives Approver for an Automated Campaign

Shell Approval
Introduction
The shell is the automated campaign form constituted from all the settings in the various screens ranging from Feed Details to Optmization screen.
When only the Shell Approval Setting is enabled. Then the Shell Approval Flow is activated and after approval of the shell the PI, Ad Sets and Ad Variants are published.

Approval settings
Approval Type: Select the approval type as either Approval User or Approval Path.
Approval Path: This field is displayed when Approval Path is selected as the Approval Type. Select the tiered approval path that will be assigned to the Shell for approval.
Approval User: This field is displayed when Approval User is selected as the Approval Type. Select the user responsible for approving the shell.
Publish as active once approved: Determines the status of the Paid Inititatives and Ad Set on Publishing
Send to Approval after every change: After every change to the shell it is sent back to approval if checked
Pause Automated Campaign till new changes are not approved: If there is a shell with pending changes for approval then the current automated campaign will be paused
Note:
A change for the shell is defined by a change made to the Automated Campaign Form (Shell). Changes made to the feed are not included.
Approval settings override status changes dictated by the Feed Ad Status Column.
Currently Number of approvers for the shell are limited to a single user
Creative Approval
Introduction
When only Creative Approval is configured. The Ad Sets and PI publish directly without passing through any form of approval. After this the creative approval flow is trigerred post completion of which the Ad Variants contatining the Creatives are published.

Approval settings
Approval Type: Select the approval type as either Approval User or Approval Path.
Approval Path: This field is displayed when Approval Path is selected as the Approval Type. Select the tiered approval path that will be assigned to the creative for approval.
Approval User: This field is displayed when Approval User is selected as the Approval Type. Select the user responsible for approving the creative.
Publish as active once approved: If unchecked then ads will be published is paused
Send for approval when
Every time an Ad is Created / Edited: Ads will be sent to approval when created or whenever edited
Only once when a new Ad is created: Ads will only be sent to approval when created once
Pause ads till new changes are not approved: If there are changes made to a creative used in the automated campaign then its corresponding ad will be paused until the changes have been approved.
Note:
An edit for the Ad is defined by a change made to the Ad creative fields. Other fields such as cutom tags do not come under ths.
Currently Number of approvers for the creatives are limited to a single user
Both Shell and Creative Approval Enabled:
As a rule of thumb the shell is always approved before the creatives are approved.
Initial Action: The Shell Approval Flow is triggered.
Intermediate Step: Upon Shell approval, Paid Initiatives and Ad Sets are published.
Following Step: Subsequently, the Creative Approval Flow is triggered.
Final Outcome: Upon Creative approval, Creatives are published.