Publish a 1 Click Ad Buy within Sprinklr Distributed
Updated
The 1 Click Ad Buy feature within Sprinklr Distributed allows admins to set up the configuration for Ad campaigns and create an Ad Buy to ensure that all the campaign creators (Distributed users) use the pre-configured values and communicate and advertise at a local level. The Distributed User has to select the Ad Buy created by the admin and use it to build a campaign.
Note: 1 Click Ad Buy is a limited capability. To get this feature enabled, get in touch with your Success Manager.
Prerequisite
As mentioned earlier, it is necessary for the admin to compose or configure 1 Click Ad Buy.
Use Cases
A Media Practitioner needs a way to launch ad campaigns at scale as quickly as possible, meeting all pre-programmed compliance regulations.
A Local Marketing Manager needs to ensure that all the ad campaigns adhere to corporate guidelines while quickly targeting specific local markets.
Benefits
Launch Ad Campaigns at scale with a few clicks.
Consistent brand image ensured across all programs.
Reduce complexity for distributed users who aren’t very tech savvy.
To Publish 1 Click Ad Buy within Distributed
Log in to the Distributed environment.
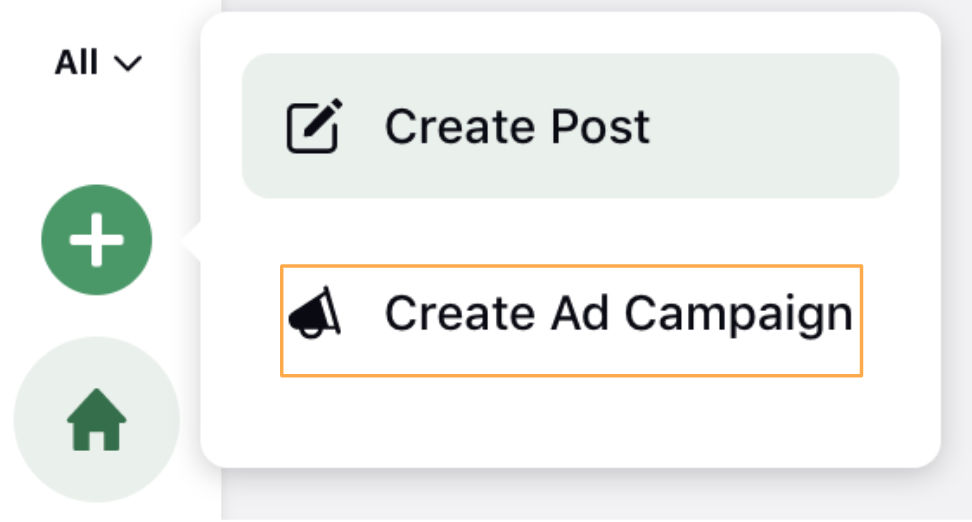
Hover over the Create icon in the toolbar to the left, and click Create Ad Campaign.

Ad Buys created by the admin will be displayed. Select your preferred one. Or, you can search for it in the search bar.

Select an Account in the Ad Account field.
Enter the campaign name under Paid Initiative Name.

In the Targeting section, select from the existing target audience, or click Create new to create a new target audience.
In the Budget section, enter the budget details.
In the Bidding section, set a pricing strategy and select an optimization for your Ad campaign.
In the Placement section, select the position where you want your Ad to be placed.
In the Ad Creative section, select from the existing posts, or click Create new to create a new Ad creative.
In the Custom Fields section, fill in the custom fields as desired.
In the Campaign Duration section, enter the Start Date and End Date for your campaign.
Click Publish in the bottom right corner.
You can also save it as a draft by clicking Save as Draft.
 Note: Note: If you save the ad as a draft, you can publish it from the Ads Manager.
Term | Usage |
Targeting | Define the specific audience segment for your Ad campaign based on demographics, interests, and behaviors. |
Budget | Allocate the total amount of money to be spent on your Ad campaign. |
Bidding | Set the maximum amount you are willing to pay for each interaction or conversion in your Ad campaign. |
Placement | Choose the specific locations where your Ads will be displayed. |
Ad Creatives | Design and select the visual and textual elements used in your Ads. |
Custom Fields | Fill any custom fields for more detailed campaign management and reporting. |
Campaign Duration | Specify the start and end dates for your Ad campaign. |
Steps to add CTA option while using 1 Click Ad Buy in Distributed
Log in to the Distributed environment.
Hover over the Create icon in the toolbar to the left, and click Create Ad Campaign.
Ad Buys created by the admin will be displayed. Select your preferred one. Or, you can search for it in the search bar.
In the Ad Creative section, click Select existing Posts.

In the Select Creatives window, hover over the Options icon on the post you want to select, and click Use as Template. (Note: You can select multiple posts to use as templates.

You can also select multiple posts to use as templates.

You can see that a copy of the post is created under Ad Creative. Hover over the Options icon in the post, and click Edit.

In the Create New window, scroll down to the Call to Action field and select from the dropdown.

Click Update in the bottom right corner.