Detailed Auto Wrap
Updated
ACW: Automate, Automate, and Automate
1. Autowrap Overview:
Autowrap, an essential feature within our system, streamlines completing after-call work (ACW) by automatically filling in necessary details within a specified timeframe. This feature proves invaluable when agents are unable to finalize ACW tasks within the designated time limits.
1.1. Functionality:
Autowrap operates by allowing users to assign auto-wrap-up values for each field. In cases where the ACW exceeds the predefined auto-wrap-up time, the system intervenes by automatically submitting the ACW with predetermined values filled in for any remaining blank fields.
1.2. Prerequisites:
- Backup values must be provided for mandatory fields in the event they are left blank by agents. Backup values can also be provided for non-mandatory fields.
- An auto-wrap time must be set, which can be either equal to or greater than the ACW timer.
1.3. Business Logic Integration
Autowrap incorporates business logic to ensure accurate disposition and sub-disposition assignments. For instance, it can be to label a call as "Contacted" if the talk time exceeds a specified duration, otherwise marking it as "Not Contacted."
By adhering to these guidelines, Autowrap significantly enhances efficiency in handling post-call tasks, ensuring a streamlined workflow for agents.
2. Use Cases with Examples
It can be used for the following use cases:-
A) In a busy call center, AutoWrap automatically completes after-call tasks if agents exceed set time limits, ensuring accurate record-keeping and freeing agents to focus on assisting customers during peak periods.
B) AutoWrap efficiently handles critical post-call workflows like sending follow-up SMS, and emails and updating tasks automatically if agents exceed designated time limits, enhancing productivity and ensuring seamless customer communication.
C) AutoWrap empowers administrators by automatically executing above mentioned tasks, ensuring consistent follow-through without complete reliance on agent inputs, thereby enhancing control and operational efficiency across client interactions.
3. Configuration Steps
3.1 Adding Autowrap Values in Disposition Plan:-
Create a disposition plan as per the need of the Client with disposition, Sub disposition, and fields
A) Enable the Auto Wrap toggle button situated under the Autowrap Up Settings as shown below.
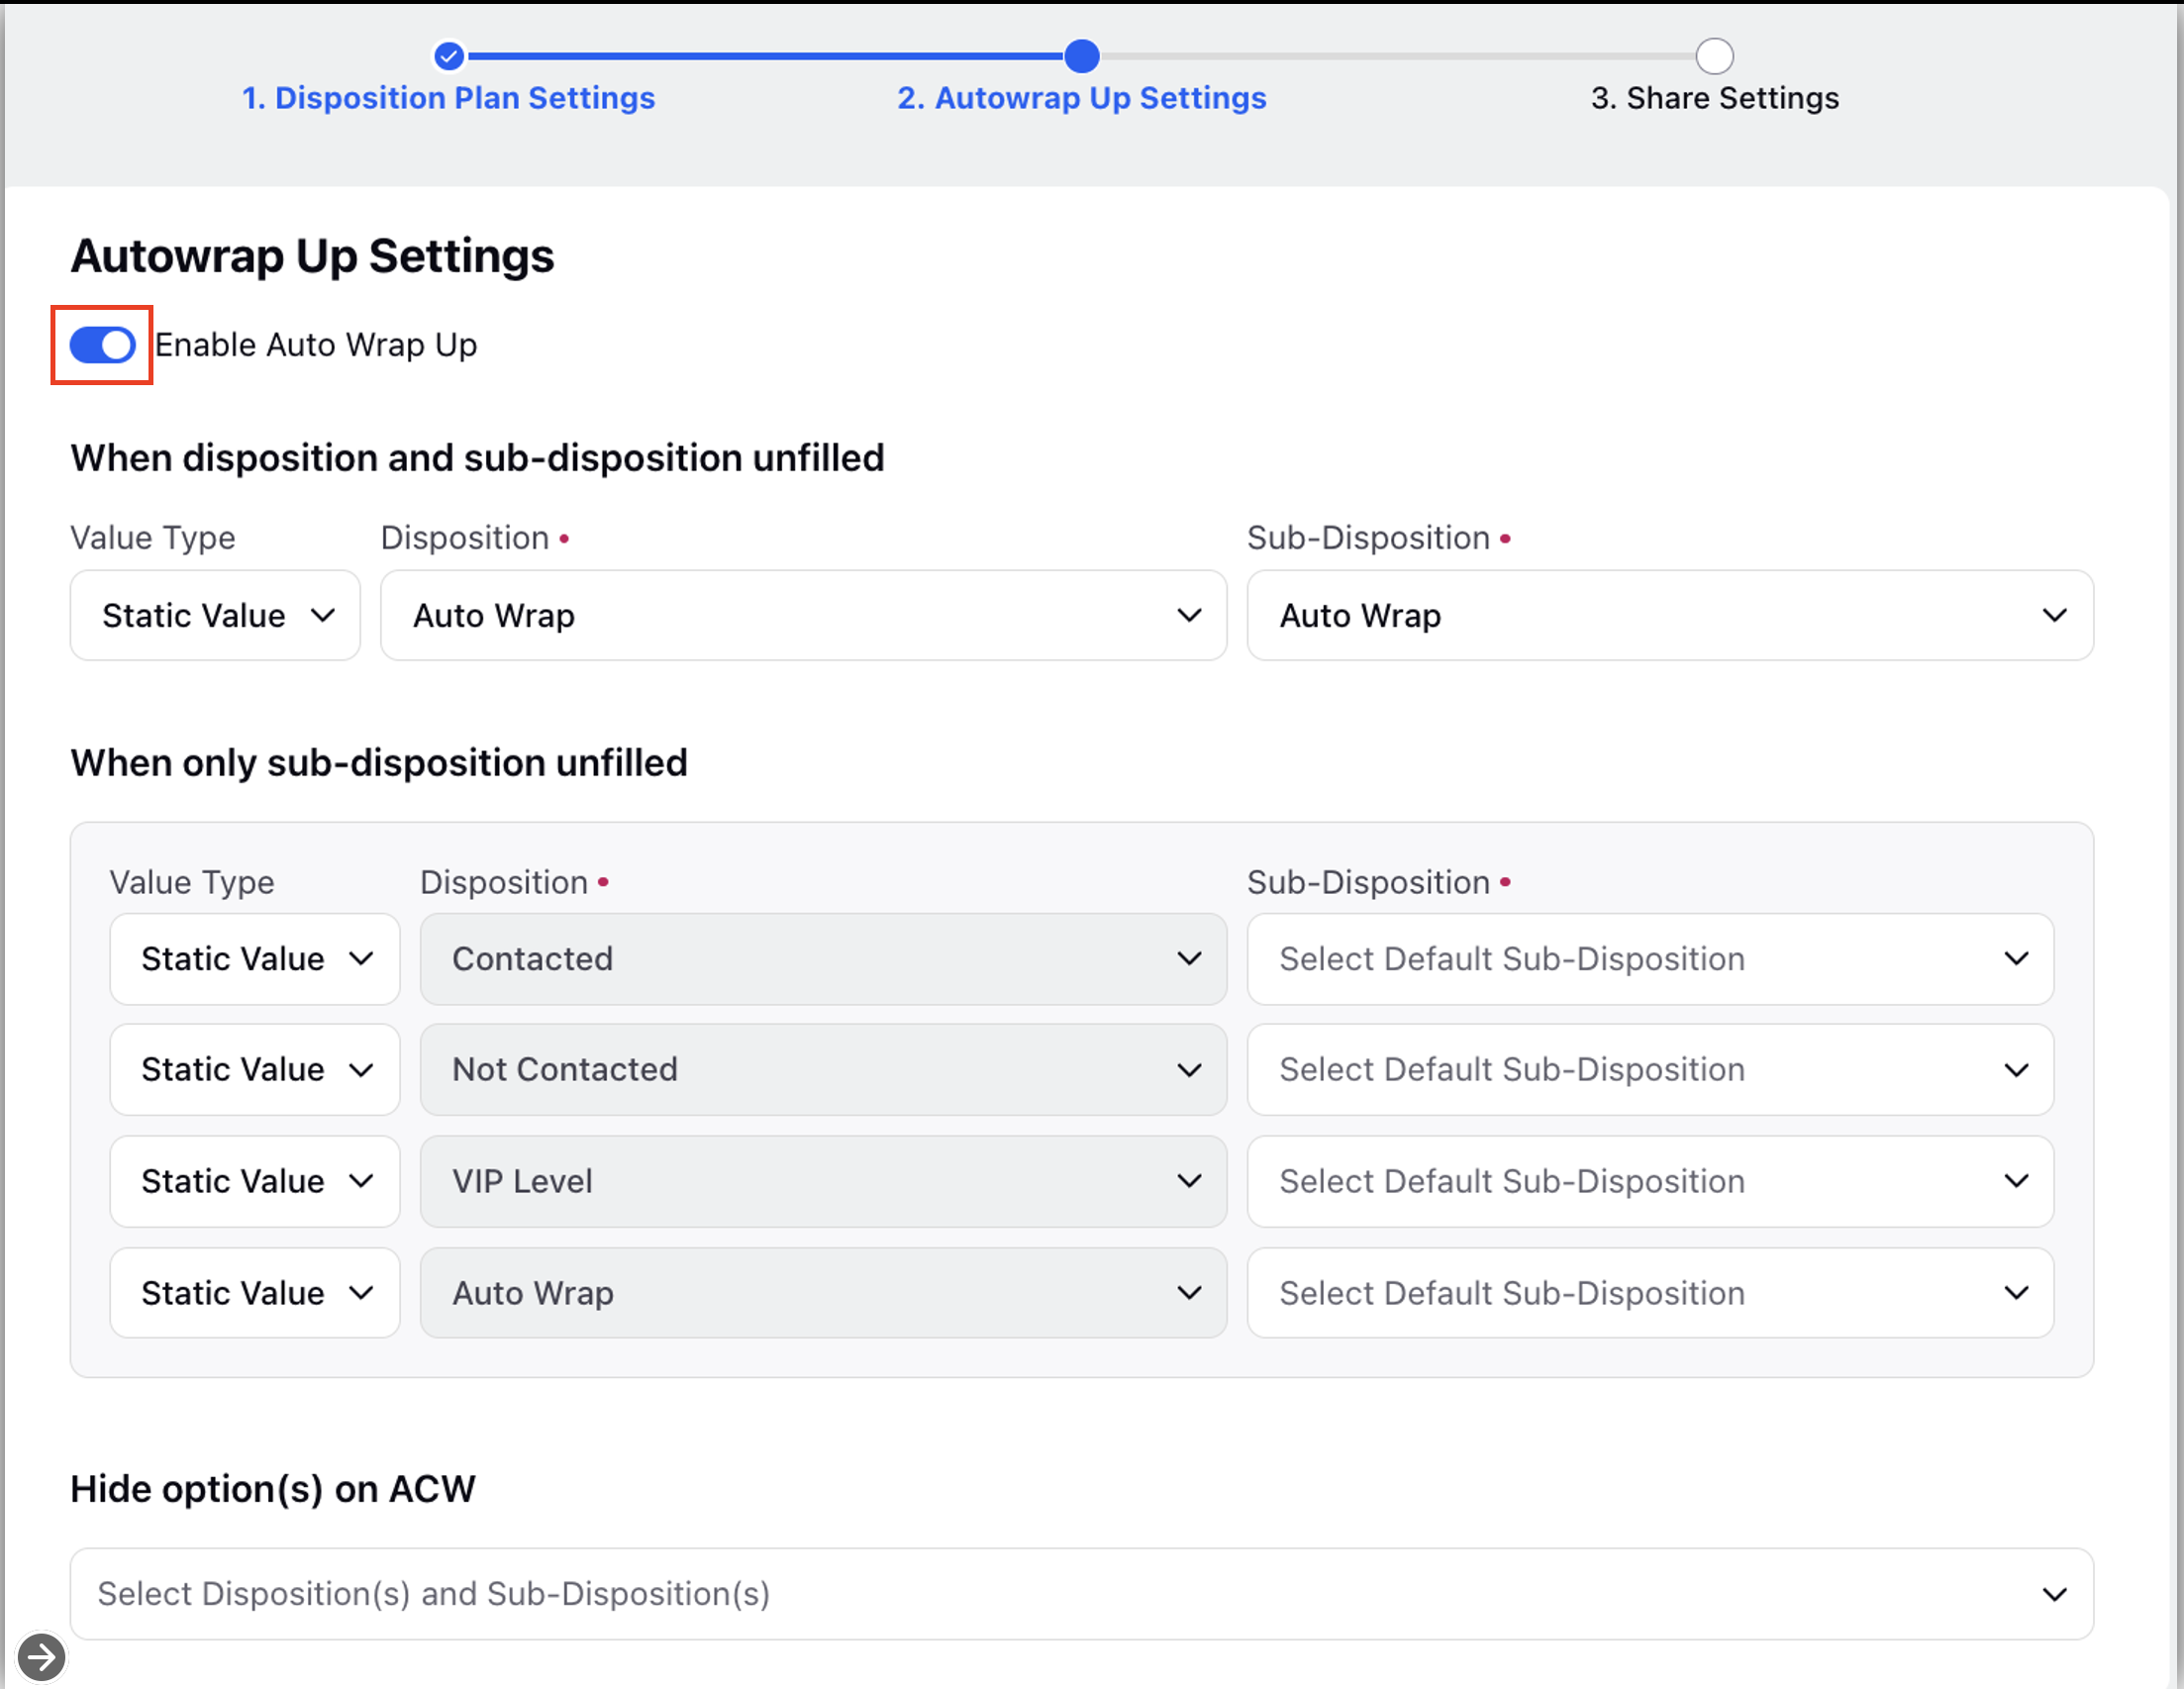
B) After enabling you need to enter backup values for disposition and sub-disposition in the column shown below with the radio button option as you want to enter static values or dynamic (Write Groovy) values in them. In the Static option, there would be a drop-down for selecting values from the above-created disposition and sub-disposition
While in the Variable Option, you would have the option to write groovy to satisfy the use case)
In Groovy User can use the local resource defined in the ACW workflow as well (the only thing to be taken care that local var should be set before using a screen with a disposition plan in it).


C) Why are Variable Wrap up values recommended
It’s recommended as we can handle wrap-up disposition if the filled disposition is A then select sub disposition from A, if the filled disposition is B then select dub disposition from B. These conditions can be handled via writing groovy (ternary operator) Whereas static buttons don’t have much flexibility as of now.
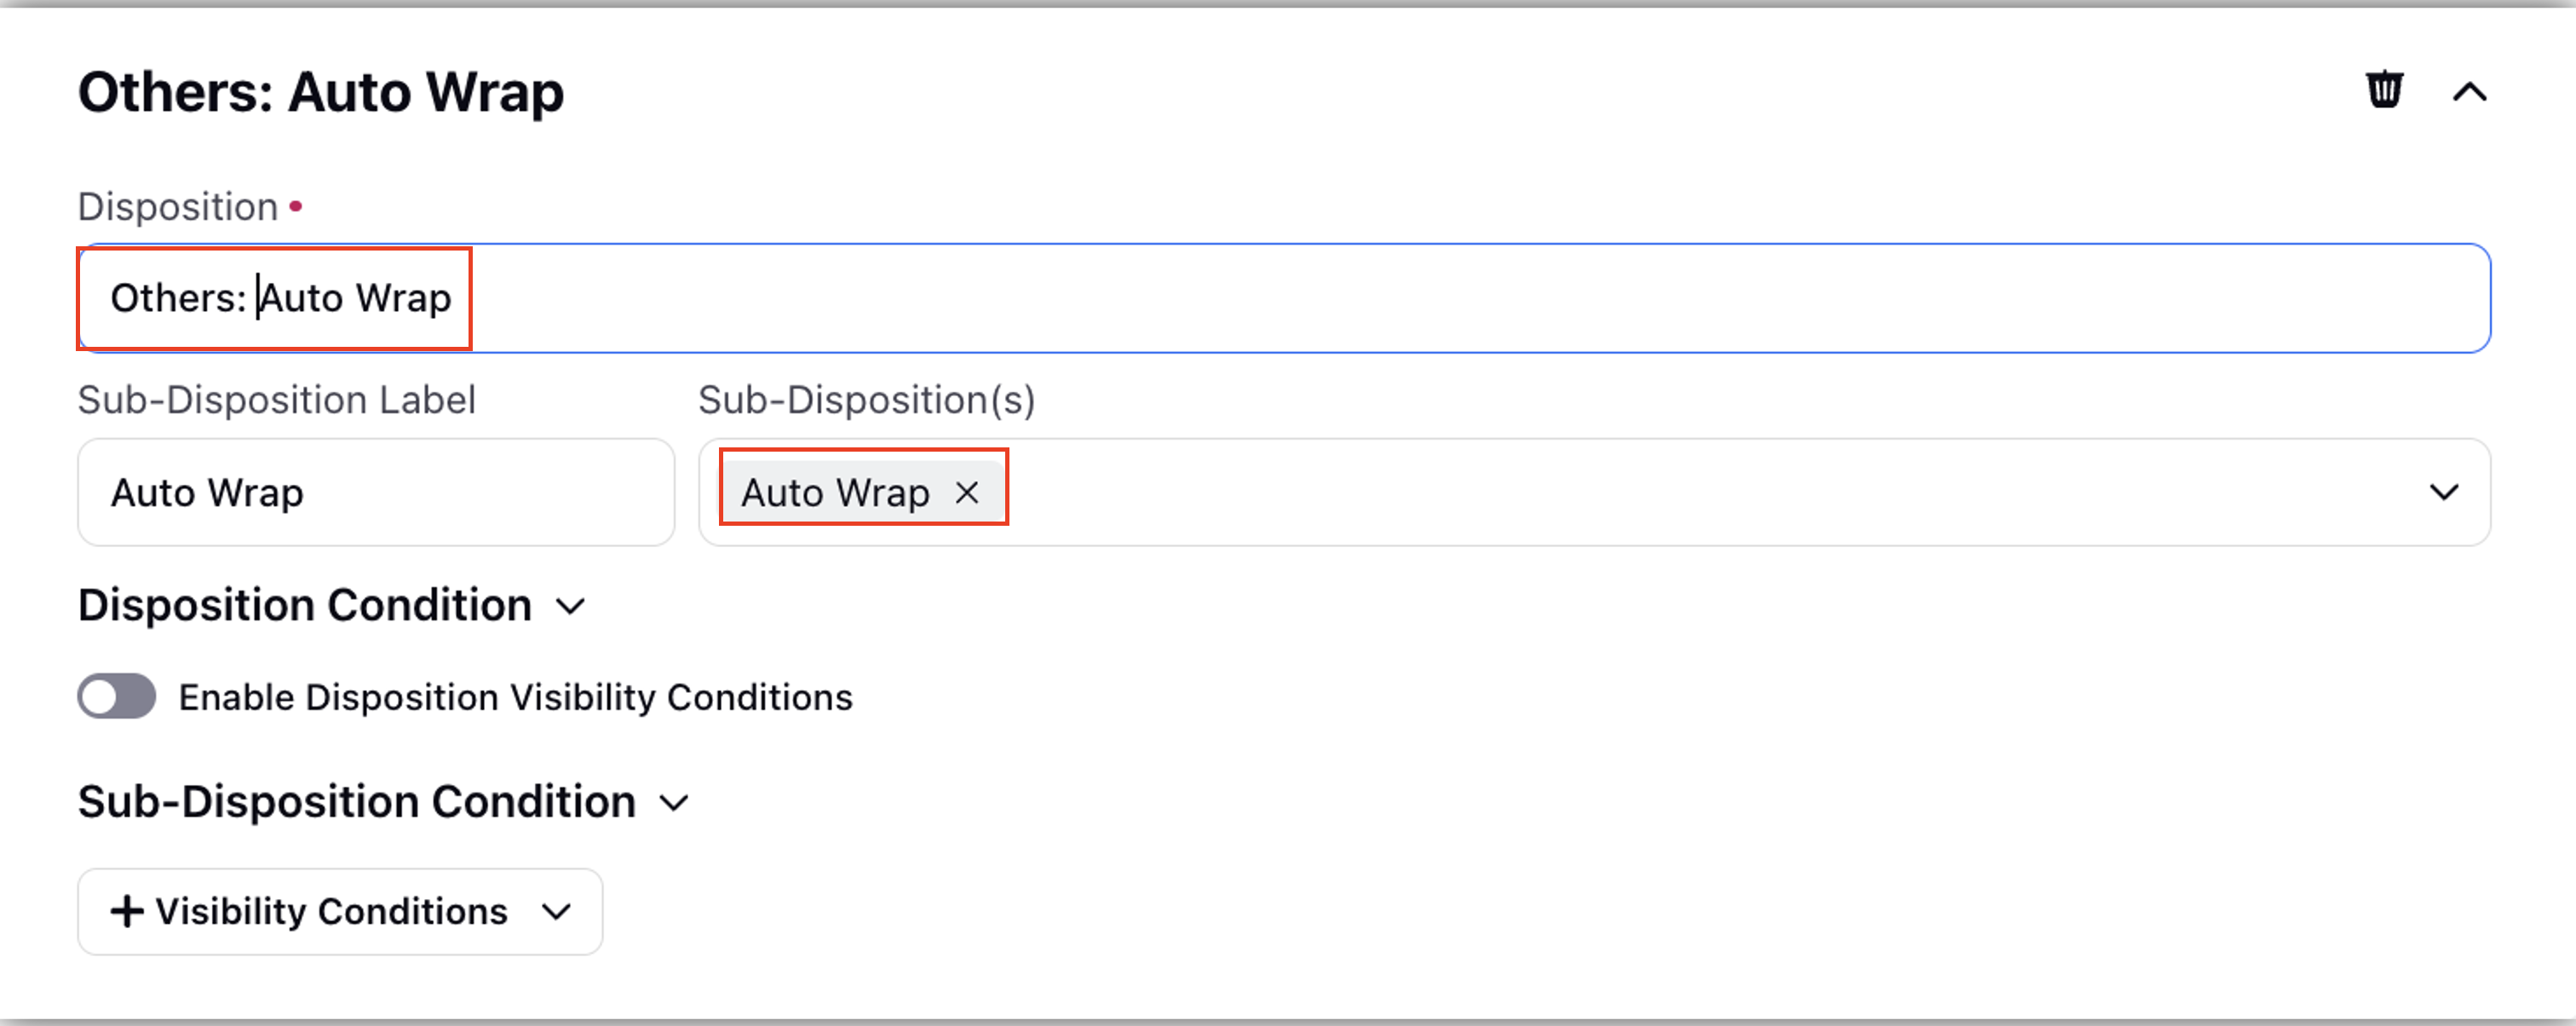
D) You can define a Sub-Disposition value for each Disposition that is selected.
E) To effectively manage AutoWrap, businesses can use two approaches if specific backup values for dispositions or sub-dispositions are missing:
Using Dummy Sub-Dispositions: Create dummy sub-dispositions as a backup where specific sub-disposition values are unavailable, ensuring AutoWrap fills all fields relevantly.
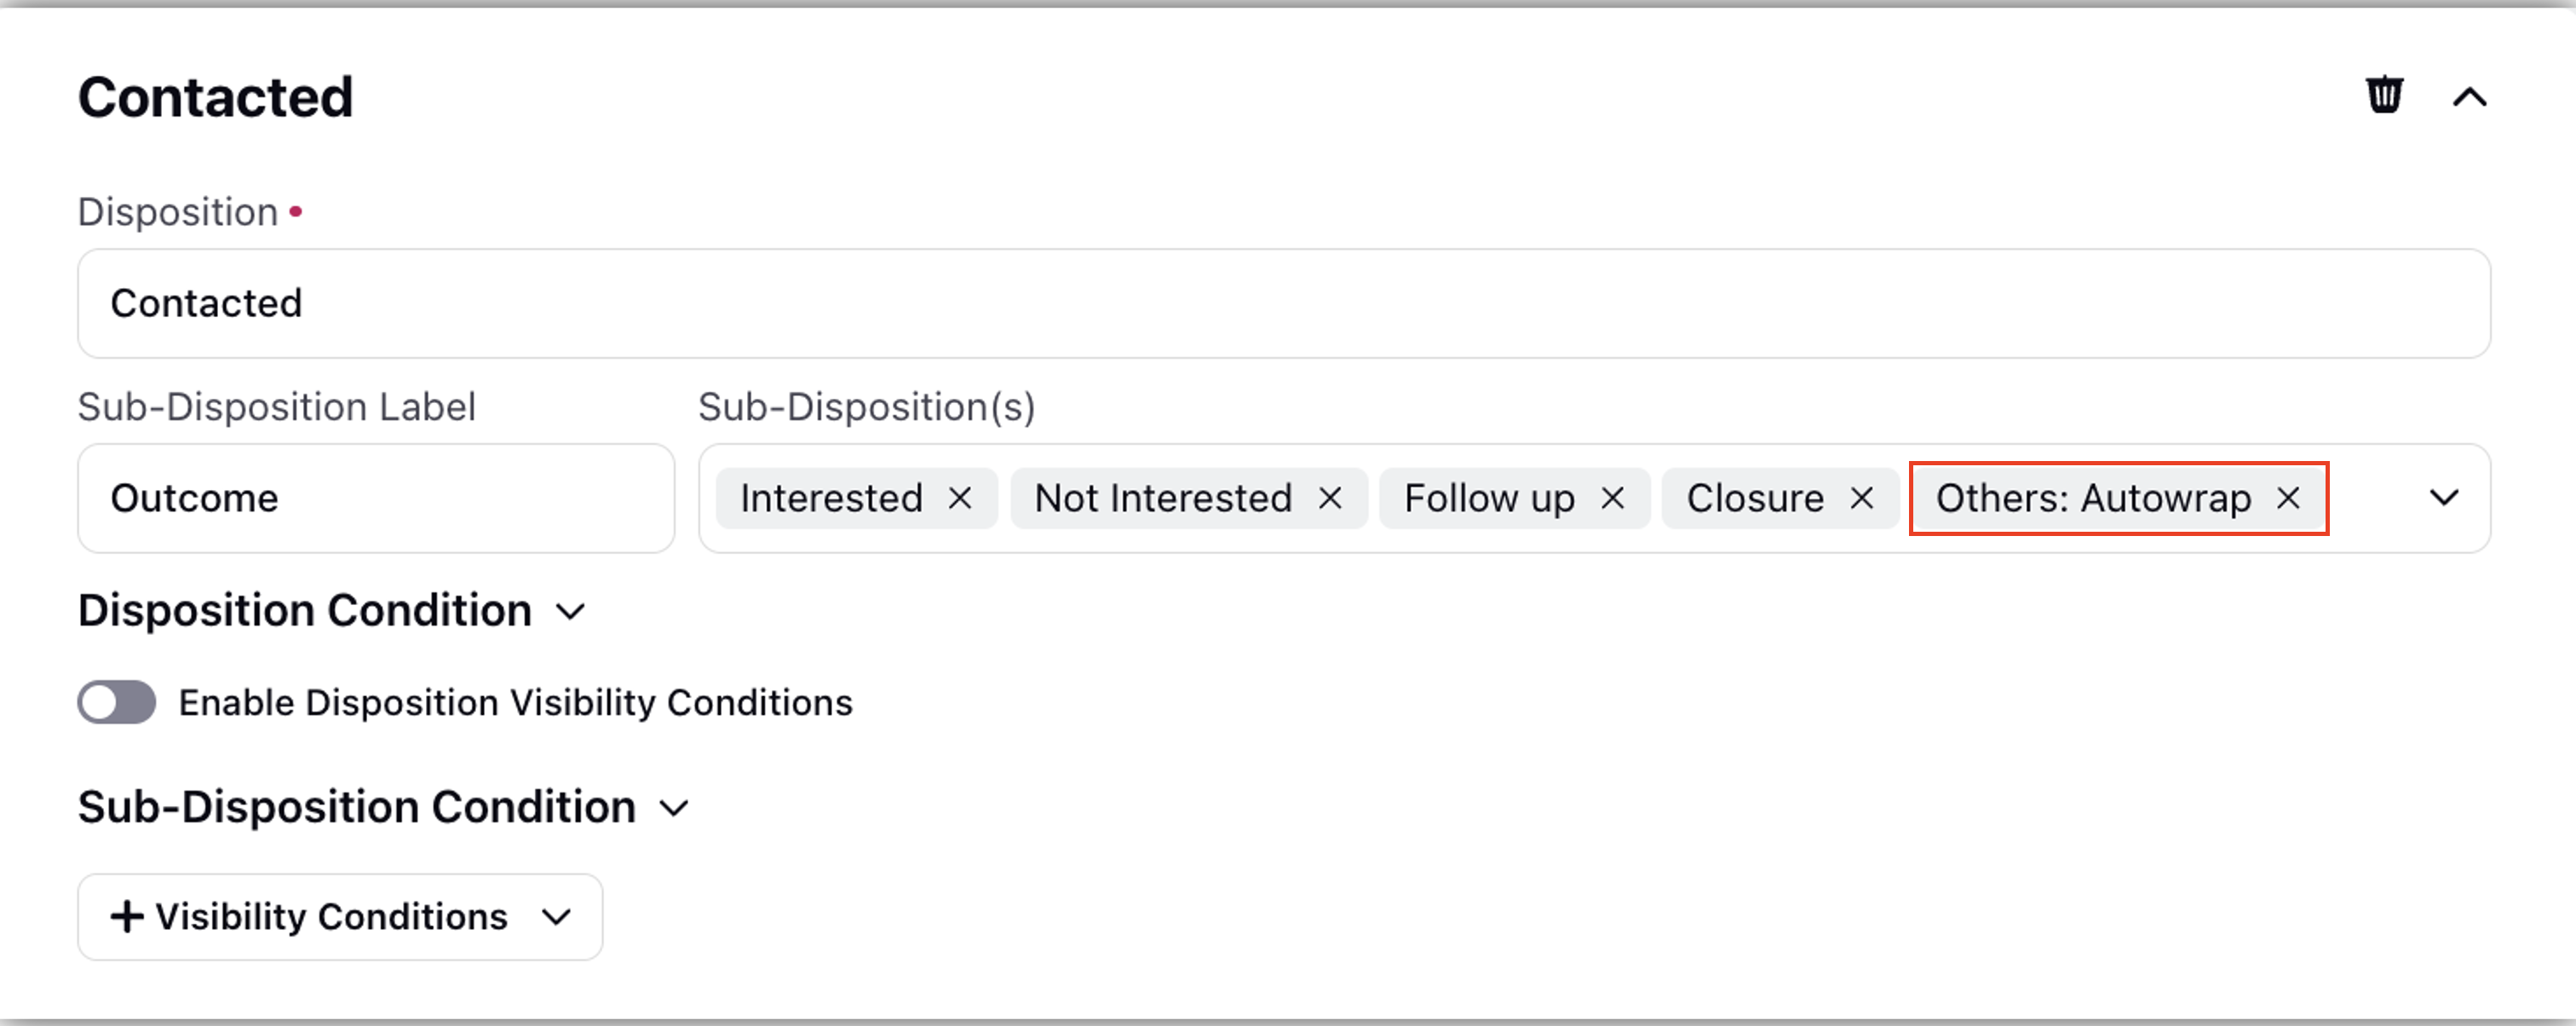
Creating Dummy Dispositions and Sub-Dispositions: Develop full sets of dummy dispositions and sub-dispositions as placeholders to ensure AutoWrap automatically completes all necessary fields in the absence of detailed agent input.
F) When Enable Auto Wrap Up toggle is enabled for ACW, you have an option to hide all those Disposition and Sub-Disposition field values that are listed under the Hide option(s) on ACW field. Once hidden these values will not get displayed under the Disposition and Sub-Disposition fields when the user fills the ACW.


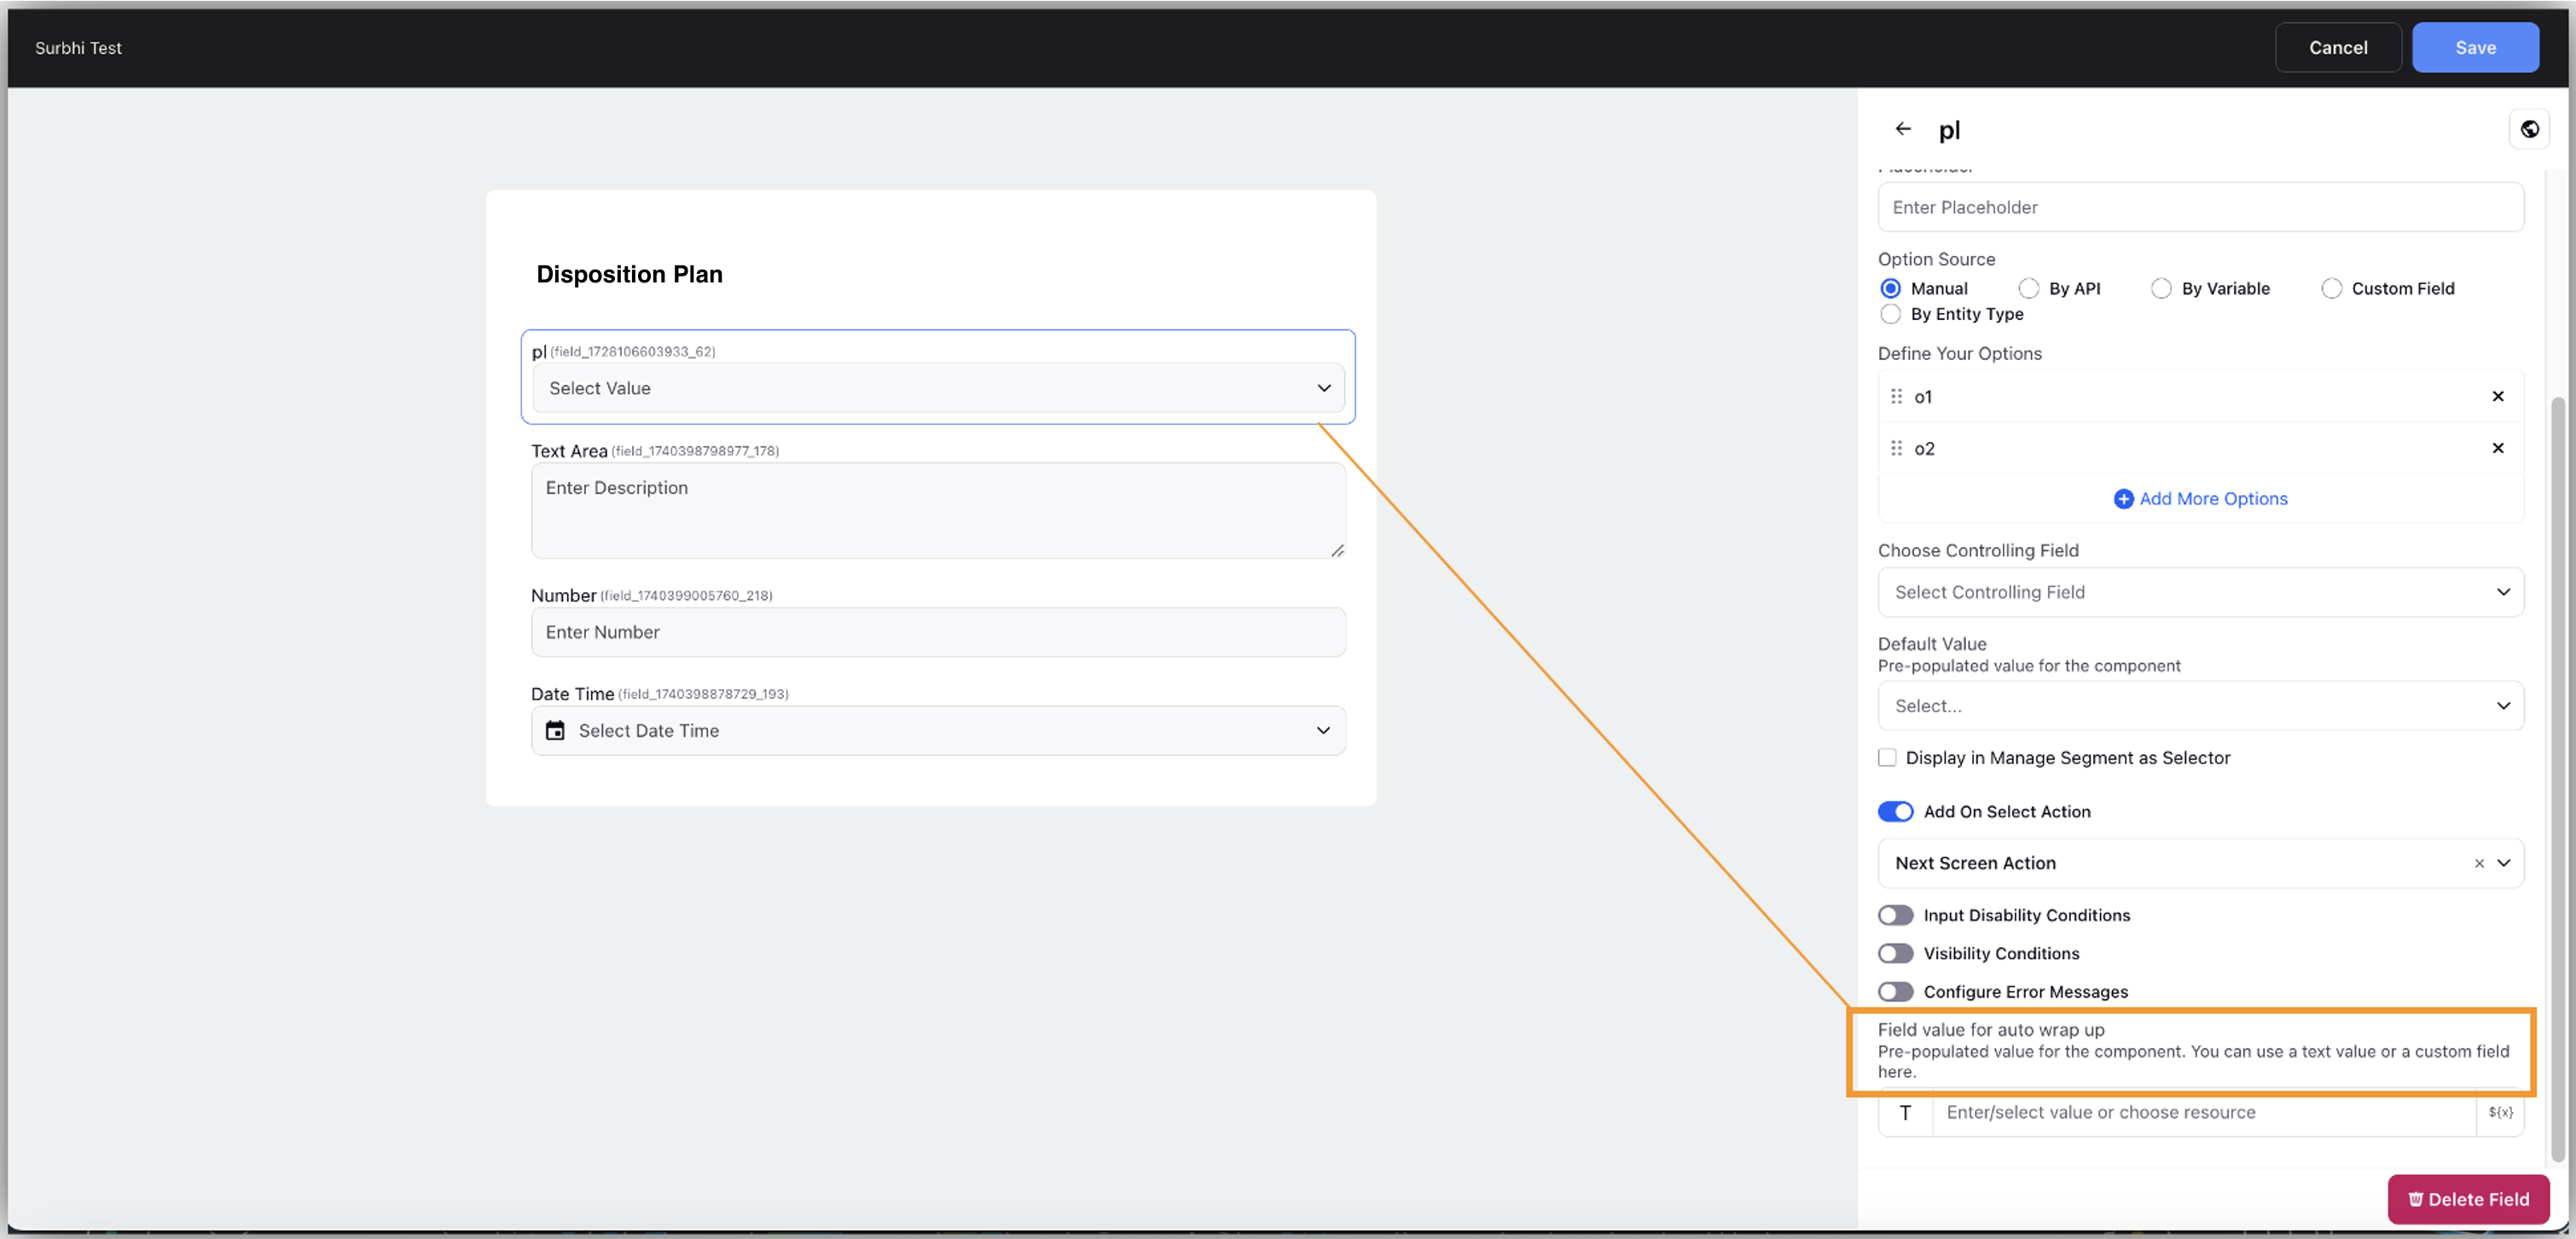
G) Setting Up Wrap Value for fields: - Users can establish backup values for fields within the column box, as depicted in the image below. For fields with data types such as picklist or multi-picklist, it's not mandatory for the backup values to already exist in the picklist options. However, it's essential to create AutoWrap Disposition and AutoWrap Sub Disposition categories within the system before utilizing them with the AutoWrap feature.
3.2 Enabling Autowrap in After-call Work: -
ACW Manager --> Select ACW --> ` Click On three dots of ACW --> ACW Settings --> Toggle Button Enable Autowrap for ACW.

After enabling the toggle button set the Auto Wrap Time as per the time given by the client, Here Auto Wrap Time would be always greater than or equal to ACW Timer i.e. AWUP Time >= ACW Time.
Here We do have options to set AWUP Time, same as ACW timeout as shown above, so that it would be as per the connected timer and as per Not Contacted (NC) ACW timer if configured above, based on conversation status.
3.3 Changes Inside ACW Canvas once Autowrap is Enabled
A) Once ACW is enabled with Autowrap then if we add any screen node we would have two different child paths which would get automatically populated as shown below. This is so that if we want to take different actions in two paths then we could take it, In the Future we will be adding actions in every node if we want to have autowrap path enabled or not. 
B) Taking special actions in the autowrap path apart from just after the screen,
suppose we don’t want to send SMS post call SMS in case of autowrap path then we could simply decide to use the send SMS node as
ACW_SUBMISSION_REASON Equals Auto Wrapped
as shown below and then would take further action.

![]() Note: This ACW Submission reason resource would be only visible in ACW Canvas if ACW is auto wrap Enabled.
Note: This ACW Submission reason resource would be only visible in ACW Canvas if ACW is auto wrap Enabled.
4. Additional Features ACW Extension
Agents can request extensions for after-call work (ACW) when faced with extensive data entry. This feature grants them extra time beyond the existing ACW timer, easing the burden of thorough information input. Choosing an extension elongates both the ACW timeout and Autowrap timeout, providing agents with a relaxed environment to complete tasks without feeling rushed.
4.1 Set the same Extension for the Connected as well as not connected timer
As an administrator, you can customize the After Call Work (ACW) extension settings in several ways:
Set Maximum Extensions: Define the maximum number of ACW extensions allowed.
Determine Extension Duration: Specify the length of time for each extension
Configure Based on Call Status:-
Connected Calls: Assign separate ACW extension times specifically for connected calls.
Not Connected Calls: Choose to either:-
These settings allow you to tailor ACW extensions to better fit the operational needs and efficiency of your call-handling process.
Extension can be enabled by following the steps mentioned below:
ACW Manager --> Select ACW --> Three dots --> ACW Settings --> Toggle button for Enable Extension for ACW--> Set Number of extension and --> Set Extension Time

4.2. Set different Extension for Connected as well as not connected timer
If we want to have different extension times as per connection time then this first requirement is to enable ACW for Not connected calls first from ACW settings and set ACW Time for NC Calls as shown below

Once the tickbox is enabled then there would be an additional toggle if we require a separate extension for Non-connected calls as shown below that could be configured based on client requirements.

![]() Note: Agent can’t use extension post-ACW Timer expiry, extension button will be greyed out, as shown below
Note: Agent can’t use extension post-ACW Timer expiry, extension button will be greyed out, as shown below

4.3. Extension reporting
The client will also get a detailed report of the usage of extension on the agent and case level.
Note:- Extension & Auto Wrap are independent features i.e it can be enabled without having auto wrap enabled, in this case, the extension will only elongate the ACW timer.
5. ACW with Autowrap, Extension Enabled (Consumption Side)
5.1 Consumption side View:-
A) Only AutoWRap is enabled:-
On the consumption side, there will be two reverse timers as shown below:-
ACW Timer
AutoWrap Timer

B) Only Extension is enabled:-
The extension feature is independent of autowrap, we can enable extension without enabling autowrap as shown below, then on clicking the “+” icon in the ACW Timer a new box with the extended feature will open, On Hovering it will show the number of extensions, while on clicking it will extend the timer.

C) Both Extension and AutoWrap are enabled:-

On the left-hand side, there is an Auto wrap timer running with a reverse timer and on the right, there is an ACW Timer and in the ACW Timer, there is a + icon which is meant for extension. On Hovering over the + icon it would tell how many extensions are remaining and clicking it will increase ACW as well as Auto Wrap Timer with snack bar notification as Timer has been increased.
5.2 Draft Value to retain user-filled values and concatenate them with backup values
After the Auto Wrap Timer Expires we freeze the screen so that the agent won’t make changes at the last moment, by freezing the screen we save the values in DRAFT and then concatenate it with Business backup values.
After a few seconds of saving value, it will get auto wrapped and there will be a snack bar notification for Auto Wrap Completion.


6. Hide Disposition and Sub disposition
Hide disposition, sub disposition for a use case like hiding autowrap values from an agent so that they don’t select it but will get selected only while autowrap by the system.
6.1 Steps to Hide
Open Disposition Plan --> Right Click On your Screen --> Open Inspect Element --> Network tab --> Update the disposition plan froUIUi by clicking on save --> Search for Update call in network tab ---> Right click on update call --> Copy --> Copy as fetch

After copying the curl, paste it in Notepad ++, paste it in Notepad+, search for disposition, sub-disposition you want to hide, and within the tag update the field \” hidden\”: true in it, and if that tag is not present then manually type hidden true withing that tag as shown below.

Once you update the draft in Notepad with hidden equals true then copy the value and then again right-click on the screen in an environment where you want to update the disposition plan --> Inspect --> Console --> Paste the curl in console --> Hit Enter --> Check for success
Now you have updated hidden = true, check it from the consumption side if the req disposition/ sub disposition is getting hidden or not.
Note:- Values updated from the Console might get overridden if you update anything from UI in that disposition plan. Get a code merged to that client so that it won’t get overwritten, until then don’t edit from UI.
7. Success Story
Sprinklr enabled this feature first for one of the renounced Global Bank . Before this feature they were facing compliance issues as several data calls and several entries done in CRM were not matching as the call center agent was not filling the ACW form pro-actively which led to the difference, Before this feature around 1000-1500 ACW was pending in an agent bucket for each agent lying unattended and when forced they might fill some data which is not of good quality as they might forget about the actual interactions. By Using This feature, we ensure 100 % CRM updation along with the AI intent summary generated which helps AutoWrap with the exact summary in the comments section. Now no any ACW is lying in pending ACW unattended either they were filled by an Agent or AutoWrapped after the End of the day TAT set for AutoWrap by the client.