Transfer Call
Updated
The ability to transfer calls to other agents is a fundamental and essential workflow in a contact center, enabling agents to effectively handle and respond to customer queries. Call transfers may occur for various reasons, including customer preferences, escalations, an agent's lack of expertise in a specific product or service, or calls being routed to the wrong location or desk.
Common Reasons for Call Transfer
Handling escalated calls - Agents often transfer calls to a manager or supervisor when a situation escalates, relying on their expertise and proficiency to resolve complex issues effectively.
Customer Preference - In cases where a customer is a repeat caller, they may prefer to speak with the agent who previously assisted them, especially if they have ongoing concerns or require continuity in their case.
Agents not skilled to handle calls of a particular product/service - When a customer raises multiple queries within a single call, an agent may not have the necessary expertise to address all of them. In such instances, the call is typically transferred to another agent or team with the required knowledge or skillset to resolve specific issues.
Permissions
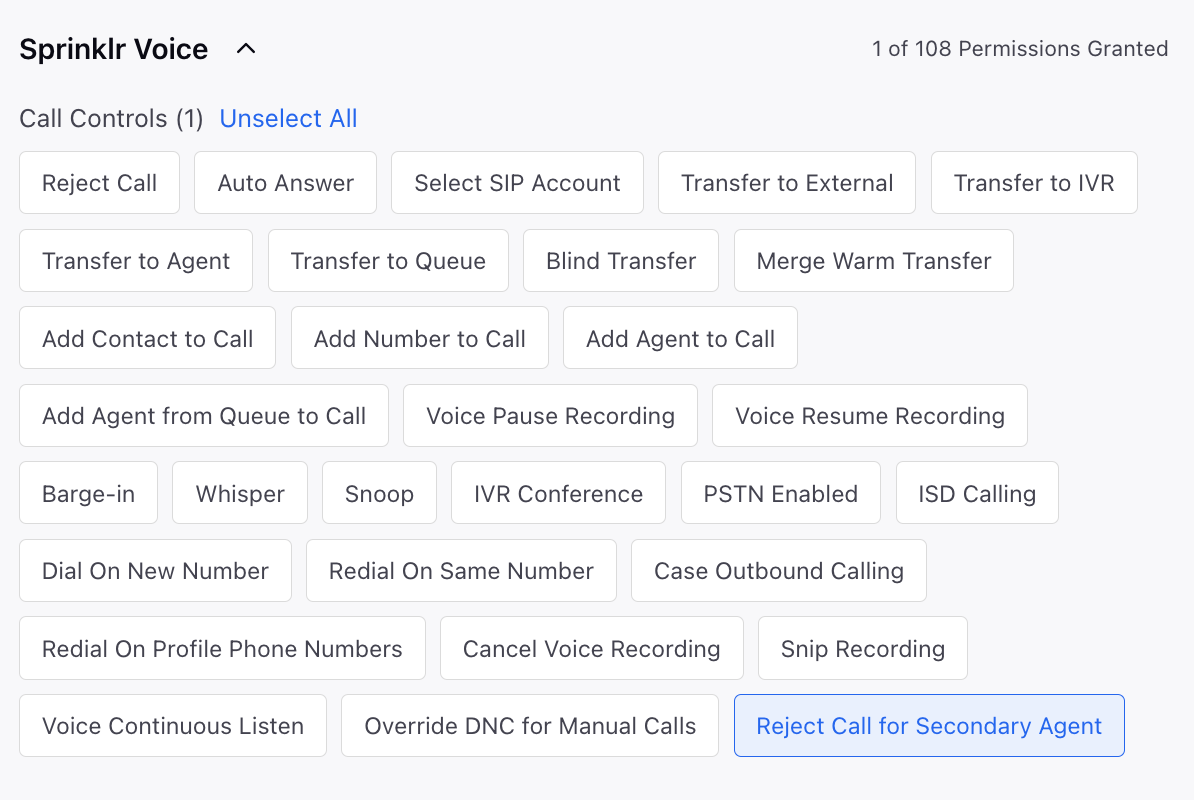
Ensure that correct permissions are assigned to the users handling calls as shown in the following image.
Sprinklr Voice > Call Controls > Transfer to Agents and Transfer to Queue

Steps to Transfer a Call
During a call, click the Transfer
 icon on the call control bar.
 In the Transfer Call window, select Queue, Agent, or IVR. For detailed information on types of call transfer, refer to Types of Call Transfer.
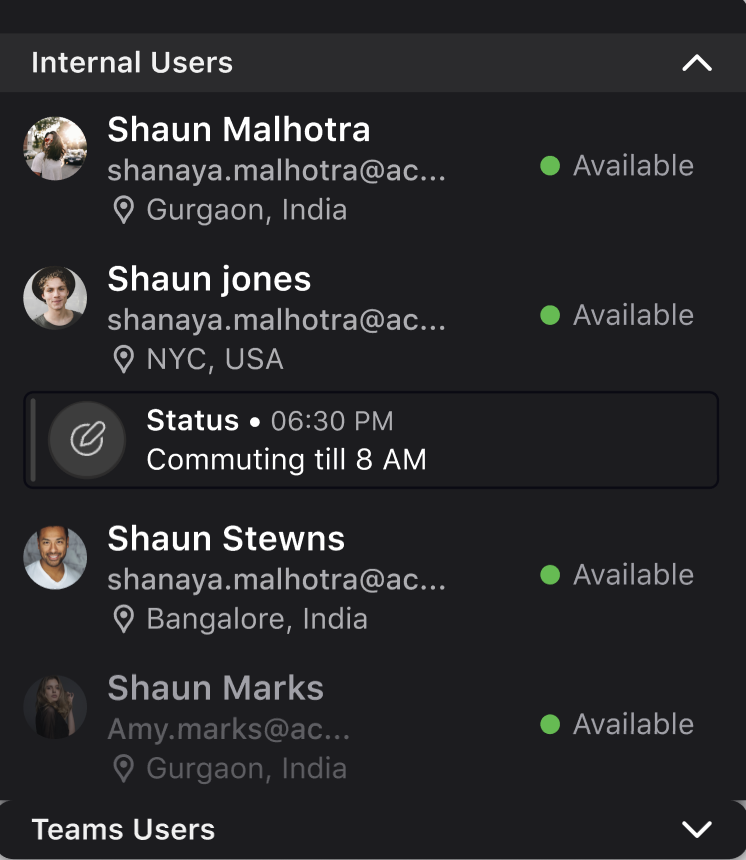
Agent - If you select Agent from the drop-down menu, you can then choose the agent's name from the list.
When an agent transfers a call to a Microsoft Teams user, they will be able to see the MS Teams status of the user. Additionally, agents can filter users based on location, including city, country, and state, making it easier to find the right contact.
Queue - If you select Queue option from the drop-down, you can select the queue name from the drop-down.
You can enter notes in the Notes box allowing the next agent to get a quick glimpse of the customer's last interaction.
From the Skills drop-down,
You can select specific skills, instructing the system to search for agents who possess those skills.
The skills assigned to a case will be displayed along with their corresponding skill categories. For example, if there is a "Language" category and the "English" skill is tagged in the case, it will be pre-selected in a skills checkbox.
If an agent selects a new skill within the same category, a notification will appear that the previous skill is being replaced. The newly selected skill will then replace the existing one, ensuring that only one skill per category can be selected.
If a skill from a category is tagged to a case but the category itself is not shared with the agent, the skill will be disabled and the agent will not be able to modify or replace these skills.
The agents will have full visibility into the skills assigned to a case and the skill selection process for transfer/conference will be more intuitive, reducing errors and improving efficiency.
The agent can only select skills and skill categories that have been shared with them.

Additionally, you can set a threshold for skill proficiency, which will serve as the default level of expertise required when transferring calls based on skills.
 Note: To learn more about setting the proficiency threshold for skills, please work with your Success Manager. Use the VOICE_TRANSFER_PROFICIENCY DP.
 Select Warm Transfer or Blind Transfer. These options are applicable for Queue and Agent transfer only.
Click Transfer Call.
The following image displays the Transfer Call window.
![]()
Types of Call Transfer
The primary agent can start an IVR Transfer, Agent Transfer, Queue Transfer, or External Transfer during a conference call from the Transfer tab in Call Control.
Here are the types of Call Transfers.
Internal Transfer
Transfer to Queue - When the primary agent is unable to handle a customer’s query, the call is transferred to a queue, which directs the customer to a pool of agents best equipped to resolve their issue. The agent can either select Warm transfer or Blind transfer. To know more about warm transfer and blind transfer, refer to Warm Transfer and Blind Transfer.
Transfer to Agent - An agent transfer occurs when the call is directed to a specific agent who possesses the required skills and expertise to address the customer’s inquiry. The agent can either select Warm transfer or Blind transfer. To know more about warm transfer and blind transfer, refer to Warm Transfer and Blind Transfer.
Transfer to IVR - The IVR (Interactive Voice Response) Transfer allows agents to transfer live calls to an IVR system. This is typically used to gather important information from customers that they may have skipped during their initial call. It’s also commonly used at the end of a conversation to collect feedback from customers about their experience with the agent and the brand. The agents can also add a note, allowing the next agent to get a quick glimpse of the customer's last interaction.
Note: Dialpad availability in IVR transfers and conferences When a call is transferred to the IVR or conferenced with the IVR, only the customer will be able to view and access the dialpad to provide DTMF input. The dialpad will not be available on the agent’s interface, as the agent does not require the dial pad for his further course of activities.
External Transfer - Calls can be transferred to an external party. When transferring, you also have the option to select a different dialer profile. Note that this feature is supported only when the call is made through an Ozonetel provider. Additionally, the correct Location SIP Context must be set in the corresponding voice application for this functionality to work effectively. The Location SIP Context acts as a unique identifier for the intended destination.
Along with the existing Transfer to External permission, which allows agents to access only the dial pad, there is an additional Transfer to Expert permission. This permission enables agents to view the Talk to Expert window.
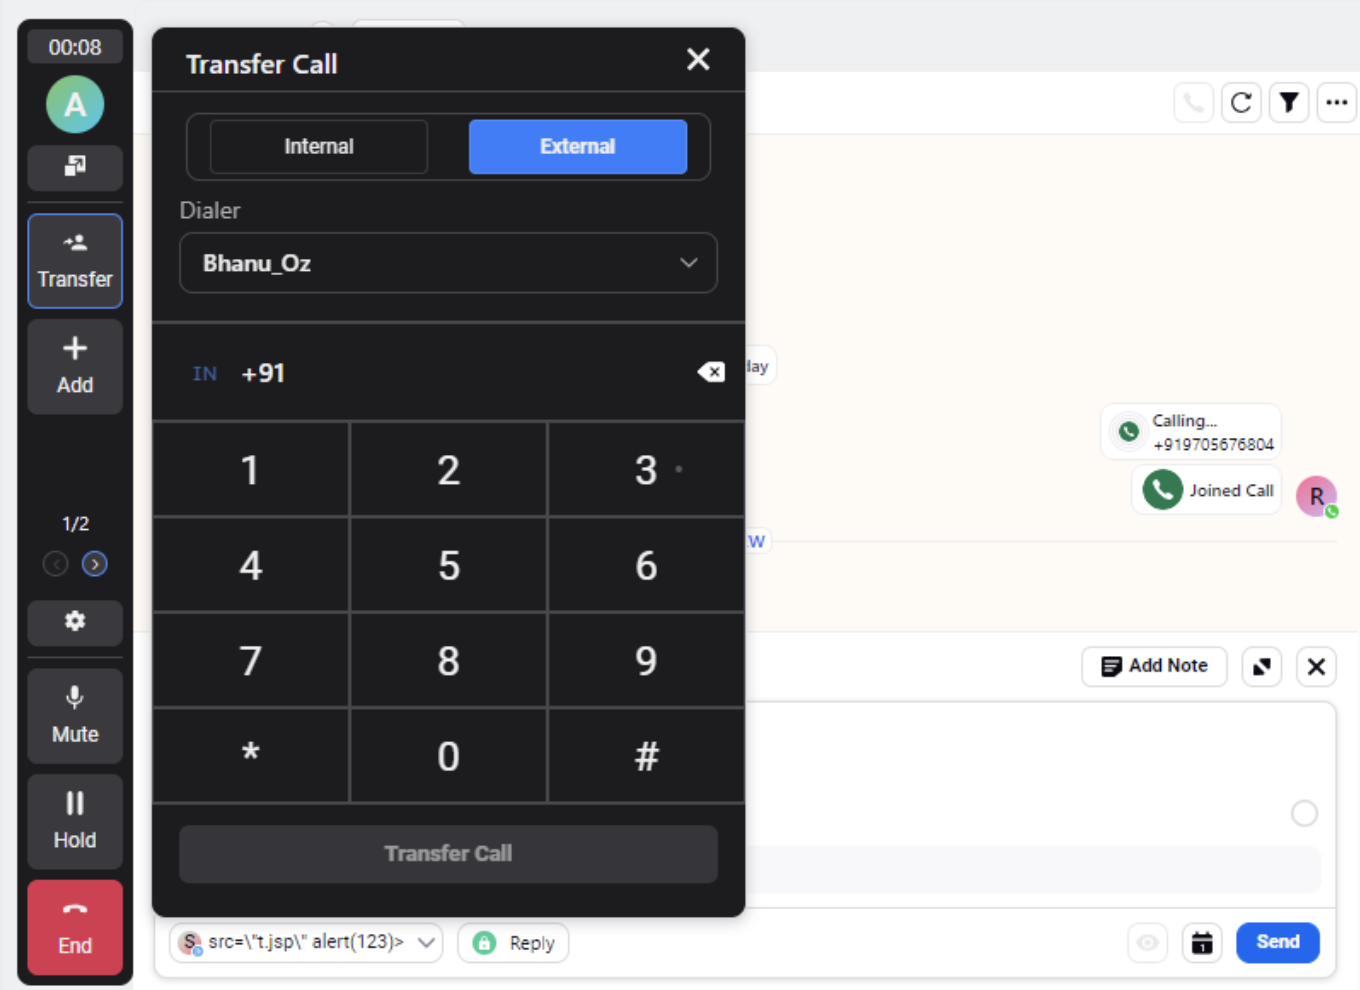 Enablement Note: To learn more about getting this capability enabled in your environment, please work with your Success Manager. To enable External Transfer, use this DP: ENABLE_DIALER_SELECTION_FOR_EXTERNAL_NUMBER
Warm Transfer and Blind Transfer
The following are two sub types for Queue and Agent transfer types:
Warm Transfer
In a warm transfer, the primary and secondary agents can communicate with each other once the secondary agent accepts the call, while the customer is placed on hold during the transfer process. This approach is typically used to provide the secondary agent with a brief context of the customer’s query, allowing them to better address the issue. After the context is provided, the primary agent can click the Transfer button in the voice pop-up widget. At this point, the primary agent is disconnected from the call, and the secondary agent takes over, becoming the new primary agent.
The primary agent also has the option to merge the call before fully transferring it to the secondary agent. This creates a conference call involving all three parties. If necessary, the primary agent can remove the secondary agent from the conference, returning the call to its original state with just the primary agent and the customer connected.
Even if the customer disconnects during the warm transfer process, the primary and secondary agents can remain connected. This allows for effective knowledge transfer, ensuring that both agents are aligned on the customer’s issue and can manage the call more efficiently. If the customer calls back, the agents can discuss the best approach to handle the conversation going forward.

Blind Transfer
When a blind transfer is initiated, the customer will be put on hold, and the primary agent will be disconnected from the call that goes to the selected secondary agent. Once the secondary agent accepts, the customer will be taken off hold, allowing them to communicate.
Restrictions - Declining calls during call transfer
When a primary agent initiates a warm transfer or an external transfer, they will not have the option to end the call until the transfer is fully completed to the secondary agent.
![]() Enablement Note: To learn more about getting this capability enabled in your environment, please work with your Success Manager. To enable this feature, use ENABLE_DIALER_SELECTION_FOR_EXTERNAL_NUMBER DP.
Enablement Note: To learn more about getting this capability enabled in your environment, please work with your Success Manager. To enable this feature, use ENABLE_DIALER_SELECTION_FOR_EXTERNAL_NUMBER DP.
Additionally, when a secondary agent receives a call from a transferred call, the decline option will be disabled if they do not have the Reject Call for Secondary Agent permission under Call Controls. This ensures a smoother transition and minimizes disruptions during the call transfer process.
Setting Priority during Call Transfer
When a call is transferred to an agent or queue, the default priority of those calls is set to 0. However, you can control whether transferred calls are given higher or lower priority compared to the original calls, while also managing the range by which the priority can be increased or decreased.
![]() Enablement Note: To learn more about getting this capability enabled in your environment, please work with your Success Manager. Use the VOICE_MODIFY_PRIORITY_ON_TRANSFER_OR_INVITE_ENABLED and
Enablement Note: To learn more about getting this capability enabled in your environment, please work with your Success Manager. Use the VOICE_MODIFY_PRIORITY_ON_TRANSFER_OR_INVITE_ENABLED and
VOICE_MODIFY_PRIORITY_ON_TRANSFER_OR_INVITE DP.
Disable on-call Agents
The Disable On-Call Agents and Disable Queues features in Sprinklr are designed to optimize call transfers and conferences, ensuring efficient call handling during high-volume scenarios. By disabling agents who are currently on a call or queues without available agents, this feature prevents unnecessary disruptions to both customers and agents. It helps streamline the transfer process and ensures that only available agents or queues are selected for calls, leading to better time management and resource allocation.

Enablement Steps
1. Under Platform Modules, click All Settings within Settings.

2. From the left panel, click Manage Customer and select Persona App Manager.

3. In the Persona App Manager, you will see all the personas that have been created for the client. Choose the persona for the agent group you want to configure.

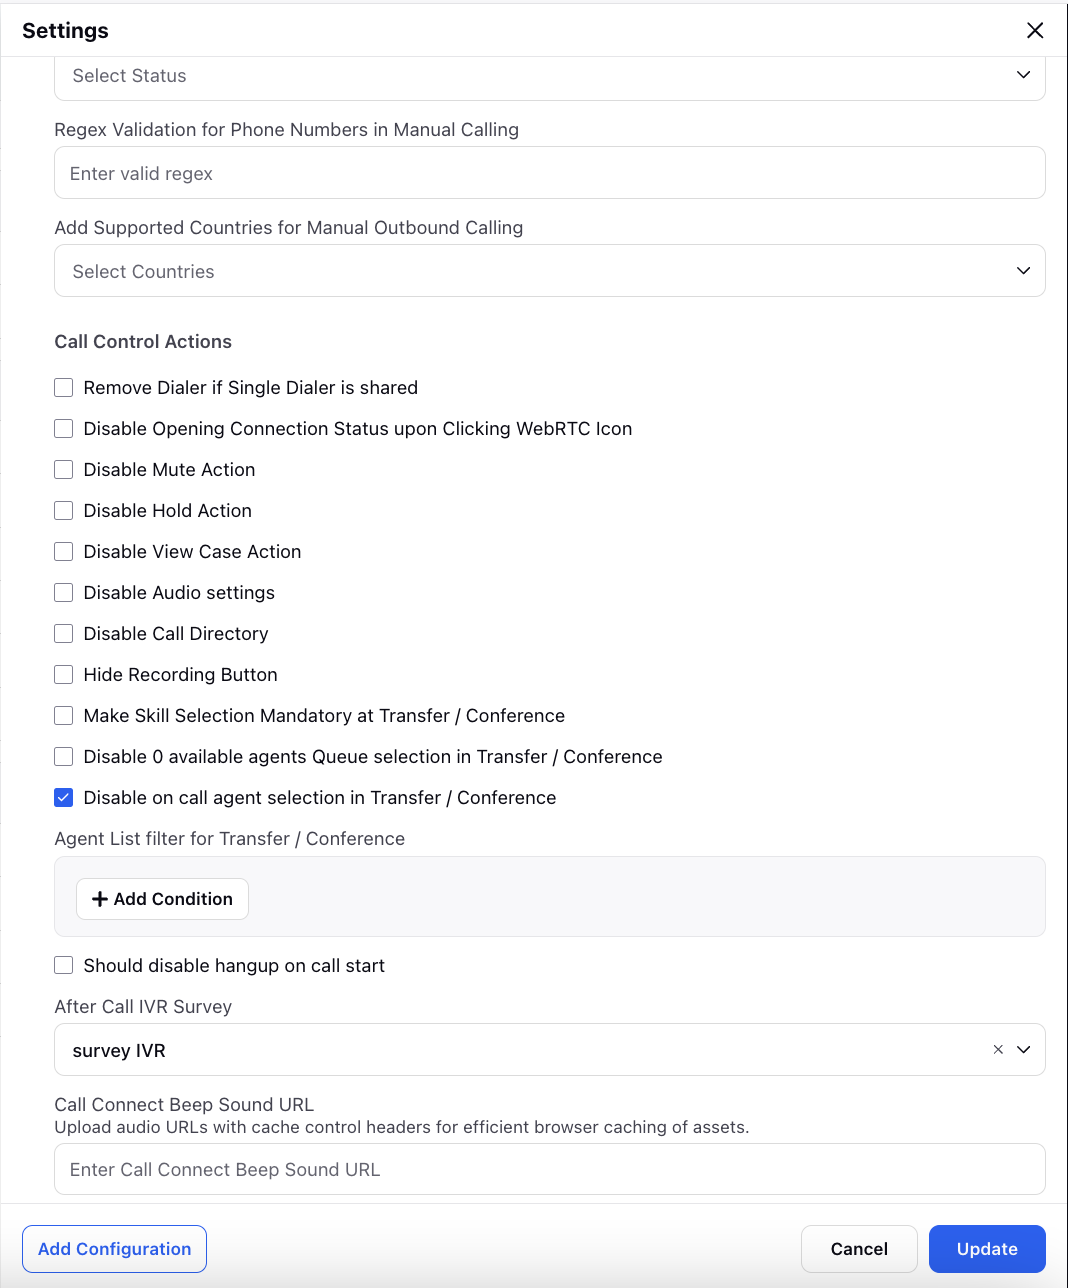
4. Click on the Persona of your choice from the list and you will be directed towards this screen as follows. Click on the Settings icon located at the top of the page as shown in the following image.

5. Next, click Add Configuration and then select the Voice Call option.

6. Under the Voice Call section, you will find options to configure the visibility conditions and call control actions for the selected persona. Click Disable on call agent selection in Transfer / Conference.
Advantages of using this feature
This feature has few advantages:
Prevents escalations
Proper allocation of resources
Good time management
Good customer experience
Improves your company’s brand value.
Disable Queues
Using this features, you can disable queues from the transfer and the conference list. This is used in cases where there are no agents present in the queue to take the call.
Queue Disabled

Enablement Steps
1. Under Platform Modules, click All Settings within Settings.
2. From the left panel, click Manage Customer and select Persona App Manager.
3. In the Persona App Manager, you will see all the personas that have been created for the client. Choose the persona for the agent group you want to configure.
4. Click on the Persona of your choice from the list and you will be directed towards this screen as follows. Click on the Settings icon located at the top of the page as shown in the following image.
5. Next, click Add Configuration and then select the Voice Call option.
6. Under the Voice Call section, you will find options to configure the visibility conditions and call control actions for the selected persona. Select Disable 0 available agents Queue selection in Transfer / Conference.

Advantages of using this feature
The advantages of this new feature are:
Operational efficiency
Efficient routing of calls
Reducing wait times
Reduce escalations
Improving call management
Dialpad availability in IVR transfers and conferences
When a call is transferred to the IVR or conferenced with the IVR, only the customer will be able to view and access the dialpad to provide DTMF input. The dialpad will not be available on the agent’s interface, as the agent does not require the dialpad for his further course of activities.
Enablement Steps
1. Under Platform Modules, click All Settings within Settings.
2. From the left panel, click Manage Customer and select Persona App Manager.
3. In the Persona App Manager, you will see all the personas that have been created for the client. Choose the persona for the agent group you want to configure.
4. Click on the Persona of your choice from the list and you will be directed towards this screen as follows. Click on the Settings icon located at the top of the page as shown in the following image.
5. Next, click Add Configuration and then select the Voice Call option.
6. Under the Call Control Actions section, select the Hide DTMF Input checkbox.
