Compose Snapchat Ads
Updated
Advertise on Snapchat and reach a wider group of audience.
Through Snapchat Ads in Sprinklr, you can advertise to an audience of 186 million daily active Snapchatters (https://forbusiness.snapchat.com/), allowing your brand to reach a highly engaged and active audience.
To learn more, click on Ads Composer.
Enablement Note:
The use of this capability requires that Sprinklr Marketing (Ads) be enabled in your environment. To learn more about Sprinklr Marketing (Ads), please work with your Success Manager.
Select Account and Objective
Click the New Tab icon. Under the Sprinklr Marketing (Ads) tab, click Ads Composer within Execute.
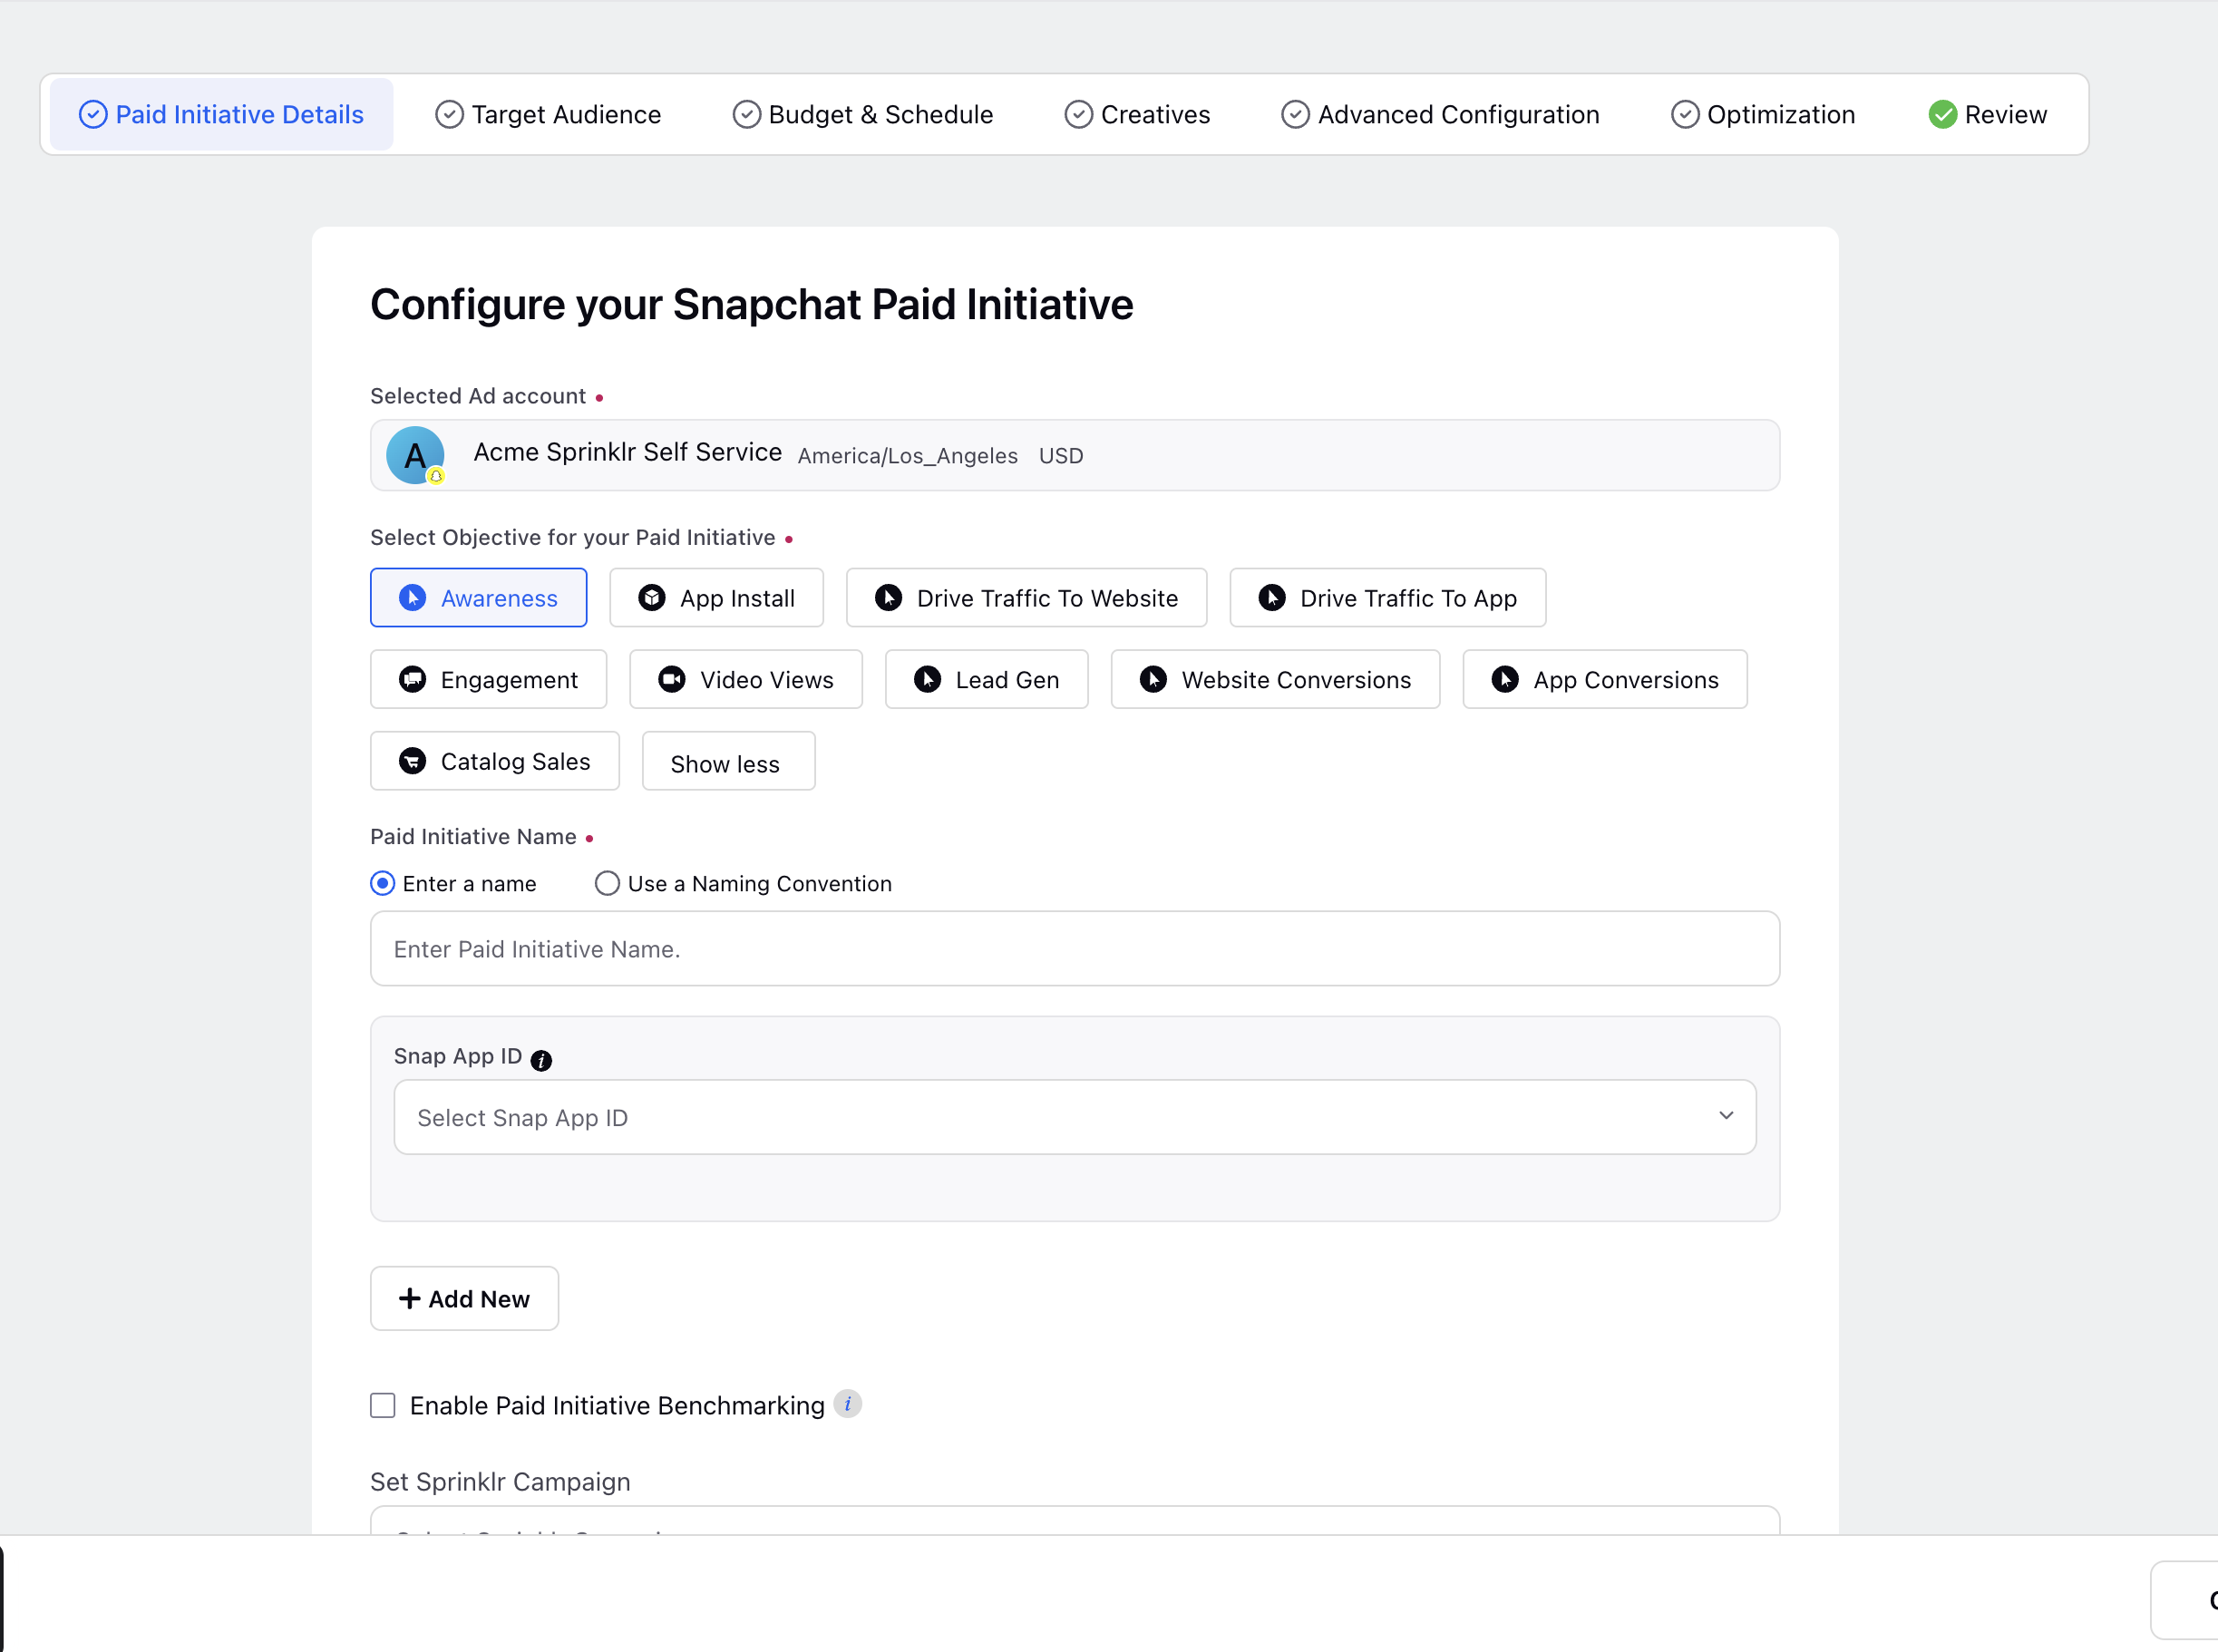
On the Ads Composer window, select your Snapchat Ad Account.
Click the New Tab icon. Under the Sprinklr Marketing (Ads) tab, click Ads Composer within Execute.
Enter your campaign name in the Campaign Name field or select Use a Naming Convention to select from predefined campaign names.
Choose an Ad Format depending on the objective selected. The ad formats with their supported objectives are:
Snap Ads: Awareness, App Install, Lead Gen, App Conversions and Website Conversions
Story Ad: Awareness, App Install, App Conversions, Website Conversions, Lead Gen, and Engagement
Collection Ads: Awareness, Drive Traffic to Website, Drive Traffic to App, Lead Generation, Website Conversion
Commercial Ads: Video Views and Awareness
AR Lens: Awareness, Drive Traffic to Website, Drive Traffic to App, Engagement, App Conversions and Website Conversions
For Snap Ads, select an Ad Type from the following:
Image or Video
Extended Play Commercial - Includes a Skip option for video lengths greater than 6 seconds. Only available for Awareness and Video Views objectives
Select the Snap App Id from the drop-down menu to track actions Snapchatters take in your mobile app after seeing your ad. Click Add New beneath each promoted object to add multiple objects to your campaign. It will create separate Ad Sets for each promoted object.
For iOS 14 Ad Campaigns:
Enable Apple’s SKAdNetwork (SKAN) to measure App Installs and App Conversions when targeting iOS 14 users. Note that the SKAdNetwork is only supported for verified iOS apps.
For more information, see Apple iOS 14 Changes and Impact on Advertising.

If you are promoting a Credit, Housing, or Employment (CHE) ad in your campaign, you will need to enable the Is CHE Campaign regulation option by sliding the Toggle icon. For more information, see Advertising Policy and Guidelines for Snapchat.
Note: CHE Campaigns are now limited to the Awareness objective only, with no other objectives available for selection. Additionally, CHE Campaigns are restricted to two optimization goals: Impressions and Clicks.
Click Define Custom Properties and select the desired custom properties.
Click Next.
Apply Targeting
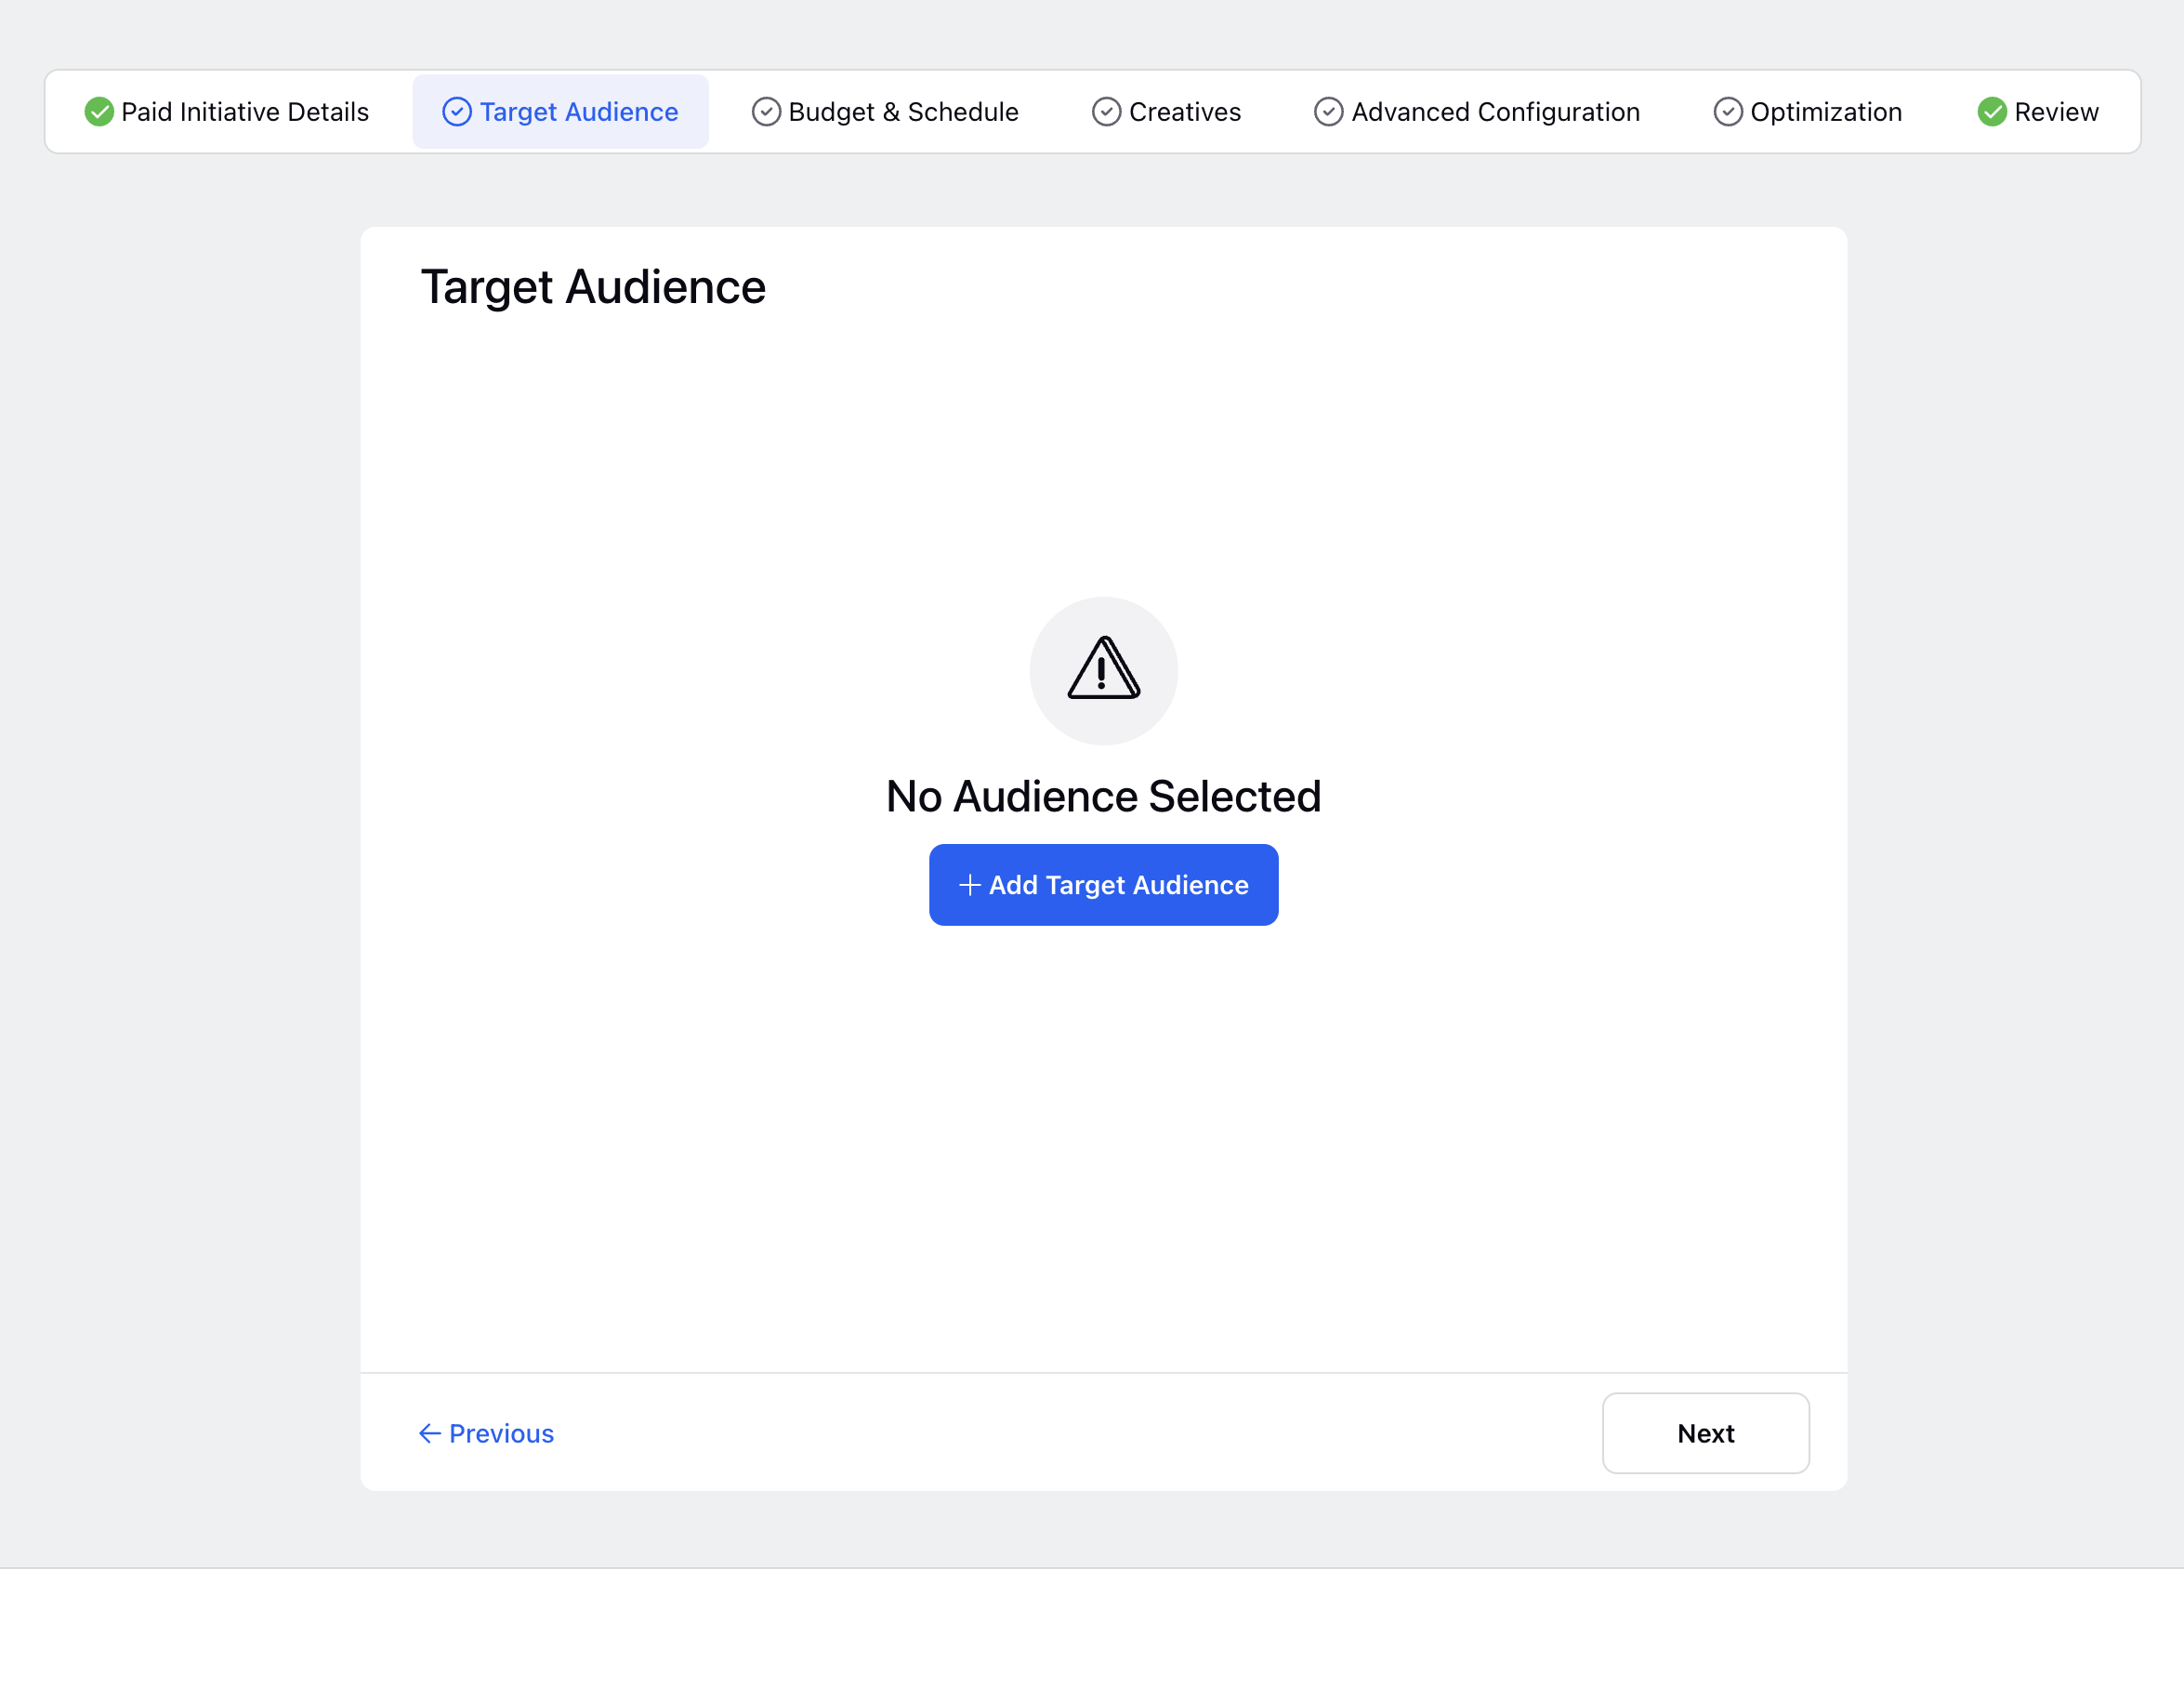
On the Targeting window, select from Saved Target Audience or click Create New Audience to create a new audience for your Ad.
Once you create a new target audience or select from the saved target audience, click Save Target Audience or Save. For more information, see Snapchat Targeting – Field Descriptions.
Click Next to go to the Budget & Schedule window.

Note: You can update the Ad Squad Targeting and all other fields regardless of whether the Ad Squad is active or paused from Ads Manager.
Snapchat Targeting — Field Descriptions
Targeting | Description |
Ad Format: Snap Ads, Collect Ads, Audience Filter, Commercial Ads, AR Lens or Story Ads | |
Name | Provide a name for your Snapchat Targeting. |
Gender | Select for gender-specific targeting. |
Geo Location* | Include a location filter to target users in a specific country or region. The locations are categorized by continent and country. Click the Import icon alongside Include to import multiple targeting to your ads. Note:
|
Location Category | Select a pre-determined type of location. The options range from music venues and beaches to car dealers and movie theaters. It is mandatory to choose a radius around the Location Category you are targeting. Note that as of now, this feature is only available in the US. |
Language | Select specific languages to target speakers. |
Age Range | Select the minimum (up to 35) and maximum age (up to 50+) from the drop-down menu. Note that if you do not specify a maximum age range, the targeting will result in no age cap. |
Advanced Demographics | Search or browse to target users of a specific education level, income, occupation, and more. |
Snap Audience Match | Use a saved customer list in your targeting. |
Predefined Audiences | Select your target audience from the following categories:
Note: 'Visitors' audience comprising of Placed segments is only available in the U.S currently. Placed Visitation Segments allow you to reach Snapchatters based on the places they visit. |
Mobile | Target users by their device. |
Regulated Content | As per Snapchat policy, if your creative or the product being advertised is required to be age-restricted (e.g. gambling-related content, alcohol, etc.) please check the box next to 'Regulated Content.’ |
Product Audiences | Select your product audience from the two available options-
|
Expand Audiences Options | Audiences are expanded by Snapchat to optimise campaign performance. When you select the "Expand Audiences Options" checkbox, the following two options will be pre-selected:
|
Install State | Select to choose a target audience based on the following three install states:
|
Save to Audience Manager | Select to save your targeting for future use. |
Ad Format: On Demand Geofilters |
Name* | Provide a name for your Snapchat targeting. |
Custom Location | Enter an address to set a custom targeting location. |
Min Age | Set a minimum age to restrict content. |
Budget and Schedule
Enter the details for the respective fields. For more details, see Budget and Schedule — Field Descriptions.
Click Next.
Budget and Schedule — Field Descriptions
Terms | Description |
Configure all Ad Squads individually | Select to apply individual configuration for your Ad Squads, if you have applied multiple targeting selections. |
Enter the Schedule & Budget details for Campaign |
Start Date | Set a Start Date for your Ad Campaign. |
End Date | Set an End Date for your Ad Campaign. |
Assign a Sprinklr Budget Source for your Paid Initiative | Select a Budget Source for your Paid Initiative. |
Spend Cap | Set a spending cap beyond which your Paid Initiative will stop running. |
Campaign Daily Budget | Set the daily budget for the campaign. |
Enter the Budget & Schedule details for all Ad Squads |
Budget Type | Select a budget type from the dropdown menu. |
Daily/Lifetime Budget | Set the budget for your Ad Squad according to the budget type. |
Start Date | Set a Start Date for your Ad Squad. |
End Date | Set an End Date for your Ad Squad. |
Enter the Placement details for all Ad Squads |
Automatic Placements (Recommended) | Click to show your ads automatically in places they are likely to perform best. |
Edit Placements | Click to edit placements as per your requirements. You can select one or both from:
|
Camera
|
Between Content (Ads watched between stories and professional content) |
User Stories | Select to run ads between the stories of your audience. |
Publisher & Creator Stories | Select to run ads between publisher and creator stories. |
Within Content (Ads watched within professional and curated content) |
Content Type | Select to include/exclude content types to run ads in between. You can select from the following content types: News, Entertainment, Science & Technology, Beauty Fashion, Men's Lifestyle, Women's Lifestyle, and General Lifestyle. |
Publisher | Select to include/exclude Snapchat publisher stories where you want to run your ad. |
Note: The above placement options are only available for non-commercial ads. To learn more about Commercial Ad placements, see Snapchat Commercial Ads. |
Add Placement Variations | Click to create add different variations to your selected placements. This will create a duplicate of your ad squad for each placement variation. To learn more, see Add Placement Variations. |
Enter the Bidding Details for all Ad Squads |
Optimize For | Select the optimization for your Ad Squads. |
See below to view the corresponding optimization goals for each ad objective: Website Conversions
Engagement
Lead Gen
Video Views
App Install
Drive Traffic to Website
Drive Traffic to App
Awareness
|
Bid | Select a bidding strategy from the following:
|
Bid Value / Minimum ROAS | Set the Max Bid / Target Bid / Minimum ROAS value. This field will not appear for Auto Bid. |
Set Up User Frequency Cap | Specify the maximum number of times and the number of days for which you want a user to view your ad. Note: You will only be able to use this feature when the field Optimize For is selected as Impressions. |
Pacing Type | The pacing type is the pace at which your ads will be delivered throughout the duration of your flight. Select a pacing type from:
Note: Accelerated delivery is only available for Max Bid with Impressions, Uses, Swipes, Video Views, and Story Opens optimization goals. |
Enter the Dayparting details for all Ad Squads |
Run ads all the time | Select to run your Ads every time. |
Run ads on a schedule | Select to run your Ads on a specific schedule. |
*Fields with red dots are mandatory.
Tip: If you set a Spend Cap, ads in the campaign will stop running once the amount has been spent, ensuring you don't over-spend.
To set an Ad Account Lifetime Spend Cap, the account must be added by a Snapchat Organization Admin or an error will occur. To be able to set these within Sprinklr, please re-add the account by an organization admin. Please see Snapchat's Roles and Permission help section for help in setting up business account permissions: https://businesshelp.snapchat.com/en...es-permissions.
Target Bid — Supported Ad Formats & Optimization Goals
Target Bid is only supported for the following Ad Formats and its corresponding Optimization Goals:
Select Creatives
On the Creatives window, select from saved Snapchat Creatives, or click Create New Creative to craft new Ad Creatives. Select the Ad format from the following options - Snap Ads, Story Ads, Collection Ads, Commercial Ads, and Filter Ads.
The instructions to add new creatives depend on the ad formats that you have chosen:
For Snap Ads and Audience Filter ad formats, see Create New Creatives for Snap Ads and Audience Filter — Field Descriptions.
For Story Ad ad format, see Create New Creatives for Story Ad — Field Descriptions.
For Collection ad format, see Create New Creatives for Collection Ad — Field Descriptions.
Create New Creatives for Snap Ads and Audience Filter — Field Descriptions
Terms | Description |
Creative Header |
Post Type | Select a post type for your creative. You can choose from the corresponding post types with respect to the selected objective:
|
Creative Details |
Image / Video | Upload image(s) or video(s) in this section. Note: For Top Snap post type, you can upload videos of between 3 to 180 seconds in length and up to 1 GB of video file size. |
Name | Enter a name for your ad creative. |
Brand Name | Enter the name of your brand. Note: Brand Name field will not be mandatory given that the public profile is selected. |
Public Profile | Select your public profile from the dropdown menu. You can also link your brand name to your public profile. |
Deep Link URL (Supported for Deep Link Ads) | Enter the deep link URL. Snapchatters will be taken here when they swipe up on your ads. |
Call to Action | Choose the action you want people to take when they see your ad. |
App Icon (Supported for App Install and Drive Traffic to App Ads) | Select your app icon image. Specifications:
|
Fallback Types (Supported for Deep Link Ads) | Select one from the following options:
|
Headline | Enter a headline to grab the attention of people towards your creatives. |
Allow users to share ads with friends | Check this box to allow your users to share ads with their friends. |
Save | Click to save your ad creative. |
Create New Creatives for Story Ad — Field Descriptions
For detailed information on how to create Snapchat Story Ads, see Compose Snapchat Story Ads.
Terms | Description |
Creative Header |
Post Type | Select Story Ads from the drop-down menu. |
Creative Details |
Discover Tile | Add the Background image, Logo, and Headline for your tile creative. |
2, 3, 4, + | Click these tabs to add photos/videos for each collection and the corresponding ad details. |
Name | Enter a name for your collection ad creative. |
Brand Name | Enter the name of your brand. |
Play Style | Select to specify whether your story ad will auto-advance or loop through each creative. By default, story ads are set to Auto Advance. |
Headline | Enter a headline to grab the attention of people towards your story ad creative. |
Allow users to share ads with friends | Check this box to allow your users to share ads with their friends. Note: This feature is not applicable if Regulated Content is checked in Targeting. |
Save | Click to save your story ad creative. |
Note
|
Create New Creatives for Collection Ad — Field Descriptions
Terms | Description |
Creative Header |
Post Type | Select from the following post types:
|
Creative Details |
Image / Video | Upload an image or video in this section. |
1, 2, 3, 4, + | Click these tabs to add photos/videos for each collection and the corresponding ad details. |
Name | Enter a name for your collection ad creative. |
Brand Name | Enter the name of your brand. |
App Name | Specify the app name for your ad. |
Deeplink URL | Enter the deep link URL. Snapchatters will be taken here when they swipe up on your ads. |
Call to Action | Choose the action you want people to take when they see your ad. |
App Icon | Select your app icon image. Specifications:
|
Headline | Enter a headline to grab the attention of people towards your story ad creative. |
Allow users to share ads with friends | Check this box to allow your users to share ads with their friends. Note: This feature is not applicable if Regulated Content is checked in Targeting. |
Save | Click to save your collection ad creative. |
Advanced Configuration
In the Advanced Configuration section, you can view the ad entities in the left-hand side pane and make changes to individual properties.
At the Campaign level, you can click Configure DCM under Third Party Tracking to configure Google Campaign Manager. On the DCM Configuration window, fill in the details and click Save. For more information, see Google Campaign Manager Configuration — Field Descriptions.
You can also delete any Ad within an Ad Squad by hovering over the Options icon alongside an ad and clicking Remove from Ad Group.
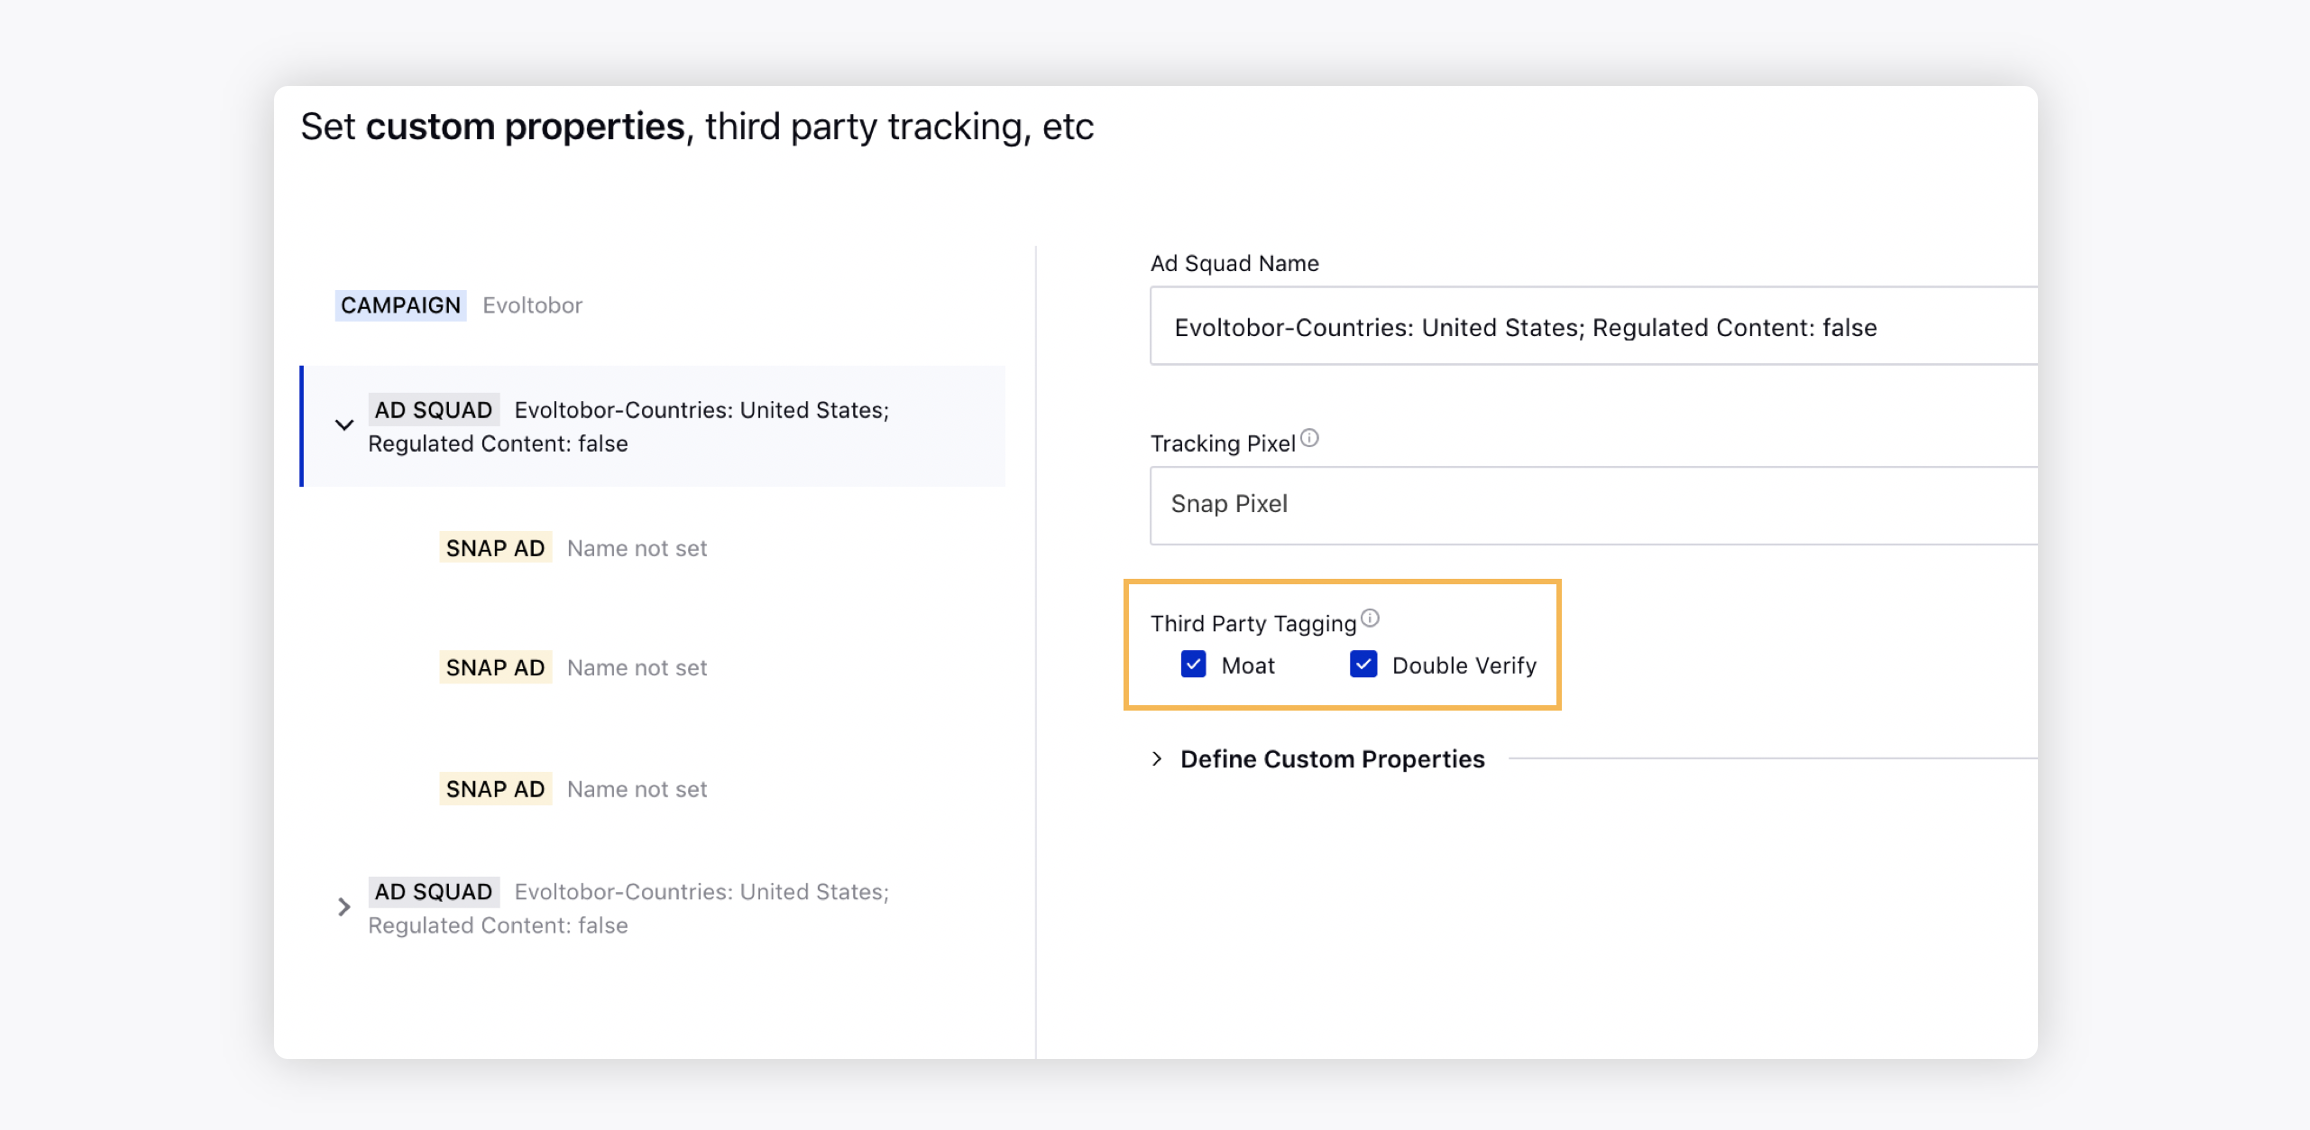
You can select Snapchat Pixel as a Tracking Pixel at the Ad Squad level to keep track of your conversions for the supported objectives. By default, it will be pre-selected for these objectives - Awareness, Engagement, Video Views, Drive Traffic to Website, Lead Gen, and Website Conversions.
At the Ad Squad level, you can automatically add tracking tags to all ads within an ad squad by flagging the following box(es) under Third Party Tagging:
MOAT- Use this flag to automatically add MOAT tracking tags to all ads under this ad squad.
DoubleVerify - Use this flag to automatically add DoubleVerify tracking tags to all ads under this ad squad.

At the Snap Ad level, you can click Copy to all alongside Impression Tag Urls and Swipe Up Tag Urlsfields and select from the below options to copy the properties to all other ad variants.
Copy to all Snap Ads in this Ad Squads
Copy to all Snap Ads in all Ad Squads
You can select a benchmark and pacing entity at the campaign level from Select Benchmark and Pacing Group drop-down menus, respectively.
You can select a type of dark post creation at the campaign level under Dark Post Creation from:
Identical Story ID Across Ad Sets - if you want one post to be created and used across all Ad Sets selected.
Unique Story ID Per Ad Set - If you want a unique post to be created for every target audience you create.
Google Campaign Manager Configuration — Field Descriptions
Terms | Description |
Select Configuration |
Create New | Select to create a new Campaign Manager configuration. |
Select Existing | Select to choose an existing Campaign Manager configuration. |
DCM Profile Information |
Select User | Select the user for the Campaign Manager Configuration. |
Select Advertiser | Select the desired advertiser from the drop-down. |
DCM Name Convention | Select the Campaign Manager naming convention. |
Placement Information |
Start Date | Select the start date for the placement. |
End Date | Select the end date for the placement. Note: Once the Google Campaign Manager is created, you cannot edit the campaign dates. Hence, it is recommended that the campaign End Date be extended far into the future. |
Placement Site Url | Enter the URL for the placement site. |
Placement Site Name | Enter a name for the placement site. |
Placement Dimensions |
Placement Height | Enter the height for the placement. |
Placement Width | Enter the width for the placement. |
Placement Compatibility | Select the placement compatibility from the drop-down menu. |
Placement Payment Source | Select the placement payment source from the drop-down menu. |
Placement Pricing Type | Select the placement pricing type from the drop-down menu. |
External ID | Enter the external ID for the placement. An external ID is any ID that you might use outside Google Campaign Manager to identify items in internal reports. |
Targeting Information - DoubleClick Placement Mapping Level |
Paid Initiative | One DoubleClick Placement will be created, and every Ad Variant under the Social Campaign will be created as DoubleClick Ads under the DoubleClick Placement. For example, if a social campaign has 2 Ad Sets with 4 Ads under each Ad Set (8 Ad Variants Total), then selecting Paid Initiative as the Targeting Level will create 1 DoubleClick Placement with 0 DoubleClick Ads under it. |
Ad Set | One DoubleClick Placement will be created for every Social Ad Set, and every Ad Variant under each specific Ad Set will be a DoubleClick Ad under the respective DoubleClick Placement. For example, if a social campaign has 3 Ad Sets with 2 Ads under each Ad Set (6 Ad Variants Total), then selecting Ad Set as the Targeting Level will create 3 DoubleClick Placements with 2 DoubleClick Ads under each. |
Ad Variant | One DoubleClick Placement will be created for every Social Ad Variant, and every Ad Variant under each specific Ad Set will be a DoubleClick Ad under the respective DoubleClick Placement. For example, if a social campaign has 10 Ad Variants, then selecting Ad Variant as the Targeting Level will create 10 DoubleClick Placements with 1 DoubleClick Ad under each. |
Optimization
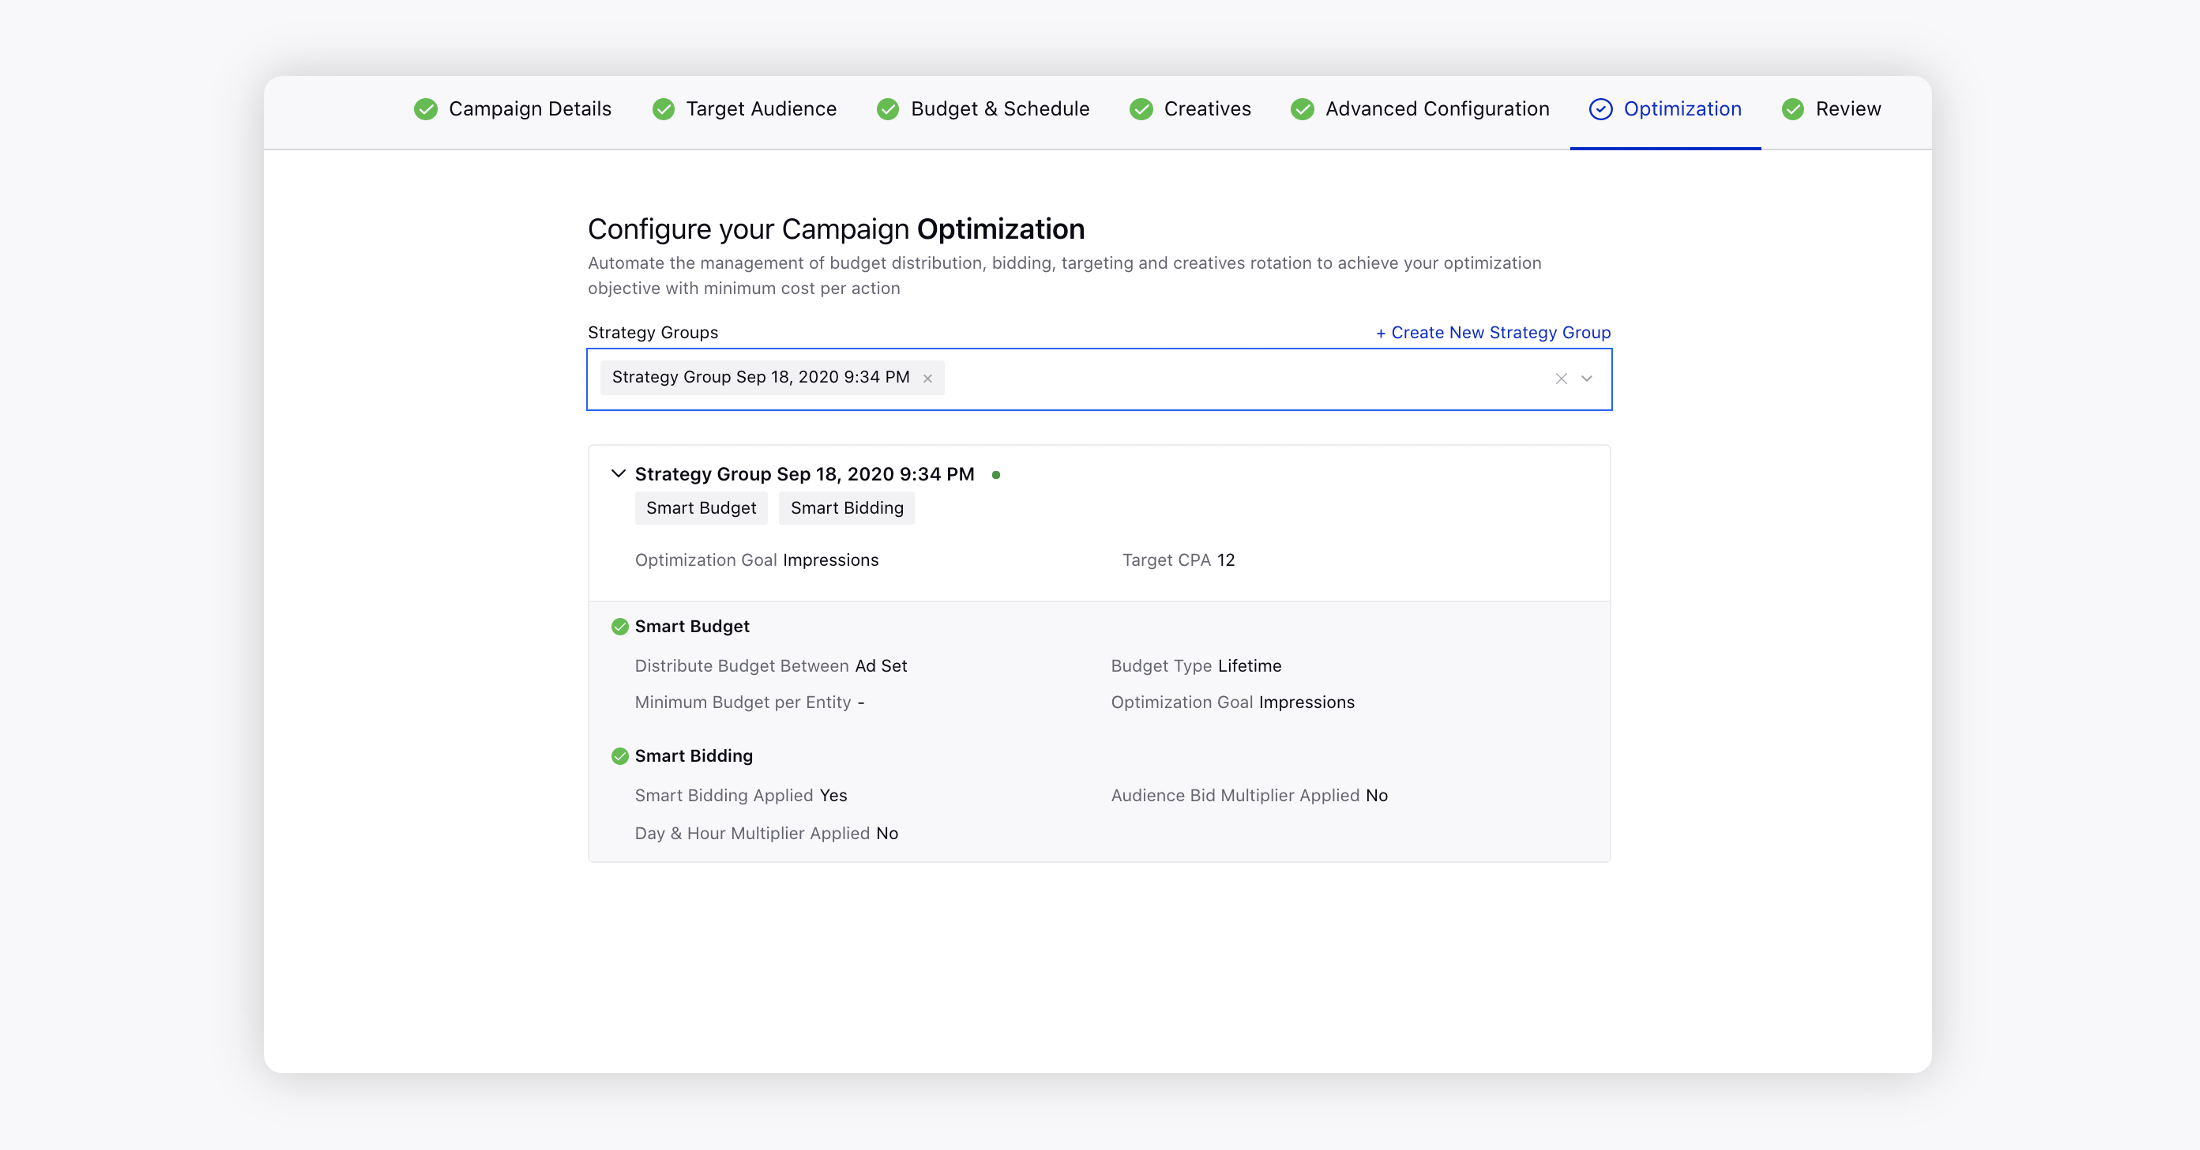
Automate the management of budget distribution, bidding, targeting, and creatives rotation to achieve your optimization objective with a minimum cost per action using Strategy Groups. Learn more about Strategy Groups.
On the Configure your Campaign Optimization window, select one or more Strategy Group optimization(s) you want to apply to your campaign from the Strategy Group drop-down menu. Your selected Strategy Group(s) details will be displayed below.

If you want to create your Strategy Group from scratch and then apply it to your campaign, click Create New below the drop-down menu or Create New Strategy Group in the top-right corner of the drop-down (when a Strategy Group is selected). This will open up the Strategy Group creation pane alongside and you will not need to leave Ads Composer.
To learn more about creating a Strategy Group, see Create a Strategy Group.
Click Next to proceed to the Review section for scheduling and publishing your campaign.
Review
On the Review window, you can review all details for the Paid Initiative, Ad Sets, and Ad Variants, including the basic details for your Campaign, Ad Set Targeting, Placements, Duration & Pricing, and all Ad Creatives.
Tip: Click the Back button in the Ads Composer to go back to make any changes to Campaign Details, Targeting, Budget & Scheduling, or Creatives. |
Click Publish and select one from the following:
Publish - To immediately schedule your Ad Campaign on Snapchat.
Published as Paused - To publish the ad campaign without activating it.
Send for Approval - To send your newly composed campaign to a reviewer for approval.