Configure Agent Availability Slots
Updated
Create a Slot in Slot Availability Manager
Creating a slot will allow supervisors to create configurations that define the appointment durations, appointments per slot, daily schedule, buffer time, holidays, etc., for particular agents/groups of agents. This configuration is used to identify the available slots and allows users to select appointment slots based on the parameters. You can create different appointment slots for different agents as they might have different working days, timezone, etc.
Click the New Tab icon. Under the Sprinklr Service tab, click Slot Availability Manager within Route.
On the Slot Availability Manager window, click Create Slot Availability in the top right corner.
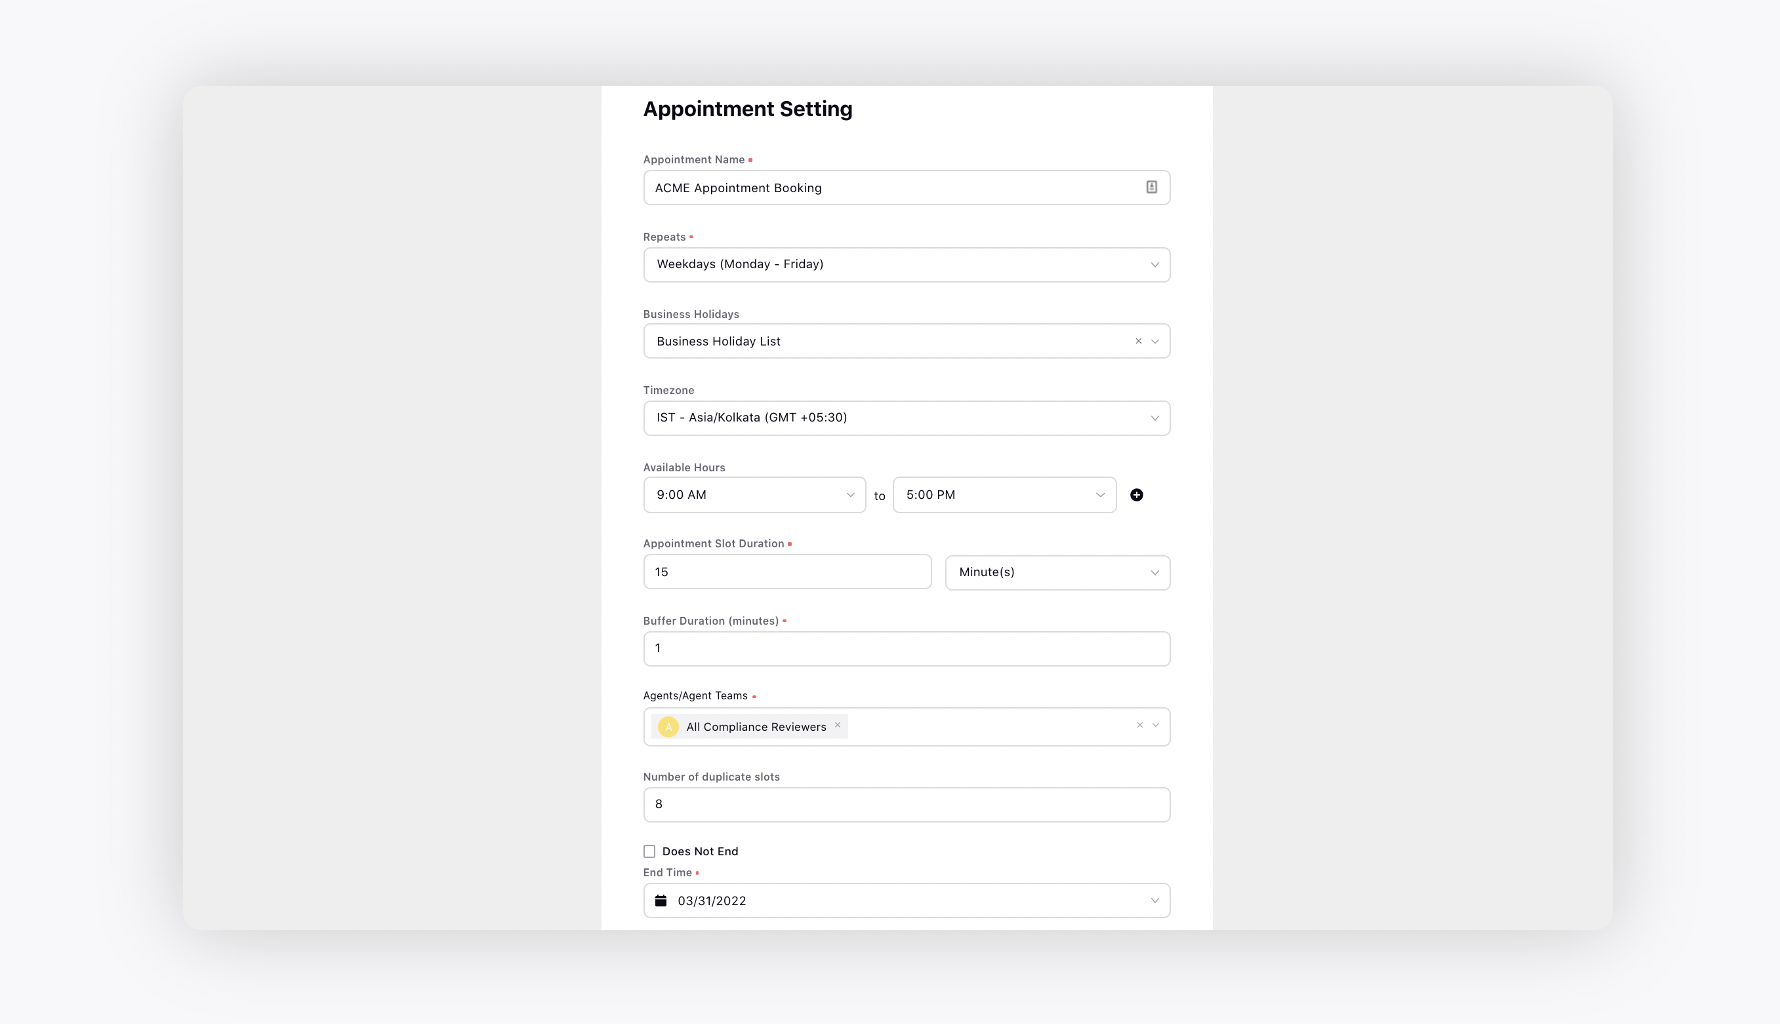
On the Appointment Setting window, fill in the details. For more information, see Appointment Setting — Field Descriptions.
Click Submit in the bottom right corner.
Appointment Setting - Field Descriptions
Term | Description |
Appointment Name | Enter a name for the appointment slot. |
Repeats | Select the days on which the created slots will be applicable. |
Business Holidays | Select business holidays to not show the appointment slots on those days. |
Timezone | Select the timezone for booking the slots. |
Available Hours | Set the hours for the appointment slots to be available. |
Appointment Slot Duration | The duration of one appointment slot. |
Buffer Duration (minutes) | The buffer duration between two slots. |
Agents/Agent Teams | The users/user groups who will be assigned the appointments. |
Number of duplicate slots | The number of duplicate available slots that you want to create for a single slot. It will depend on the number of available agents that you have selected above. For example, if there are 10 agents available for 1 slot, you can add 10 or fewer duplicate slots. As the slots will keep getting booked, the slot availability will be updated in real-time. |
Does Not End | Check the box if you do not want to set the end date and time for the recurring appointment slots. |
Slot Actions
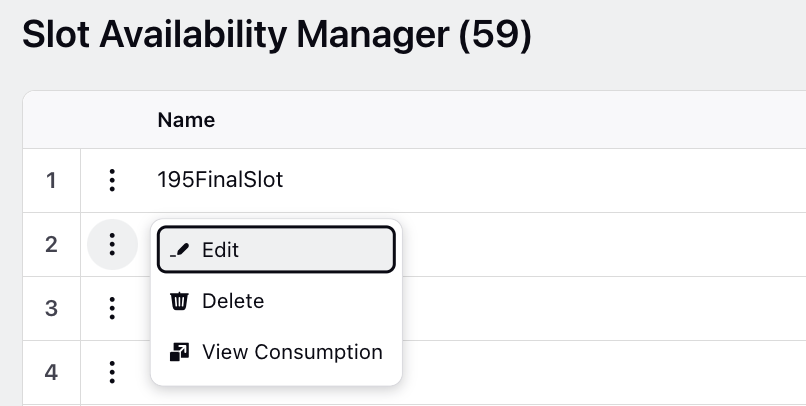
Once added, hover over the Options icon alongside the slot and select:
Edit: Modify the slot details.
Delete: Remove the slot.
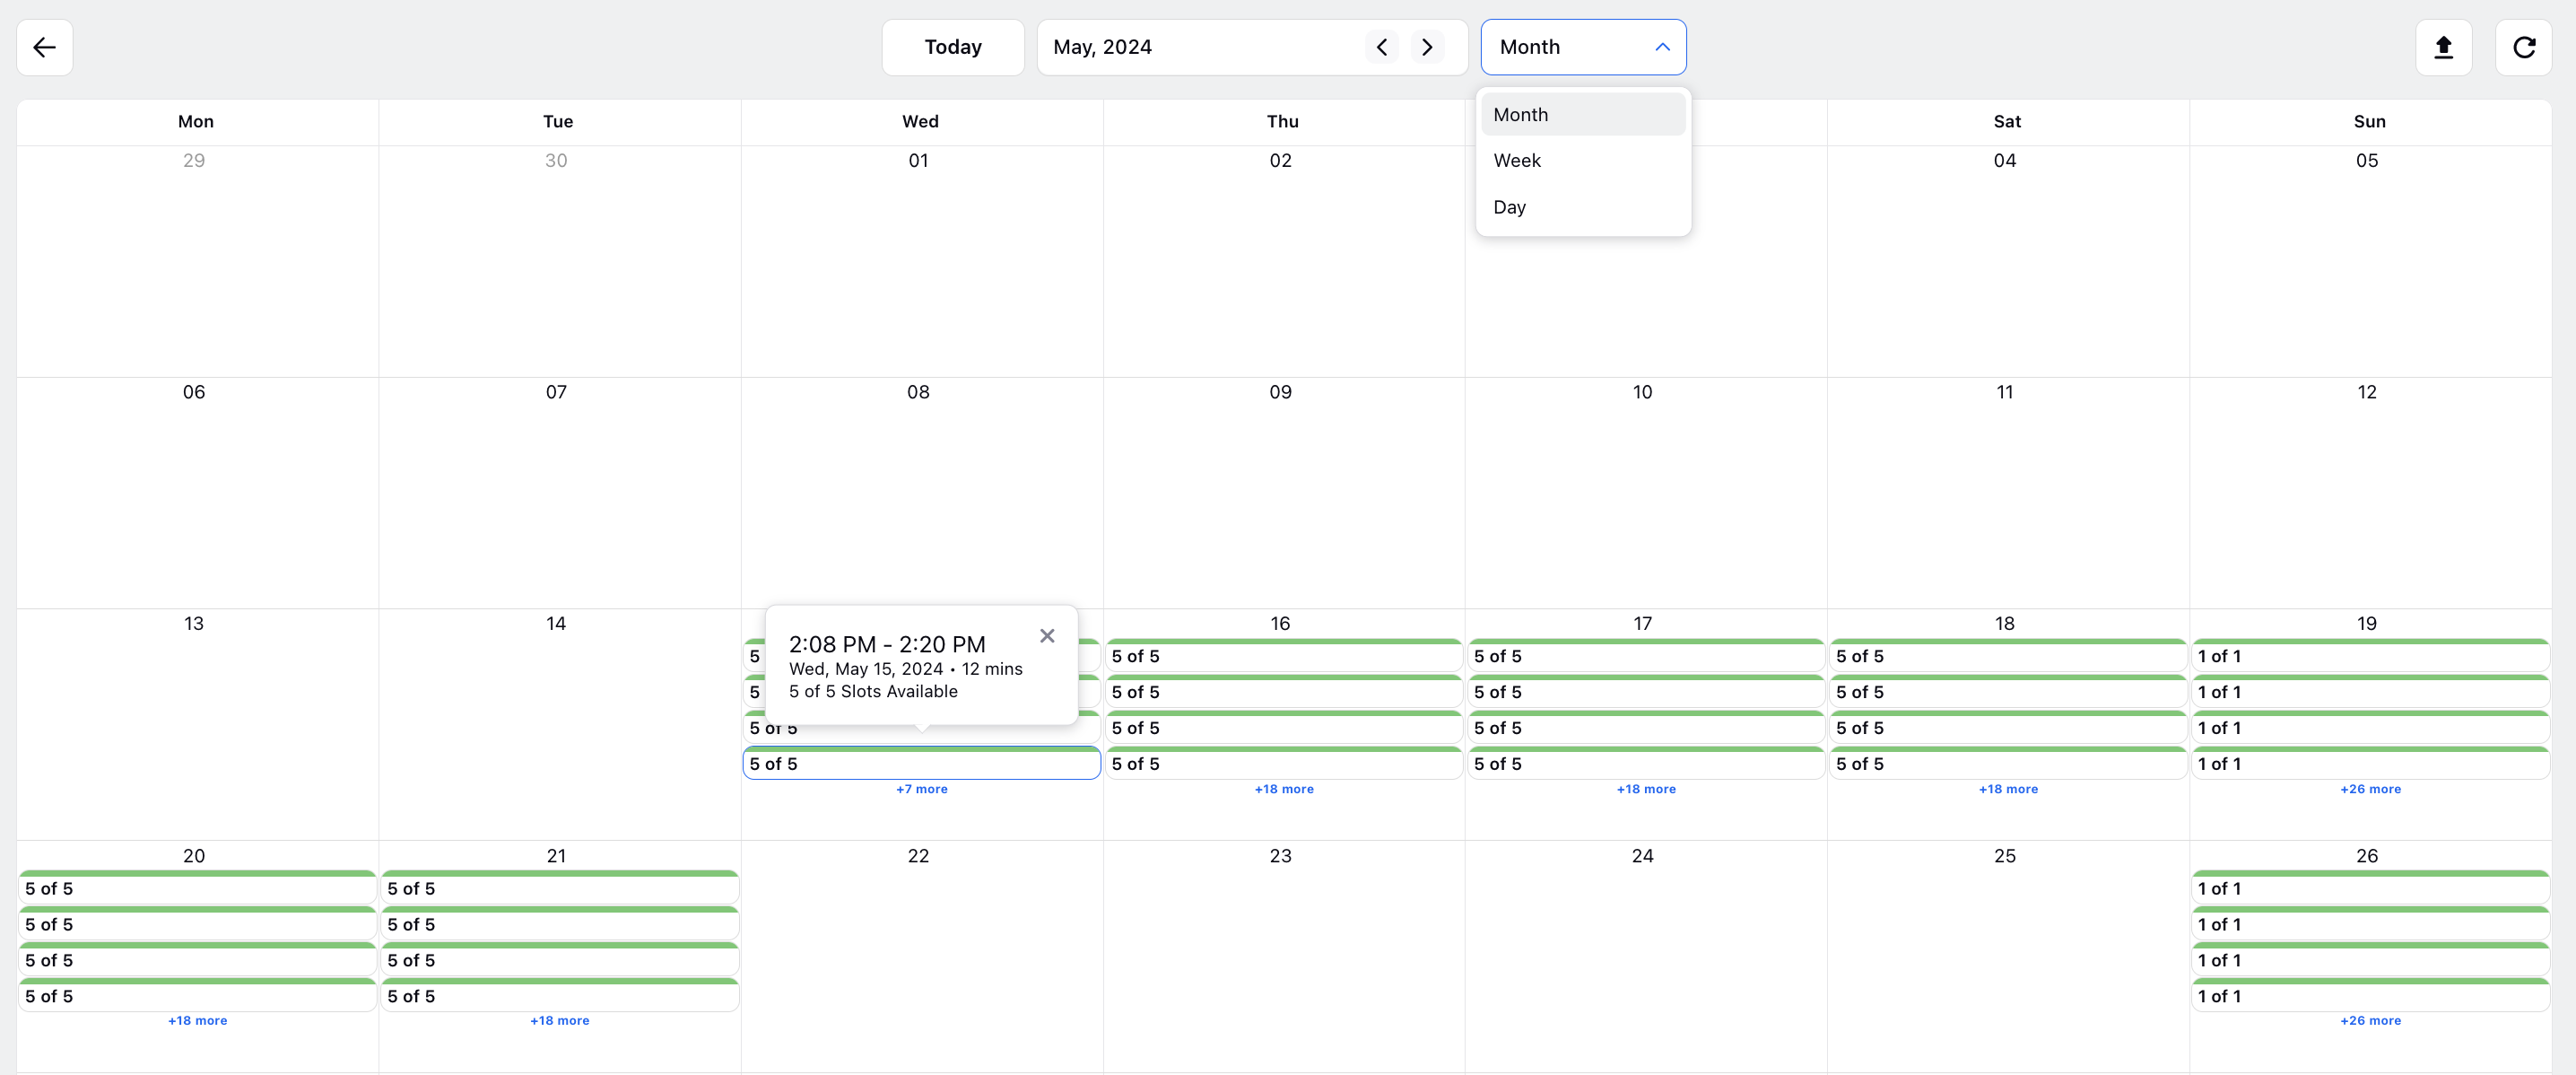
View Consumption: Check the total number of consumed slots out of the total available slots for a specific time period. You can change the time filter to day, week, or month. For the monthly view, data for four slots on a particular day will be shown, with an option to view all slots for that day. By hovering over a slot, an overlay with detailed slot information will appear. An option to export the data based on the selected time filter (day, week, or month) will be available for users to export the slots.
![]() Note: To enable the View Consumption option in your environment, reach out to Sprinklr Support at tickets@sprinklr.com.
Note: To enable the View Consumption option in your environment, reach out to Sprinklr Support at tickets@sprinklr.com.
Create an Appointment Asset
Create an appointment template to capture the preferred date and time from the users.
Click the New Tab icon. Under the Sprinklr Social tab, click Assets within Engage.
In the top right corner of the Asset Management window, click the Dropdown icon alongside Add Asset and select Omni Chat Templates from the dropdown.
On the Create New Asset window, enter a Name and optional Description for your asset under the Basic Details section.
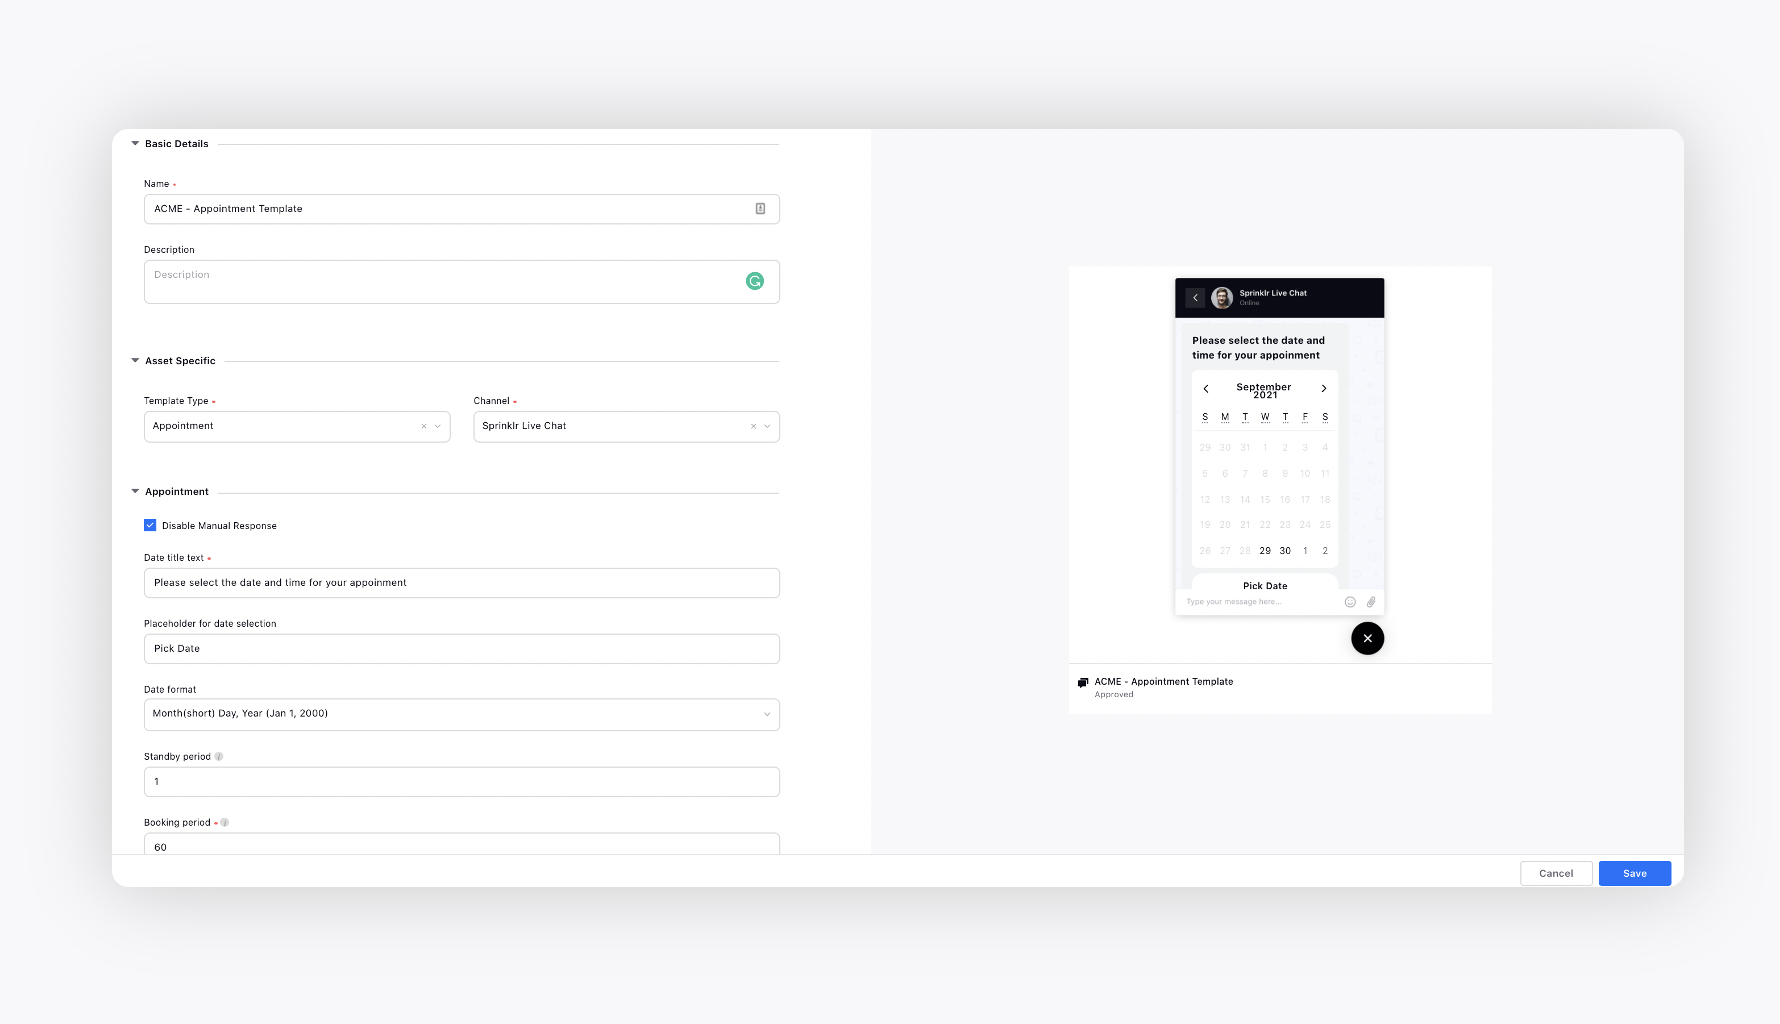
Under the Asset Specific section, select Appointment from the Template Type dropdown and Sprinklr Live Chat from the Channel dropdown. For more information, see Appointment Template — Field Descriptions.
Under Asset Details, select Campaigns, Sub Campaigns, Status, Available from, Visible from, Expires on, Tags, Restricted, Brands, Persona, Customer Journey Stage, Automated Tags, and Information.
Under Asset Sharing, select Workspace(s) and Users/Users Group(s) you want to share this asset with. You can also check the box alongside Visible in all workspaces to share the asset with all workspaces.
Next, enter the Properties per your needs.
Click Save in the bottom right corner.
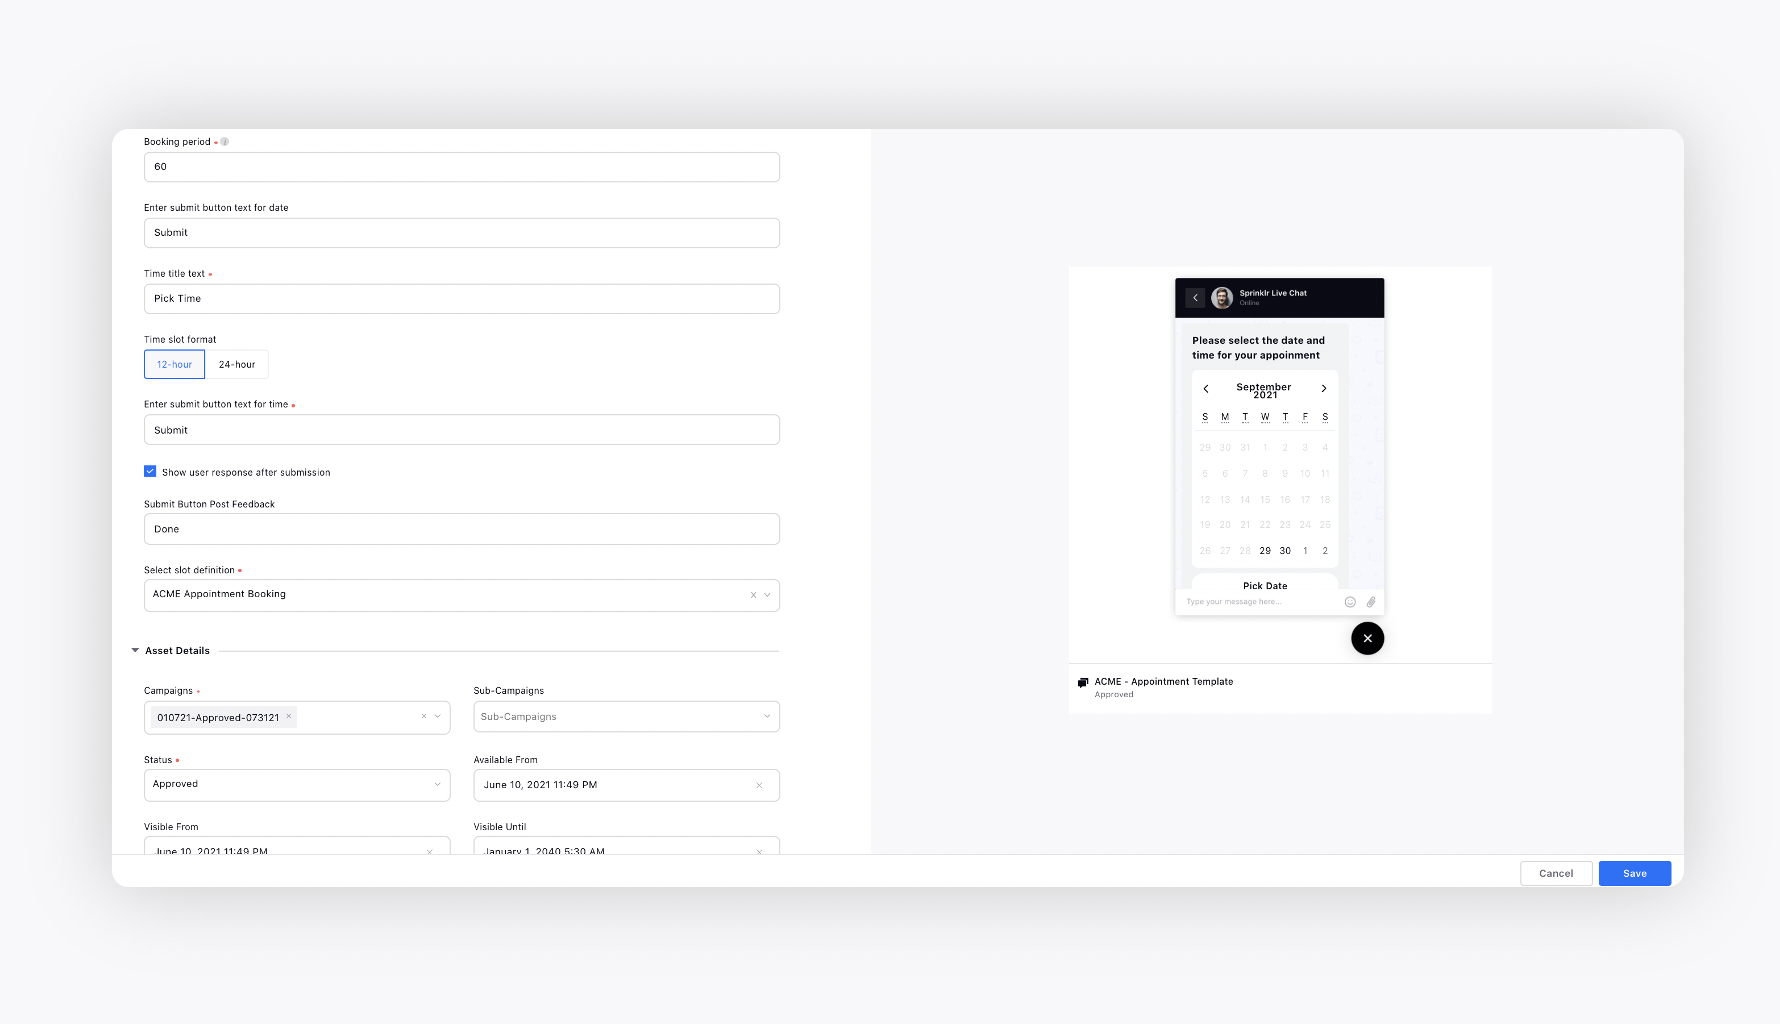
Appointment Template - Field Descriptions
Term | Description |
Hide Attachment Option | If you check the box alongside, your customers will not be able to send any attachments after selecting a response from this template until you (brand) send a message again. |
Disable Manual Response | If you check the box alongside, your customers will not be able to send any message after selecting a response from this template until you (brand) send a message again. |
Date title text | Enter a title for the date and time selection, for example, Please select the date and time for your appointment. |
Placeholder for date selection | Enter a placeholder for the date selection, for example, Pick a date. |
Date format | Select the date format as desired. |
Standby period | No. of days after which the appointment booking will start. |
Booking period | No. of days for the appointments slots to be available. |
Enter submit button text for date | Enter a label for the date submit button. Once the user submits the date, there will be a time selection menu. |
Time title text | Enter a title for the time selection, for example, Pick a time. |
Time slot format | Select between the 12-hour and 24-hour format. |
Enter submit button text for time | Enter a label for the time submit button. |
Show user response after submission | Shows user-selected input. Here, the date and time that the user selected will be shown even after submitting the template. |
Submit Button Post Feedback | Enter a label of the Submit button to be changed once submitted. |
Hide post submission image | Check the box to hide the tick mark once the template is submitted. |
Enter the post back submit title | Enter a label for the Submit button to be changed once submitted. |
Select slot definition | Select the appointment slot that you have created in the Slot Availability Manager. |
Create an agent work queue
Next, create a case work queue and add the same agents as added while creating the appointment slot. This work queue will be used later for actual assignment