Data Collection using File Upload Connector
Updated
Marketers have a high volume of customer data offline, and thus it is difficult to manage and use it for customer experience efforts. Sprinklr offers data onboarding using File Upload to import any amount of offline data to feed into outbound campaigns.
To start importing offline lead lists/files in excel/.csv format, click on Campaigns under Voice.
Click on the Data Collection icon under Voice Campaign management.
To upload the file, click on Install Connector on the top right-hand corner of the Data Collection page.
On the pop-up, select File Upload under Connector type. By clicking on the box below, supervisors can create lead events on all the leads being uploaded on the file. Lead event is an action in the system that gathers contact information about a lead that has expressed some form of interest in a product or service.
Upon clicking on Next, the file upload can begin in 3 phases, for Sprinklr to ingest the leads as cleanly as possible.
1. Create Connector:
Fill in a name for the list and upload it in the upload window by clicking on browse.
The Primary Column Name is the name of the column/field that serves as the main identifier. Typically, a unique ID is used to identify customers, so it is best practice to select fields with unique identifiers as the Primary Column.
Sprinklr offers an array of schema types. Here select Schema Type as custom identifier. Scrolling down,
Data Type has 2 options on a drop-down menu:
Subscriber data: refers to information about individual users who have opted-in to receive communications from a particular company or organization. This can include data such as their name, email address, phone number, mailing address, or preferences.
Event data: refers to information about specific actions taken by subscribers or other users of a system. This can include data such as the date and time of an event, the location or device used to perform the event, and any relevant details or metadata.
Enter Event type fields information in case Event data is selected and set a time zone to move on to the next screen that is, Create Schema.
2. Create Schema:

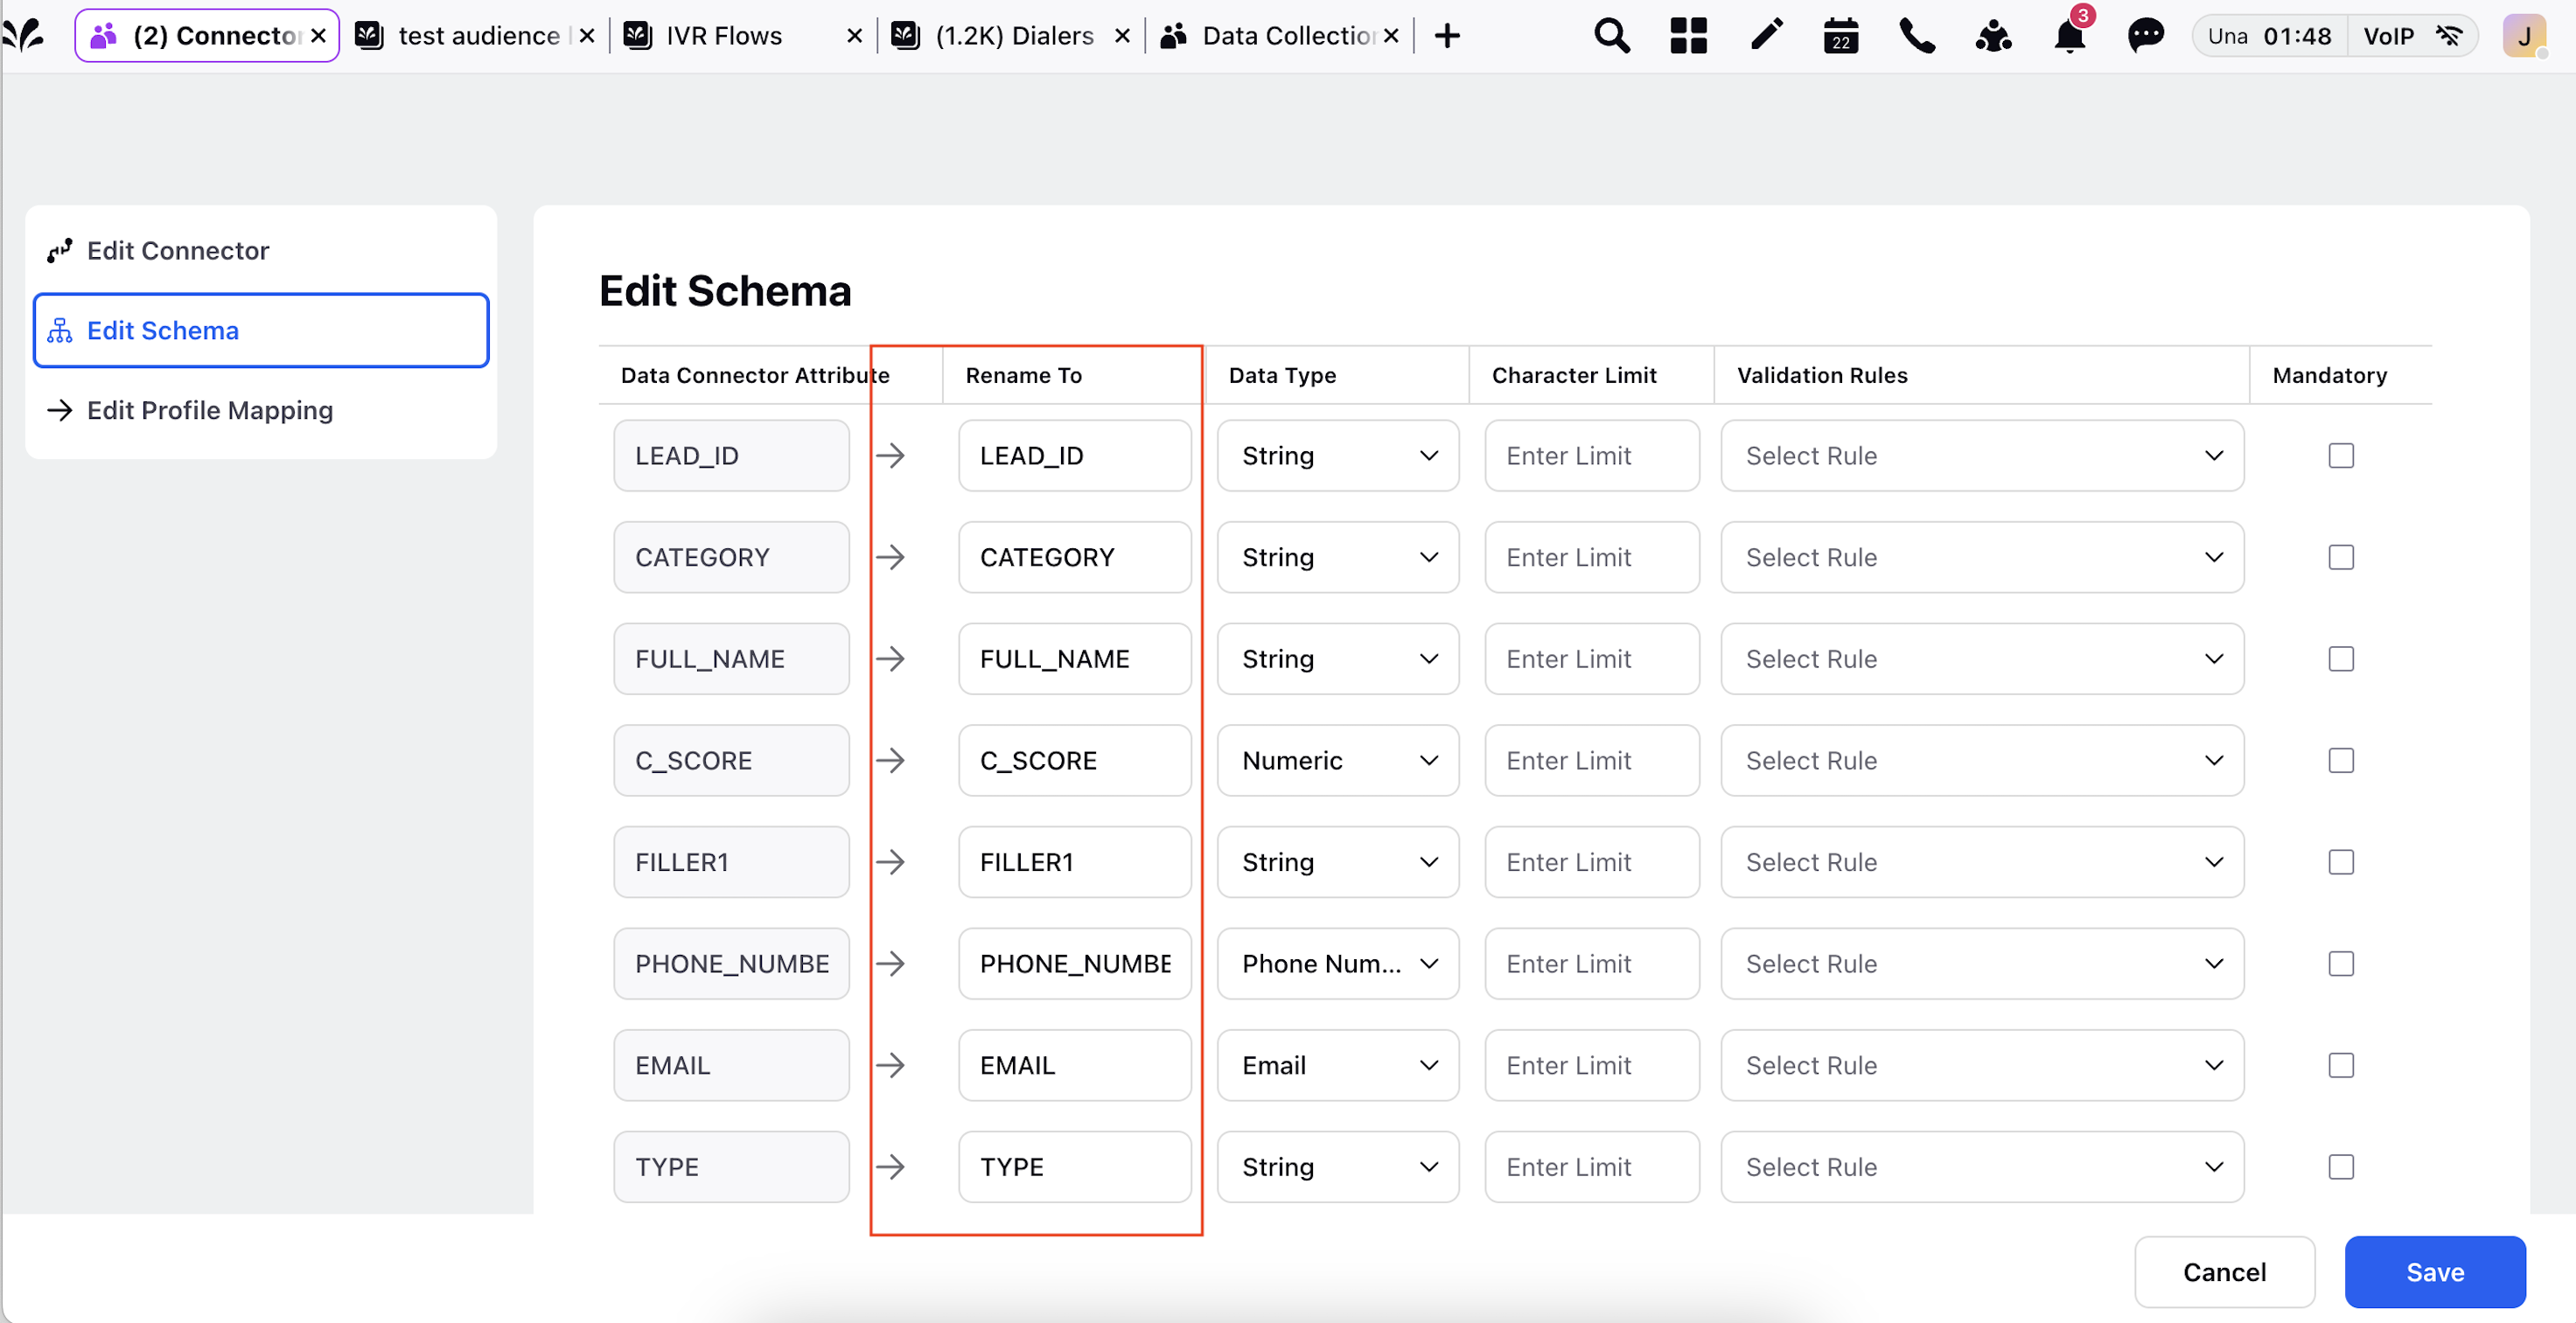
Here, all the column names in the lead list will be displayed under Data Connector Attribute and can be renamed for the purpose of conformity and data hygiene in the system.
Post Enablement of a DP, Rename To column is the one that is used to create attributes at the backend instead of the Data Connector Attribute column. This allows clients to rename attributes for data ingestion flexibly. With Dynamic Property enabled, attribute names in the backend gets updated with the renamed columns, supporting consistent and adaptable data management.
Data type should be set to the data type of entries in the corresponding Data Connector Attribute. eg: Cust_Name as String, Email as String, Phone_No as Phone Number etc.
These entries can be limited to certain characters and valuable information such as Phone and Email can be validated using Validation Rules.
Clicking on Next takes us to Create Profile Mapping screen.
Note:
To prevent file name duplication across the platform (partner environment), a validation mechanism is implemented to prompt users when a file with the same name already exists. In the File Upload Connector, users are not allowed to save the connector after adding a duplicate file, and an error is displayed: A file with this name already exists, please rename the file and try again. For the SFTP Connector, duplicate files are automatically failed and are moved to the failed directory, with the same error message applied to the first record, eliminating the need to process the entire file.
When any of the mandatory columns are missing during a file upload, the system displays a clear and concise notification: File upload failed due to missing mandatory columns.
3. Create Profile Mapping:
Profile mapping is the process of associating the fields in a lead list with the corresponding fields in a target system. When uploading a lead list, Sprinklr may have different fields and data types than the original list. Profile mapping allows you to match the fields in the lead list with the appropriate fields in Sprinklr, ensuring that the data is accurately imported.
In this case, we used Lead_ID as the primary data connector attribute, however the profile in Sprinklr is called User Id. Hence, we map Lead_ID to User Id by clicking on Select field option corresponding to Lead_ID and selecting User Id in the drop-down menu.
Similarly, the other attributes can be mapped to the Sprinklr profiles, making it easier to manage and analyse the leads in the system.
Click Save.
The Data collection screen with the newly added lead list is displayed.
View Data Connector
To check if the lead list and all its data fields are uploaded onto Sprinklr, hover on the three vertical dots next to the status of the newly uploaded list and click View Details.
A screen is displayed on the right side called Connector Activity.
The fields under file name are the default settings while the ones on the right of the arrow mark are updated fields. Check with the offline sheet if the number of records match and ensure all data has been ingested.