Create and Manage Knowledge Base Categories
Updated
Categories are a way to organize content into groups based on their shared characteristics or properties. They help to make it easier for users to find the information they are looking for by providing a structured and intuitive navigation system.
Categories can be created based on a variety of criteria, such as product or service type, issue type, teams or departments, geographic region, or content format. For example, if you are running an e-commerce website, you might have categories for different product types such as clothing, electronics, or home goods. Within each of these categories, you could create subcategories for more specific items like shoes, laptops, or furniture.
The level of detail you include in your category structure depends on your specific needs and the complexity of your content. Some organizations may only need a few broad categories, while others may require a more granular structure with many nested subcategories. Every article in Sprinklr Knowledge Base is located within a Category.
Create Knowledge Base Category
Click the New Tab icon on the launchpad. Under the Sprinklr Service tab, select Knowledge Base within Resolve.

On the Knowledge Base window, click Create Category in the top right corner. This will open the Create Category form.
Fill in the required fields on the Create Category page. Fields marked with a red dot are mandatory. Below are the descriptions of the fields on this page:

Category Name: Enter the name of the Category. (Required)
Parent Category: Select the Parent Category from the drop-down menu under which you want to create the current category. Leave this field blank if you want the category to be a parent category.
Description: Enter a brief description of the Category.
Image: Choose an image for the Category.

Tags: Select the relevant tags for the Category for easier categorization and filtering.
Priority: Specify the priority for the Category. This value determines which Category appears first on the Knowledge Base builder, with a higher number indicating a higher priority. For example, if you assign a priority of 10 to the category "Laptop" and 20 to the category "Desktop", "Desktop" will take precedence over "Laptop". If multiple Categories share the same priority, they are sorted by creation time in descending order.
 Note: Knowledge Base categories are sorted by their creation time in descending order if no priority is set.
Share Settings
Visible in all workspaces: Select this checkbox to allow your Category to be displayed in all the workspaces.
Workspaces: Select the Workspaces that you want to share the Category with. This field will be accessible only if the Visible in all workspaces checkbox is not selected.
User/User Groups: Select the User(s)/User Group(s) you want to share the Category with. This field will be accessible only if the Visible in all workspaces checkbox is not selected.
Visible to: This section shows the User, User Groups, and Workspaces that can view the Category.
Click the Save button to create the Category with the specified configuration.
To take actions on Categories/Sub-categories
Once you have created a category or sub-category, you can take many actions on it. Hover over to the Category/Sub Category that you have created and select the desired option. For more information, see Manage Category/Sub Category — Description.
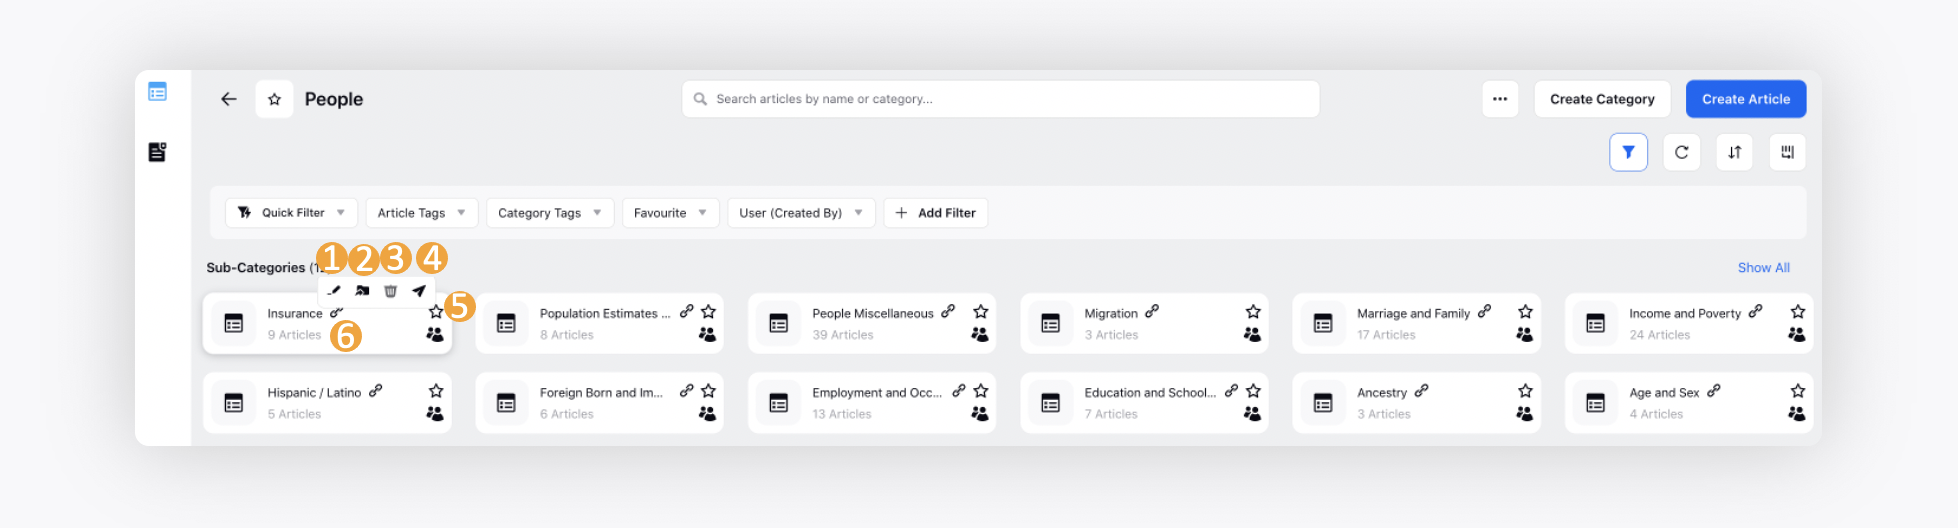
Manage Category/Sub Category — Description
# | Term | Description |
1 | Edit | Select to make the changes in the configuration. |
2 | Move to Category | Select to move the category/subcategory to another category/subcategory. |
3 | Delete | Select to permanently delete the category/subcategory. You can not delete a category unless you delete the subcategories and articles inside it. |
4 | Bulk Publish Articles | For a category mapped to community, make all the approved articles within it public at once. Note: Only the approved articles/translations which are immediate children of the mapped category (& not located within any of its subcategories) will be published. |
5 | Star | Select to mark your category/subcategory as favorite or important. |
6 | Mapped to Category | View the community name/s the category is mapped to. |
Clone Knowledge Base Category Hierarchy and Articles
The Knowledge Base category hierarchies can now be cloned for efficient content management and organization. This will provide a convenient way to easily replicate category hierachies, nested sub-categories, and the articles within them.
Cloning categories also create a clone of all the articles in that category, named “Copy of original_article_name”. Cloning a category also creates a clone of any nested sub-categories and will be called “Copy of original_category_name”. Any article(s) within these sub-categories will also be cloned with the name “Copy of original_article_name”.
Any article cloned from the parent category or any of the nested sub-categories will be automatically set to the “Draft” status.
The cloned categories and sub-categories will retain the following attributes:
The category image(s) will be cloned.
The category tag(s) will be cloned.
The visibility of the category will be the same as the parent category.
![]() Note: For the original category and nested sub-categories, which are mapped to the Community Builder, the cloned versions will not be mapped to the Community Builder.
Note: For the original category and nested sub-categories, which are mapped to the Community Builder, the cloned versions will not be mapped to the Community Builder.
![]() Note: While cloning the Knowledge Base category hierarchy, if article(s) in the category or nested sub-categories are mapped to other Knowledge Base categories, they will not be cloned in the mapped Knowledge Base categories.
Note: While cloning the Knowledge Base category hierarchy, if article(s) in the category or nested sub-categories are mapped to other Knowledge Base categories, they will not be cloned in the mapped Knowledge Base categories.
The cloned articles will have the following attributes:
Except for article tags, no article properties will be cloned.
Custom properties of articles will not be cloned.
Translations in “Inactive” status will not be cloned.
Articles' parent translations, parent variants, and variant translations will be cloned, with connection to their respective base article clones.
Follow these steps to clone a Knowledge Base category hierarchy:

Go to Knowledge Base on the Launchpad under the Resolve column. Alternatively, search for ‘Knowledge Base’ in the Launchpad search bar.

Hover over the category whose hierarchy you want to clone. This will show a toolbar above the category.
Select the Clone Category Hierarchy option from the toolbar. This will open the Clone Category Hierarchy confirmation window.

In the confirmation window, select Confirm. This action cannot be undone.
After this step, you will receive a toast notification confirming your request to clone the category.

Once the cloning process is completed, you will receive a system notification confirming the successful cloning. Upon which a new category with the name “Copy of original_category_name” will be visible. The clone of the category has been created with the same hierarchy as the original category.

Upon successful cloning of the Category, any article in the Category will also be cloned with the name “Copy of original_article_name”.

This completes the process of cloning Category hierarchy in Knowledge Base along with the nested sub-categoties and relevant articles.
Color Tagging Knowledge Base Categories
Color tagging articles on agent-facing interfaces helps improve agent efficiency and reduces the risk of sharing internal-only content with customers. This is achieved by applying Color Tags to Knowledge Base categories. All relevant articles within those categories will display a color-coded tag when viewed by agents through interfaces like the Smart Assist Widget and Knowledge Base Widget.
These visual tags allow agents to quickly identify the nature of an article, for example, whether it contains public information or internal/confidential details.
Follow these steps to apply color tagging to Knowledge Base Categories on agent-facing interfaces:

Go to All Settings under the Listen column on Launchpad, then go to Color Tagging under the Manage Workspace section. This will open the Color Tagging Record Manager.

Click the Create Color Tag button at the top right of the Record Manager to open the Create New Color Tag page.
Fill in the required fields on the Create New Color Tag page. Fields marked with a red dot are mandatory. Below are the descriptions of the fields on this page:

Name: Enter the name of the Color Tag for easy identification. (Required)
Module Type: Select Knowledge Base Folder. (Required)
Share Settings
Visible in all workspaces: Select this checkbox to share the Color Tag with all available Workspaces.
Workspaces: Select the Workspaces that you want to share the Color Tag with. This field will be accessible only if the Visible in all workspaces checkbox is not selected.
User/User Groups: Select the User(s)/User Group(s) you want to share the Color Tag with. This field will be accessible only if the Visible in all workspaces checkbox is not selected.
Color Tag Criteria

Select Attribute: Choose the attribute that determines how the color tag will be applied to articles. Only one option can be selected simultaneously. (Required)
The available options are:
Nested Category: Applies the color tag to all articles within the selected Knowledge Base category, including its sub-categories.
Category: Applies the color tag only to articles within the selected Knowledge Base category, excluding sub-categories.
Operator: Select In or Not In, according to your preference.
In: Use this condition to include records where the field value matches any value from a specified list.
Not In: Use this condition to exclude records where the field value matches any value from a specified list.
Value: Select the values depending on the selected parameter.

Color Picker: Click the Color Picker button to choose the color that will highlight the Color Tag on agent-facing interfaces. Make sure the selected color reflects the purpose of the tag. You can pick a color from the canvas or enter a specific color using its hexadecimal or RGB code.
Click the Add Tag button to configure multiple Color Tag criteria.
Click the Create button to create the Color Tag with the specified configurations.
This completes the process of applying color tag to Knowledge Base Categories on agent-facing interfaces