Compose Facebook & Instagram Ads
Updated
Sprinklr's Ads Composer allows you to create ads for a defined audience and helps you stay within budget using effective bid strategies.
Advertising on Facebook and Instagram allows you to create visually immersive stories that reach over 2 billion monthly active users worldwide.
To learn more, click Ads Composer.
Select Account and Objective
Click the New Tab icon. Under the Sprinklr Marketing (Ads) tab, click Ads Composer within Execute.
On the Ads Composer window, select your Facebook ad account.
In the Campaign Details section, choose your campaign Objective from Select Objective for your Campaign. For more information, see Facebook and Instagram Objectives.
Under Campaign Name, enter a name for your campaign or use a naming convention.
Select an object you want to promote (e.g., Page) in your ad sets (Promoted Object) from the section below Campaign Name.
Click Add beneath each promoted object to add multiple objects to your campaign. It will create separate Ad Sets for each promoted object.

Select a Special Ad Category that best describes your campaign (Financial Products and Services, Employment, Housing, or Social Issues, Elections, or Politics). If your Facebook campaign does not offer credit, employment, or housing opportunities, then you can select None.
For more information, see Advertising Policy and Guidelines for Facebook.
![]() Note:
Note:
Certain customer list custom audiences for housing, employment, and financial products and services (including credit) campaigns are restricted for advertisers based in the US or reaching audiences in the US making them ineligible for use in Special Ad Category Ad sets.
If you are running campaigns with Financial Products and Services, Housing, and/or Employment opportunities, you will need to select one or more Special Ad Countries where you want to run your campaign.
This will determine the targeting options that will be made available to comply with the audience targeting restrictions. The account country will be selected by default.
.png)
Select the custom properties under Define Custom Properties and click Next.
Facebook and Instagram Objectives
Terms | Description |
Traffic | Get people to visit your website or app. |
Conversions | Promote specific conversions of your website or app. Note: Once a Conversion Pixel is added at the campaign level, you won't be required to select it at the ad variant level. For more information, see Set a Facebook Conversion Pixel. |
Note: For Traffic and Conversion objectives, you can choose where you want to drive traffic from the following:
|
Post Engagement | Boost your page posts. |
Engagement | Get more messages, video views, post engagement, Page likes or event responses. Good for, Messages, Video views, Likes, comments and shares. For Traffic and Conversion objectives, you can choose where you want to drive traffic from the following:
|
Video Views | Create Ads that get more people to view a video. |
Leads | Reach people who are near your business. |
Page Likes* | Get Page likes to grow your audience and build your brand. |
Sales | Create ads from your product catalog. Note: If you are creating a new Product Set using Product IDs (Products, Flights, and Hotels), you can paste multiple comma-separated IDsat once rather than selecting product ids one at a time. |
Brand Awareness | Increase awareness of your brand. |
App Promotion | Send people to the store where they can purchase your app. The available store types you can select from are:
You can run two types of App Install campaigns:
|
App Install Campaigns You can check the box alongside iOS 14 Campaign so that your ad campaign is in compliance with Apple's iOS 14 App Tracking Transparency (ATT) framework that requires apps to receive the user’s permission through the framework to track them or access their device’s advertising identifier. For more information, see Apple iOS 14 Changes and Impact on Advertising. 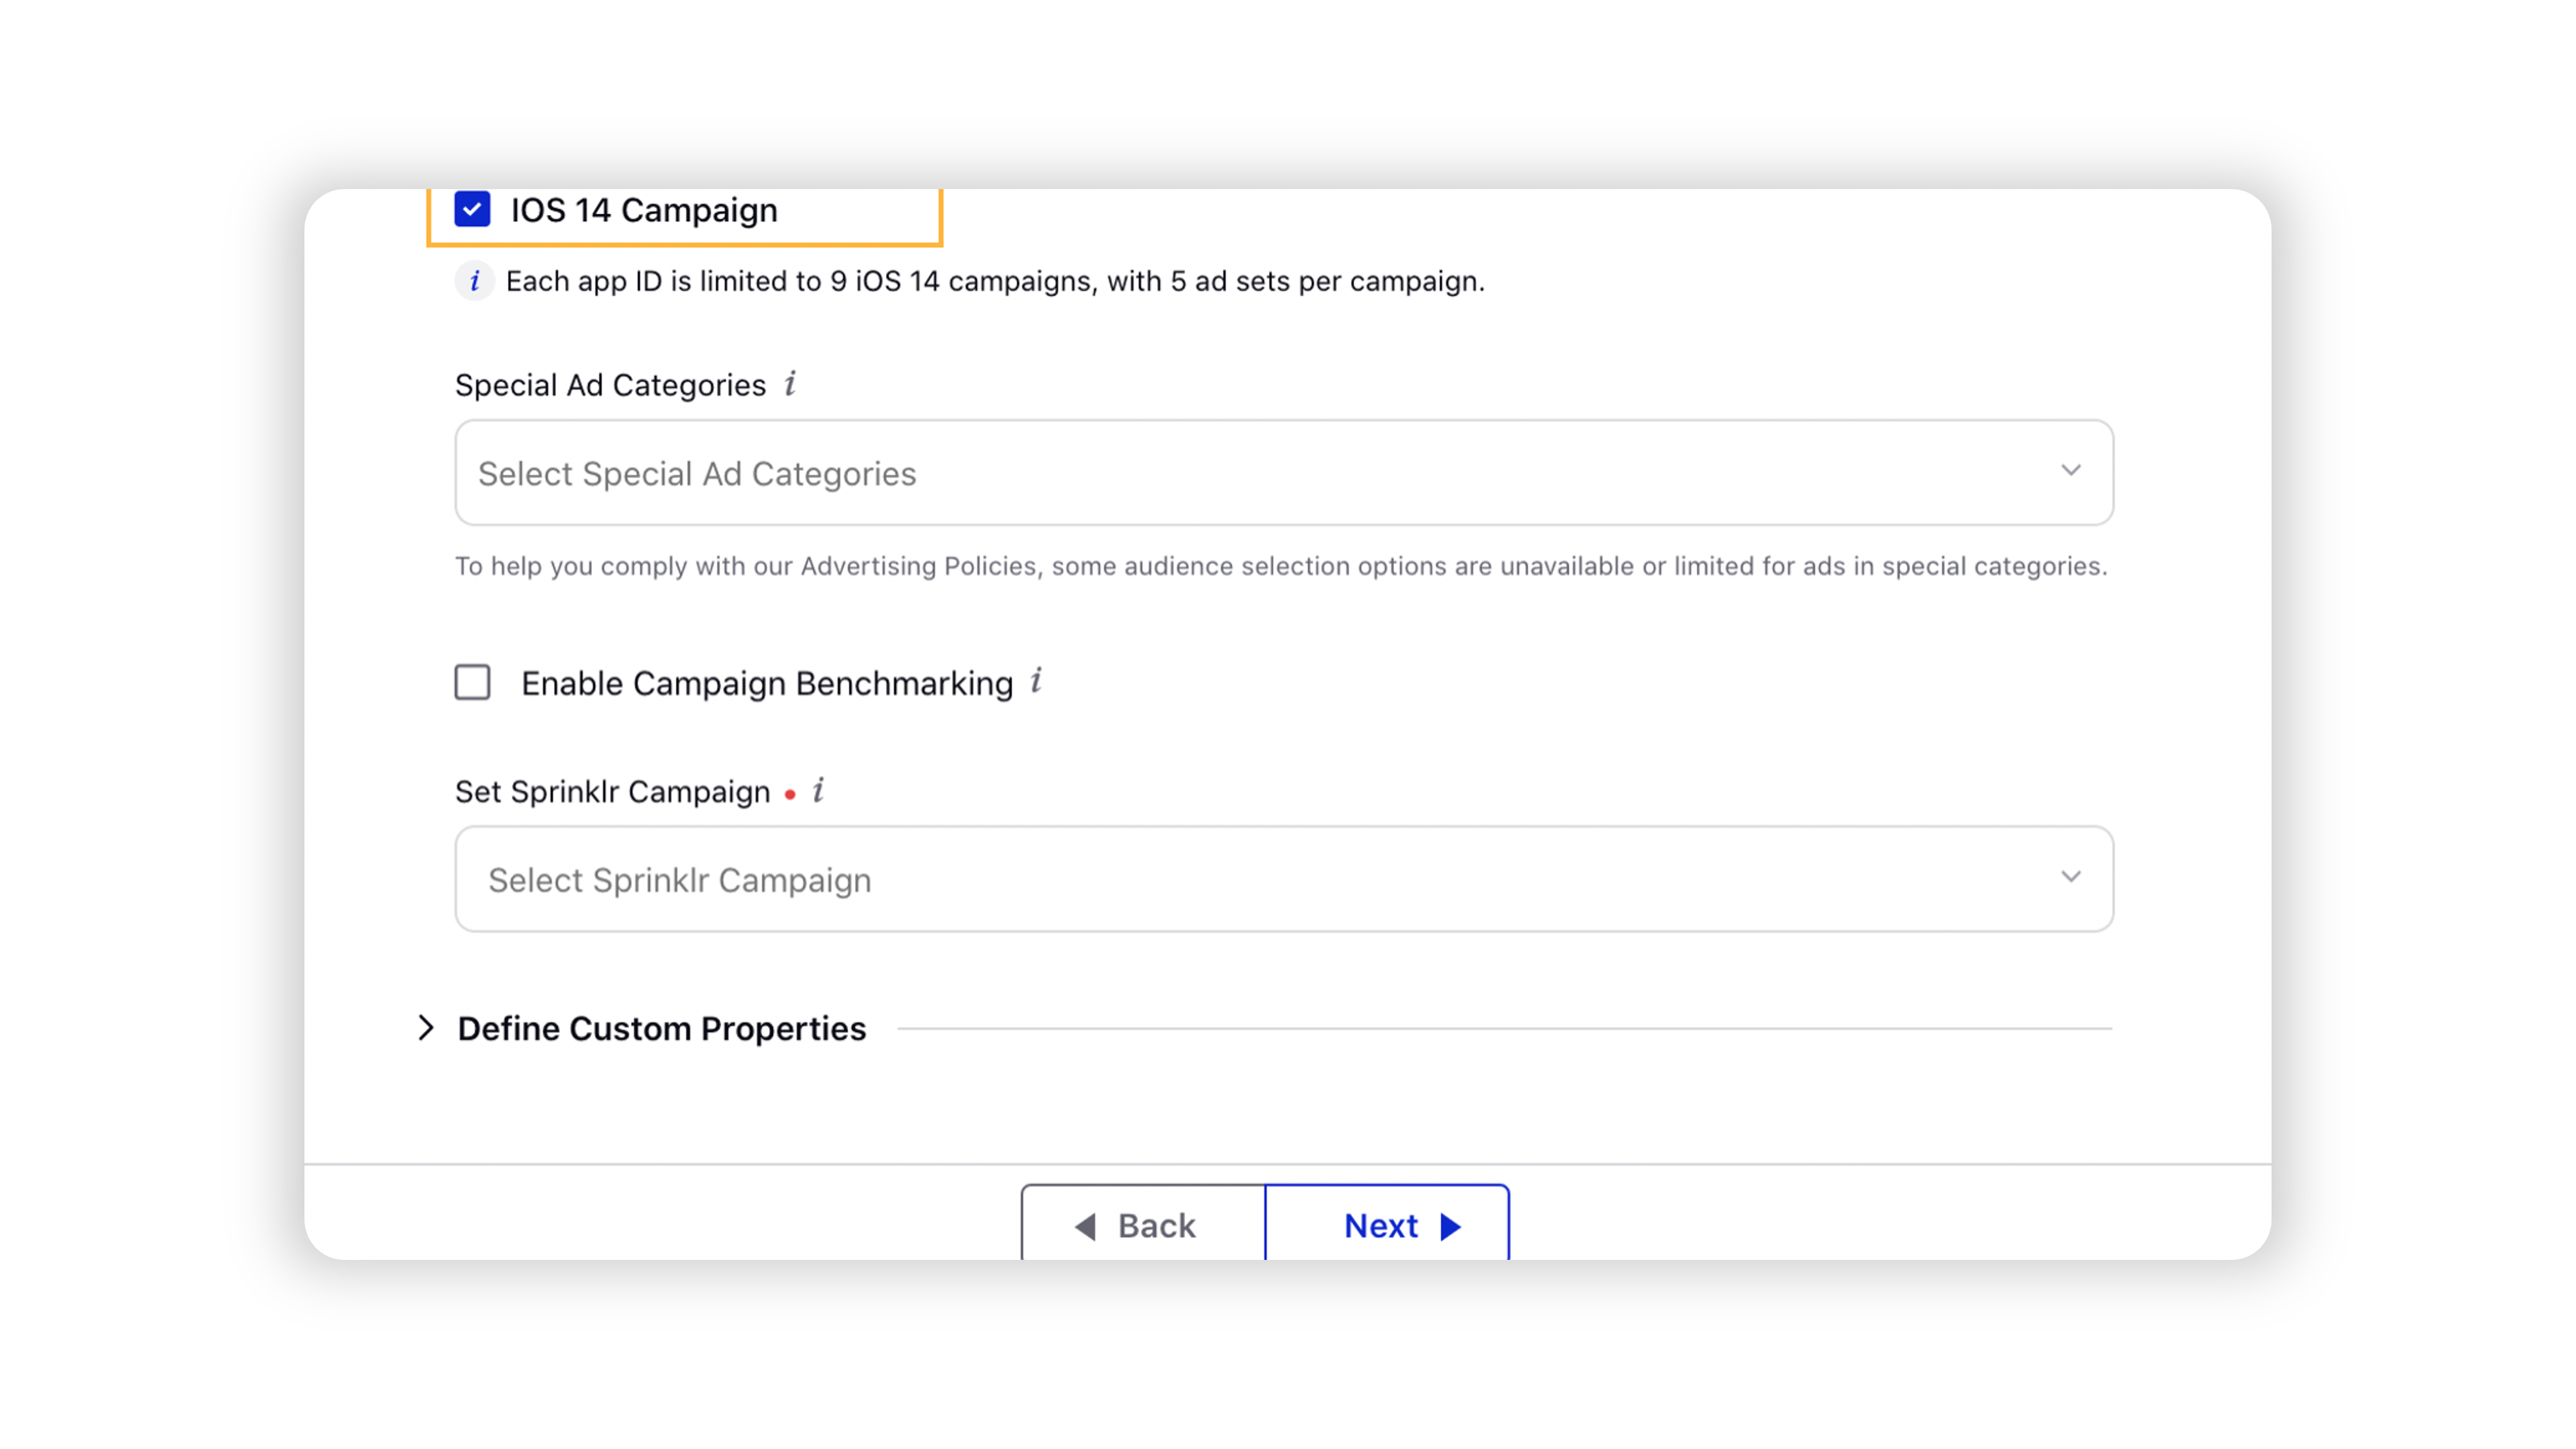 |
Store Visits | Use the store visits objective to promote multiple business locations to people nearby. |
Reach | Show your ad to the maximum number of people. |
Messages | Get more people to send messages to your business in Messenger. |
*Advertising on Instagram is not available for these objectives.
Apply targeting
1. In the Target Audience section, select from an existing target audience, or click Create New Audience to create a new target audience for your Ad. For more information, see Facebook and Instagram Ads Targeting — Field Descriptions.
![]() Note: If you have multiple Promoted Objects selected in the Campaign Details section, they will appear in the left pane. Click Add Targeting to apply targeting to each promoted object individually.
Note: If you have multiple Promoted Objects selected in the Campaign Details section, they will appear in the left pane. Click Add Targeting to apply targeting to each promoted object individually.
2. Click Save Target Audience to confirm your changes or click Segment & Save to create different variations of your target audience.
Facebook and Instagram ads targeting — Field descriptions
Terms | Description |
Name | Provide a name for your Facebook Targeting. |
Custom Audiences | Search an audience you already know from an existing customer list to target. For Special Ad Category campaigns, make sure that your audience selections do not discriminate against people based on certain personal characteristics. |
Include a location filter to target users in a specific country or region. Click the Import icon alongside Include to import multiple targeting for your ads. For Special Ad Category campaigns, Postal Code selection is unavailable. Location selection must include all areas within a 15-mile radius of any selected city, address, or dropped pin. | |
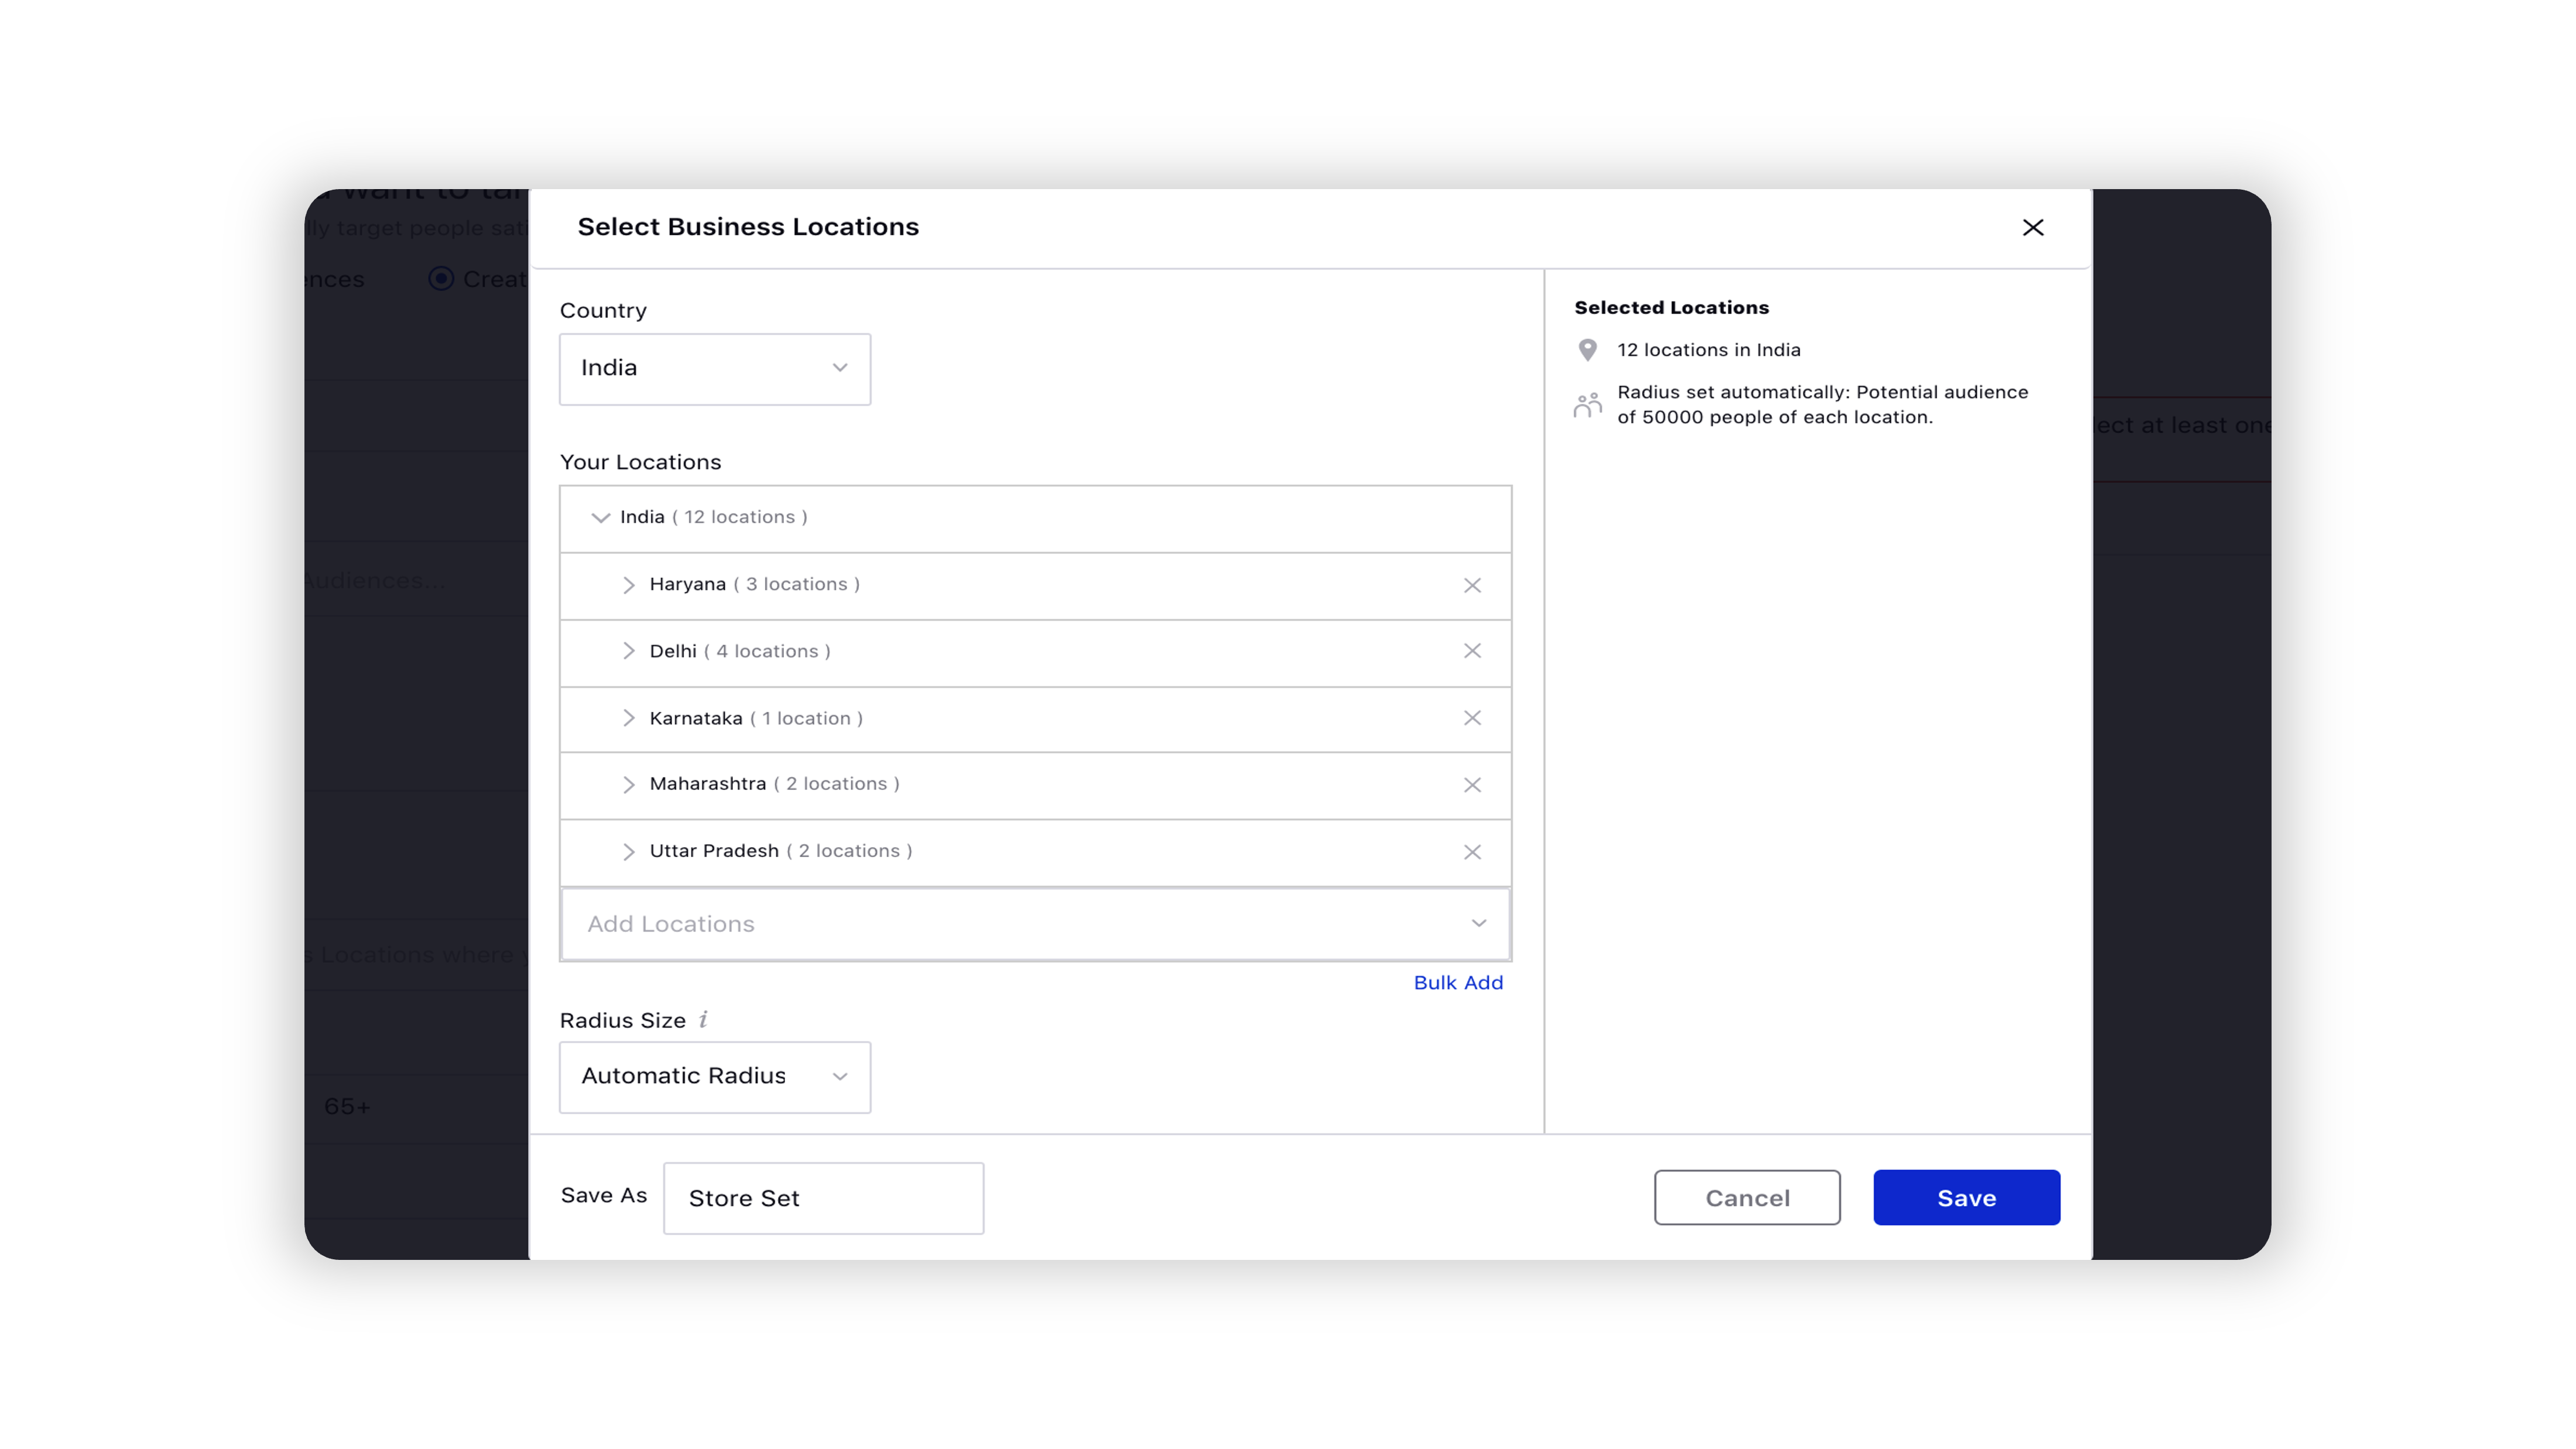
Locations (Store Visits) | Select from the following options:
|
(Catalog Sales) | Set target audiences more efficiently. |
Age Range | Select specific age ranges to target users of a certain age. For Special Ad Category campaigns, the age range will remain fixed to include ages 18 through 65+ and can't be changed. |
Gender | Select for gender-specific targeting. For Special Ad Category campaigns, options are fixed to include all genders and can't be changed. |
Language | Select specific languages to target speakers. |
Detailed Targeting | Refine your target audience by including them based on demographics, interests, behaviors, more categories, and custom audiences. Click the Import icon alongside to import multiple targeting where you can copy and paste a list of Interests, Behaviors, etc. separated by commas, verify, and easily add targeting without having to search for each individual target. You can also narrow your audiences further by clicking Narrow Audience below. For Special Ad Category campaigns, some detailed targeting options, which may include demographics, behaviors, or interests, are unavailable. |
Expand interests when it may increase link clicks at a lower cost per link click (Traffic, Conversions, Post Engagement, and App Install) Not supported for Reach and Frequency Campaigns | Select to add interests to reach more people who may convert, but wouldn’t otherwise have been in your target audience. Facebook has a proprietary way of looking at certain interests and understanding a high degree of relevancy for other similar interests. For example, if you target interest in 'Cycling', it may also expand the interest to 'Outdoor Exercise' or something like that. This just allows you to expand while still keeping some relevancy in the expansion. |
People Who Liked Your Page/Used Your App | Facebook has deprecated Connections targeting. If you select a connection, it will be automatically converted into Custom and Lookalike audiences. For more information, see Facebook Ad Targeting Changes. |
Mobile | Target users based on the following:
|
Advanced Options | Select the advanced options for your target audience as required. |
Save this Target Audience for Future | Select to save your targeting for future use. |
Budget and Schedule
1. Enter the details for the respective fields. For more details, see Budget and Schedule — Field Descriptions.
2. Click Next.
Budget and Schedule — Field descriptions
Terms | Description |
Configure all Ad Sets individually | Select to apply individual configuration for your Ad Sets, if you have applied multiple targeting selections. |
Enter the Budget details for Campaign |
Budget Optimization | Enable to distribute your budget across Ad Sets to control spending on each Ad Set. Note: Budget Optimization can also be enabled for published Facebook campaigns from the Ads Manager. |
Budget Type (when budget optimization enabled) | Select a budget type from the drop-down menu. If you choose a lifetime budget, we'll never spend more than that amount. If you choose a daily budget, you may spend more on some days and less on others but will maintain an average daily budget. |
Daily/Lifetime Budget (when budget optimization enabled) | Set the budget for your campaign according to the budget type. |
Spend Cap | Set a spending cap beyond which your Paid Initiative will stop running. Note:
|
Assign a Sprinklr Budget Source for your Paid Initiative | Select a Budget Source for your Paid Initiative. |
Enter the Bidding details for Campaign (when Budget Optimization is enabled) |
Pricing Strategy | Click to set a pricing strategy for your campaign.
Note The Highest Value & Minimum ROAS bid strategy is only available for Conversions, Product Catalog Sales, and App Install campaigns.
This is only available if you are eligible for value optimization. To check whether you are eligible, refer to Eligibility Requirements. |
Delivery Type | Select a delivery type for your Campaign to run on the platform.
|
Enter the Dayparting details for Campaign (when Budget Optimization is enabled) |
Run ads all the time | Select to run your ads every time. |
Run ads on a schedule | Select to run your ads on a specific schedule. Note: Adset Scheduling will run only if the Paid Initiative is active. |
Enter the Budget & Schedule details for all Ad Sets |
Budget Type | Select a budget type from the drop-down menu. |
Daily/Lifetime Budget | Set the budget for your Ad Set according to the budget type. |
Start Date | Set a Start Date for your Ad Campaign. |
End Date | Set an End Date for your Ad Campaign. |
Enter the Dynamic Creative details for all Ad Sets |
Slide the Toggle icon to provide individual assets, such as images and headlines, and automatically generate an optimized creative combination for your audience. Note: This capability is only supported for Conversions, Brand Awareness, Reach, Video Views, App Installs, Traffic, and Lead Generation objectives. |
Enter the Placement details for all Ad Sets |
Automatic Placements (Recommended) | Click to automatically display your Ads to your target audience in places such as Facebook Stories, Instagram Stories, etc. where they are likely to perform best. For more information, see Facebook Automatic Placements. |
Edit Placements | Click to customize your Ad placements based on the supported objectives from :
|
|
Edit Inventory Filter Details | Edit the Inventory Filter details for your ad placement. To learn more, see Facebook Audience Exclusion for Ad Placement. |
Manage Skippable Ads (Brand Awareness, Reach, Traffic, PostEngagement, Video Views, Lead Generation, Conversions, and Catalog Sales) | Check the box alongside Exclude Skippable Ads in this Ad Set to exclude skippable ads from your ad set. Note that skippable ads will be included in your Ad Sets by default. You can only use this option if you have selected Edit Placements and In-stream Videos as Platform Position. |
Add Placement Variation | Click to add multiple variations to your ad placement. To learn more, see Add Placement Variations in Ads Composer. |
Enter the Bidding Details for all Ad Sets (Bid Strategy can only be edited at the Campaign level when Budget Optimization is enabled) |
Optimize for | Select an optimization goal for your Ad Sets. Note that any platform positions that are incompatible with a selected optimization goal for a particular objective will be removed and a validation message will be displayed for the same. |
Pricing Strategy | Click to set a pricing strategy for your Ad Sets. |
Delivery Type | Select a delivery type for your Ads to run on the platform from the following:
|
Frequency | Set a frequency cap to control the number of times you want your ads to be shown to your target audience. You can adjust the frequency cap up to 90 days of impressions. Note: You are required to whitelist your ad accounts natively in order to add a frequency cap. Frequency cap is supported for the following objectives and their corresponding Optimization Goals:
|
Optimize to Reach Potential Travellers | Enable this to deliver static ad creatives to people with an intent to travel. You can provide a specific creative to display, and the delivery will be optimized to show to those people who have expressed an interest in travel but have not yet selected a destination. Note: This capability is only available for App Install, Lead Generation, Link Clicks, Messages, Page Likes, Post Engagement, Video Views, and Website Conversions campaigns. |
Enter the Dayparting details for all Ad Sets |
Run ads all the time | Select to run your Ads every time. |
Run ads on schedule | Select to run your Ads on a specific schedule. |
*Fields with red dots are mandatory.
![]() Note: If you set a Spend Cap, ads in the campaign will stop running once the amount has been spent, ensuring you don't over-spend.
Note: If you set a Spend Cap, ads in the campaign will stop running once the amount has been spent, ensuring you don't over-spend.
Select Creatives
In the Creatives section, click Add another Creative. On the Select Creatives window, select from the saved creatives or click Add New creative to create a new ad creative.
You can search for a creative by entering Post Text, Post Id, or Permalink in the search bar.
Tip: If you have selected from existing posts, you can apply the following channel-specific properties within the Creative Details section of the Selected Creatives window:
|
If you choose to Add New Creative, please follow the steps below. Note that the last used Facebook Page for that ad account will be auto-selected by default.
Note:
|
Refer to the below resources for best practices on ad creative aspect ratios: |
1. Select the Post Type for your creative. You can select from the following post types with respect to the supported campaign objective:
Media Post - Traffic, Reach, Page Likes, Conversions, App Install, Post Engagement, Messages, Brand Awareness, Lead Generation
Video Post - Video Views, Store Visits
Image Post - Store Visit, Catalog Sales
Slideshow Post - Conversions, Traffic, Brand Awareness, Post Engagement, Reach, Page Likes, Video Views, App Installs, Store Visits, Lead Generation, and Messages
Carousel Ads - Conversions, Traffic, Brand Awareness, Reach, App Installs, Catalog Sales, Store Visits, Lead Generation, and Messages
Collection Ad - New Objectives: Traffic, Engagement, Leads & Sales (only when using the Conversion Locations “Website” & “App”) and Awareness. Old objectives: Brand Awareness, Reach, Traffic, Conversions & Catalogue Sales.
Note:
|
2. Under the Creative Details section, enter the field details according to your selected post type. For details on certain objective-specific creative fields, see Objective Specific Creative Fields.
Note: You can provide a separate image for Instagram placement using the Separate Instagram Image option. By default, the Instagram placement will use the same Image provided for Facebook. |
3. Click Save from the bottom right corner to save your changes. In the preview screen to the right, all the Ad Variants will be displayed.
4. You can individually add or remove creatives from each Ad Set by checking the box alongside Configure creatives for each Ad Set individually.
5. Click Next.
Objective specific creative fields
Terms | Description | ||||||
You can customize your ad creatives for different placements by enabling Placement Asset Customization. For more information, see Placement Asset Customization for Facebook Assets. | 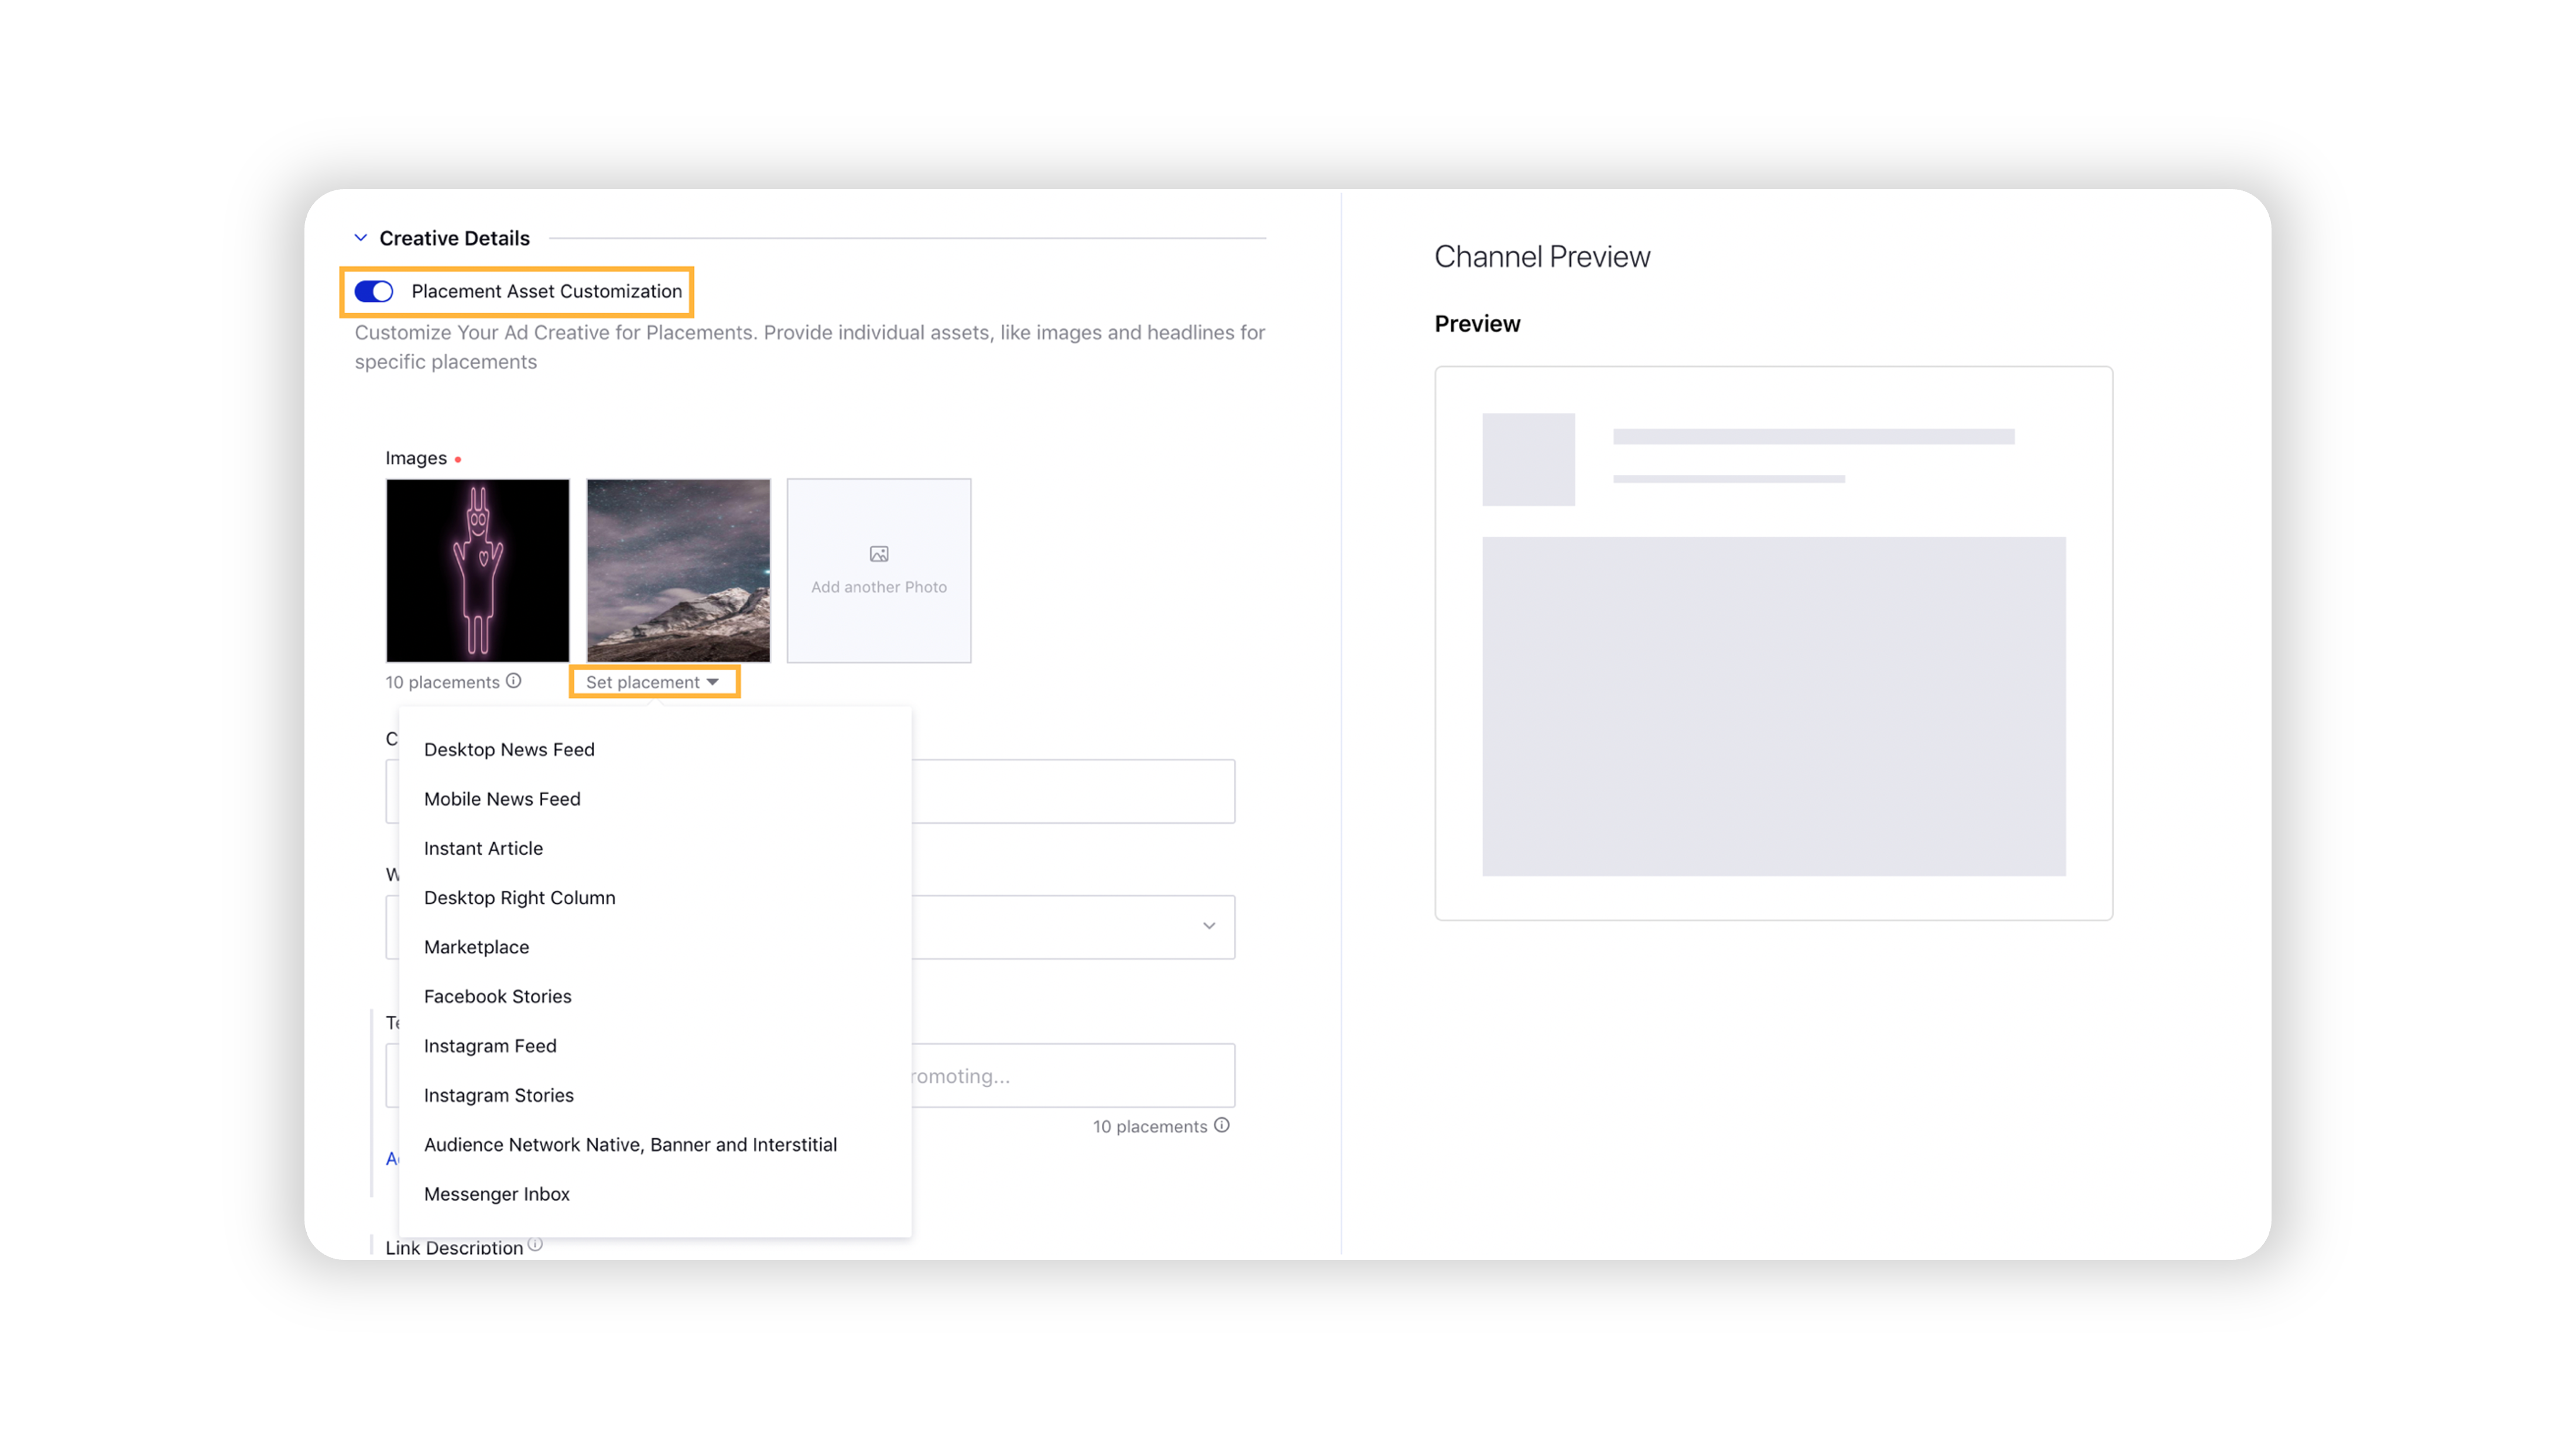 | ||||||
You can customize your ad creatives in multiple languages by enabling Language Customization. For more information, see Language Customization for Facebook Assets. | 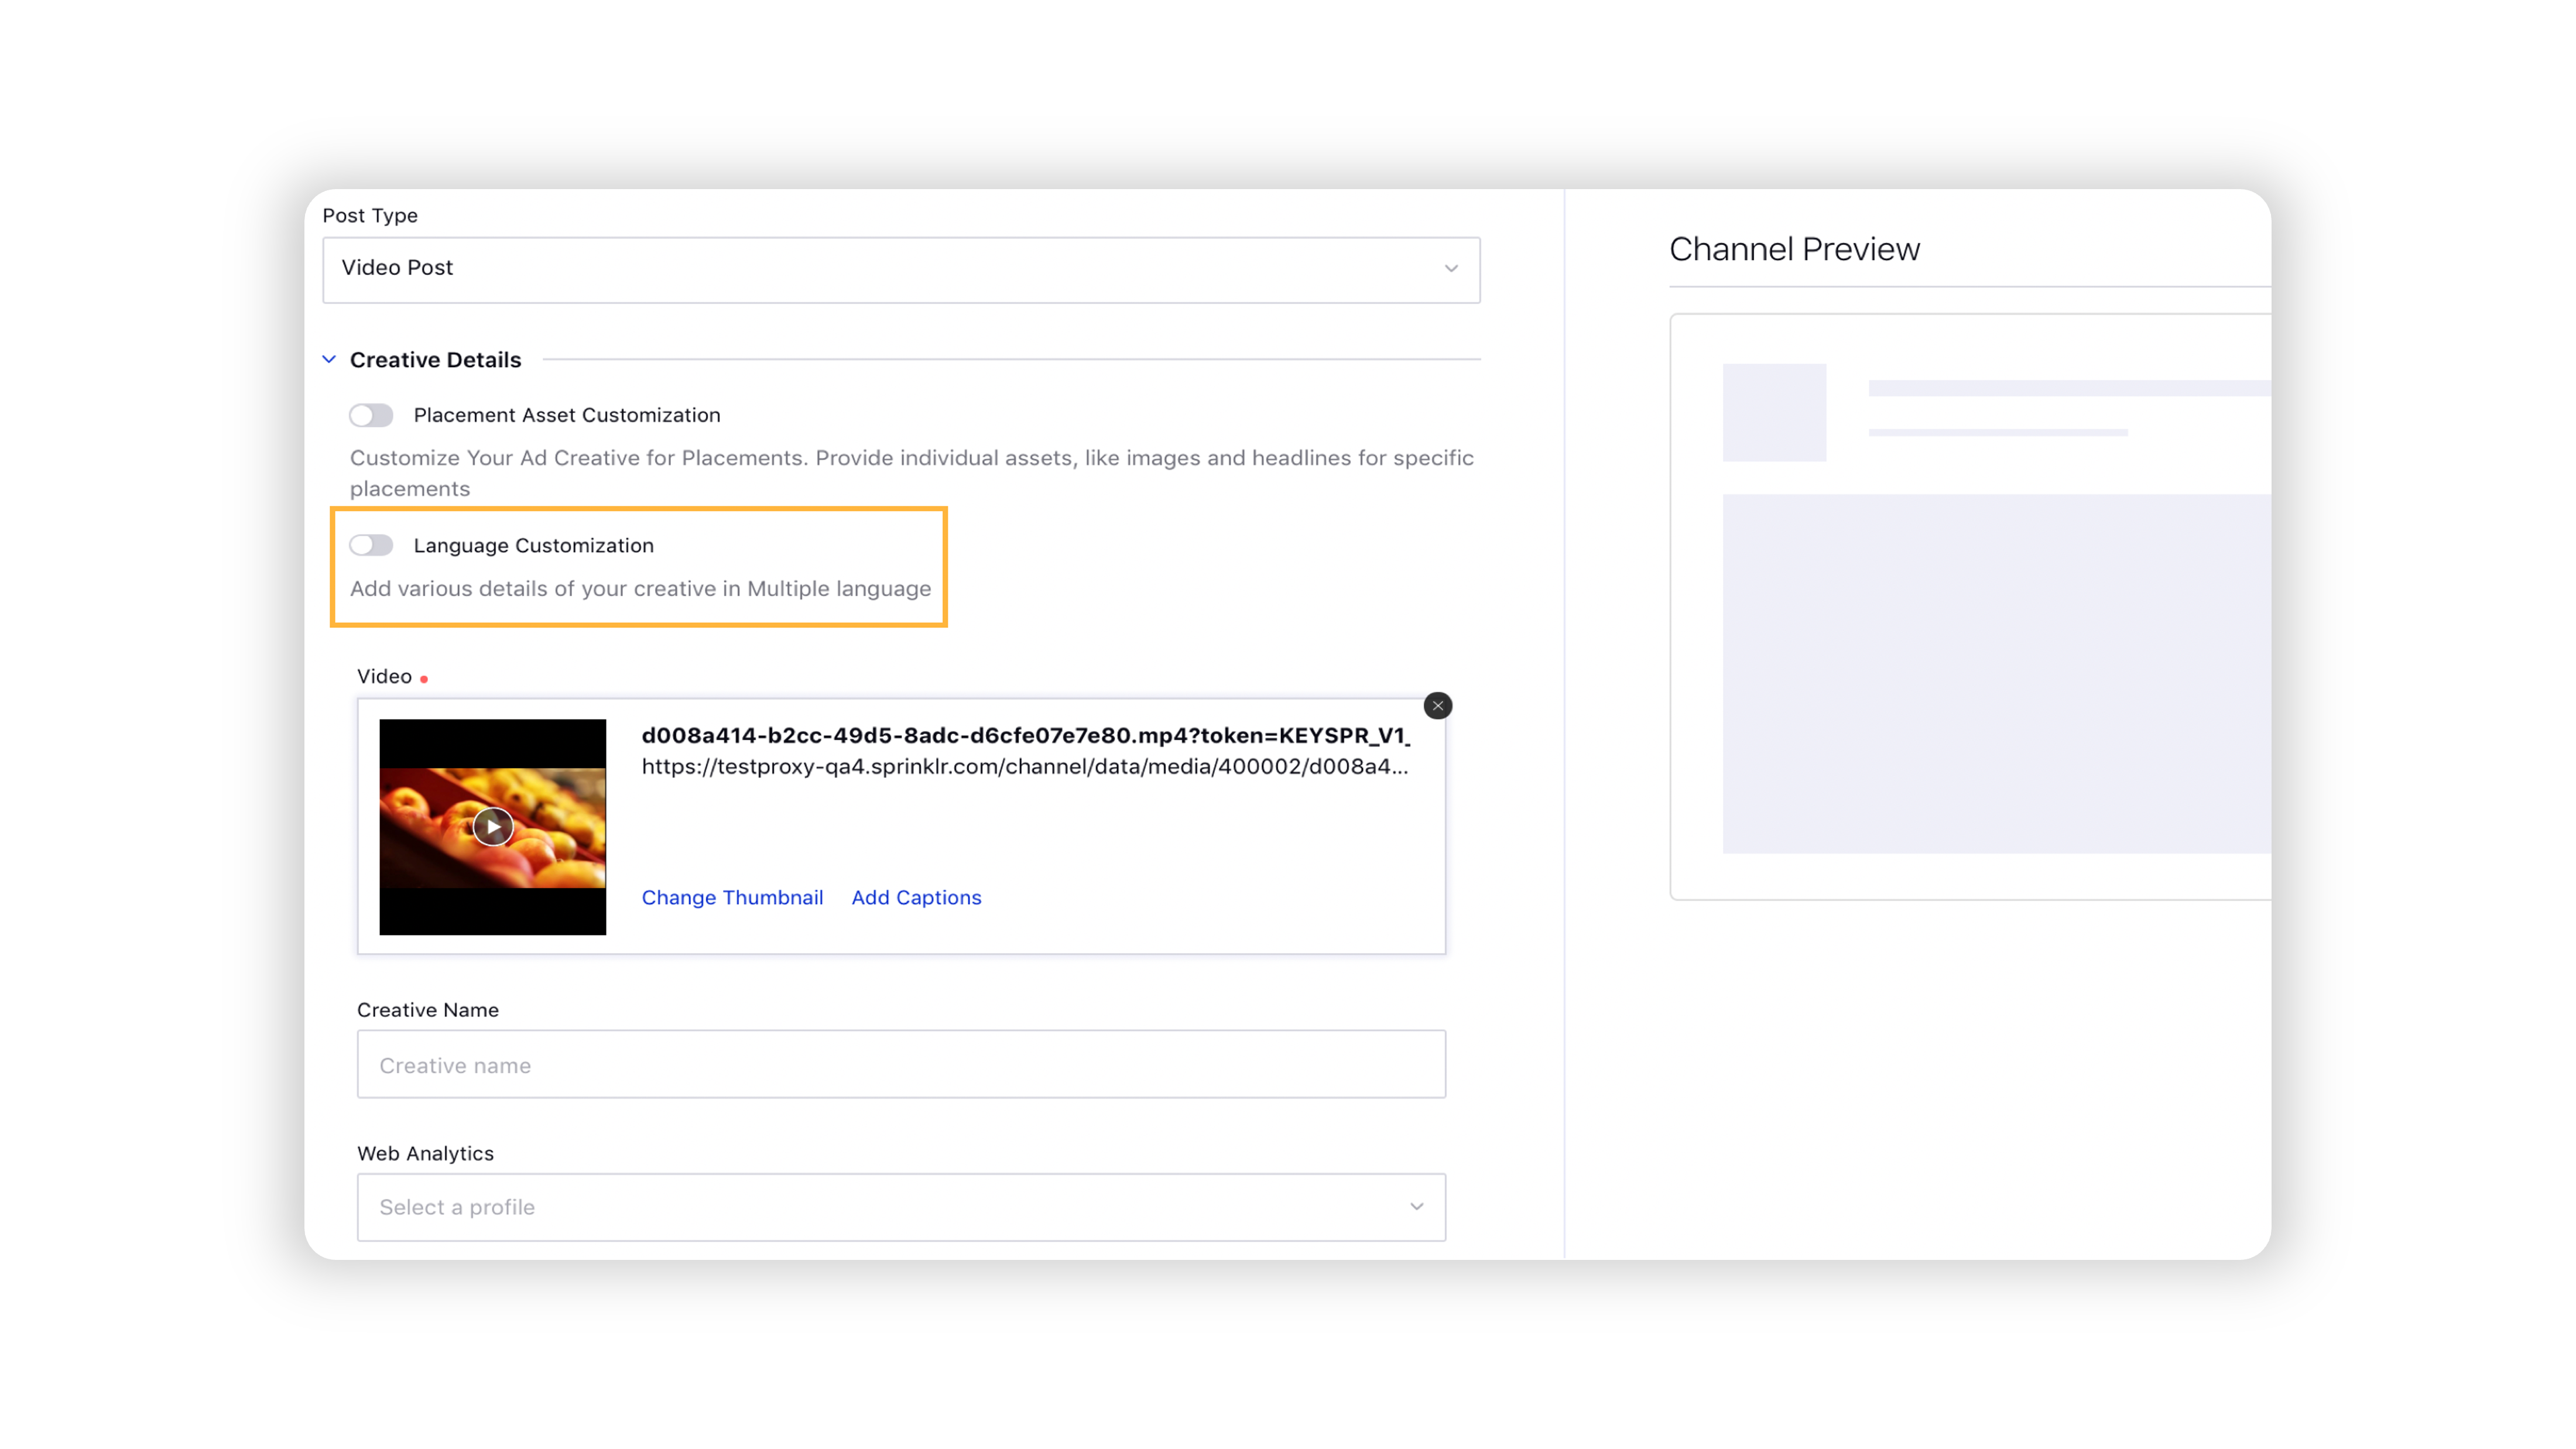 | ||||||
You can customize various details of your ad creatives for multiple locations by enabling Location Customization. For more information, see Location Customization for Facebook Assets. | 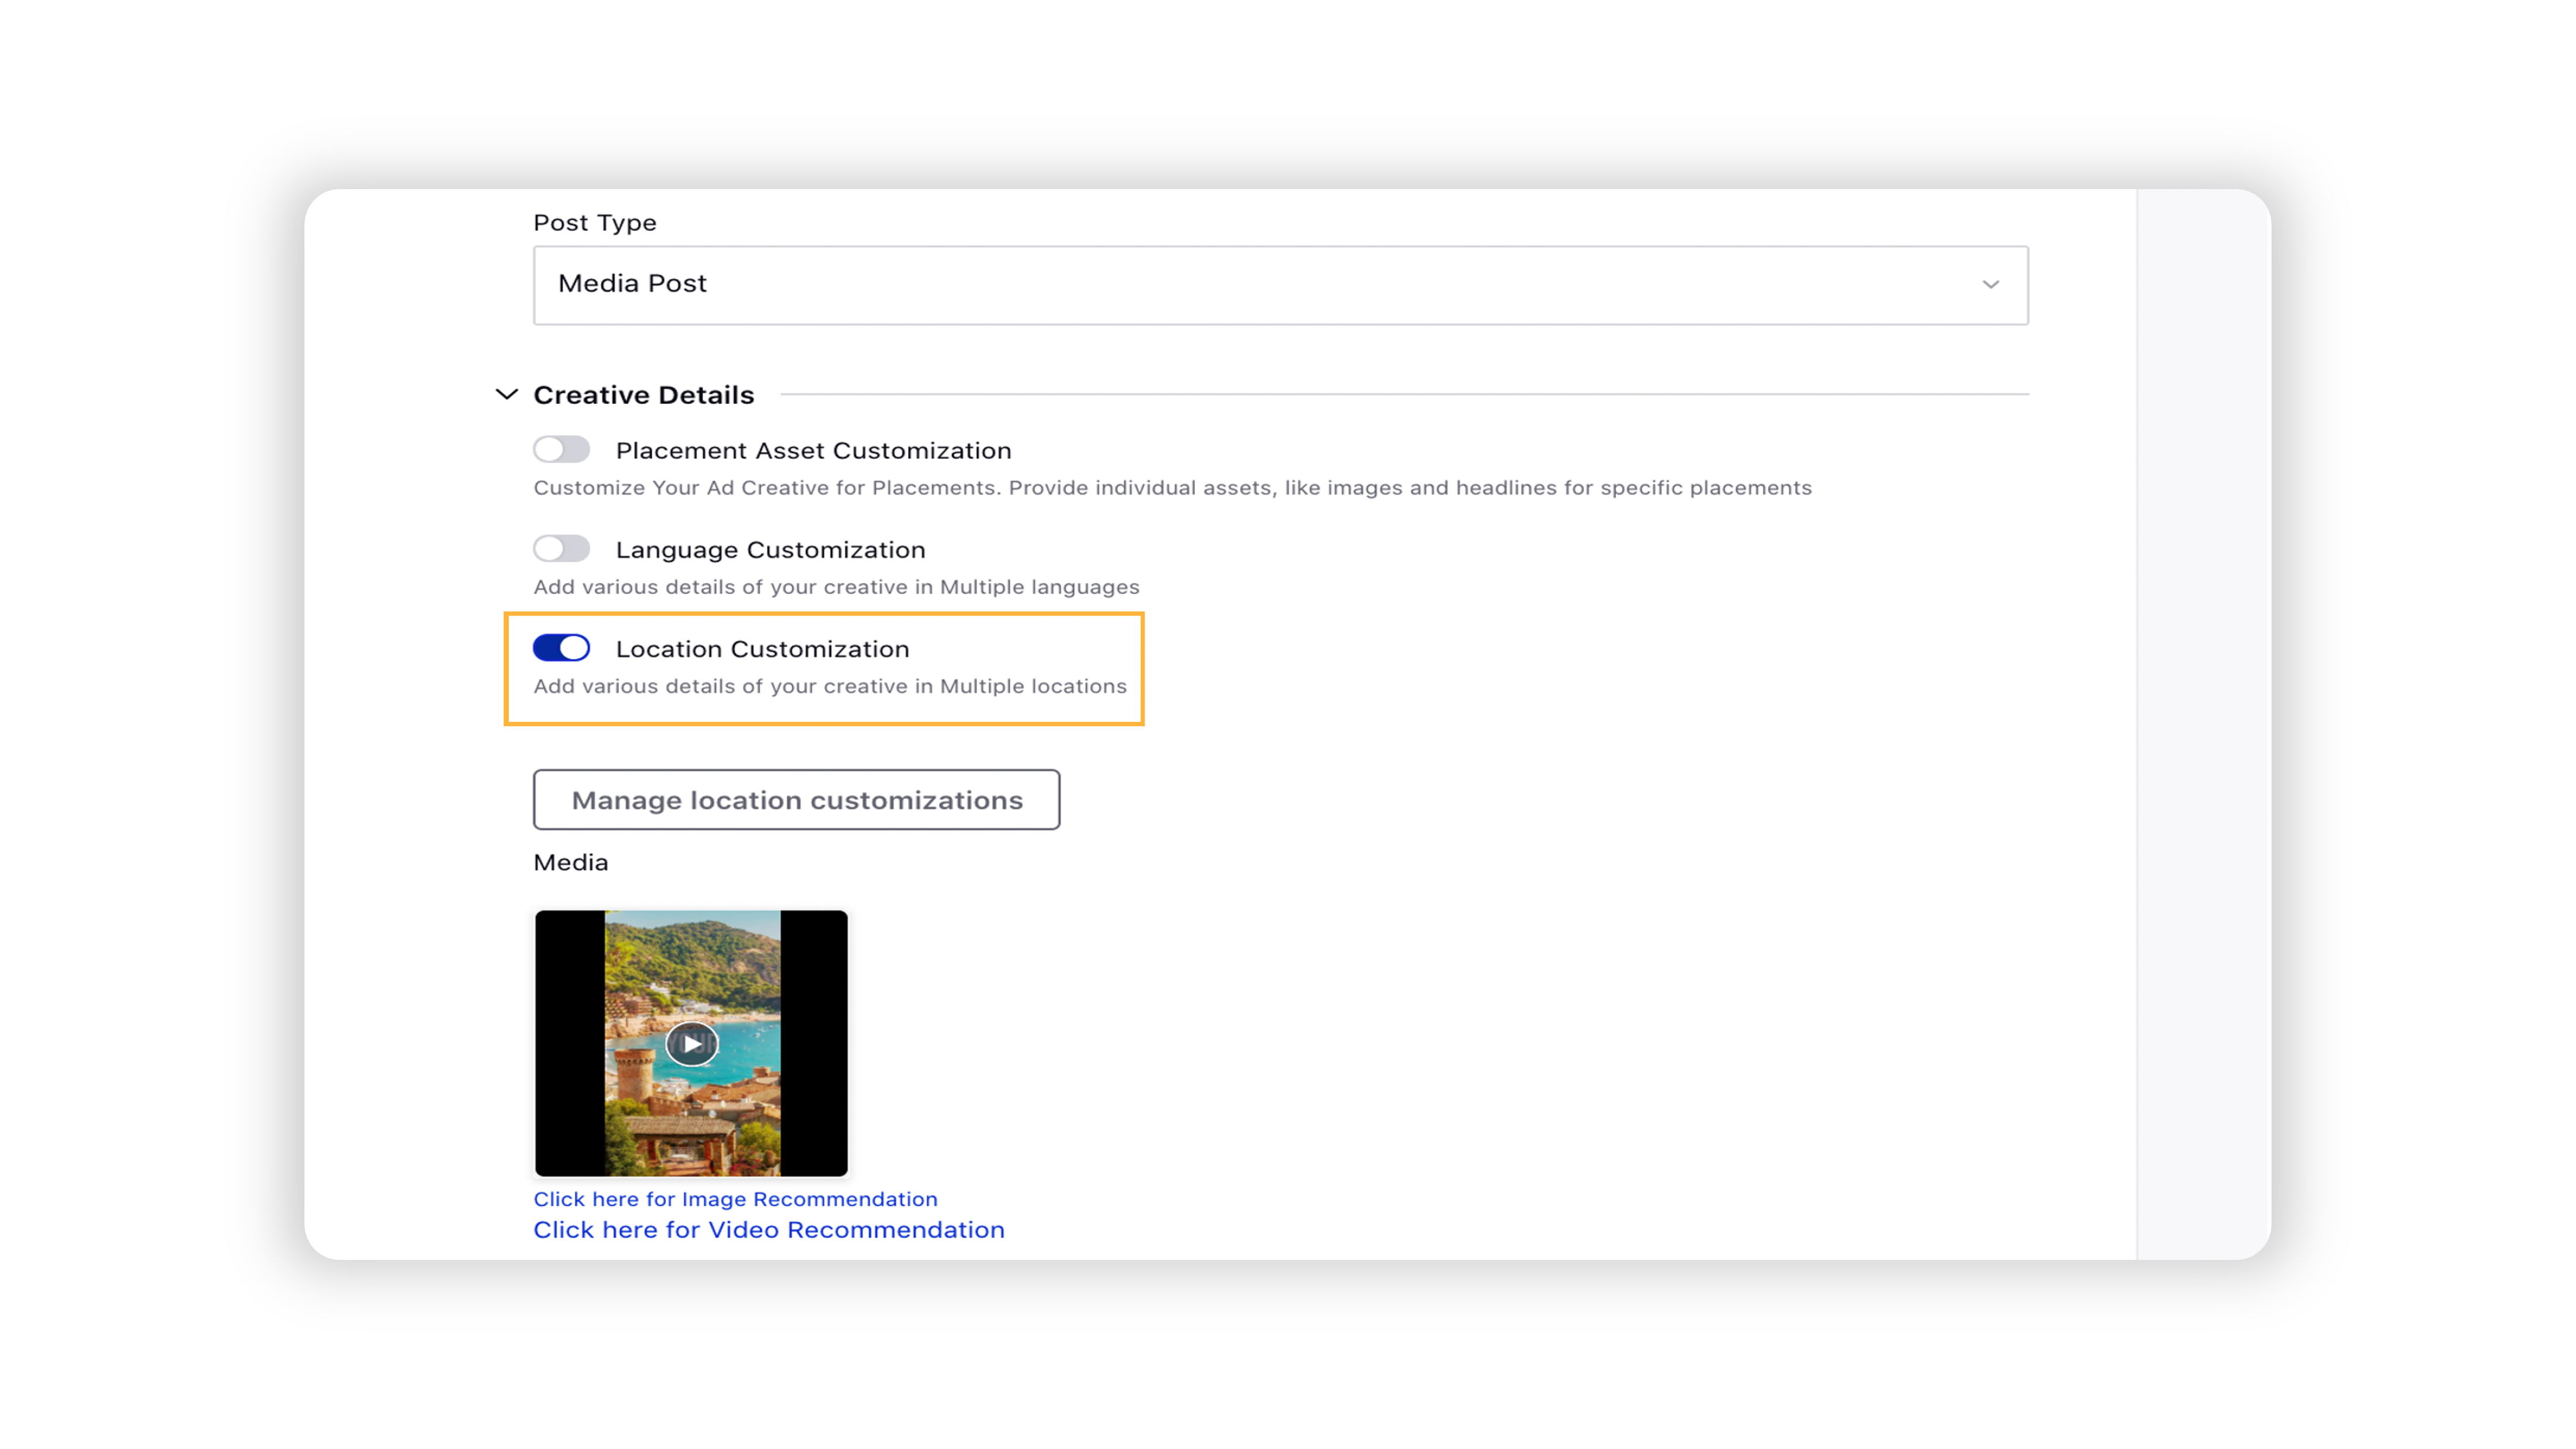 | ||||||
You can change the Thumbnail of the Video in your ad creative by clicking the Change Thumbnail icon in the bottom right corner of the video you uploaded. To add captions to your videos, you can click the CC icon in the bottom left corner of the uploaded video. | 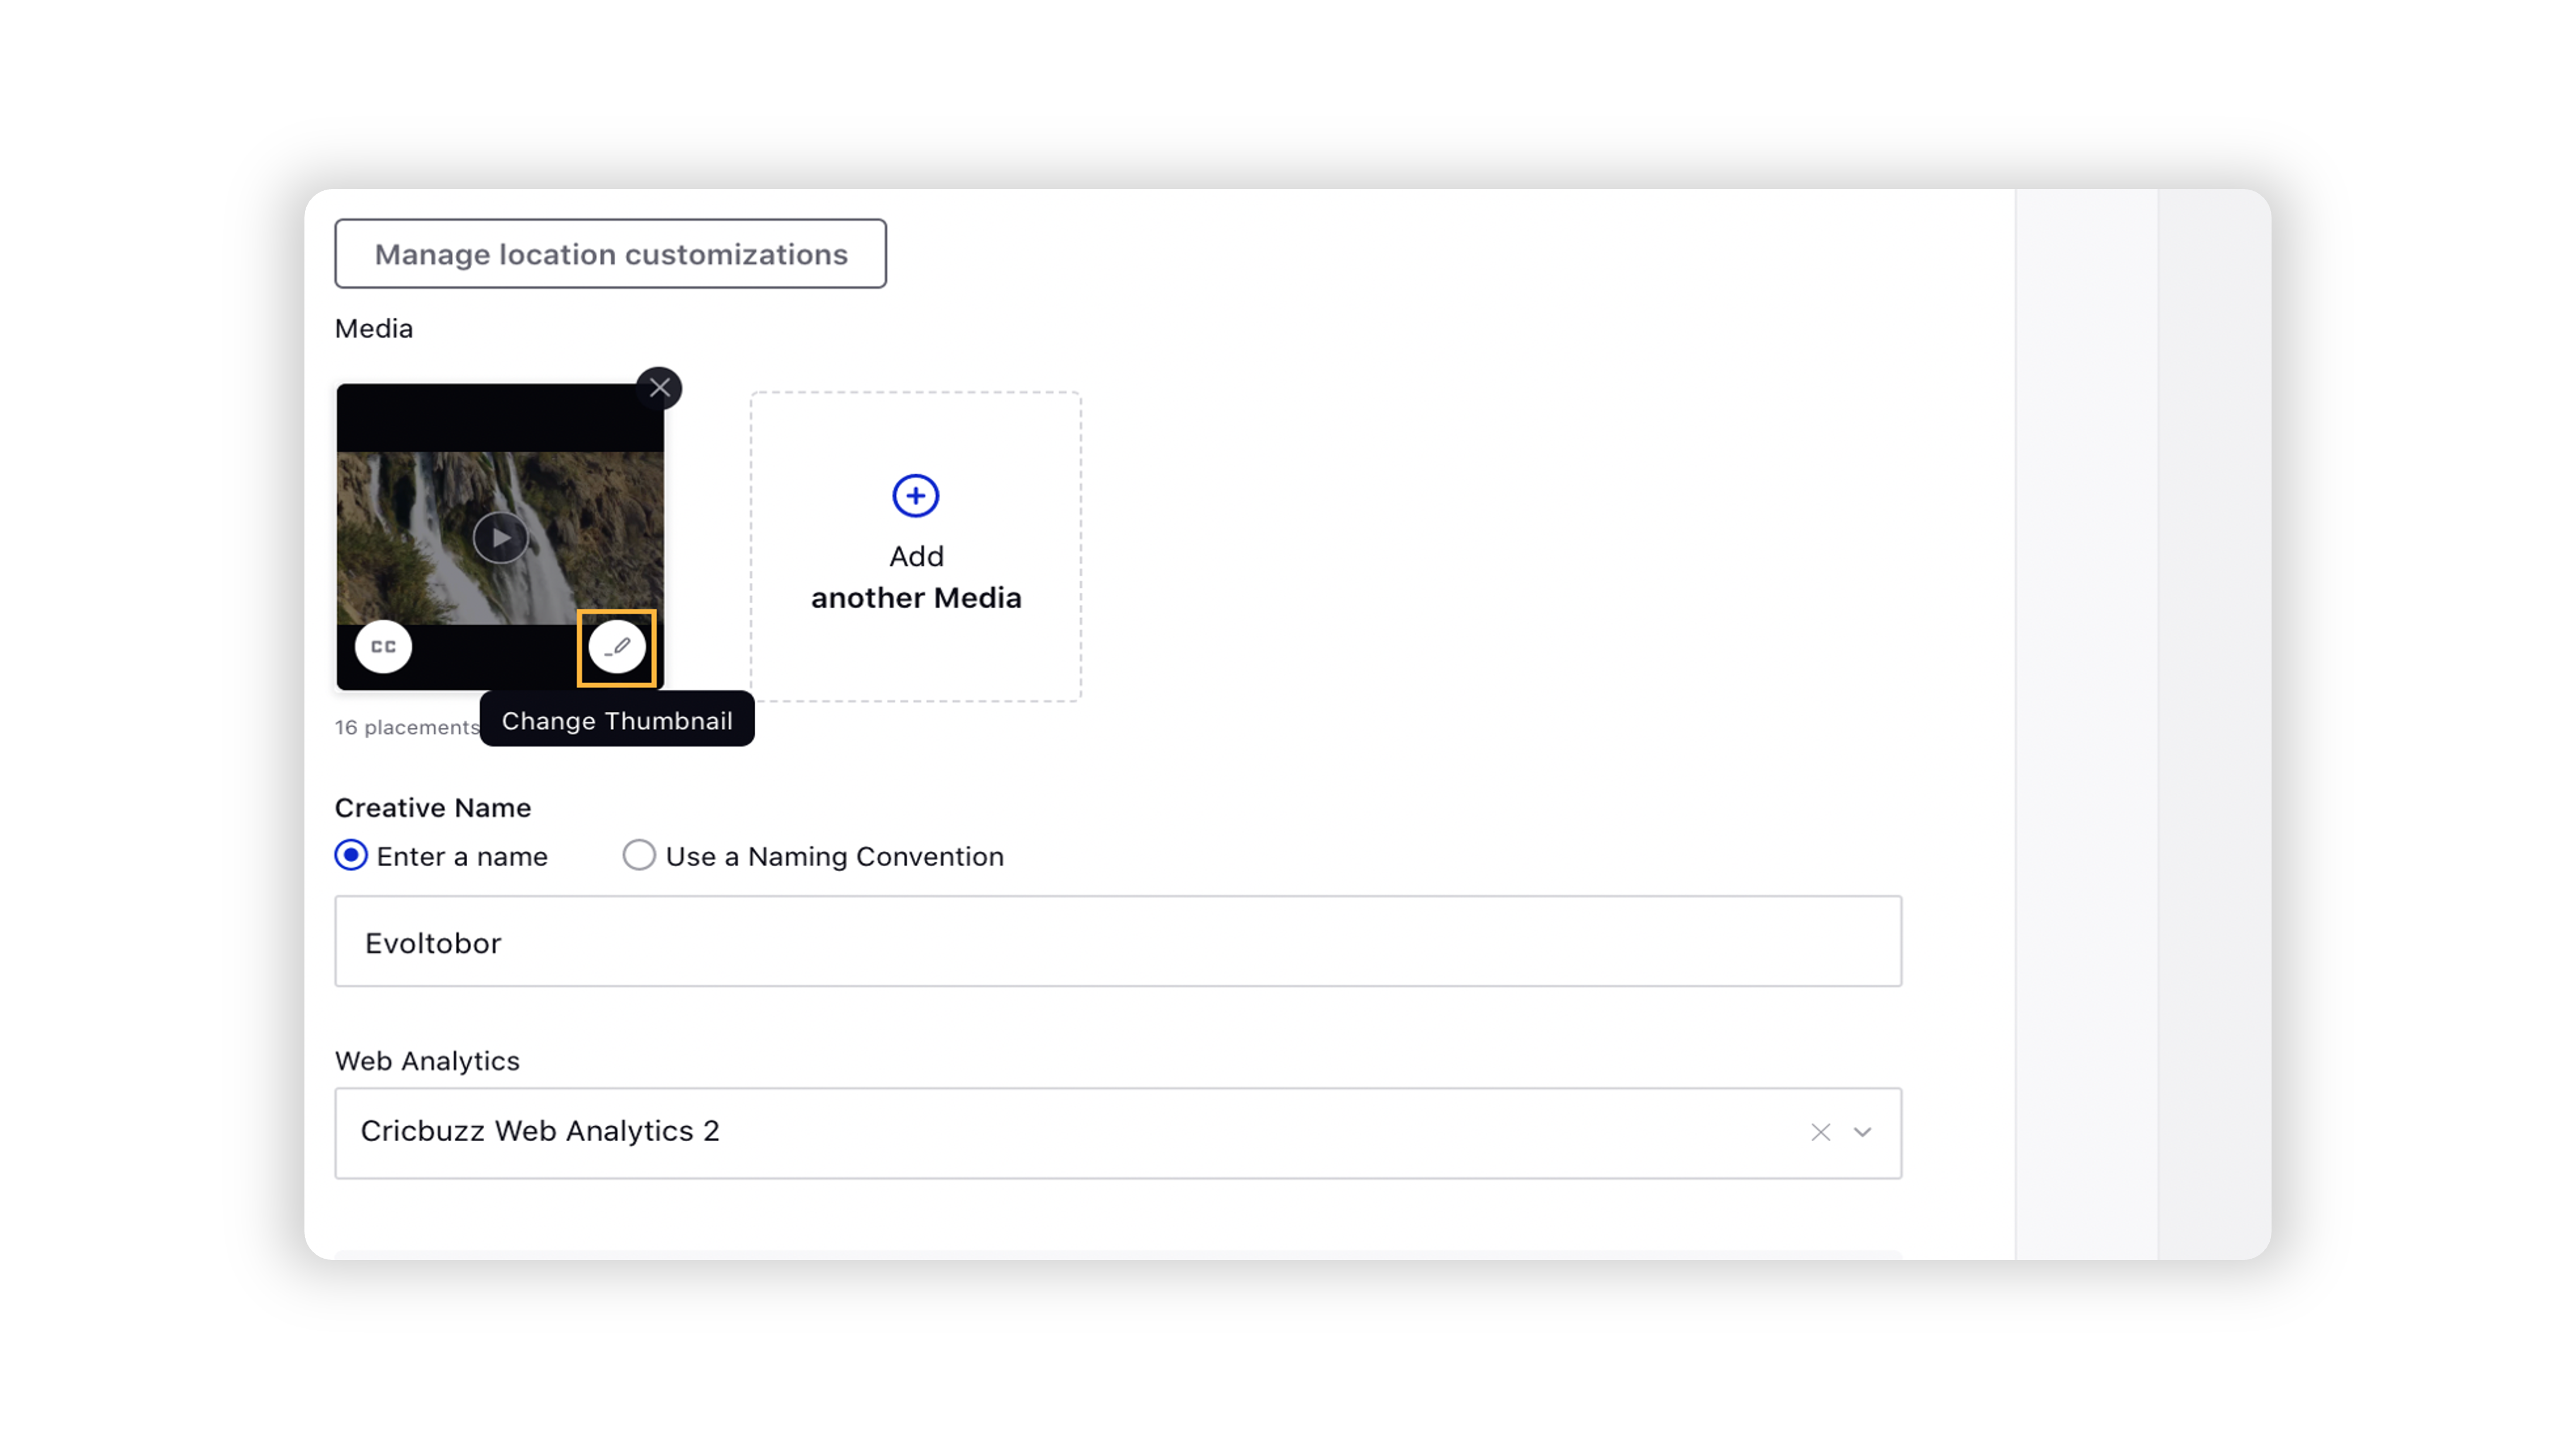 | ||||||
You can select Web Analytics to be applied to the URL Parameters field for Store Visits and Catalog Sales objectives. The same is also applicable for Collection Ads of any ad objective excluding App Install. For more information, see Apply Web Analytics to URL Parameters Field. | 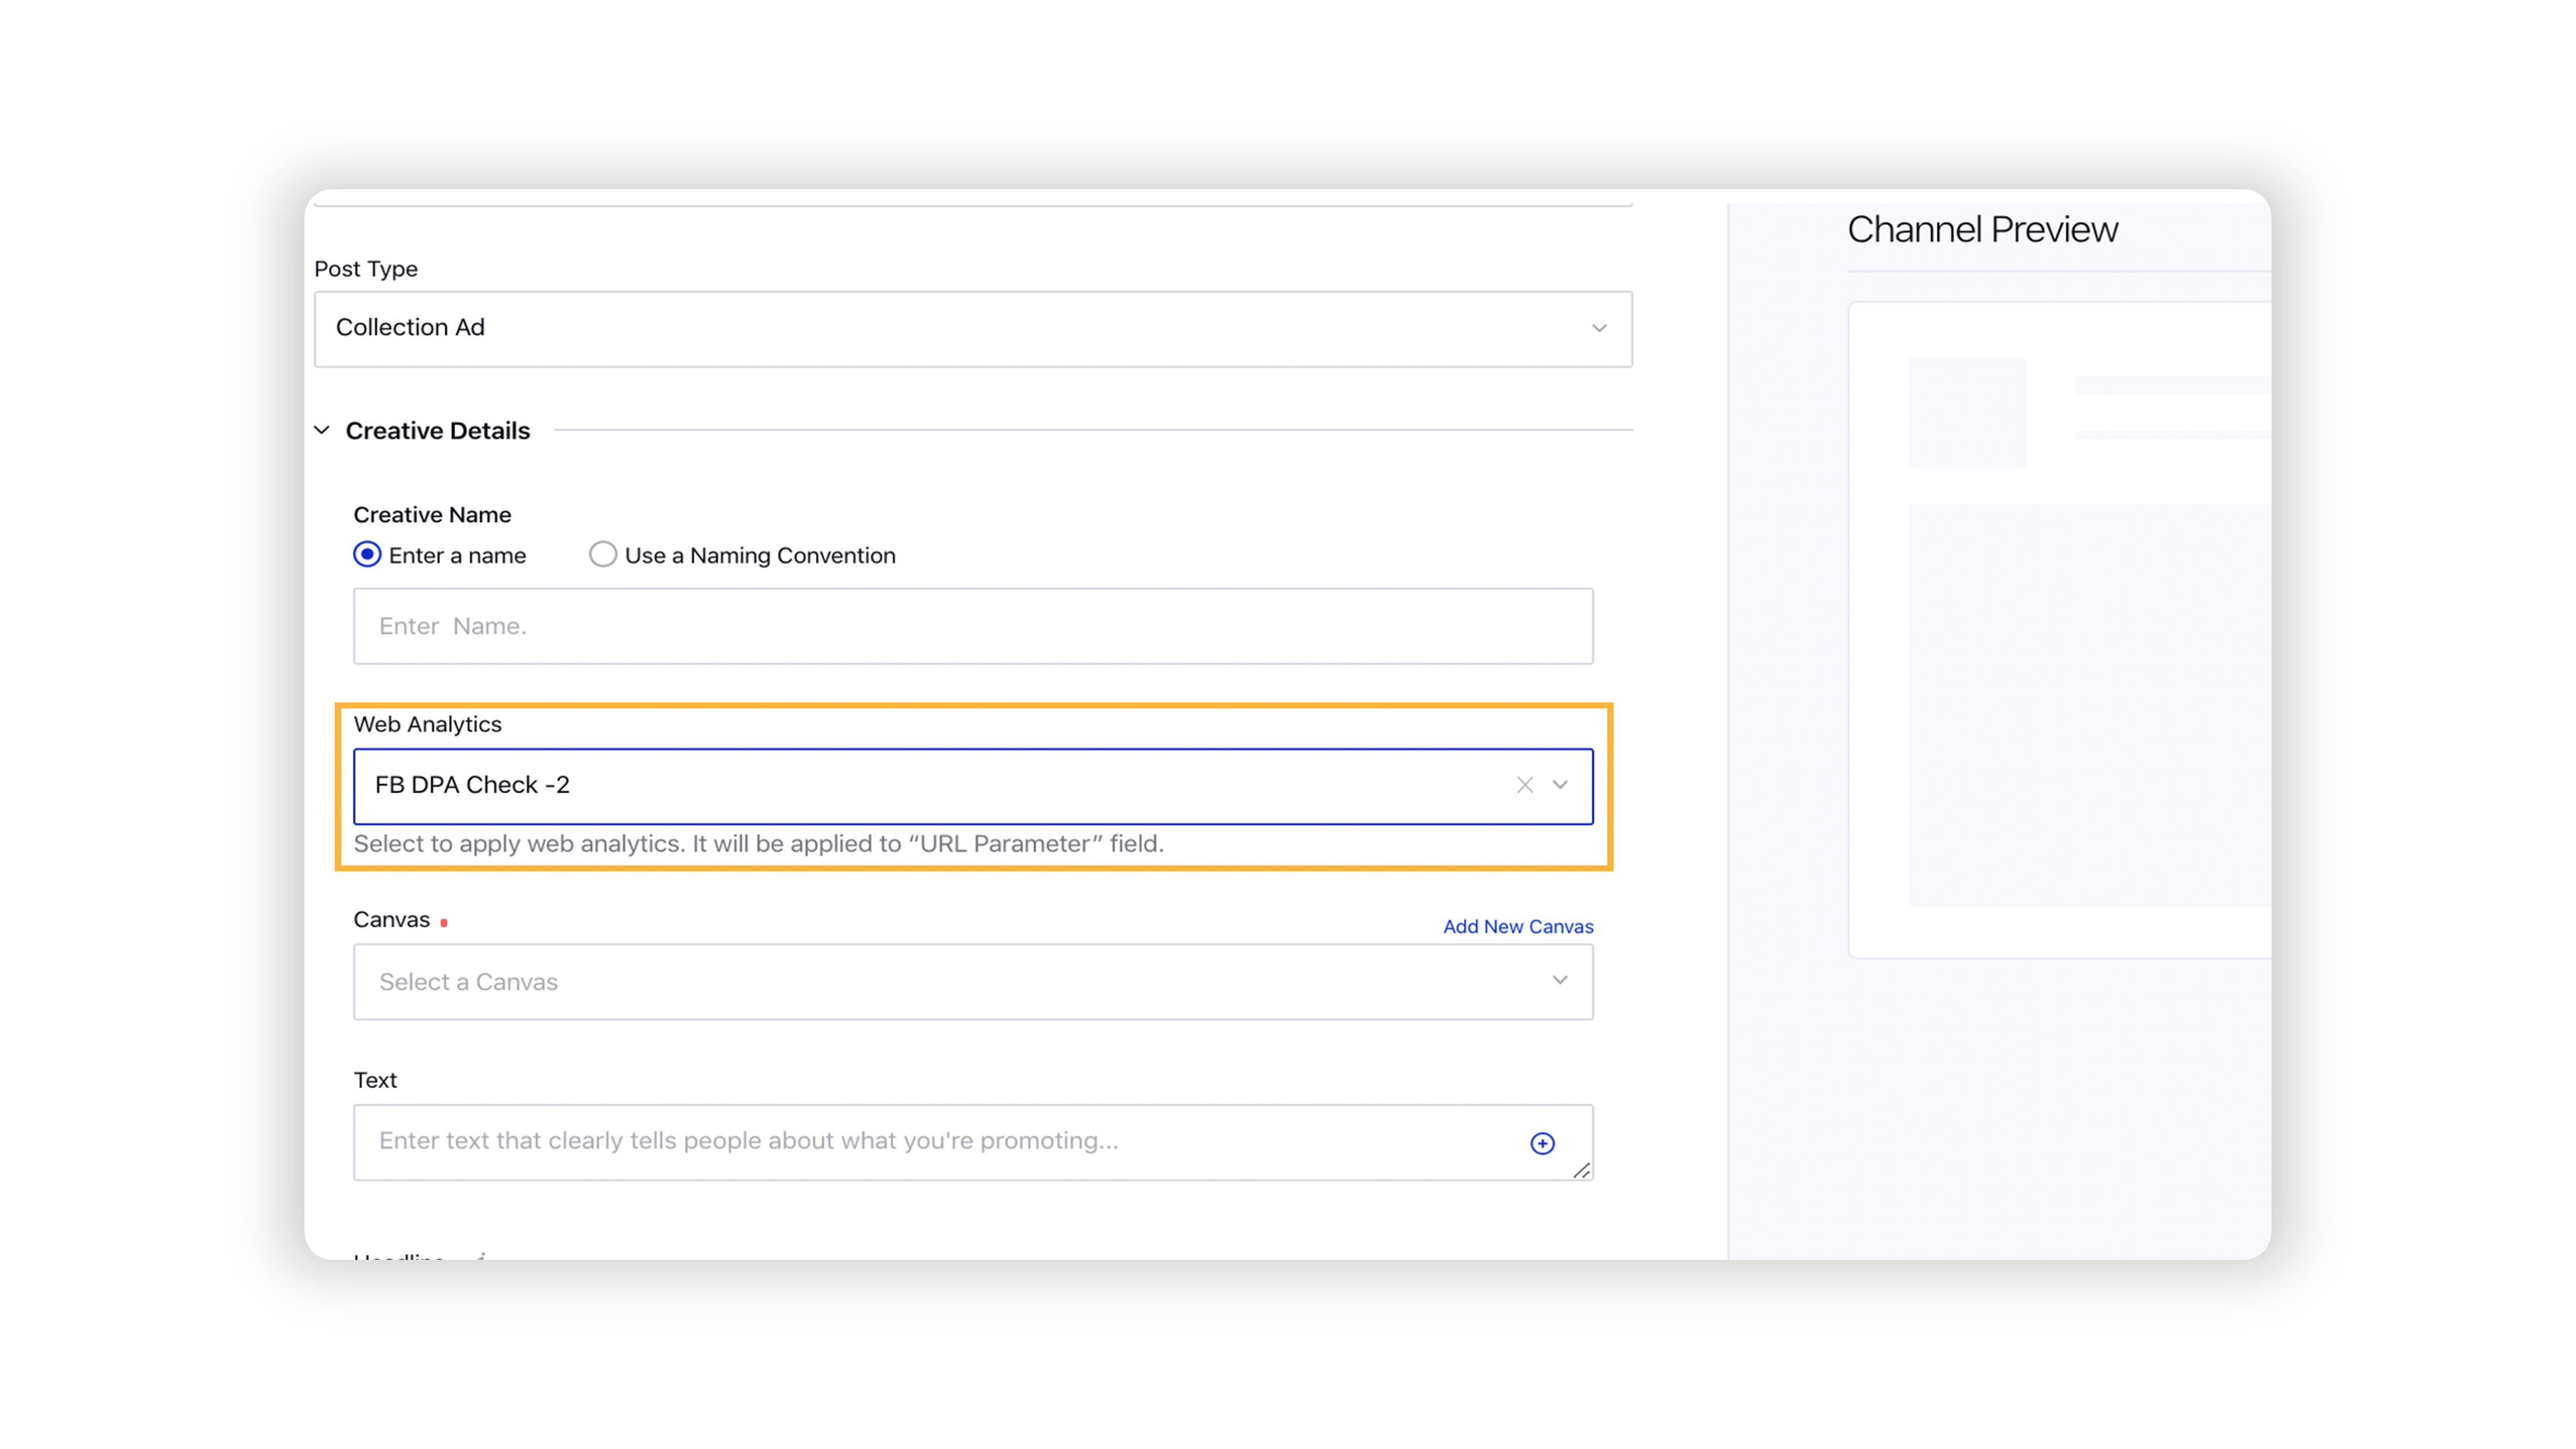 | ||||||
You have the option to create a new canvas using the Facebook Canvas Editor dialog box for supported objectives and post types.
| 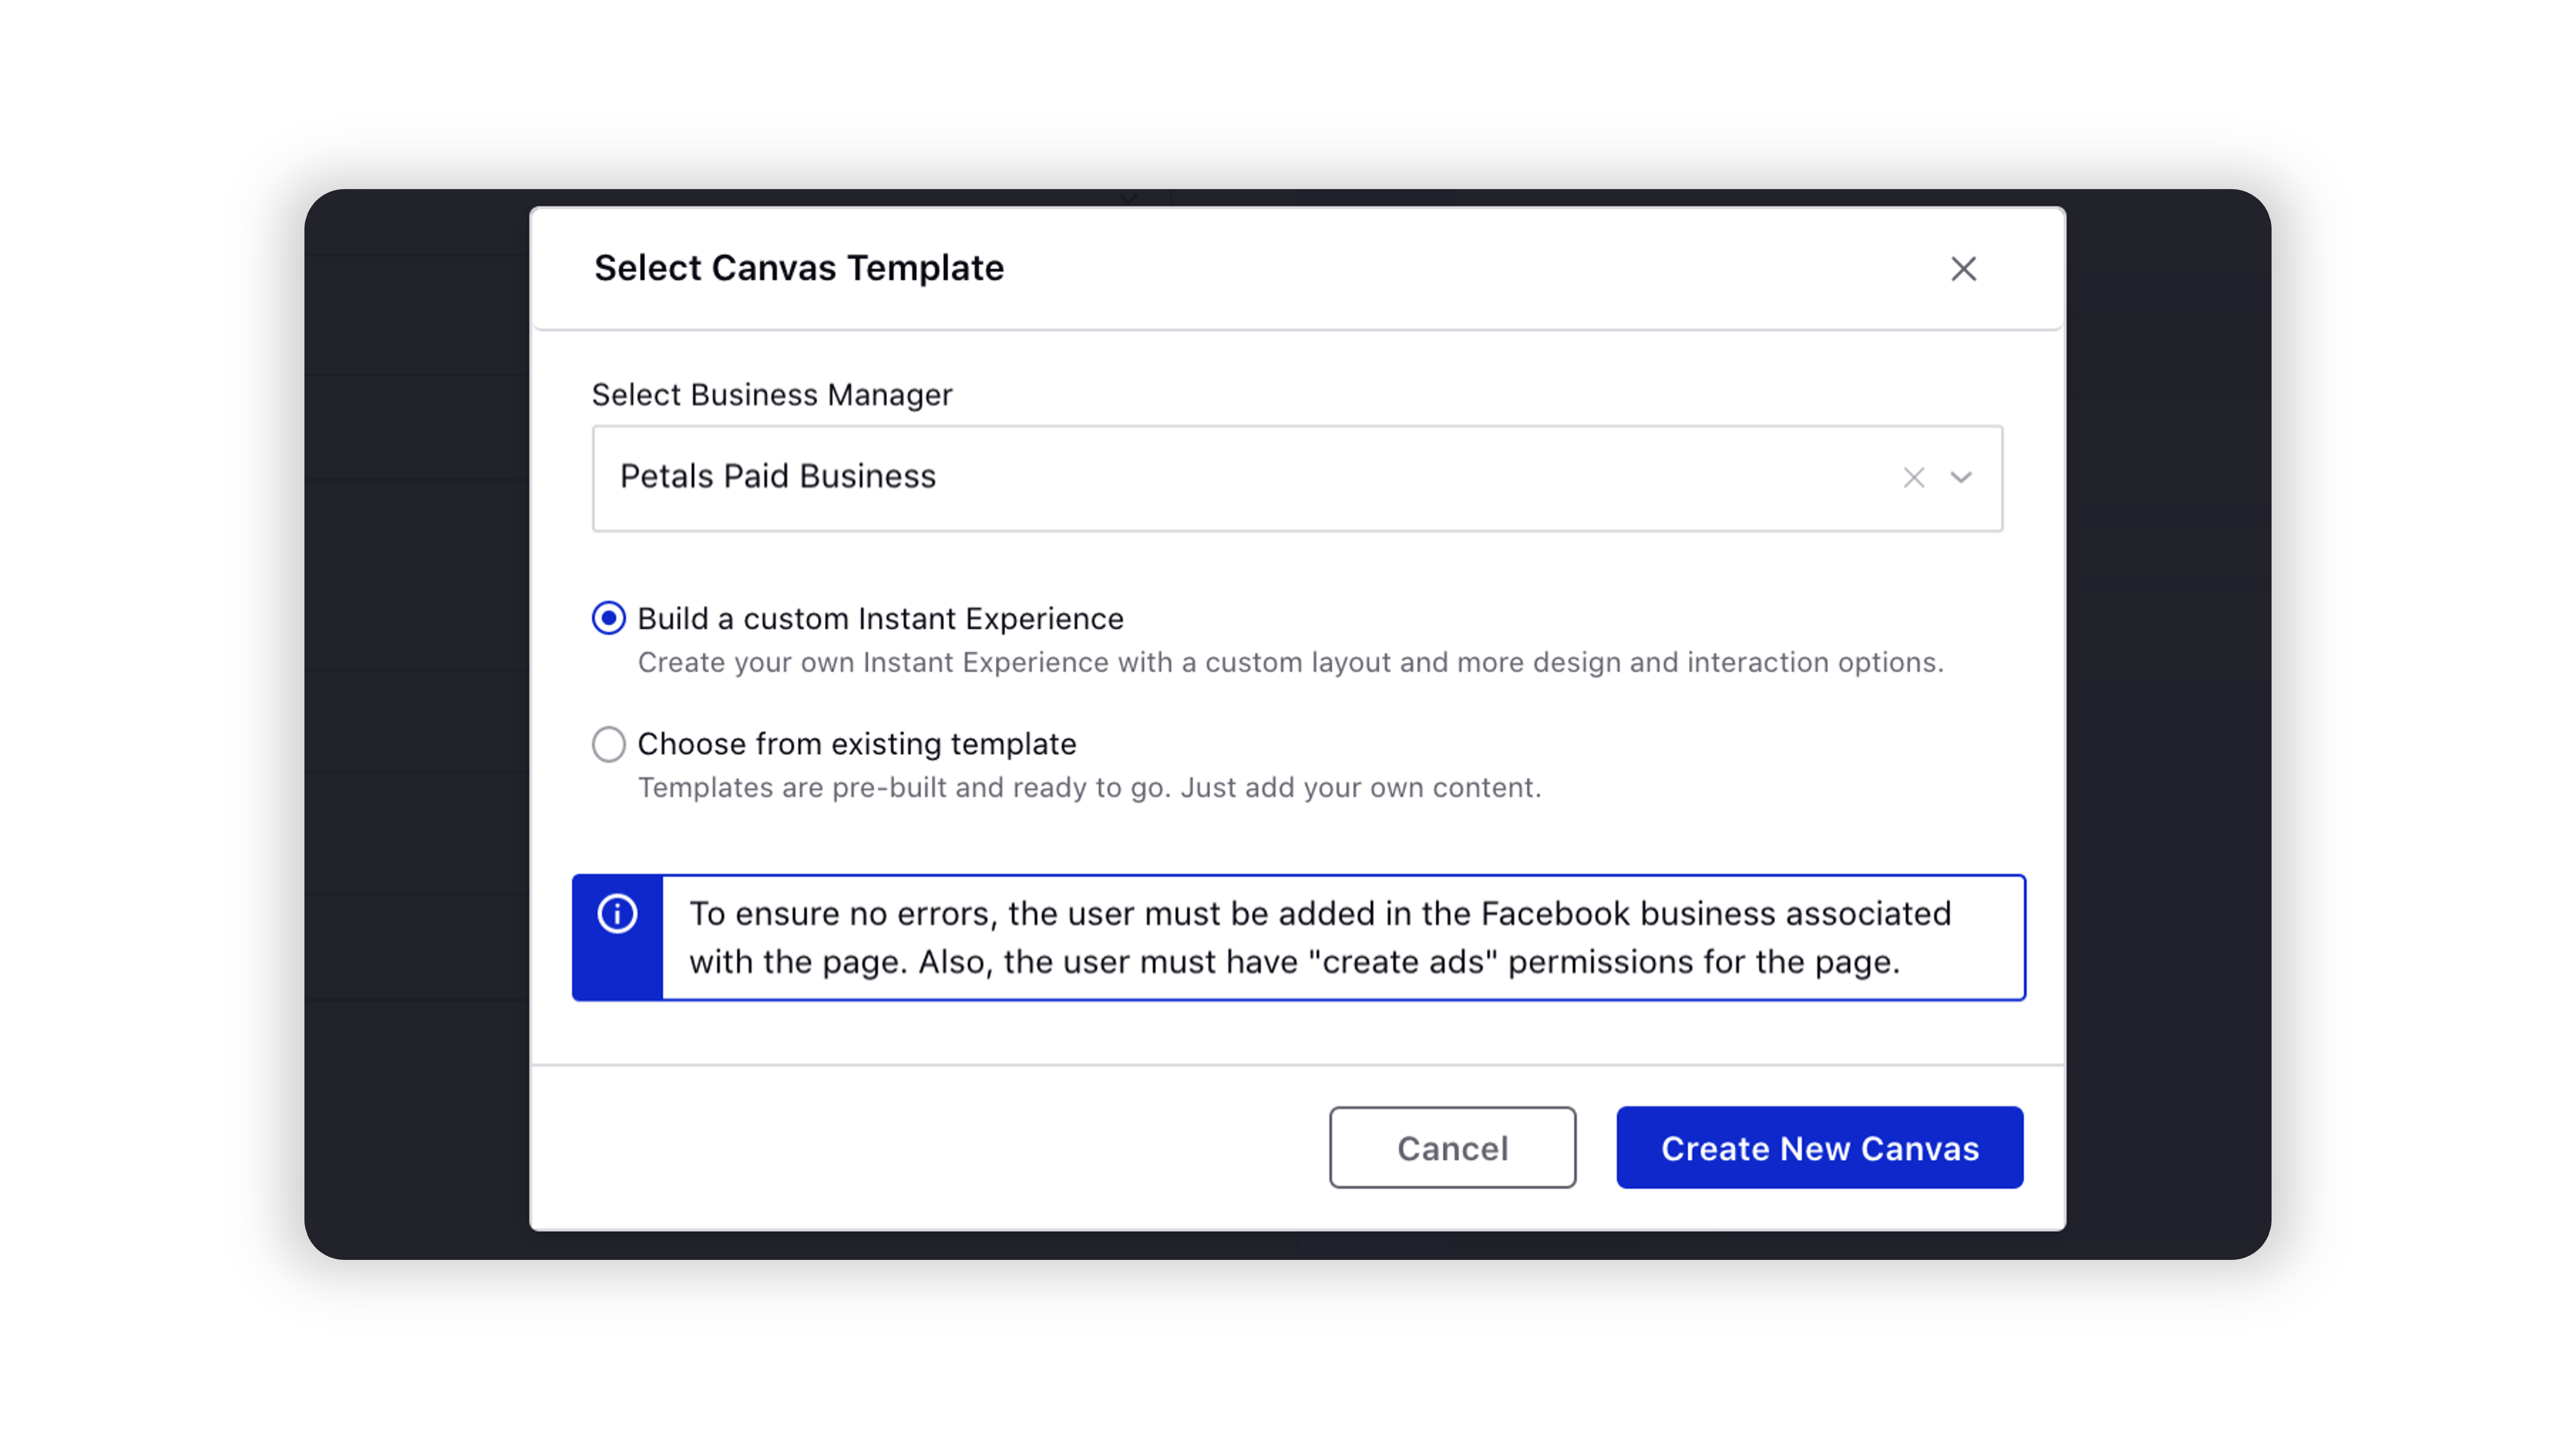 | ||||||
You can select a Destination where people will be taken when they click on your ad for the supported post types and objectives. For example:
Note that the supported values for Call to Action will populate based on the selected Destination. | 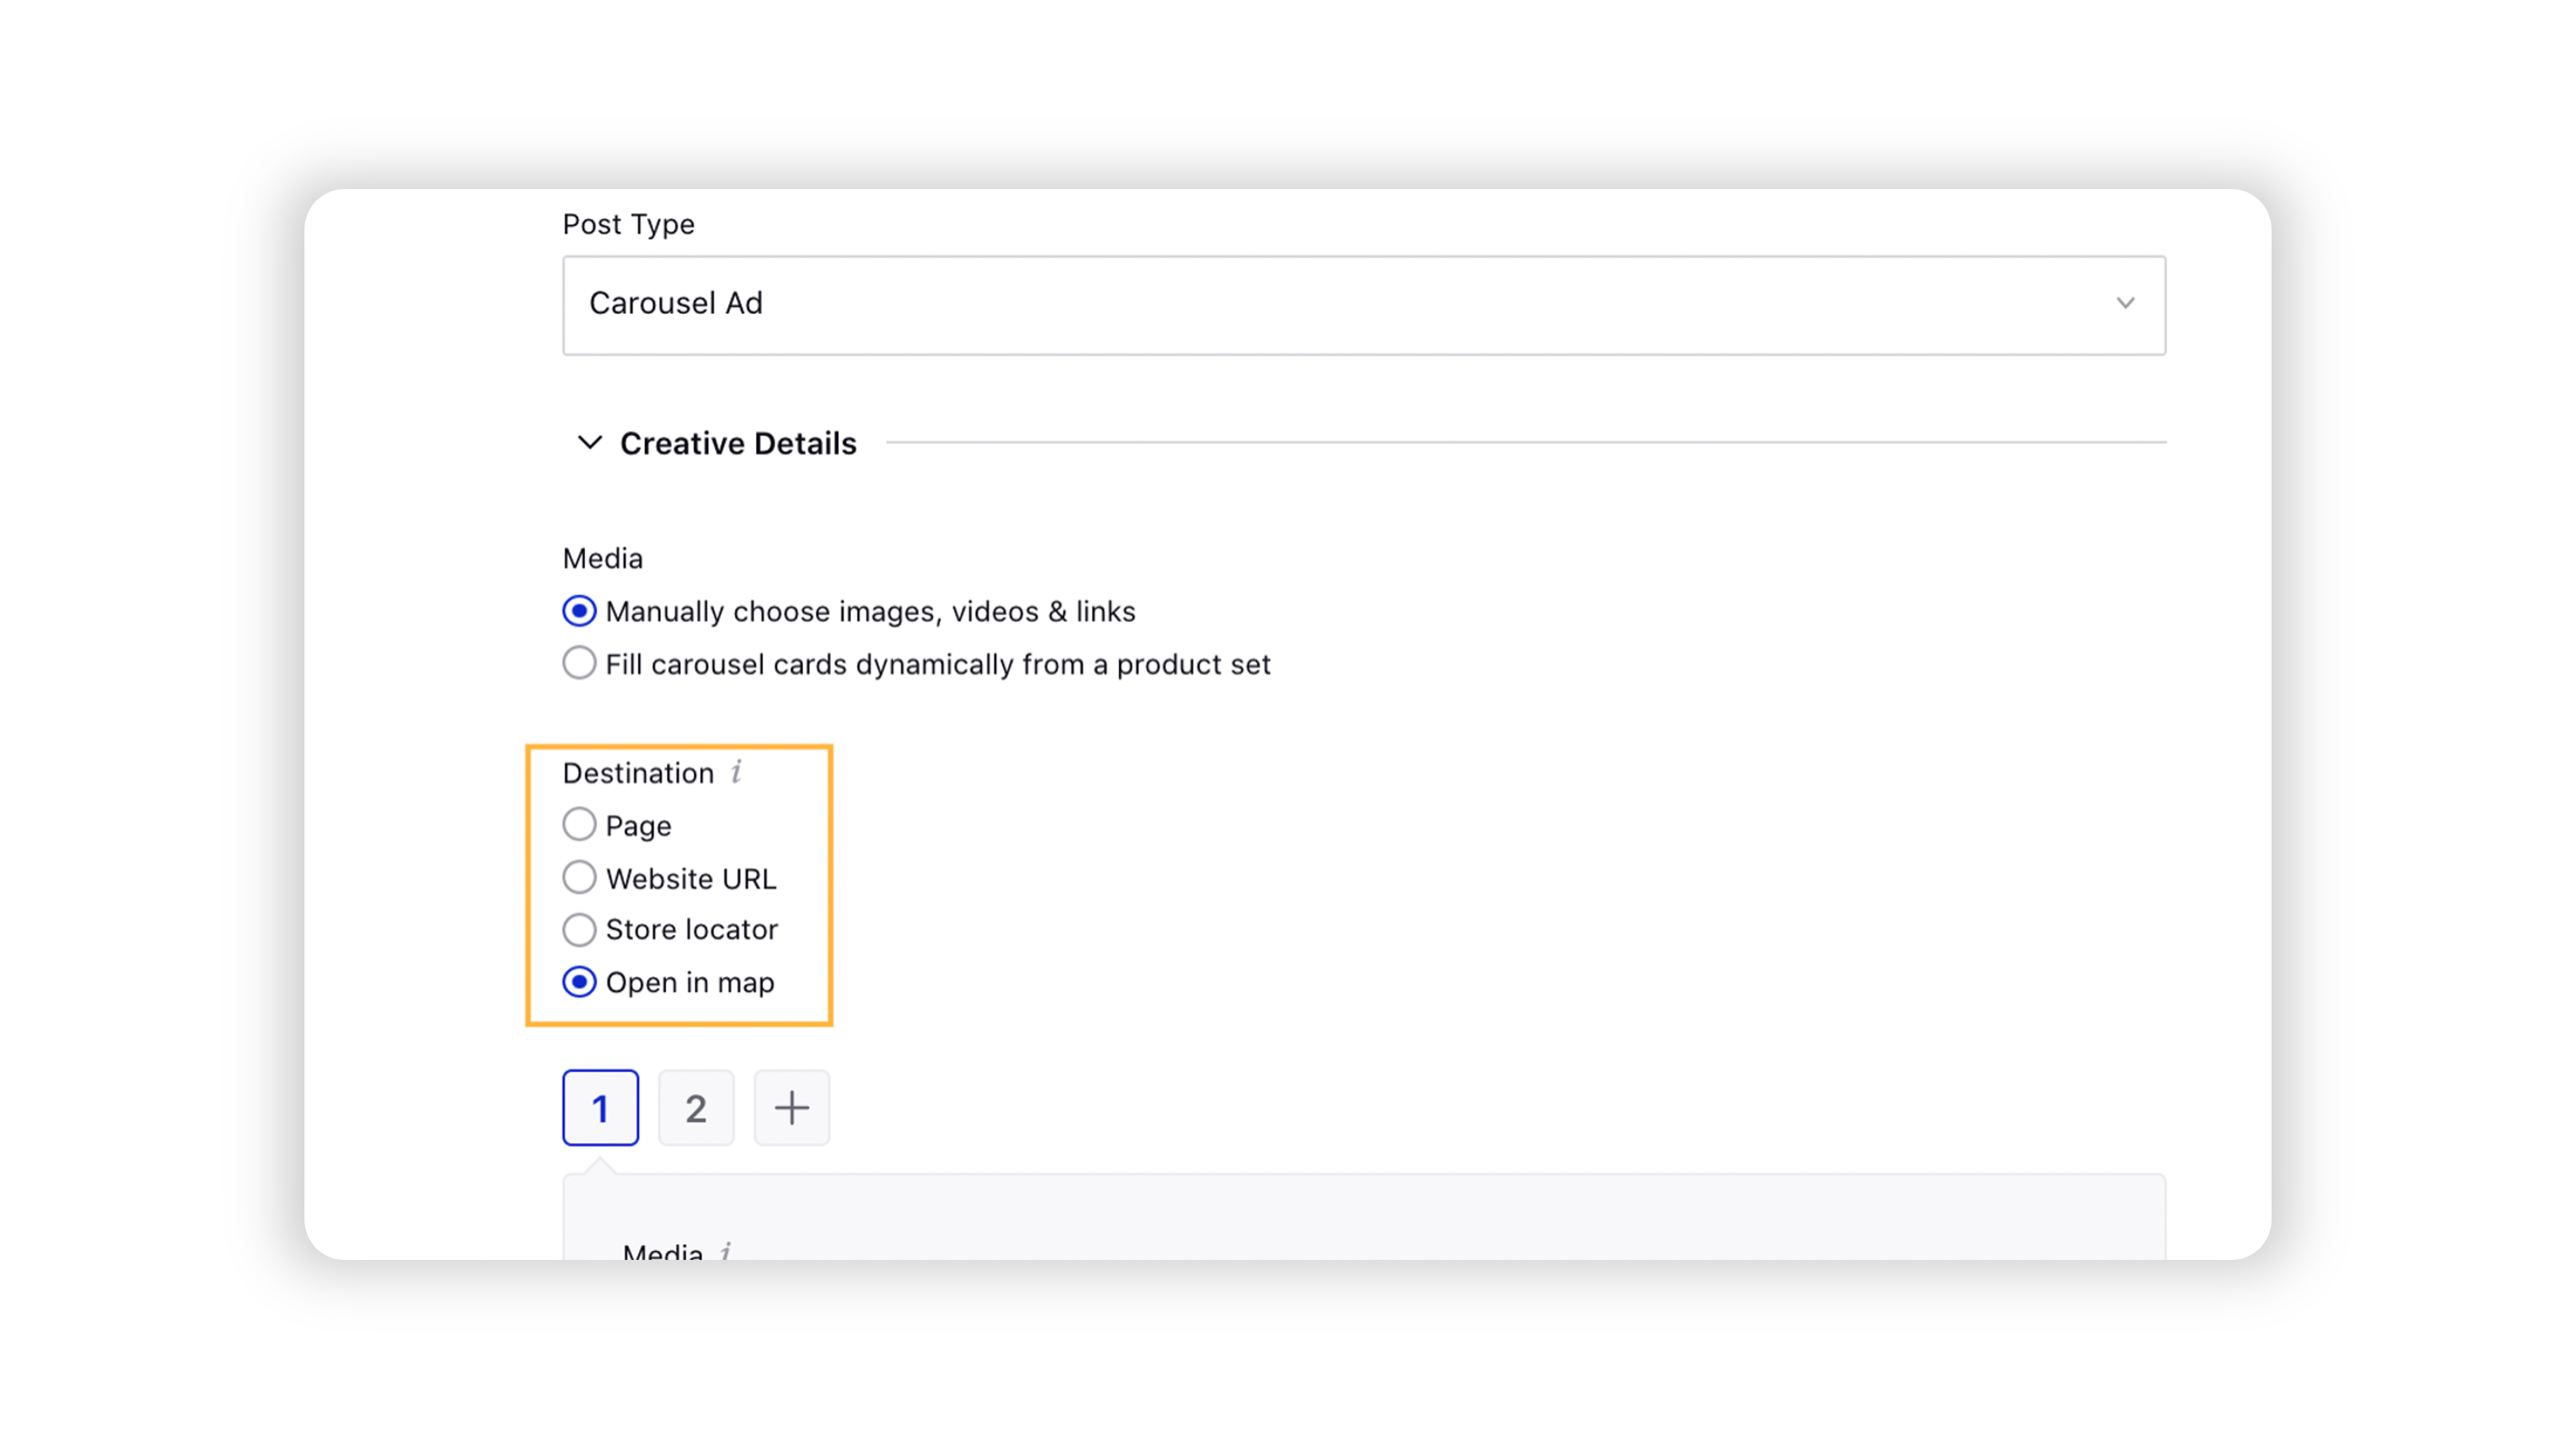 | ||||||
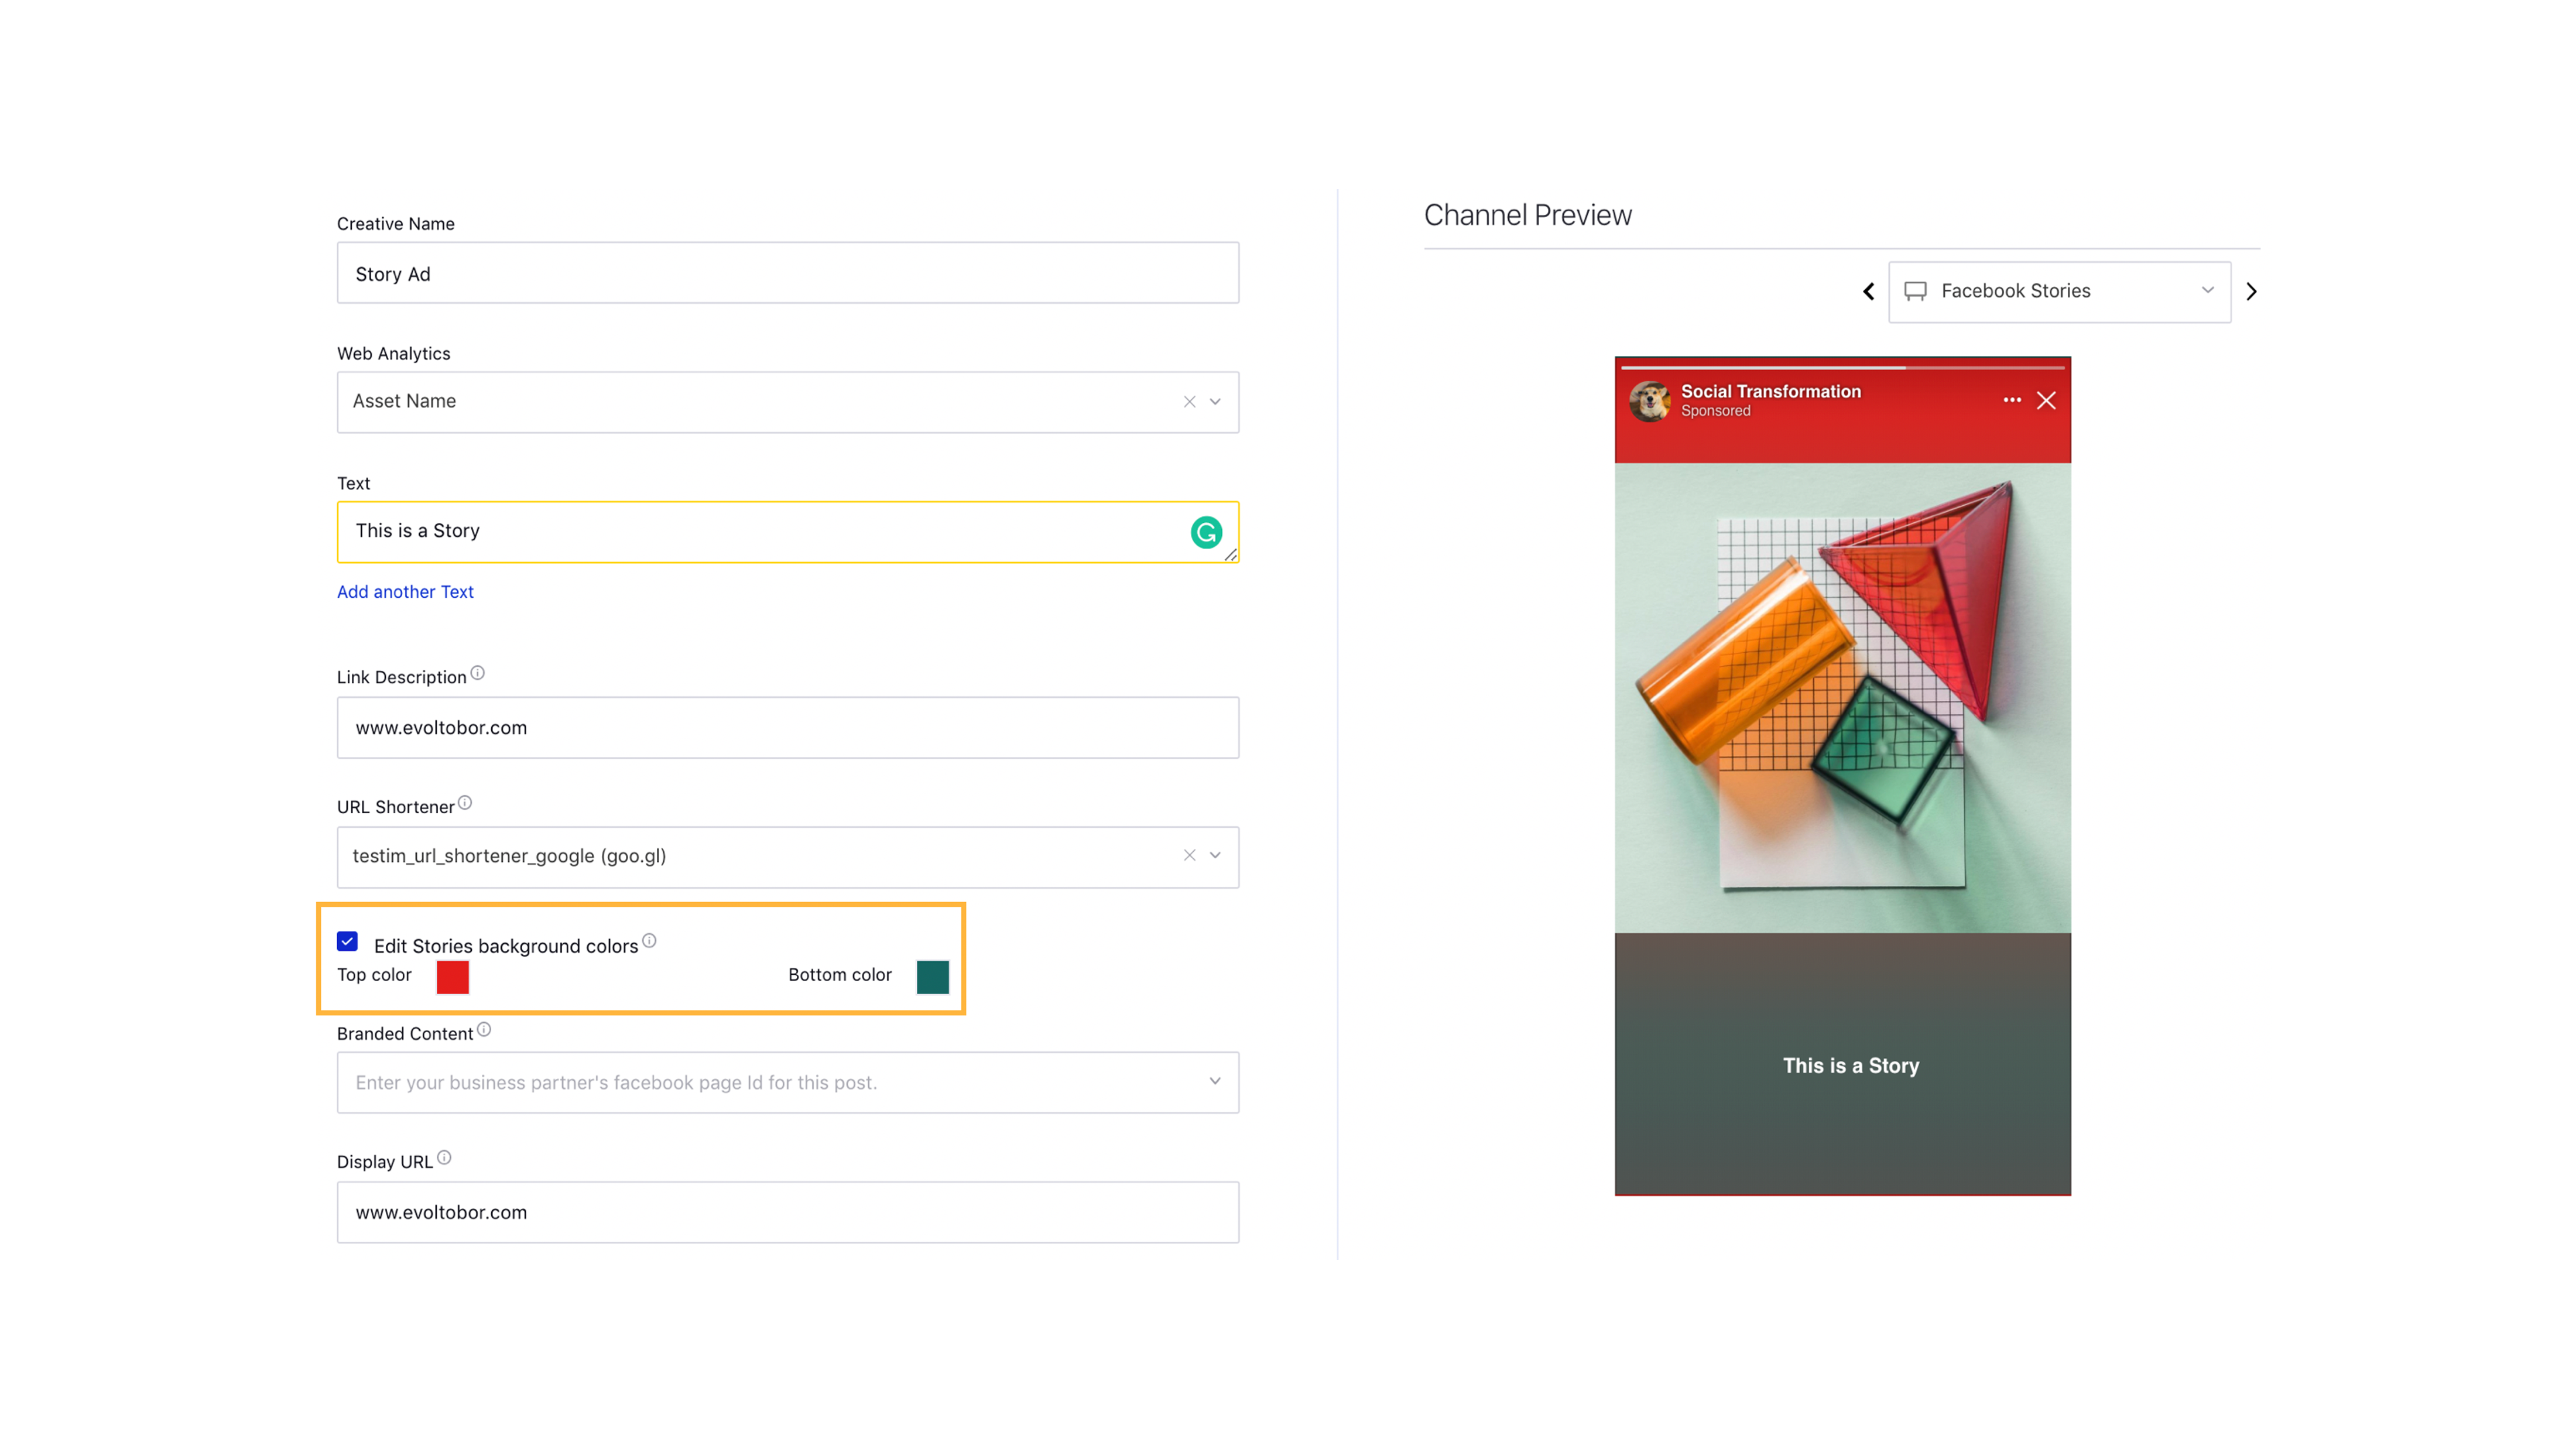
You can check the box alongside Edit Storiesbackground colors and select the top and bottom colors for your story ads. This is supported for the following objectives: Brand Awareness, Reach, Traffic, App Installs, Video Views, Lead Generation, and Conversions. Note
|  | ||||||
Turn on the Enable Disclaimer button to add a disclaimer to your ad. Choose the Disclaimer Type, then enter the Disclaimer Text and Disclaimer URL. You can select from the following disclaimer types -
|
| ||||||
In Dynamic Product Carousel Ads, the Multiple Products catalog option allows you to promote a different product from your catalog in each carousel card. Learn more about the creative details for Dynamic Product Ads in DPA — Creative Details. | 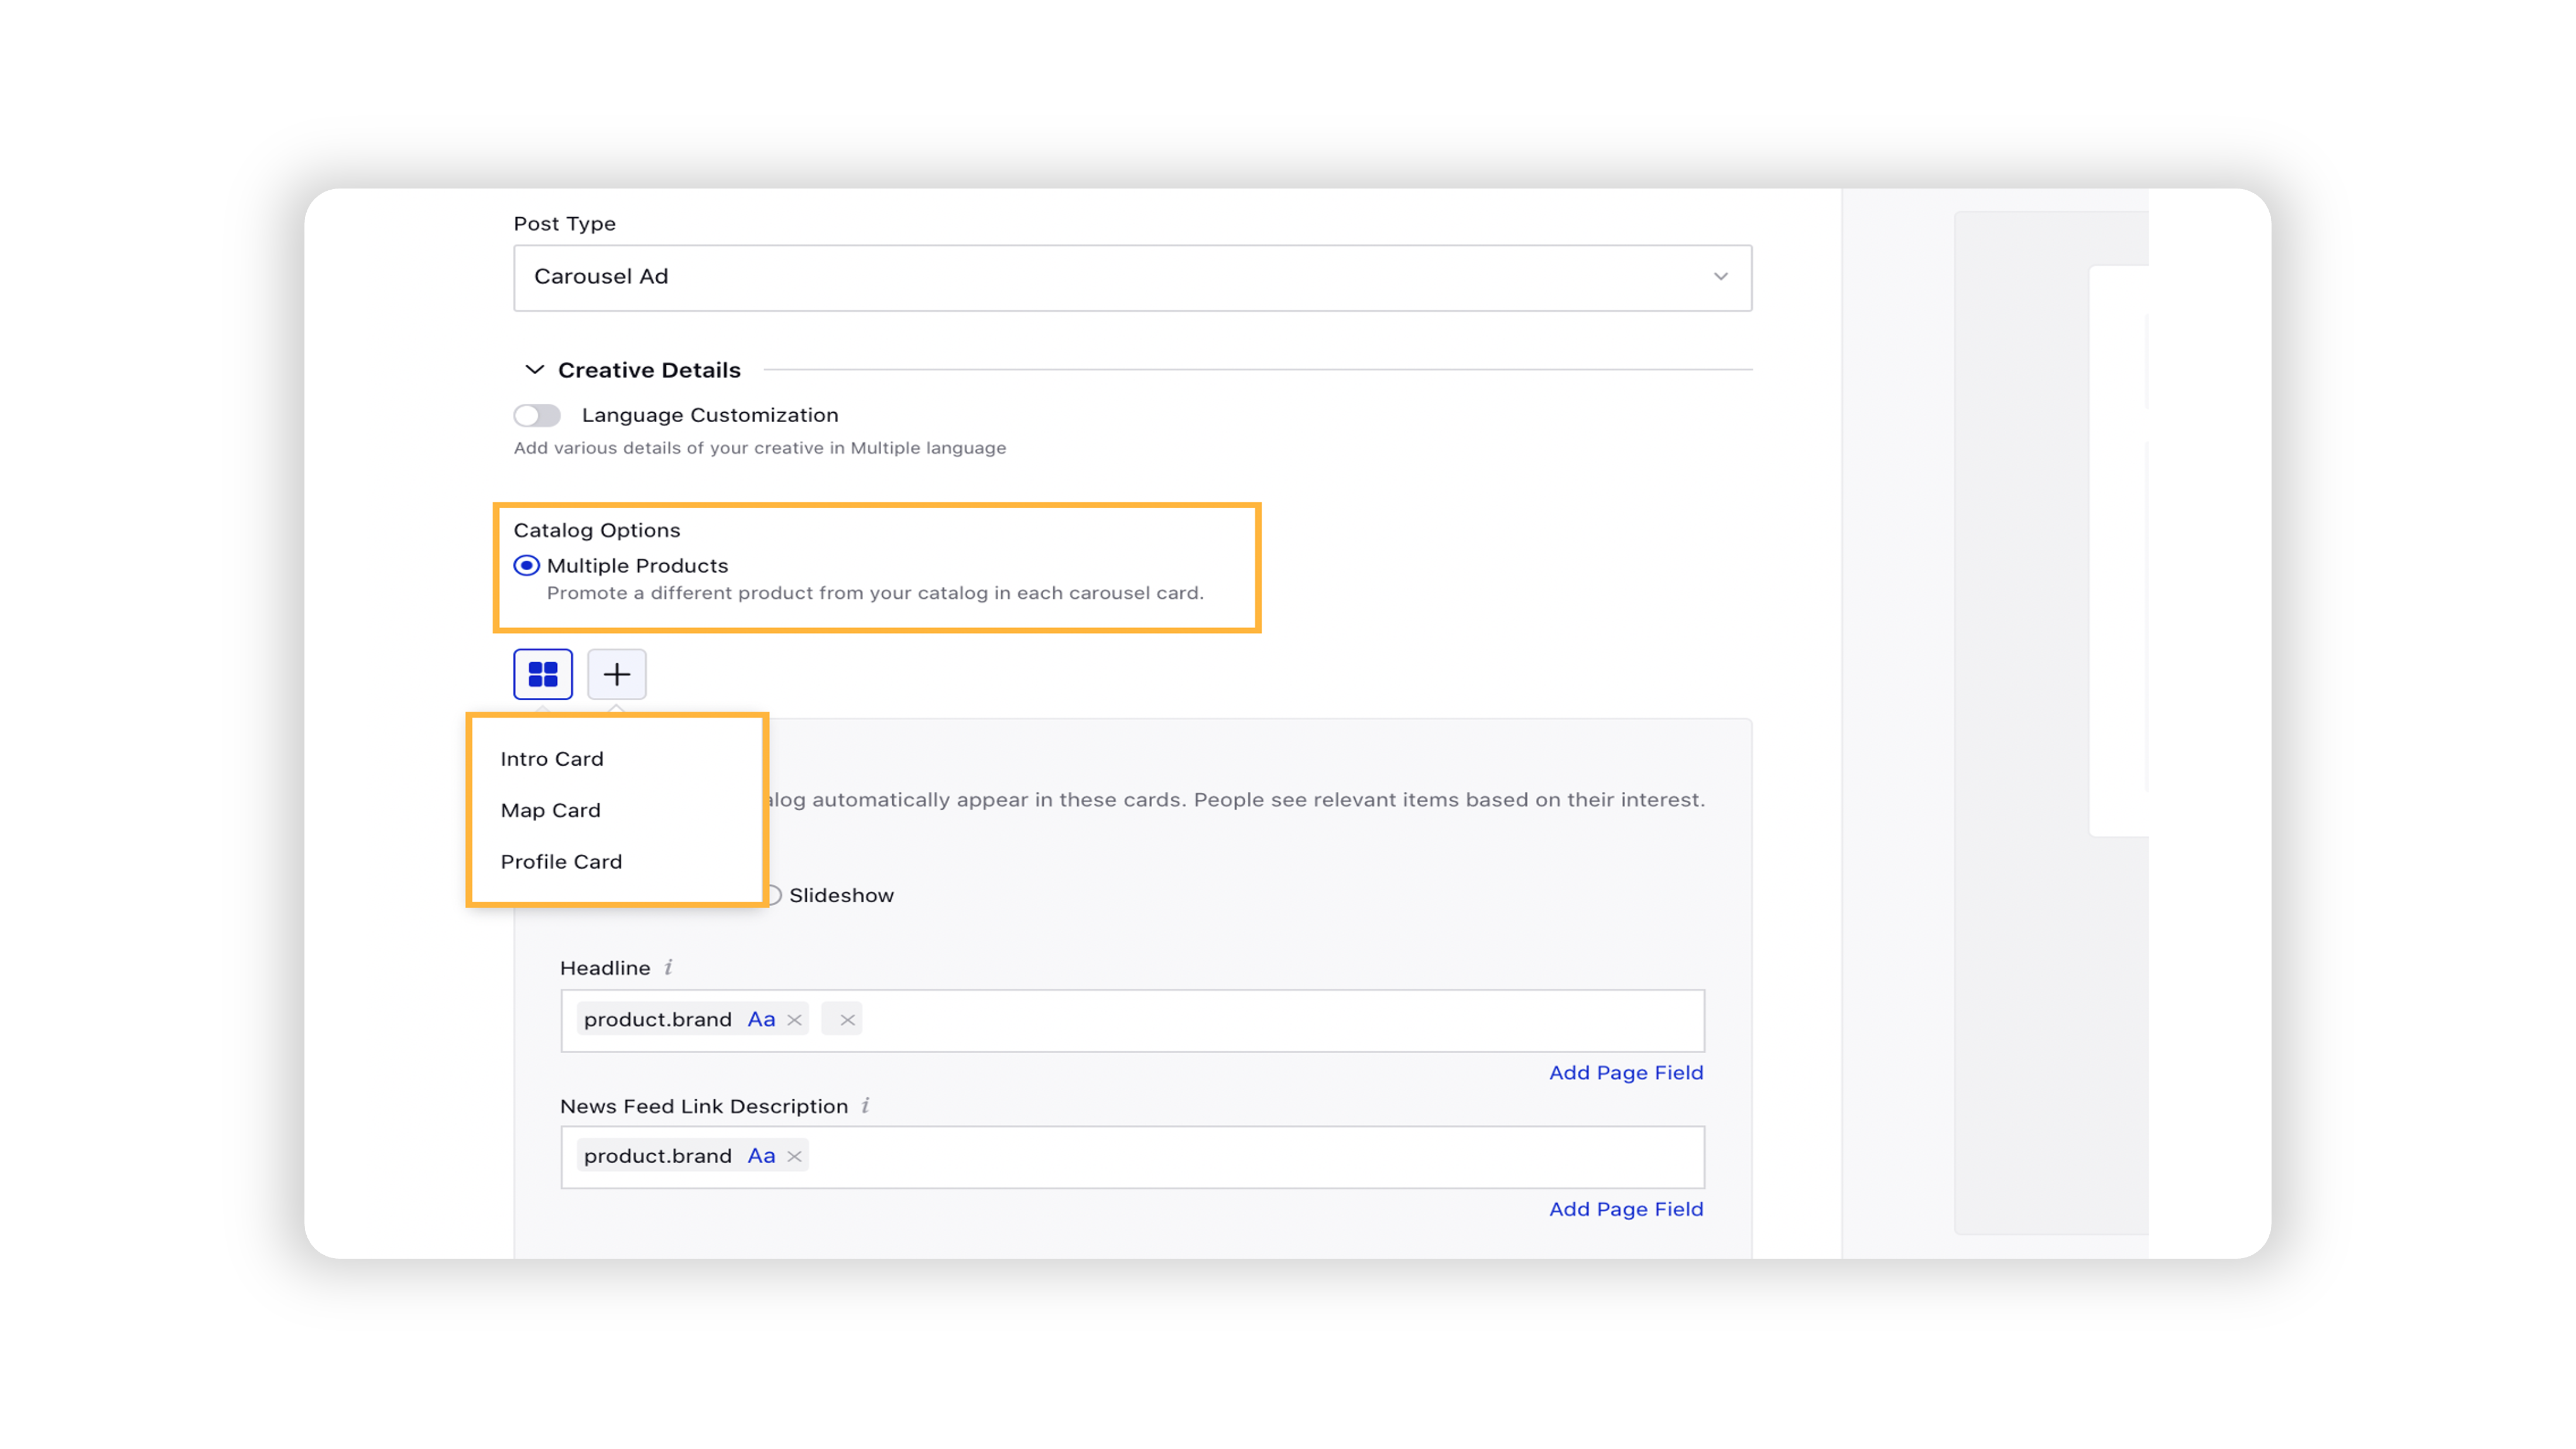 | ||||||
You can select from the following Media Options for Carousel Ads belonging to Traffic (Website and App destination), Conversions (Website and App destination), or Store Visits objective (click to learn more):
For more information, see the Carousel Ad section of DPA — Creative Details. | 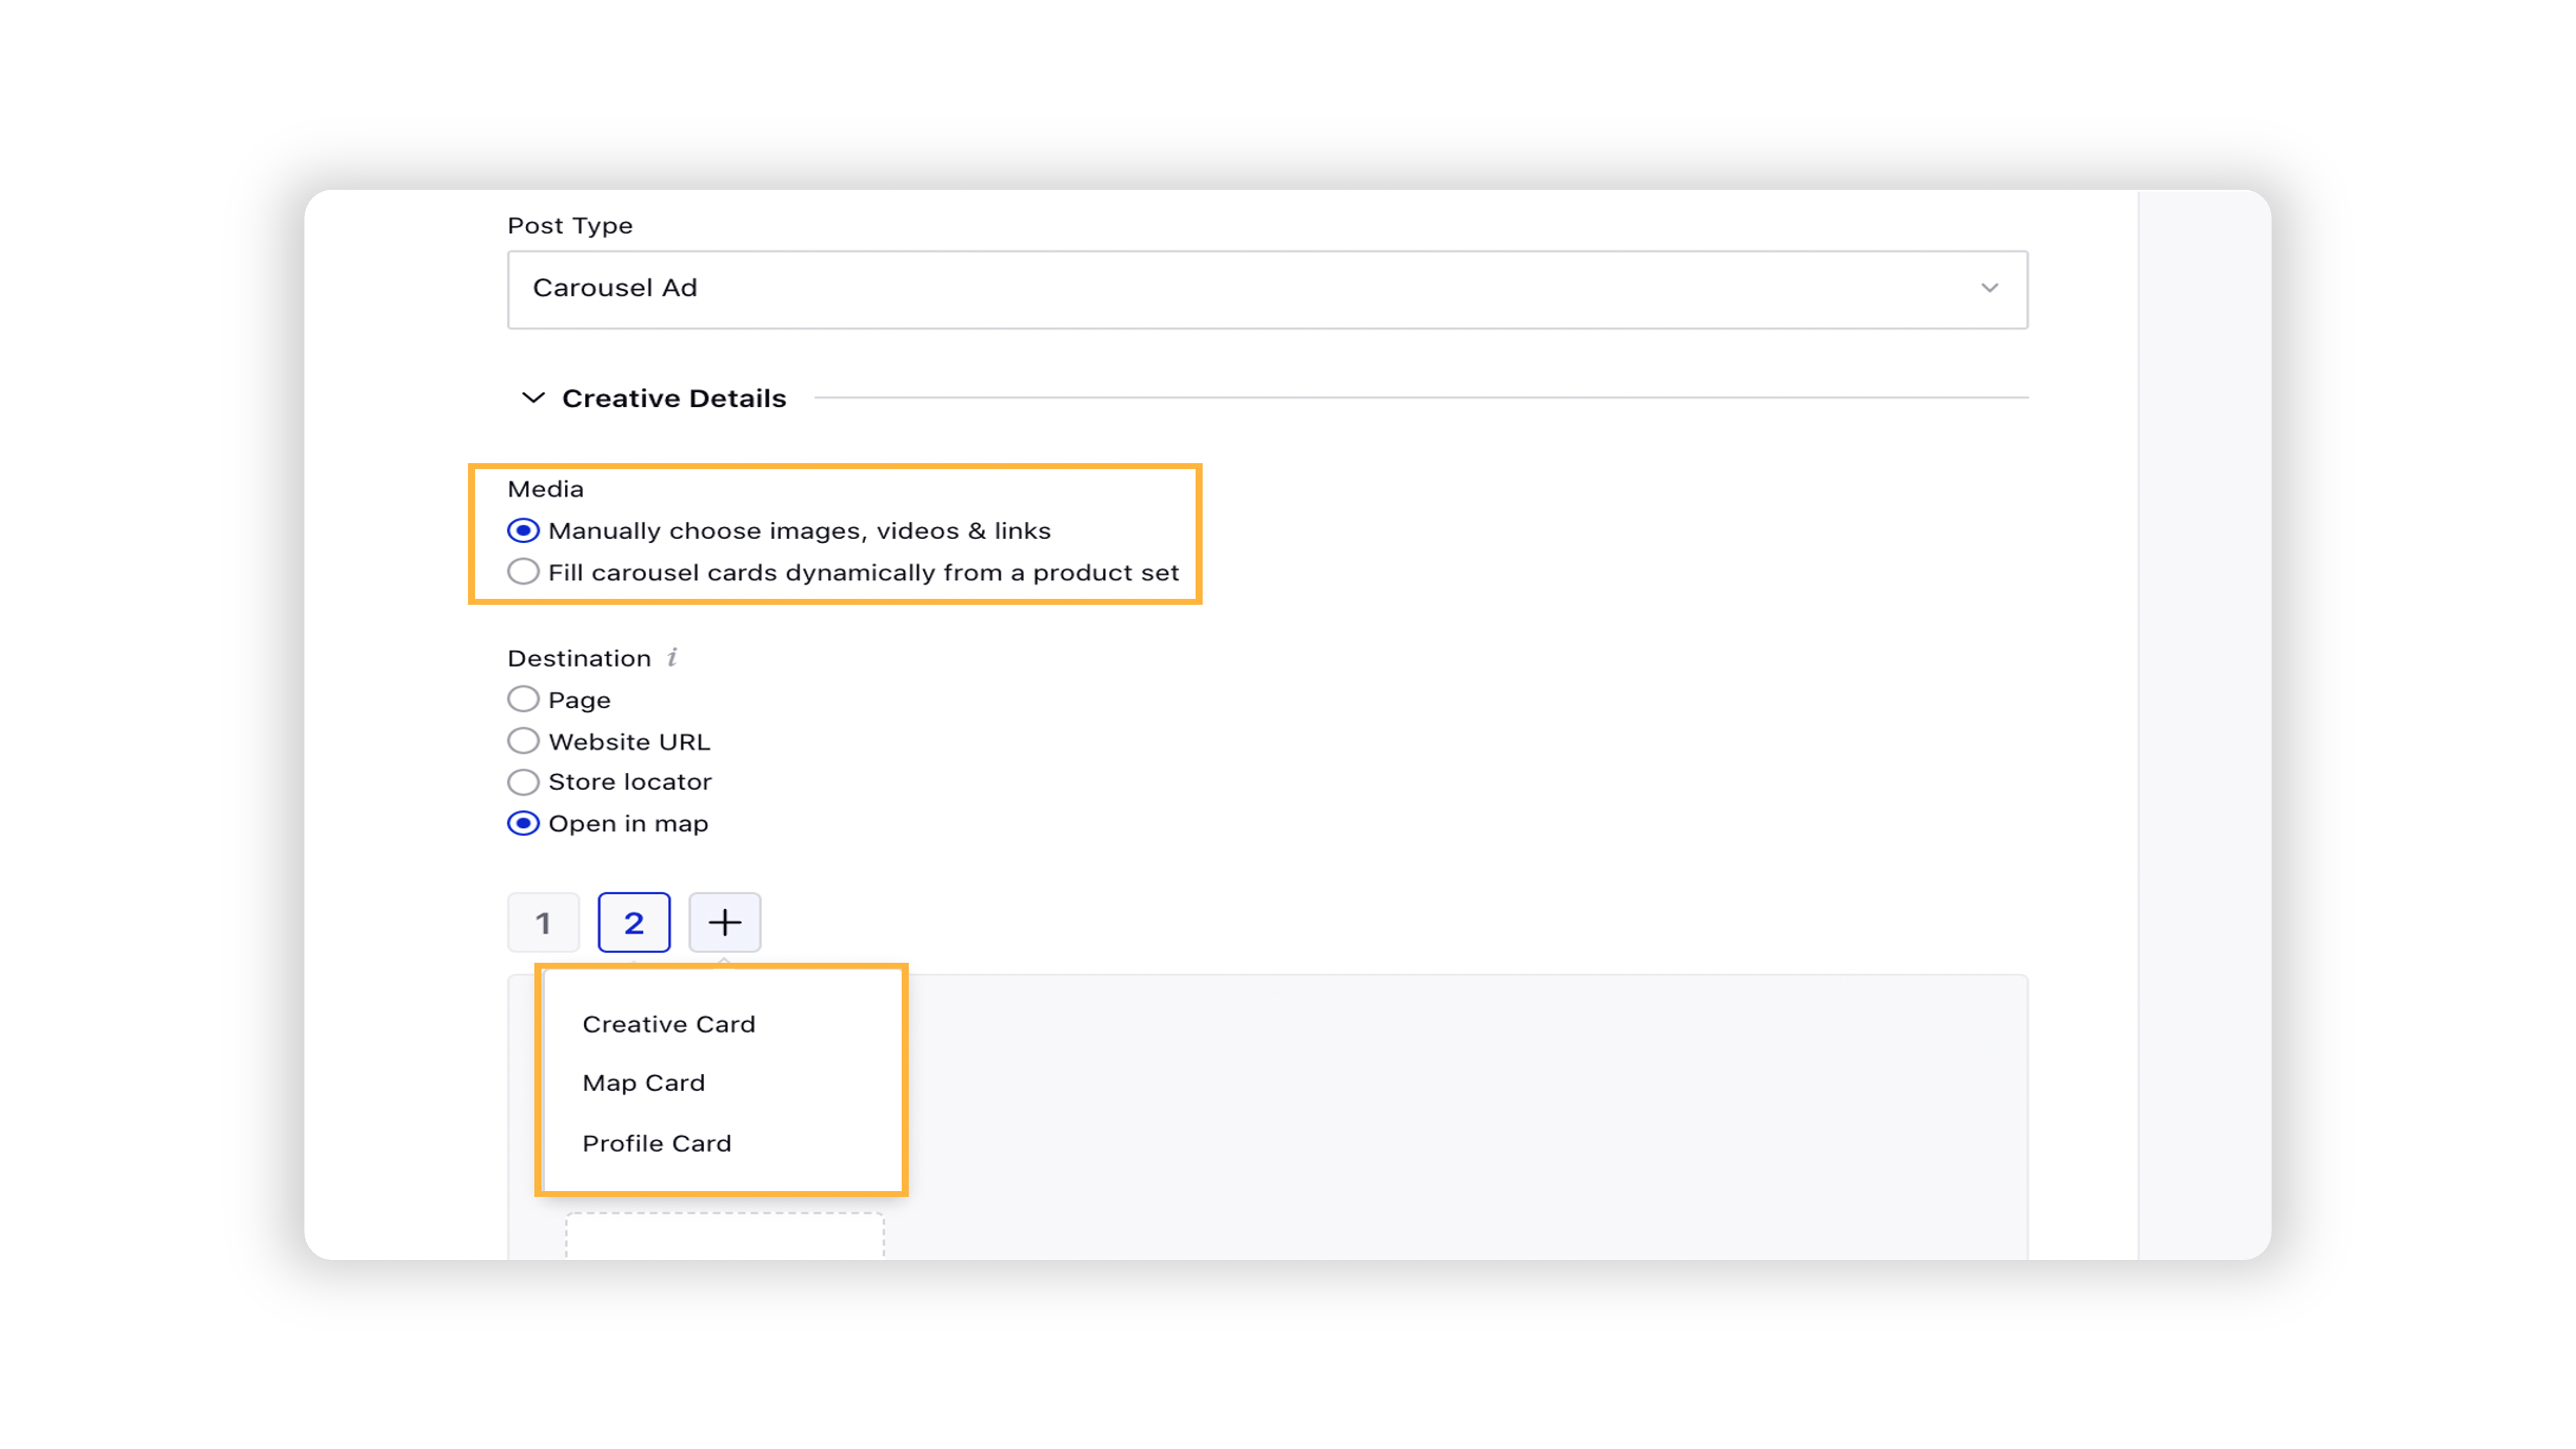 |

Advanced configuration
1. In the Advanced Configuration section, you can view the Ad Sets in the left-hand side pane and make changes to individual ads. Click an Ad to view details and make changes to the properties as desired.
Note: At the Ad Variant level, you can click Copy to all alongside Tracking Pixel, Mobile App Event Tracking, View Tag Urls, and URL Tags fields and select from the below options to copy the properties to all other ad variants.
You can also delete any Ads within an Ad Set by clicking the Delete icon alongside it. |
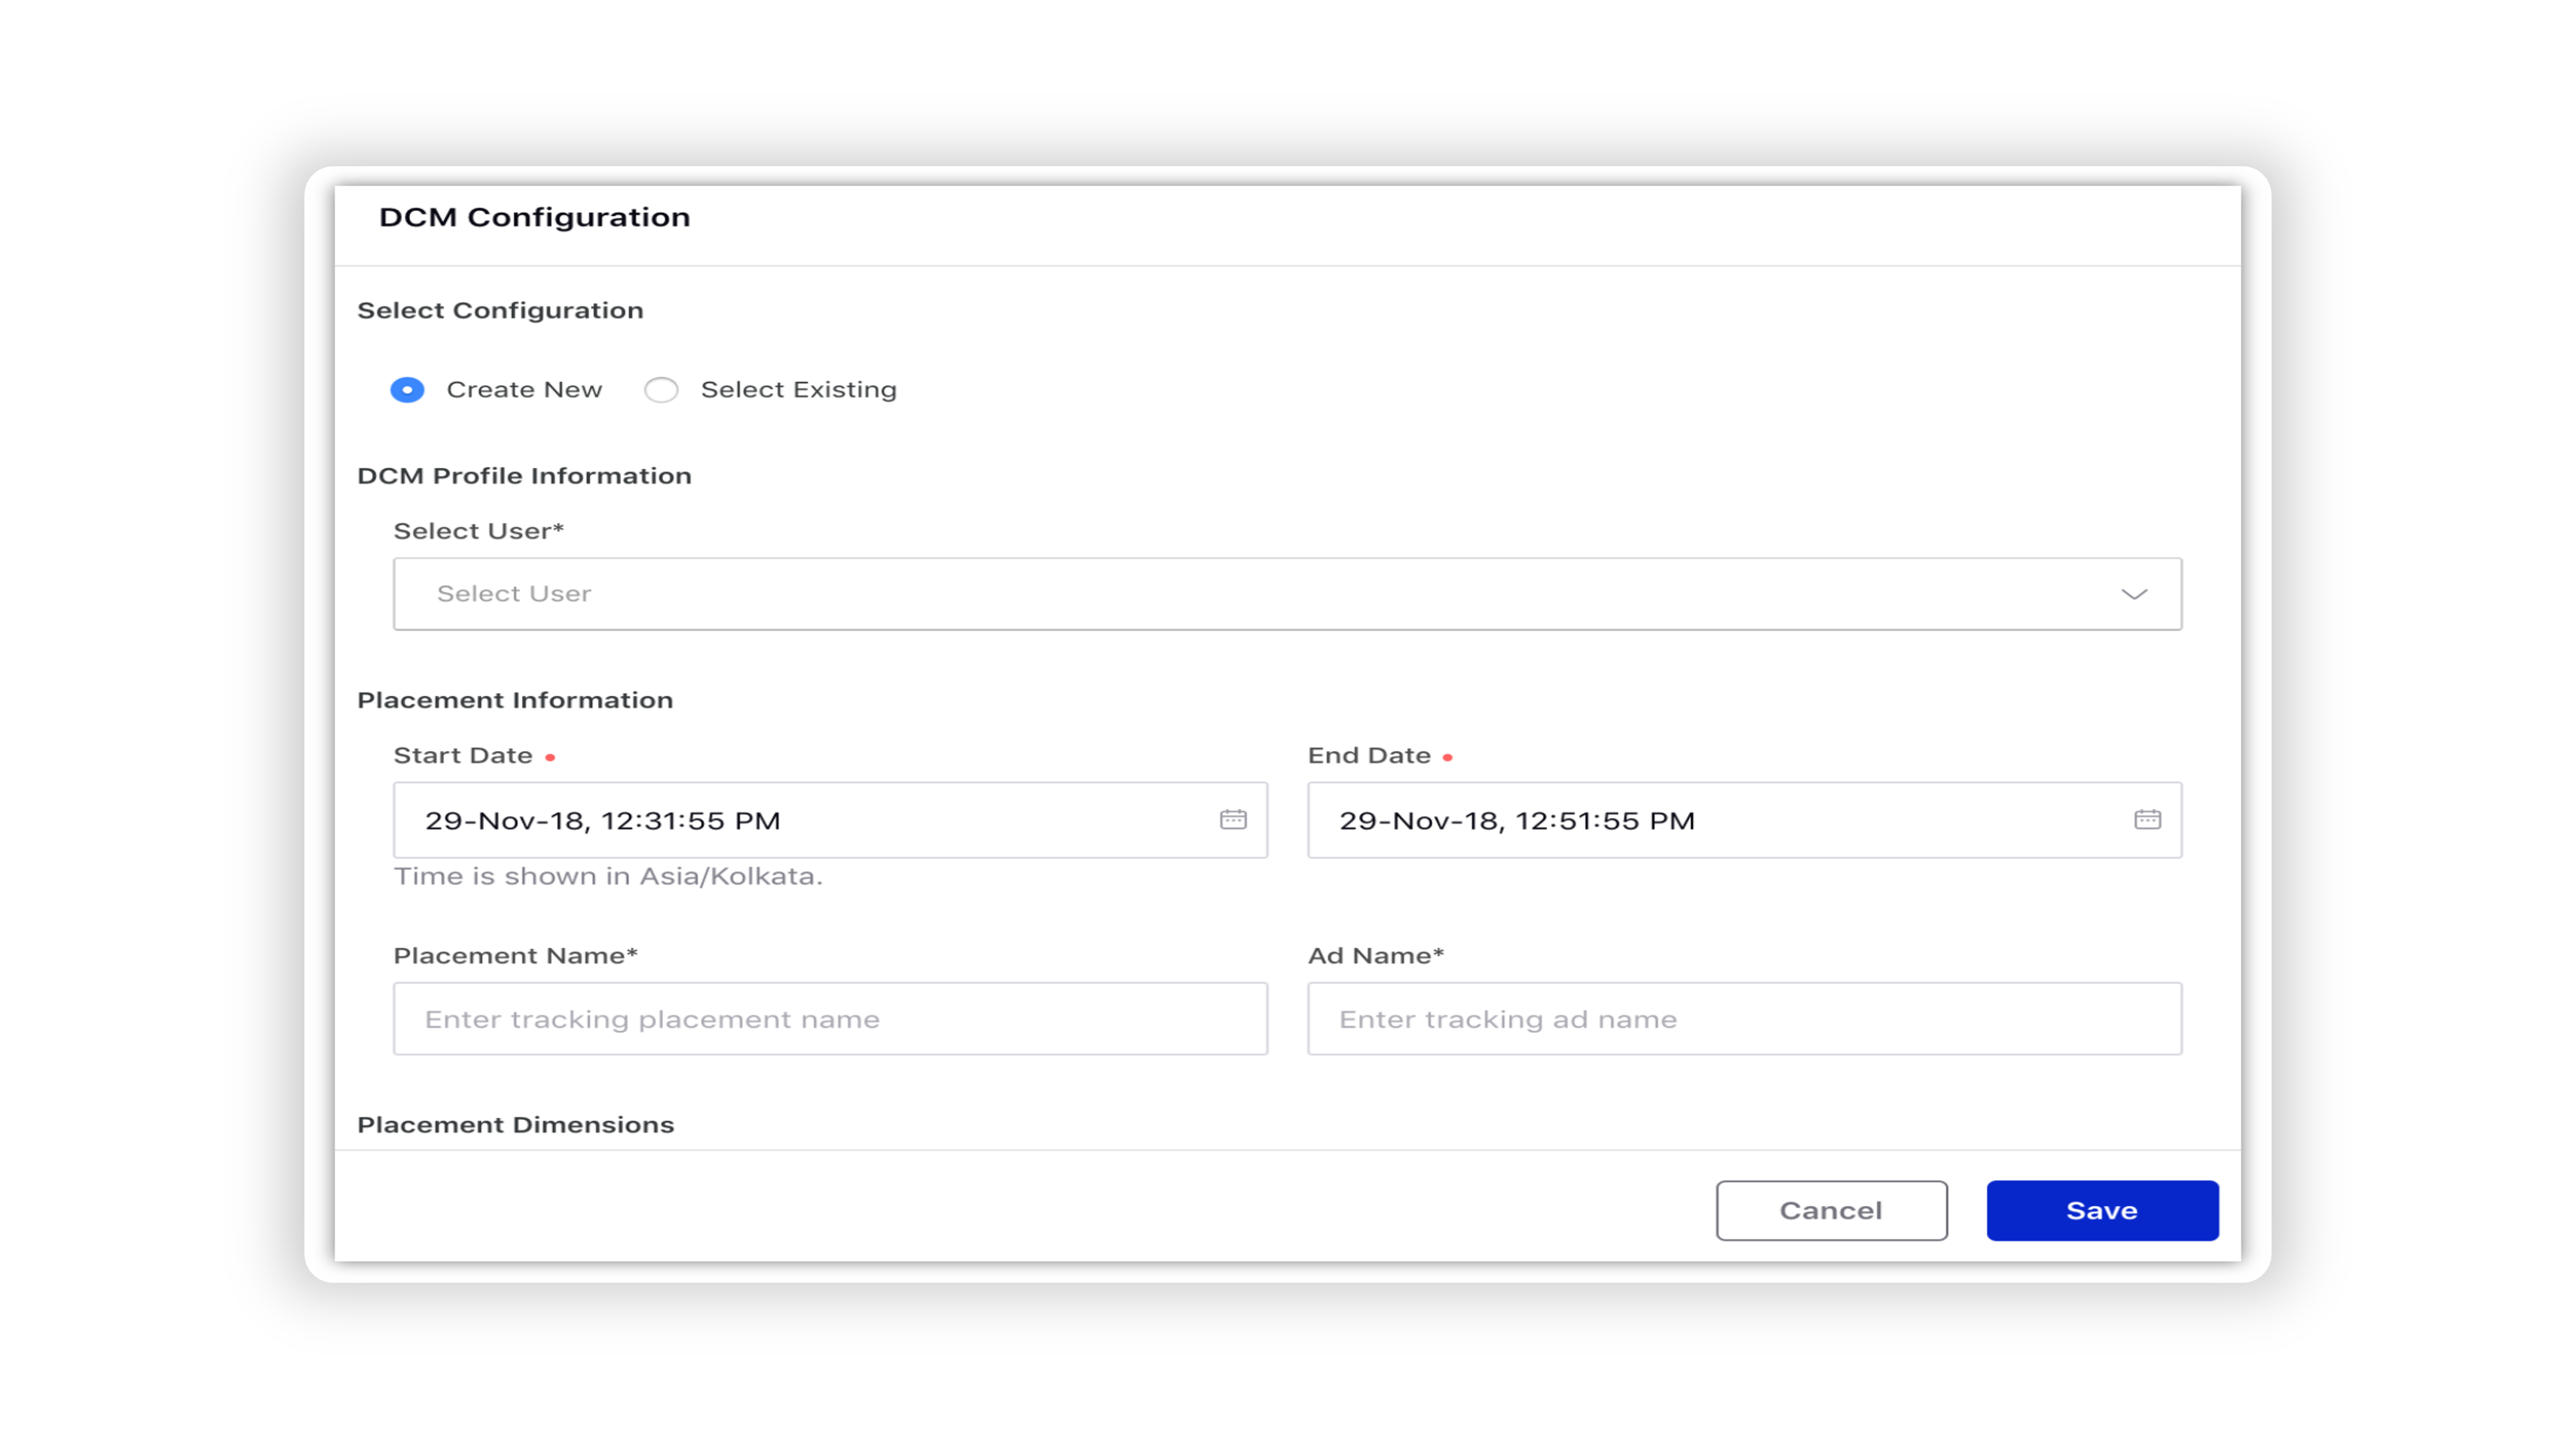
2. Click Configure DCM under the Third Party Tracking section to configure Google Campaign Manager. On the DCM Configuration window, fill in the details and click Save. For more information, see Google Campaign Manager Configuration — Field Descriptions.
![]() Enablement Note:
Enablement Note:
To learn more about Google Campaign Manager enablement in your environment, please work with your Success Manager.
|
3. You can select a Benchmark for your campaign.
4. Under Dark Post Creation, you can create a dark post:
On checking Identical Story ID Across Ad Sets, one post will be created and used across all Ad Sets selected.
On checking Unique Story ID Per Ad Set, a unique post will be created for every target audience you create.
5. At the Ad Set level, enter your Ad Set Name and Define Custom Properties as per your needs.
6. At the Ad level, enter a name for your Ad.
If your Facebook page is marked as Authorized for Ads Related to Politics and Issues of National Importance, then you can select the checkbox alongside This Ad is Related to Politics or Issues of National Importance to mark your ad content as political. For more information, see Compose Facebook Social and Political Ads.
![]() Enablement Note:
Enablement Note:
To learn more about getting this capability enabled in your environment, please work with your Success Manager.
You can click Copy to all alongside This Ad is Related to Politics or Issues of National Importance and select from the below options to copy the Political Ad value to all other ad variants.
Copy to all Ads in this Ad Set Copy to all Ads in all Ad Sets
7. Define Custom Properties and Custom Outbound Properties for your Ad.
Google Campaign Manager configuration — Field descriptions
Terms | Description |
Select Configuration |
Create New | Select to create a new Campaign Manager configuration. |
Select Existing | Select to choose an existing Campaign Manager configuration. |
DCM Profile Information |
Select User | Select the user for the Campaign Manager Configuration. |
Select Advertiser | Select the desired advertiser from the drop-down. |
DCM Name Convention | Select the Campaign Manager naming convention. |
Placement Information |
Start Date | Select the start date for the placement. |
End Date | Select the end date for the placement. Note: Once the Google Campaign Manager is created, you cannot edit the campaign dates. Hence, it is recommended that the campaign End Date is extended far into the future. |
Placement Site Url | Enter the URL for the placement site. |
Placement Site Name | Enter a name for the placement site. |
Placement Dimensions |
Placement Height | Enter the height for the placement. |
Placement Width | Enter the width for the placement. |
Placement Compatibility | Select the placement compatibility from the drop-down menu. |
Placement Payment Source | Select the placement payment source from the drop-down menu. |
Placement Pricing Type | Select the placement pricing type from the drop-down menu. |
External ID | Enter the external ID for the placement. An external ID is any ID that you might use outside Google Campaign Manager to identify items in internal reports. |
Targeting Information - DoubleClick Placement Mapping Level |
Paid Initiative | One DoubleClick Placement will be created, and every Ad Variant under the Social Campaign will be created as DoubleClick Ads under the DoubleClick Placement. For example, if a social campaign has 2 Ad Sets with 4 Ads under each Ad Set (8 Ad Variants Total), then selecting Paid Initiative as the Targeting Level will create 1 DoubleClick Placement with 0 DoubleClick Ads under it. |
Ad Set | One DoubleClick Placement will be created for every Social Ad Set, and every Ad Variant under each specific Ad Set will be a DoubleClick Ad under the respective DoubleClick Placement. For example, if a social campaign has 3 Ad Sets with 2 Ads under each Ad Set (6 Ad Variants Total), then selecting Ad Set as the Targeting Level will create 3 DoubleClick Placements with 2 DoubleClick Ads under each. |
Ad Variant | One DoubleClick Placement will be created for every Social Ad Variant, and every Ad Variant under each specific Ad Set will be a DoubleClick Ad under the respective DoubleClick Placement. For example, if a social campaign has 10 Ad Variants, then selecting Ad Variant as the Targeting Level will create 10 DoubleClick Placements with 1 DoubleClick Ad under each. |
Optimization
Automate the management of budget distribution, bidding, targeting, and creatives rotation to achieve your optimization objective with a minimum cost per action using Strategy Groups. Learn more about Strategy Groups.
1. On the Configure your Campaign Optimization window, select one or more Strategy Group optimization(s) you want to apply to your campaign from the Strategy Group drop-down menu. Your selected Strategy Group(s) details will be displayed below.
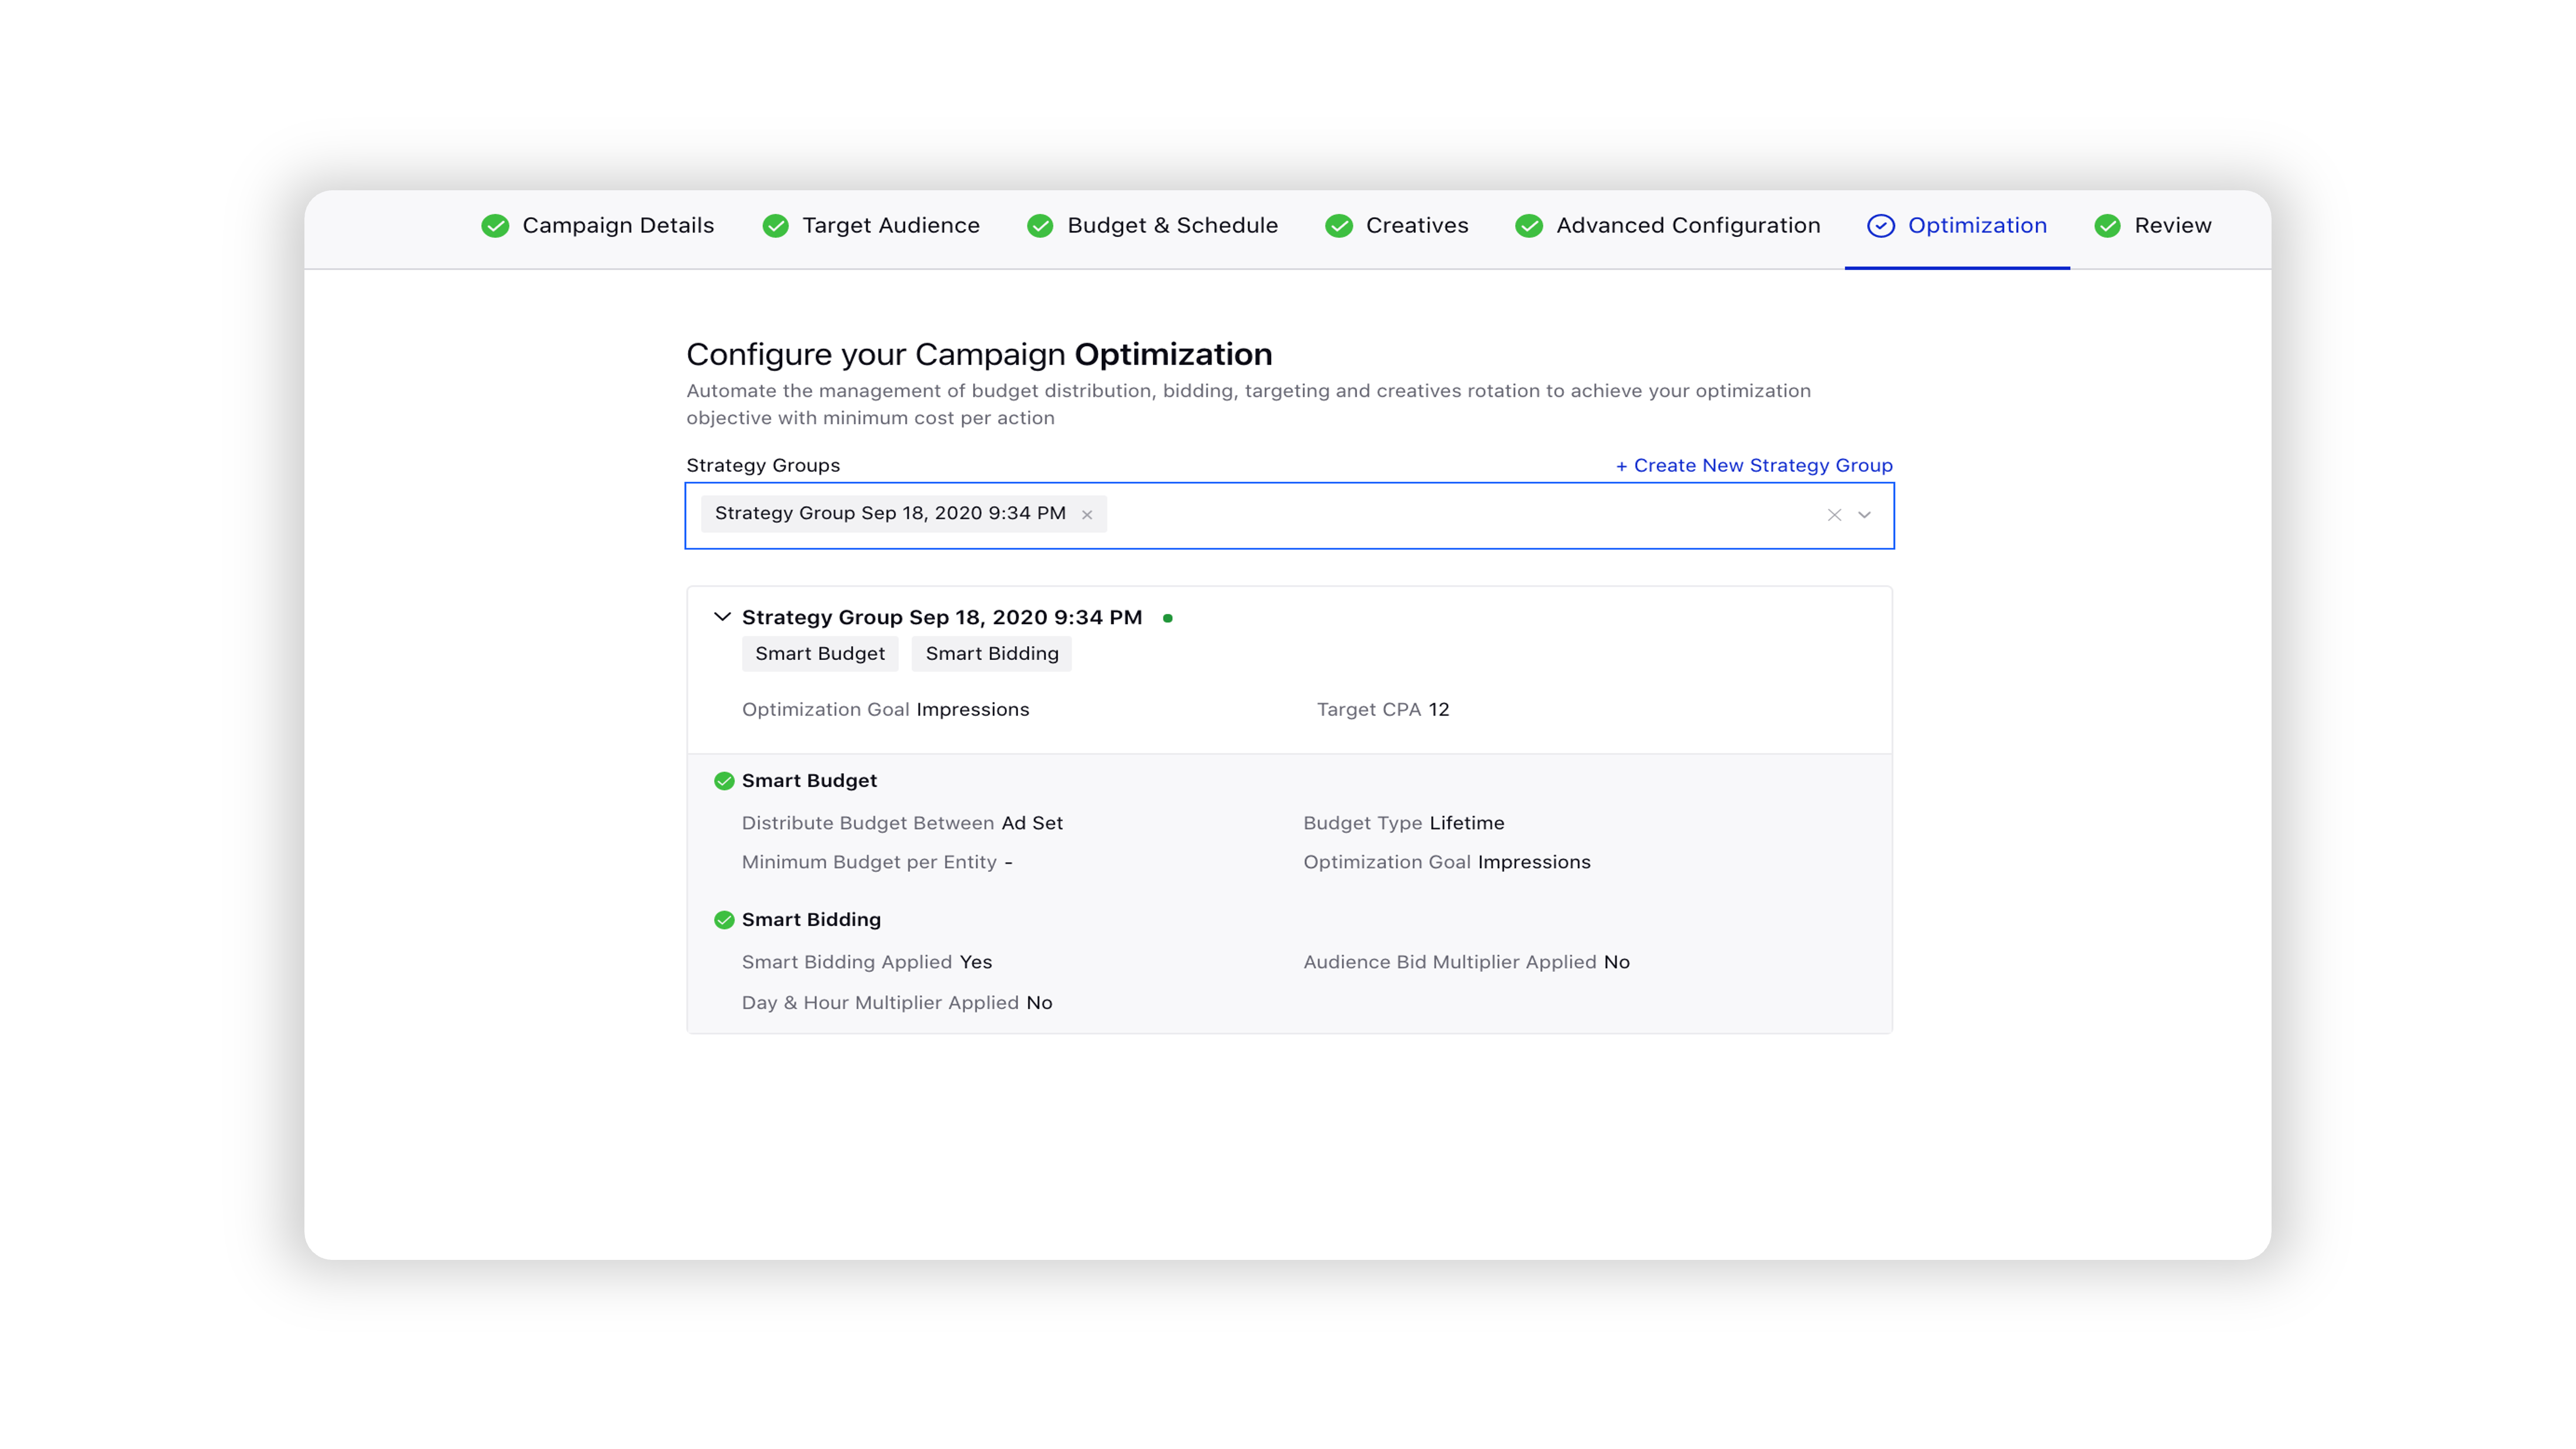
2. If you want to create your Strategy Group from scratch and then apply it to your campaign, click Create New below the drop-down menu or Create New Strategy Group in the top-right corner of the drop-down (when a Strategy Group is selected). This will open up the Strategy Group creation pane alongside and you will not need to leave Ads Composer.
To learn more about creating a Strategy Group, see Create a Strategy Group.
3. Click Next to proceed to the Review section for scheduling and publishing your campaign.
Review
In the Review section, you can review all the details for the Paid Initiative, Ad Sets, and Ad Variants, including the basic details for your Campaign, Ad Set targeting Placements, Duration & Pricing, and all Ad Set Creative.
![]() Tip: Click Back in the Ads Composer to make any changes to Campaign Details, Targeting, Budget & Scheduling, or Creative.
Tip: Click Back in the Ads Composer to make any changes to Campaign Details, Targeting, Budget & Scheduling, or Creative.
However, over Publish in the bottom right corner and select Publish to immediately publish your Ad Campaign on Facebook or Instagram, Publish as Paused to publish without activating it, or select Send for Approval to send your newly composed campaign to a reviewer.