Callback Dialers
Updated
A Callback dialer is an automated outbound calling system designed to enhance contact center efficiency by allowing users to schedule a callback to a specific phone number at a later time, rather than connecting immediately. The callback dialer records the request and automatically dials the phone number at a pre-set time, ensuring a more efficient and convenient experience for both the caller and the agent or service.
This leads to higher customer satisfaction, more efficient call management, and successful campaigns for sales and marketing.
Types of Callback Dialers
Callback Dialer works in three ways:
Agent First Dialer: In this type of callback, the system sends calls to agents first before calling the customer. This gives agents time to review the call context and provide a better customer experience.
For example, a customer requests a follow-up call about a billing issue at 7.30 PM IST, but with his past interactions and history, the agent is well-notified with the customer’s case when the Agent-First dialer is selected, which allows agents to spend more time in understanding the case and tackling the customer smartly.
Customer First Dialer: In this type of callback, the system dials the call to the customer before offering it to the agent. This call is triggered when it finds that the agent who is entitled to take the callback is free or available or at least one agent is available in the agent work queue which is entitled for the callback.
For example, a customer requests a follow-up call about Service 1 subscription at 7.30 PM IST and requires the call to be with the relevant assistant from the company. Now, in this case, the agent and the customer have not spoken to each other prior to it hence, there is no need for the agent to take the call first and spend time in recollecting the information. Hence, the business can use Customer First Dialer, which helps in saving agent’s time and improve productivity.
IVR Dialer: In this type of callback, the system directs the call through an Interactive Voice Response (IVR) system. To improve customer experience and avoid unanswered callbacks, the IVR Dialer checks agent availability in real time before dialing the callback.
This ensures callbacks are only triggered when an agent (or an appropriate queue) is available to handle the interaction.For example, a customer requests a follow-up call about a billing issue at 7.30 PM IST, for which the business already has a troubleshooting workflow setup in IVR, then in this case, the callback type would be IVR.

Attributes of IVR Dialer:
IVR Processes: The IVR interacts with the customer to collect choices or feedback.
Assign Agent Node: If needed, the IVR can automatically transfer the call to a live agent.
Functioning of IVR Dialer:
Before initiating a callback, the IVR system must perform a real-time check of agent availability to ensure optimal call routing and customer experience.
For Queue-Based Assignments
The system should evaluate the following parameters:
Agents currently logged into the queue.
Their status (For example, Available or Idle).
Skill match, if skill-based routing is enabled.
For Agent-Specific Callbacks
Verify that the assigned agent is online and available before triggering the callback.
When No Suitable Agent is Available
The system should not initiate the callback immediately.
Apply a retry mechanism based on either configurable or default retry logic.
Log the reason for the deferred callback (For example, “No available agents in queue XYZ”).
Additional Requirement
The IVR callback mechanism must not interfere with ongoing calls or existing call flows.
Creating Callback Dialers
Perform the following steps to create the Callback Dialers:
Click the New Tab icon. Under the Sprinklr Service tab, click Voice Care within Listen.
Navigate to Dialer Profiles from the left pane.
Click Add Dialers at the top right corner of the screen.

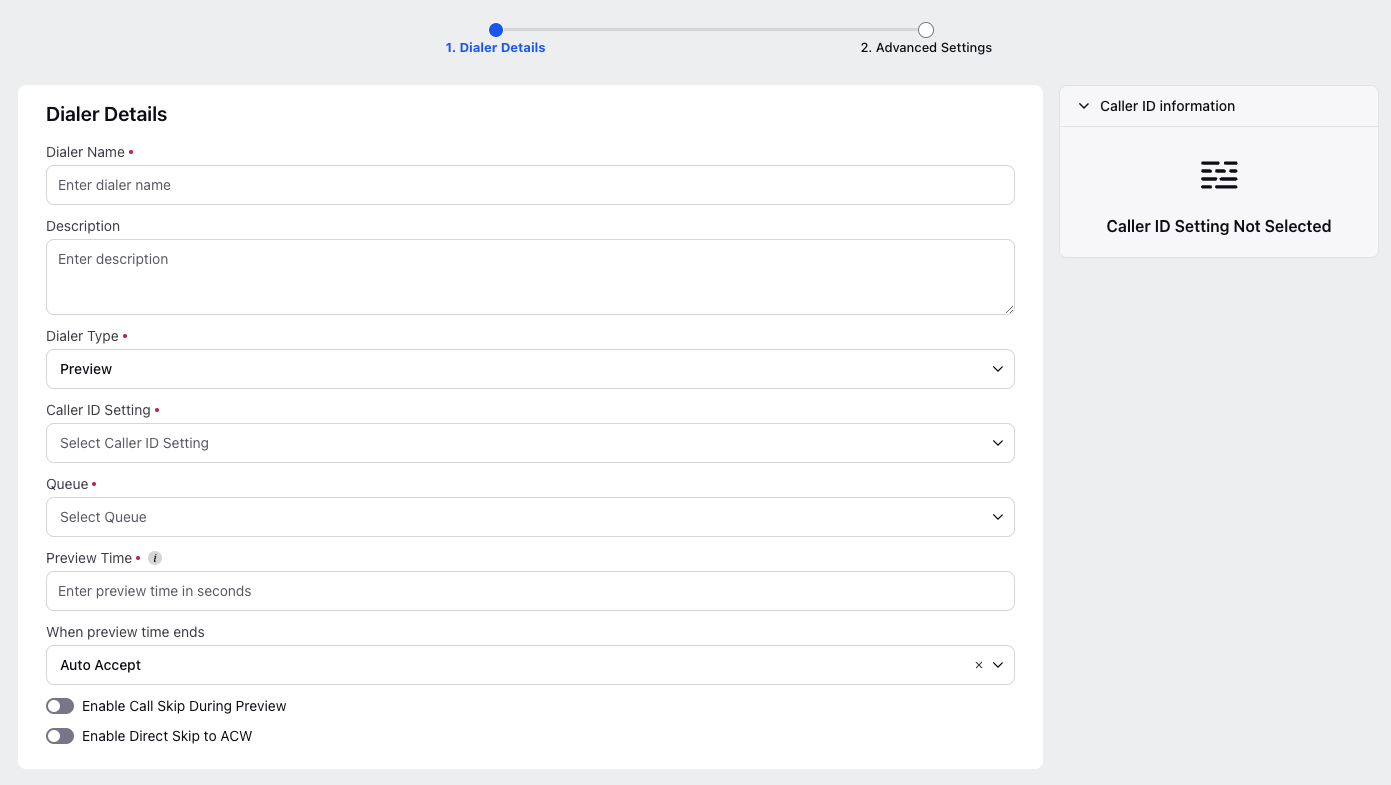
Under the Dialer Details screen, Enter the Dialer Name.
Enter the Description.

Select Callback from the Dialer Type drop down menu.
Select the caller ID setting from the Caller ID Setting drop down menu.
Click the Agent First or Customer First or Callback IVR radio button to select the Callback Type.
Toggle the Enable Auto Respond (if required).
Enter the Preview Time.
Select the value from the When preview time ends drop down menu.
Select the status from the User Available Statuses drop down menu.
Toggle the Enable Call Skip During Preview (if required).
Toggle the Enable Direct Skip to ACW (if required).
Under the Advanced Settings screen, enter the Unassigned Call Timeout value.


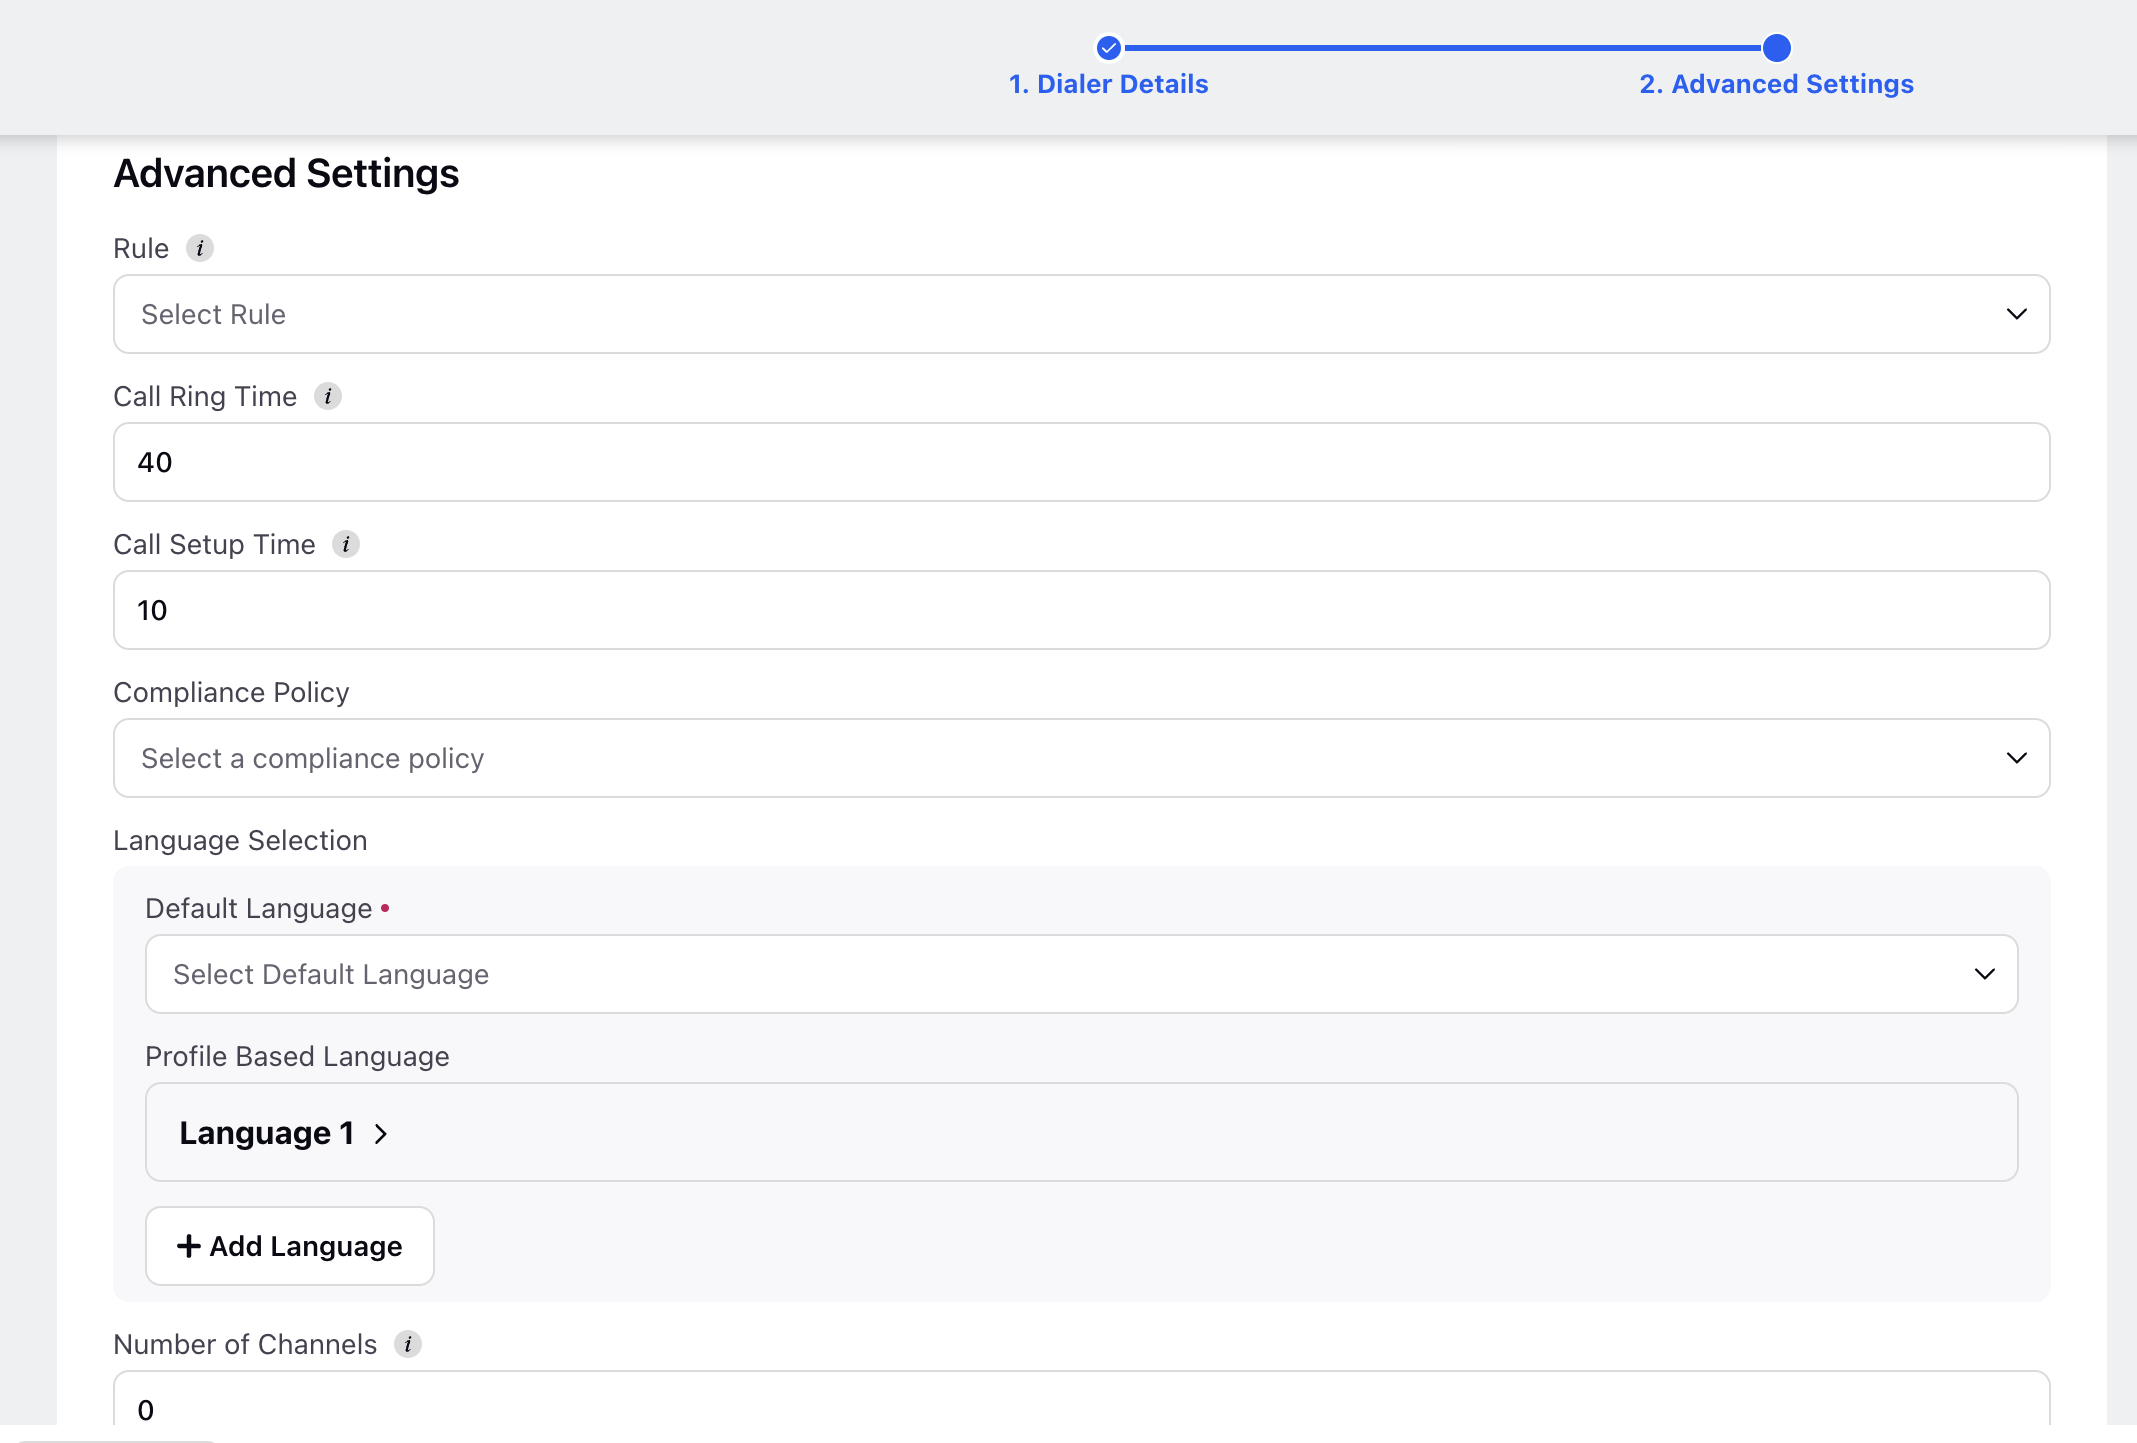
Select the rule from the Rule drop down menu.
Enter the Call Ring Time.
Enter the Call Setup Time.
Select the compliance policy from the Compliance Policy drop down menu.
Select the default language from the Default Language drop down menu under the Language Selection section.
Enter the Number of Channels.
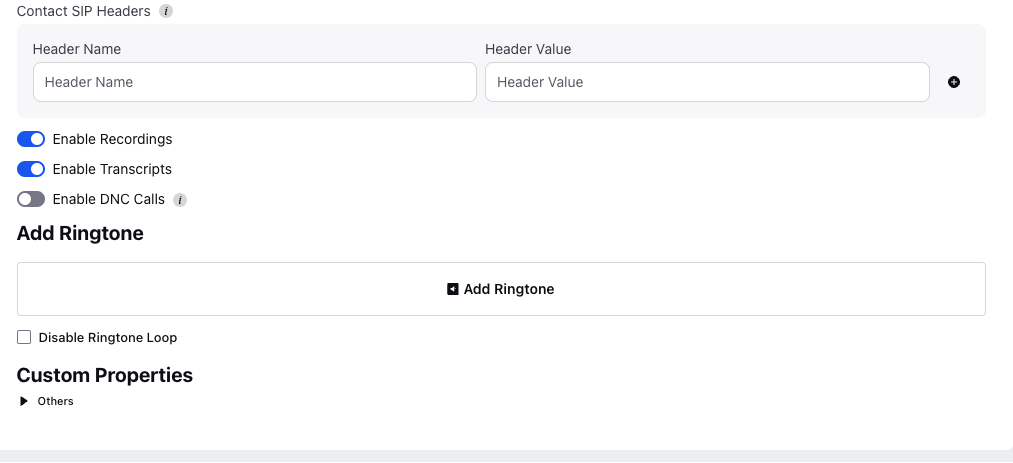
Enter the Contact SIP Headers Name and Value.
Toggle the Enable Recordings (if required).
Toggle the Enable Transcripts (if required).
Toggle the Enable DNC Calls (if required).
Click the Add Ringtone icon to add a ringtone.
Click Disable Ringtone Loop checkbox (if required).
Enter the Custom Properties.
Click Update.
The following table lists the description of the Parameters of the Callback Dialers Screen.
Parameter | Description |
Dialer Name | This field is mandatory and contains the name of the dialer. |
Description | This field is optional and user might enter any notes or reason for creating the dialer in order to remember it. |
Dialer Type | Specifies the dialer type which in this case is Callback dialer. |
Enable Auto Respond | This allows the user to govern whether the call needs to be automatically answered for the agent (when customer has already connected).
|
Preview Time | The time allotted for the agent to review the call details before accepting the call. |
When preview time ends | It automatically connects the call. |
User Available Statuses | Defines the statuses under which a user is considered available for handling calls. |
Enable Call Skip During Preview | Allows agents to skip the call during the preview time if they determine it's unnecessary or they are unable to take it. |
Enable Direct Skip to ACW (After Call Work) | Enables agents to skip directly to After Call Work if they decide not to proceed with the call. |
Unassigned Call Timeout | Helps to keep the customer in the waiting queue for a mentioned time when the agent to whom callback is assigned is occupied or no agent is available in the queue in which callback is assigned. |
Rule | Rules can also be assigned to Manual dialers based on the business necessities which get triggered whenever a manual call is placed. |
Call Ring Time | Call ring time is basically the time for which the call will be dialed at customer end i.e. the time for which customer is called before the calling stops if customer doesn't picks up. |
Call Setup Time | Call setup time is basically the time the dialer awaits the confirmation whether the customer has been dialed or not.
This means the dialer waits for 15 seconds to receive confirmation from the telco (Telecommunication service provider) whether a call has been placed or not. Once the call is set up it will ring for 60 seconds for the customer before it gets answered or receives any other telephony outcome. |
Compliance Policy | This ensures that all outbound calls through the selected dialer follow the specified recording and data retention rules defined in the compliance policy. |
Language Selection | Language preferences can be configured at the dialer level based on customer lead attributes to ensure that transcripts are generated in the appropriate language for different leads dialed from the same dialer. When a call is initiated, the system verifies if a language is configured at the dialer level and whether the specified attribute value matches the customer's lead. If both conditions are met, the corresponding language setting is applied. If no match is found, the default language specified at the dialer level is used. In the absence of a default language at the dialer level, it defaults to the workspace language setting. |
Number of Channels | Number of parallel calls that would be made in one iteration across all campaigns.
|
Contact SIP Headers | In the SIP Header Mapping section, you see the option to add multiple SIP headers.
|
Enable Recordings | Enables the recording of the calls which can be used by quality managers for auditing purposes. |
Enable Transcripts | This enables the transcripts of the recorded calls which is also used by the quality managers for auditing purposes. |
Enable DNC Calls | Enabling this gives the dialer rights to call customers or dial to phone numbers which are in DND list or which do not give consent to be dialed. |
Add Ringtone | Adds a specific ringtone during preview time. Defaults to system ringtone if none is specified. |
Custom Properties | Add the desired custom properties. These custom fields can be created by selecting "Asset" as Dialer Profile. |