FAQs (Supervisor Console)
No tags available
Updated
2 years ago
, by [Redesign] Sprinklr Help Center
Find below the answers to frequently asked questions about Supervisor Console 2.0.
Supervisor Console 2.0 comes in the following views.
Persona Mode
Hyperspace Mode
Hyperspace view is an integration of enterprise and persona view.
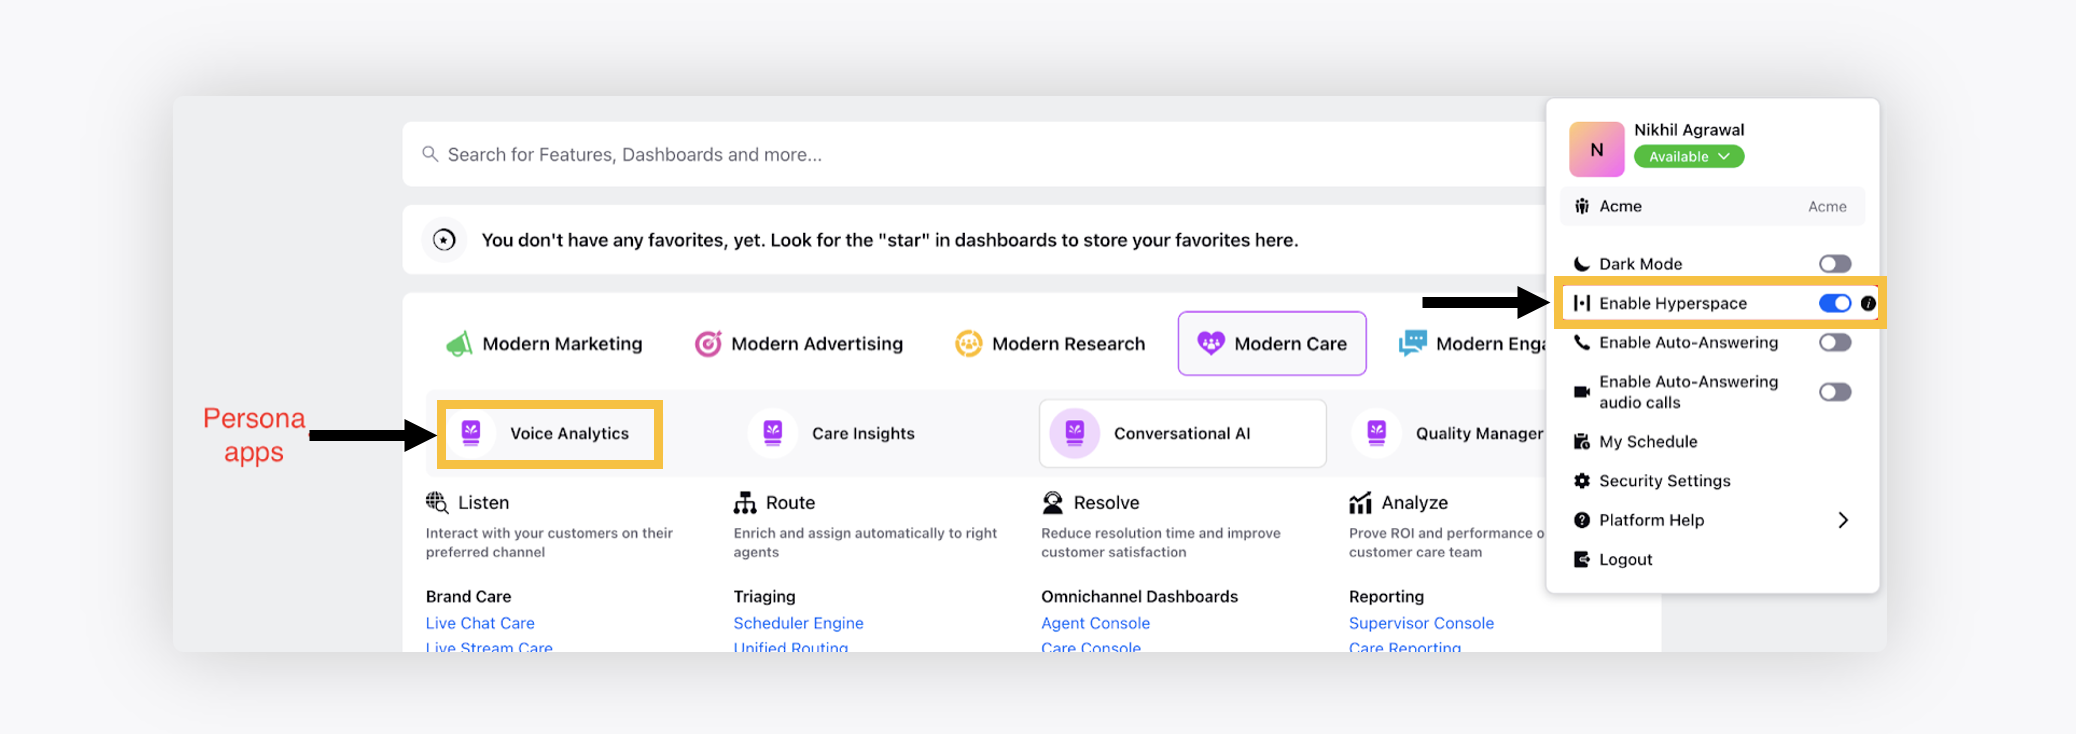
Hyperspace view enables users to
Access multiple personas at once
Open multiple reports in different tabs
Steps to share persona apps with the users using the hyperspace view
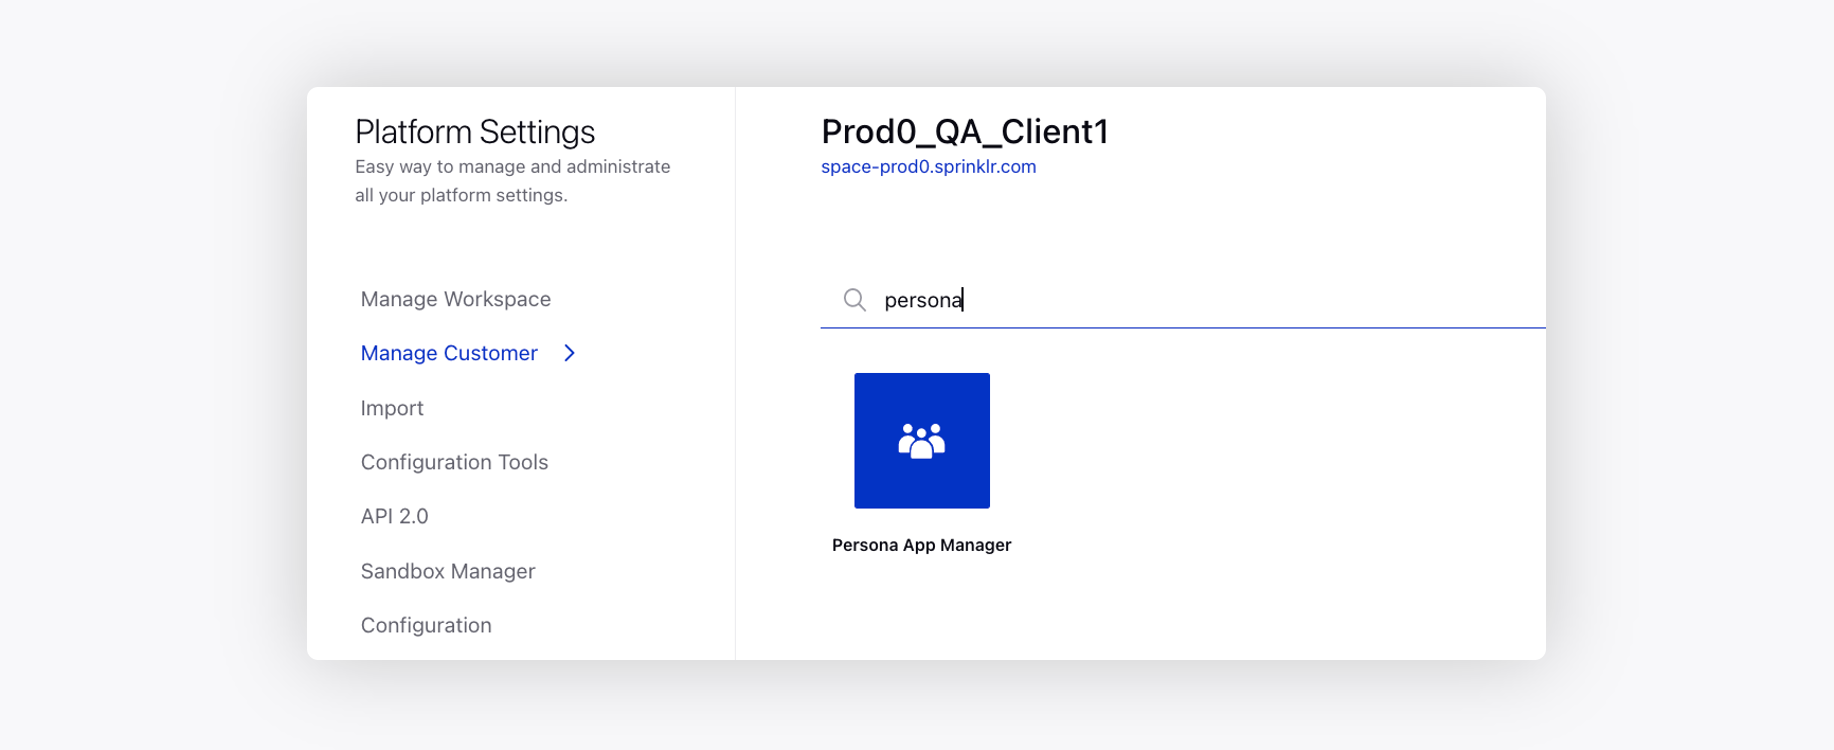
1. Go to Platform Settings by clicking All Settings under Governance Console.
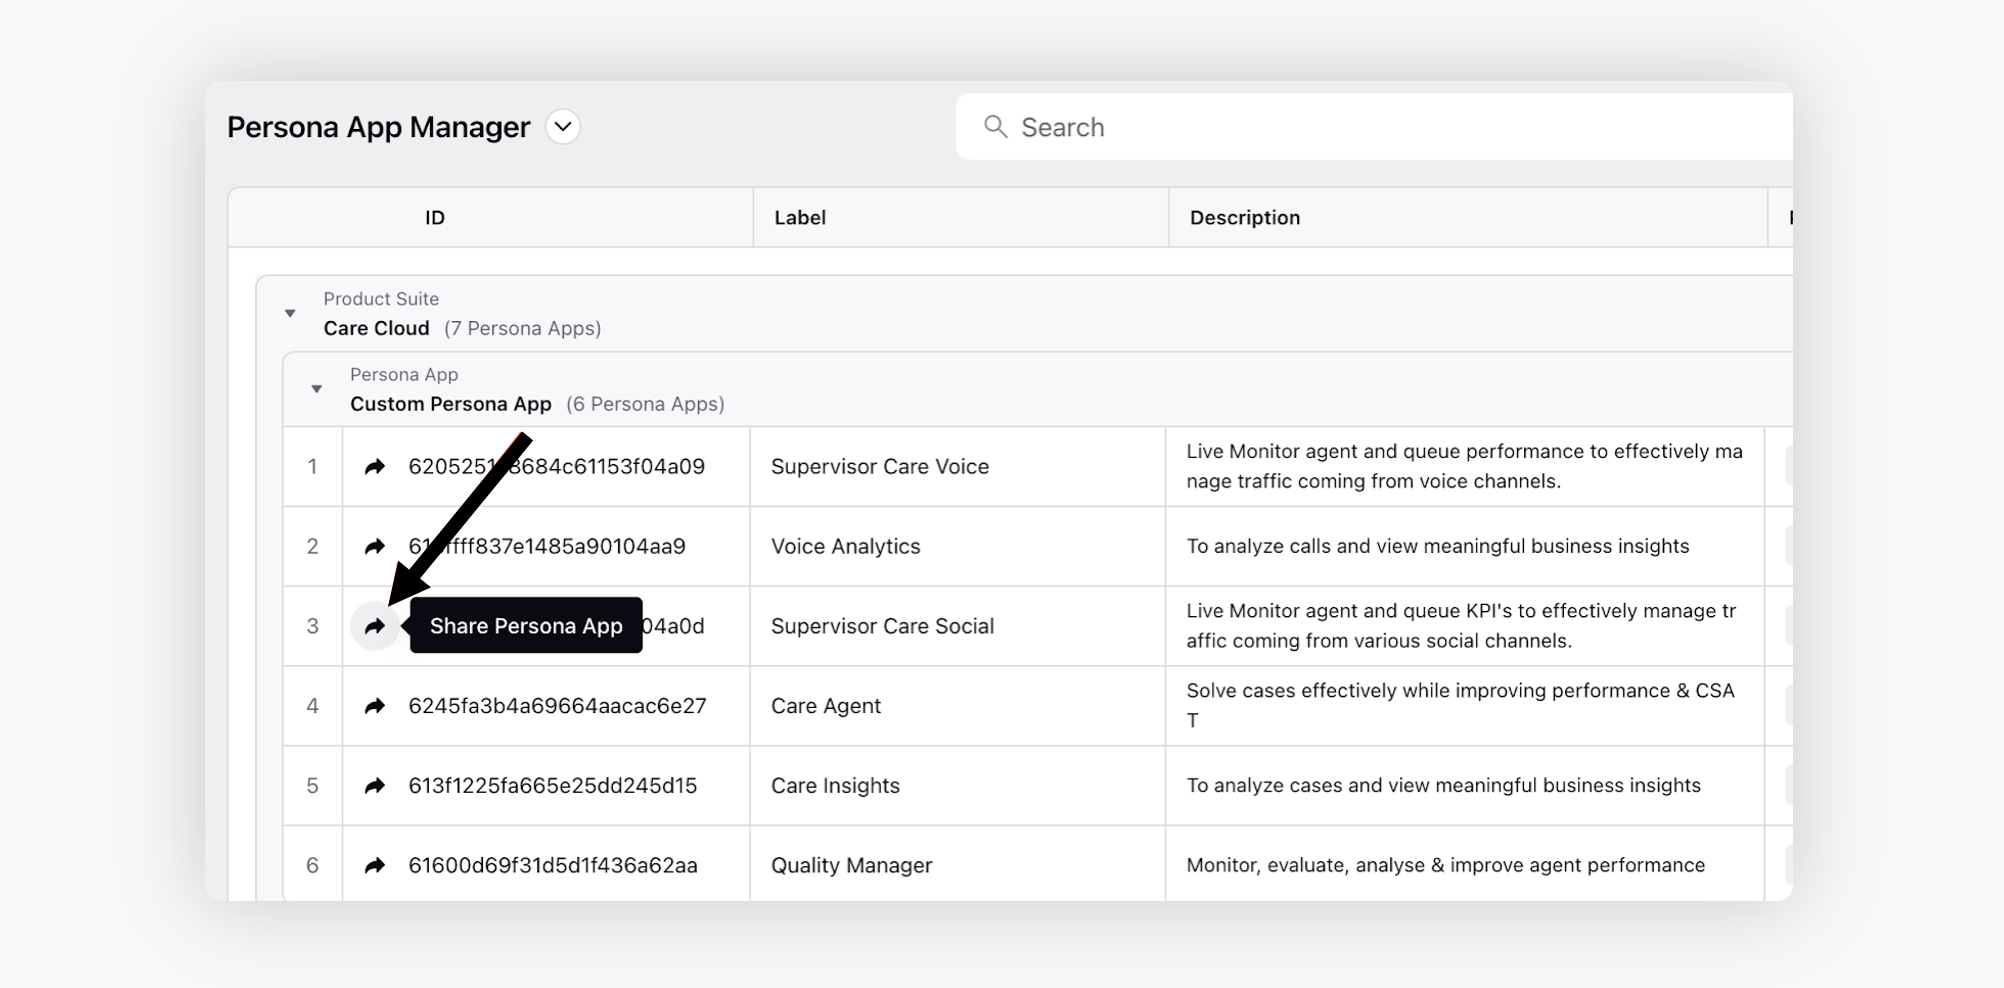
2. Within the Manage Customer section, search and select Persona App Manager. This shows the list of persona apps created under different product suites.
3. To share a persona, click the Share Persona App icon to the left of the Persona ID.
To enable the hyperspace view by default for a partner, please work with your Success Manager.
There are various instances of Supervisor Console that can be enabled by raising a support ticket.
- Supervisor Care Omni Channel Persona
- Supervisor Care Inbound Voice Persona
- Supervisor Care Outbound Voice Persona
- Supervisor Care Voice Persona
- Supervisor Care Social Persona
Supervisor Care Omnichannel | Supervisor Care Inbound Voice | Supervisor Care Outbound Voice | Supervisor Care Voice | Supervisor Care Social |
Home Page | Home Page | Home Page | Home Page | Home Page |
Agents Monitoring | Agents Monitoring
| Agents Monitoring
| Agents Monitoring
| Agents Monitoring
|
Queue Monitoring | Queue Monitoring | Campaign Monitoring | Campaign Monitoring | Queue Monitoring |
Call Back Manager | Call Back Manager | Call Back Manager | Call Back Manager | Quality Management |
Quality Management | Quality Management | Quality Management | Quality Management | Alerts |
Alerts | Alerts | Alerts | Alerts | Announcements |
Announcements | Announcements | Announcements | Announcements | Reporting
|
Reporting
| Reporting
| Reporting
| Reporting
| Care Console |
Care Console | Care Console | Care Console | Care Console | |
Call Icon | Call Icon | Call Icon | Call Icon |
The widgets and the associated metrics can be added, removed, and modified through persona configuration. Kindly raise a support ticket at tickets@sprinklr.com for the same based on the use case.
1. Click the Options icon in the top right corner of the desired reporting dashboard and select Share.
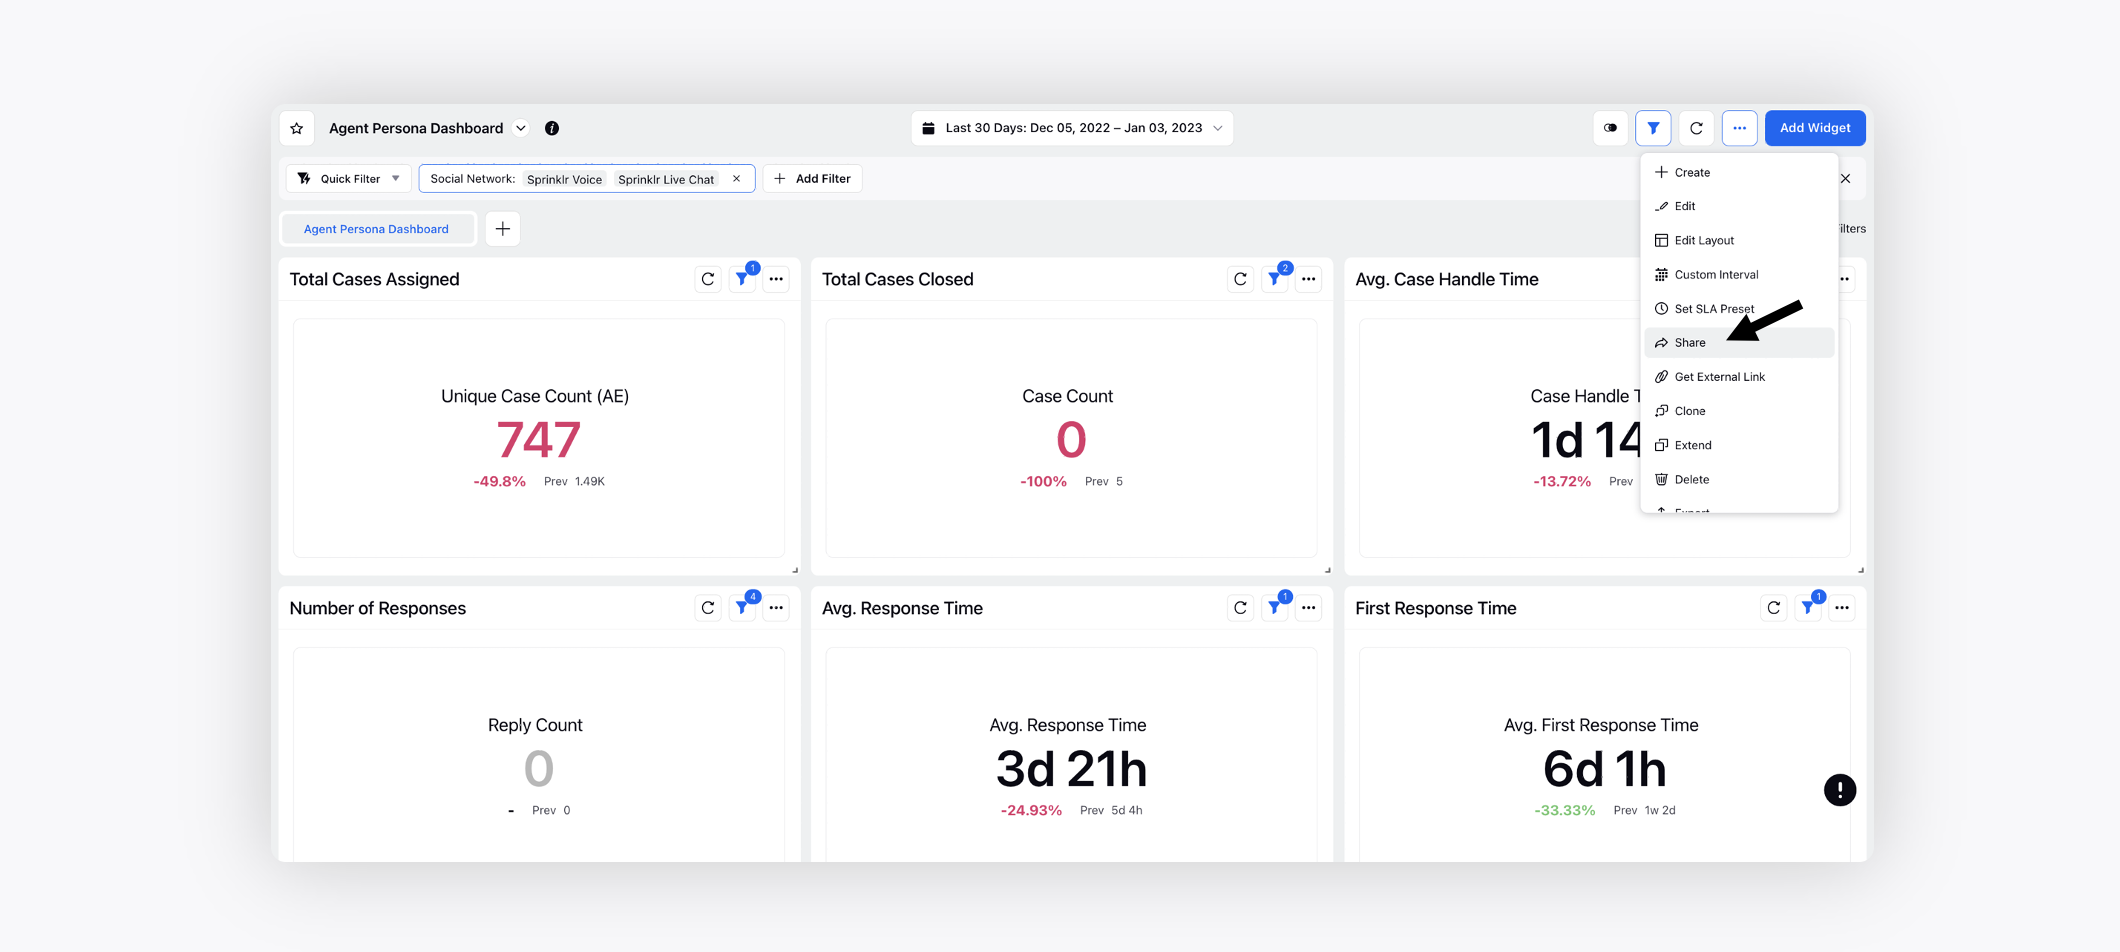
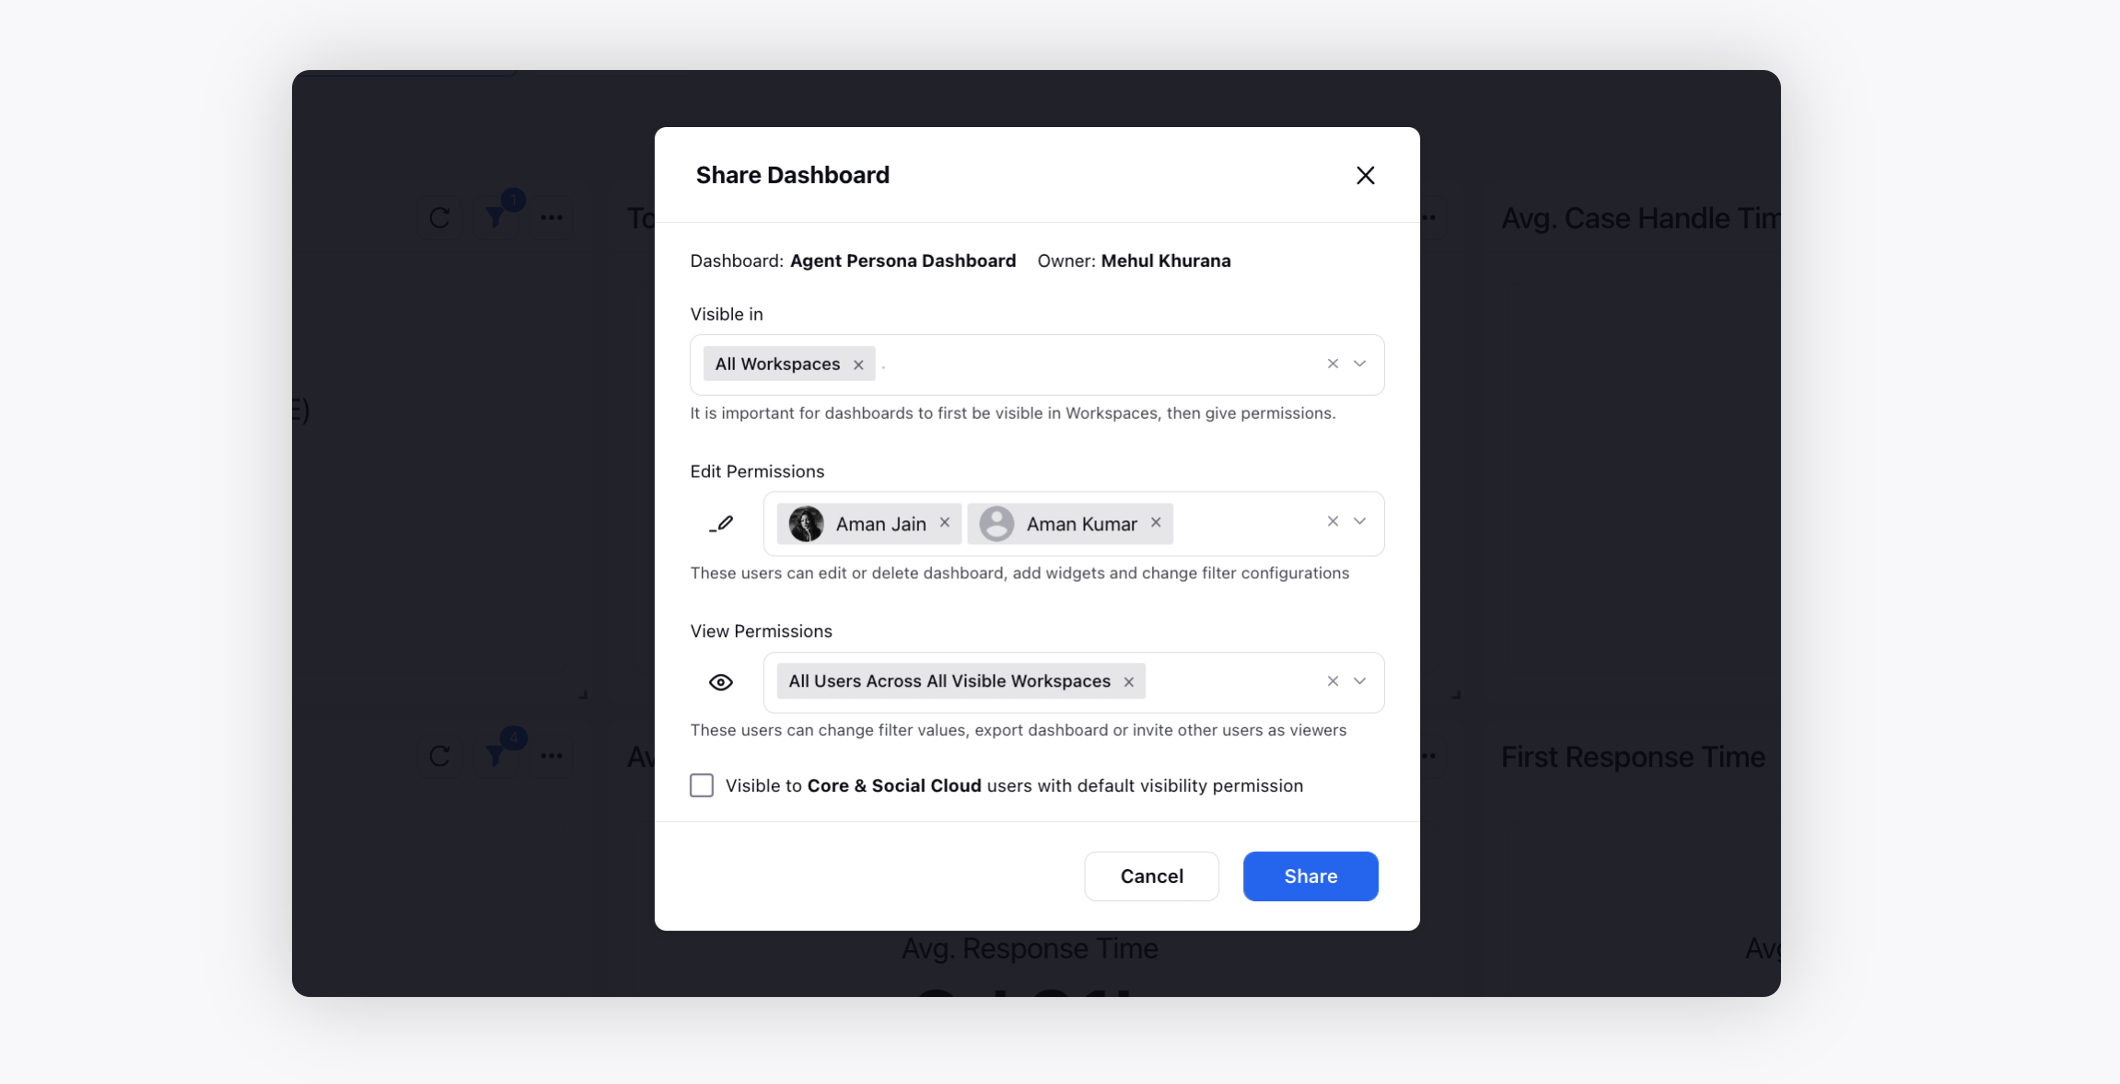
2. On the Share Dashboard pop-up window, select the workspaces or worlspace groups with which the reporting dashboard needs to be shared. You can also share the Edit and View permissions. Click Share.
3. To view this dashboard in the persona, you need to add the reporting persona tag. Click the Options icon in the top right corner and select Edit Dashboard.
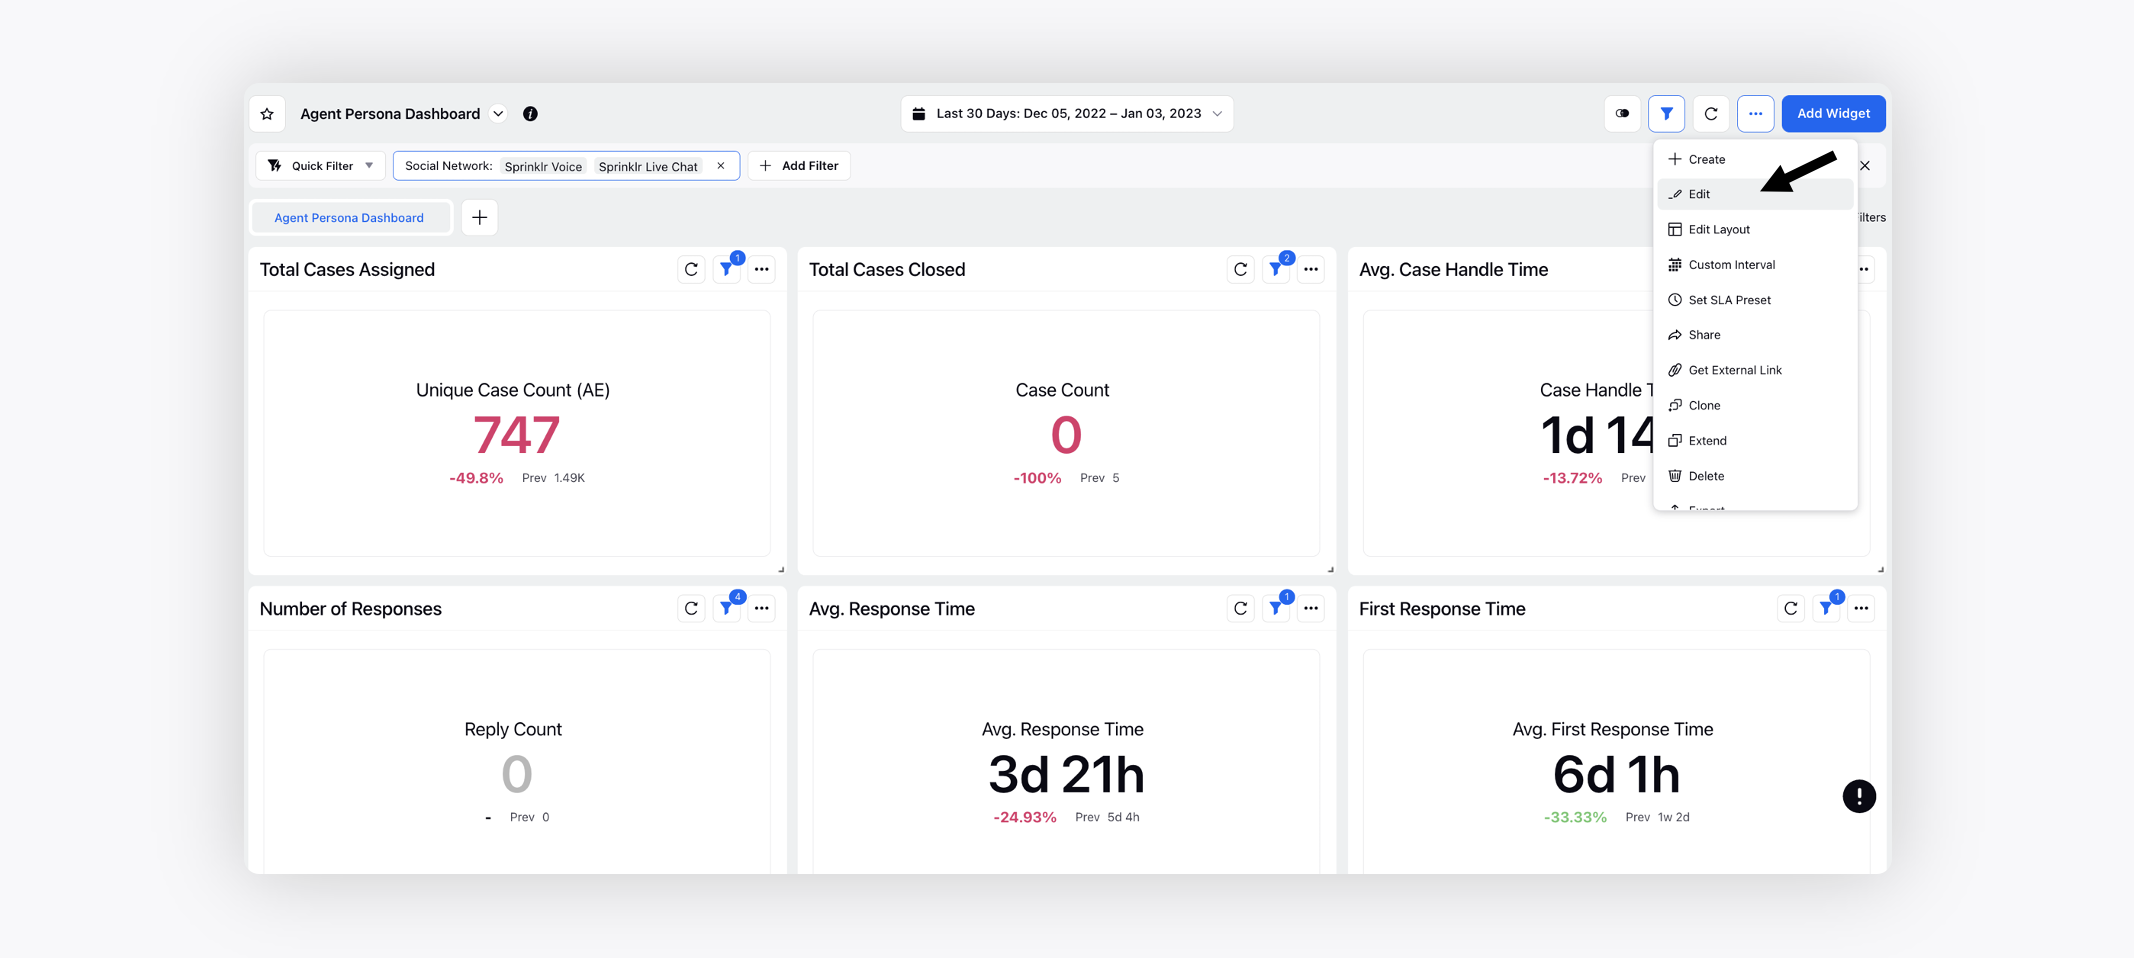
4. Add the persona tag, SPR#PERSONA#SUPERVISOR_CONSOLE from the Tags dropdown.

Persona Tag Mapping
Persona Name | Persona Tag |
Supervisor Care Social Persona | SPR#PERSONA#SUPERVISOR_CONSOLE_REPORTING_SOCIAL |
Supervisor Care Inbound Voice Persona | SPR#PERSONA#SUPERVISOR_CONSOLE_REPORTING_INBOUND_VOICE |
Supervisor Care Outbound Voice Persona | SPR#PERSONA#SUPERVISOR_CONSOLE_REPORTING_OUTBOUND_VOICE |
Supervisor Care Omni Channel Persona | SPR#PERSONA#SUPERVISOR_CONSOLE_REPORTING_OMNICHANNEL |
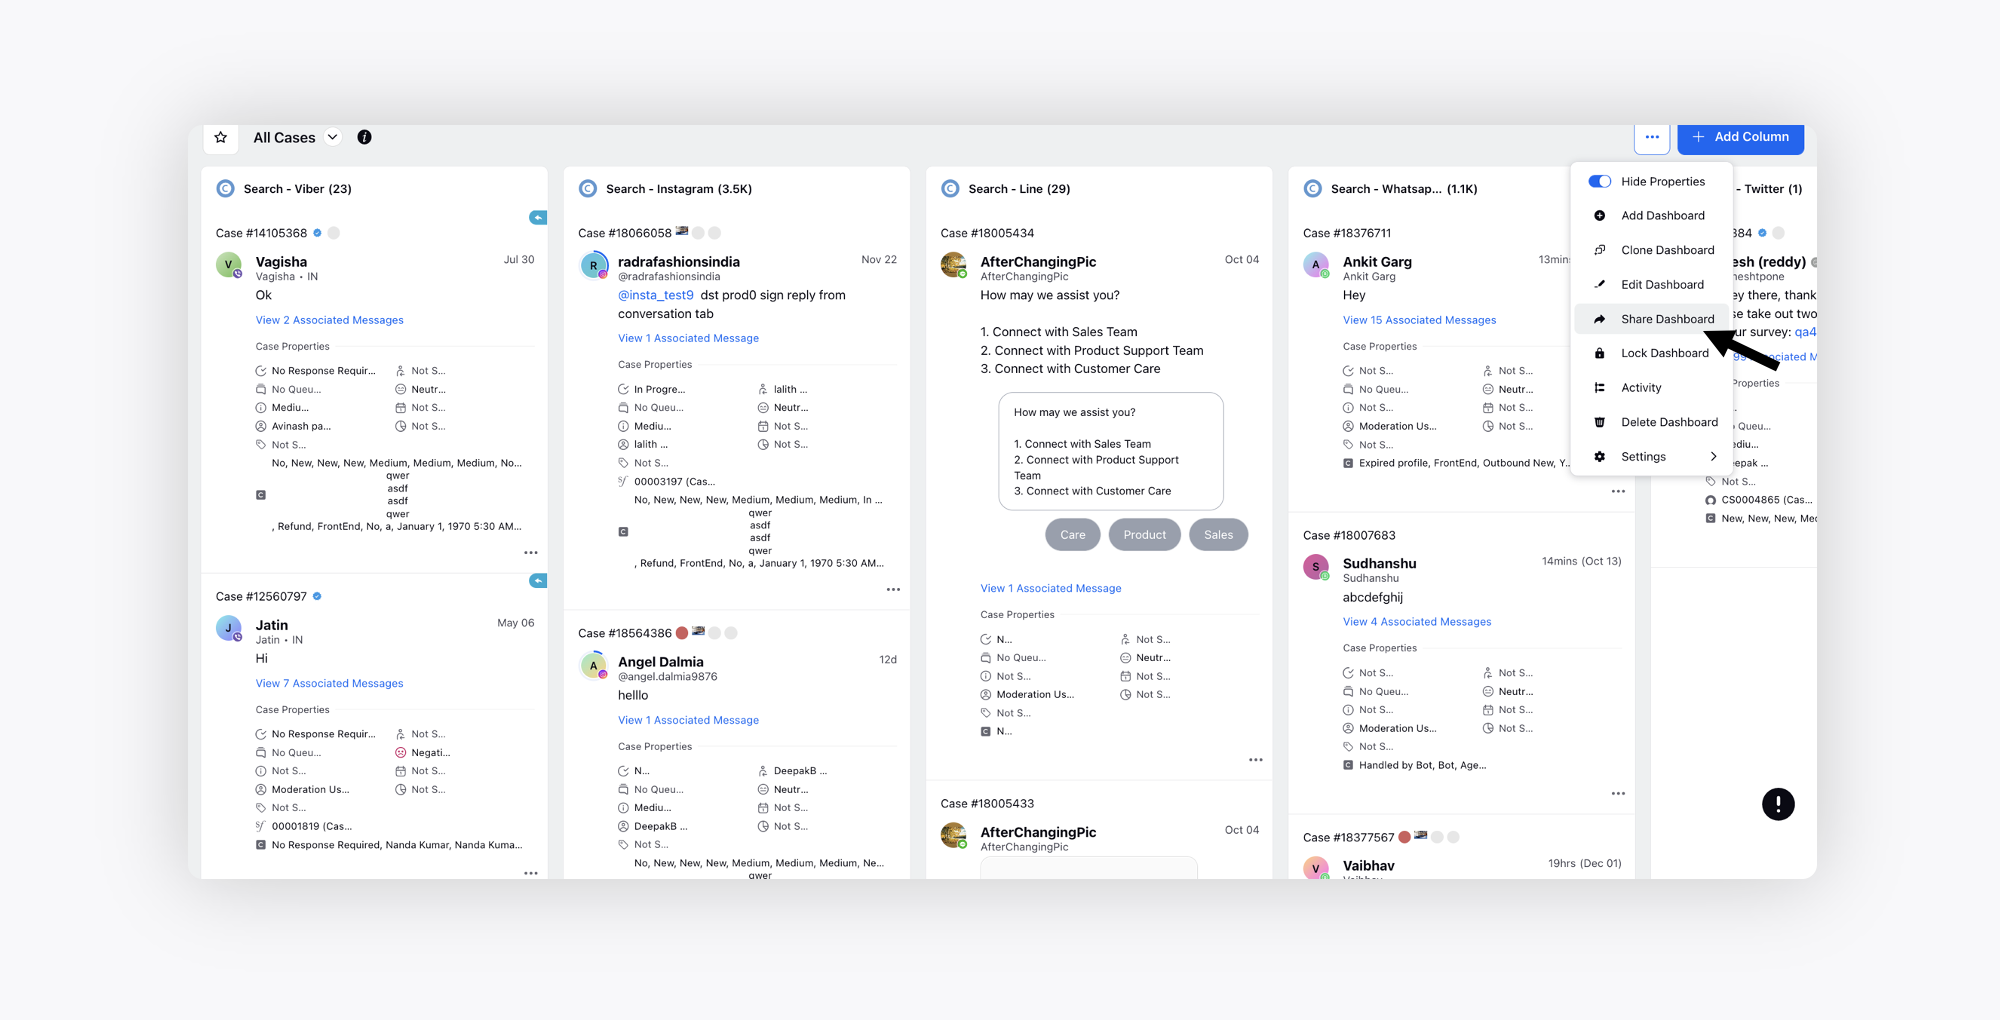
1. Click the Options icon in the top right corner of the desired engagement dashboard and select Share Dashboard.
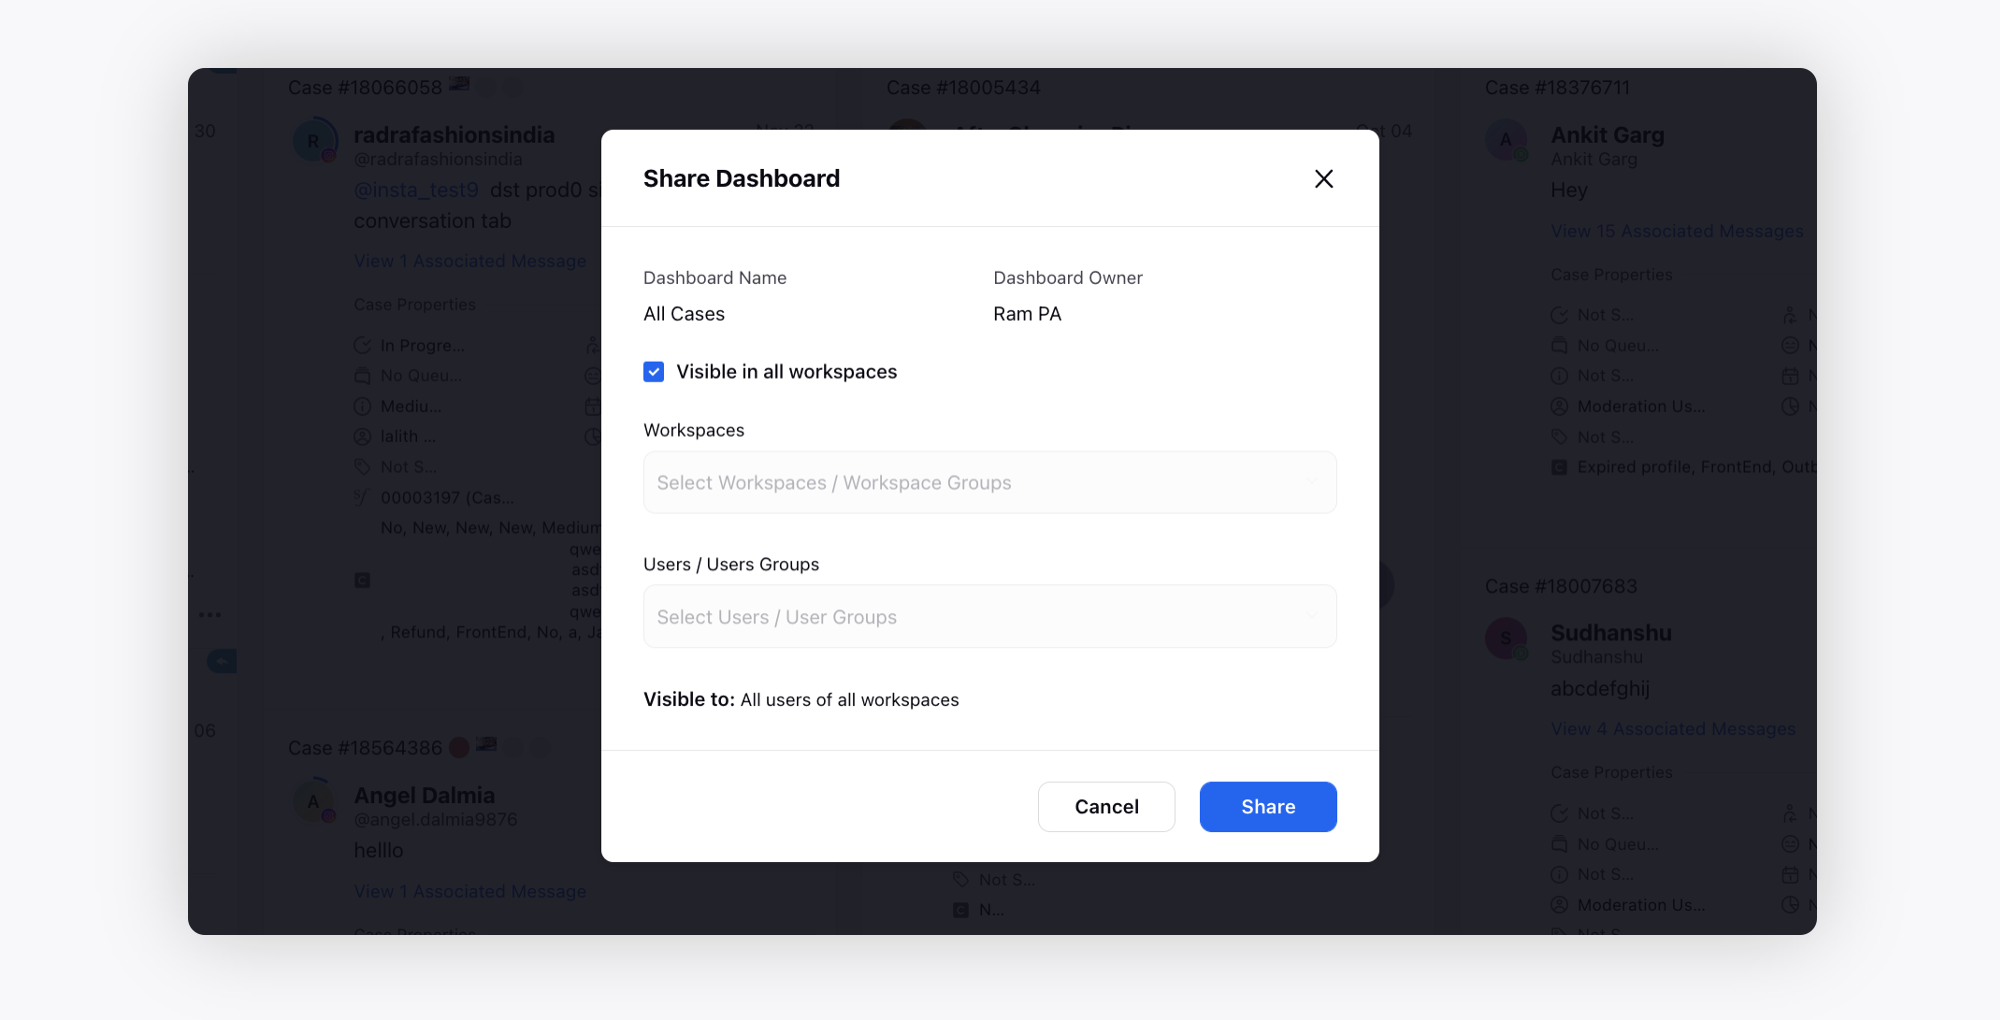
2. On the Share Dashboard pop-up window, select the workspaces or users/user groups with which the engagement dashboard needs to be shared. Click Share.
3. To view this dashboard in the persona, you need to add the Care Console persona tag. Click the Options icon in the top right corner and select Edit Dashboard.
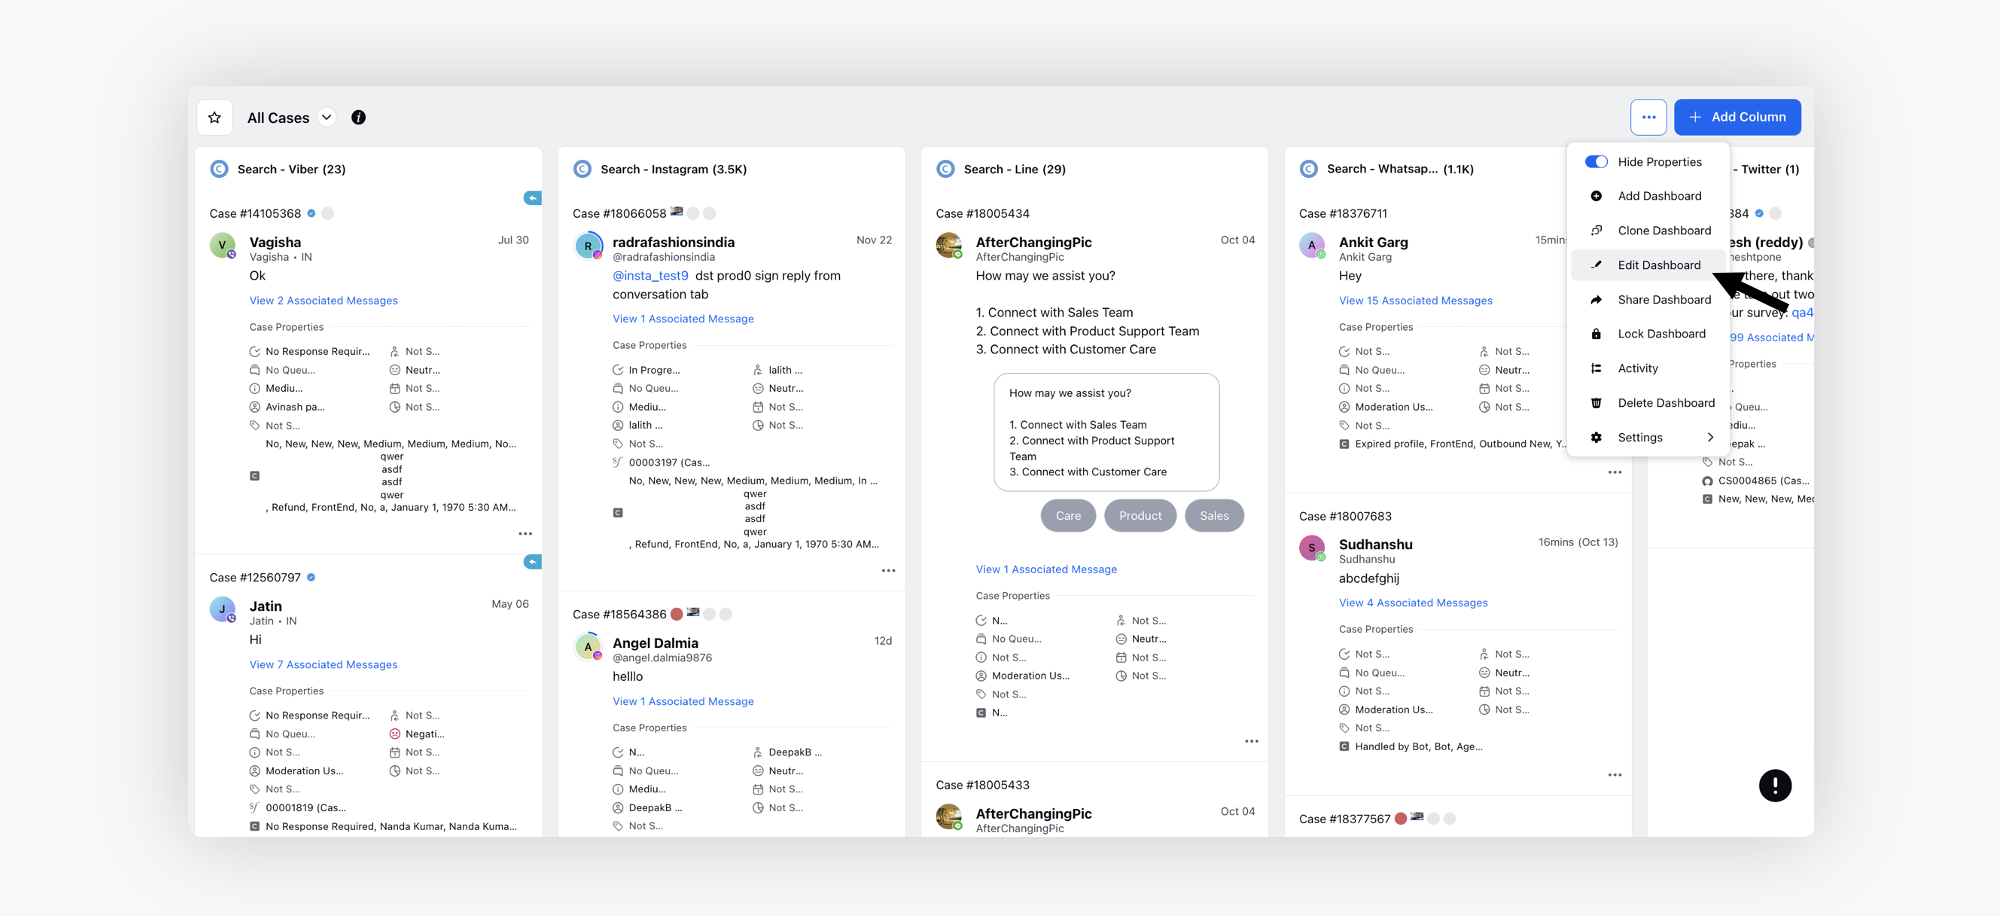
4. Add the Care Console tag, SPR#PERSONA#SUPERVISOR_CARE_CONSOLE from the Tags dropdown.

Persona Tag Mapping
Persona Name | Persona Tag |
Supervisor Care Social Persona | SPR#PERSONA#SUPERVISOR_CARE_CONSOLE_SOCIAL |
Supervisor Care Voice Persona | SPR#PERSONA#SUPERVISOR_CARE_VOICE_CONSOLE |
Supervisor Care Inbound Voice Persona | SPR#PERSONA#SUPERVISOR_CARE_CONSOLE_INBOUND_VOICE |
Supervisor Care Outbound Voice Persona | SPR#PERSONA#SUPERVISOR_CARE_CONSOLE_OUTBOUND_VOICE |
Supervisor Care Omni Channel Persona | SPR#PERSONA#SUPERVISOR_CARE_CONSOLE_OMNI_CHANNEL |
There might be some scenarios where you may not be able to find the tag needed to share the reporting or engagement dashboards to persona apps. To retrieve tags of a specific persona, follow the videos below.
Note : Switch from Classic View to Persona view
Tags for Reporting Dashboards
Tags for Engagement Dashboard
Yes, Care Console enablement is required for Supervisor Console enablement. Care Console is a next-gen omnichannel console with a fully customizable agent interface that unifies case handling and lets agents seamlessly switch between channels, including digital and voice, while maintaining customer context at every step.
Additionally, out-of-the-box integrations with CRM systems and robust APIs give agents a consolidated, complete picture of customer information.
The live monitoring of agents can be done in the Supervisor Console only if the agent is using Care Console. The live monitoring of agents via states can’t be done if the agent is using Agent Console.
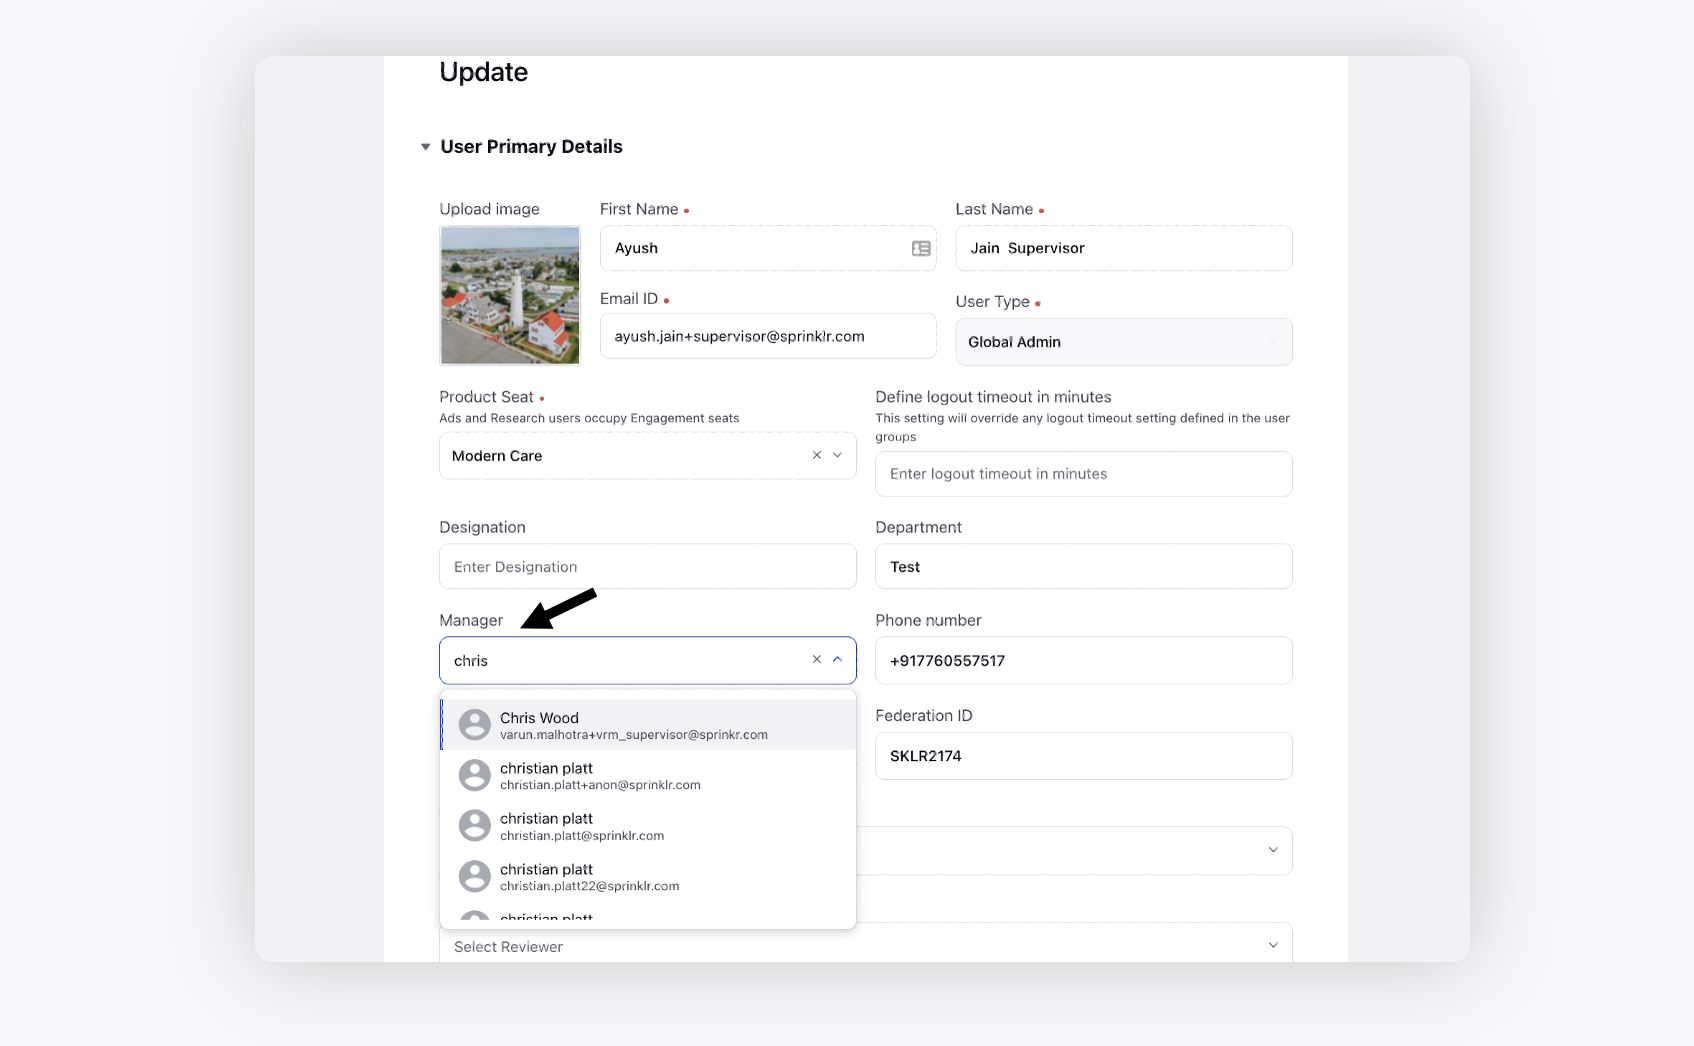
1. Edit the desired user and update the Manager field with the user’s manager.
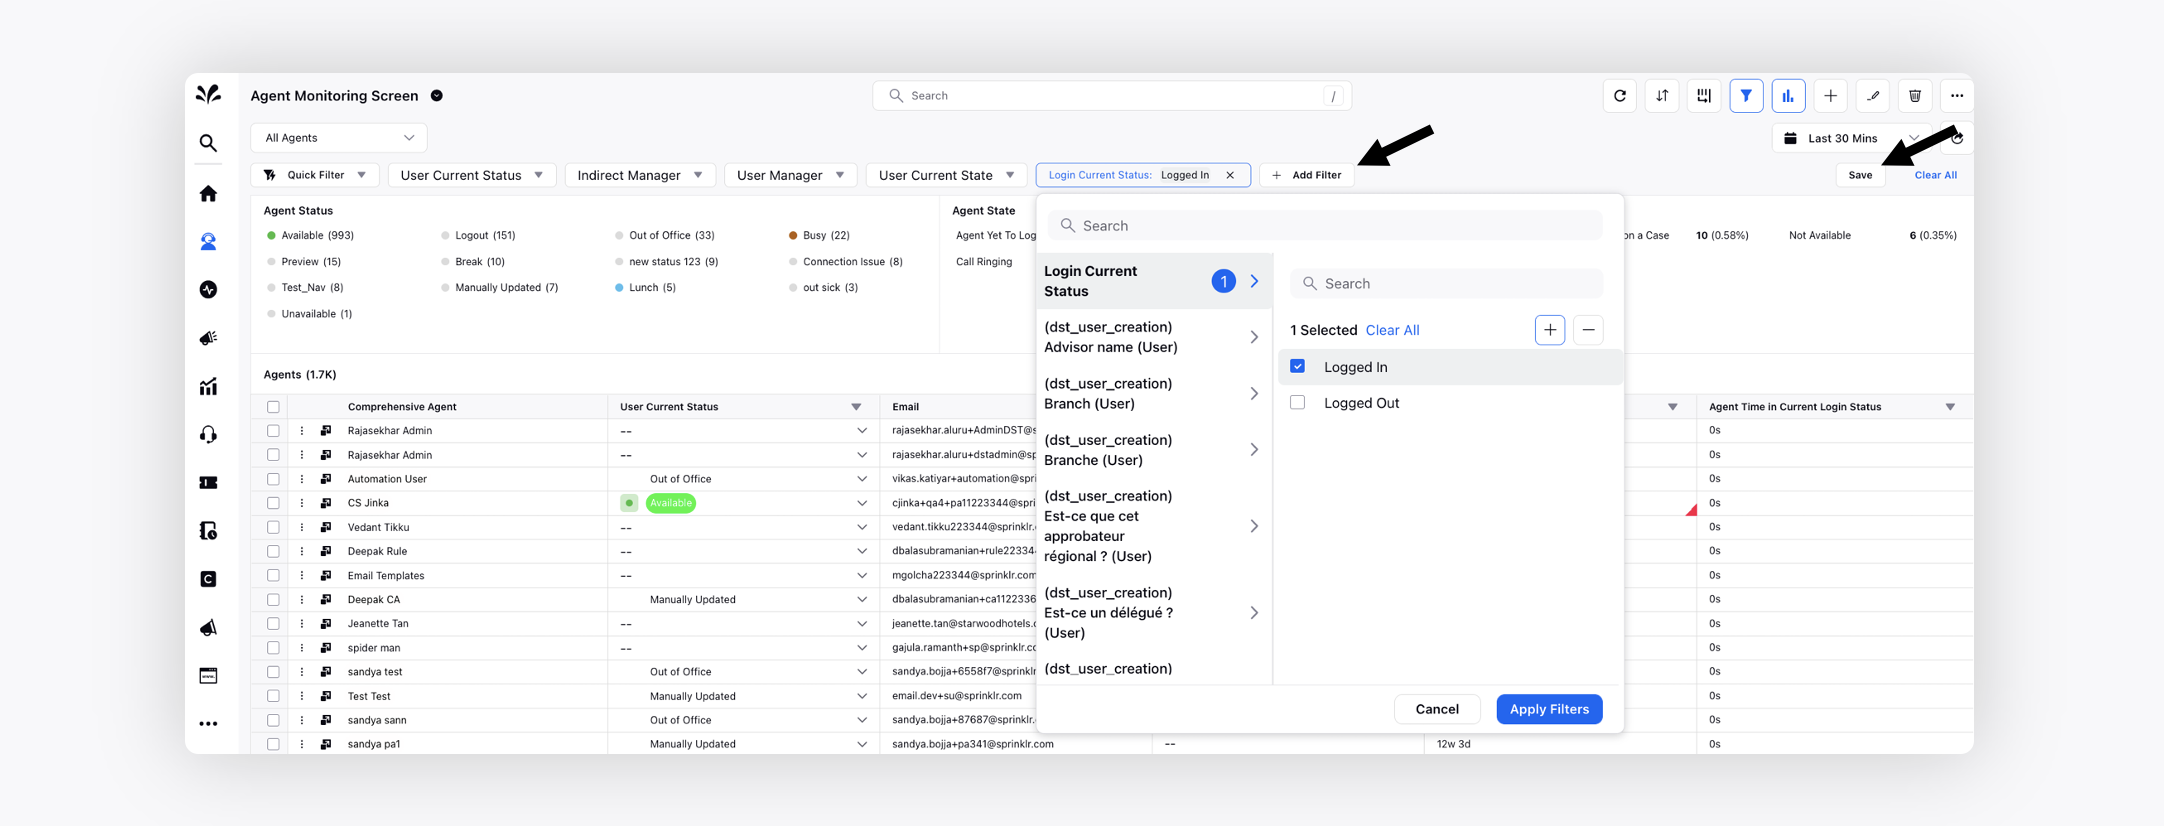
1. To create/save a quick filter, add the desired filters and click Apply Filters. To save the applied filters, click Save on the right of the filters bar.
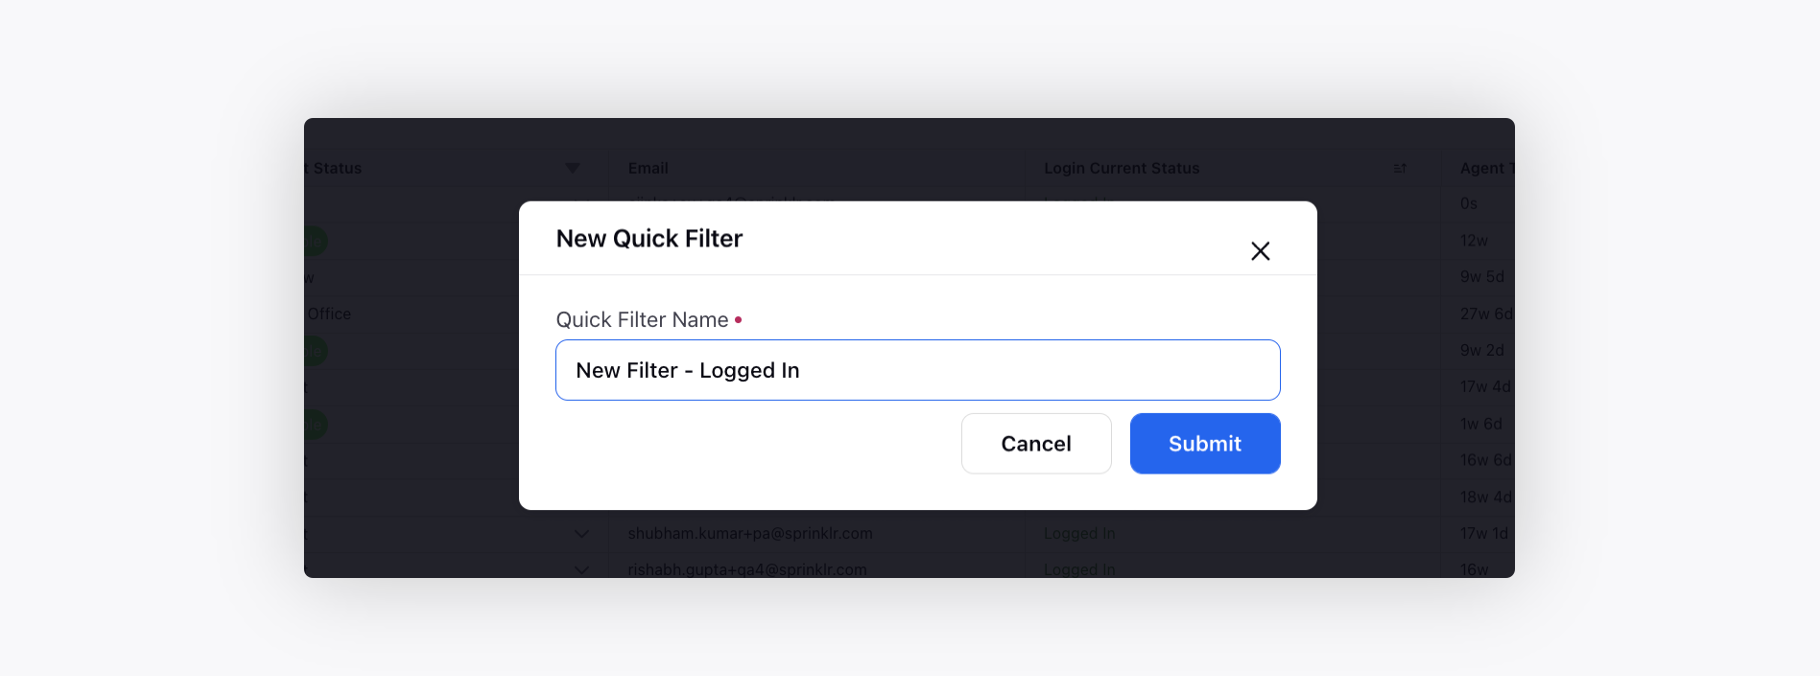
2. Enter the desired filter name.
3. Now, you can see the newly created quick filter in the Quick Filter dropdown.
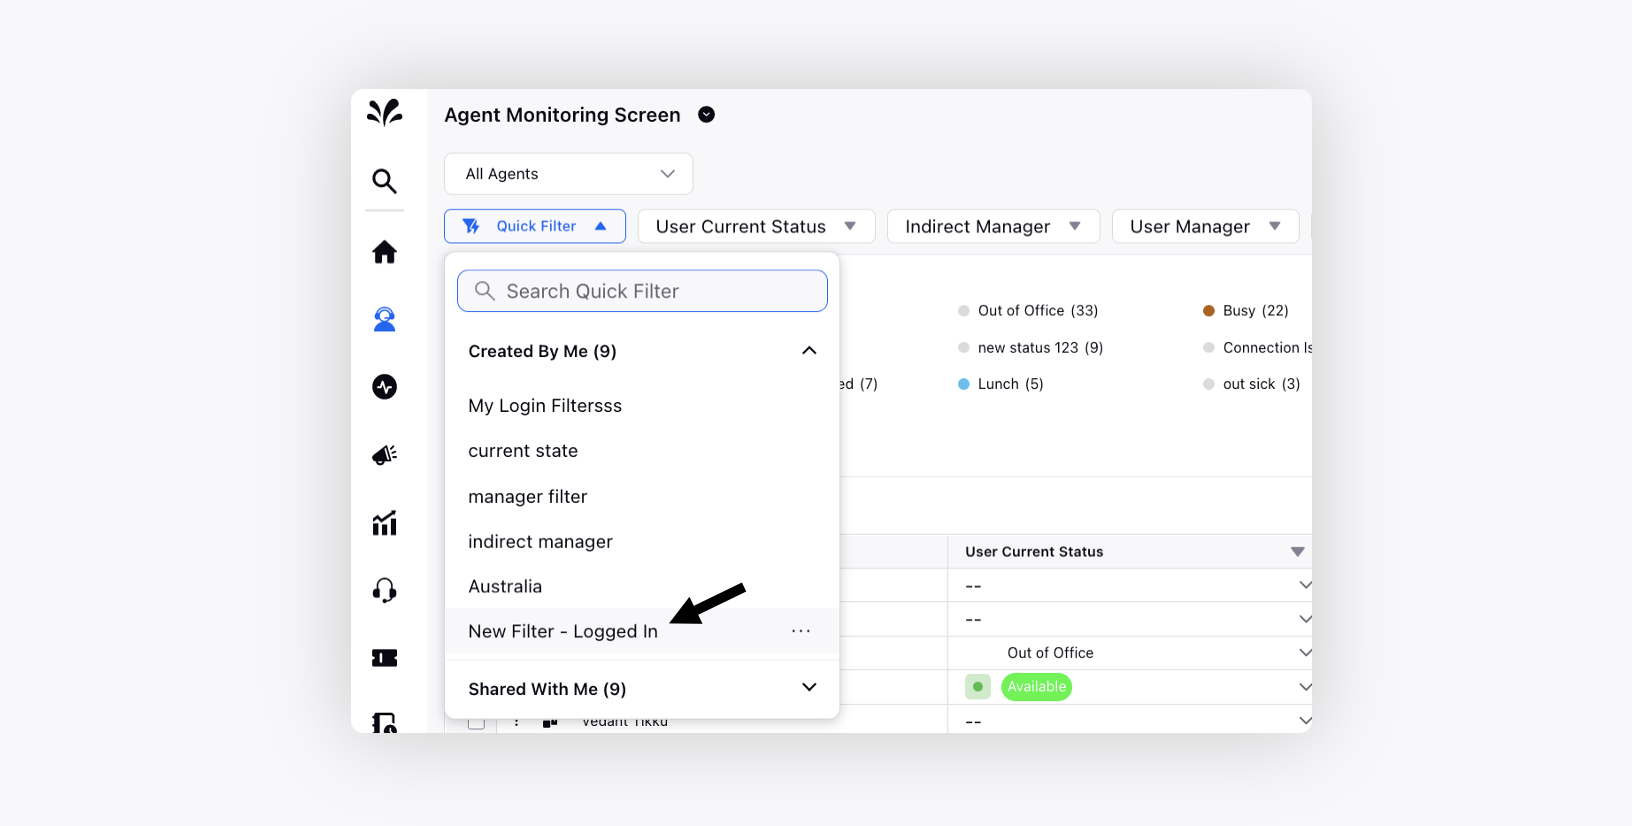
1. Go to Color Tagging under Persona Settings.
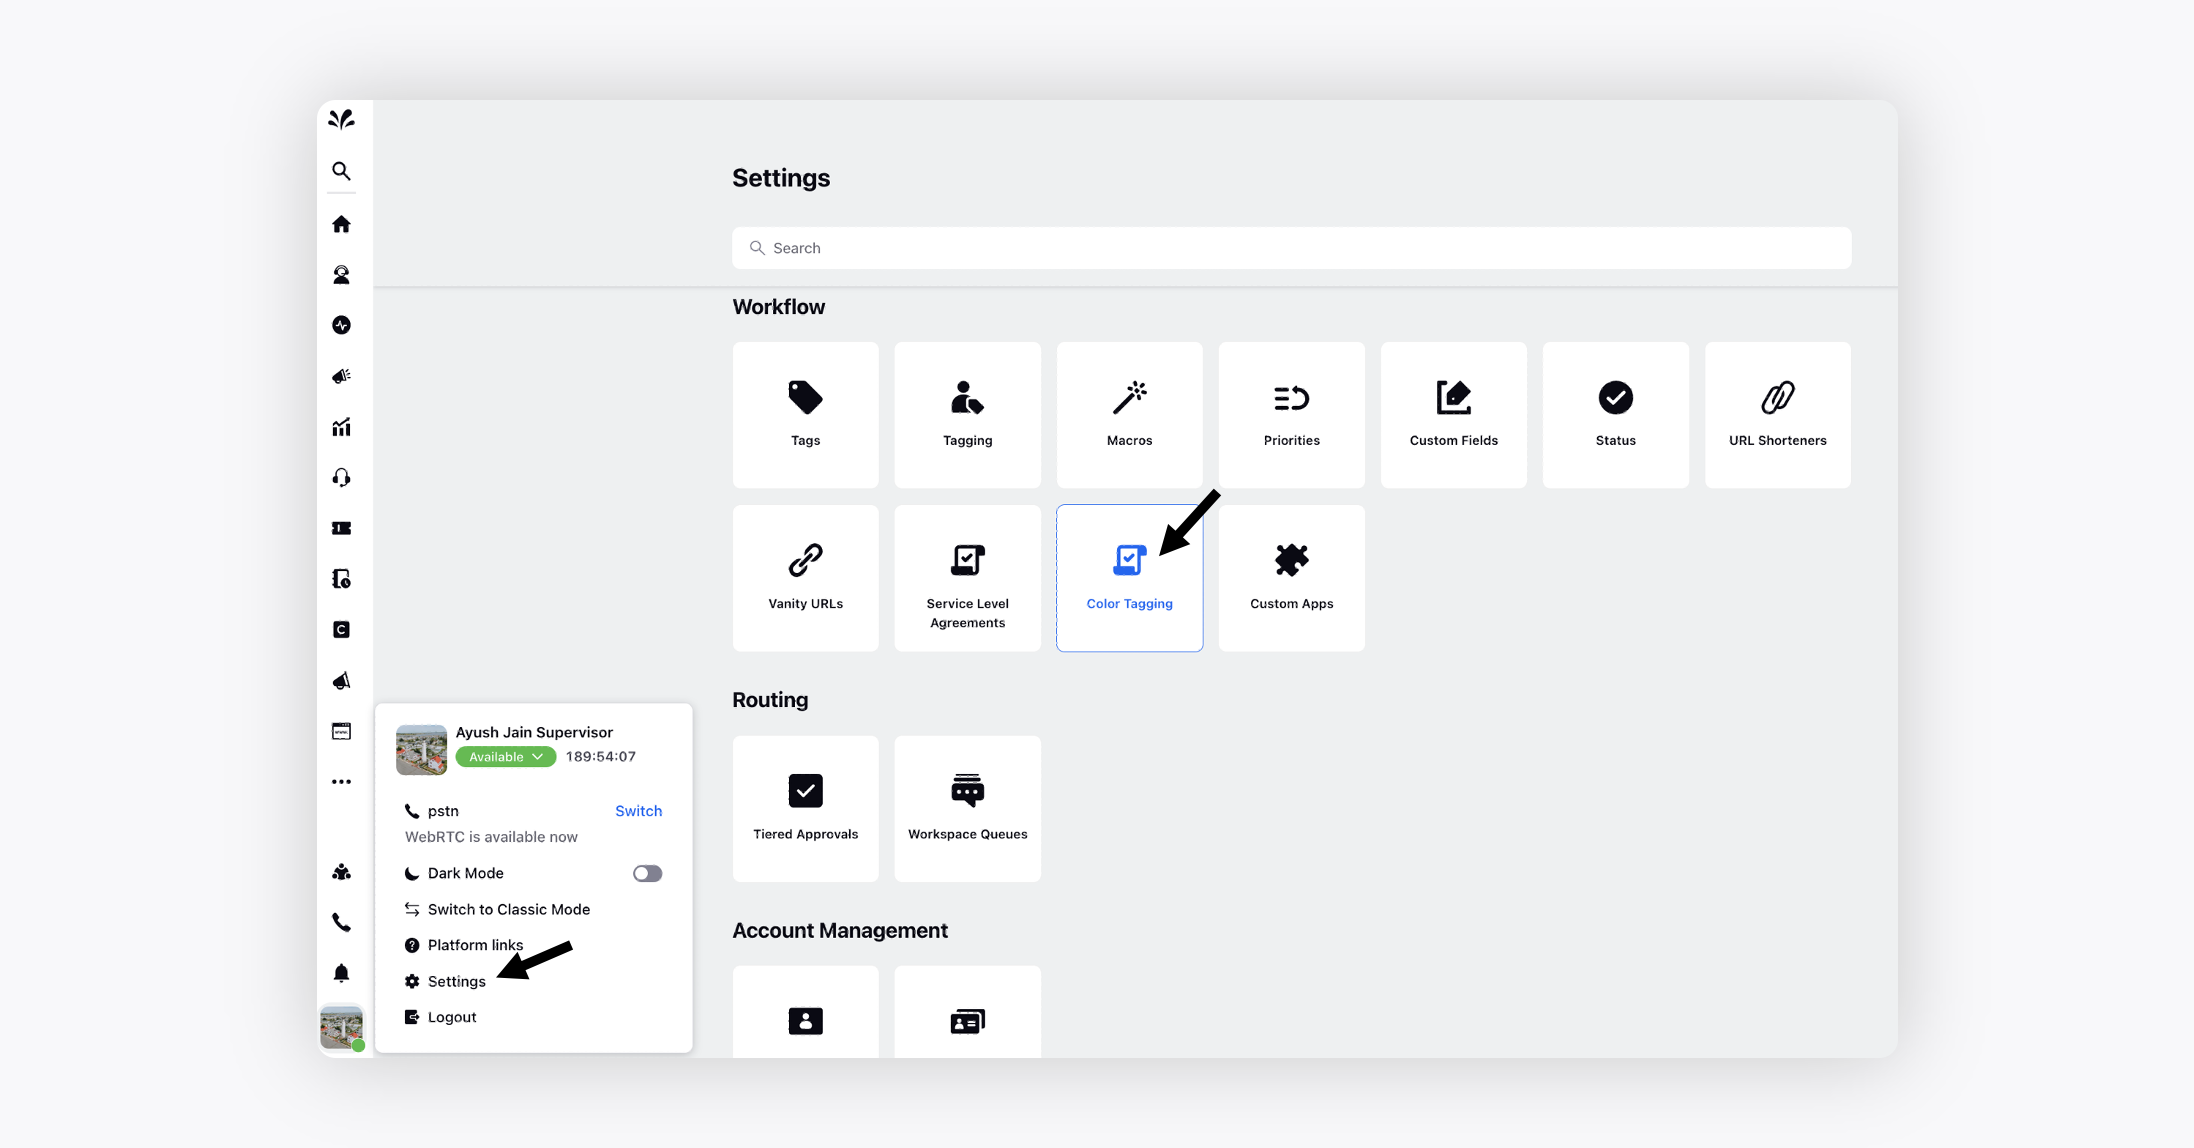
2. Set the Tag name, workspaces, and user groups across which the color settings will be applied.
3. Select the attribute you want to color code and set the criteria. Then, select the column name which will be affected with the above criteria and set the color.
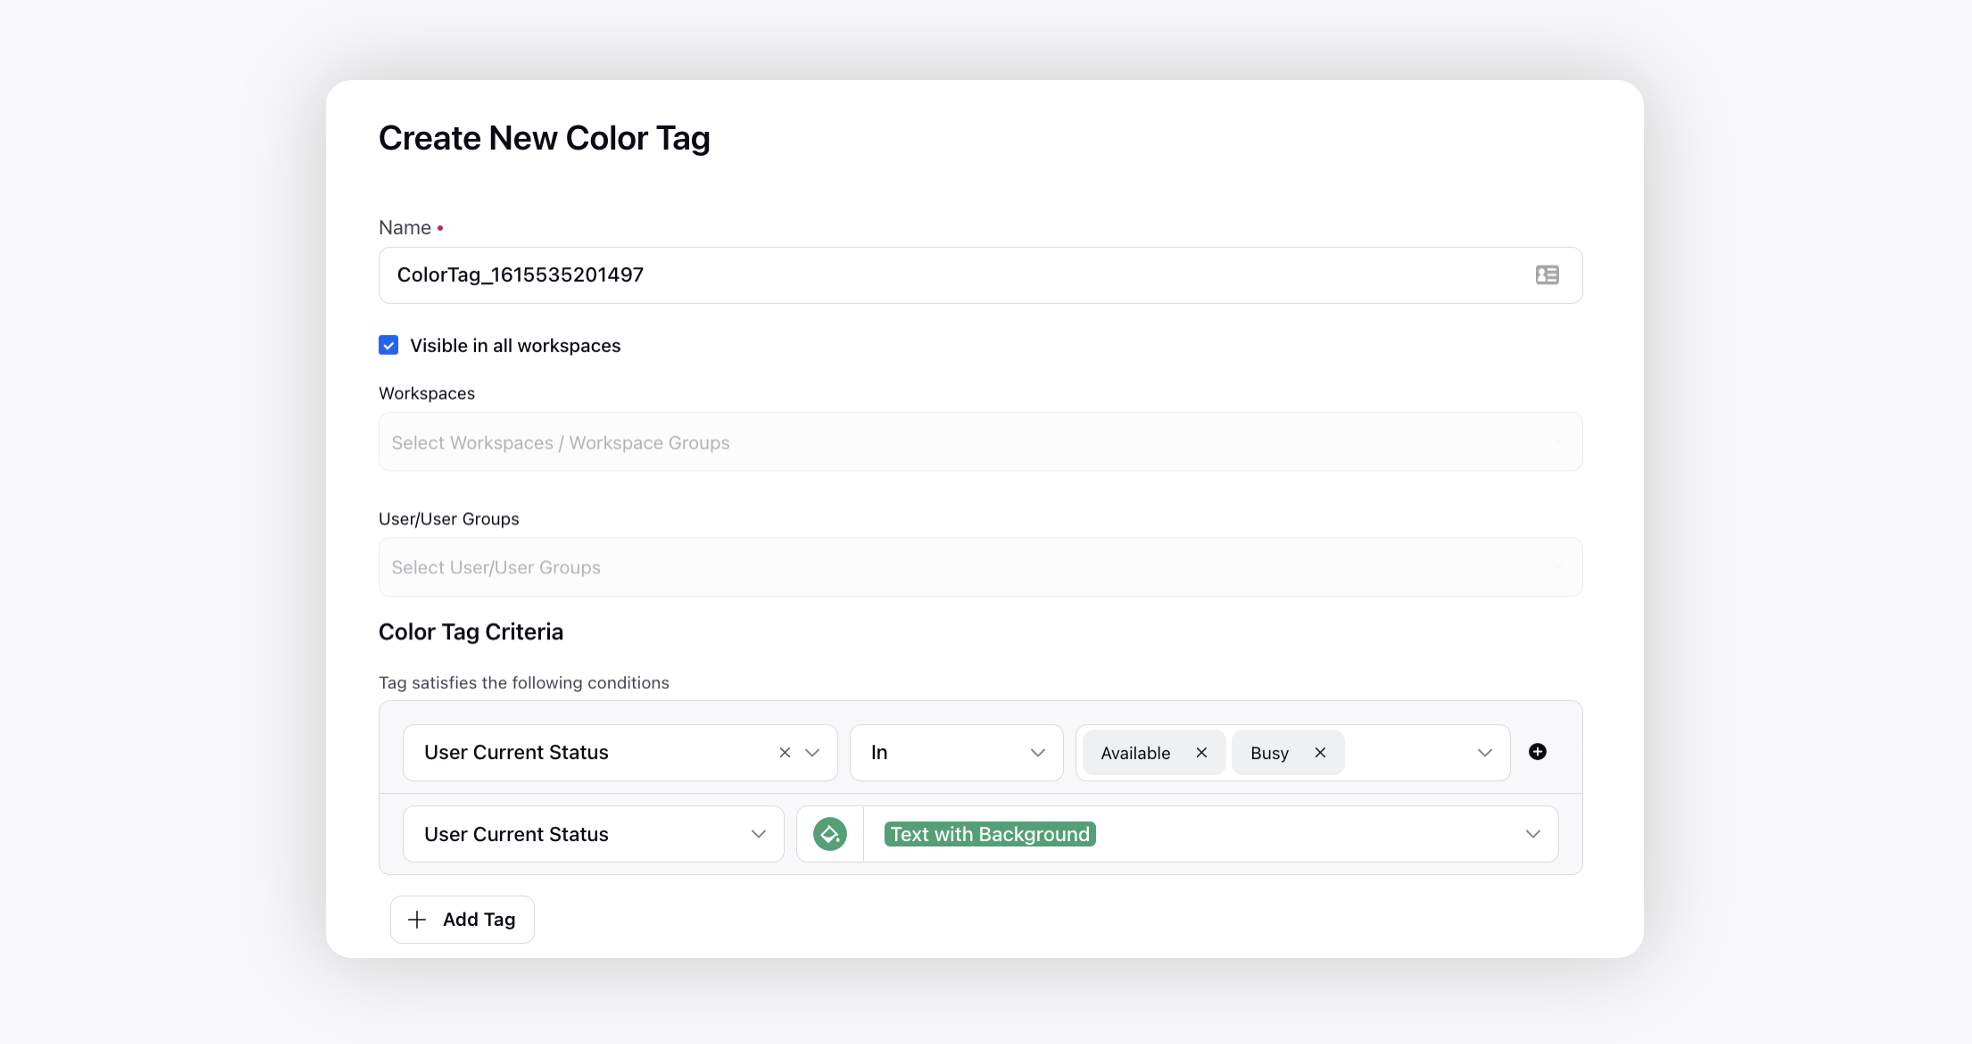
The following color-coding themes are available:
Change the color of the background appearing beneath the text.
Change the color of the text itself.
Select the color of the circle-shaped icon that will appear before your text, depending upon your availability.
Choose the color of the triangular-shaped figure that appears after your text.
Agent Status - Shows the aggregate summary of the agent's availability status, such as Available, Unavailable, Lunch, Tea break, Connection issue, etc. This value comes based on the defined values of the User Availability Status Custom Field.
Agent State - Shows the aggregate summary of agents' current states such as On Outbound Call, On Inbound Call, Call Ringing, Idle, Working on a Case, etc. It helps you understand the live activity performed by the agent.
Refer to Agent Status and State for more information.
The refresh time is 15 seconds. It can be further reduced to 10s if needed. Kindly raise a support ticket at tickets@sprinklr.com for the same.
The support ticket should have the partner ID and the reason for reducing the refresh interval.
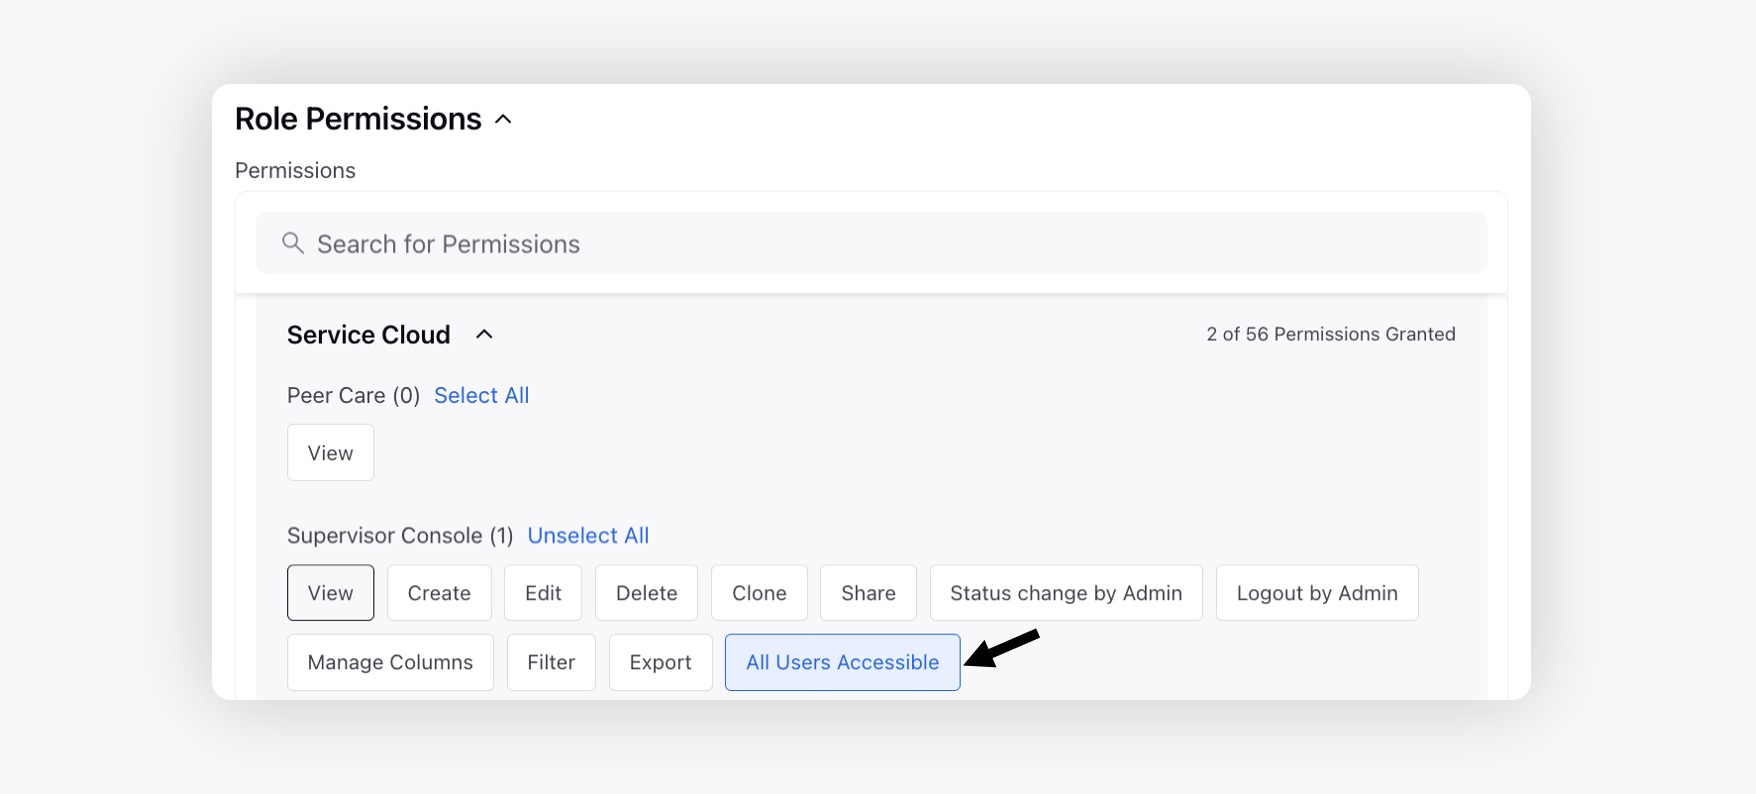
This can be disabled while assigning permissions to a supervisor in Sprinklr.
1. Go to Workspace Role under All Settings.
2. Search for the role assigned to your user and click Edit.
3. Under the Role Permissions section, search for Supervisor Console and to disable the all agents access, disable the All Users Accessible tab.

The audit of the following agent activities can be tracked via View Activity.
Logged In
Logged Out
Answered/Declined call
Receiving warm/blind transfer call
Connect back
Attended/Initiated conference
Scheduled Call back
Call back happened
Filled ACW
ACW Timer reached
Macro applied by
Case assigned to / unassigned from
Notes added by the user on cases/messages
Macro run on cases/messages
Likes on cases/messages
Profile Comments
Assignment and un-assignment of cases/messages
Agent Status Change Trails
All Agents: By applying this filter, the supervisor will be able to see all the agents. It is controlled by the All Users Accessible permission.
My Team: By applying this filter, the supervisor can see the direct and indirect reportees.
My Reportees: By applying this filter, the supervisor can see the direct reportees.
