How To Setup Feeds for Automated Campaigns
Updated
Sprinklr's advanced feature, the automated campaign feed, provides you with a seamless solution to create multiple ads for your campaign by harnessing the power of Dynamic Image Templates (DIT) and a Feed Data Sheet. This efficient process streamlines your advertising efforts and maximizes your campaign's impact.
To streamline your advertising efforts and maximize campaign impact, Sprinklr's Automated Campaign Feed offers a powerful solution. This process entails four main phases: Creating a feed, Importing it, and Applying media templates & Approving created assets.
Before you start
You need to plan well, how eaxctly you are creating your data feed, what all columns you are keeping in the feed. Based on your automation requirements these columns can be entirely customised. You can consider following aspects while planning your feed structure/columns:
Channel & Ojbective related Details: Determine the channels, objectives, ad accounts, pages, ad formats, placements, budget type, and targeting values for your campaign.
Paid Initiative & Naming Details: Organize campaign details, including ID, Ad status, Grouping (PI & Ad set), Naming, and channel-specific fields (targeting cities, budget, etc.) in a Google Sheets document.
Campaign Naming using one column: Whether to set a unique and meaningful name using a feed column
Multiple columns to set a dynamic Name: Using multiple columns to concatenate and make a meaning ful and dynamic name for different campaign entities
Columns required in Media Templates: Information which will be used as an input in Dynamic Image & Video Templates to design highly dynamic ads. Elements like product images, descriptions, prices, fonts, titles and other Ad related data can be added in the feed file.
Data Revealed: Carefully decide what information is shared in the feed, considering its visibility across teams.
Columns to Filters: You can now filter different rows which will be used to filter rows in a campaign, ad creation. So are you creating a column in your feed which can be used to use those filters in the later stage
Ad Set Grouping: Columns which you are using in targeting are getting used in Ad Set level Grouping and Ad Set naming for easy identifucation and auto, else different values used for same ad set in different rows will be ignored
Custom fields you want to use at different levels: Campaign level, Ad Set, Creative Level, Audience, etc
Do's and Don'ts:
Do's:
Include essential columns in the Feed Data Sheet: ID, Ad status, Grouping, Naming, and channel-specific fields (targeting cities, budget, etc.).
Use the provided KP for detailed information on column formatting.
Apply media templates to create varied ad formats automatically.
Don'ts:
Don't set different values of targeting / budget for a same ad set in different rows
Don't edit values for non-editable channel fields (indicated by red headers).
Rename Headers once they are mapped in a Automated Campaign shell
Changing data in Grouping feed columns once a row is published
Avoid changing the ID of an ad once set.
Delete columns that are used in active campaigns.
Don't have duplicate values in DCO columns
Step-by-Step Guide
Step 1: Create Data Feed
The Feed Data Sheet serves as the document format from which the automated campaign feed extracts content to populate the dynamic placeholders used in Dynamic Image Templates (DIT).
In the Feed Data Sheet, each column represents a distinct content placeholder, defining the specific element that will be dynamically updated in the DIT-based templates. These placeholders can include variables such as product names, descriptions, prices, images, promotional offers, and other relevant information.
The values in the corresponding rows beneath each column represent different data entries for the respective variable. For example, if one column represents product names, each row beneath that column would contain a different product name. Similarly, if another column represents prices, each row beneath that column would contain a different price value.
Note: Feed Data Sheet can be created on google sheets (recommended) or any other feed management tools like, Smarsheets or Sharepoint Excels. The exact process of importing them into Sprinklr is listed below.
Step 2: Importing data feed
Data soureces can be imported in Sprinklr as Automated Feeds using two Methods:
Importing live Google Sheets, Sharepoint Excels, Smartsheets or any other CSV URLs
Manual CSV Uploads
--- How to import Google sheets/ Excels/ Smartsheets
Importing Live Feeds:
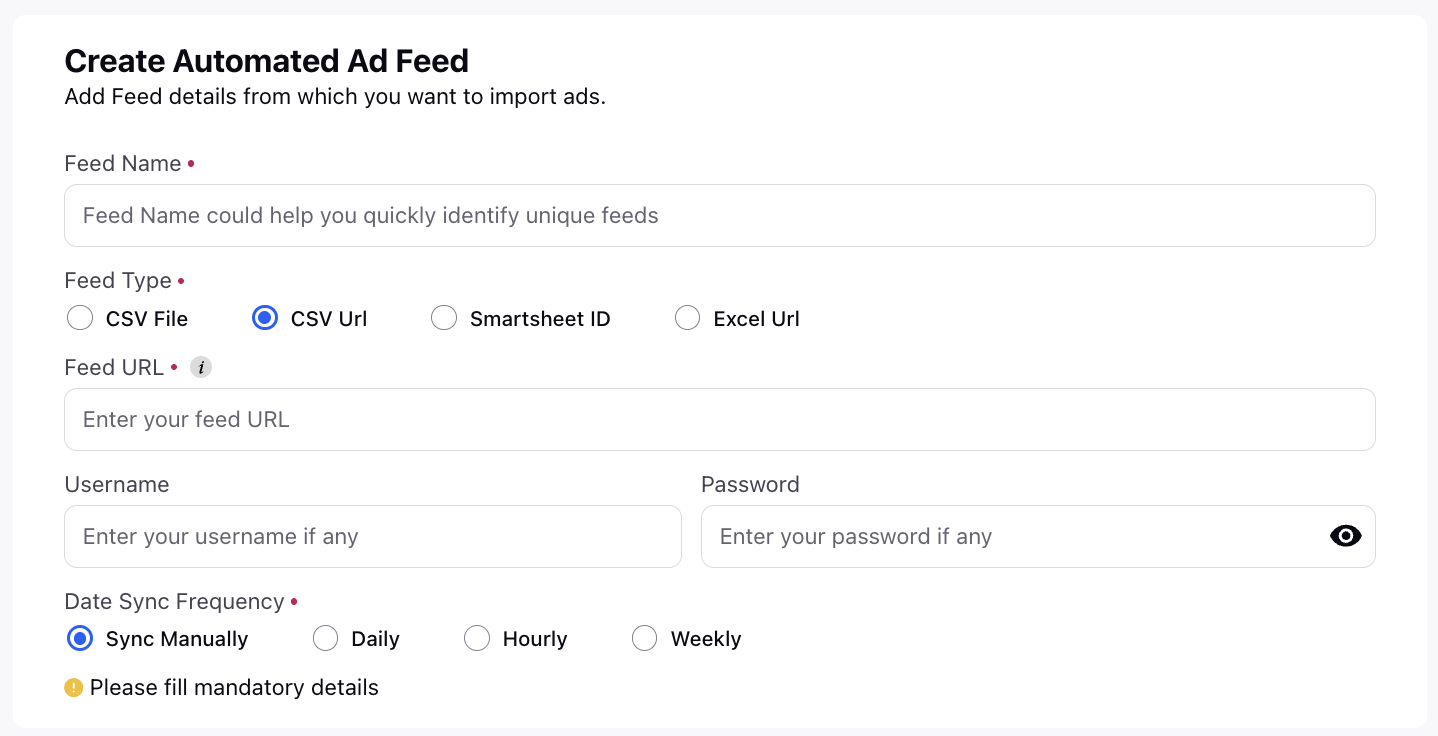
Once you have created the Feed Data Sheet, it's time to set up the automated feed by adding the necessary details for importing ads:
Feed Name: Provide a unique name for your campaign's feed. This name will help identify and differentiate it from other feeds you may have.
Feed Type: Select the feed source. Use CSV URL for Google sheets import
Feed Details (URL/ID): Enter the link to the Feed Data Sheet from which you want to extract the data. This URL/ID serves as the source for retrieving the content for your automated ads.
User Name and Password: This field is optional and allows you to specify login credentials if you want to restrict access to the automated feed only to certain individuals or teams.
Data Sync Frequency: Determine the frequency at which the content in the feed is synchronized with the generated ads. You have four options to choose from:
Sync Manually: With this option, you have control over when to initiate the data sync by clicking a button. The content update occurs at your discretion.
Sync Daily: Selecting this option ensures that the data is automatically updated every 24 hours. This frequency is suitable when you want the ads to reflect the latest information on a daily basis.
Sync Hourly: By choosing this option, the data is automatically updated every hour. It provides more frequent content synchronization, ideal for campaigns requiring real-time or frequently changing information.
Sync Weekly: Opting for this option enables automatic data updates on a weekly basis. If your campaign requires less frequent content updates, such as for longer-running promotions, this frequency is suitable.
Create Variations: This setting allows you to generate different variations of ads based on the data extracted from the Feed Data Sheet and the dynamic variables defined in the Dynamic Image Templates (DIT). Select the variables you want to incorporate, such as headline and call-to-action (CTA), from the feed data. The number of unique graphics generated by the automated feed will depend on the selected variables.
Or Manual CSV Upload:
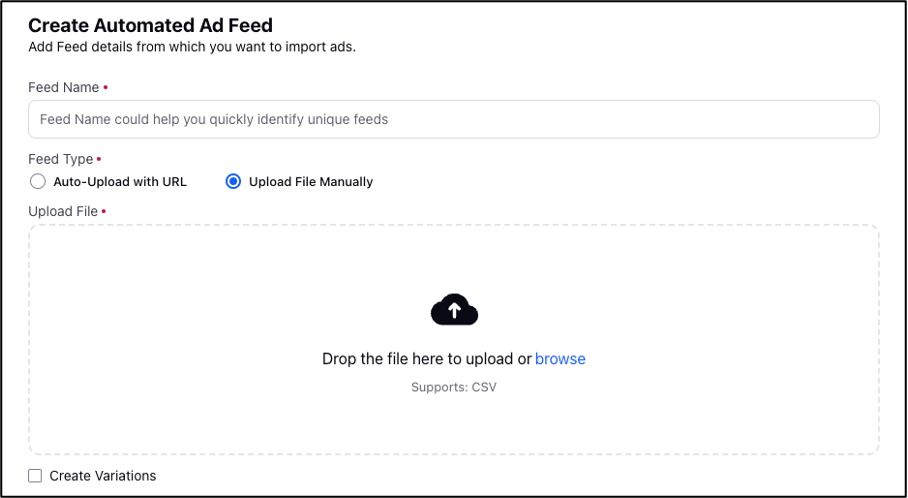
Once you have created the Feed Data Sheet, it's time to set up the automated feed by adding the necessary details for importing ads:
Feed Name: Provide a unique name for your campaign's feed. This name will help identify and differentiate it from other feeds you may have.
Upload File: Take an export of your Feed Data Sheet as a CSV File and Upload it
Create Variations: This setting allows you to generate different variations of ads based on the data extracted from the Feed Data Sheet and the dynamic variables defined in the Dynamic Image Templates (DIT). Select the variables you want to incorporate, such as headline and call-to-action (CTA), from the feed data. The number of unique graphics generated by the automated feed will depend on the selected variables.
Note:
The “Ad Status” column is case-sensitive and is used to control the status of ads. The header of this column must "Ad Status". Users can directly manage the status of an ad by specifying it in this column with values like "Active", "Paused", or "Deleted". This column’s status overrides any manually set status.
Step 3: Appy Dynamic template
Go to the Automated Feeds window to use media.
Click the Apply Template icon next to your automated feed name.
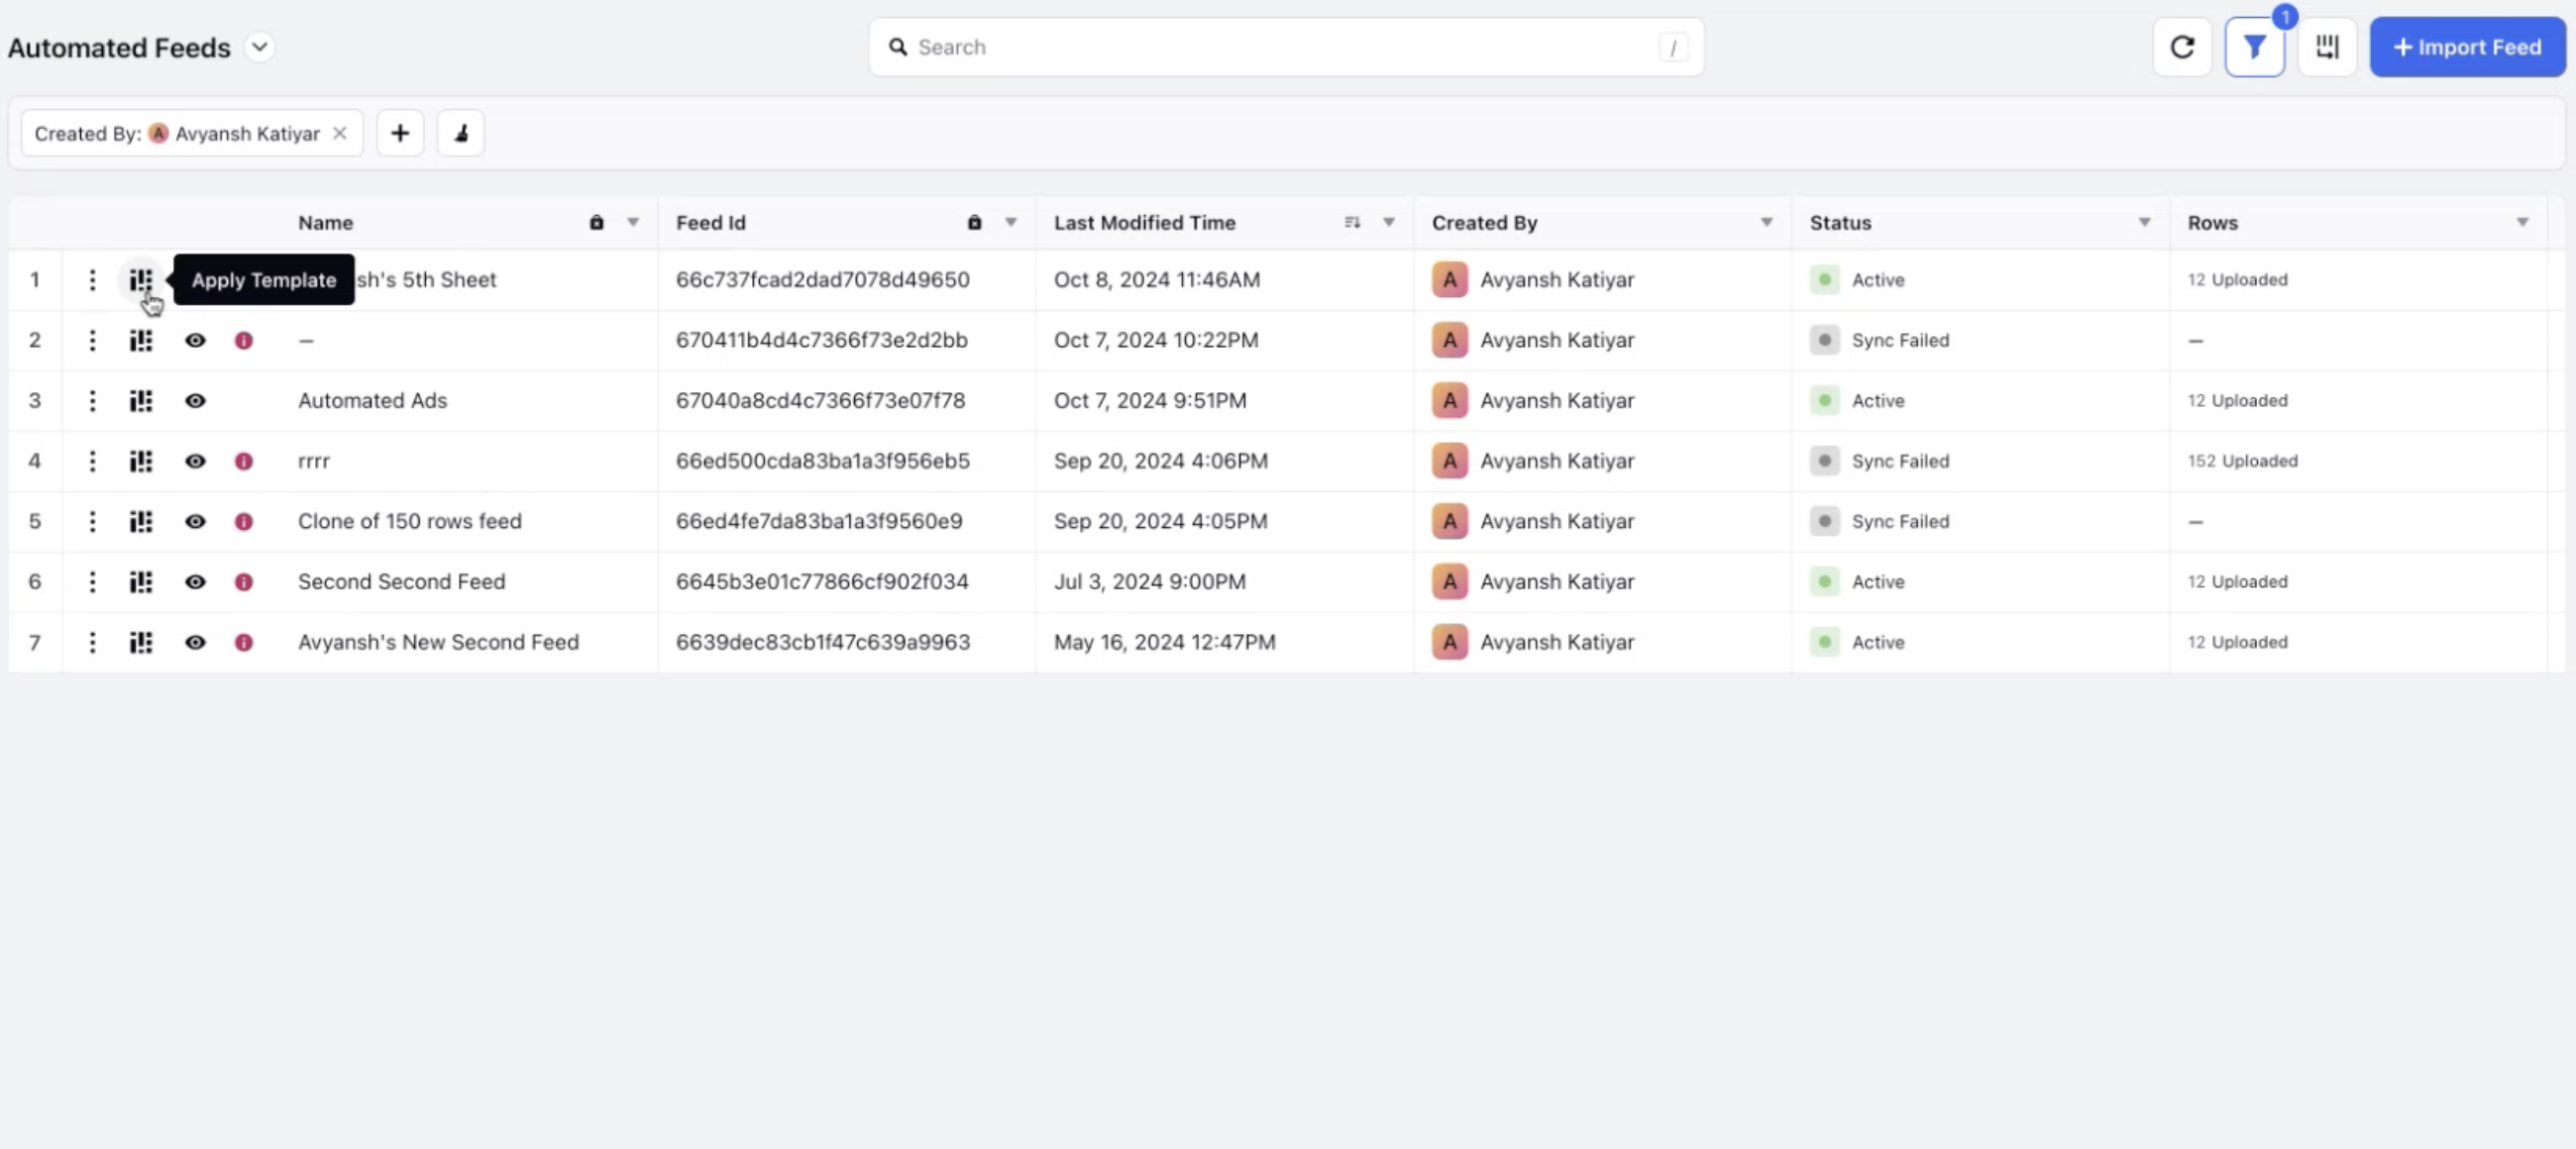
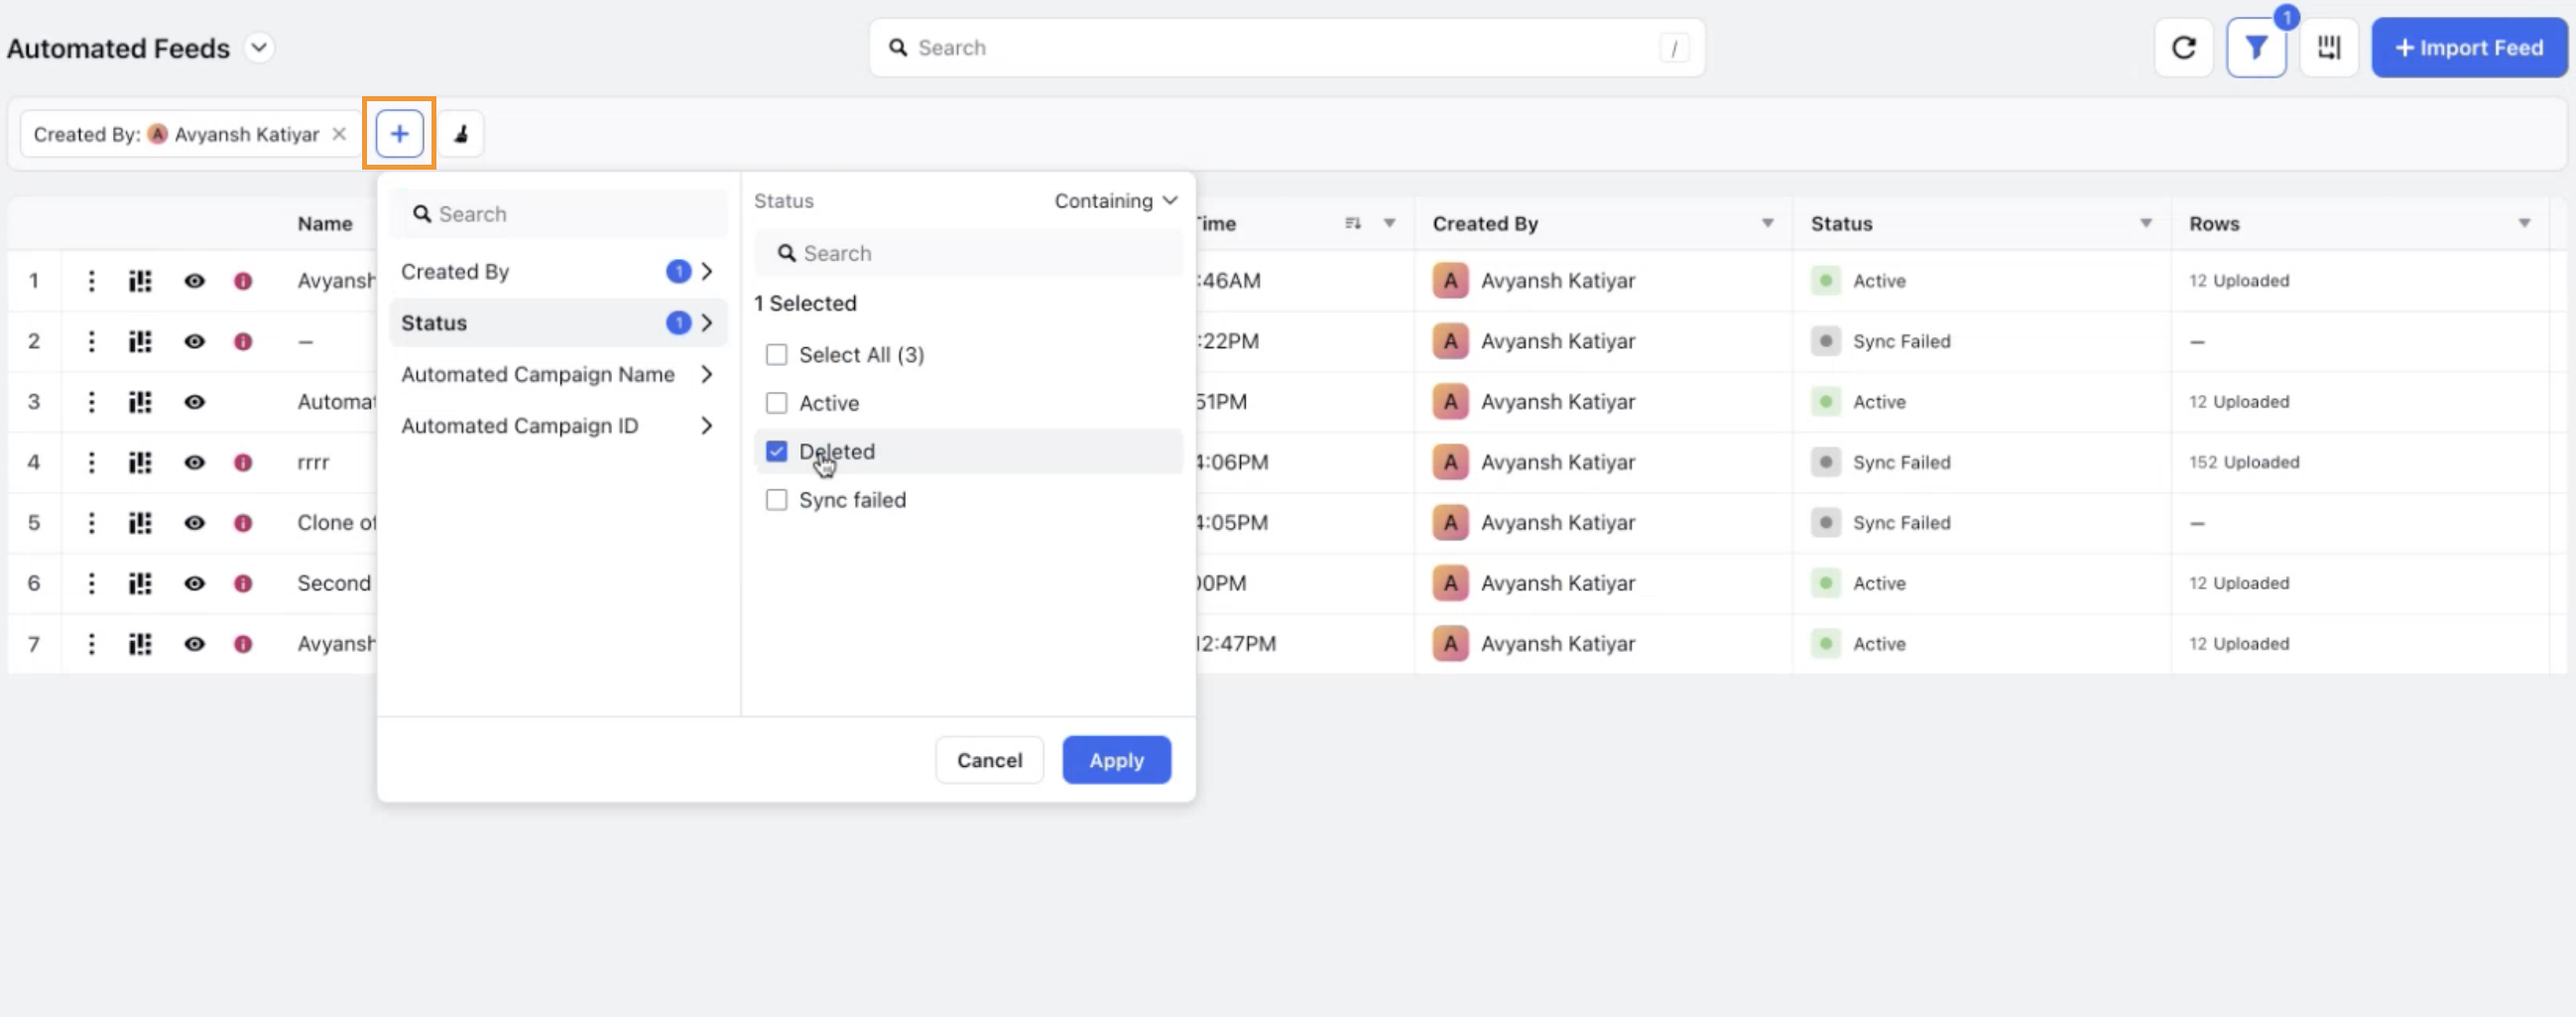
Note: Feeds with deleted status are filtered out by default. Use the Status filter at the top to view any deleted feeds.
Click +Dynamic Template in the top right corner.
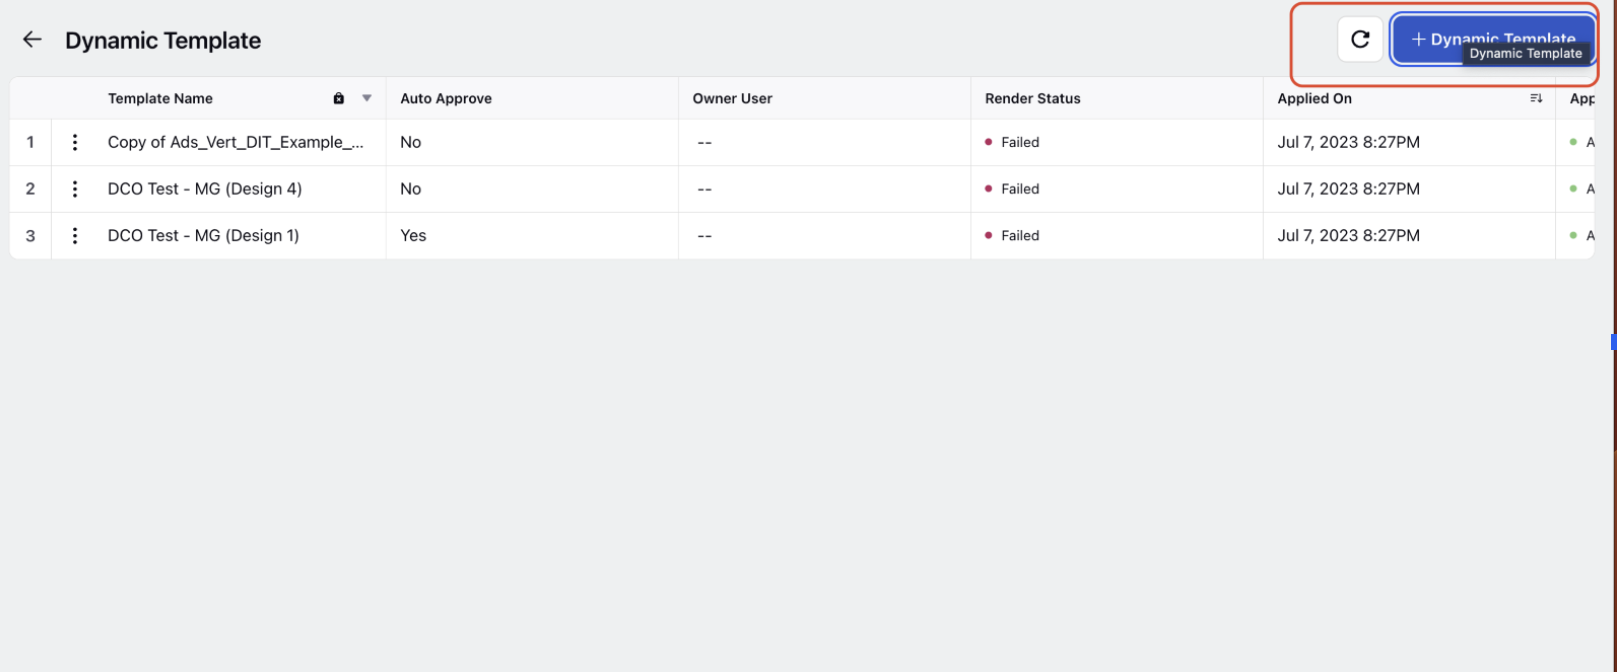
Scroll through the DAM to select the DIT that you want for the particular campaign.

Note: Selecting Process with Filter will allow you to further refine the rows of the feed file that are used to create assets using conditional filters.

5. Now, assign the dynamic values with the columns from the Feed data sheet and click update images. For example - image name –ID, headline – headline, CTA button – Cta Button, Dynamic image 1- image_link
Step 4: Set Approval for applied templates
Now, once applied and assets will be created you can set following approval options
Auto Approve – All the post created by the feed will be auto-approved and ready for the ads.
Review and approve – Select and approve selected posts genberated by the feed and make then ready for the ads. If you select this, after every change, a new asset will be created but will not be pushed to the Ads until you come back here and approve the asset. This step is added for an additional level of security