Flutter - v8.0.0
Updated
Note:
Sprinklr Messenger for Android supports minimum API 23
SprinklrMessenger for Android supports compileSdkVersion 34
Gradle version has been updated to 8.3.x and Android Gradle Plugin version has been updated to 8.1.x
Step 1: Getting Started
1) Install Sprinklr Messenger
Start by downloading the Sprinklr Messenger plugin and saving it to your preferred location. For example, you can place the plugin outside the main directory of your project.
Add the plugin's dependency to your project's pubspec.yaml file under the dependencies section:
dependencies: sprinklr_plugin: path: PATH_HERE |
Please replace PATH_HERE with the actual path where the Sprinklr Messenger plugin is located.
Run: flutter pub get
Note: Please raise a support ticket(tickets@sprinklr.com) or reach out to SM for Sprinklr Messenger Plugin
2) Setup for Android
You can skip this step if your app does not support Android.
Note: Sprinklr Messenger for Android supports API 23 and above
Video Player Support
To add support for video player in android, add the following flag to the project’s root level build.gradle file:
buildscript { |
Add Permissions to your project:
We include the INTERNET permission by default as it's required to make network requests;
<uses-permission android:name="android.permission.INTERNET" />
Include the following permissions if you are supporting upload and download media functionality in messenger:
<uses-permission android:name="android.permission.READ_EXTERNAL_STORAGE" />
<uses-permission android:name="android.permission.WRITE_EXTERNAL_STORAGE" />
<uses-permission android:name="android.permission.DOWNLOAD_WITHOUT_NOTIFICATION" />
<uses-permission android:name="android.permission.CAMERA" />
<uses-permission android:name="android.permission.RECORD_AUDIO" />
<uses-permission android:name="android.permission.READ_MEDIA_IMAGES" />
<uses-permission android:name="android.permission.READ_MEDIA_VIDEO" />
<uses-permission android:name="android.permission.POST_NOTIFICATIONS"/>
3) Setup for iOS
You can skip this step if your app does not support iOS.
Install Messenger iOS Dependency
Include the following permissions in your info.plist file if you are supporting upload and download media functionality in Messenger:
STEP A: To start with this, download the Messenger zip and podspec file and keep both of them in the same directory.
STEP B: Add SPRMessengerClient to your Podfile and run the following code.
pod install target :YourTargetName do pod 'SPRMessengerClient', :podspec => <path_to_messenger_folder>/SPRMessengerClient.podspec end |
STEP C: If your app has enabled bitcode, add this pod installer script in your Podfile:
post_install do |installer| |
Add Permissions
Include the following permissions in info.plist if you are supporting upload and download media functionality in messenger:
<key>NSCameraUsageDescription</key> |
Above permissions are required by Apple for all apps that access the photo library or use the camera/microphone.
Step 2: Initialize the Messenger
STEP A: Create a SPRMessengerConfig object with the parameters provided by Sprinklr.
STEP B: Call the SPRMessenger().takeOff() function with SPRMessengerConfig object as an argument.
For Anonymous Users
SPRMessengerConfig messengerConfig = SPRMessengerConfig( locale: "en", // default value is en deviceId: "UNIQUE_DEVICE_ID", pushAppId: "SPR_PUSH_ID", // Should be Unique id, if not sure pass same as device ID themeMode: "DEFAULT", // default value is DEFAULT, options: DEFAULT | DARK "
SPRMessenger().takeOff(config: messengerConfig); |
For Authenticated Users
This step is done after the user logs in successfully and completes the authentication process within the application and after the authentication process, it should be passed in Sprinklr including the app id. In case, a user is not logged in case (s)he has never used the application then an anonymous user can be created for the same.
After the authentication process, the client should pass the user bean, the application ID, the messenger activity including the information so that Sprinklr can begin the initial setup process in the background.
To initiate the process, following fields are needed:
id
firstName
lastName
profileImageUrl
phoneNo
email
SPRMessengerUser messengerUser = SPRMessengerUser(
SPRMessengerConfig messengerConfig = SPRMessengerConfig( locale: "en", // default value is en deviceId: "UNIQUE_DEVICE_ID", pushAppId: "SPR_PUSH_ID", // Should be Unique id, if not sure pass same as device ID themeMode: "DEFAULT", // default value is DEFAULT, options: DEFAULT | DARK user: messengerUser,
SPRMessenger().takeOff(config: messengerConfig); |
Note: UserID and Hash are mandatory parameters and hash should be generated for every change in user object. To know the procedure of how to generate Hash, check Step - 6 Generate User Hash.
For Authenticated Custom Users
This step is done to create a custom user account using custom or specific attributes. In other words, it involves creating user accounts with personalized details or characteristics
Below is the example to initiate the process with custom attributes and Hash, where you can pass the attributes values:
Custom Attribute 1
Custom Attribute 2
Hash
Map<String, Object> customUser = { “customAttribute2”: "value2", //Add your own attribute “hash”: HmacHashCalculation.generateHash(
SPRMessengerConfig messengerConfig = SPRMessengerConfig( locale: "en", // default value is en deviceId: "UNIQUE_DEVICE_ID", pushAppId: "SPR_PUSH_ID", // Should be Unique id, if not sure pass same as device ID themeMode: "DEFAULT", // default value is DEFAULT, options: DEFAULT | DARK customUser: customUser,
SPRMessenger().takeOff(config: messengerConfig); |
Note: If you wish to implement a Custom User Authentication Flow, kindly get in touch with the Sprinklr Team to initiate discussions about the implementation process.
Step 3: Show Messenger
Add the following code with the button present inside your application-
SPRMessenger().startApplication(); |
Step 4: Messenger Configurations
1) Update User
To update user information, create a new SPRMessengerUser object and pass it to the SPRMessenger().updateUser() function as shown below:
SPRMessengerUser messengerUser = SPRMessengerUser( |
Note: UserID and Hash are mandatory parameters and hash should be generated for every change in user object.
2) Update Custom User
To update user information, create a new customUser object and pass it to the SPRMessenger().updateCustomUser() function as shown below:
Map<String, Object> customUser = { "customAttribute2": "value2", |
3) Update Language
To update the user's language preference, you can use the SPRMessenger().updateLocale() function like this:
SPRMessenger().updateLocale(locale: "LOCALE_VALUE"); |
Sprinklr messenger supports the following languages: Arabic, Bokmal, Chinese, English, Thai, Turkish, Vietnamese, Portuguese, Spanish, Indonesian, Japanese, Korean, French.
Few languages with limited availability are: Albanian, Norwegian, Bosnian, Chinese (traditional), Chinese (honk-kong), Croatian, Czech, Danish, Dutch, Estonian, Finnish, German, Hebrew, Hungarian, Italian, Latvian, Lithuanian, Macedonian, Malayalam, Polish, Romanian, Serbian, Slovak, Slovanian, Swedish.
4) Cleanup
You can log out the user and perform data cleanup by calling as shown below:
SPRMessenger().logout(); |
5) Customize Messenger Landing Screen
By default, the messenger view opens with a home page displaying all conversations. However, you can customize this behavior and launch MessengerView with a single conversation view. Two options for customization are provided:
Open single conversation view with new conversation
If you want to skip the previous conversation history and open the single conversation view with a new conversation, you can use the following code:
SPRMessenger().startApplication(chatInitialisationContext: {
"scope": "CONVERSATION",
"landingScreen": "NEW_CONVERSATION",
});Open single conversation view with previous conversation history
If you want to open the single conversation view with previous conversation history, you can use the following code:
SPRMessenger().startApplication(chatInitialisationContext: {
"scope": "CONVERSATION",
"landingScreen": "LAST_CONVERSATION",
});
Open single conversation view with a particular conversation id
If you directly want to open single conversation view with a particular conversation, you can use the following code:
SPRMessenger().startApplication(chatInitialisationContext: {
"scope": "CONVERSATION",
"landingScreen": "EXISTING_CONVERSATION",
"params": {
"conversationId": "id_of_conversation",
}
});
Note: The option landingScreen: LAST_CONVERSATION allows brands to direct users to the last interacted open conversation. If there are no open conversations, the user lands on a new conversation window
6) Capture Customer Context When Starting a New Conversation from Custom View
When chat is being opened from a custom view, sometimes you might want to capture additional context on the conversation/case.
Example: A button called “Know More about this laptop” near a laptop product which opens a chat with a predefined contextual welcome message - “Hi there! It looks like you are interested in buying a laptop”. At the same time, you might want to set the case custom fields indicating the “product category: laptop”, “case type: inquiry”.
To do this,
Create the case custom fields and note down their field name: (Right now it’s not possible to get the field name of custom fields from UI, you can work with support to get the relevant field name of the custom fields).
Create a Map<String, List<String>> called conversationContext to represent the context you want to capture.
For example: In this example, "5ea7fa9e87651f356209878f" and "5eb7fa9e87651f356219348e" are the two custom field names with corresponding values.
Pass conversationContext to chatInitialisationContext* when opening a new conversation directly (5ea7fa9e87651f356209878f and 5eb7fa9e87651f356219348e are the two custom field names). All the field values should be passed as an array of strings.
Map<String, List<String>> conversationContext = {
"5ea7fa9e87651f356209878f": ["laptop"],
"5eb7fa9e87651f356219348e": ["inquiry"]
};
*Note: chatInitialisationContext is explained in previous section
7) Capture Customer Context from the Application on All Cases of the User
There may be times when you want to pass contextual information in case custom fields for all conversations initiated by a user.
To achieve this, follow these steps:
Create the Case Custom Fields: Note down the field names for your case custom fields. Currently, it is not possible to obtain the field names of custom fields from the user interface. You can work with Sprinklr support to get the relevant field names for your custom fields.
Pass Customer Context in the Initial Configuration: You can pass clientContext during the initialization phase by including it in the takeOff method. Here's an example:
Map<String, List<String>> clientContext = {
"5ea7fa9e87651f356209878f": ["laptop"],
"5eb7fa9e87651f356219348e": ["inquiry"]
};SPRMessengerConfig messengerConfig = SPRMessengerConfig(
// rest config,
clientContext: clientContext,
);
You can also update the client context on run time by calling the following method:
Map<String, List<String>> clientContext = {
"5ea7fa9e87651f356209878f": ["laptop"],
"5eb7fa9e87651f356219348e": ["inquiry"]
};
SPRMessenger().updateClientContext(clientContext: clientContext)
8) Update Conversation Context (Case Custom Field) on Demand
At times you might want to update the value of conversation context/case custom field during or after a conversation.
Example: After a purchase is made on the website you might want to set the transaction amount or id on the case for reporting. After doing this, you can attribute sales to each conversation/case.
To do this,
Create the case custom fields and note down their field name1.
Whenever you want to update the case custom field, call the following:
Map<String, List<String>> context = {
"5ea7fa9e87651f356209878f": ["laptop"],
"5eb7fa9e87651f356219348e": ["inquiry"]
};
SPRMessenger().updateConversationContext(conversationContext: {"context": context},
);
9) Update the profile context within Profile Custom Fields
When chat is being opened from a custom button or hyperlink, sometimes you might want to capture some context on the profile/user during the conversation or after the conversation. To do this,
Create the profile custom fields and note down their field name.
Whenever you want to update the profile custom field, call the following:
Map<String, List<String>> userContext = {
"5ea7fa9e87651f356209878f": ["laptop"],
"5eb7fa9e87651f356219348e": ["inquiry"]
};SPRMessenger().updateUserContext(userContext: userContext);
10) Close Messenger
You can close messenger from the main application by calling:
SPRMessenger().closeMessenger(); |
11) Add Delegate to Listen to External Events from Messenger
void handleExternalAction(Map payload) {
SPRMessengerDelegate messengerDelegate = SPRMessengerDelegate(
SPRMessenger().setMessengerDelegate( |
12) Get number of Open Conversations
Sometimes you might want to hide the live chat widget based on the number of open conversation. To do this,
Call the the below function to get the number of open conversations
SPRMessenger().getNumberOfOpenConversations();
Add Delegate to listen to the output of above function
void onUpdateNumberOfOpenConversations(int numOfOpenConversations) {
// Your function body
}
SPRMessengerDelegate messengerDelegate = SPRMessengerDelegate(
onUpdateNumberOfOpenConversations: onUpdateNumberOfOpenConversations,
);SPRMessenger().setMessengerDelegate(
messengerDelegate: messengerDelegate,
);
13) Get number of unread messages
You can keep track of changes in the total number of unread messages in conversations by using a delegate that accepts responses of type SPRMessagesCountResponse. This way, you'll get notified whenever there's a change in the unread message count. It's a convenient way to stay updated on unread message counts in real-time.
Call the the below function to get the number of unread messages
SPRMessenger().getUnreadMessagesCount();
Add Delegate to listen to the output of above function
void onUpdateUnreadMessagesCount(Map response) {
// Your function body
}SPRMessengerDelegate messengerDelegate = SPRMessengerDelegate(
onUpdateUnreadMessagesCount: onUpdateUnreadMessagesCount,
);SPRMessenger().setMessengerDelegate(
messengerDelegate: messengerDelegate,
);
Note: Please define and use MessengerDelegate function together to fetch number of open conversations count, external events and number of unread messages count.
14) Add Messenger Analytics Handler to Listen to tracking events and screen
void trackEvent(String eventType, String payload) { void trackScreen(String screenName) { SPRMessenger().setMessengerAnalyticsHandler( |
15) Add Messenger Events Listener to sdk events
The following events can be listened:
void onEvent(String eventGroup, String eventType, String payload) {
SPRMessengerEventsListener eventsListener = SPRMessengerEventsListener(
SPRMessenger().setMessengerEventsListener( ); |
16) Add Events Logger to SDK Events
The provided code snippet establishes a custom logging system which can handle logging events at different levels. This setup enables us to efficiently track and manage various events within the app.
void _write(SPRLogLevel level, List<String> logs) { |
The following log levels are maintained:
SPR_OFF, SPR_FATAL, SPR_ERROR, SPR_WARN, SPR_INFO, SPR_DEBUG, SPR_TRACE, SPR_ALL
17) Update Theme Mode for User on demand
You can update the theme mode on demand:
SPRMessenger().updateThemeMode(themeMode:'DARK'); // options: DEFAULT | DARK |
Note: Upon invoking the updateThemeMode() method, a confirmation alert will prompt the user to reload the app for the changes in theme to take effect. Furthermore, the parent application should send the updated theme within the configuration while chat initialization
18) Configure your Status Card
Note: To get this capability enabled, please reach out to our support team at tickets@sprinklr.com, providing the live chat application ID. Status Card can be enabled only if you are using the modern skin version of live chat widget.
Using Status Cards, you can update your customers about the health of a key resource. This key resource could be a tool or service that they interact with frequently. By showing the status of this resource directly, customers don’t have to reach to agents repeatedly. Hence, this improves the customer experience while reducing agent workload
Once status card is enabled for your Livechat widget, you can update the status card by using the following:
SPRMessenger().updateWidget( id: “WIDGET_ID”, //Same ID configured in the Live Chat builder must also be utilized here details: SPRMessengerWidgetDetailsConfig( title: “Your title, %%[status]”, description: “Your description, %%[updatedAt]”, status: SPRStatus.ALL_SYSTEMS_OPERATIONAL, updatedAt: DateTime.now().millisecondsSinceEpoch, ), ); |
You can use the following placeholders for title and description:
%%[updatedAt] --> Placeholder for formatted time
%%[status] --> Placeholder for Status, mentioned below in the table as SPRStatus
19) Disable Attachments for Customer
You can prevent customers from adding attachments in the chat by hiding the attachment icon from the chat widget.
To do this, you can pass disableAttachment:true in the takeOff method
SPRMessengerConfig messengerConfig = SPRMessengerConfig( // rest config, disableAttachment: true, // by default, attachments are enabled ); |
20) Integrate Your Brand's Custom Header in Live Chat
Enhance your live chat experience by incorporating your own custom header. This allows you to replace Live Chat default header with one that aligns with your brand identity, creating a consistent and seamless experience for your users.
SPRMessenger().startApplication(chatInitialisationContext: { “disableHeader”: false, // Default: false. To disable Sprinklr's header, set to true “isRenderedAsFullView”: true, // Default: true. If set to false, the brand must manage device top insets }); |
21) Implement Back Button Handling to Control Hardware Back Button
Utilize the below method to handle the back action within your chat application. This function allows users to seamlessly navigate back to the previous screen, enhancing the overall user experience by providing intuitive and efficient navigation
SPRMessenger().goBack(); // Handles the back action |
22) Close Conversation
Use the method below to close a conversation on live chat. This feature allows brands to efficiently handle conversation endings, providing control over when and how interactions are closed. Apply this method only on the conversation screen when the case is open to ensure a seamless transition for users as conversations end.
SPRMessenger().closeConversation(); |
23) Close All Conversations
Use the method below to close all conversation on live chat. This option is visible to users with open cases, if there are no cases or all existing cases are already closed then user will not be able to see this option.
SPRMessenger().closeAllConversations(); |
24) Delete Conversation
Use this method to delete a conversation in live chat. This feature allows brands to efficiently remove interactions as needed, providing control over conversation deletions. Apply this method only on the conversation screen to manage deletions effectively.
SPRMessenger().deleteConversation(); |
25) Delete All Conversations
Use this method to delete all the conversations in live chat. This feature allows brands to efficiently remove interactions as needed, providing control over conversation deletions. Apply this method only on the home screen to manage deletions effectively.
SPRMessenger().deleteAllConversations(); |
26) Clear User Session
You can now enable users to clear their session details. When a user clears their session, any new conversations will be treated as if they are from a completely new user. This feature is especially useful for users interacting with your brand in public spaces or over a public network.
SPRMessenger().clearSession(); |
Step 5: Push Notifications
For more details on mobile push notifications, please refer here
Note: If you are using push notifications for Android, please ensure that "app/res/drawable" should have "notification_icon.png" before takeOff method is called
Prerequisite
Android: Google service.json file
iOS: APNS certificate (P12) along with its credentials
Note:
Google service.json file can be different for staging/prod env
APNS certificate (P12) and its credentials must be different for staging/prod env
If you are testing the push notification setup on prod mobile application(iOS), plesae ensure to use test flight build
If the Google service.json file is different sandbox/prod env and you are testing the push notification setup on prod mobile application(Android), plesae ensure to use Android release build
Configuration
To enable push notifications, please raise a support ticket to tickets@sprinklr.com with the following information:
Google service.json file
APNS certificate (P12) along with its credentials
Live Chat AppID
Partner ID
Env
1) Register/Unregister for Push Notifications
You can register the messenger to send push notifications by providing the push token received from APNS/FCM as shown below:
SPRMessenger().setPushRegistrationToken(token: token); |
You can unregister for messenger push notifications by sending empty token as below:
SPRMessenger().setPushRegistrationToken(token: ""); |
2) Handle Messenger Push Notifications
Once you have registered for messenger push notifications then you might receive notifications from your platform as well as messenger. To check if notification is messenger notification you can check as below:
bool isMessengerNotification = await SPRMessenger().canHandlePushEvent(message: remoteData); // remoteData is fcm RemoteMessage received in onBackgroundMessage of firebase messaging service |
Once you have identified if the notification is messenger notification you need to follow the below step to handle push notification.
SPRMessenger().handlePushEvent(message: remoteData); |
You can now open the conversation screen directly from a push notification when the app is in the background and the Messenger SDK is mounted.
SPRMessenger().handlePushNotification(message: remoteMessage); |
3) Open Live Chat Messenger
Open live chat view with initial notification: Messenger view can be presented with initial notification as the result of opening from notifications or in-app notification banners:
Map<String, Object> launchOptions = { SPRMessenger().startApplication(launchOptions: launchOptions); |
4) Controlling Notification Permissions
Note: Below Step 1 and Step 2 should be done before takeOff()
Prior to initializing the Messenger, you have the option to handle push notifications based on the user's app settings and permission status, provided your app has already obtained permission from the user.
1) To deactivate the push notifications according to the user’s application setting or if the user has not granted notification permission to your application:
SPRMessenger().setPushEnabled(pushEnabled:false); // Disable if app settings are disabled |
2) The live chat application will never request notification permission again if it has already been granted. When your application has not obtained notification permissions and if you also wish to prevent the live chat application from requesting notification permission when 'takeOff' is called, you can set the 'autoRequestPermission' parameter to false.
SPRMessenger().setAutoRequestNotificationPermissions( |
3) Whenever the user has granted notification permission to your application, we need to ensure that the push notifications for live chat application are also enabled. To do this:
SPRMessenger().setPushEnabled(pushEnabled: true); |
Step 6: Generate User Hash
The userHash is a generated HMAC or Hash-based Message Authentication Code. Sprinklr utilizes the sha256 hash function for HMAC. You need to generate HMAC for the following "string" of user details. These user details are concatenated to form a string, separated by underscores as demonstrated below:
userId_firstName_lastName_profileImageUrl_phoneNo_email |
For example, in the case provided, the string for which you need to generate hash would be:
12345_John_Doe_https://images.com.1.png_999999999_xyz@example.com
To generate hash, you can utilize the HmacHashCalculation.generateHash() utility provided by the Sprinklr Messenger plugin, as illustrated below:
import 'package:sprinklr_plugin/sprinklr_plugin.dart'; ... String data = 12345_John_Doe_https://images.com.1.png_999999999_xyz@example.com; String hash = HmacHashCalculation.generateHash(data: data, key: "<API-KEY>"); |
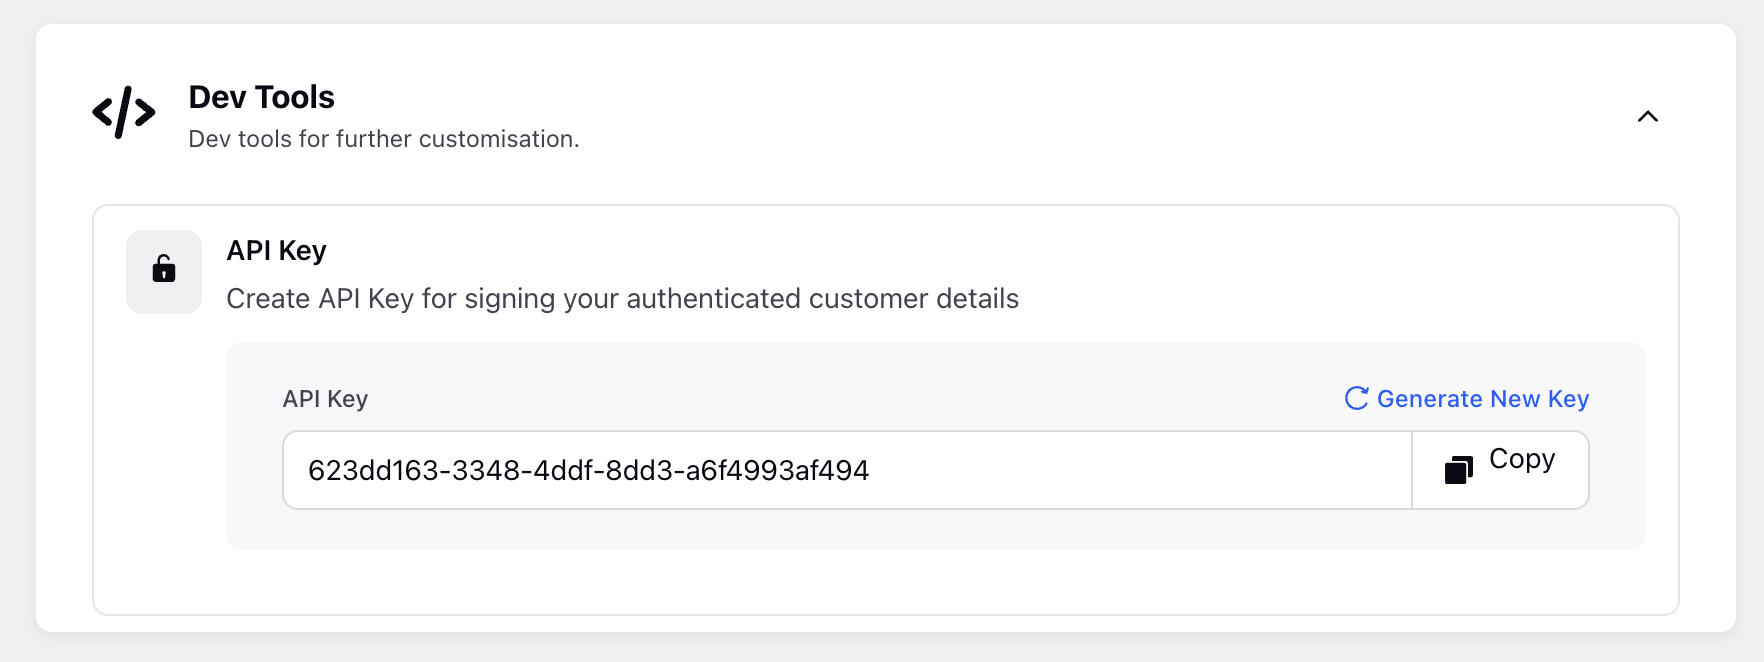
The secret key used in HMAC for your application can be located on the Sprinklr platform, displayed as the "API Key."

Note:
firstName, hash and one of email or phoneNumber are mandatory
User details are supposed to be concatenated to form a string, separated by underscore as shown below:
userId_firstName_lastName_profileImageUrl_phoneNo_email
If you don’t have a few values, you need not send anything but keep the underscores as is. For example, let’s say you don’t have profileimageUrl, there will be 2 underscores after lastName. The string will be as shown below:
|
Troubleshooting
1) LiveChat not showing up while passing authenticated user details
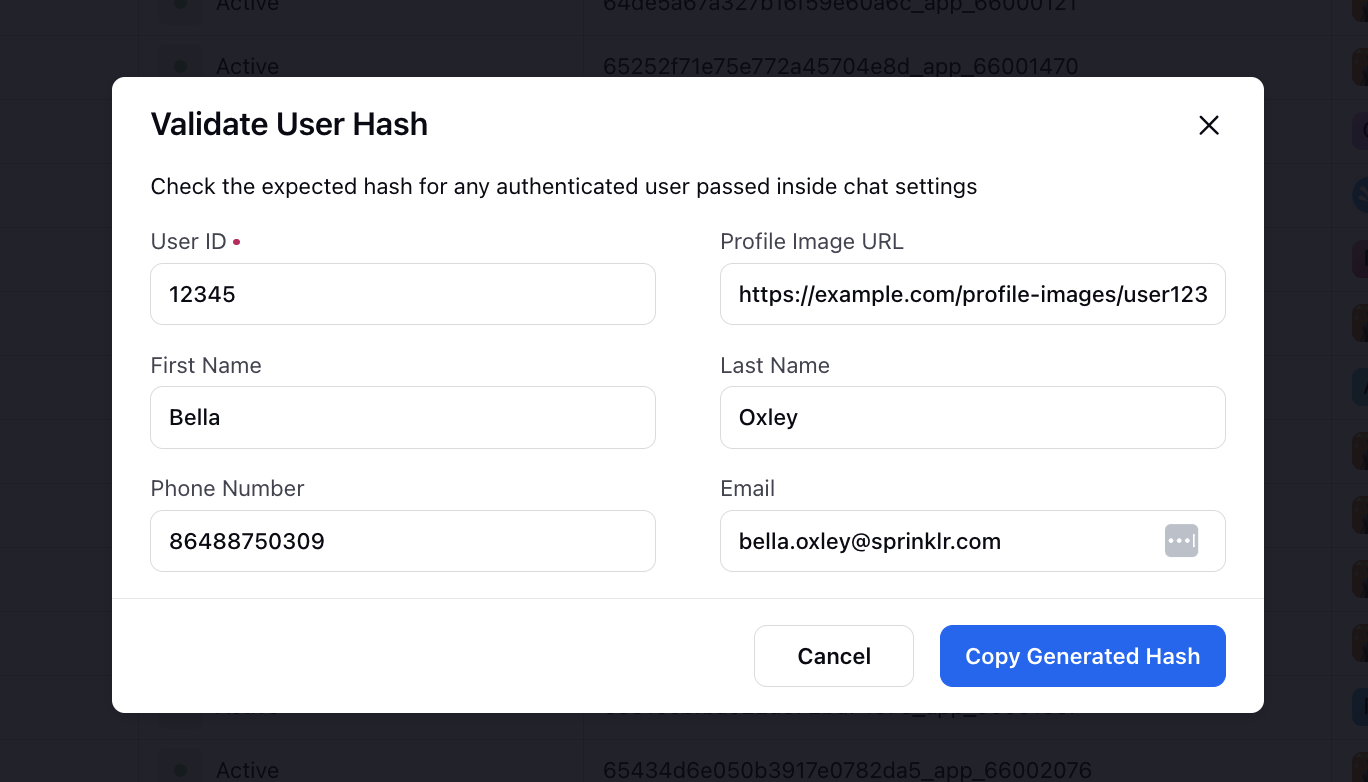
Check the expected hash for any authenticated user passed inside chat settings.
Hover over the Options icon alongside your Live Chat Application and select Validate User Hash.

On the Validate User Hash window, enter User ID, Profile Image URL, First Name, Last Name, Phone Number and Email. Click Copy Generated Hash and verify it with the hash generated by you.
2) Check if correct FCM Server key is being used for push notifications using Open API of FCM
Please use the following curl with your FCM server key and registration device token, to check if the FCM Server key is correct or not:
|
3) More than one file was found with OS independent path
Add the following lines to your app's build.gradle files -
android { |
4) Gestures being registered on both LiveChat SDK and Flutter application
Note: This issue might happen on some older Flutter versions.
To override the gesture responder chain in MessengerViewController to skip FlutterViewController, preventing Flutter from becoming the touch responder when Live Chat is open. Please implement the following changes:
You can resolve this issue by configuring the SPRMessengerConfig to override the default behavior. To do this, set the overrideMessengerViewsResponderChain flag to true in the configuration sent to the takeOff method. Here's how you can specify this flag in takeOff:
SPRMessengerConfig messengerConfig = SPRMessengerConfig( // Other configuration options overrideMessengerViewsResponderChain: true, );
SPRMessenger().takeOff(config: messengerConfig); |
Alternatively, you can also set this flag directly when starting the Live Chat using the startApplication method:
SPRMessenger().startApplication(overrideMessengerViewsResponderChain: true); |
By setting the overrideMessengerViewsResponderChain flag to true, you ensure that gesture events are only registered on the intended screen, thus preventing conflicts between the Live Chat screen and the Flutter application screen.