How to Create an Ad Campaign in Ads Composer
Updated
You can compose Facebook, Twitter, LinkedIn, Pinterest, Snapchat, LINE, TikTok, and Nextdoor Ads from the Ads Composer, allowing you to create the same ads through Sprinklr that you can create on various channels. You can create multiple ads for multiple channels through a single platform. This article discusses the use cases and different features available in Sprinklr Ads Composer.
![]() Enablement Note: Use of this feature requires that Sprinklr Marketing (Ads) be enabled in your environment. To learn more about Sprinklr Marketing (Ads), please work with your Success Manager.
Enablement Note: Use of this feature requires that Sprinklr Marketing (Ads) be enabled in your environment. To learn more about Sprinklr Marketing (Ads), please work with your Success Manager.
Use Cases of Ads Composer
Media Practitioner | Manager |
|
|
Navigate to the Ads Composer
Click the New Tab icon. Under the Sprinklr Marketing (Ads) tab, click Ads Composer within Execute.
Select Campaign Creation Type
Sprinklr Ads Composer provides you with the following options to create a campaign:
Campaign Creation | Description |
Create New Campaign | Select an ad account and create your campaign. |
Create a new campaign by using the existing or the draft campaign as a campaign template. To create a new campaign, click on any listed ad account, and then you can choose from the following templates within the existing template:
Note: Use Campaign as a Template can be used on all campaigns but not on Deleted or Archived campaigns. With a base version of each campaign, Campaign Templates allow you to select the desired campaign and use the full Ads Composer flow to make necessary edits. Bulk workflows allow changes to be made quickly across multiple different campaigns. You can use the first campaign as a reference and swap out the creative, click tags, and other features as needed. | |
Edit Draft Campaign | Select from the existing draft campaigns to make changes as required.
|
Add to an Existing Campaign | Select existing campaigns to add new Ad Sets or Ads. |
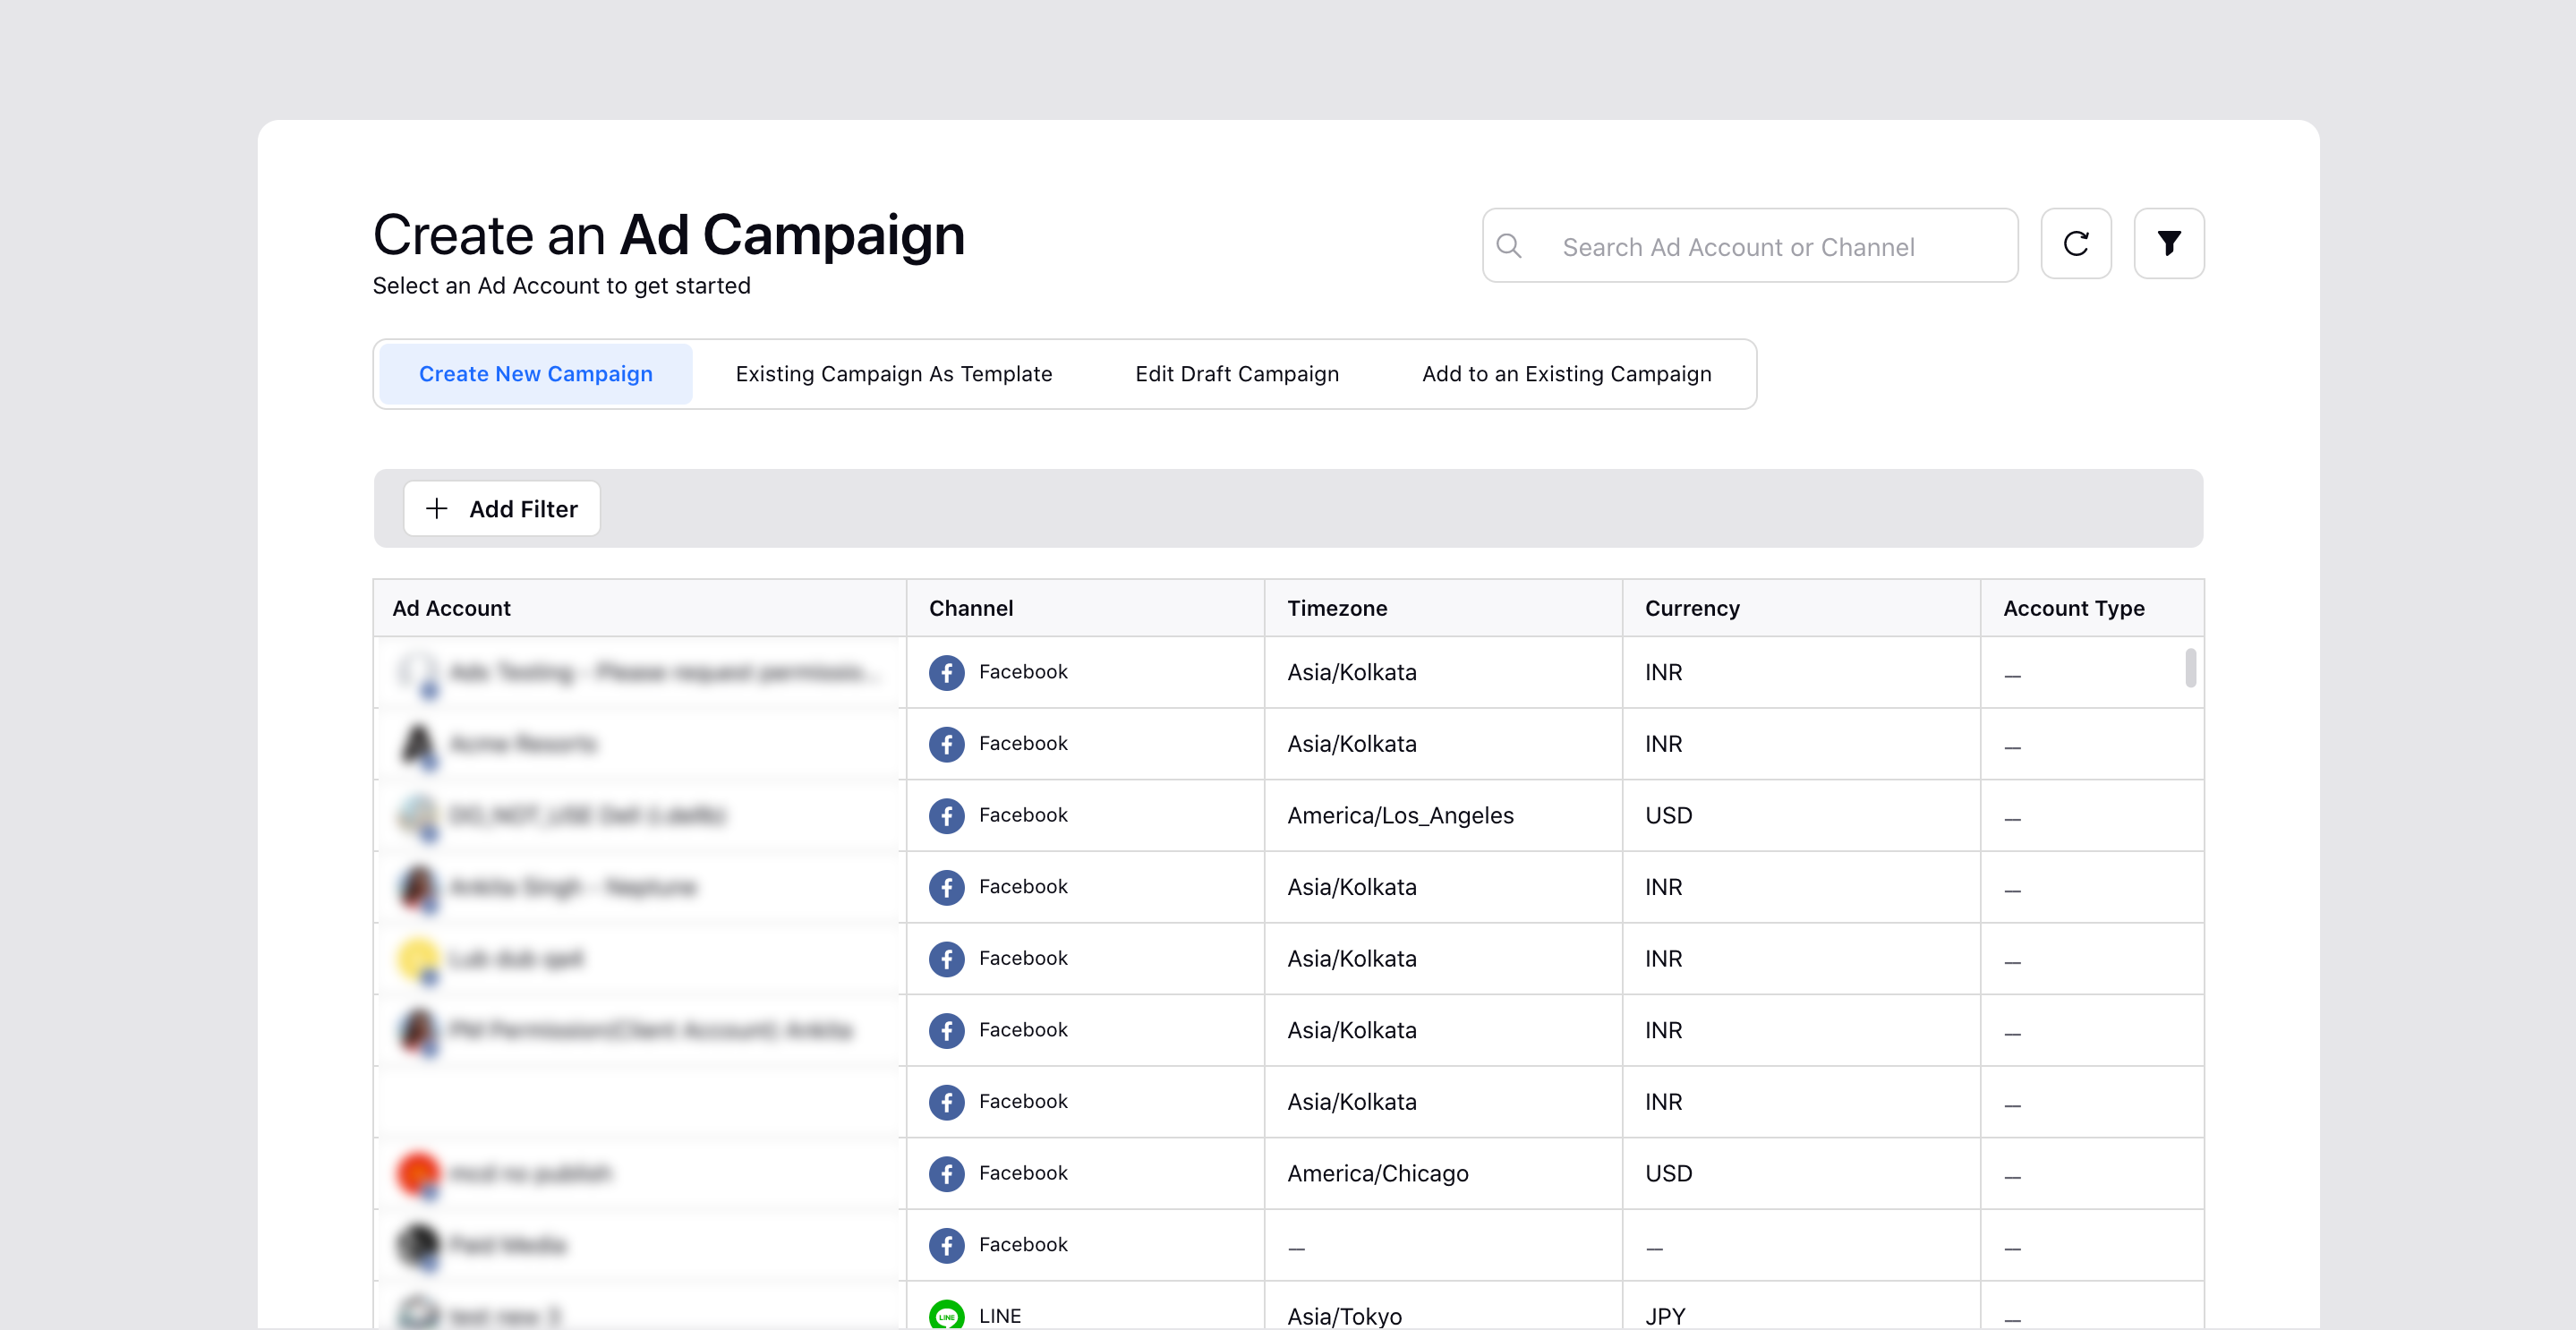
Select Account and Objective
1. On the Create an Ad Campaign window, select your Ad Account.
Tip | Click the Filter icon in the top-right corner to filter down by channels from which you want to select an ad account. You can also search the ad account or channel in the Search bar alongside. Additionally, you can sort the columns as desired by clicking the Sort icon alongside each column. Below are the filter and sort options for the different campaign creation types. Filters:
Sort (Ascending / Descending):
|
2. In the Campaign Details section, select your Objective. You can see all of the campaign objectives by clicking More.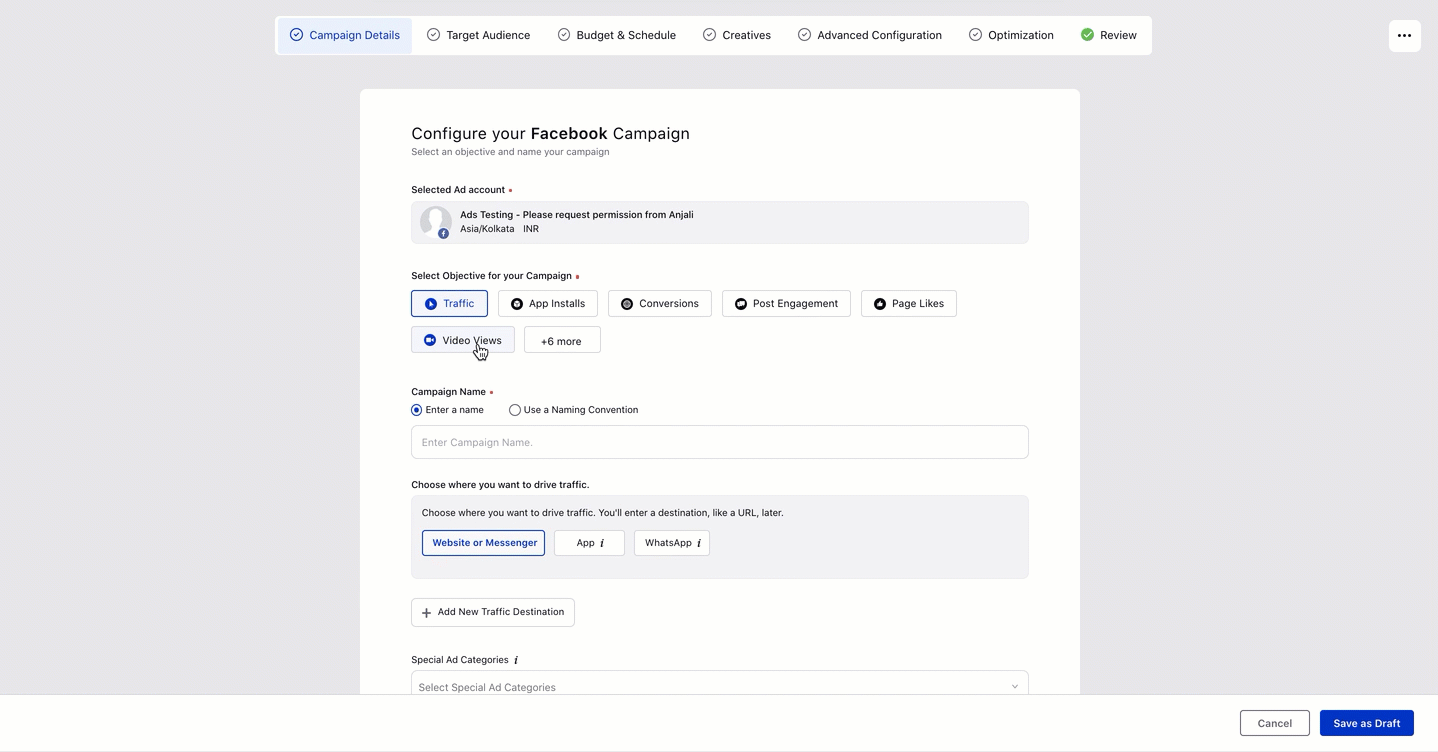
3. Enter the Campaign Name. You can also select Use a Naming Convention for a predefined campaign name.
Character limits for Campaign, Ad Set, and Ad names:
|
4. Select a Sprinklr Campaign to measure your Organic and Paid Reach from the Set Sprinklr Campaign drop-down menu. You can also select a Sub Campaign of the selected Sprinklr Campaign from the Set Sprinklr Sub-Campaign drop-down menu.
This will provide greater flexibility in linking your Sprinklr Campaigns with Paid Initiatives.
To make the Sprinklr Sub-Campaign field mandatory in your environment, please work with your Success Manager. |
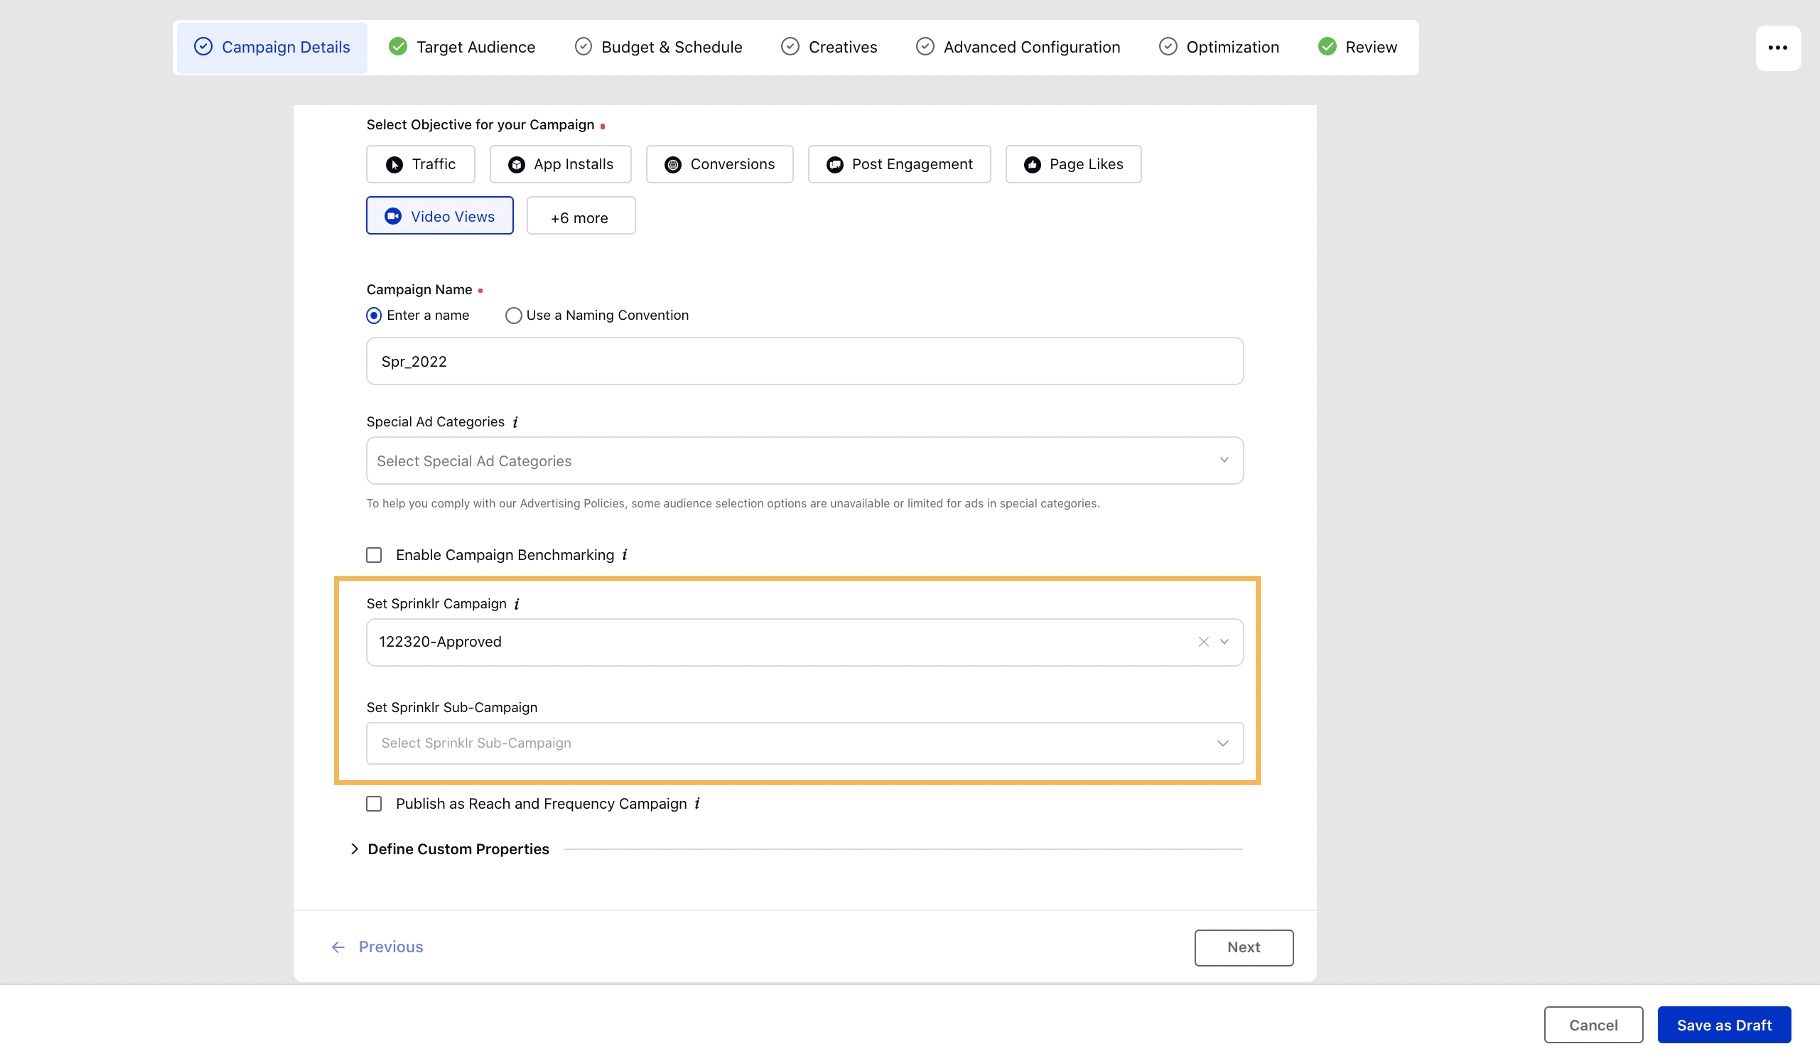
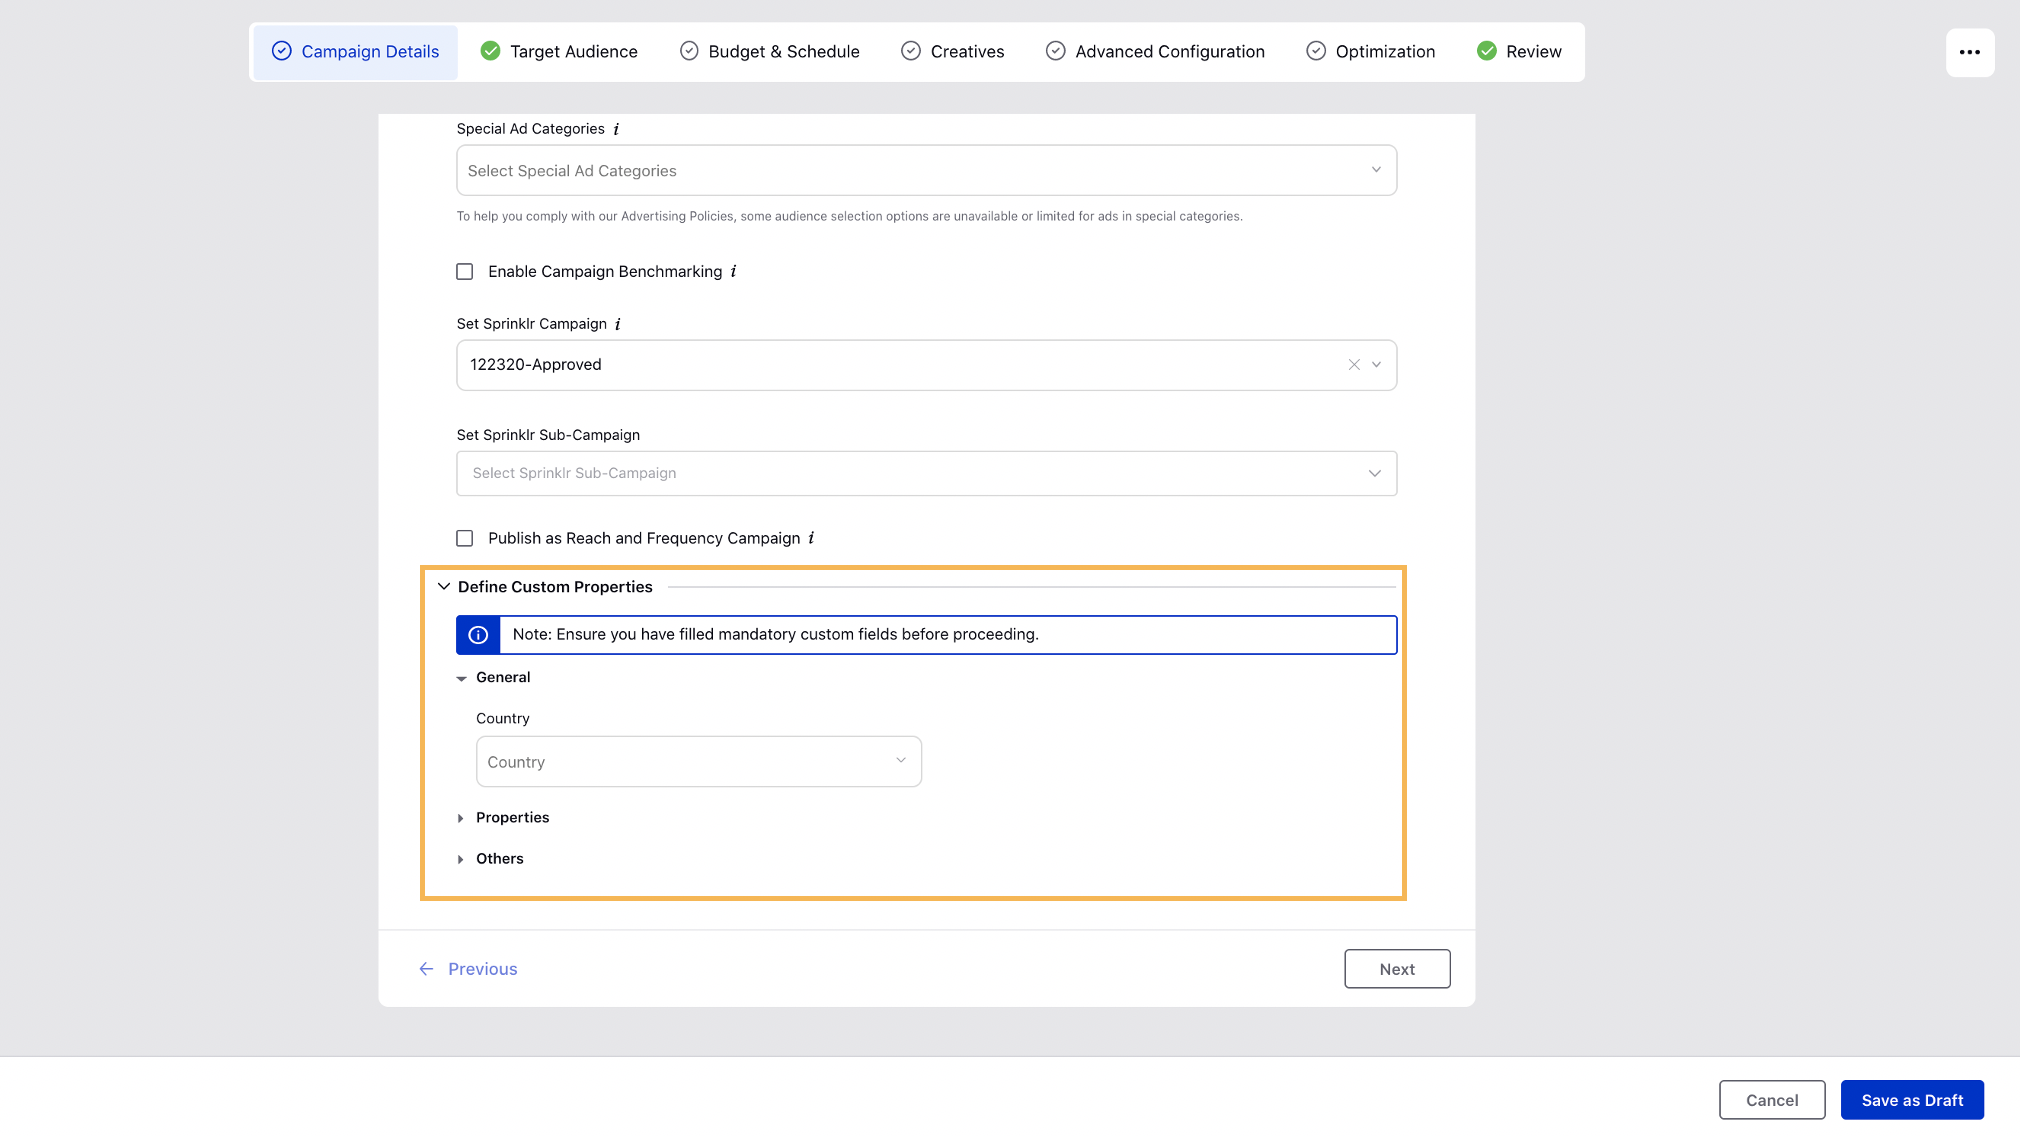
5. Define the Custom Properties as desired and click Next.
If you have any unfilled mandatory custom fields, the Custom Properties section will be expanded by default along with a pop-up banner to inform you to fill in the custom fields.
Apply Targeting
In the Target Audience section, click Add Target Audience.
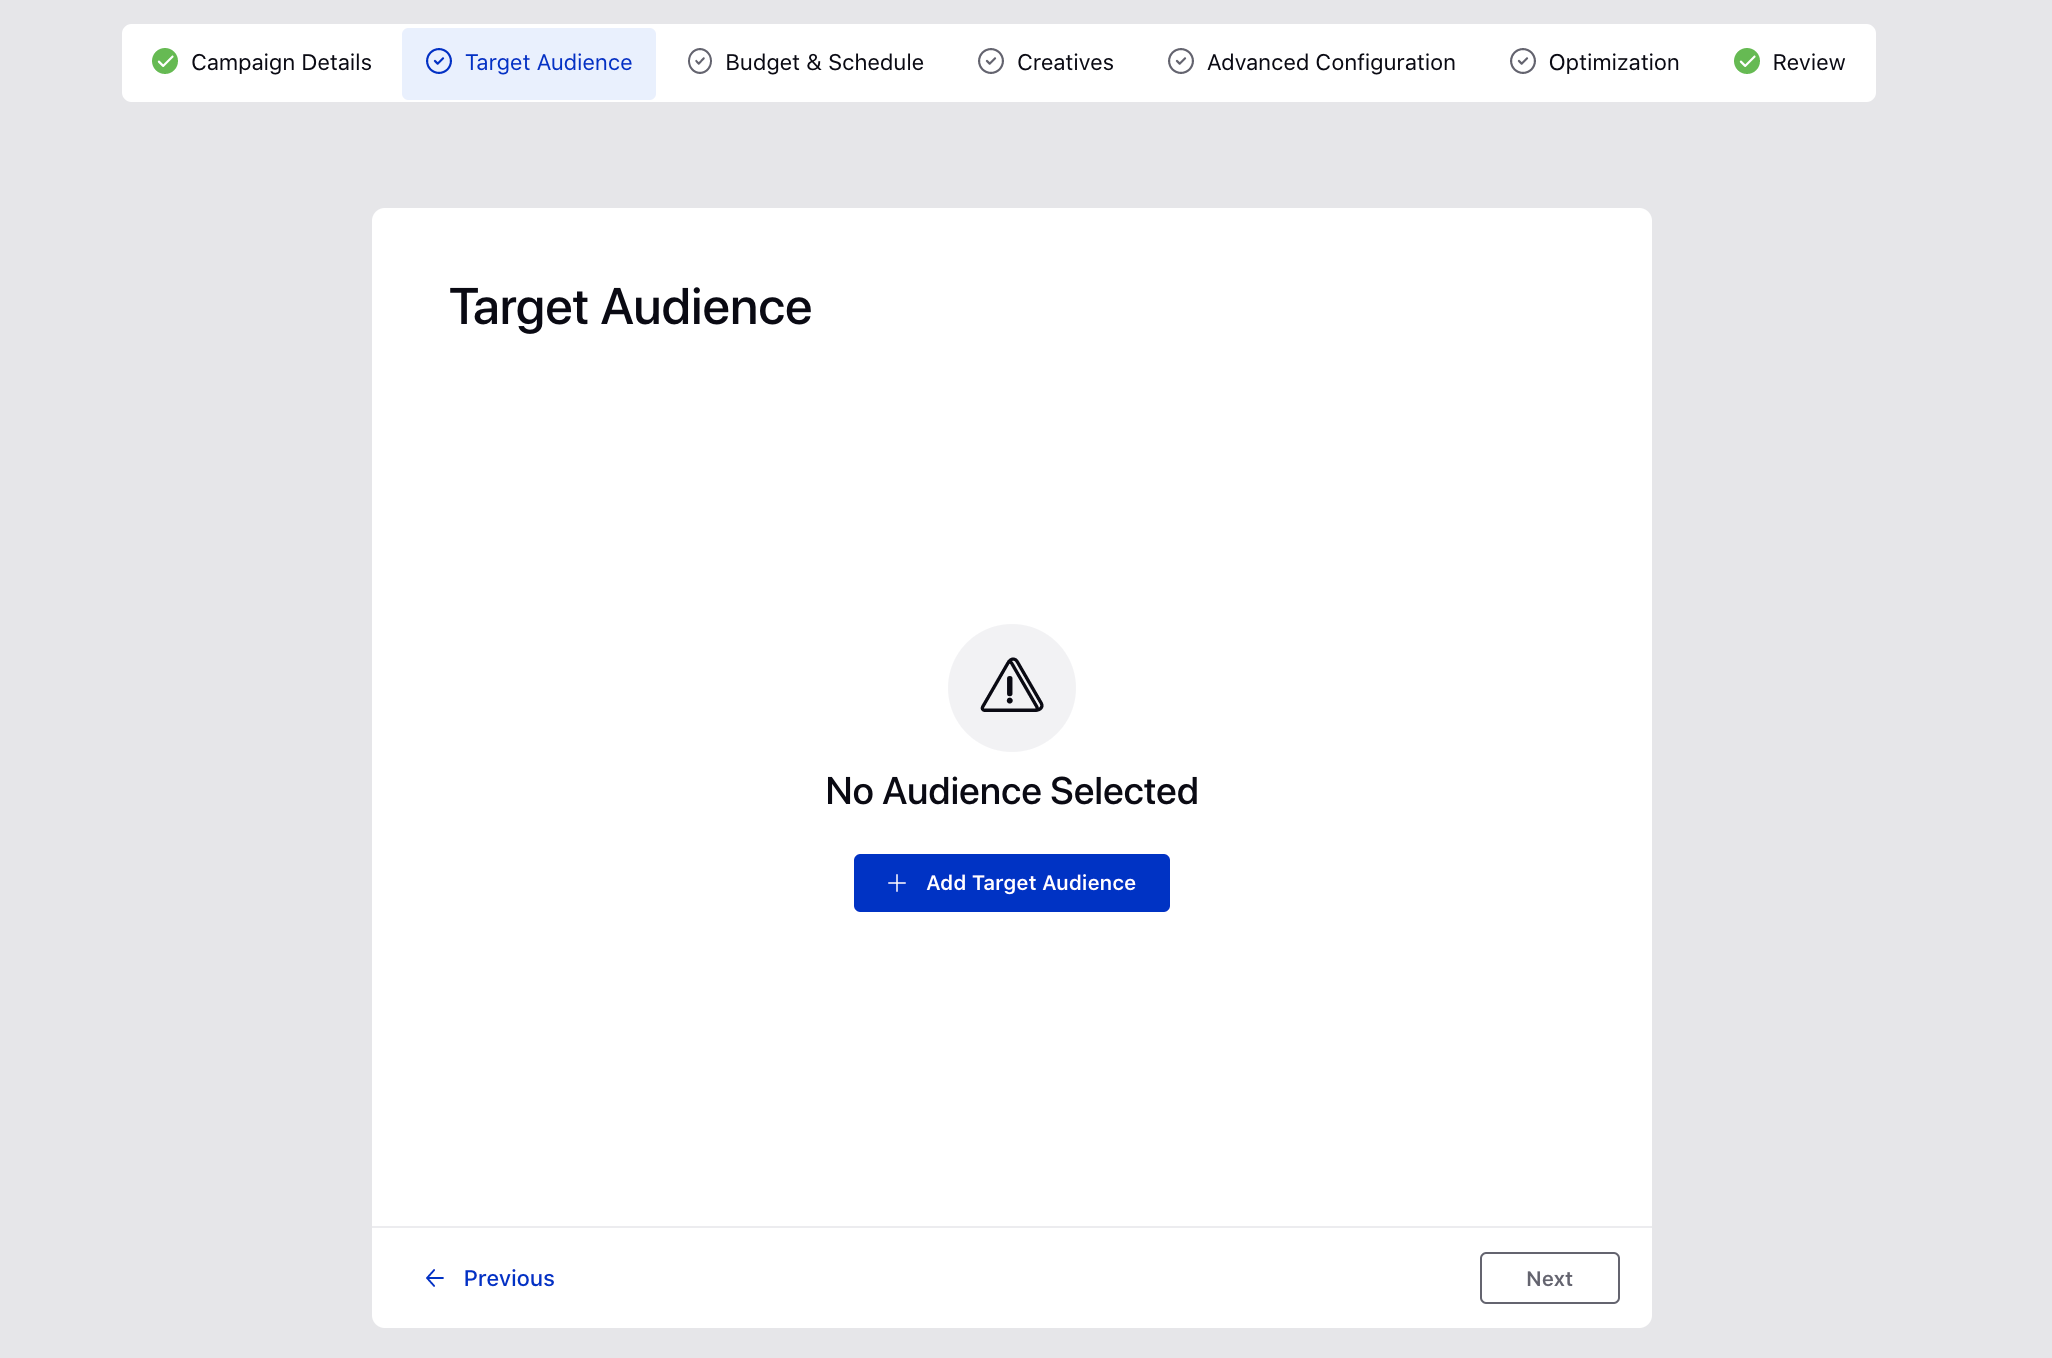
Select/Search the Target Audiences that you would like to use or click Add New Audience to create your custom target audience.
Tip | For an efficient selection, you can click Add Filter below the search bar to filter your saved target audiences by:
We will retain the filter configuration every time you compose a new ad campaign and define targeting. |
By default, all the valid target audiences will be populated on the Select from Saved Target Audiences window. You can also search and select invalid target audiences available in the Audience Manager from the Search bar. On searching for a particular invalid target audience, it will populate along with a warning message.
Note | While selecting your target audience from Saved Target Audiences based on a particular keyword such as a part of the saved audience's name, you can quickly multi-select all the audiences that contain the keyword by selecting the checkbox in the top-left corner of the audience details table. Please note that this functionality will not work cross-pages. |
Tip | Hover over the Options icon alongside a saved audience and select View Details to see more information on the target audience. |

1. On creating a new audience, enter the target audience details. A summary of the selected target audience will populate on the right-hand side along with its estimated reach.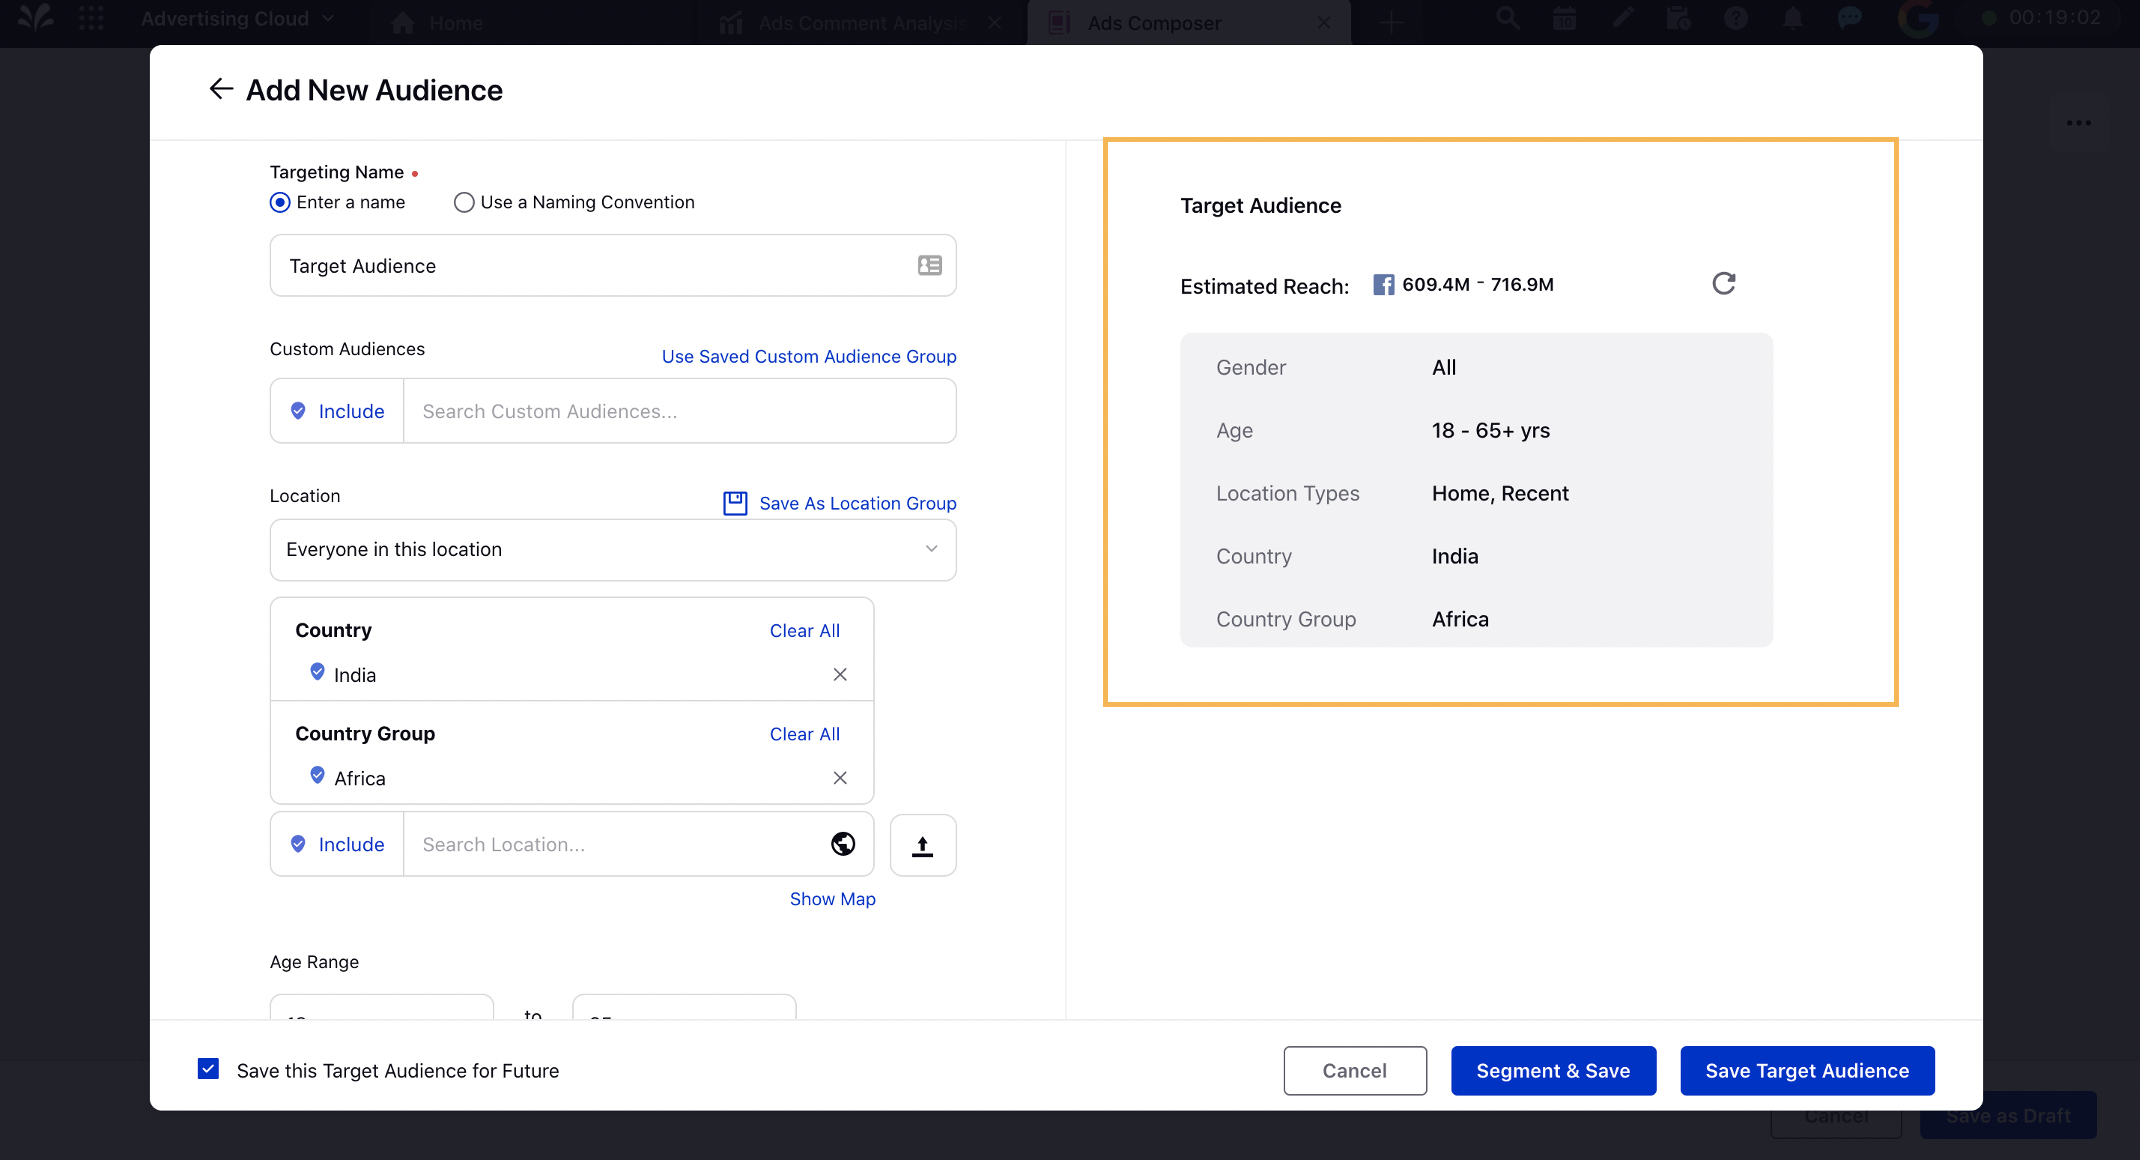
2. Scroll down to the Define Custom Properties section and set the custom properties relevant to your target audience. This will allow you to analyze their performance in reporting.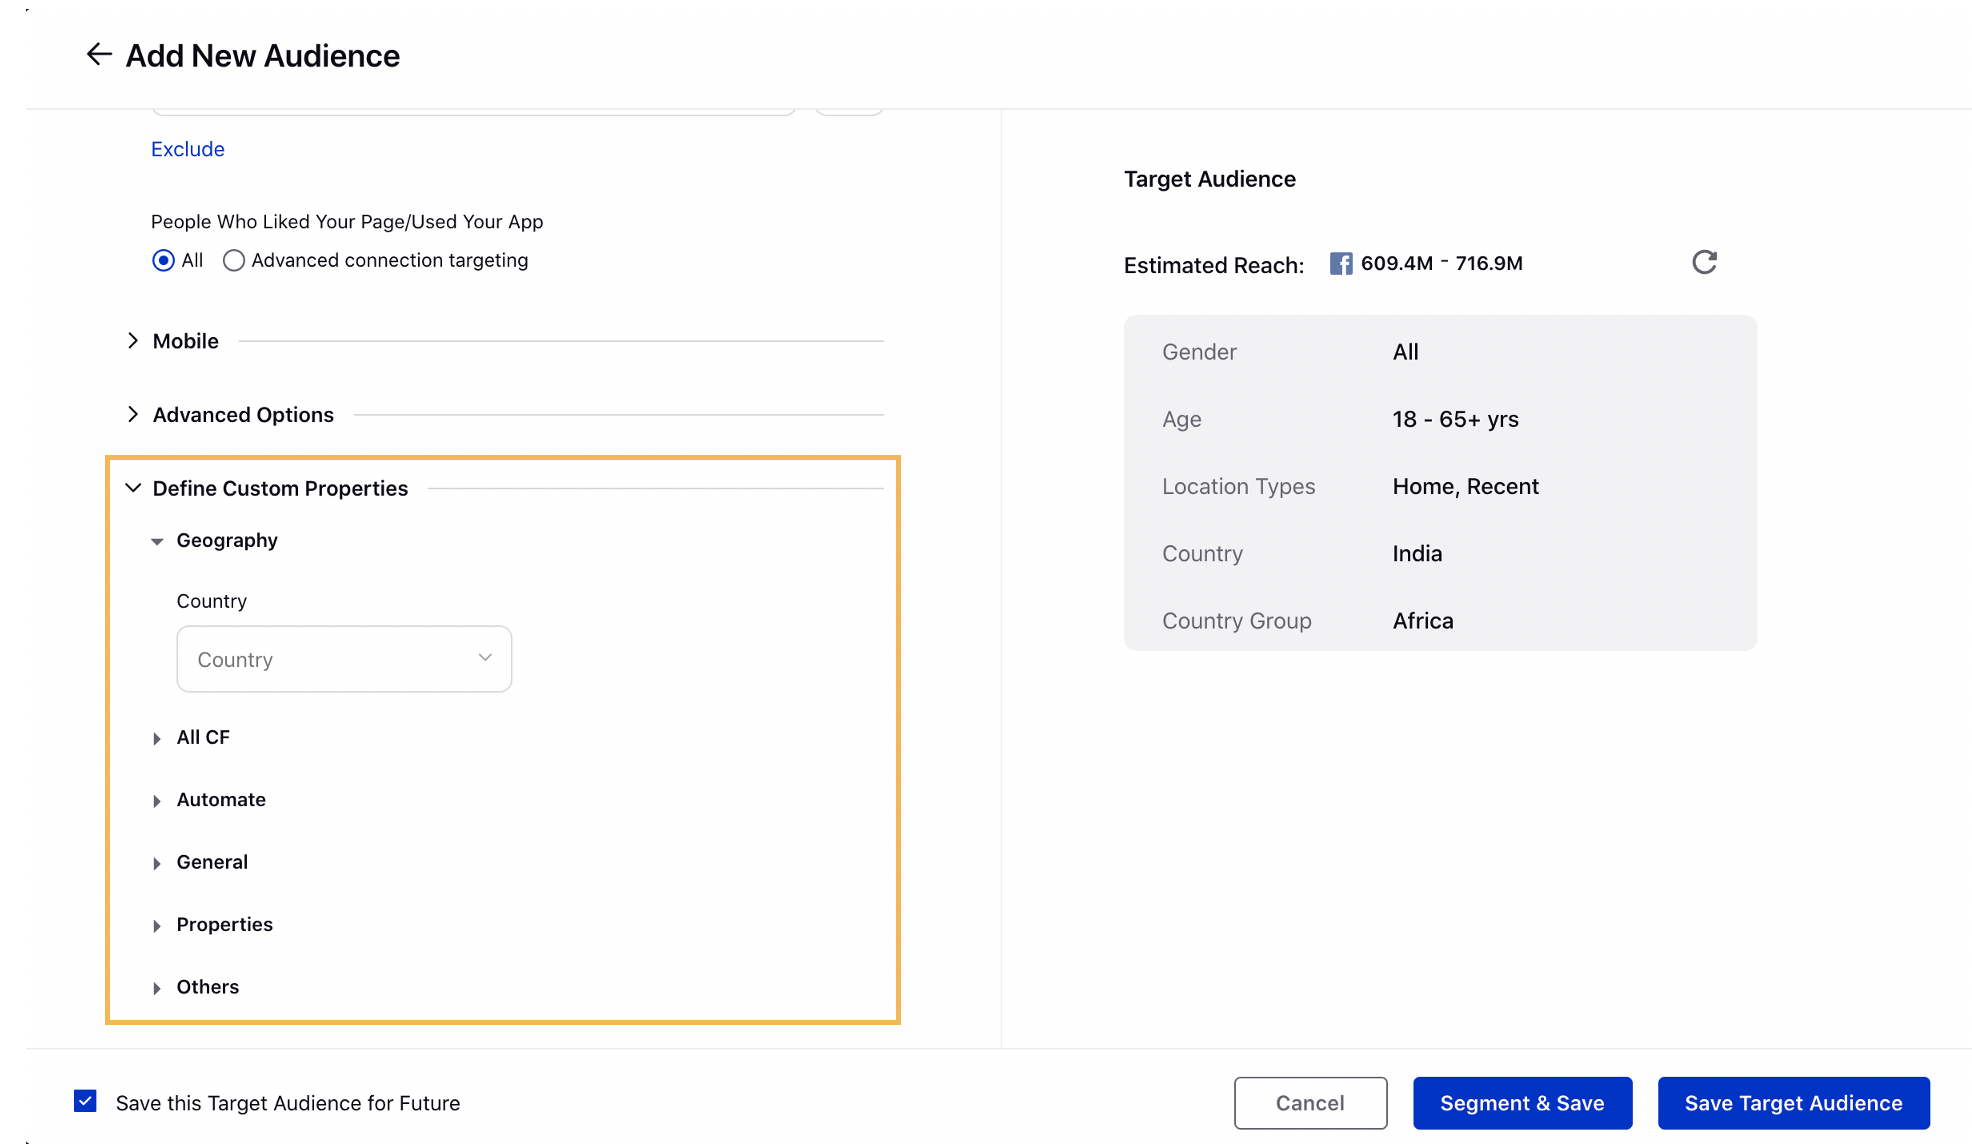
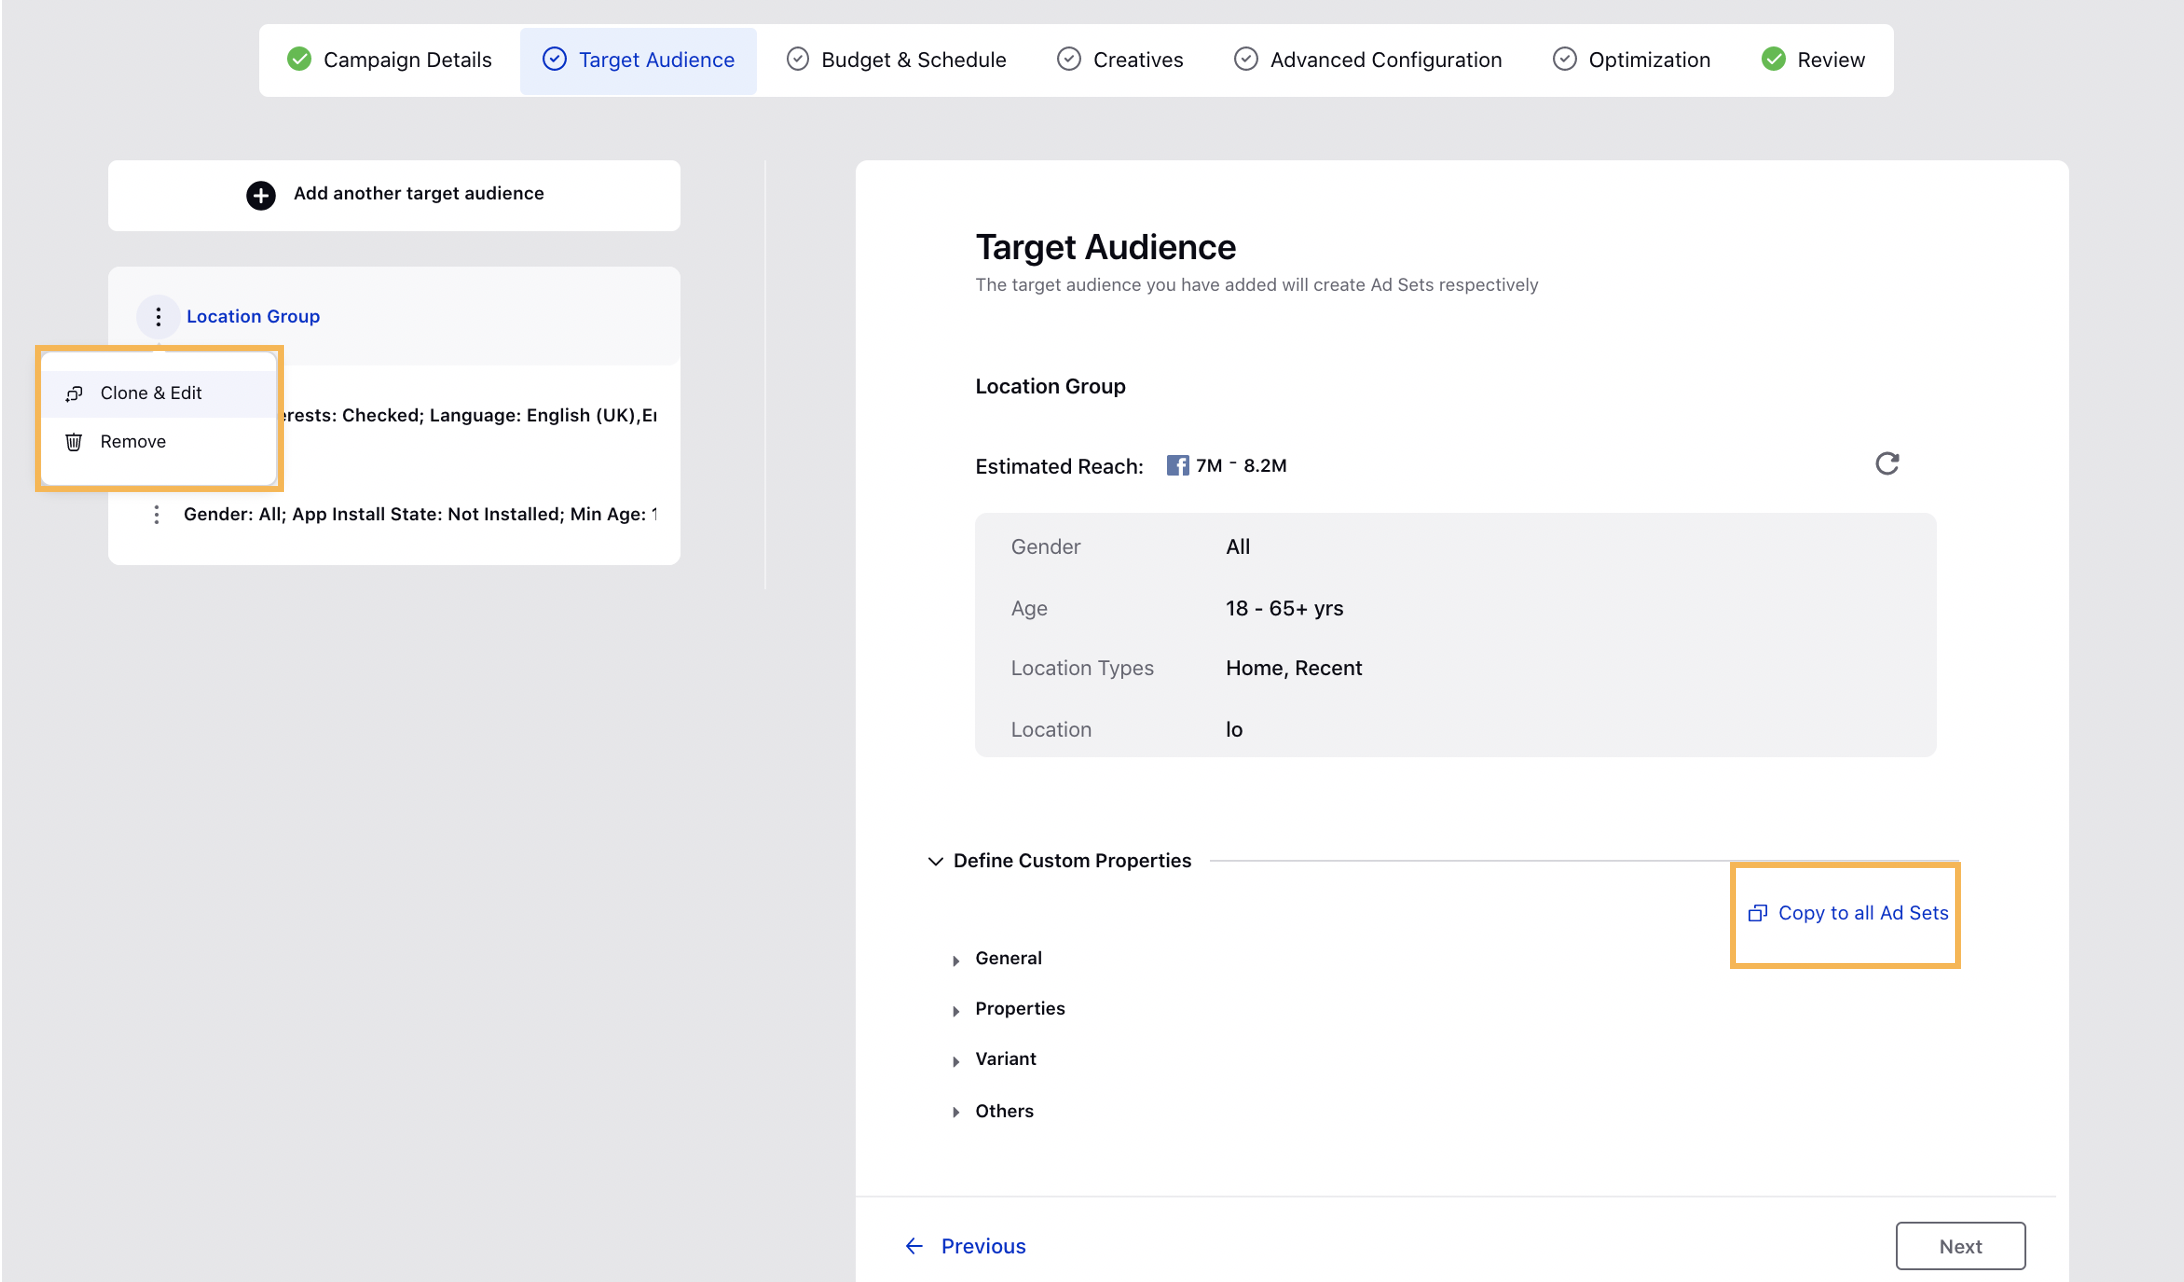
3. Review the target audience you have selected in the right-hand pane. You can perform below actions on the selected target audience -
You may clone and edit your selected target audience by clicking the Options icon alongside a target audience and selecting the Clone & Edit option.
A clone of that audience will be available to edit containing the same target audience demographics. Any changes made to the Saved Audience from the Ads composer will reflect in the corresponding Saved Audience within the Audience Manager.
While reviewing target audiences, you may create new targeting by clicking Add another target audience.
4. Once you have completed, click Save. This will create a new Target Audience within Social DMP, and a new Target Audience within your campaign.
5. Click Next.
Apply Budget and Schedule
1. In the Budget & Schedule section, you can apply budgeting and scheduling to all Ad Sets or set them individually.
If Configure all Ad Sets individually is unchecked, the values entered will be applied to all your Ad Sets.
If Configure all Ad Sets individually is checked, you will have the ability to set unique values for each Ad Set. For more information, see Search and Configure Budget for Ad Sets Individually. Furthermore, once you have configured the budget for one of the filtered Ad Set, you can click Copy values to all Ad Sets.
Note | The currency of your budget will depend on the currency that you have set in your ad account and cannot be changed in Ads Composer. |
Tip | If you want the Budget and Schedule for Ad Sets to be generally the same with small changes to particular Ad Sets, uncheck Configure all Ad Sets individually. Enter your general Budget and Schedule, Placement, Bidding, and Dayparting details. Then select Configure all Ad Sets individually. Individual Ad Sets will have the generally entered values and you can modify specific Ad Sets as needed. |
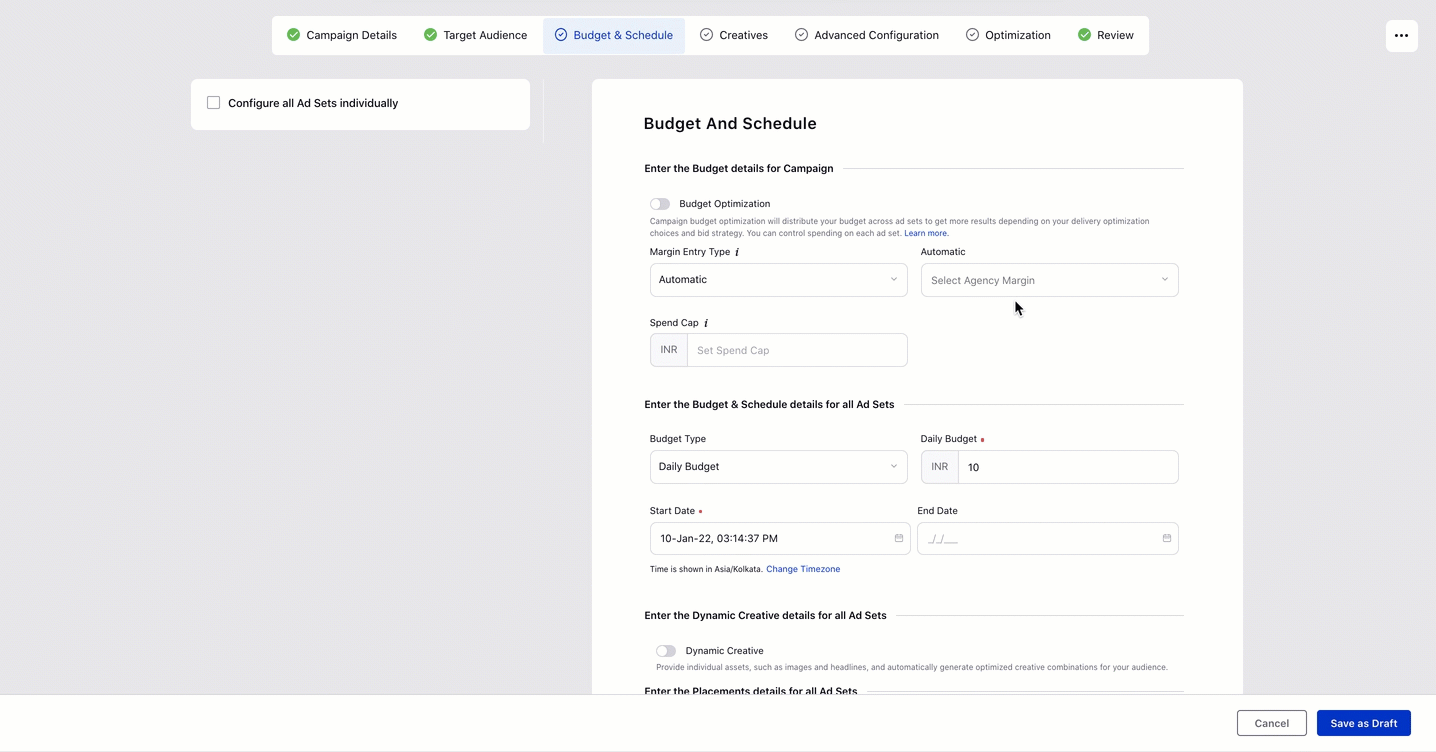
2. Set the placement details for your Ad Sets under Enter the Placements details for all Ad Sets. You can add multiple placement variations for your ad sets by clicking Add Placement Variation. For more information, see Add Placement Variations in Ads Composer.
3. Click Next to proceed to the Creatives section.
Note | After your campaign is published, if you had Dayparting enabled for your Ad Sets, the ads which were manually paused will show no change in their current behavior. The time of the day set in dayparting will determine whether these ads will be paused or activated and ignore any action you take. However, if the dayparting isn't enabled, the ads will remain paused when outside the start-end date range irrespective of your actions. The ads within the start-end date range will stay active by default and you can pause the ads when desired. For more information, see Dayparting in Sprinklr Advertising. |
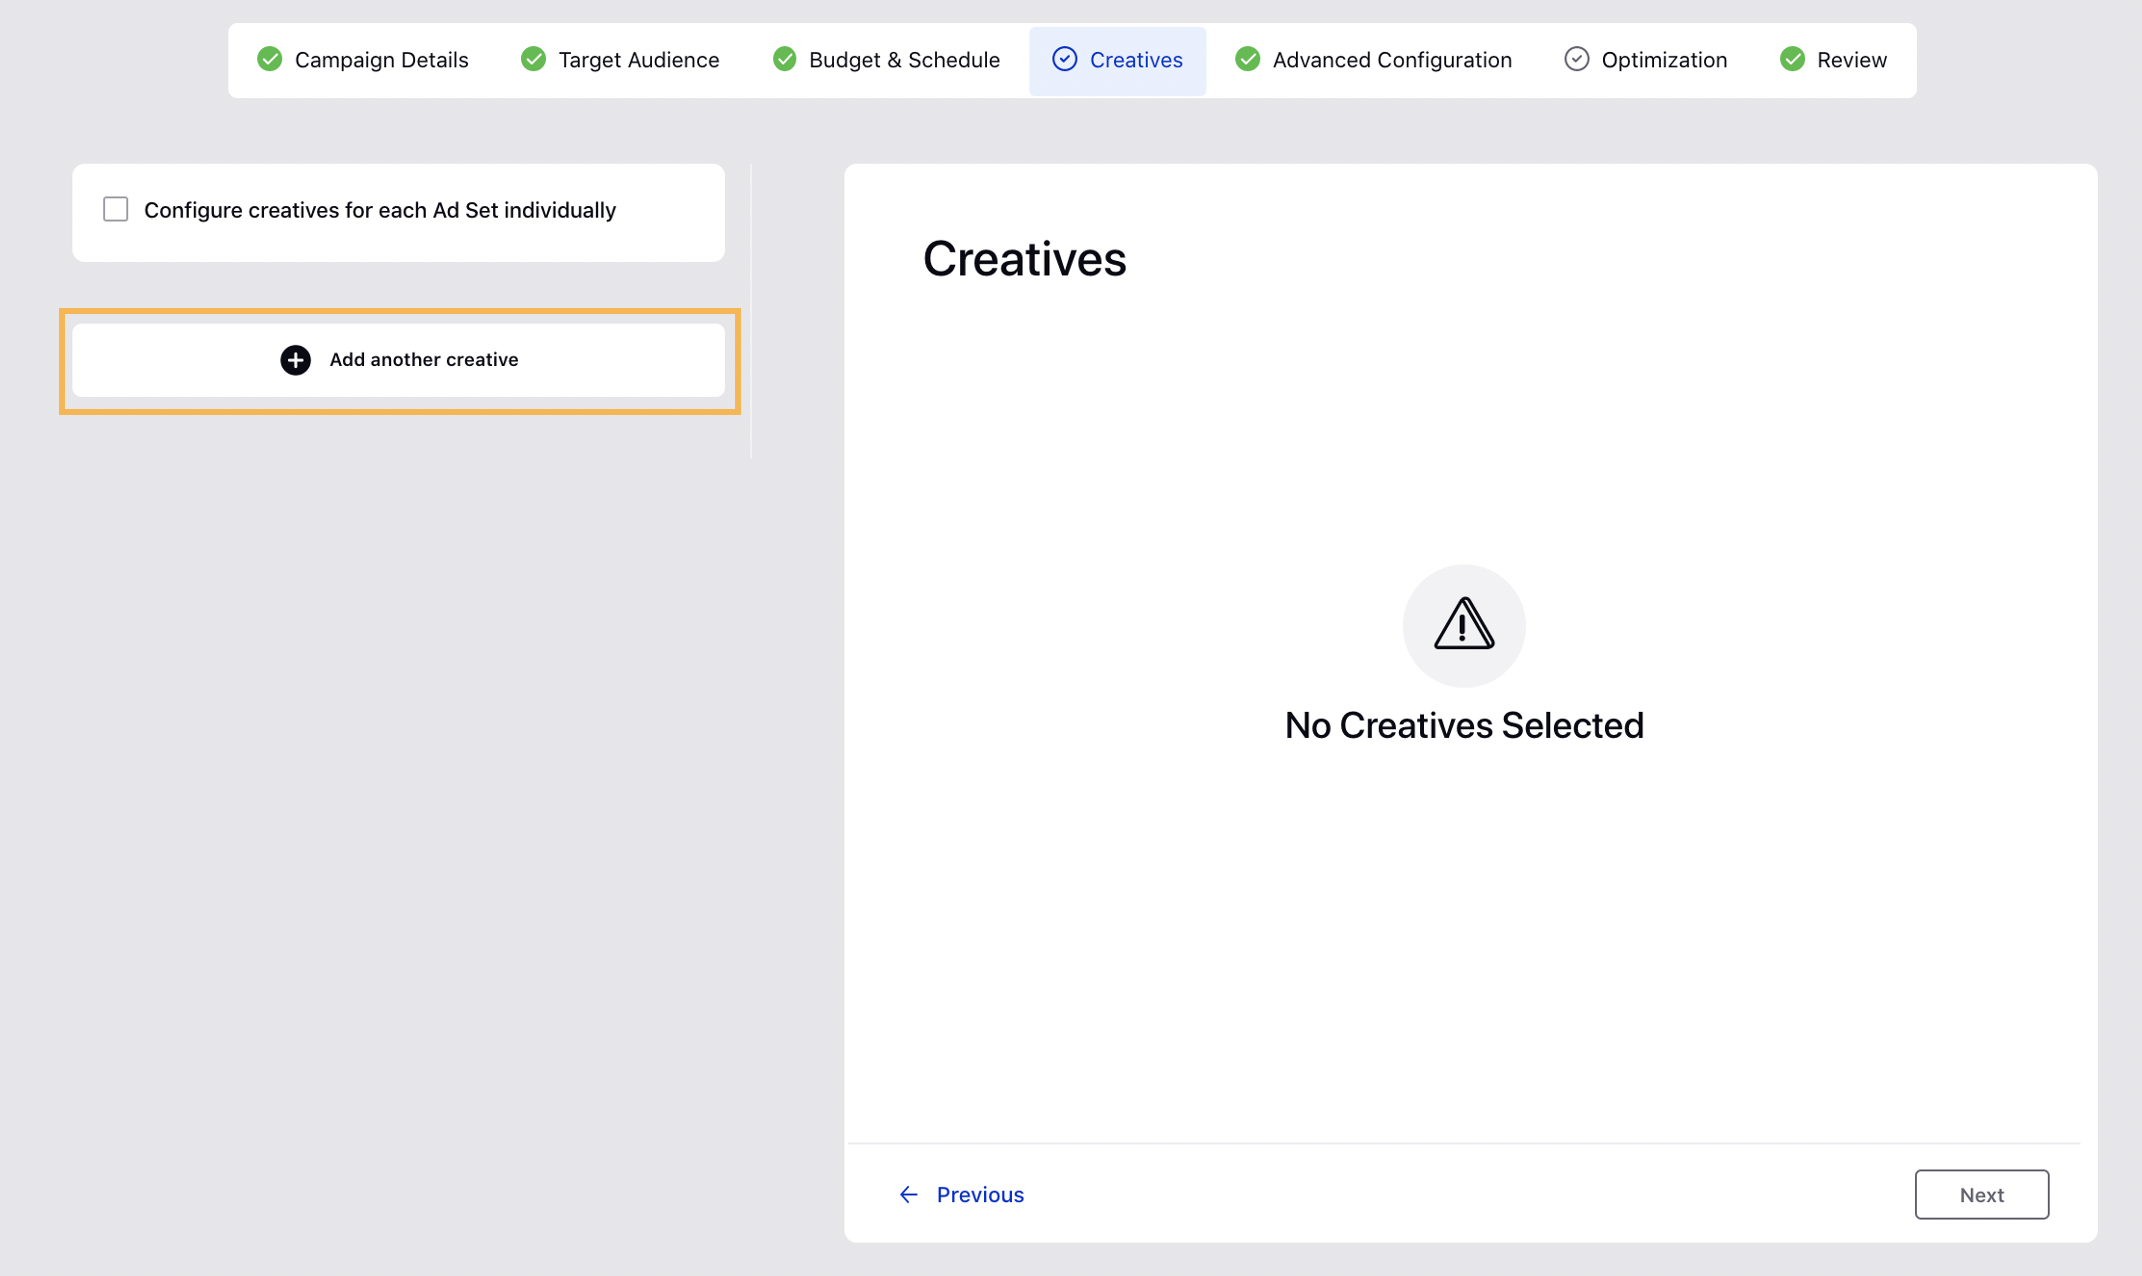
Apply Creatives
In the Creatives section, click Add another creative. You can search/select from an existing creative for your campaign by clicking on the available creatives or create an ad campaign with other media type posts by clicking Add New Creative.
Select from existing Creatives
Note | You can restrict the selection of creatives for your campaign to only those creatives that are approved by setting the Approved Draft Only permission in Ads Composer Role Permissions. |
By default, all the valid creatives will be populated. You can also search and select invalid creatives available in the Creative Library from the Search bar. On searching for an invalid creative, it will populate along with a warning message.
While selecting from existing ad creatives, you will have a selection box in the corner of each creative card to easily identify the multi-selected ad creatives. On saving your selection, each creative will be attached to a unique Ad Variant per Ad Set.
When two or more creatives are selected, you will have bulk options to Use as Template or unselect the creatives. Use as Template will not open the Post Editor and you will need to individually edit the posts from the selected Creatives window.
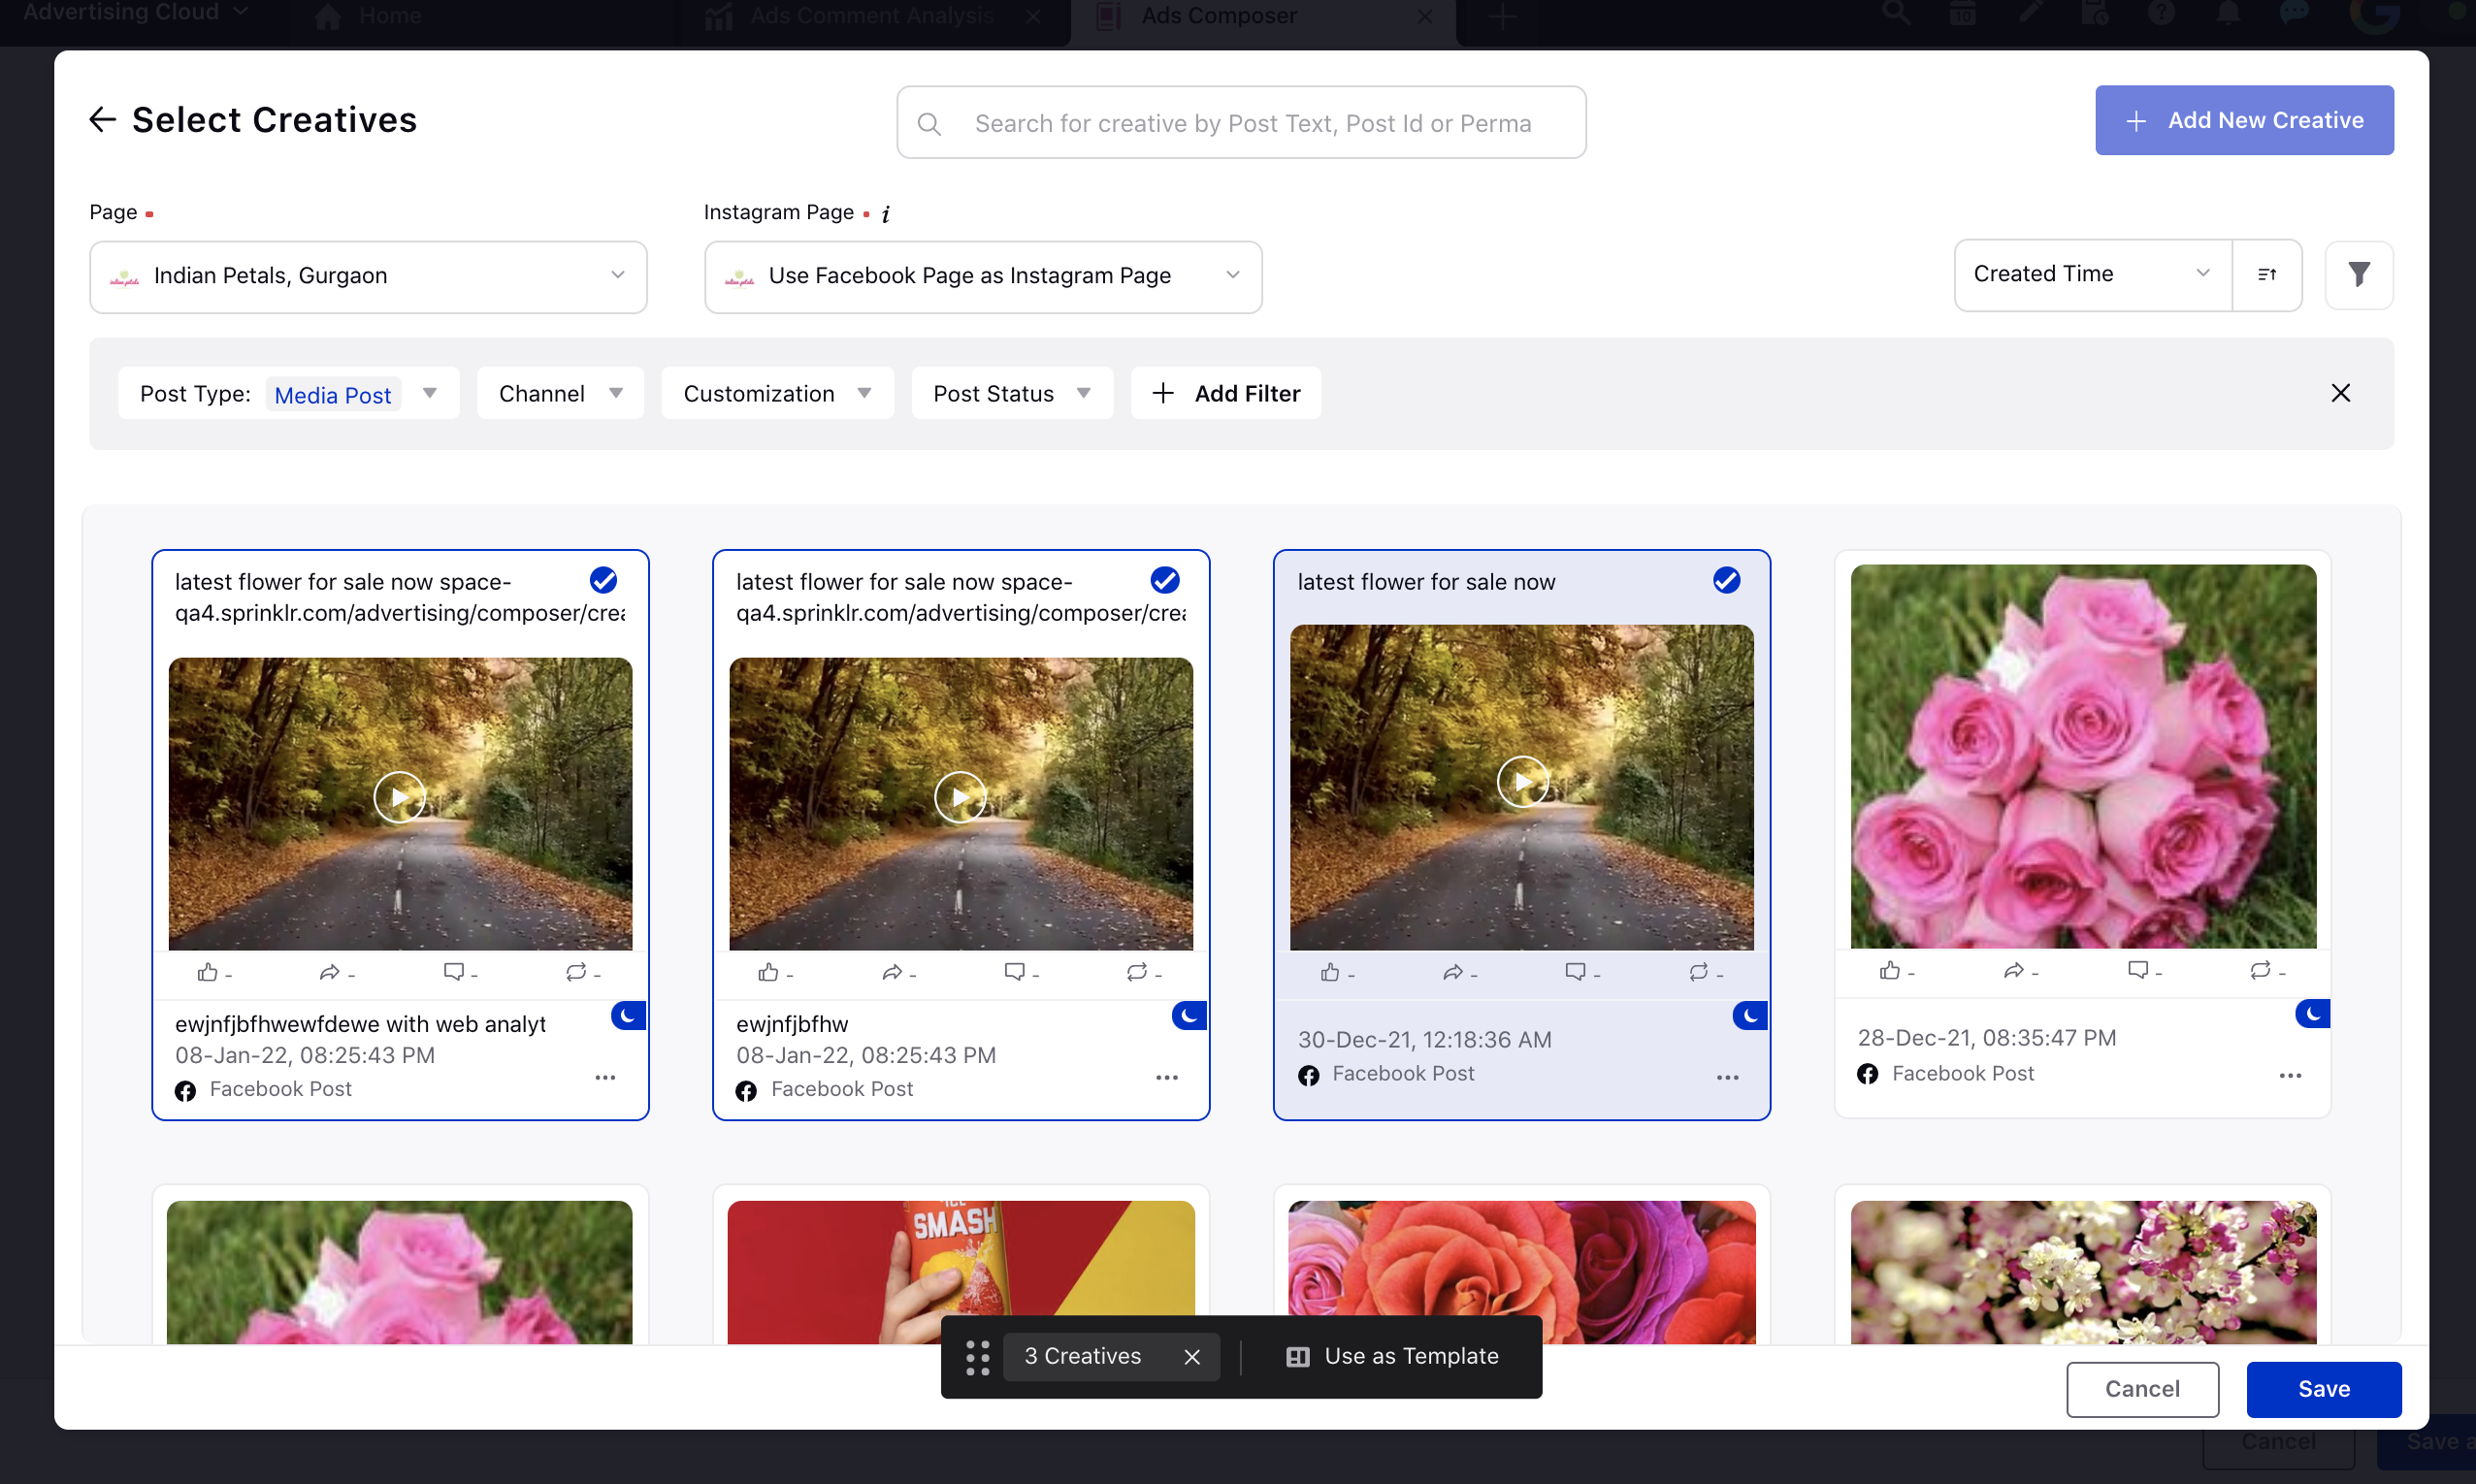
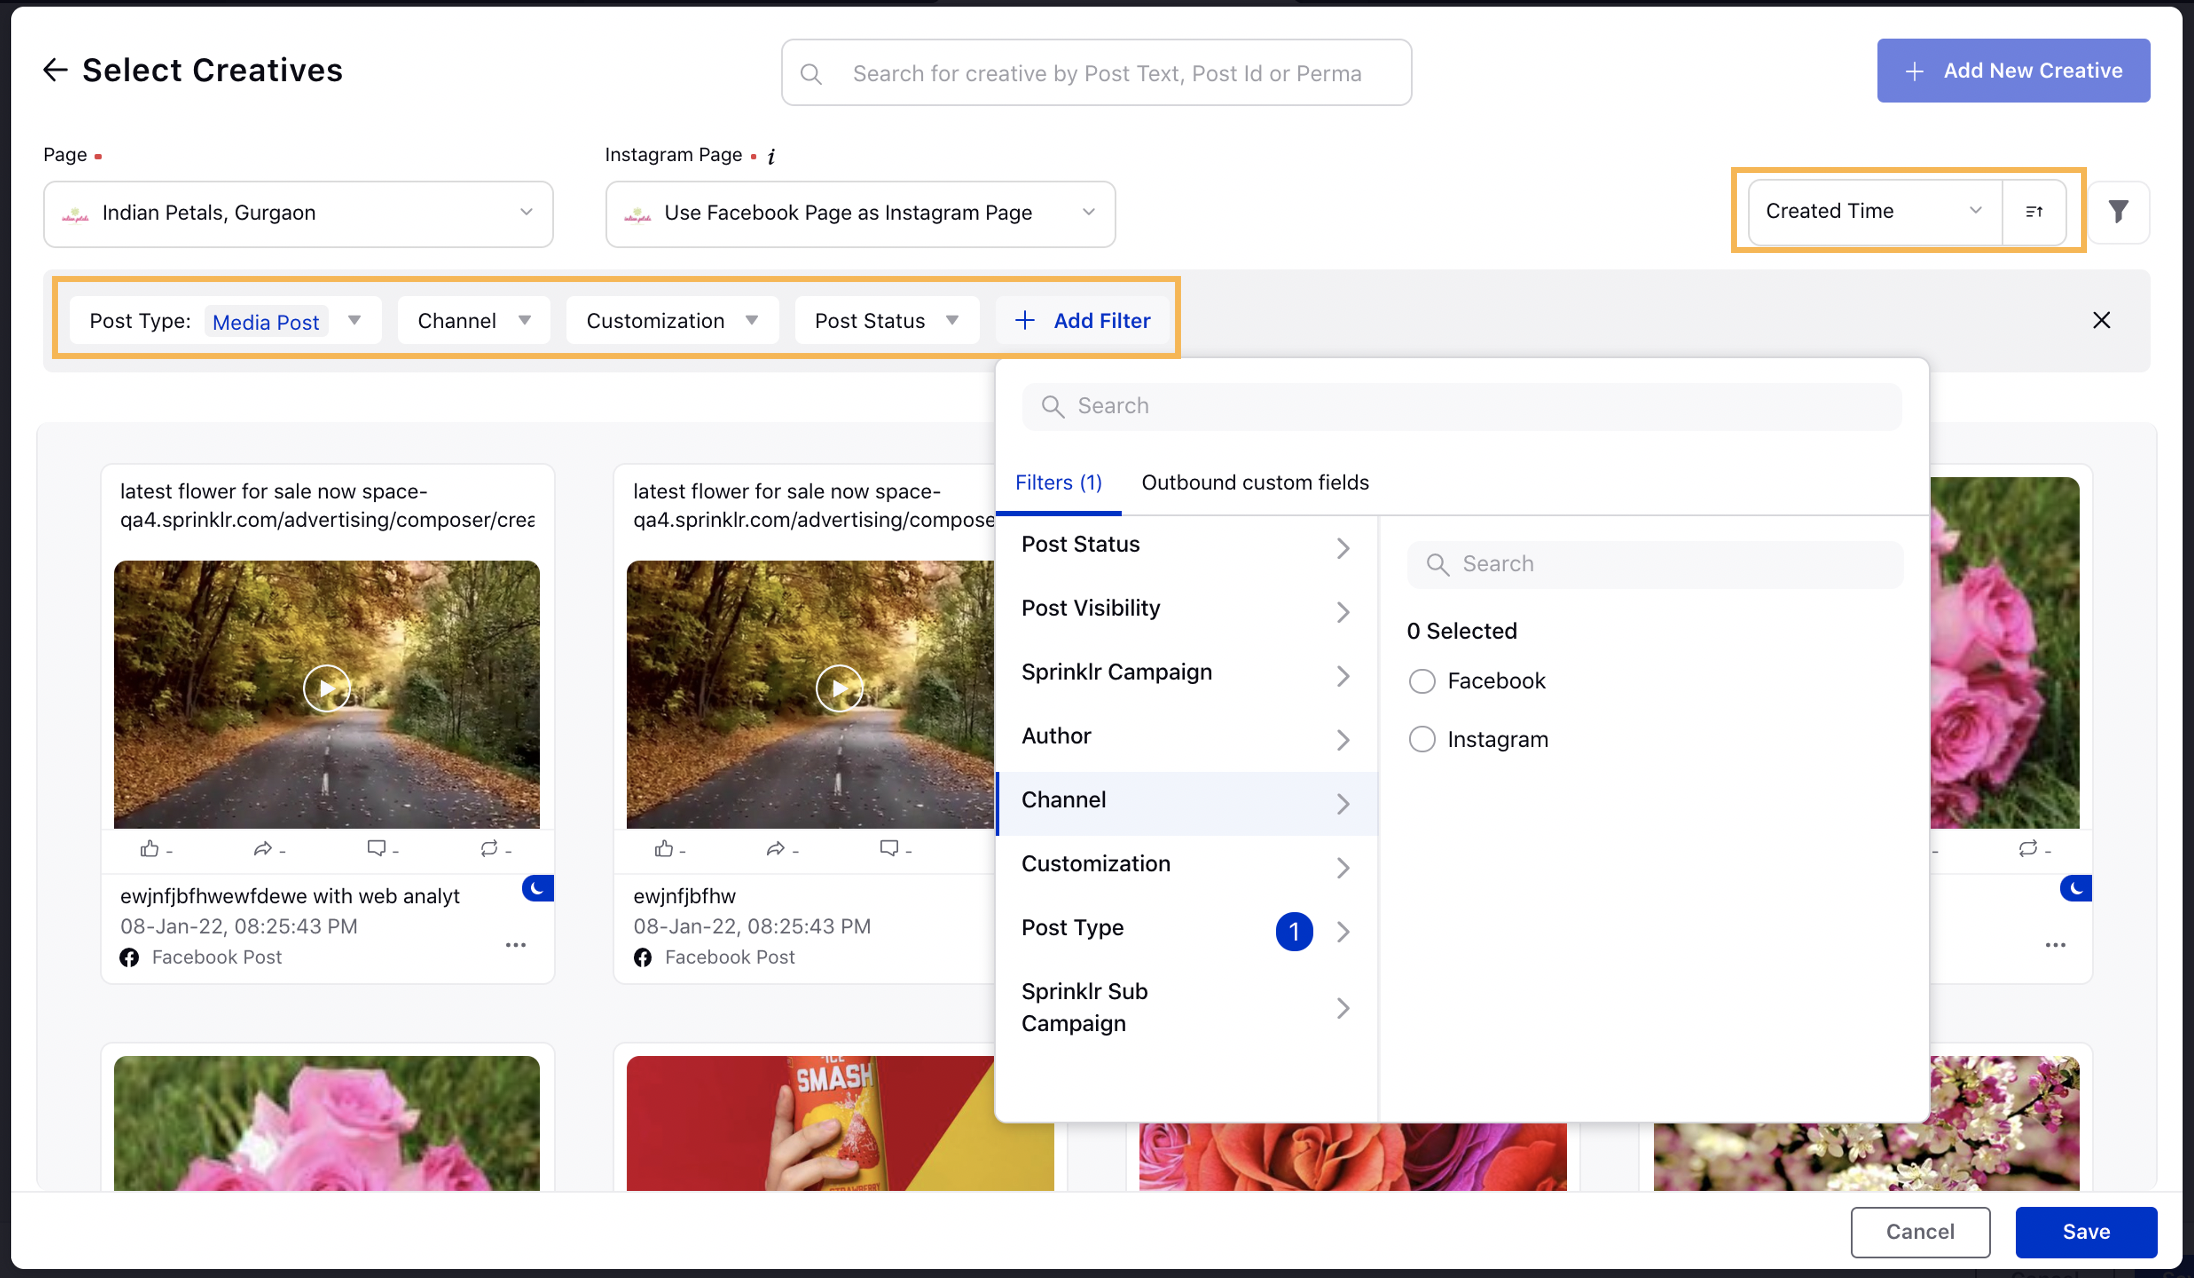
Apply Filters:
Click the Filter icon in the top-right corner to collapse/expand the filter bar.
Add filters to search for an existing creative asset by clicking Add Filter, or use the up-front filters (Post Type, Customization, Post Status, Channel).
Sort creatives by Published Time, Modified Time, Engagement Rate, Likes, Comment, Shares, and Reach metrics/dimensions in the far right.
Filter the assets by Page from the Page drop-down menu above the search bar.
Note | The Sprinklr Campaign and Sub-Campaign filters will be auto-applied for creatives if a Sprinklr Campaign and/or Sub-Campaign is selected at the Paid Initiative level. |
Select from existing Creatives
1. While creating a new creative, select the Post Type.
Tip | While adding a video for Facebook, Twitter, and Pinterest, you can manually select the desired Thumbnail for your video. |
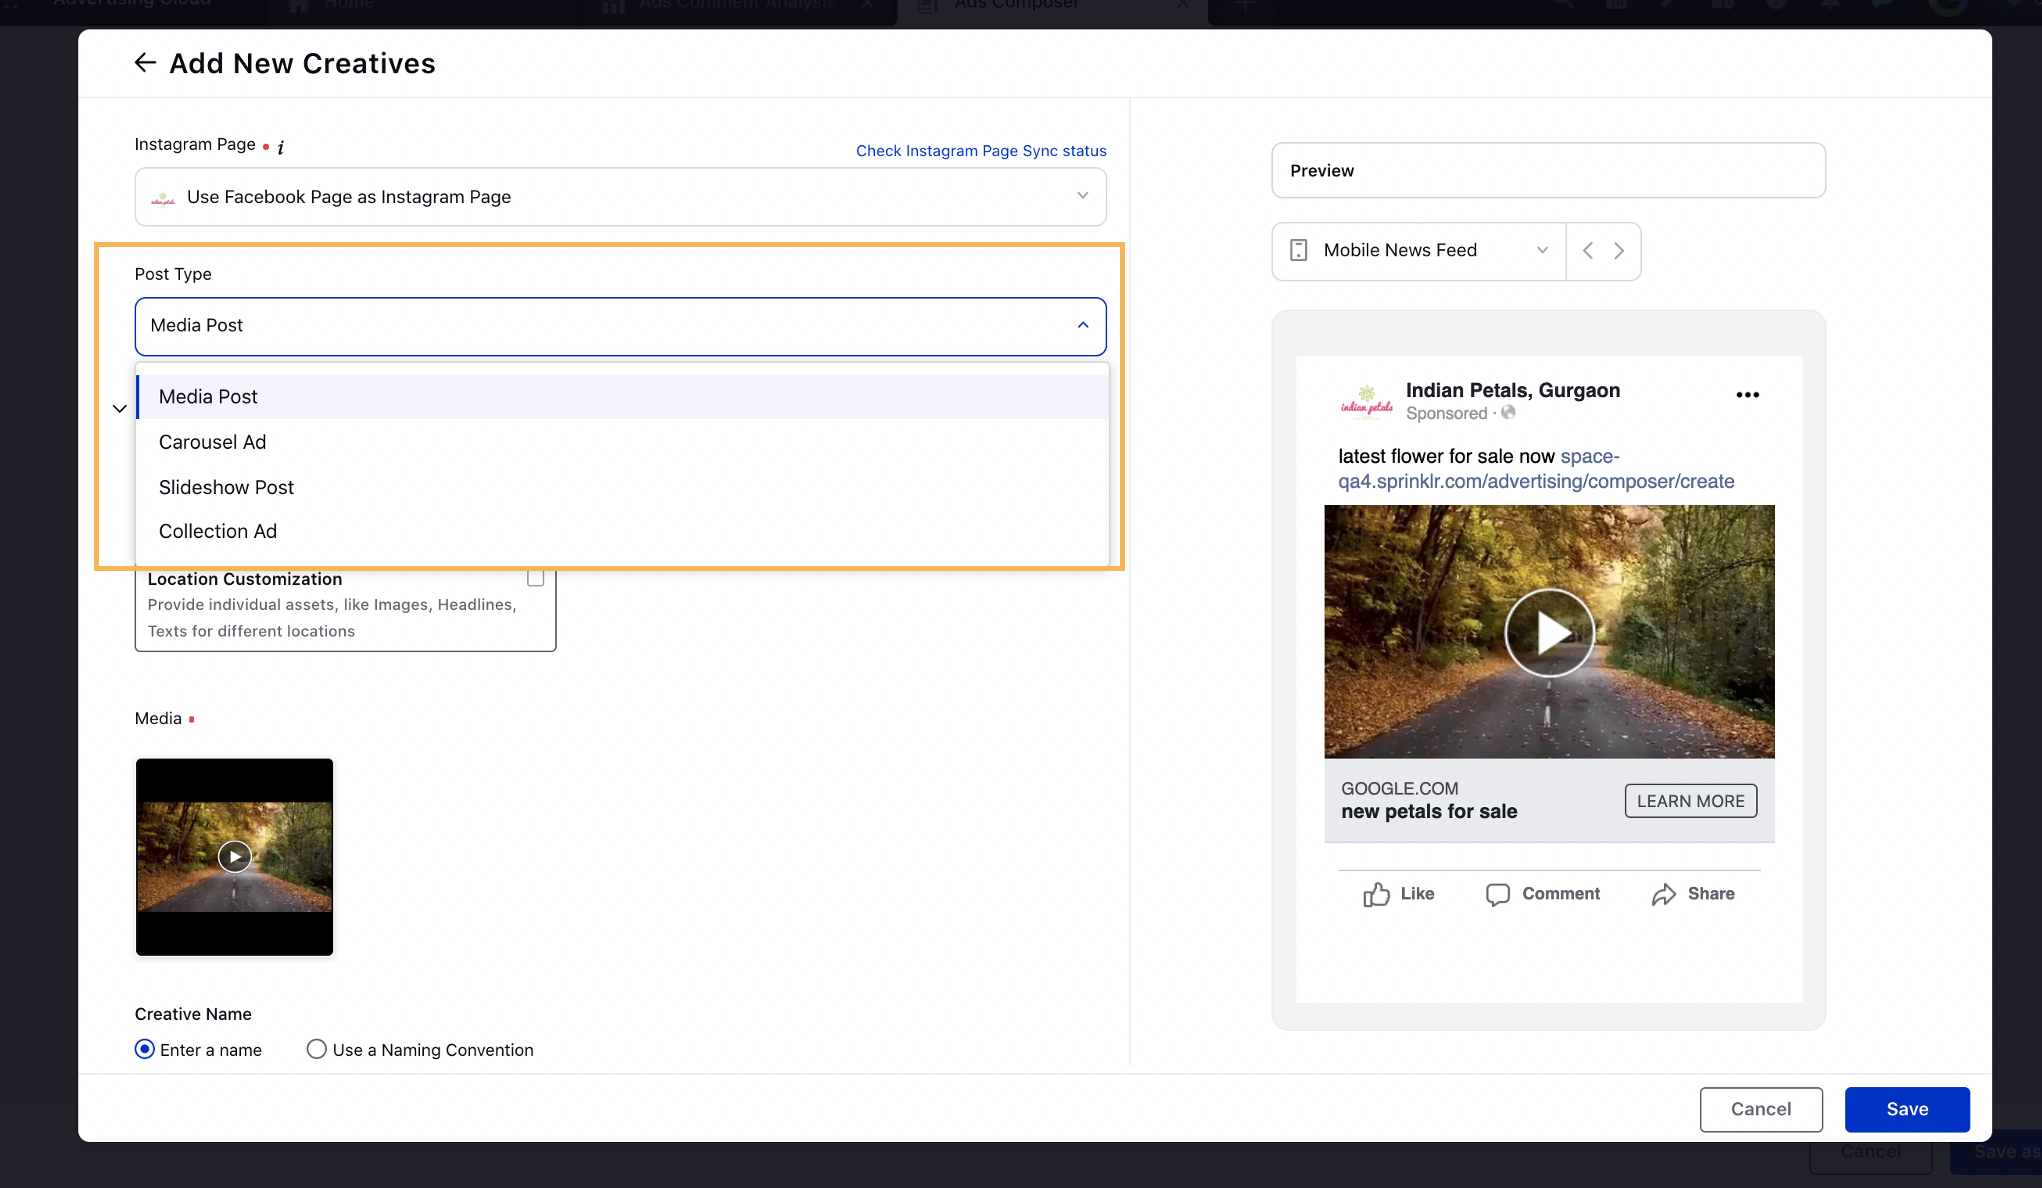
2. Enter the Creative details.
You can insert Text Template(s) to reuse content and maintain consistency within fields requiring texts (Text, Link Description, etc.) by clicking the Insert Text Template icon alongside the desired text box. On the Media Uploader pop-up window, select the text template(s) and click Add in the bottom-right corner to add to your post.
You can navigate between different preview options by placements in the Channel Preview pane to the right.
3. Once you have completed, click Save in the bottom-right corner.
4. In the Creative Review screen, you can make additional changes by selecting Add another creative. You can also remove the applied Creatives by hovering over the Options icon alongside any Creative and selecting Remove.
If you want to associate several creatives for different target audience types to create a targeted Ad Set, you can configure it individually. For more information, see Search and Associate Creatives with each Ad Set Individually.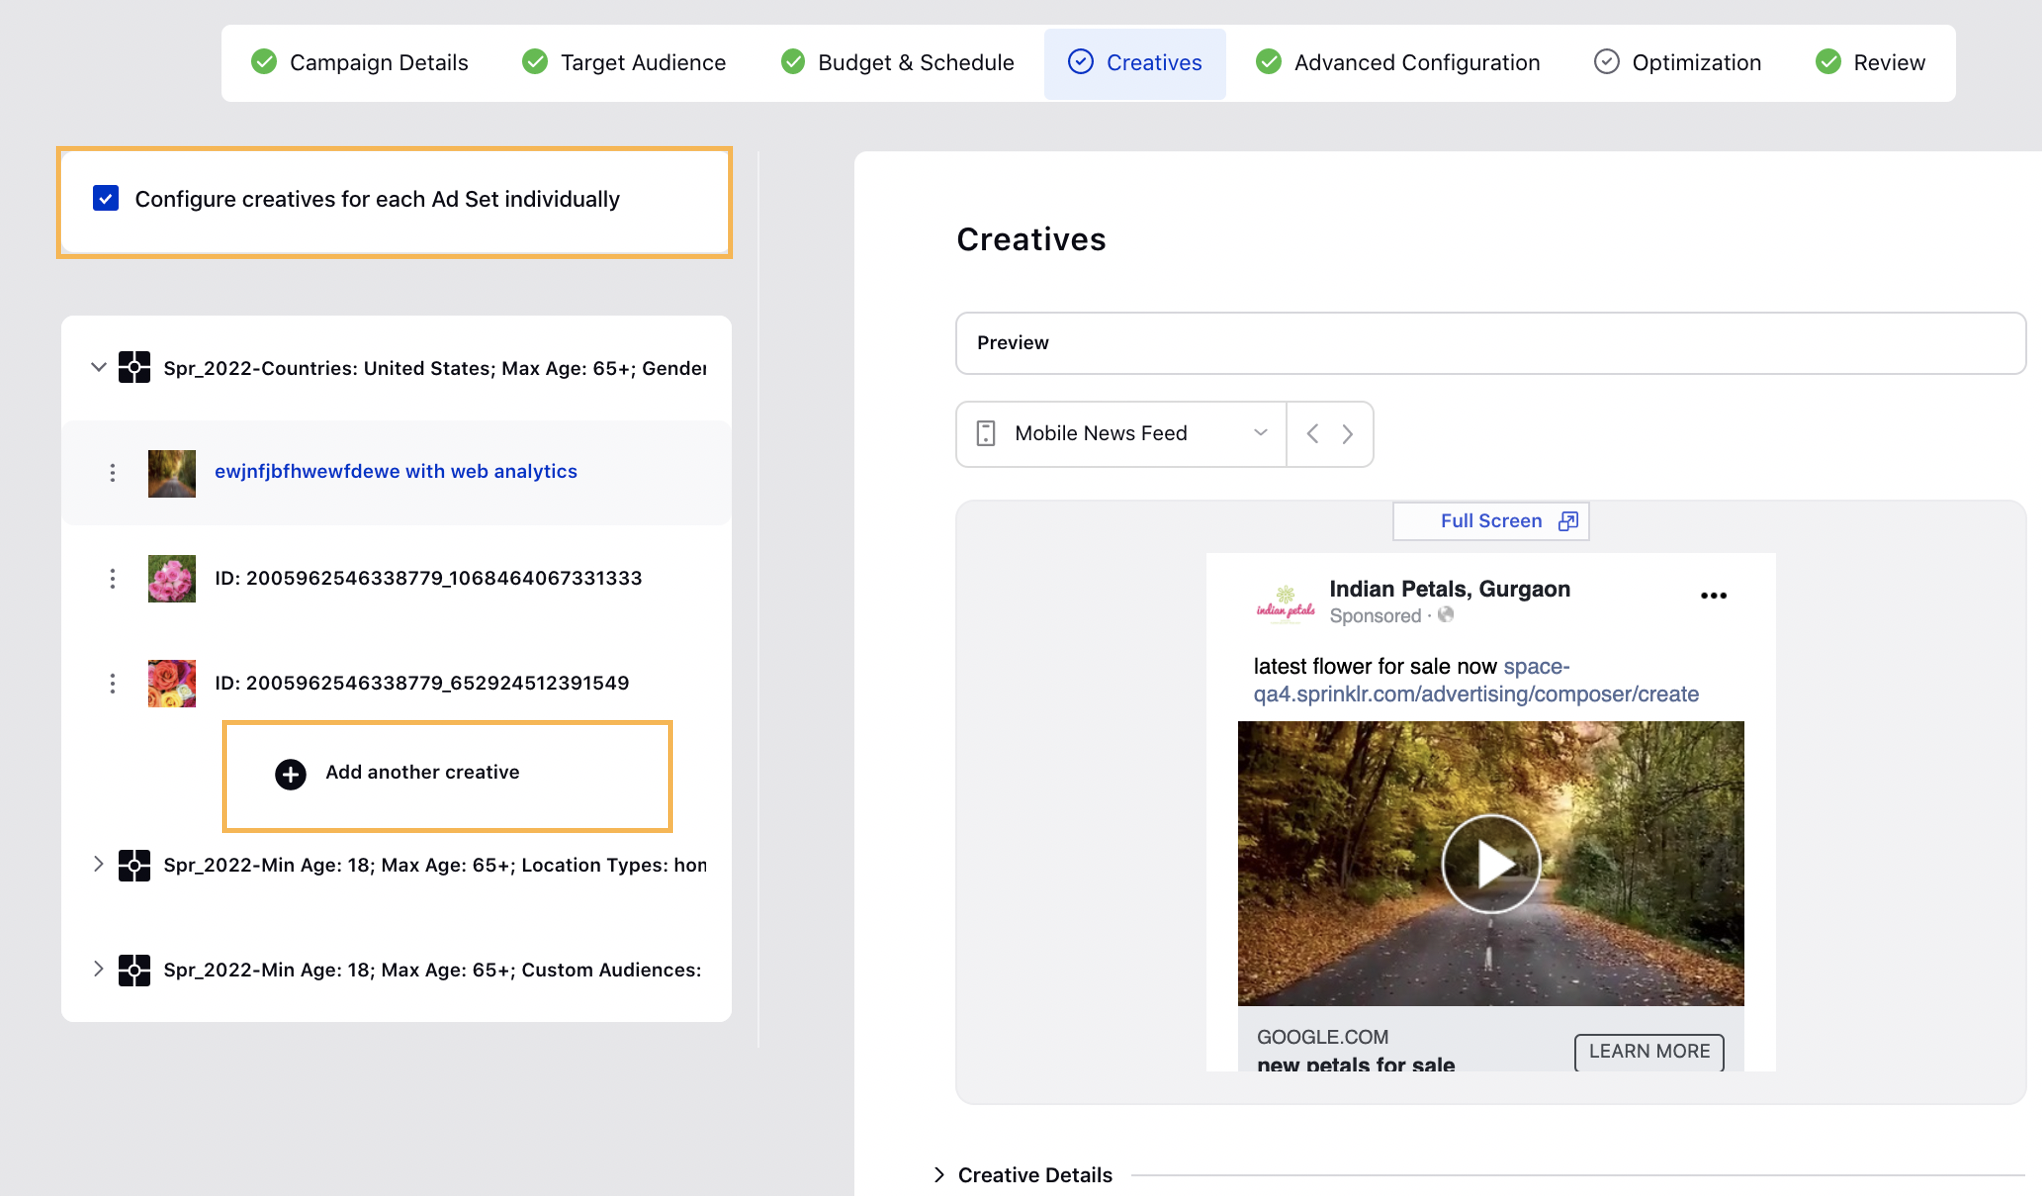
5. Click Next to finalize the creative selections.
Advanced Configuration
In the Advanced Configuration section, you can select options that are not mandatory, including applying Custom Properties.
You can apply changes at the following levels:
Campaign Level: Campaign Name, Campaign Tags, Tags, Paid Initiative Custom Properties, Benchmark, Configure Third-Party Tracking, Pacing Group.
Ad Set Level: Ad Set Name, Budgeting, Duration, Ad Set Custom Properties.
Ad Variant Level: Ad Variant Name, Creative Publishing, Ad Variant Custom Properties.
Tip |
|
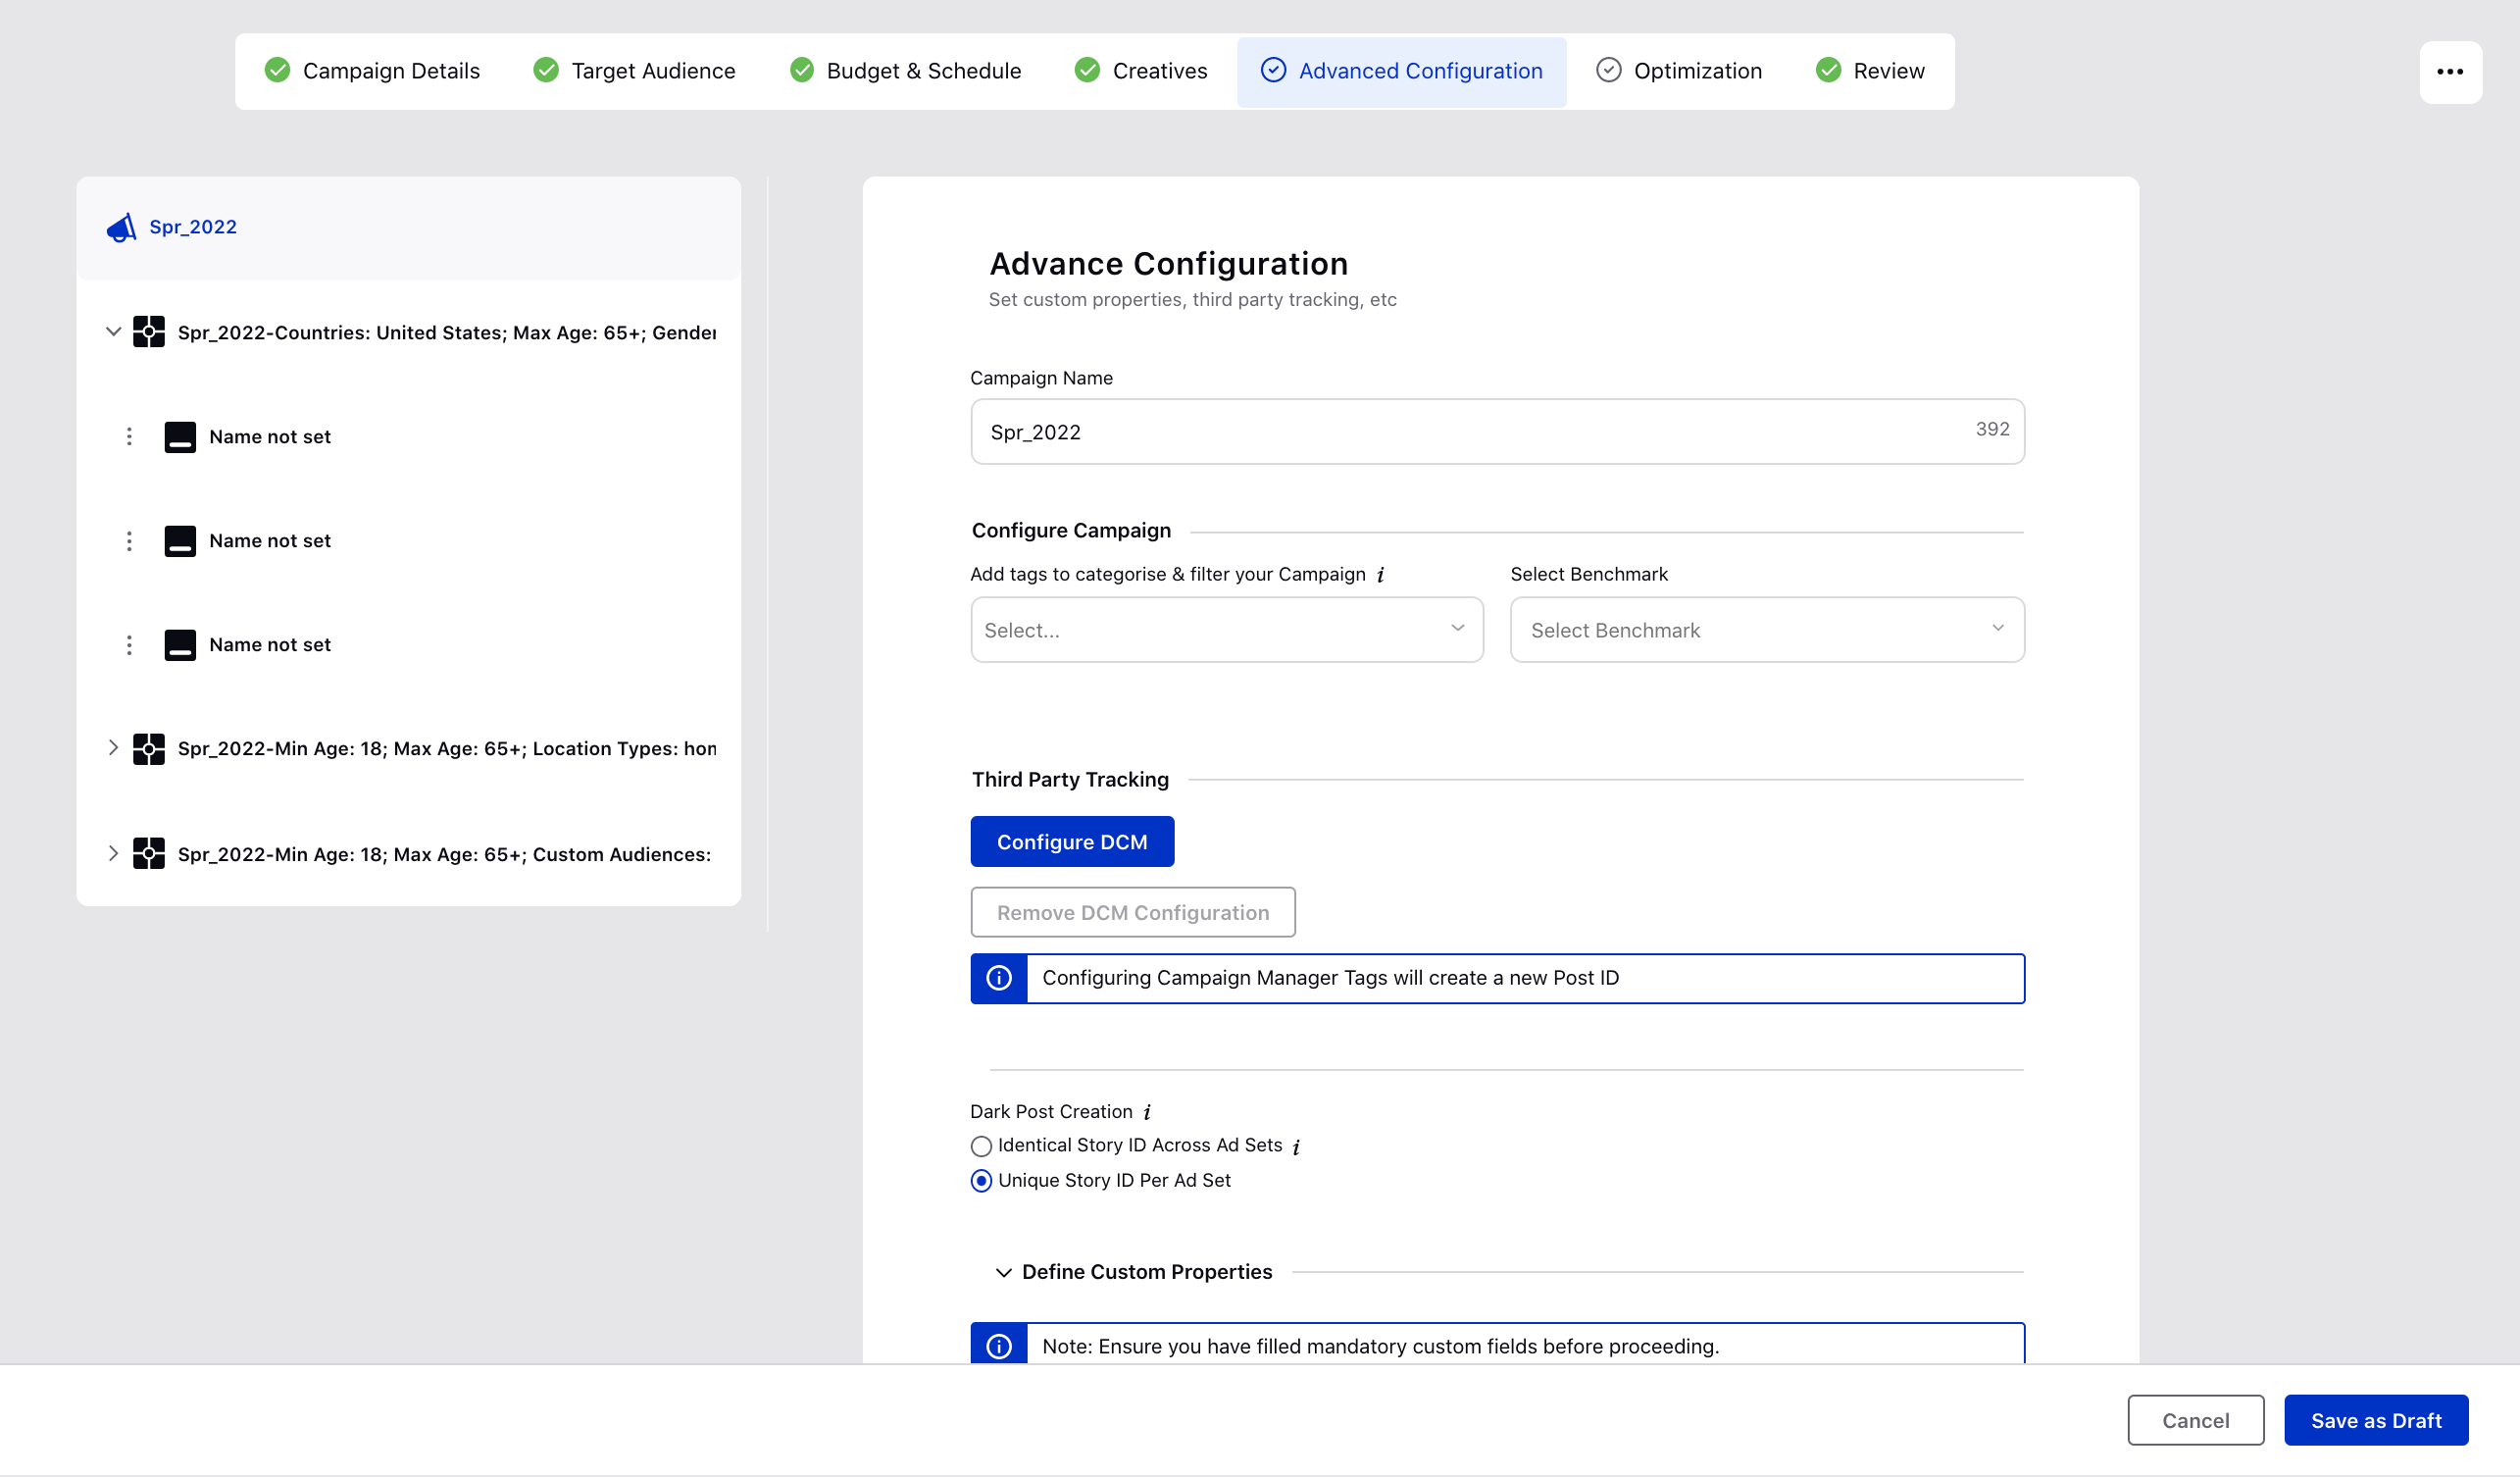
Click Configure DCM under Third Party racking section to configure Double Click Management (DCM). On the DCM Configuration window, fill in the details and click Save. For more information, see Add and Configure a DCM/DFA Account.
After you have set the Advanced Configuration, click Next to proceed to the Optimization section.
Tip | At the Ad Variant level, if you select Do Not Publish this Ad, the ad will not get published for that Ad Set. |
Apply Optimization
Automate the management of budget distribution, bidding, targeting, and creatives rotation to achieve your optimization objective with a minimum cost per action using Strategy Groups. Learn more about Strategy Groups.
1. On the Optimizations window, select one or more Strategy Group optimization(s) you want to apply to your campaign from the Strategy Group drop-down menu. Your selected Strategy Group(s) details will be displayed below.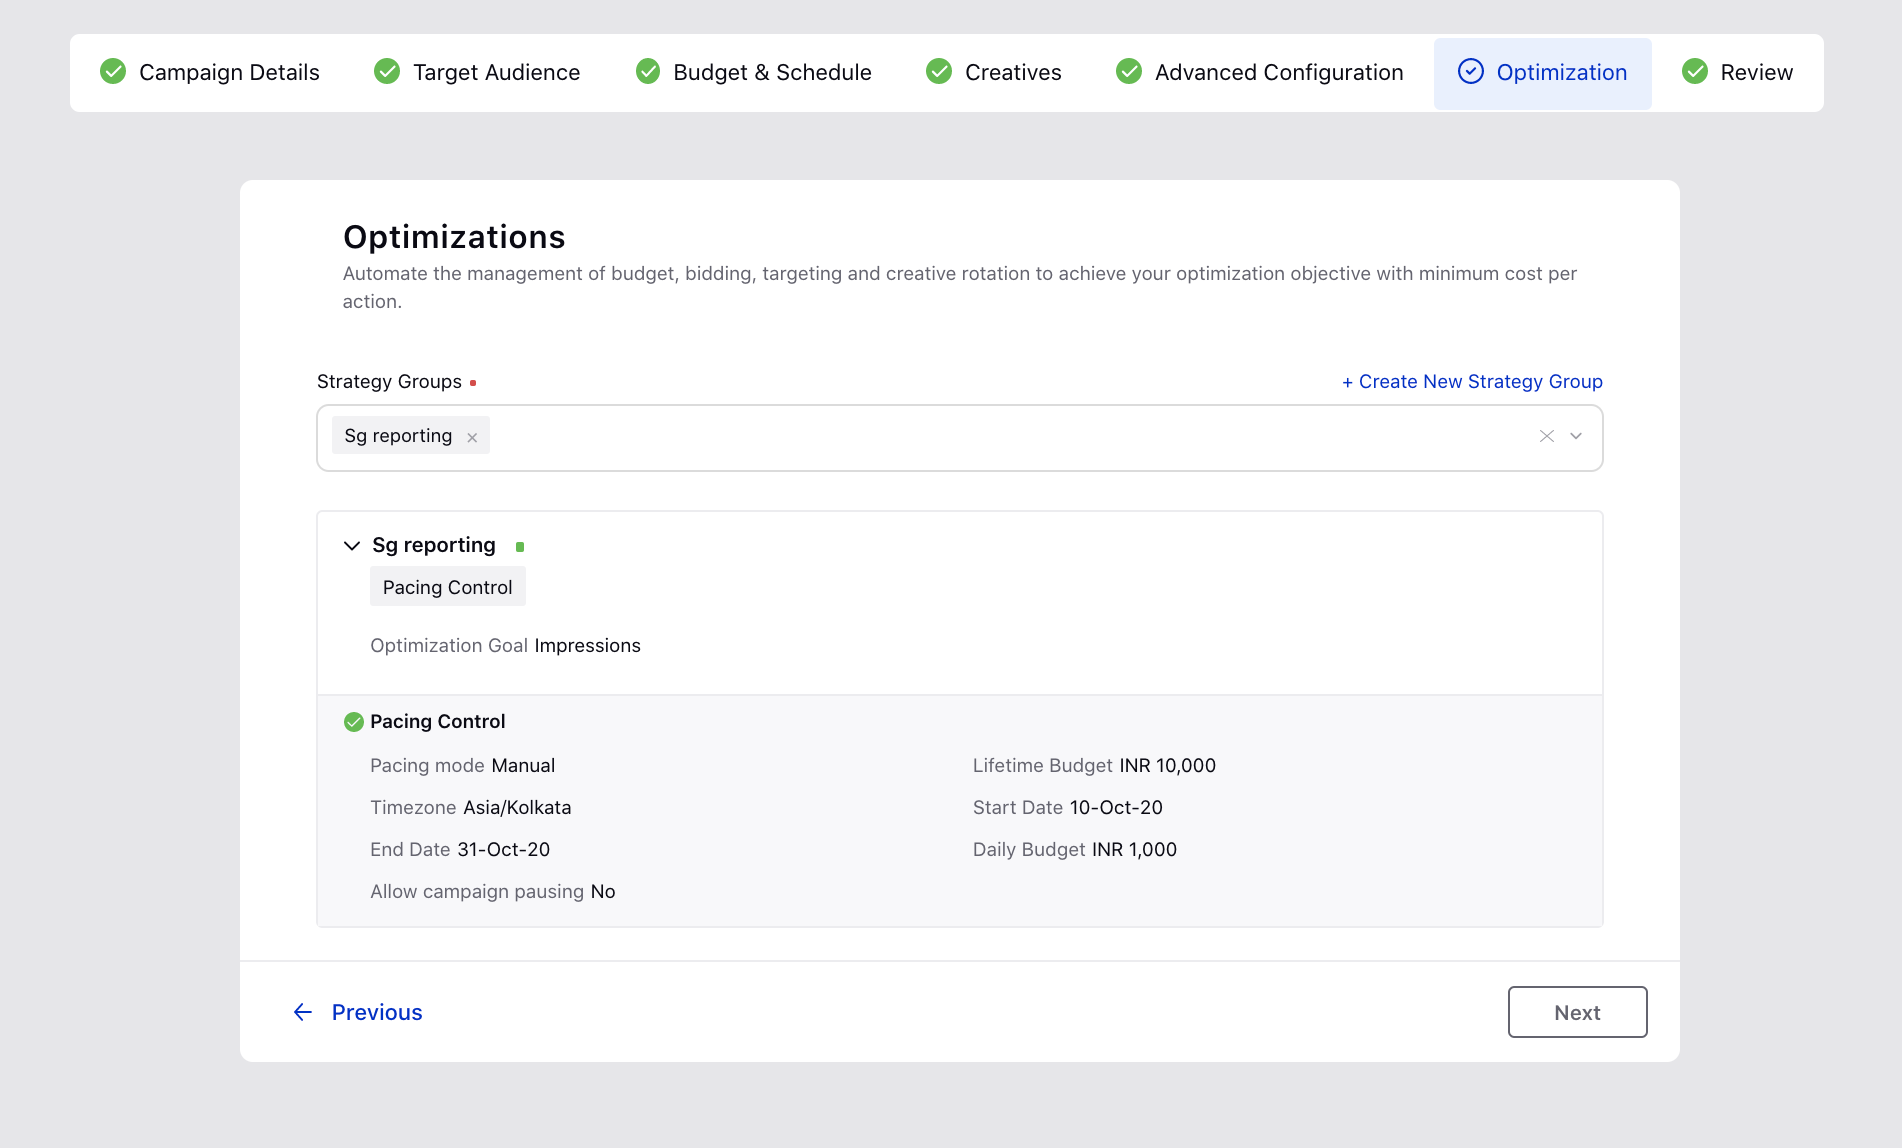 2. If you want to create your Strategy Group from scratch and then apply it to your campaign, click Create New below the drop-down menu or Create New Strategy Group in the top-right corner of the drop-down (when a Strategy Group is selected). This will open up the Strategy Group creation pane alongside and you will not need to leave Ads Composer.
To learn more about creating a Strategy Group, see Create a Strategy Group.
3. Click Next to proceed to the Review section for scheduling and publishing your campaign.
Schedule and Publish
The Review window shows a holistic view of the campaign with information on the Account, Objective, Targeting, Budget, Creatives, and Optimization available on a single window.
In case of any errors, you will be prompted with error messages along with the option to Fix it. Clicking Fix it would directly open up the area where the issue exists and highlight the field so that it can be easily fixed. For instance, if you do not set the Reach and Frequency, you will receive an error and by clicking Fix it, you will be redirected to the Ad Set section of the Budget & Schedule screen with Set Reach & Frequency option highlighted.
1. Once you are ready to publish the campaign, click Publish. You will have the ability to Publish, Publish As Paused, and Send for Approval. If you are not ready to publish, you can also save the campaign as a draft by selecting Save as Draft.
Tip | If you select Publish As Paused, the campaign will get published but will not be in the active state on native. You can change the state later from the Ads Manager. |

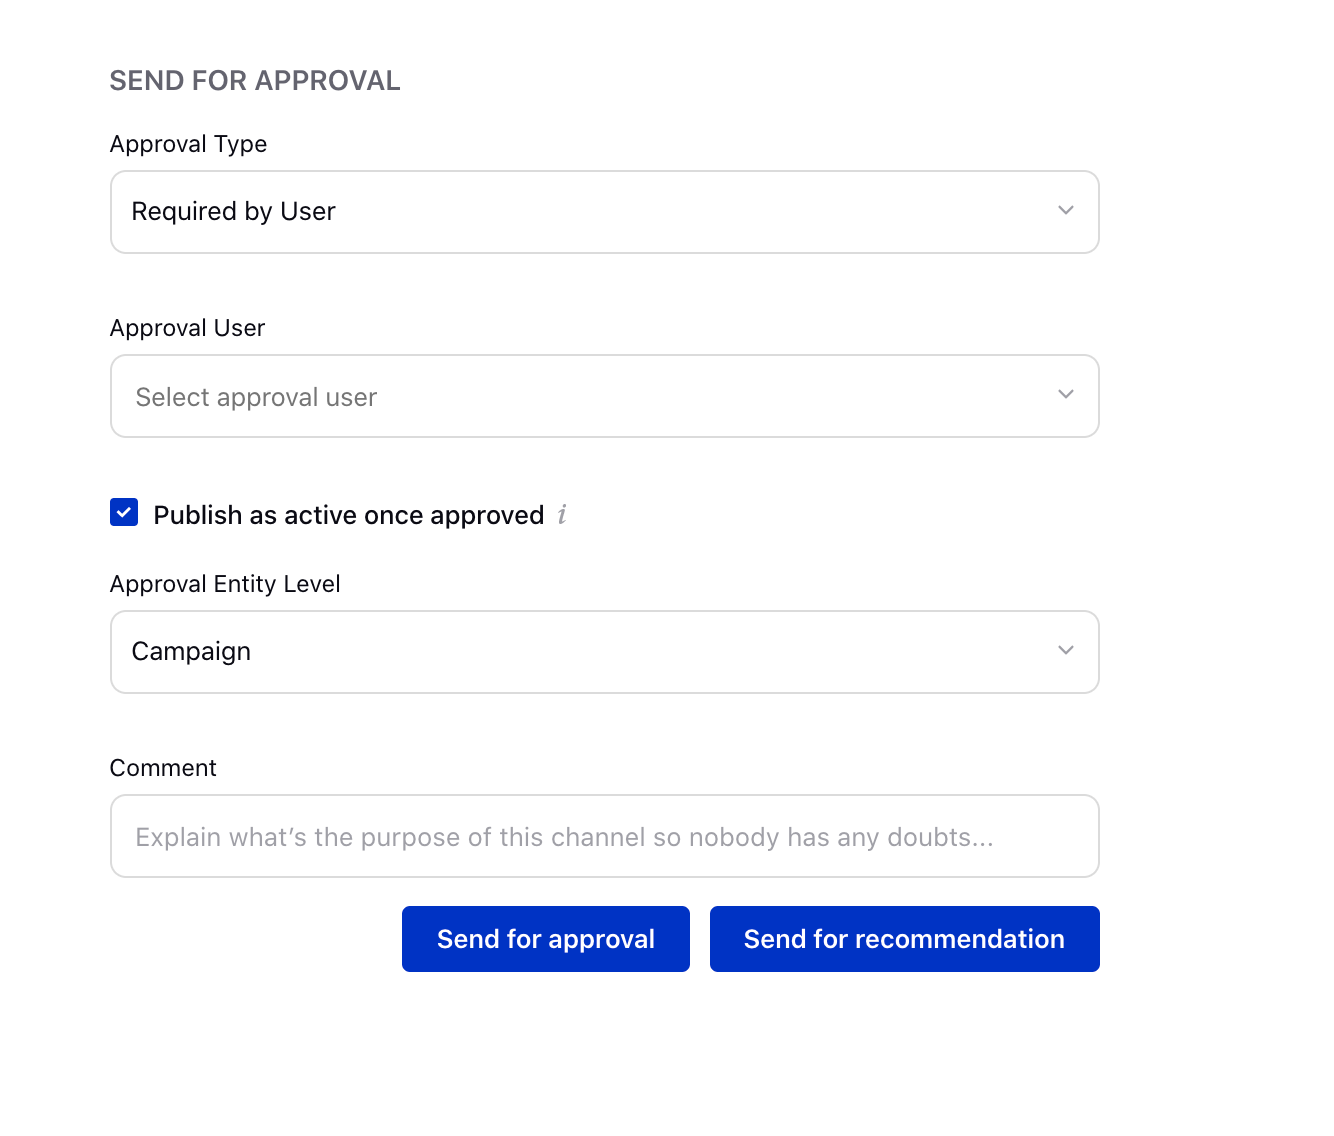
2. If you select Send for Approval, you will be able to select the approval path or approver. Add any internal comments as needed and click Send for Approval. Once the approver approves it, the campaign gets published. See Set Approval Paths for Ads for more information.
Tip | To access the add-on features of Sprinklr Ads Composer for specific requirements such as Restriction on Publishing Organic Posts, Dark Post Unique Story Id Option, and selecting Approved Drafts Only, you require certain roles and permissions within your environment. For more information, see Ads Composer Role Permissions. |
FAQs
What are the prerequisites for using Ads Composer?
Adding an Ad Account and having the pages linked to the ad account is mandatory for using Ads Composer.
Is Sprinklr Composer flow the same for all channels?
Yes, as Sprinklr aims to simplify the process of creating large campaigns, the flow is the same for any channel campaign.
What are the advantages of composing Ads on Sprinklr than on native?
Easy third-party tracking (DCM, GA, etc.), same flow for all channels, Sprinklr value-added features (Ad rotation, Pacing Group, Budget Source, custom fields, Benchmark, SBA).