How to Gather Language from Customer
Updated
Pre-requisite for configuring this node in IVR: Sprinklr Voice should be enabled for the environment and your user should have IVR View, Edit or Create permission

The "Gather customer language" node enables callers to select their preferred language. This node determines the language that will be used for playing prompts in subsequent menus.
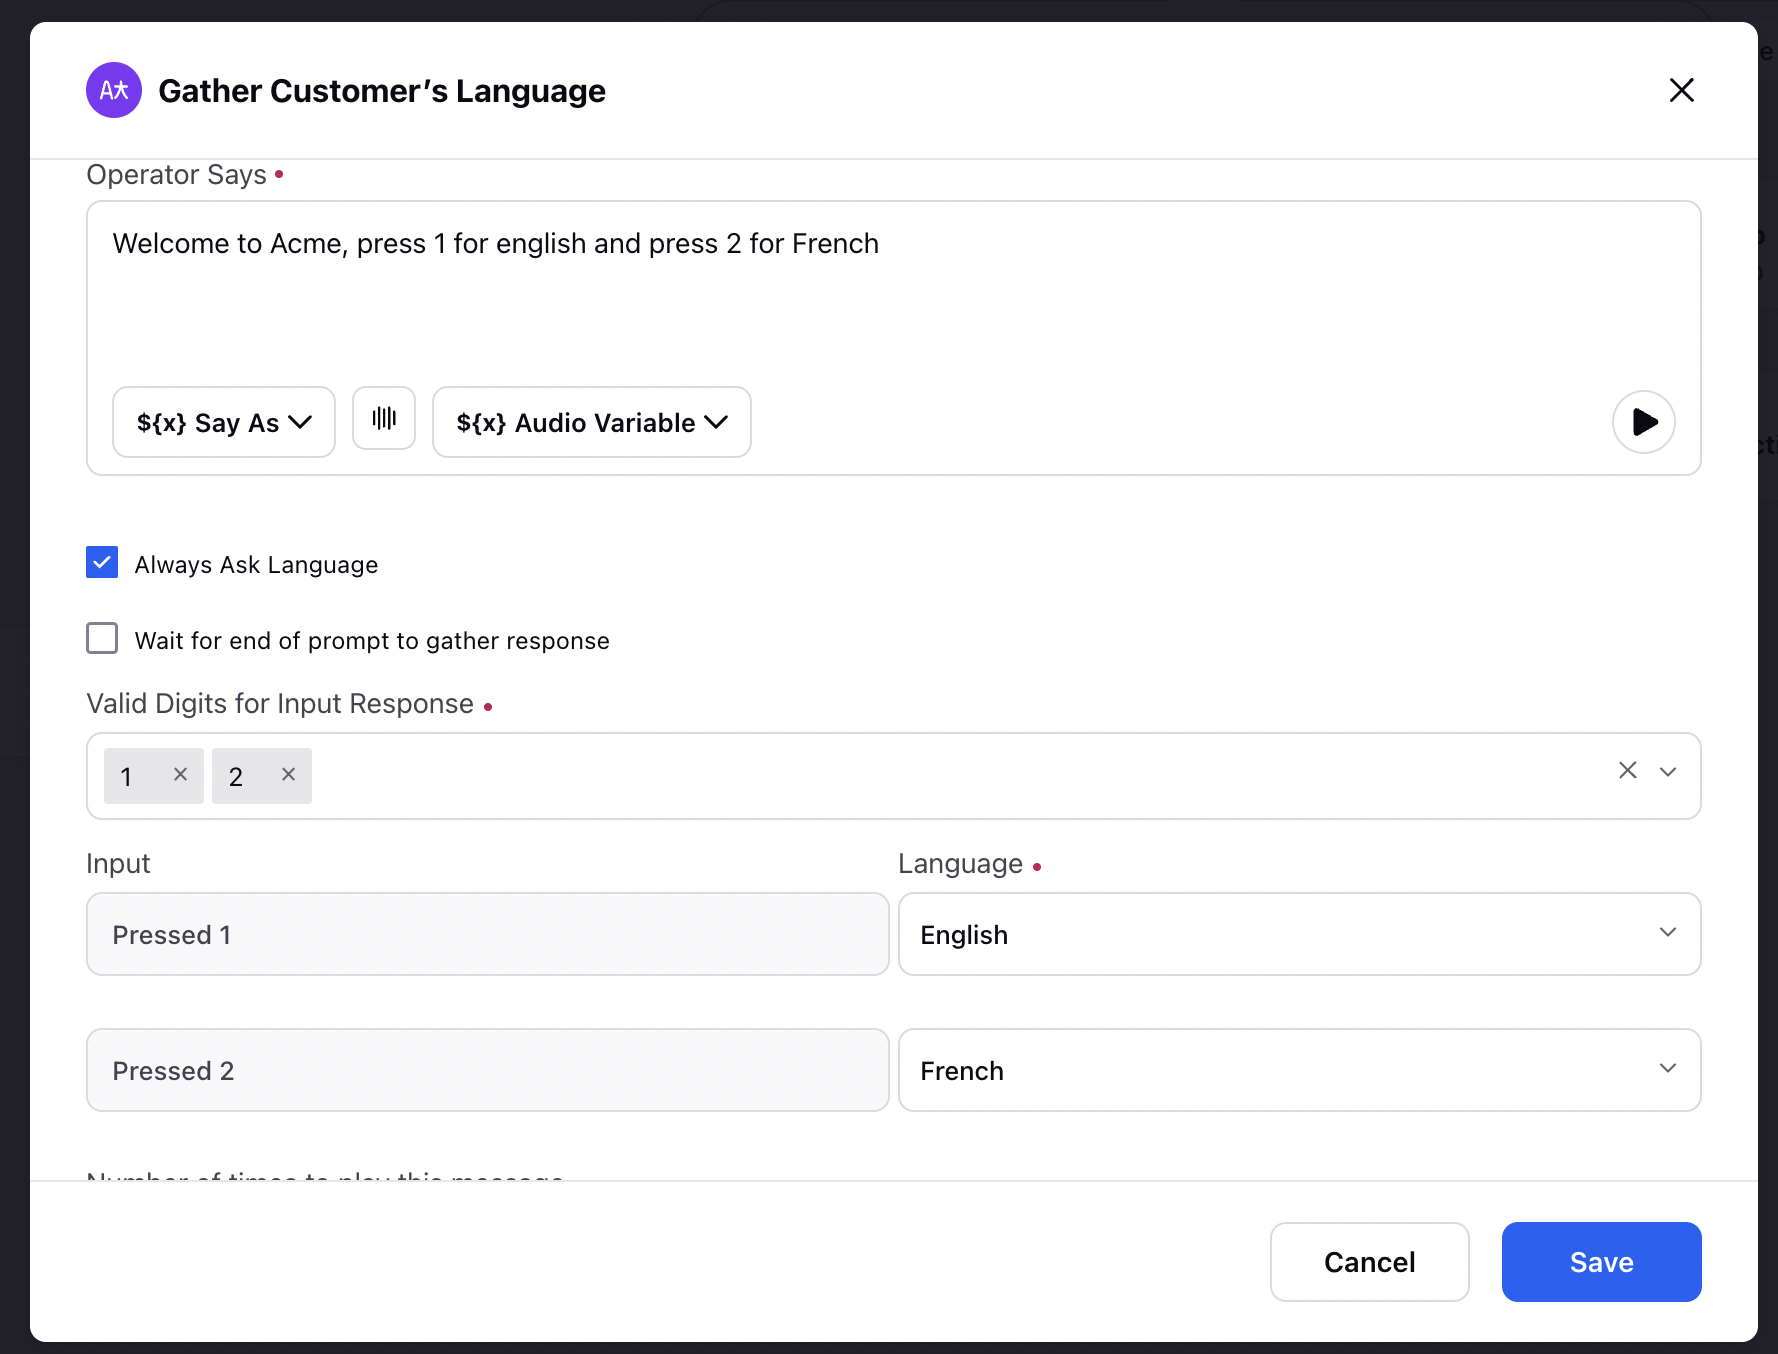
Here is a screenshot displaying the configuration of this node-

Components
The gather customer language node major components are:
Operator Says: This the message which will be played to the user while asking for the langauge. Here you can put text which will be voiced out using text to speech and you can also upload the redorded prompt. In the above example "Welcome to Acme, Press 1 for English and Press 2 for French" will be voiced out while asking for langauge.
Always ask language checkbox:
If this checkbox is checked, users will be prompted to select their preferred language every time they call through the IVR, regardless of their previous language selection.
If the checkbox is disabled, users will only be asked to choose their language during their first call, and subsequent calls will skip this language selection step based on their previous choice. This is used to remember the preffered language of the caller.
Wait till the end checkbox: If this checkbox is enabled, the IVR will only accept user input after the prompt has finished playing. Any key presses made before the prompt completion will be disregarded.
Valid digits input: This picklist allows you to define the acceptable input digits for the IVR to continue. For example, if the prompt instructs the user to "Press 1 for English or Press 2 for French," the valid digits would include 1 and 2, while any other input would be considered invalid.
If user enters any invalid entry, the invalid message defined on IVR or defined on this node will be played
Set Language: Here you can establish a mapping between input digits and languages. you need to assign a language to each valid input by selecting the corresponding language. You need to assign one language to each key press.
Note: The list of languages available for selection in the "Set Language" mapping will be based on the languages you have chosen during the IVR creation process.
Max Retries: In this field, you specify the number of times the prompt should be repeated if the user provides an invalid input or does not provide any input at all. For example, if you set it to 2, the language selection message will be played a total of 3 times (initial prompt + 2 retries) if the user enters an invalid input or remains silent.
Note: If the number of retries exceeds the defined limit, the default path will be executed if it is enabled. However, if the default path is not enabled, the call will be disconnected.
Add default path: If this is checkboxed, you include a default path in the IVR configuration. If the user exceeds the retry limit, this default path will be executed.
Note: In the default path, you need to set the default language. If you do not select a default language, the first language in the list will be played by default. If the default path is not configured, the call will be disconnected after reaching the defined limit of retries.
Timeout Message Checkbox:
By enabling this, you can define a custom message to be played when the user does not provide any input within the DTMF timeout duration (defined in the voice application settings). Upon checking this box, you can upload recorded prompts or enter your desired message in the "operator says" content box. For instance, you can add a message like "Sorry. I did not capture any input. Please try again."
If the "Timeout Message" checkbox remains unchecked, the timeout message defined at the IVR level (during the IVR creation) will be played instead.
Invalid Input Message Checkbox: Another condition that is possible is that the user gives an invalid input. In this case, we can enter a custom message to be played when user provides invalid input [Works similar to the timeout message].Upon checking this box, you can upload recorded prompts or enter your desired message in the "operator says" content box. For instance, you can add a message like "Sorry. This is an invalid input. Please try again."