Sprinklr Marketplace UX for Salesforce Integration
Updated
In this article, you will learn about the Sprinklr Marketplace UX for Salesforce connectors.
To Manage Permissions for Marketplace
Click the New Tab icon
. Under the Platform Modules, click All Settings within Platform Setup.
In the Platform Settings window, either select Workspace Roles or Global Roles within Manage Workspace and Manage Customer, respectively.
In the Roles (Settings) window, click Create Role in the top right corner to add a role.
In the Create New Role window, fill in the following details:
Enter a Name to identify the role (ex: Marketing Team, Customer Care Team) and an optional Description for the role.
Under the Users and User Groups section, select Assigned Users and Assigned User Groups from the drop-down menu.
.png)
Tip
Permissioning User Groups can be a great way to assign multiple users on your team to a role quickly. When a user gets added (or removed) to a group, that user will automatically have all the permissions assigned to the group.
Under the Role Permissions section, search for the Integrated Application
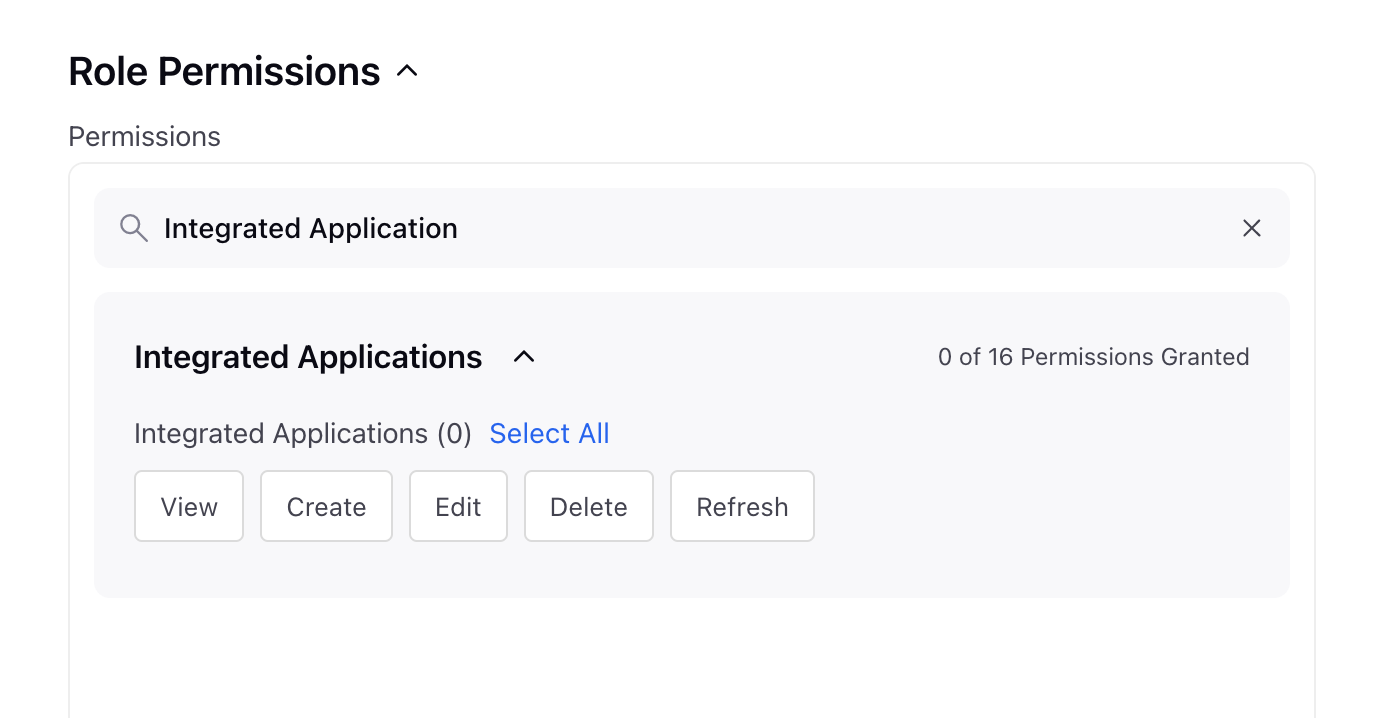
Within the Marketplace permissions, the following permissions are available:
Permissions Available
Description
View
Allows users to access and view the Marketplace.
Create
Allow users to install a app in the Marketplace.
Edit
Allow user to edit the installed app in the Marketplace.
Delete
Allow users to delete the app in the Marketplace.
Refresh
Allow users to refresh the app in the Marketplace.
Click Save in the bottom right corner to define roles and permissions for any user.
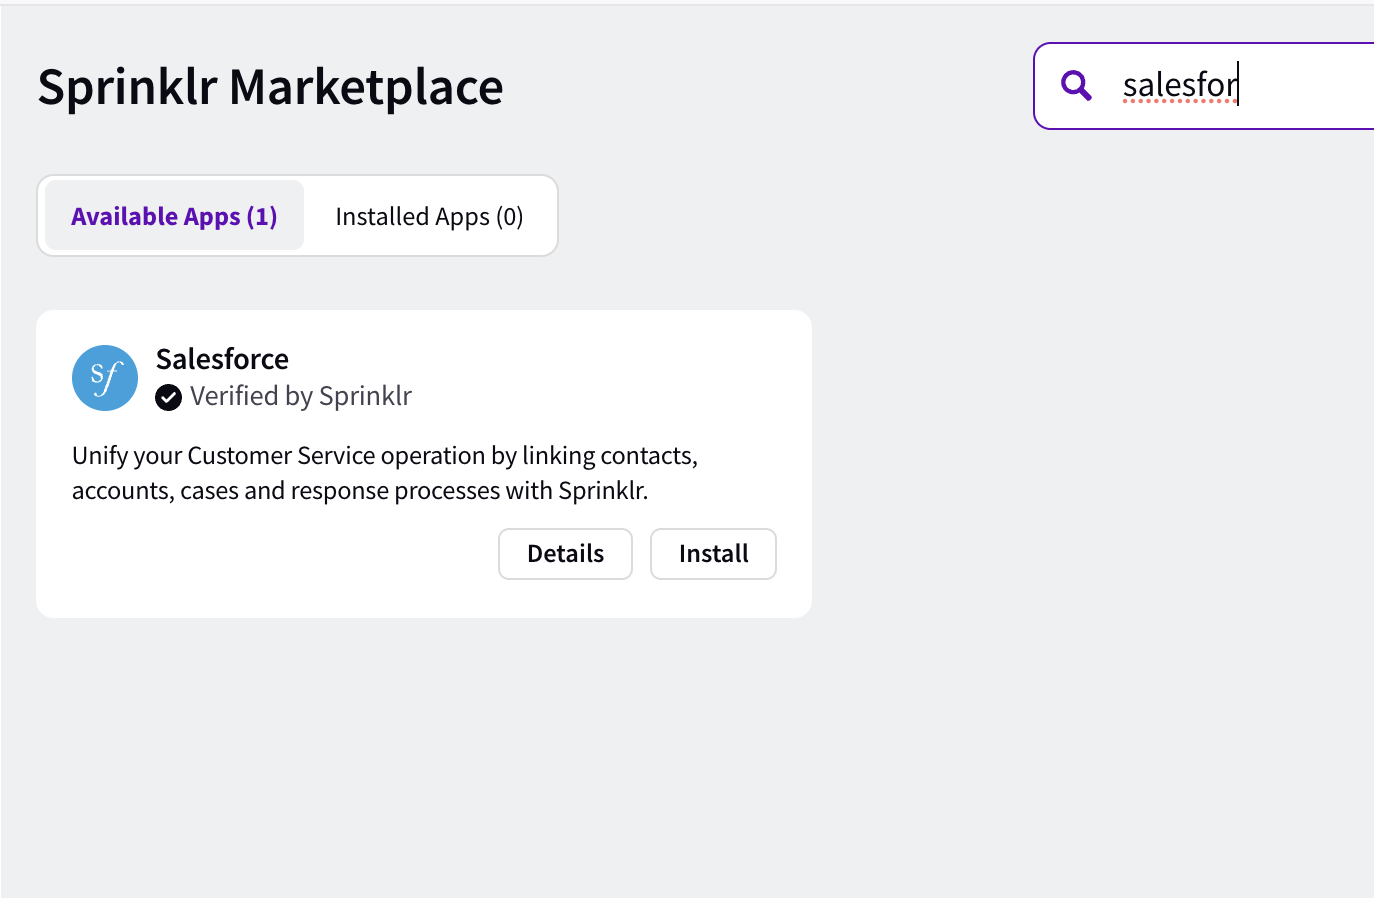
To Configure Salesforce Connector in Marketplace
Click the New Tab icon
. Under the Platform Modules, select All Marketpalce within Integrate.
In the Sprinklr Marketplace window, Search for Salesforce or apply the filter CRM systems and click Install on Salesforce
In the Install Salesforce tab, enter the desired Configuration Name.
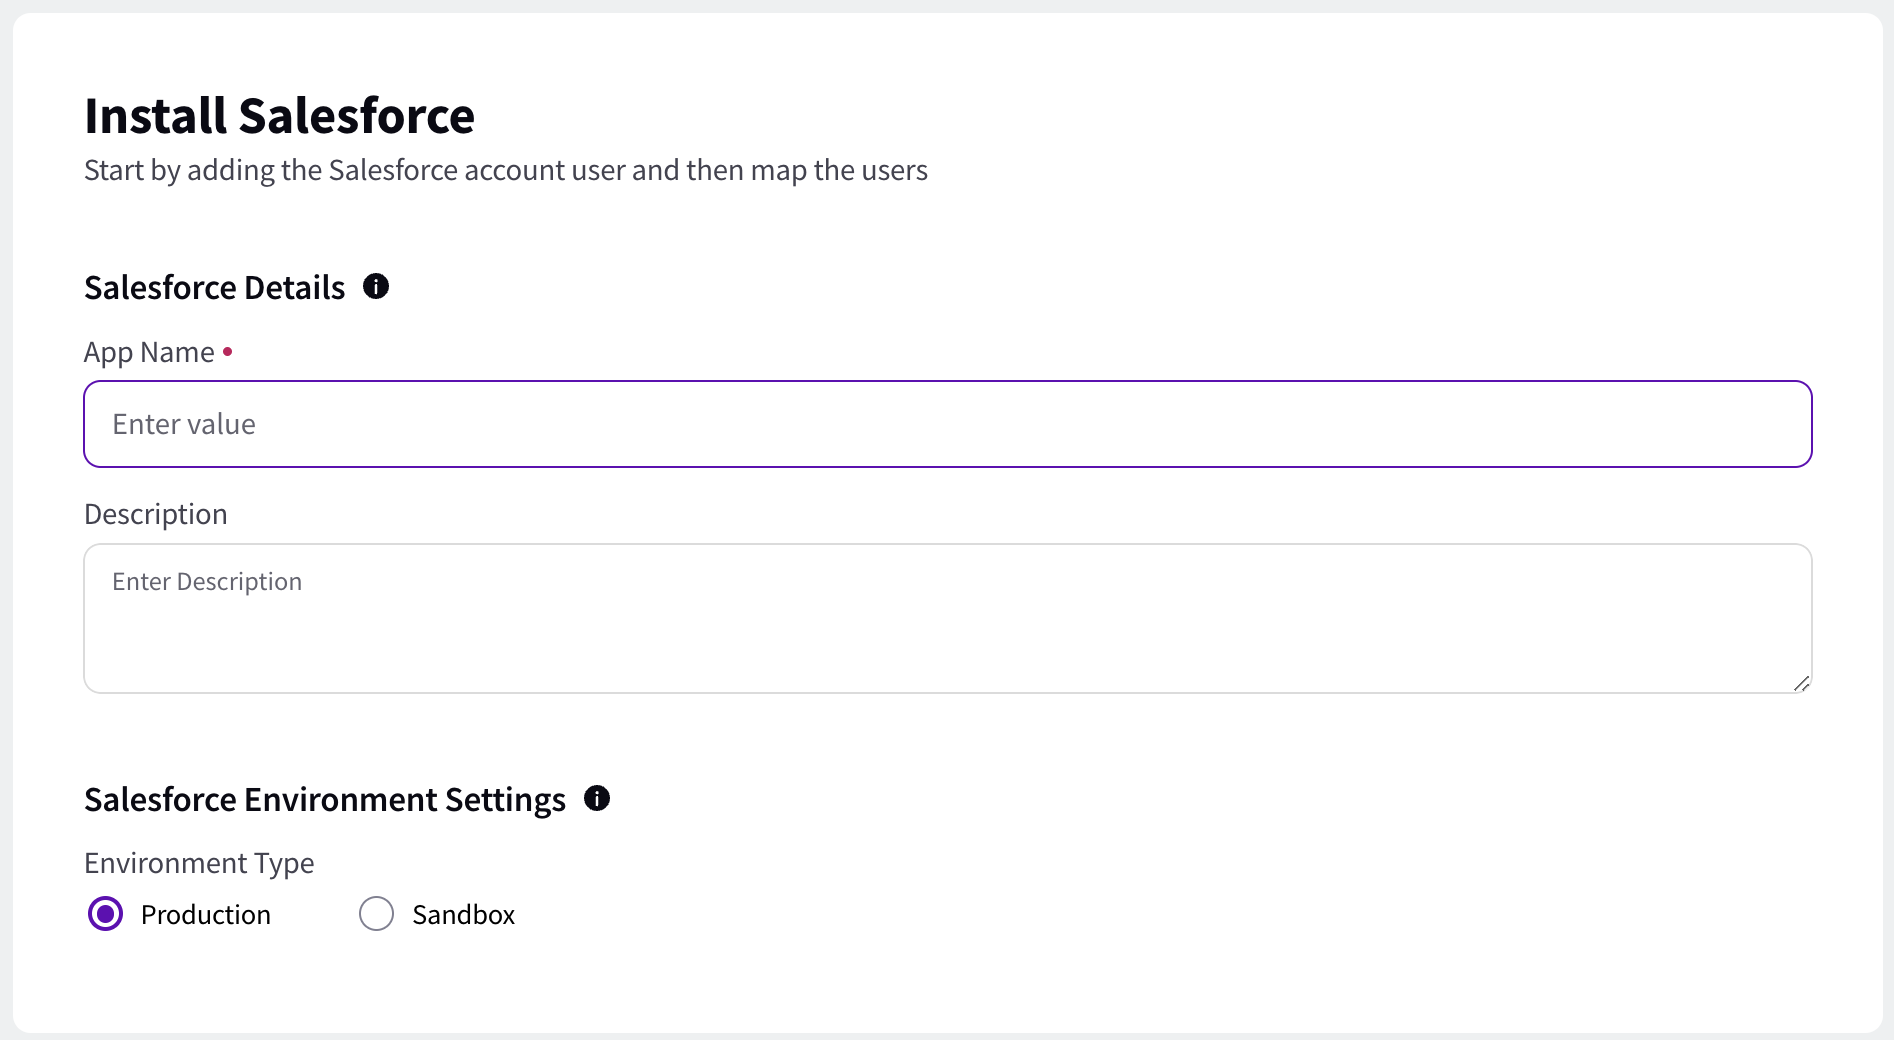
Select the Environment Type within the Salesforce Environment Settings tab.

Note
For https://test.salesforce.com/ environment check Test Environment.
For https://login.salesforce.com/ environment check Production Environment.
Click Save in the bottom right corner to create the Salesforce application. Next, you will be re-directed to the Salesforce site.
In the Salesforce native window, you will be prompted to login natively using the credentials for your native account and perform the authentication.
Once the application is authorized and gets added on the platform, you'll be redirected back to the Sprinklr Marketplace window where you can update the details of your Salesforce application.
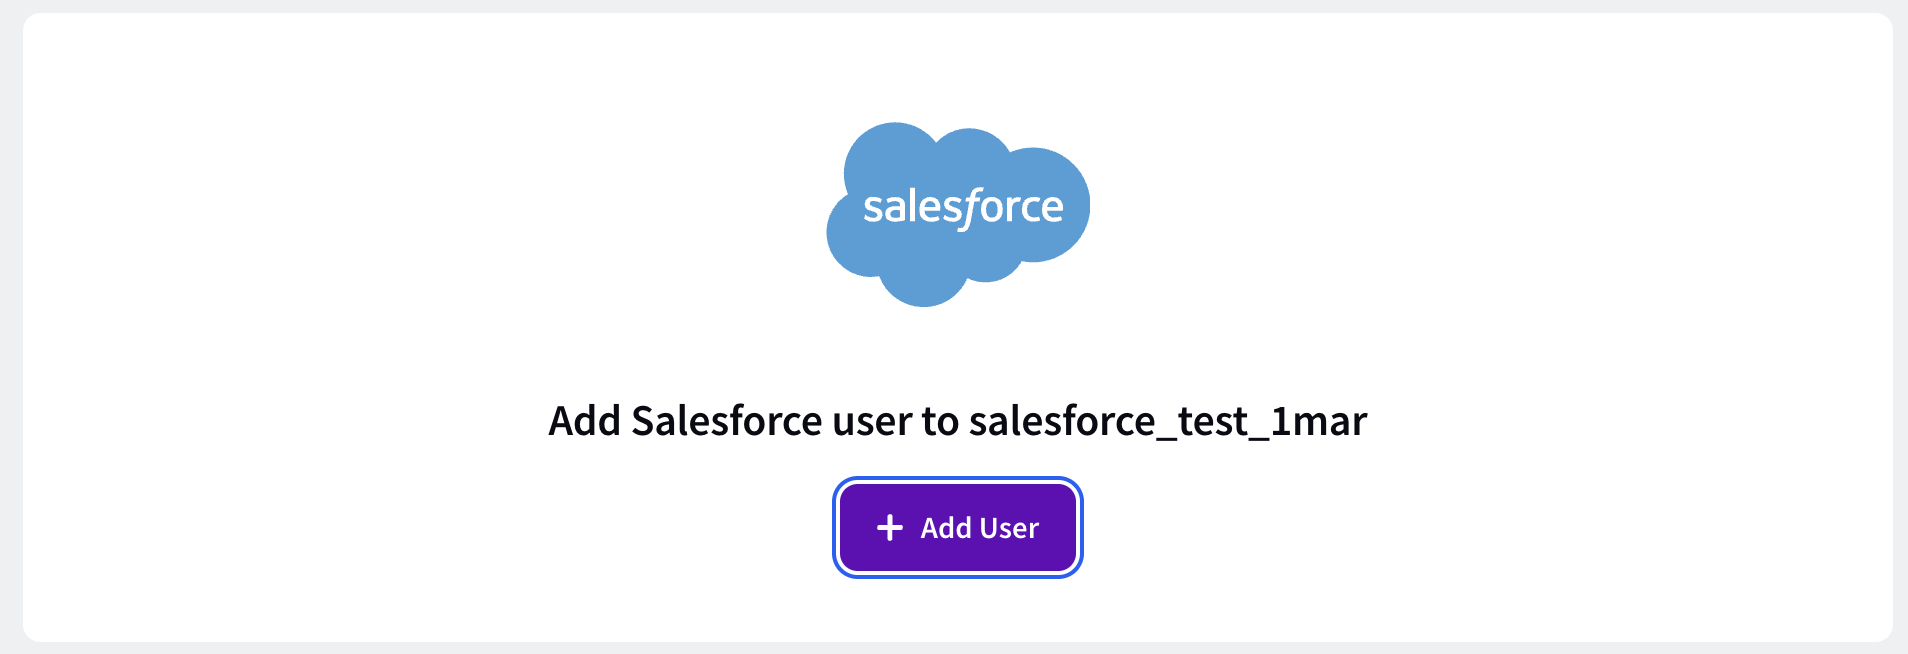
In the Salesforce User tab, if you wish to add an additional Salesforce user, click the
Add Salesforce User icon or you can simply select the Default Salesforce User from the drop-down menu.
In the Connector Configuration tab,
You can select the Notification Types as Email from the drop-down list.
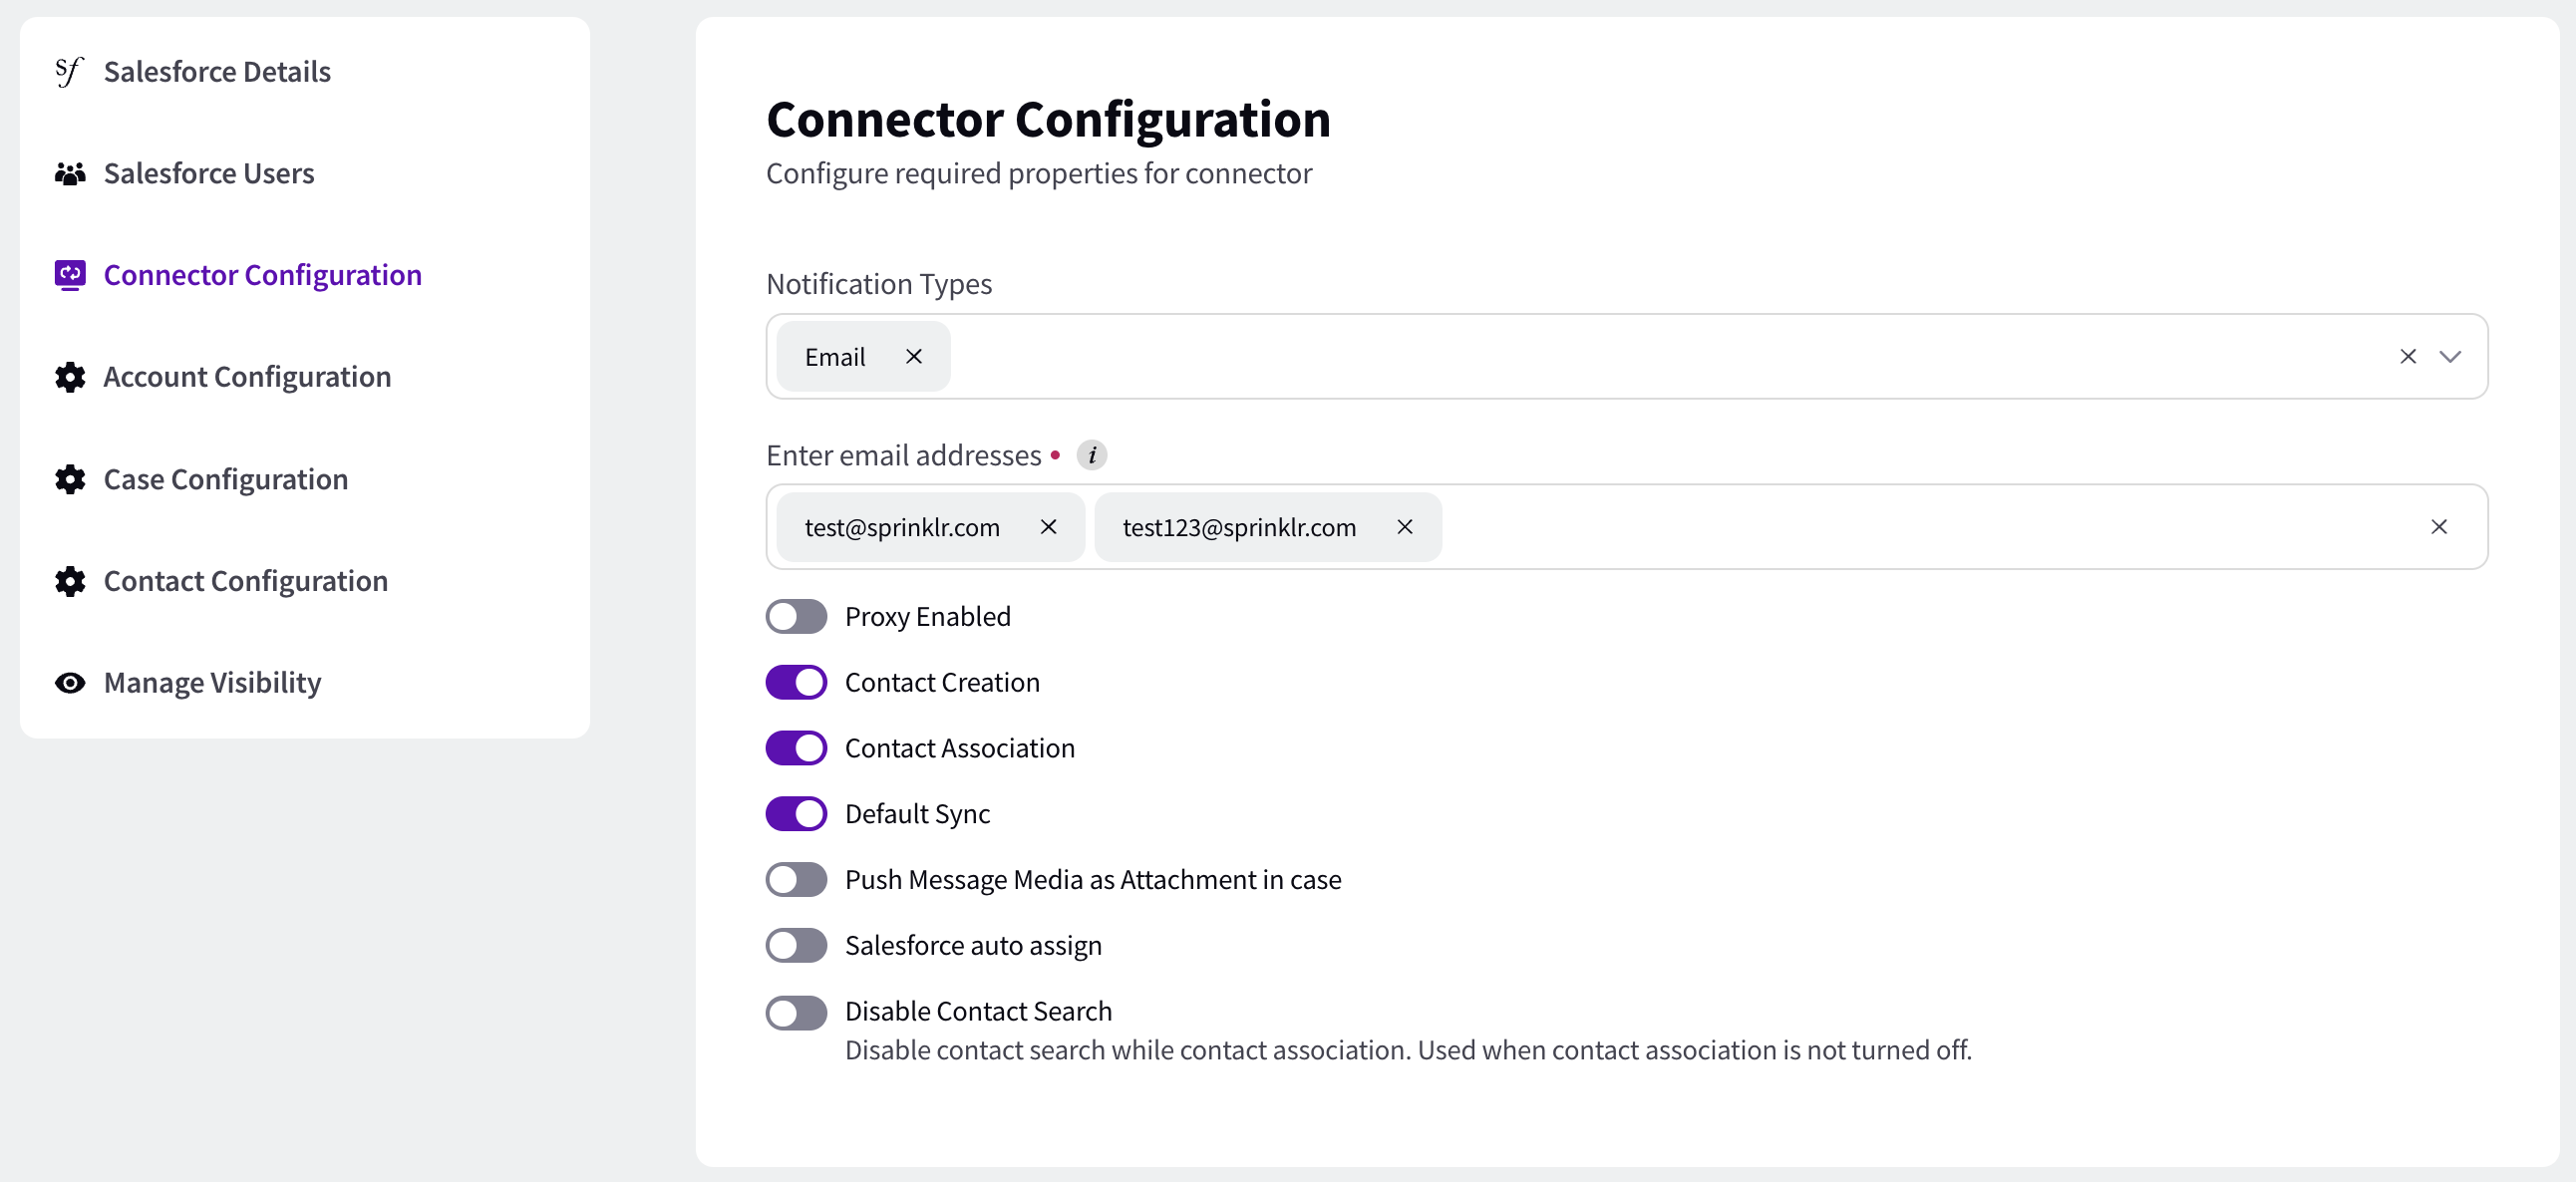
In the Enter email addresses fields, enter the desired email address to whom you wish forward the notifications. Note that you can enter multiple email addresses as per your requirements.
Enter the Default Origin value.
Select the Case Record Type from the drop-down list.
Additionally, you can toggle the following functionalities:
Proxy Enabled
Contact Creation
Contact Association
Default Sync
Push Message Media as Attachment in Case
Salesforce auto assign
In the Account Configutation tab,
In the Sprinklr fields mapped to Salesforce fields option, first select the Sprinklr Field from the drop-down and then map the respective Salesforce Field from the drop-down.
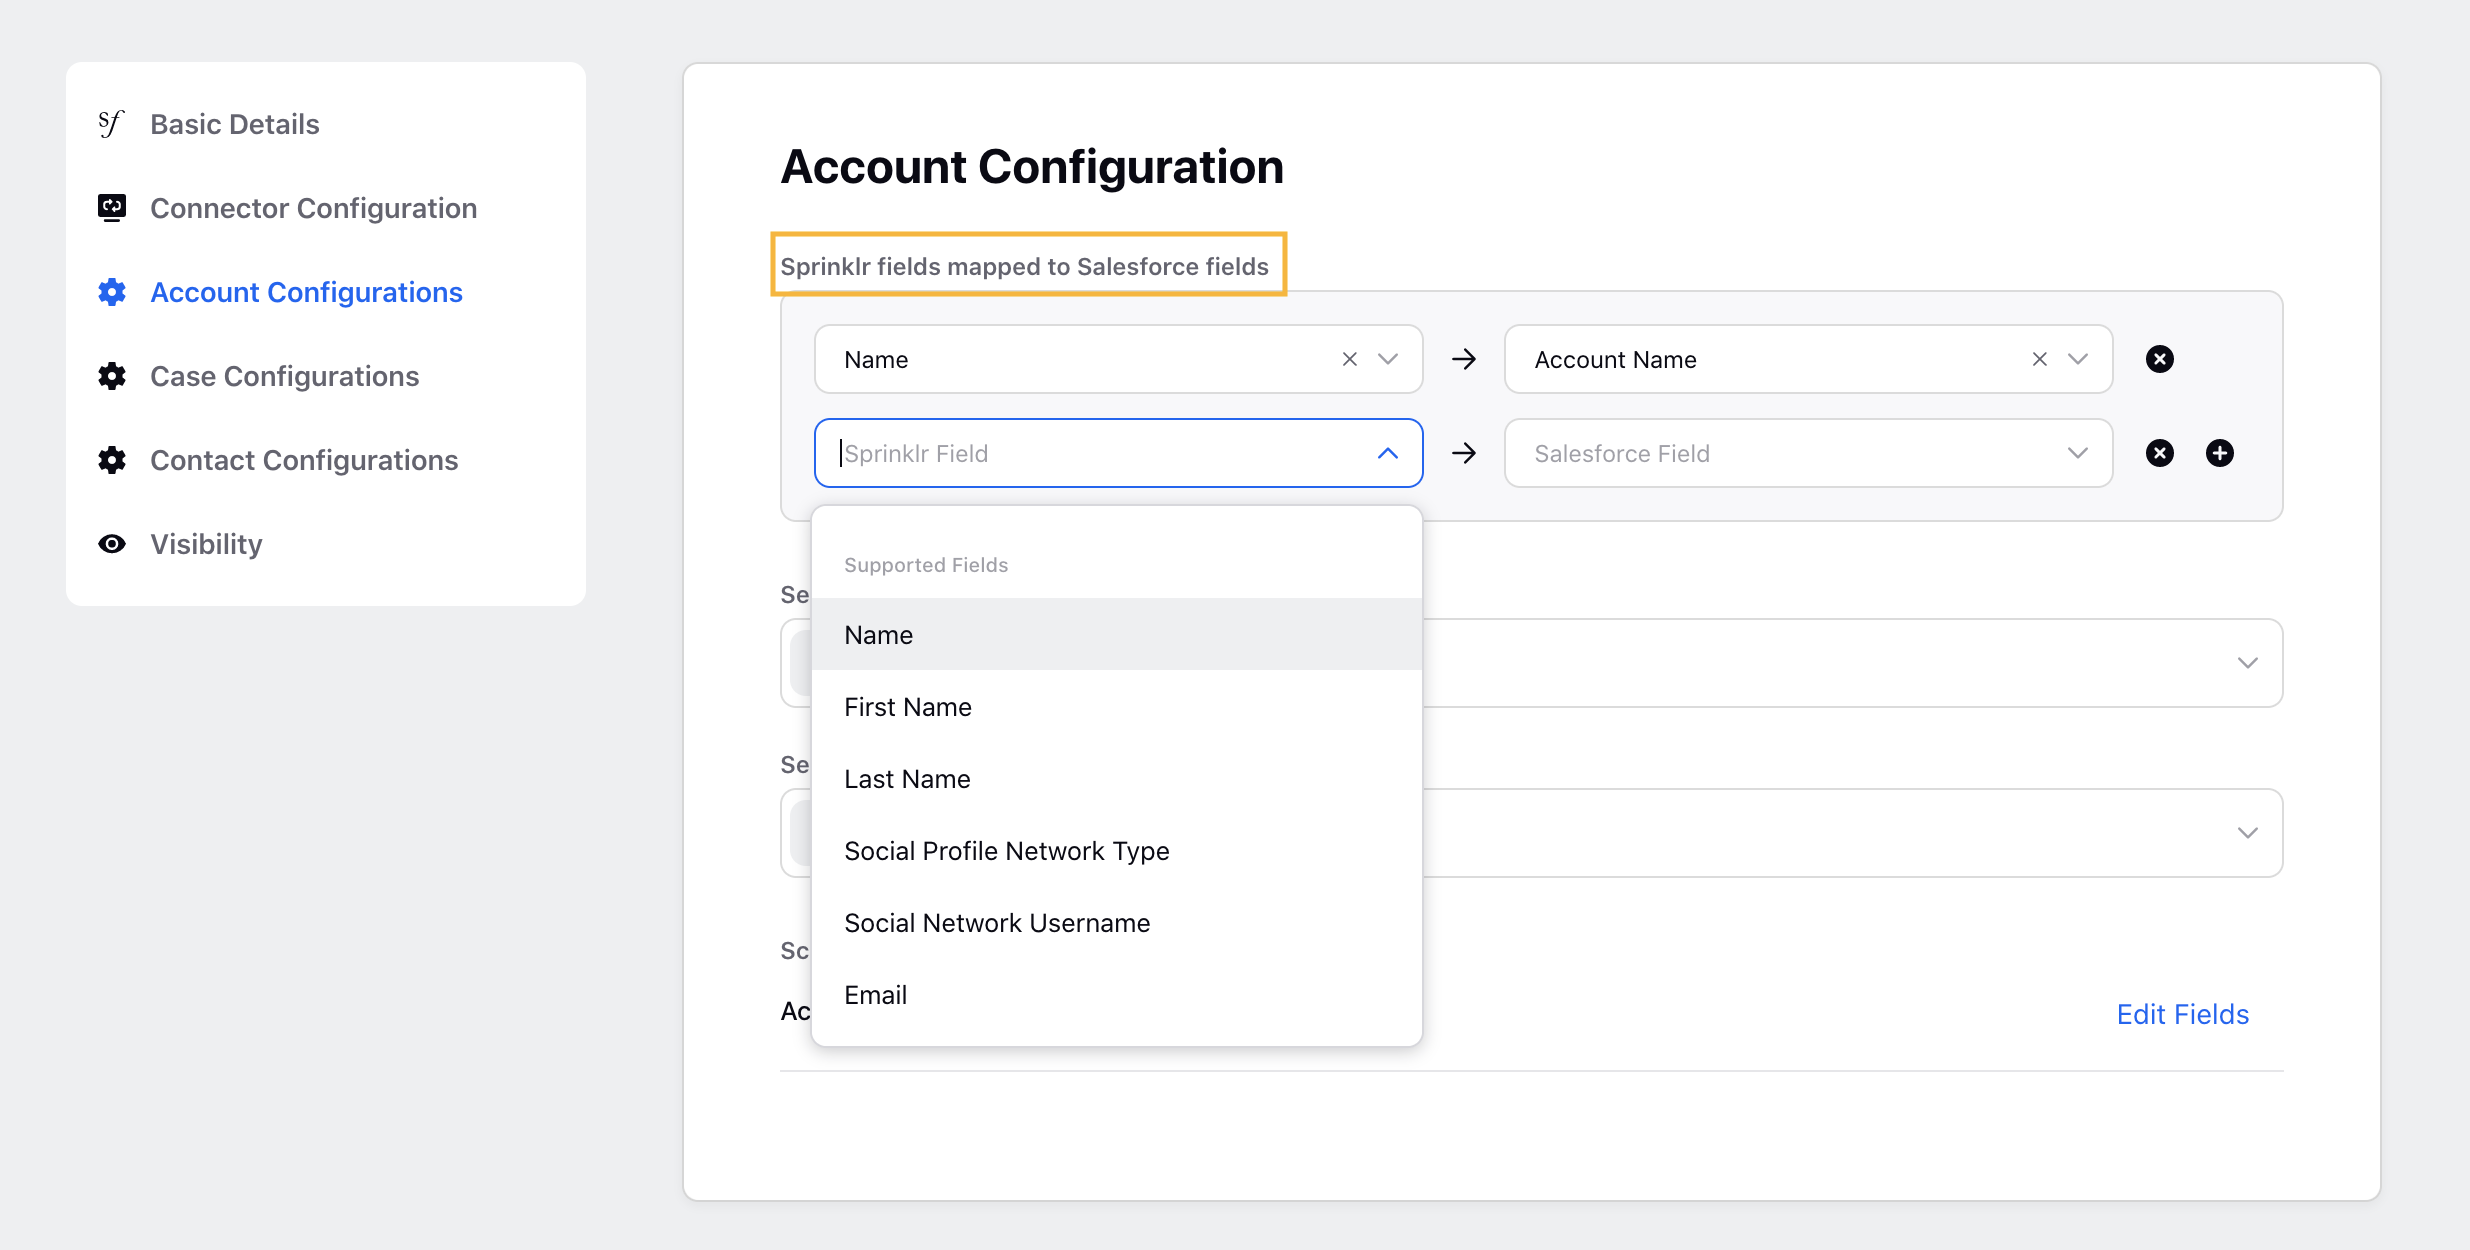
To map more fields, click Add icon
.
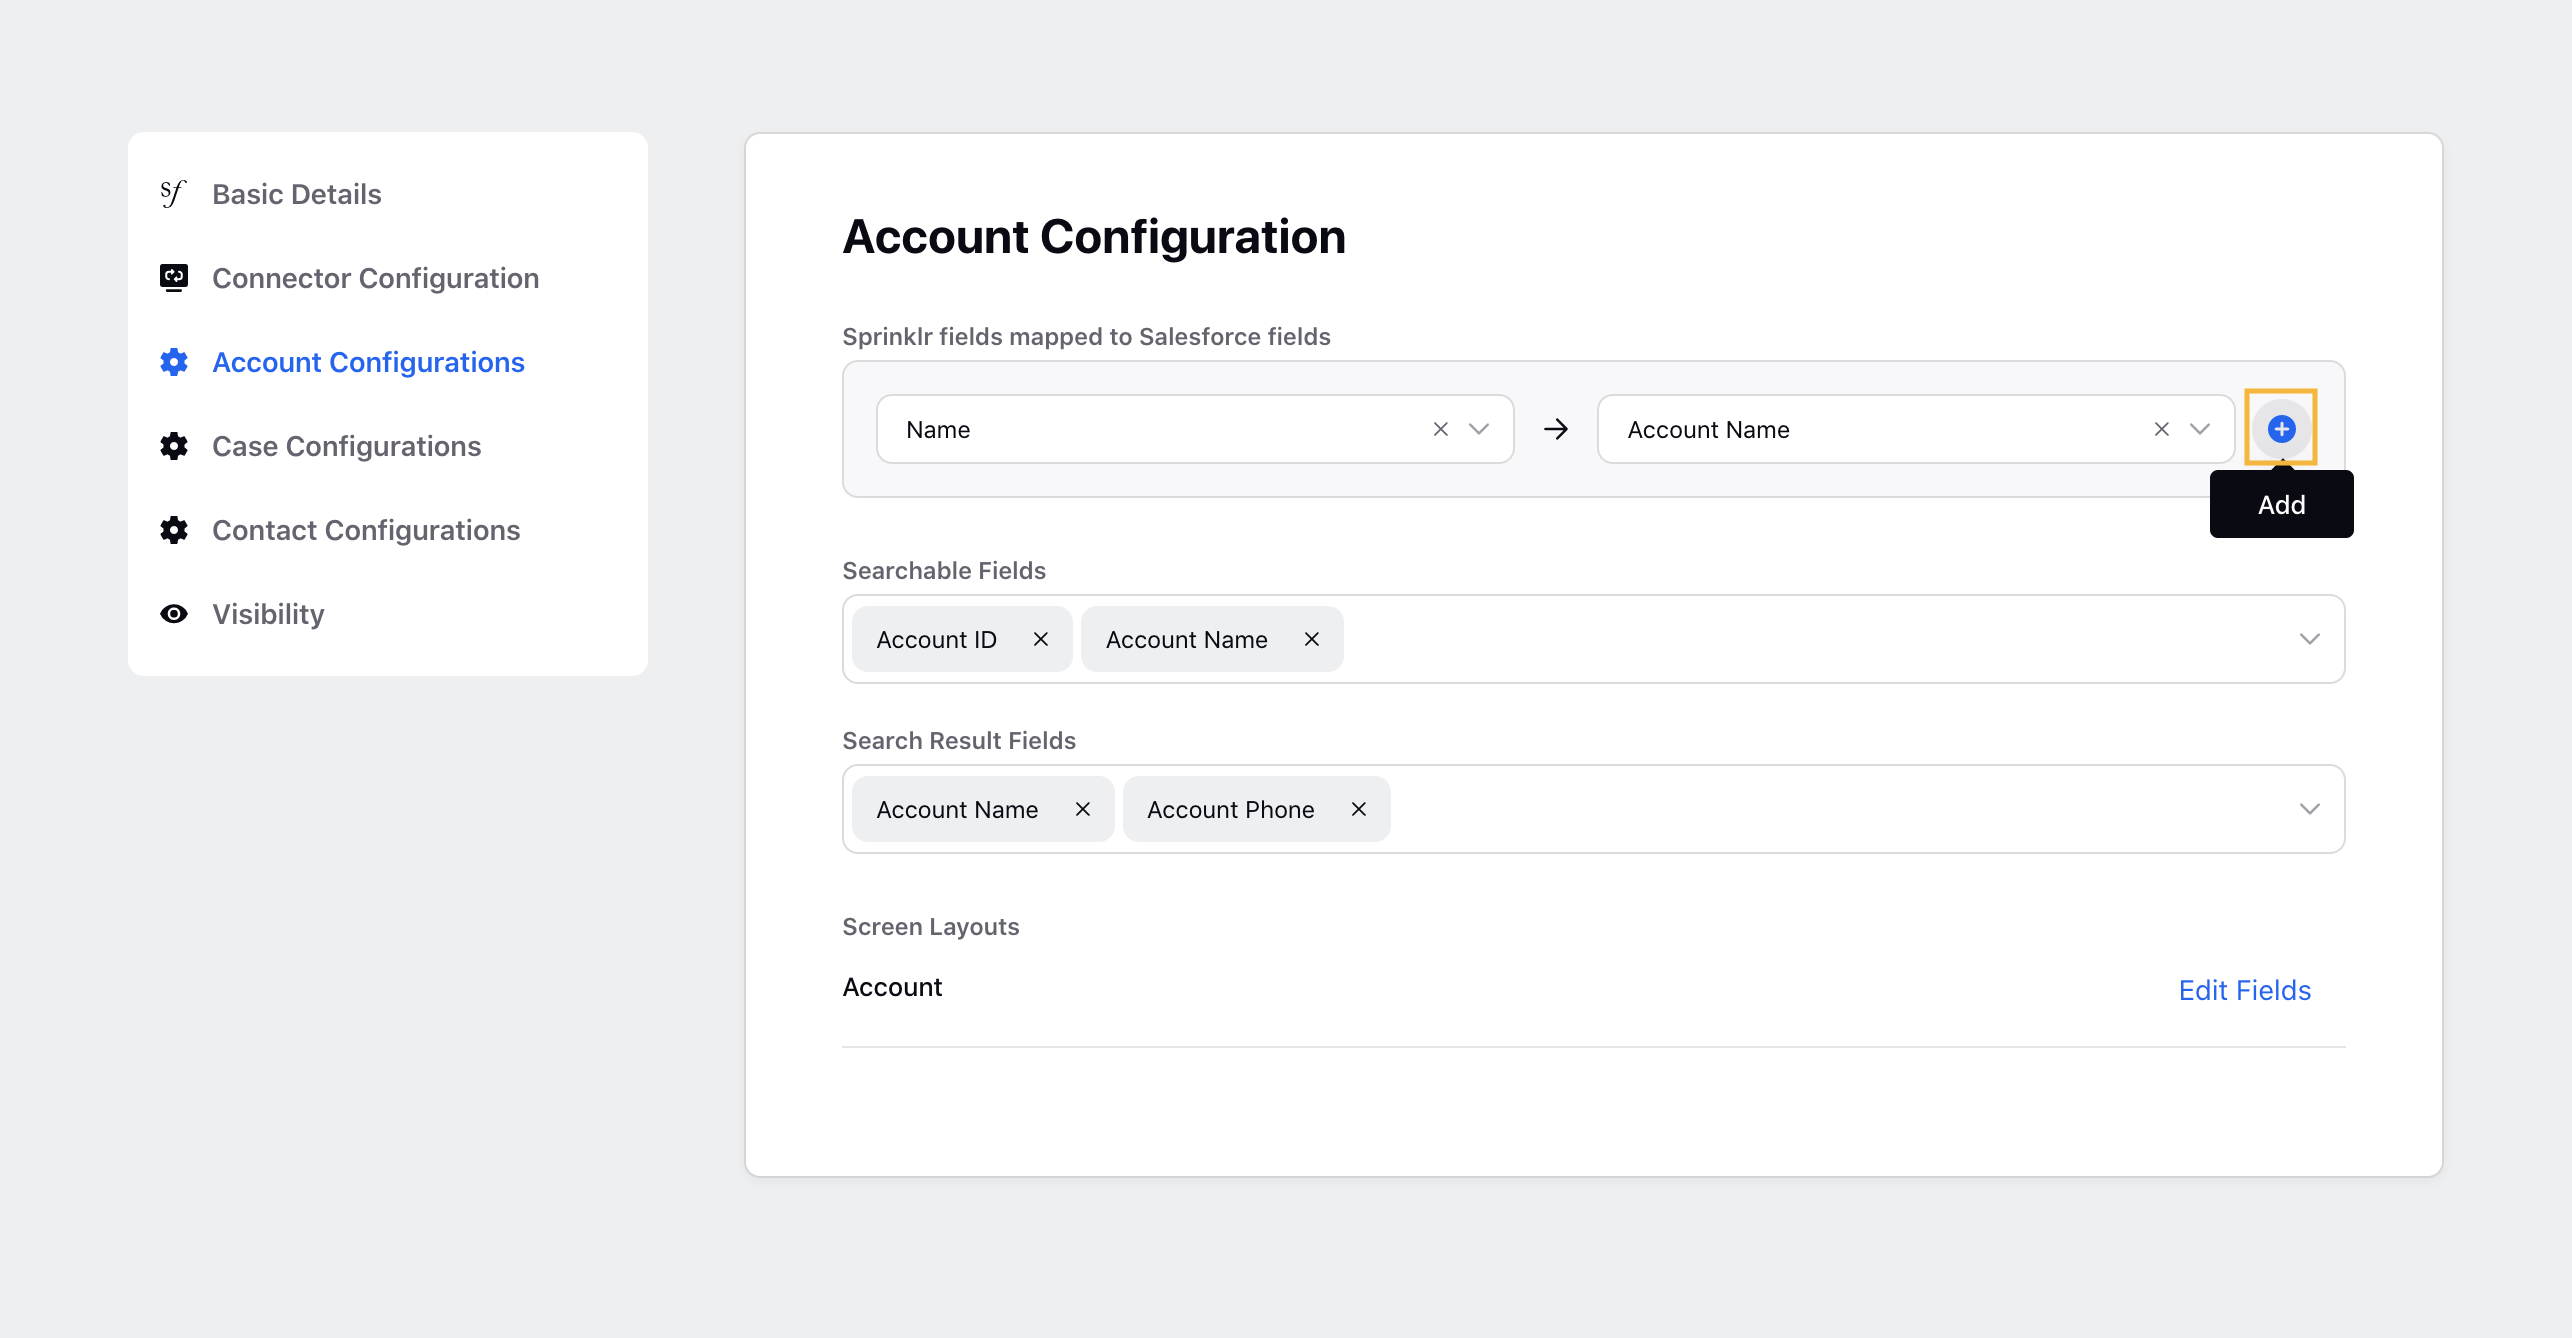
Select Searchable Fields and Searchable Result Fields from the drop-down menu.
In the Screen Layouts option, click Edit Fields to set the Editable Fields and Variable Fields in the Account Edit Layout window. Once all the fields are set as per your requirement, click Submit in the bottom right corner of the Account Edit Layout window.
In the Case Configuration tab,
In the Sprinklr fields mapped to Salesforce fields option, first select the Sprinklr Field from the drop-down and then map the respective Salesforce Field from the drop-down. To map more fields, click Add icon
In the Screen Layouts option, click Edit Fields to set the Editable Fields and Variable Fields in the Case Edit Layout window. Once all the fields are set as per your requirement, click Submit in the bottom right corner of the Case Edit Layout window.
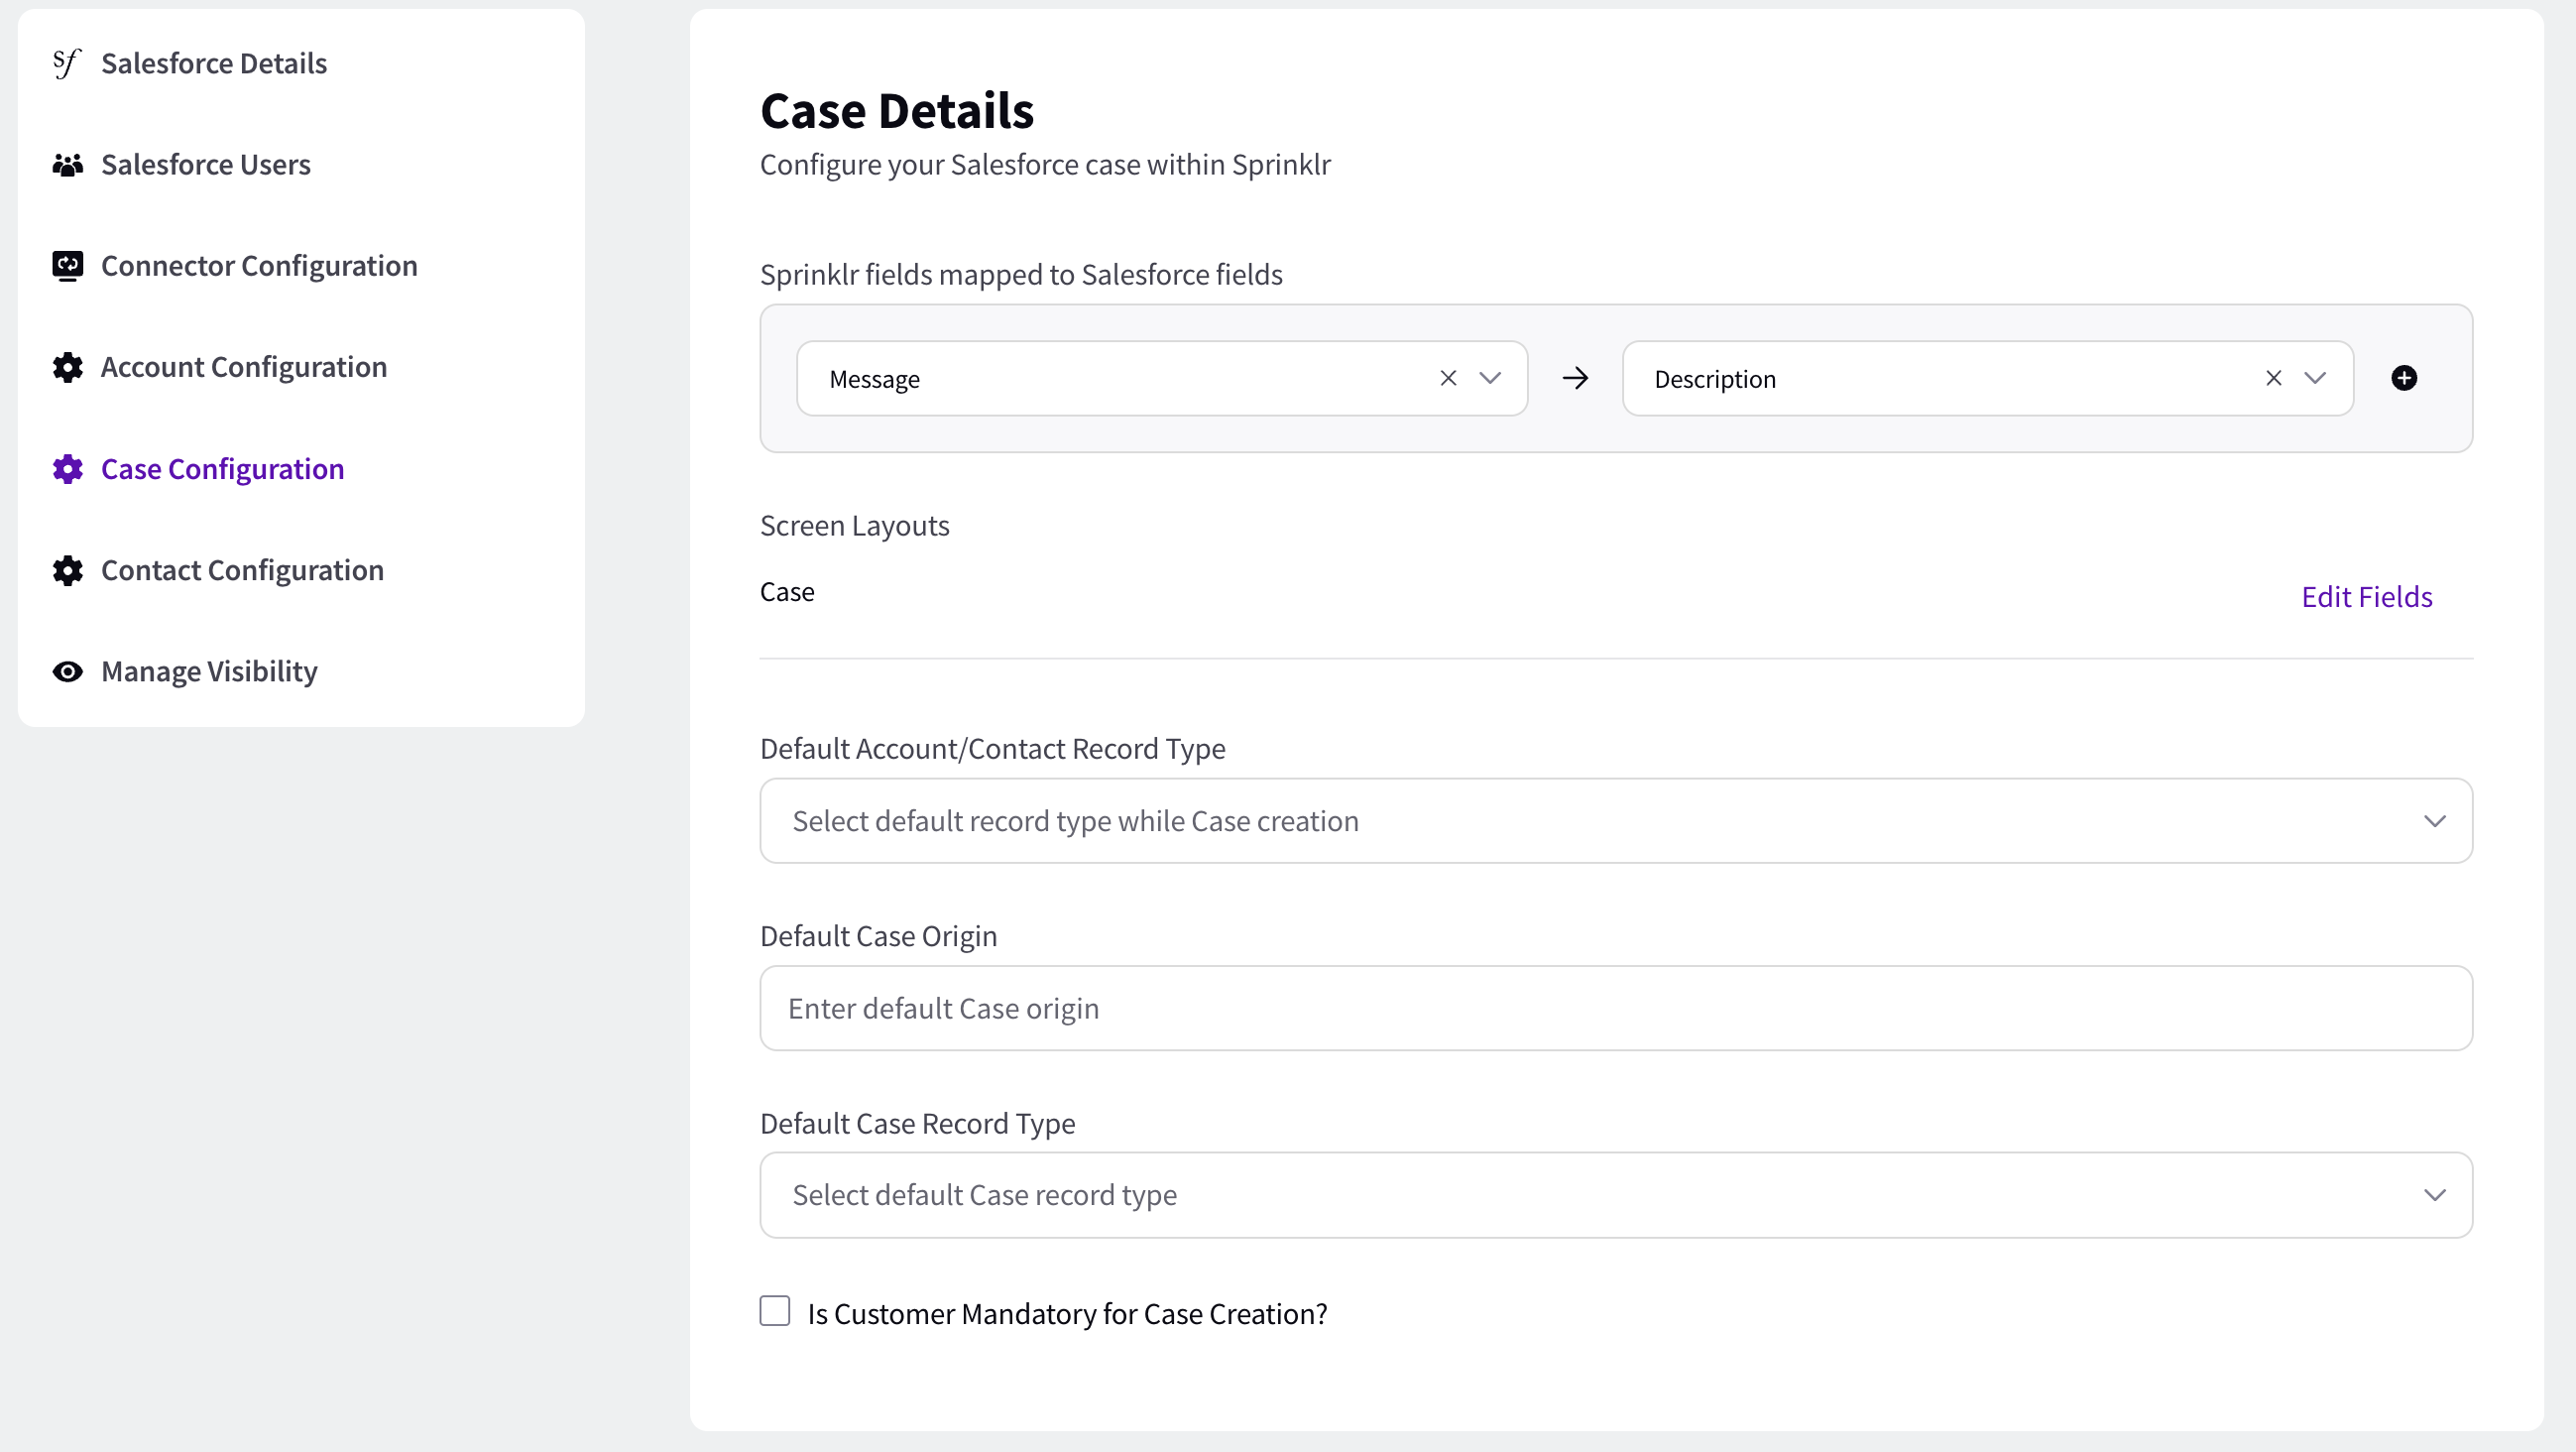
Select the Default Record Type from the drop-down menu. You can set the following as a record type while case creation:
Account
Contact
Check the Is Customer Mandatory for Case Creation? box as per your requirement.
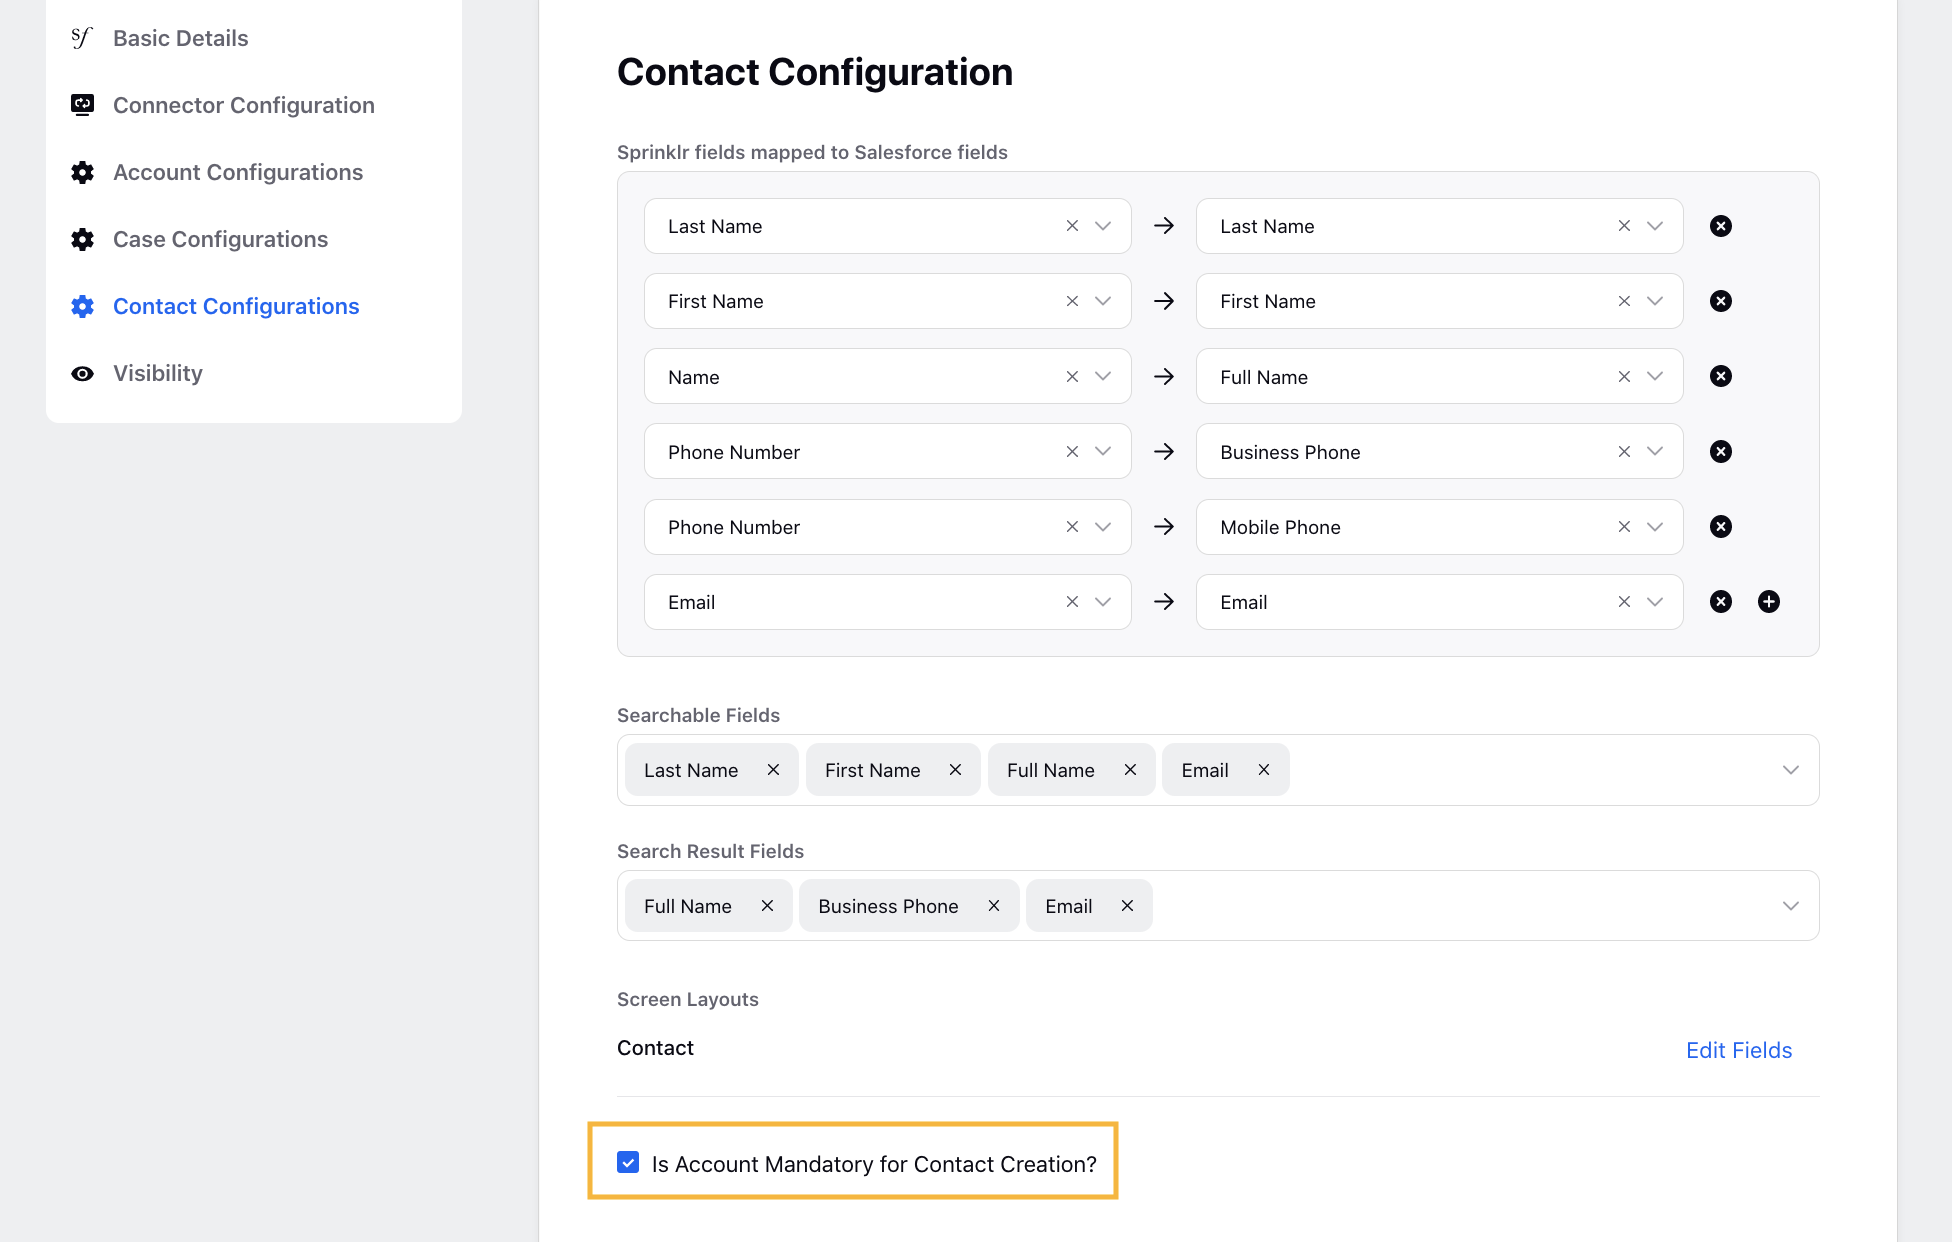
In the Contact Configuration tab,
In the Sprinklr fields mapped to Salesforce fields option, first select the Sprinklr Field from the drop-down and then map the respective Salesforce Field from the drop-down. To map more fields, click Add icon
Select Searchable Fields and Searchable Result Fields from the drop-down menu.
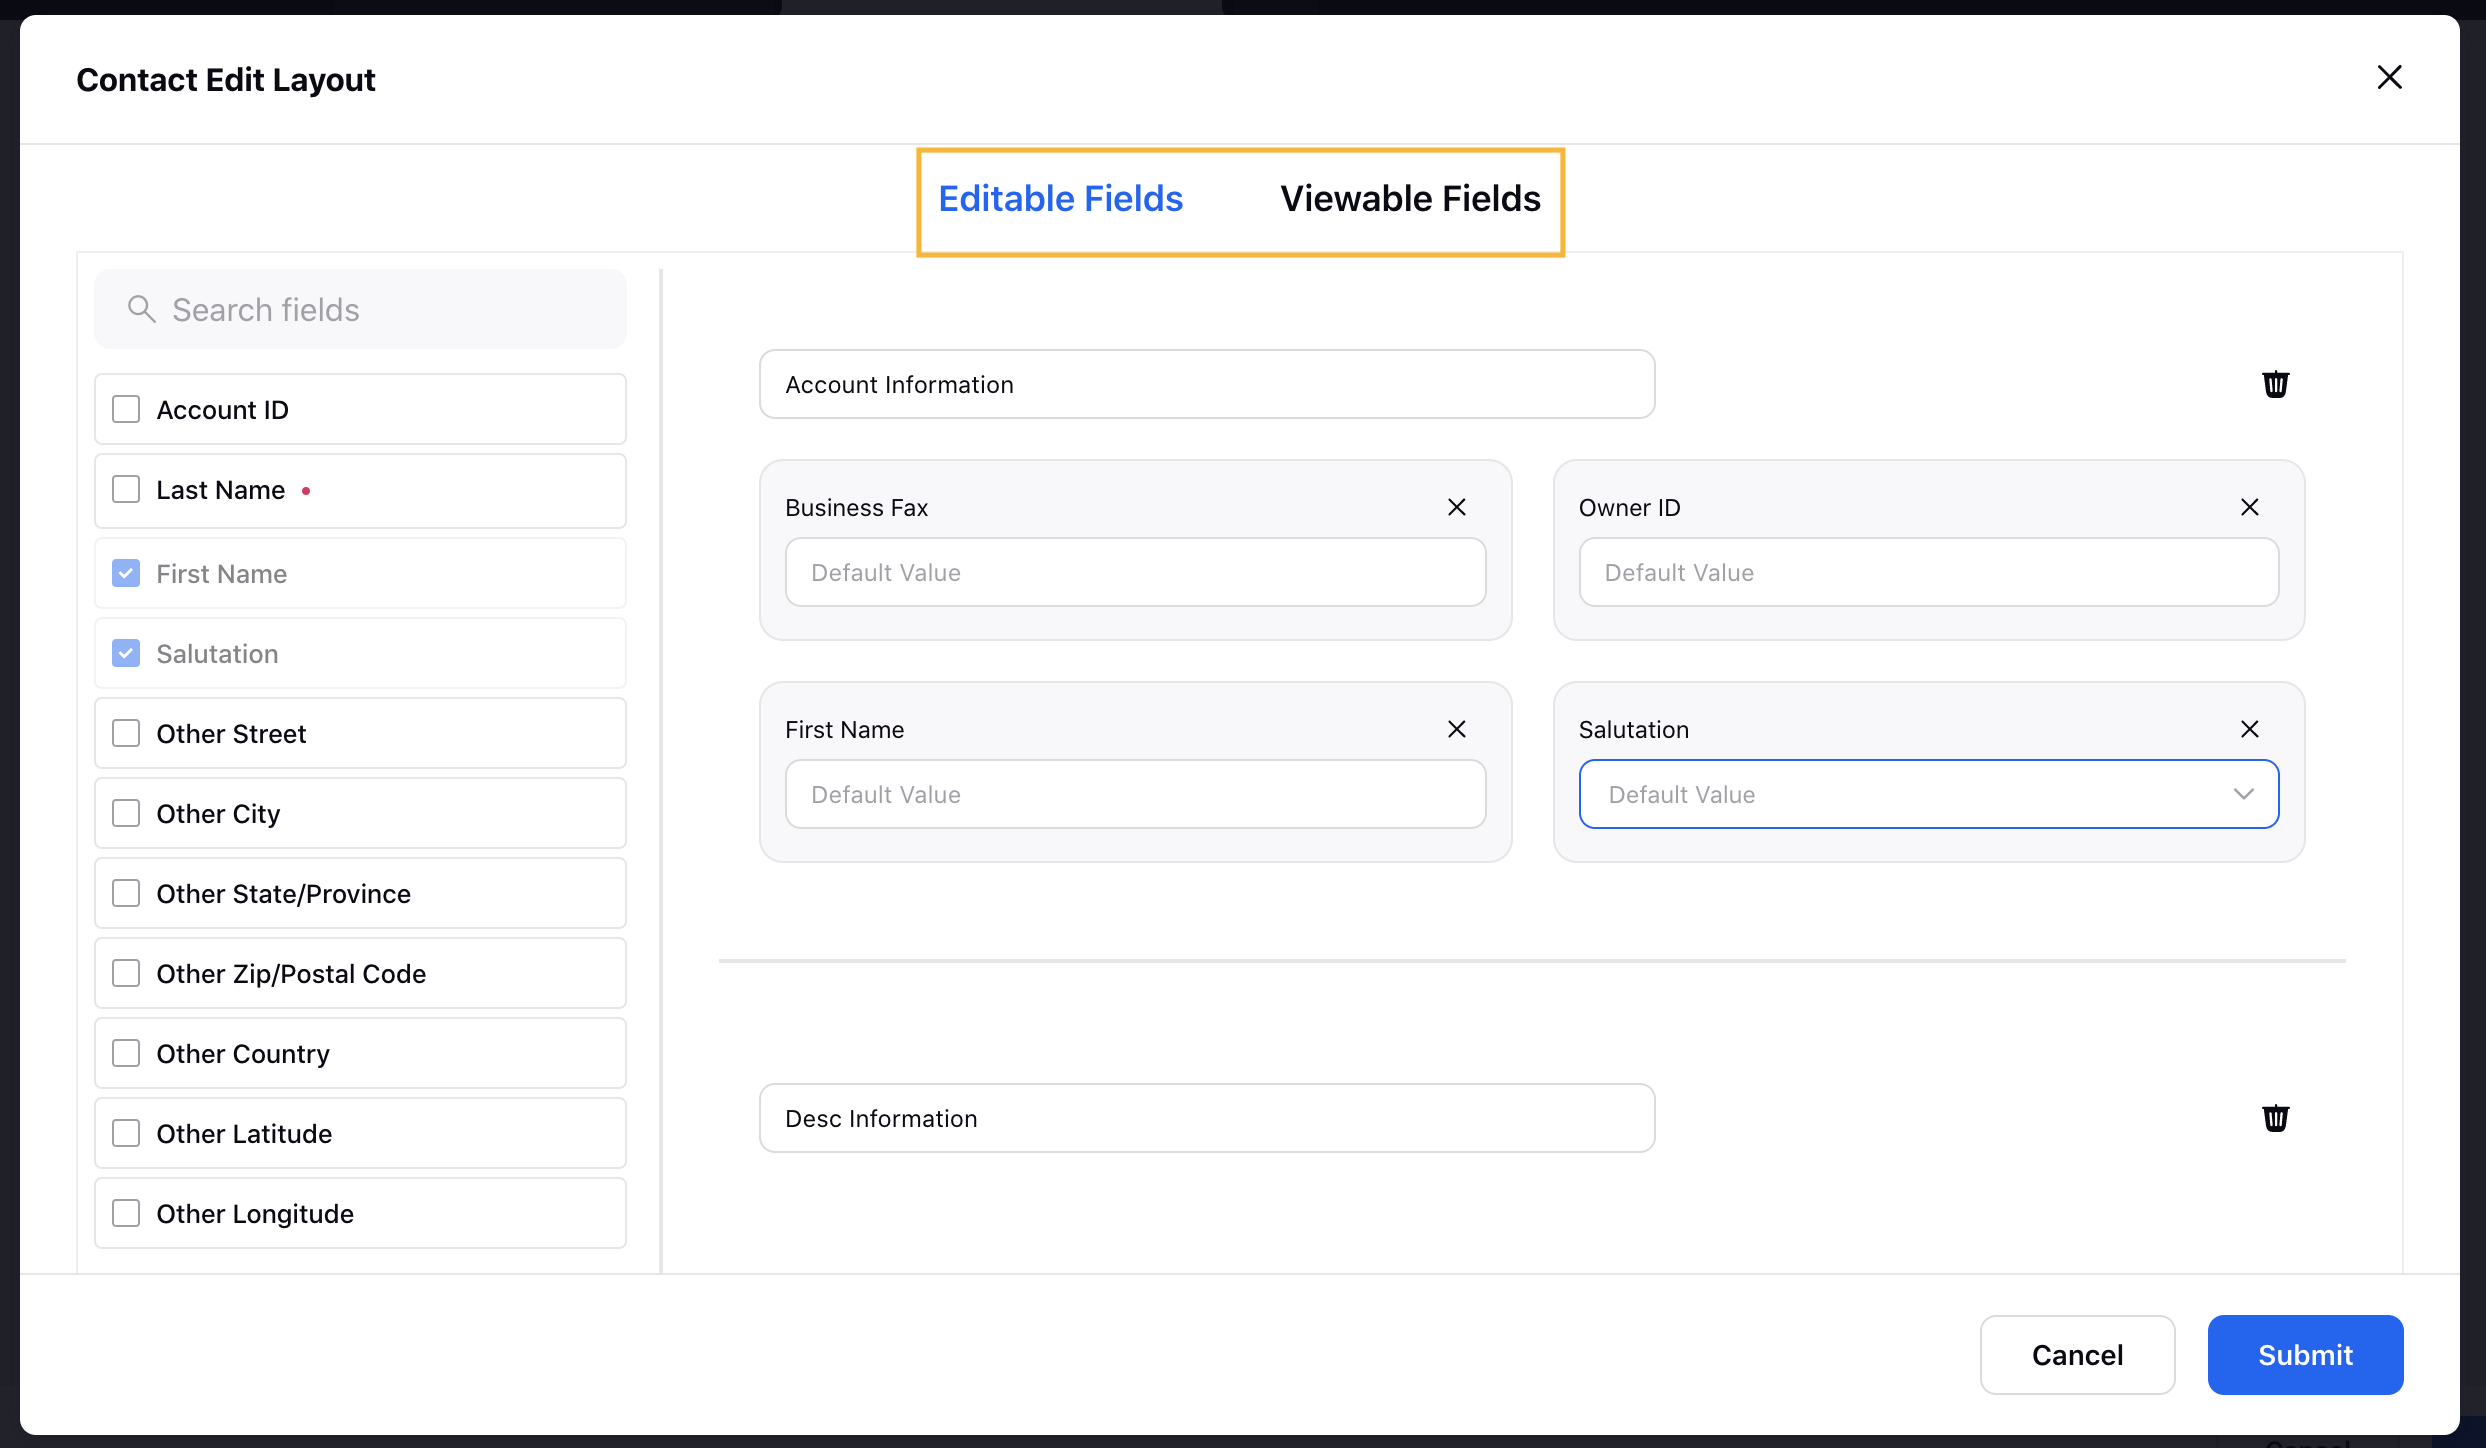
In the Screen Layouts option, click Edit Fields to set the Editable Fields and Variable Fields in the Contact Edit Layout window. Once all the fields are set as per your requirement, click Submit in the bottom right corner of the Contact Edit Layout window.
Check the Is Account Mandatory for Contact Creation? box as per your requirement.
In the Manage Visibility tab, you can make this Salesforce configuration visible to other workspaces, users, and/or groups in Sprinklr.
Check Visible in all Workspace box, as per your requirement.
Select Workspaces from the drop-down menu.
Select User/User Groups from the drop-down menu.
Click Save in the bottom right corner to save your Salesforce configuration.

For more information about Salesforce User Mapping once you have configured Salesforce Connector in Marketplace, see Salesforce User Mapping.
For more information about Salesforce in Sprinklr, see Sprinklr - Salesforce Service Cloud (v2).