Unified Data Connector
Updated
Data connectors in Sprinklr streamline the integration of external data sources with its platform, facilitating seamless data flow and enhancing operational efficiency. This guide provides comprehensive instructions on installing, configuring, and managing data connectors within Sprinklr.
You can begin by selecting the appropriate entity type—whether system-defined, standard, or custom—and configuring integration settings such as data synchronization methods and entity-specific details. You can then define the source of the data, whether from cloud storage services like S3 and Google Cloud Storage, file uploads, or secure FTP (SFTP) servers, ensuring compatibility and security.
Once data sources are configured, proceed to map data columns to corresponding fields in Sprinklr, applying validation rules like regex patterns for data consistency. Finally, you can manage access permissions through share settings, specifying user groups and assigning permissions ranging from view-only access to full administrative control.
Enablement note: To learn more about getting this capability enabled in your environment, please work with your Success Manager. |
Accessing Unified Data Connector
Make sure these permissions are assigned to the user to access the data connector before you start to install the Connector.
Permissions
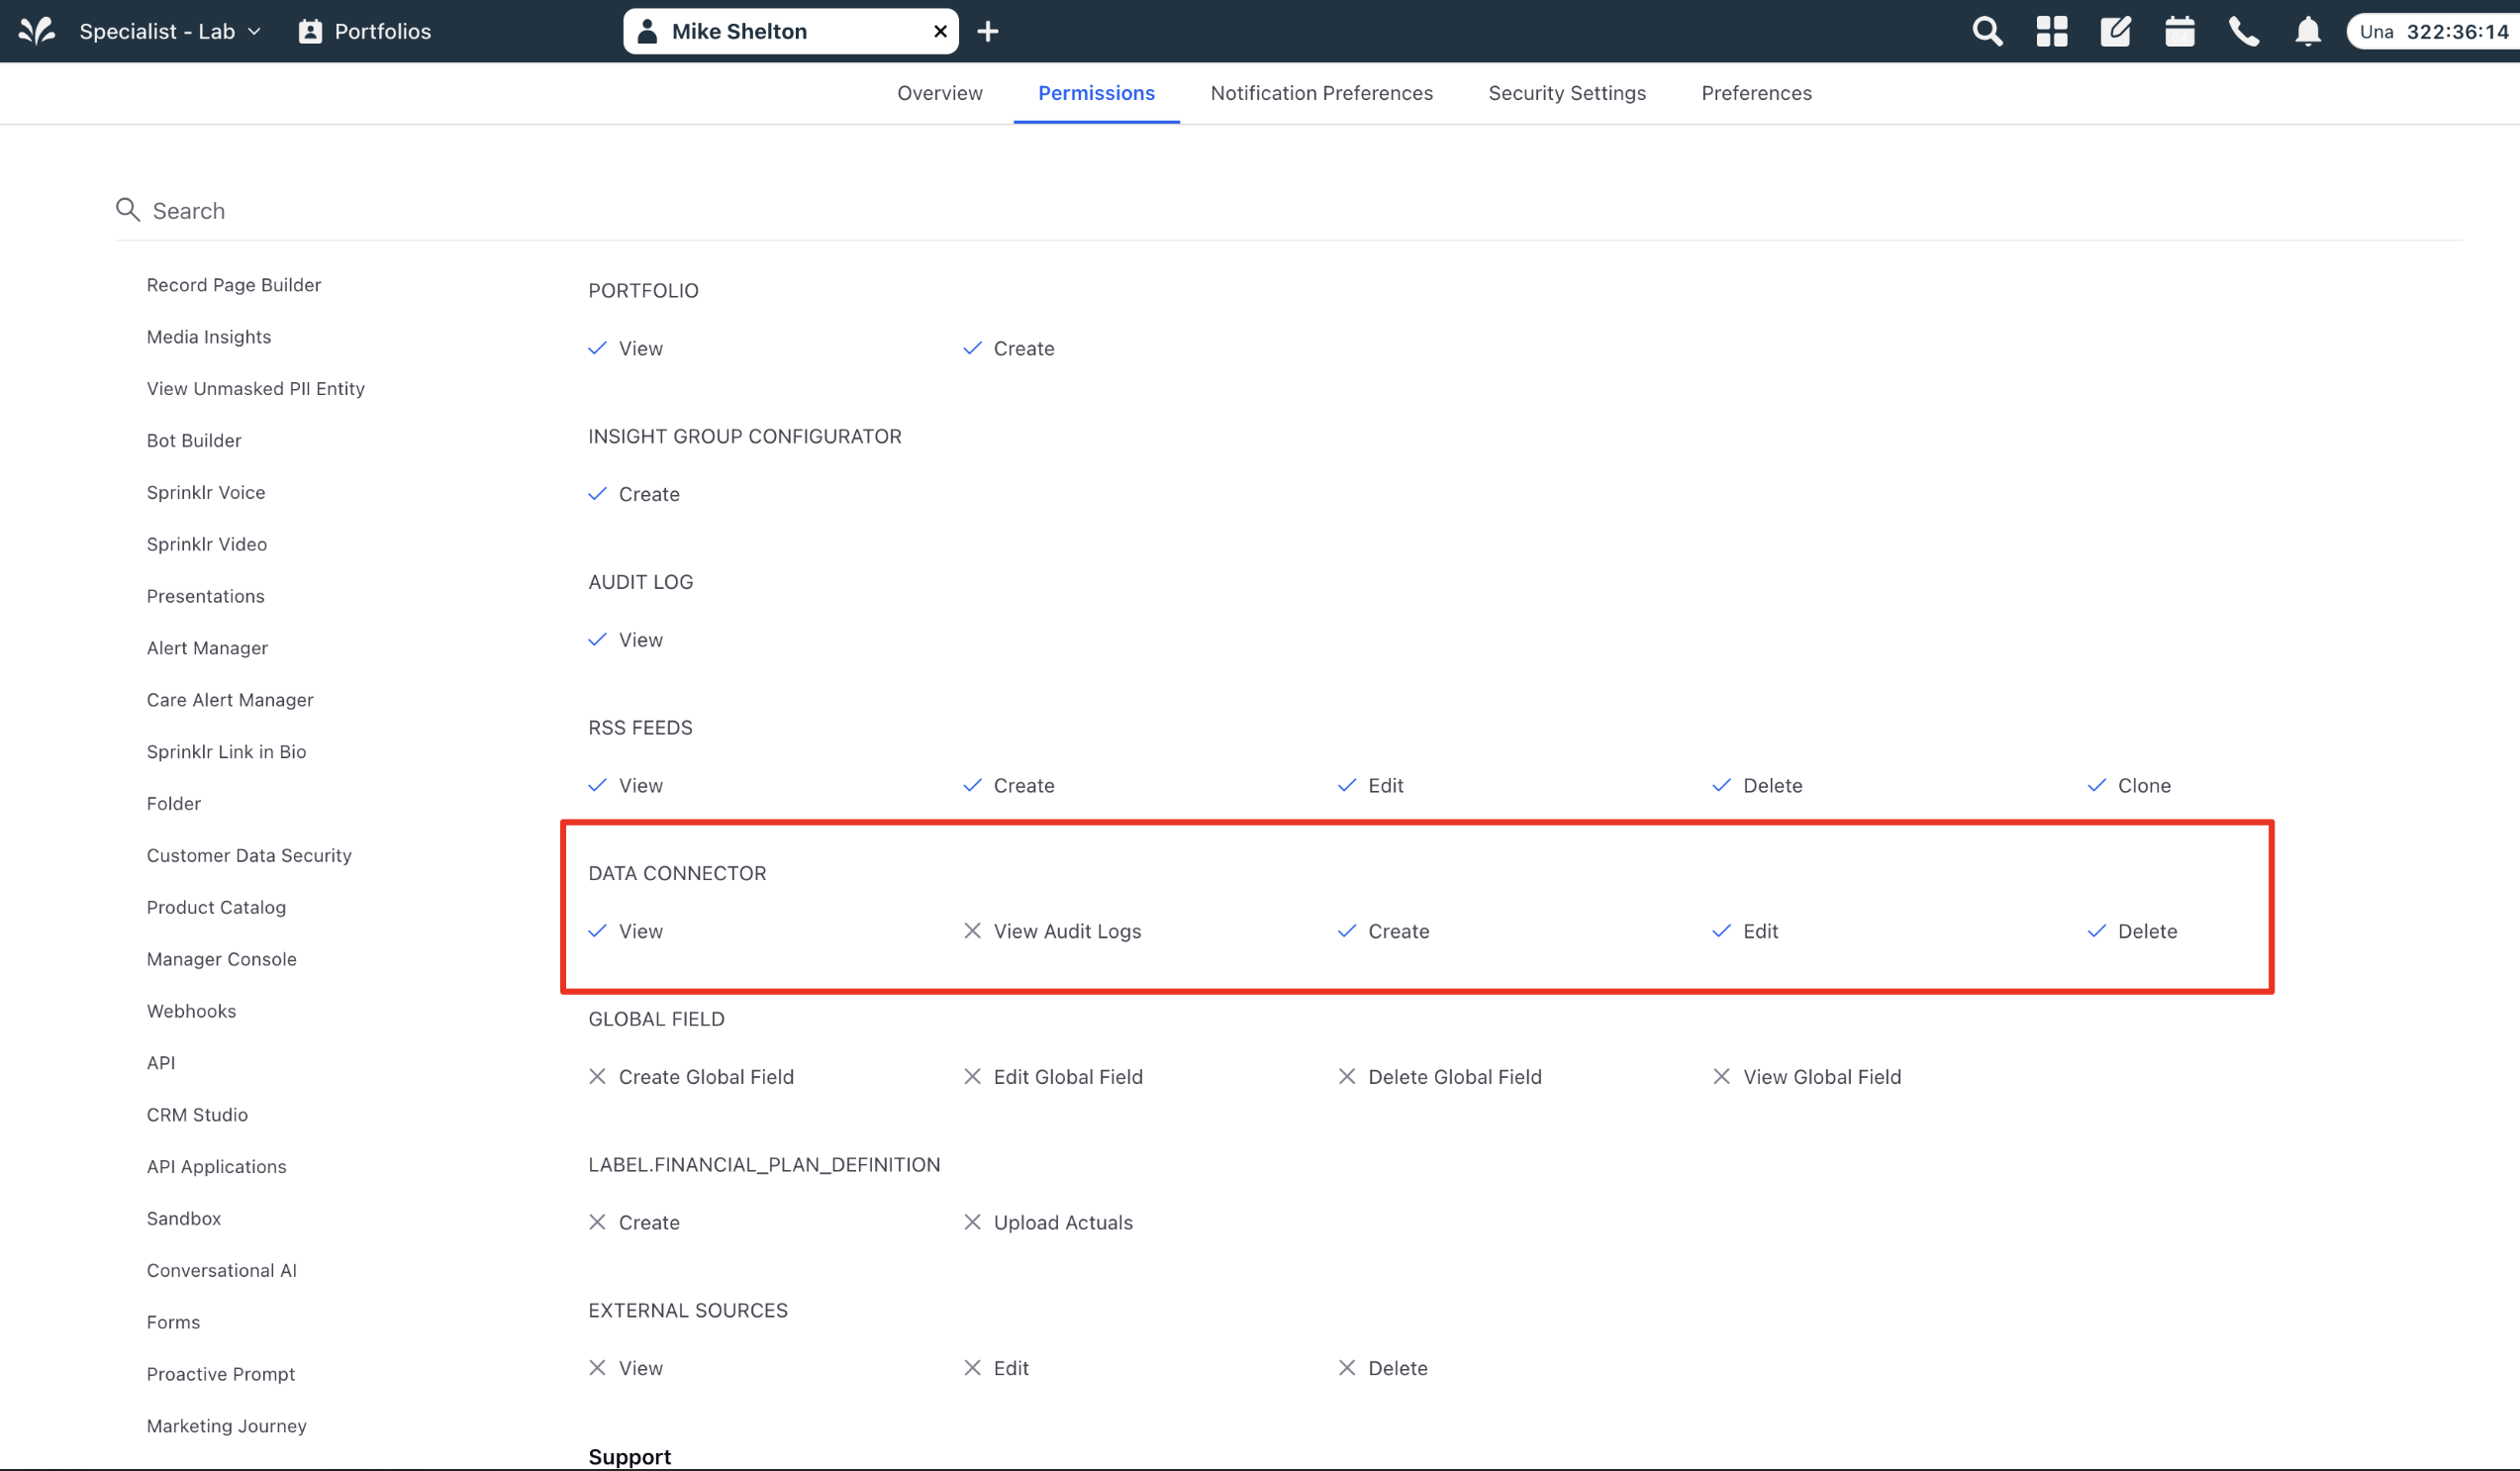
The relevant permissions for a user to access Data Connector are depicted in the screenshot below:
View: This allows the user to view the record page of the Data Connector and gives the permission to view the Data Connector link on the platform launchpad.
Create: This gives user the permission to view the “Install Connector” button in the record manager of Data Connector.
Edit: This gives the user permissions to edit a data connector at a global level. The user must also have specific permissions for that connector to make edits.
Delete: This gives user the permissions to delete a data connector at a global level. The user must also have specific permissions for that connector to delete it.
Access
This feature can be accessed from the launchpad config of the platform. The user can also search for “Unified Data Connector” to access this feature.
Installing a Connector
Follow these steps to install a Connector
Click Install Connector
At the top right corner of the Data Connectors window, click Install Connector.

Select Entity
In the Select Entity window, choose the appropriate entity type:
System (Case)
Standard
Custom
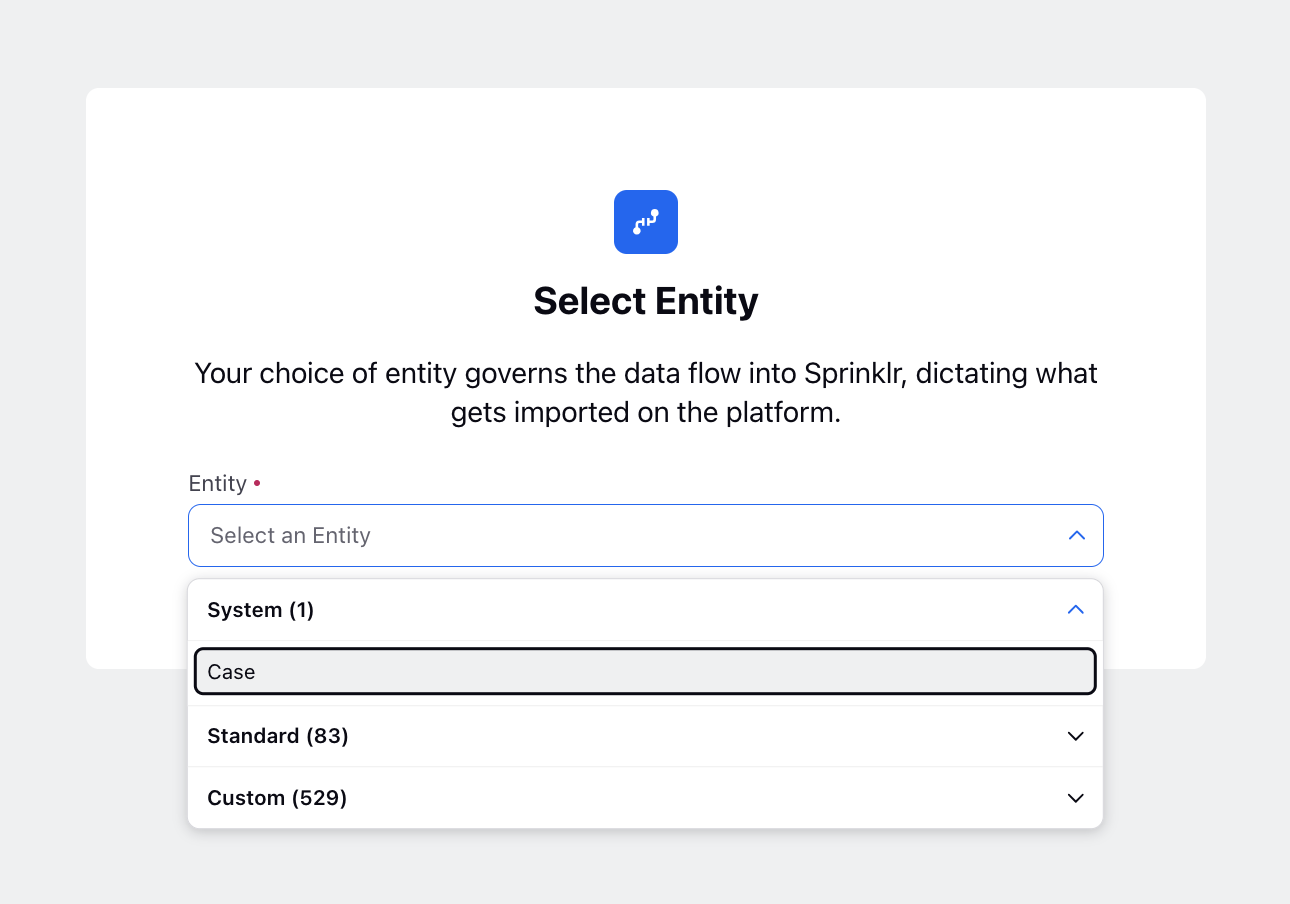
After selecting the entity, click Next.
Entity Specific Settings
For Standard and Custom Entities:
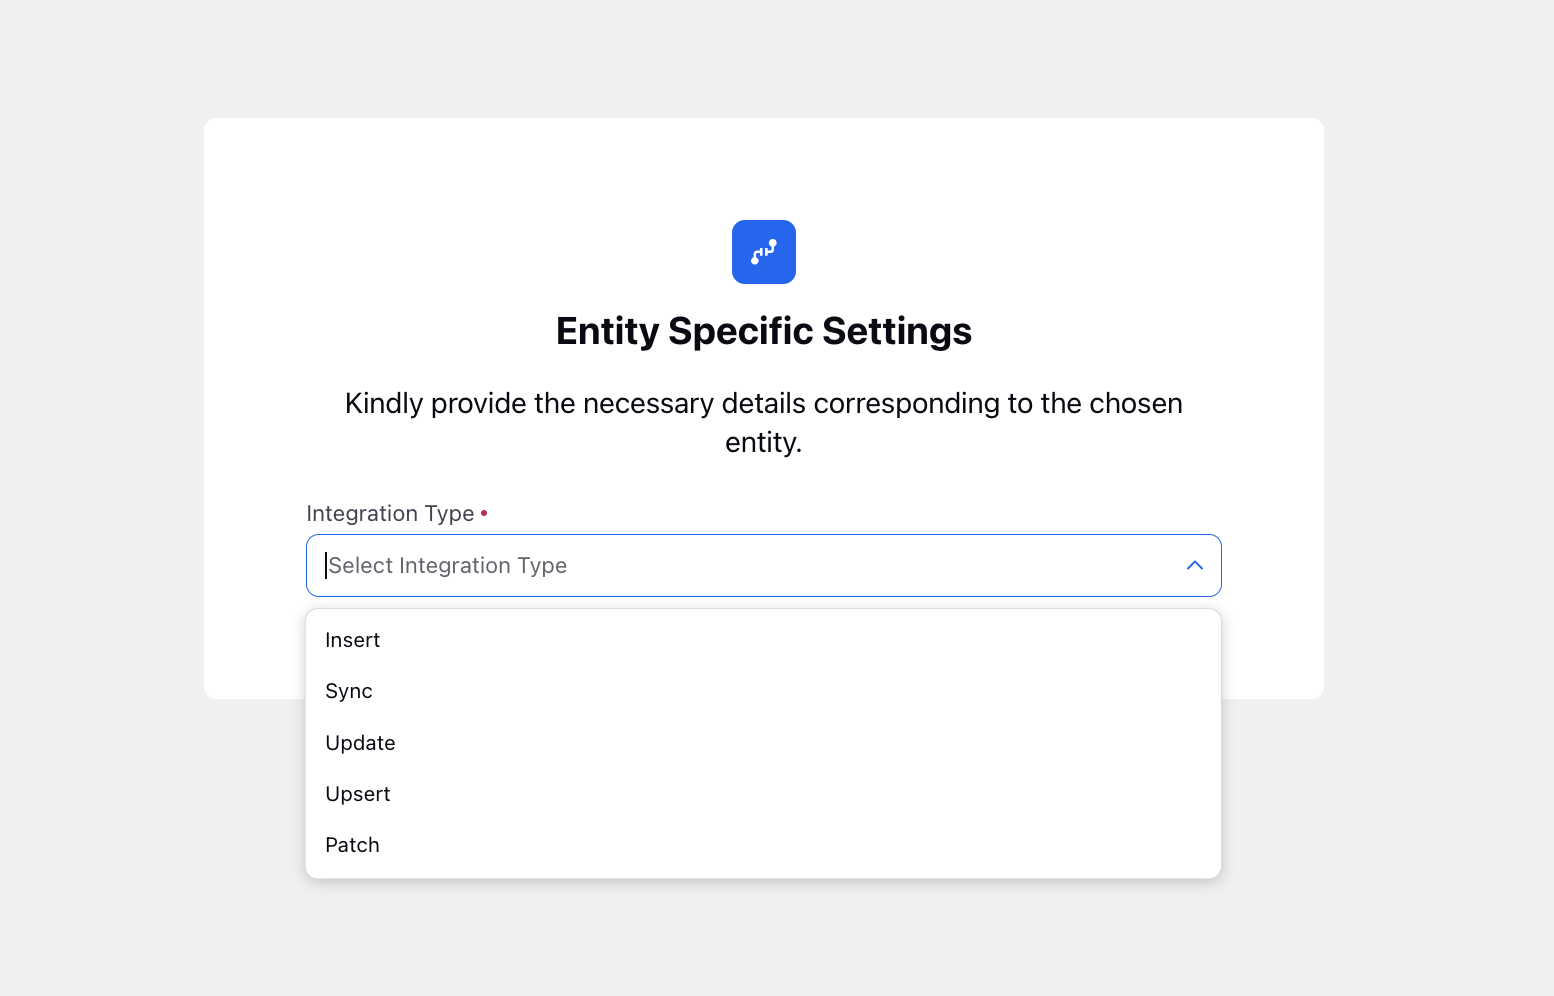
In the Entity Specific Settings window, select the Integration Type. The available options are:
Insert
Sync
Update
Upsert
Patch
For System Entities:
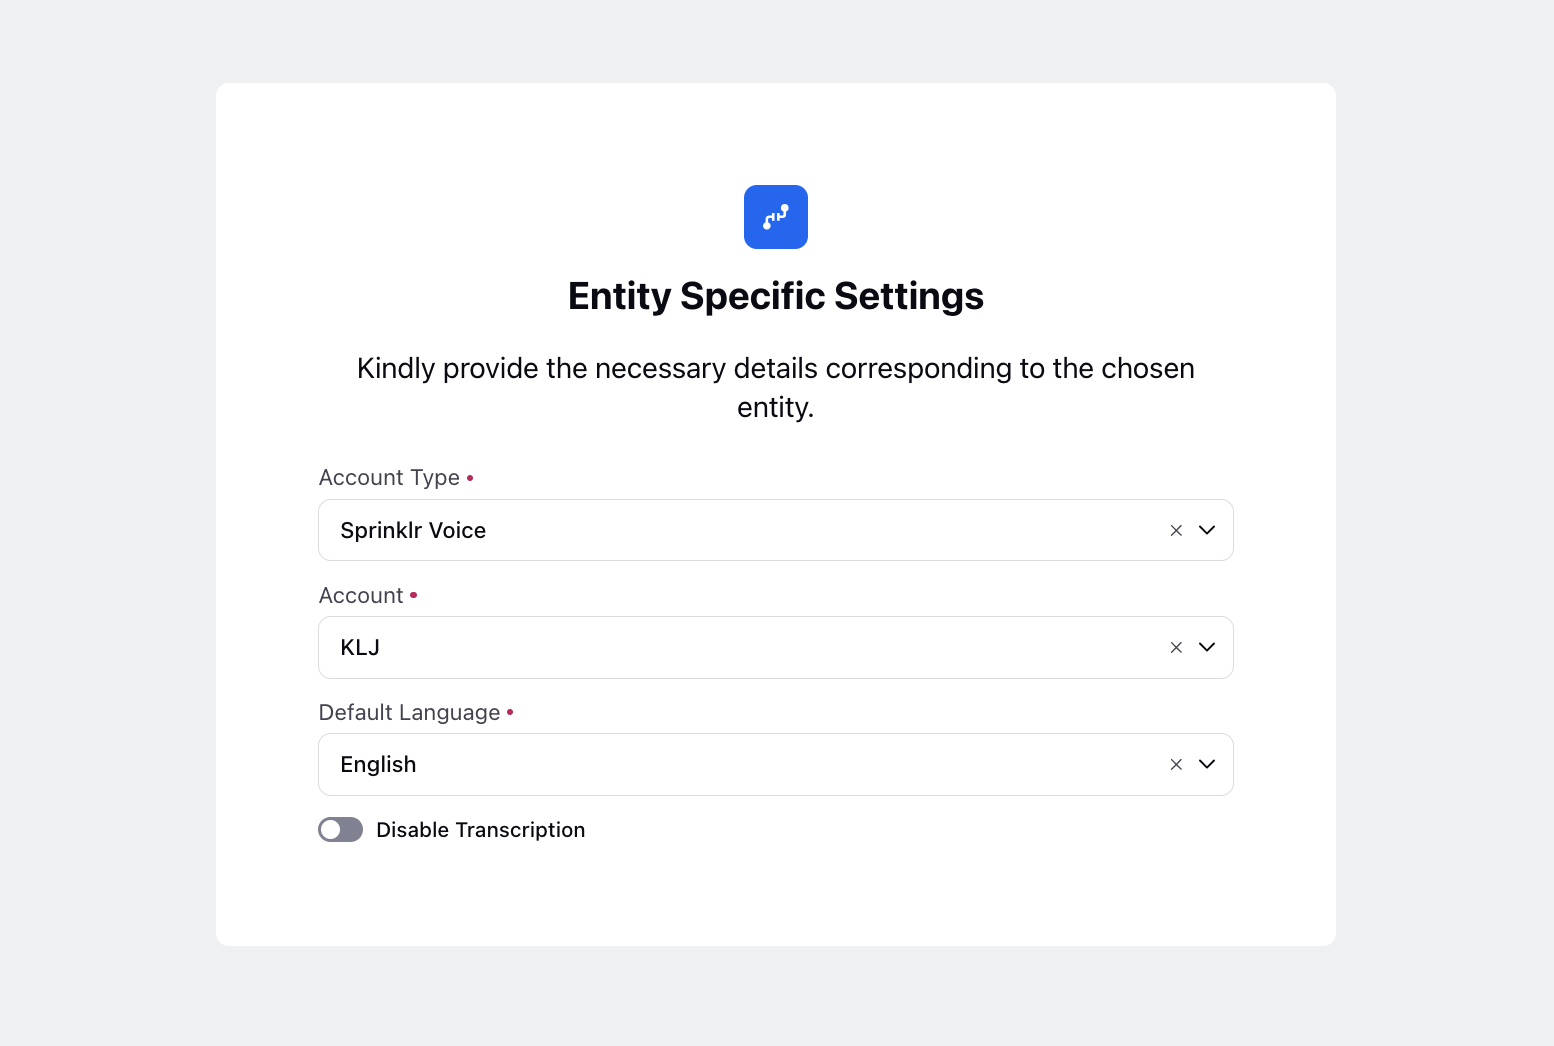
In the Entity Specific Settings window, choose the Account Type. The available options are:
Sprinklr Voice
Sprinklr Live Chat
Email
Select the Account (either create a new one or select an existing account).
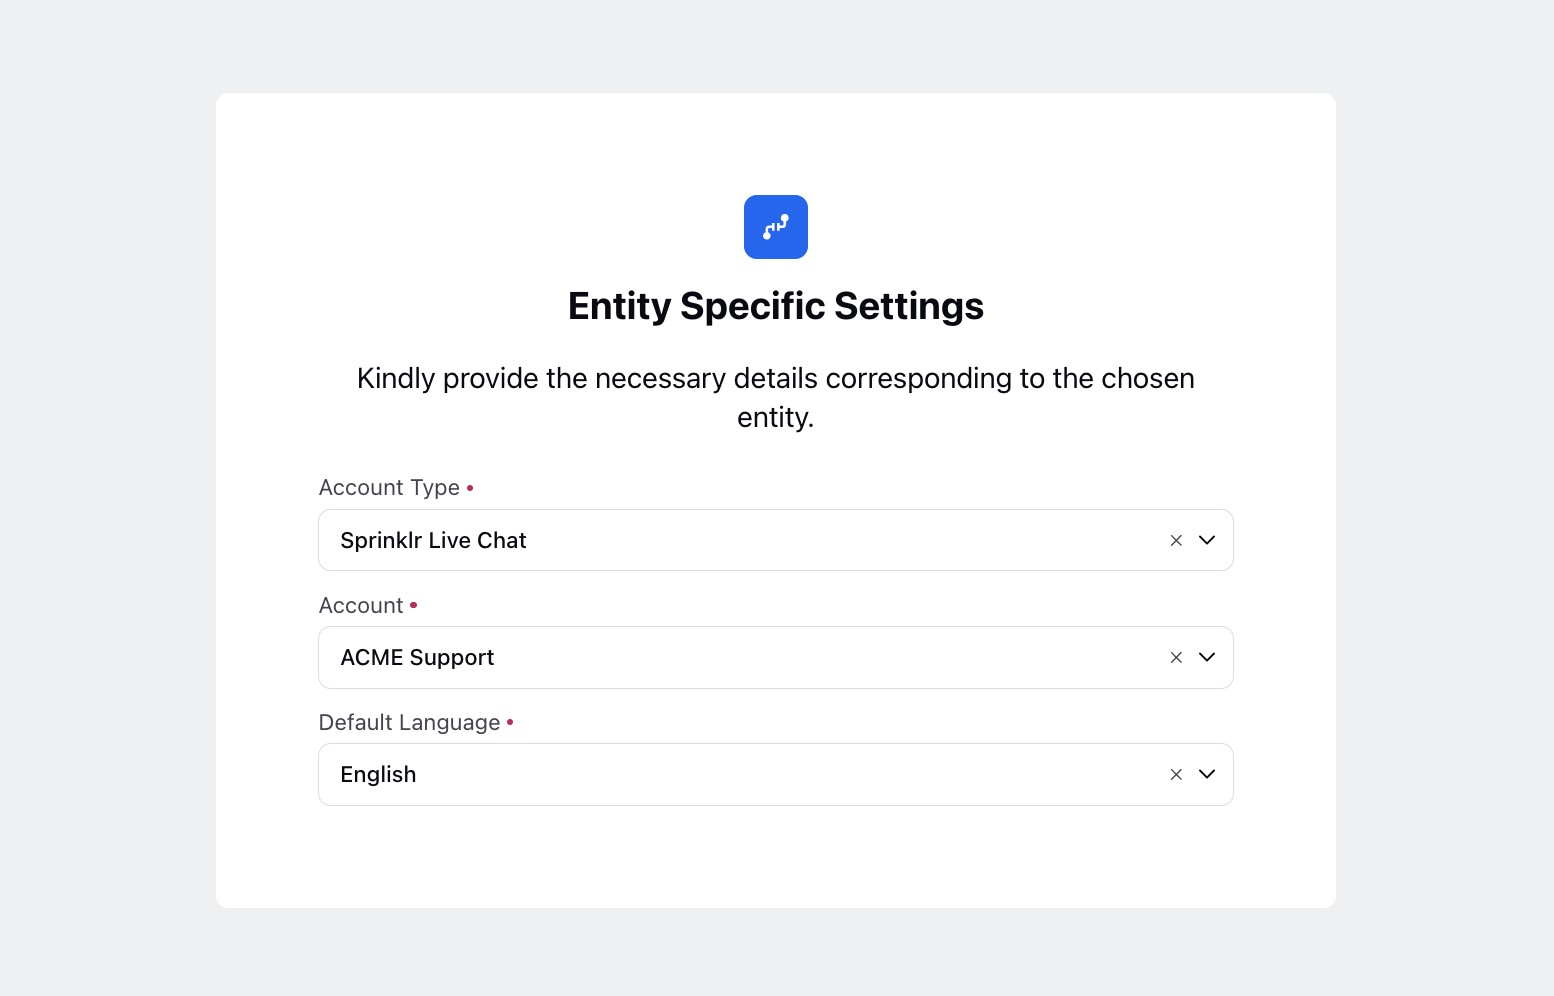
Choose the Default Language as desired.
For Sprinklr Voice:
Enable the toggle of Disable Transcription to disable automatic transcription of voice interactions.
Click Next.
Connector Details
Fill in the required details for the connector:
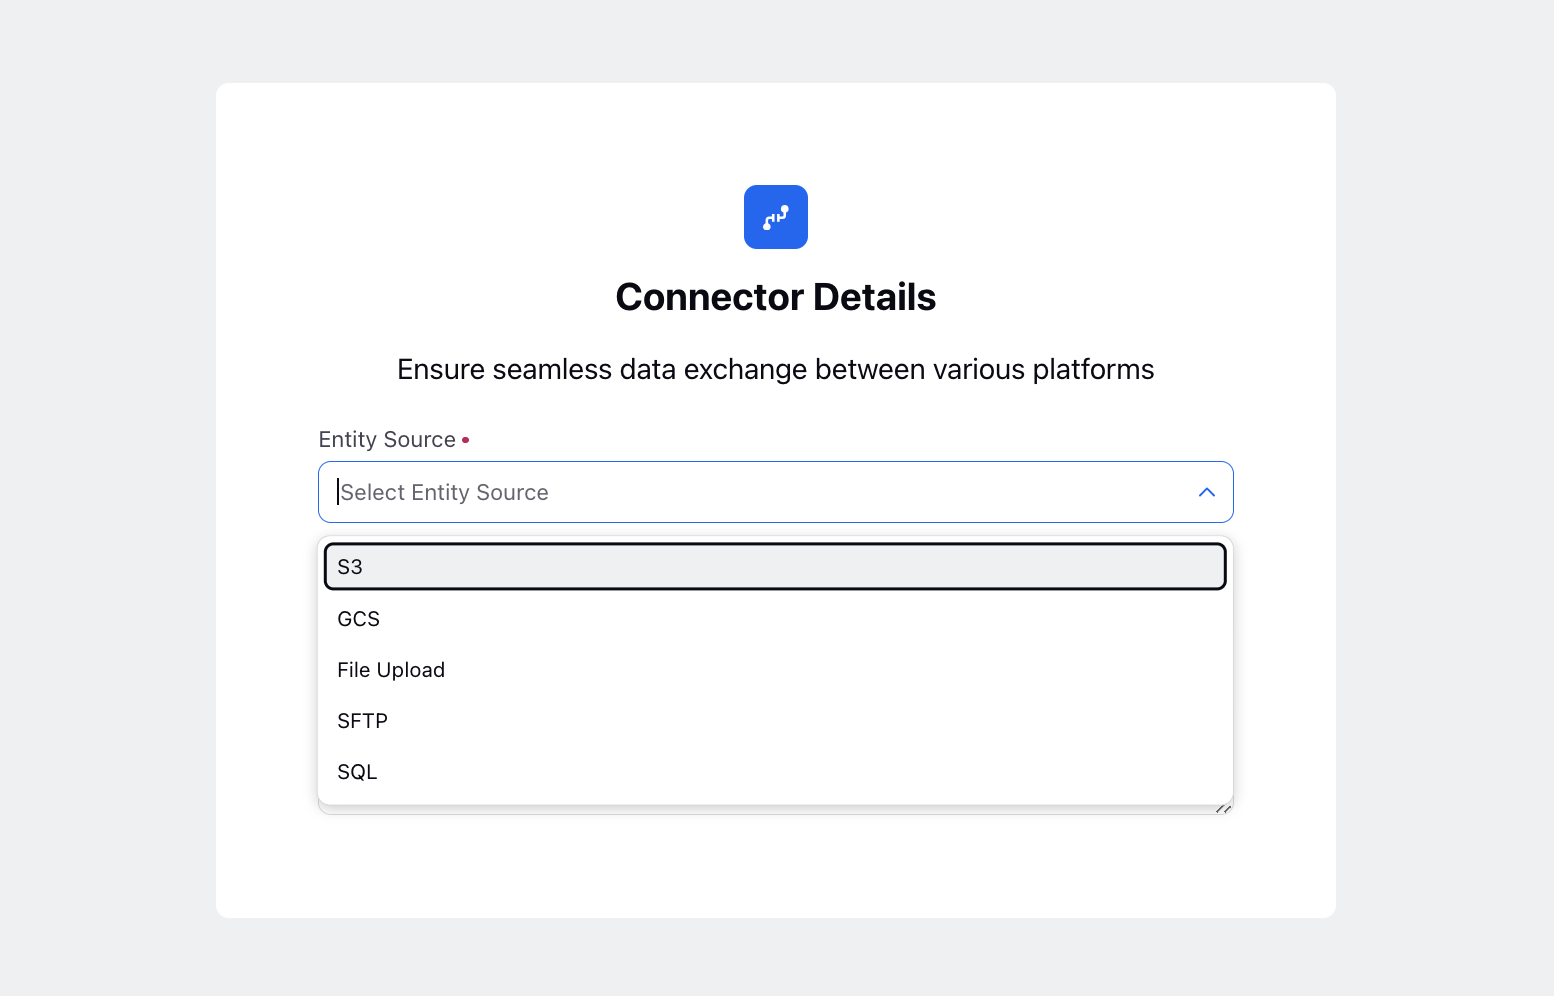
Entity Source: Specify the source of the entity. The available options are:
S3
GCS
File Upload
SFTP
SQL (Only for Standard and Custom Entities)
Connector Name: Provide a name for the connector.
Description: Add a description for the connector.
Click Next.
Source Specifications - Depending on the selected Entity Source, additional specifications need to be configured.
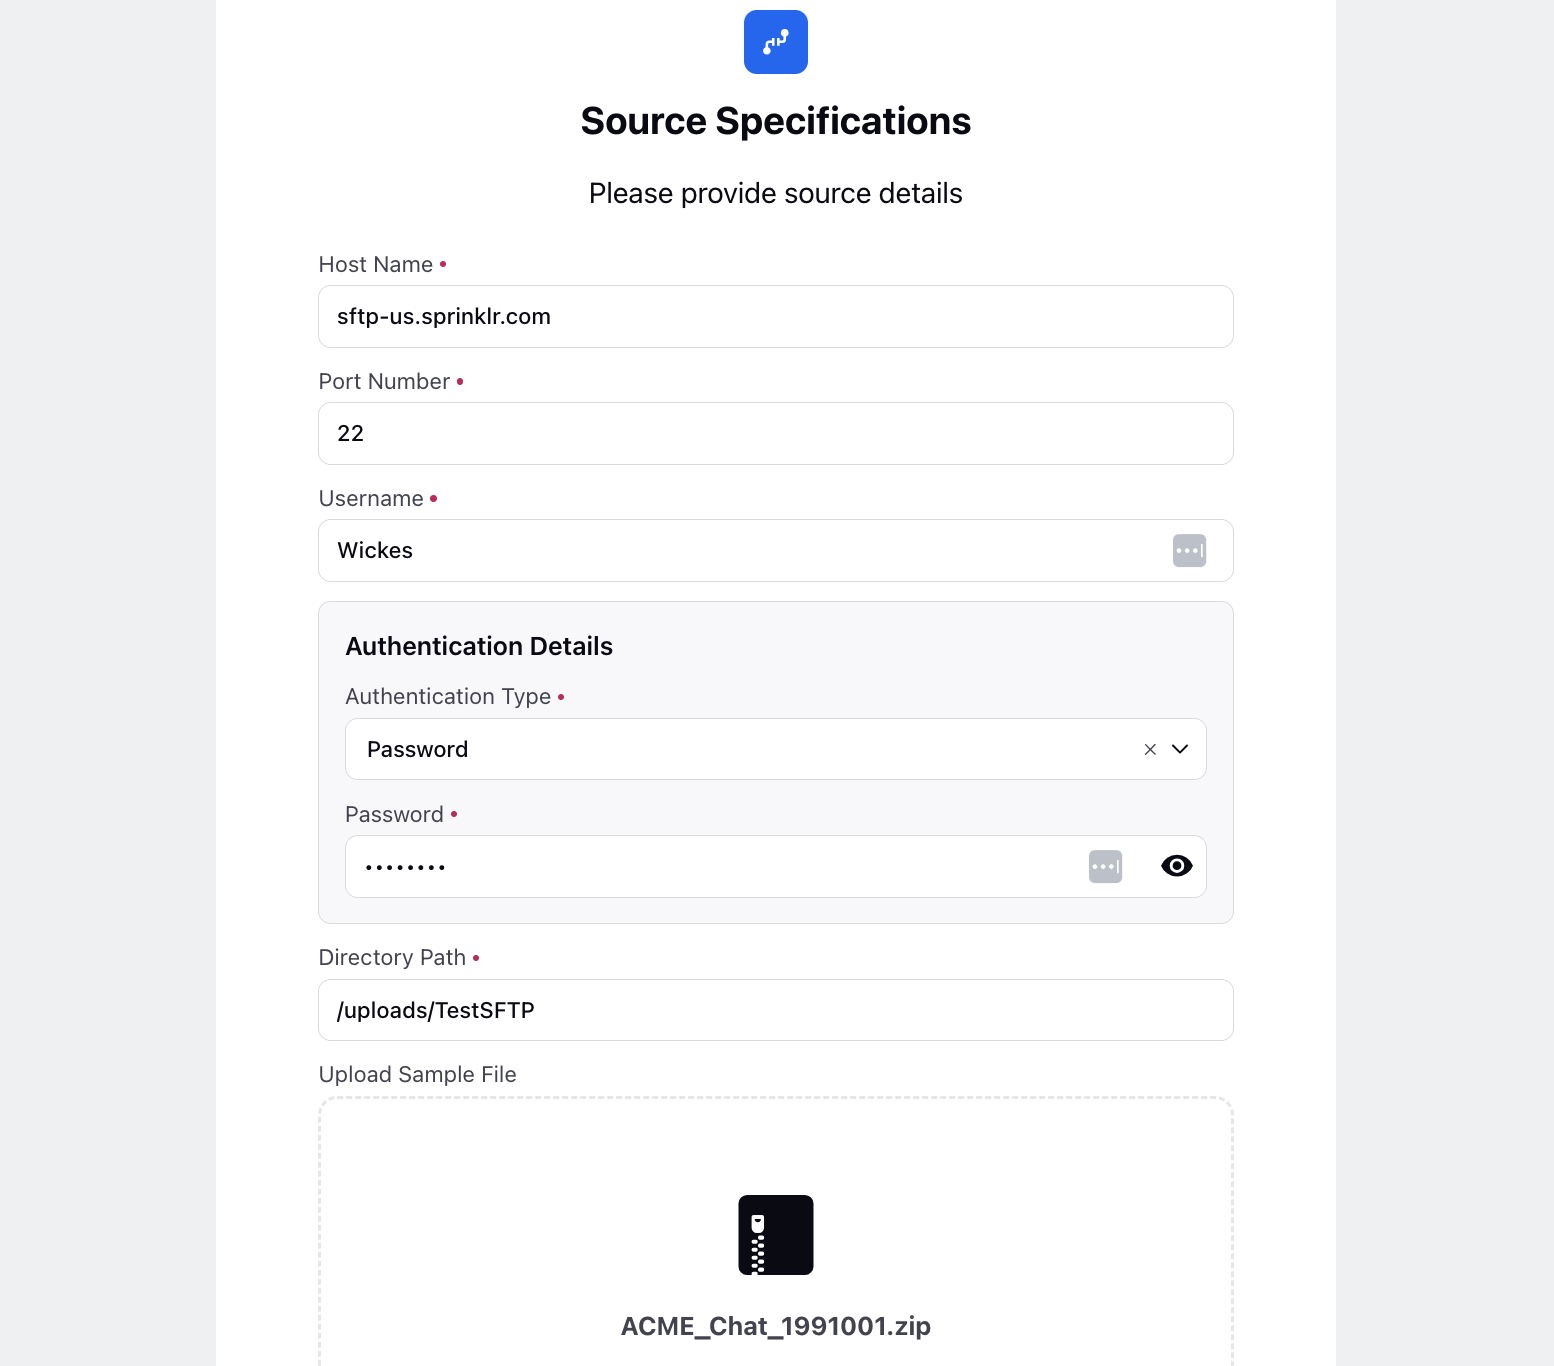
For SFTP, follow these steps:
Host Name: Enter the host name of the SFTP server.
Port Number: The default port number is 22.
Username: Enter the username for the SFTP server.
Authentication Details: Select the authentication type from the dropdown menu.
Directory Path: Specify the directory path on the SFTP server, with the default being /.
Upload Sample File: Drag and drop attachments here. Supported file formats include ZIP and GZ, with a maximum size of 10.0 MB. For Live Chat, it should include both a metadata file and a message file. For Voice, ensure it includes both a metadata file and an audio file.
Source File Prefix: Provide the prefix for the source files.
Metadata File Extension: Select the file extension for metadata files from the dropdown menu.
Metadata File - CSV Delimiter Type: Select the delimiter type for CSV metadata files from the dropdown menu.
Metadata File Prefix: Provide the prefix for metadata files.
Messages File Prefix: Provide the prefix for message files.
Messages File - CSV Delimiter Type: Select the delimiter type for CSV message files from the dropdown menu.
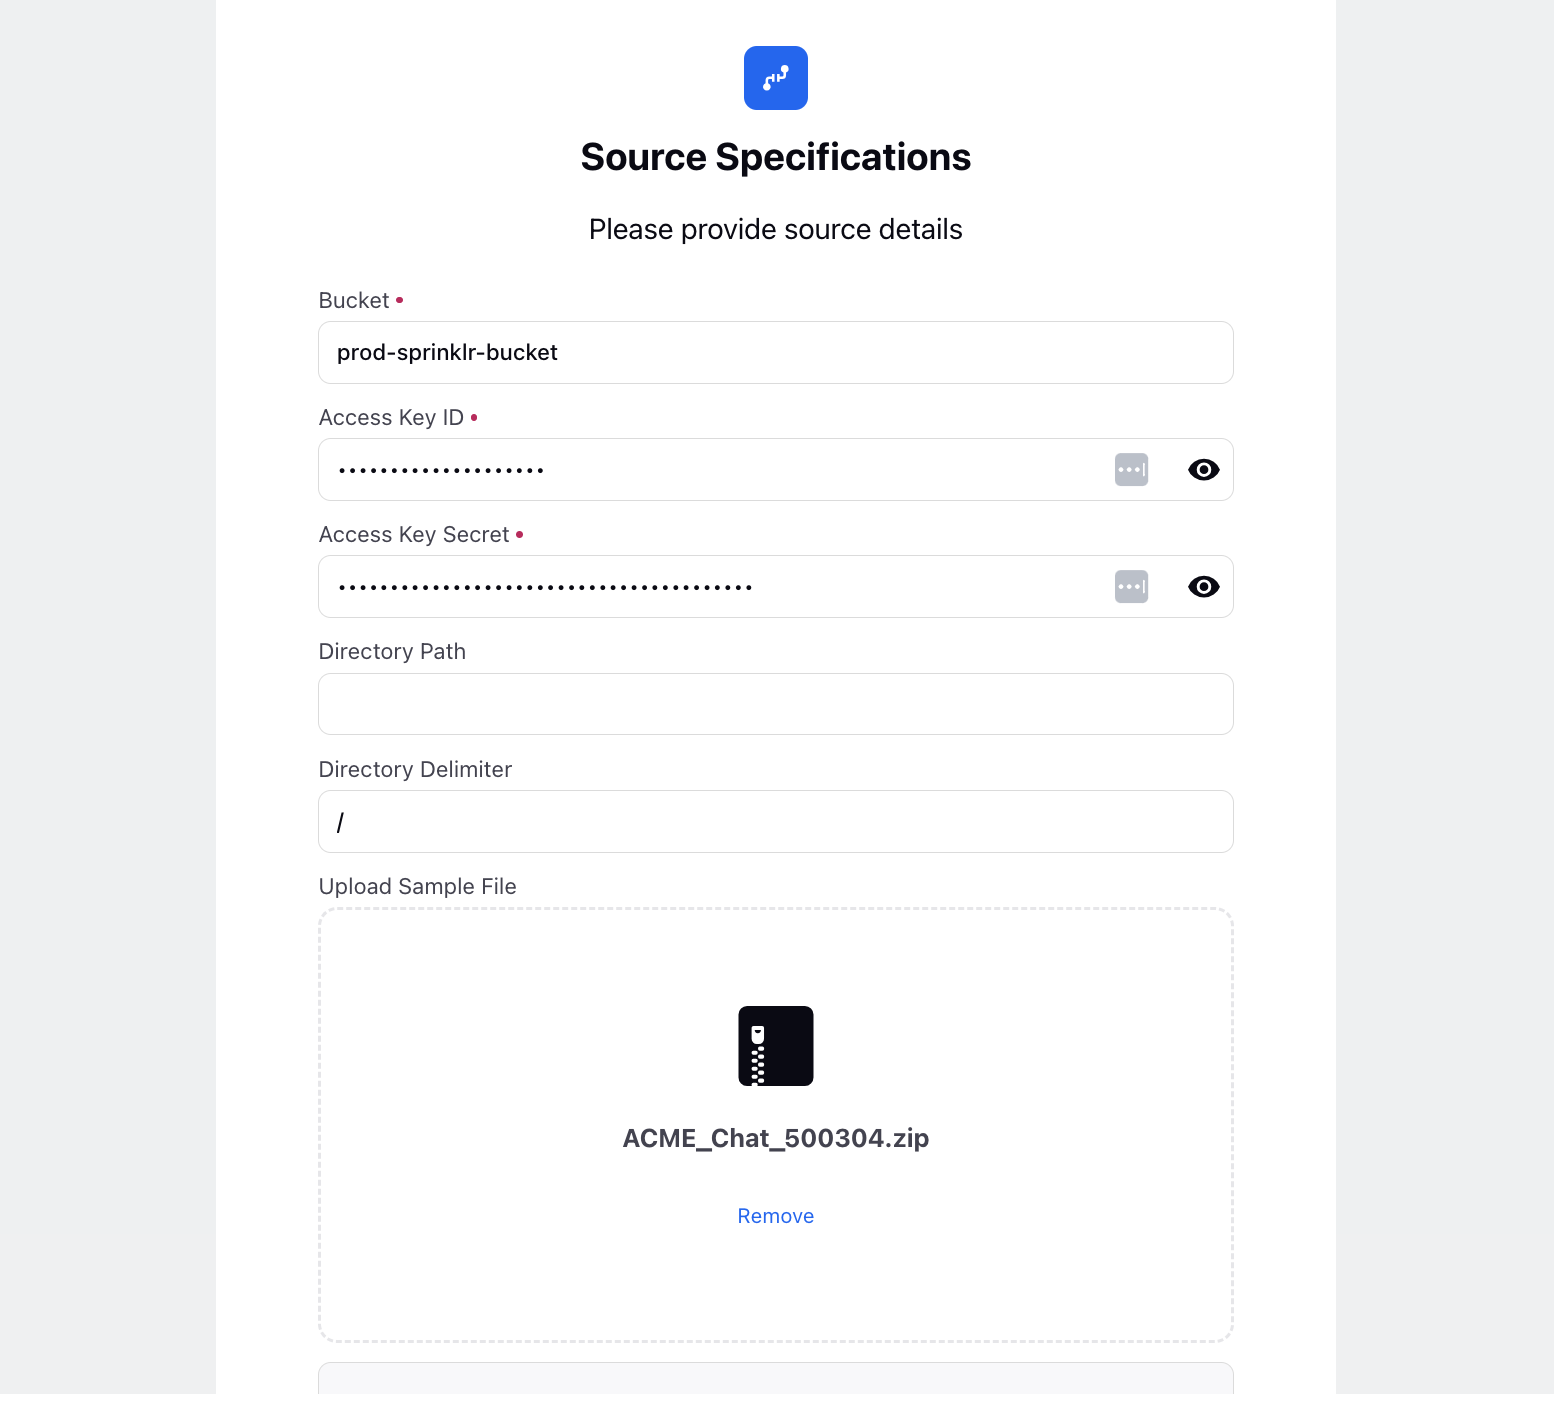
For S3, follow these steps:
Bucket: Enter the name of the S3 bucket where your data files are stored.
Access Key ID: Provide the Access Key ID associated with your AWS IAM user or role that has permissions to access the S3 bucket.
Access Key Secret: Enter the corresponding Access Key Secret, which serves as the password for the Access Key ID.
Directory Path: Specify the directory path within the S3 bucket where the files are located. The default delimiter is /.
Upload Sample File: Drag and drop attachments here. Supported file formats include ZIP and GZ, with a maximum size of 10.0 MB. For Live Chat, it should include both a metadata file and a message file. For Voice, ensure it includes both a metadata file and an audio file.
Source File Prefix: Provide a prefix that identifies the source files in the S3 bucket.
Metadata File Extension: Select the file extension for metadata files from the dropdown menu.
Metadata File - CSV Delimiter Type: Select the delimiter type for CSV metadata files from the dropdown menu.
Metadata File Prefix: Specify a prefix for metadata files associated with your data.
Messages File Prefix: Define a prefix for message files, if relevant to your data integration.
Messages File - CSV Delimiter Type: Choose the delimiter type for CSV files used in your data integration process.
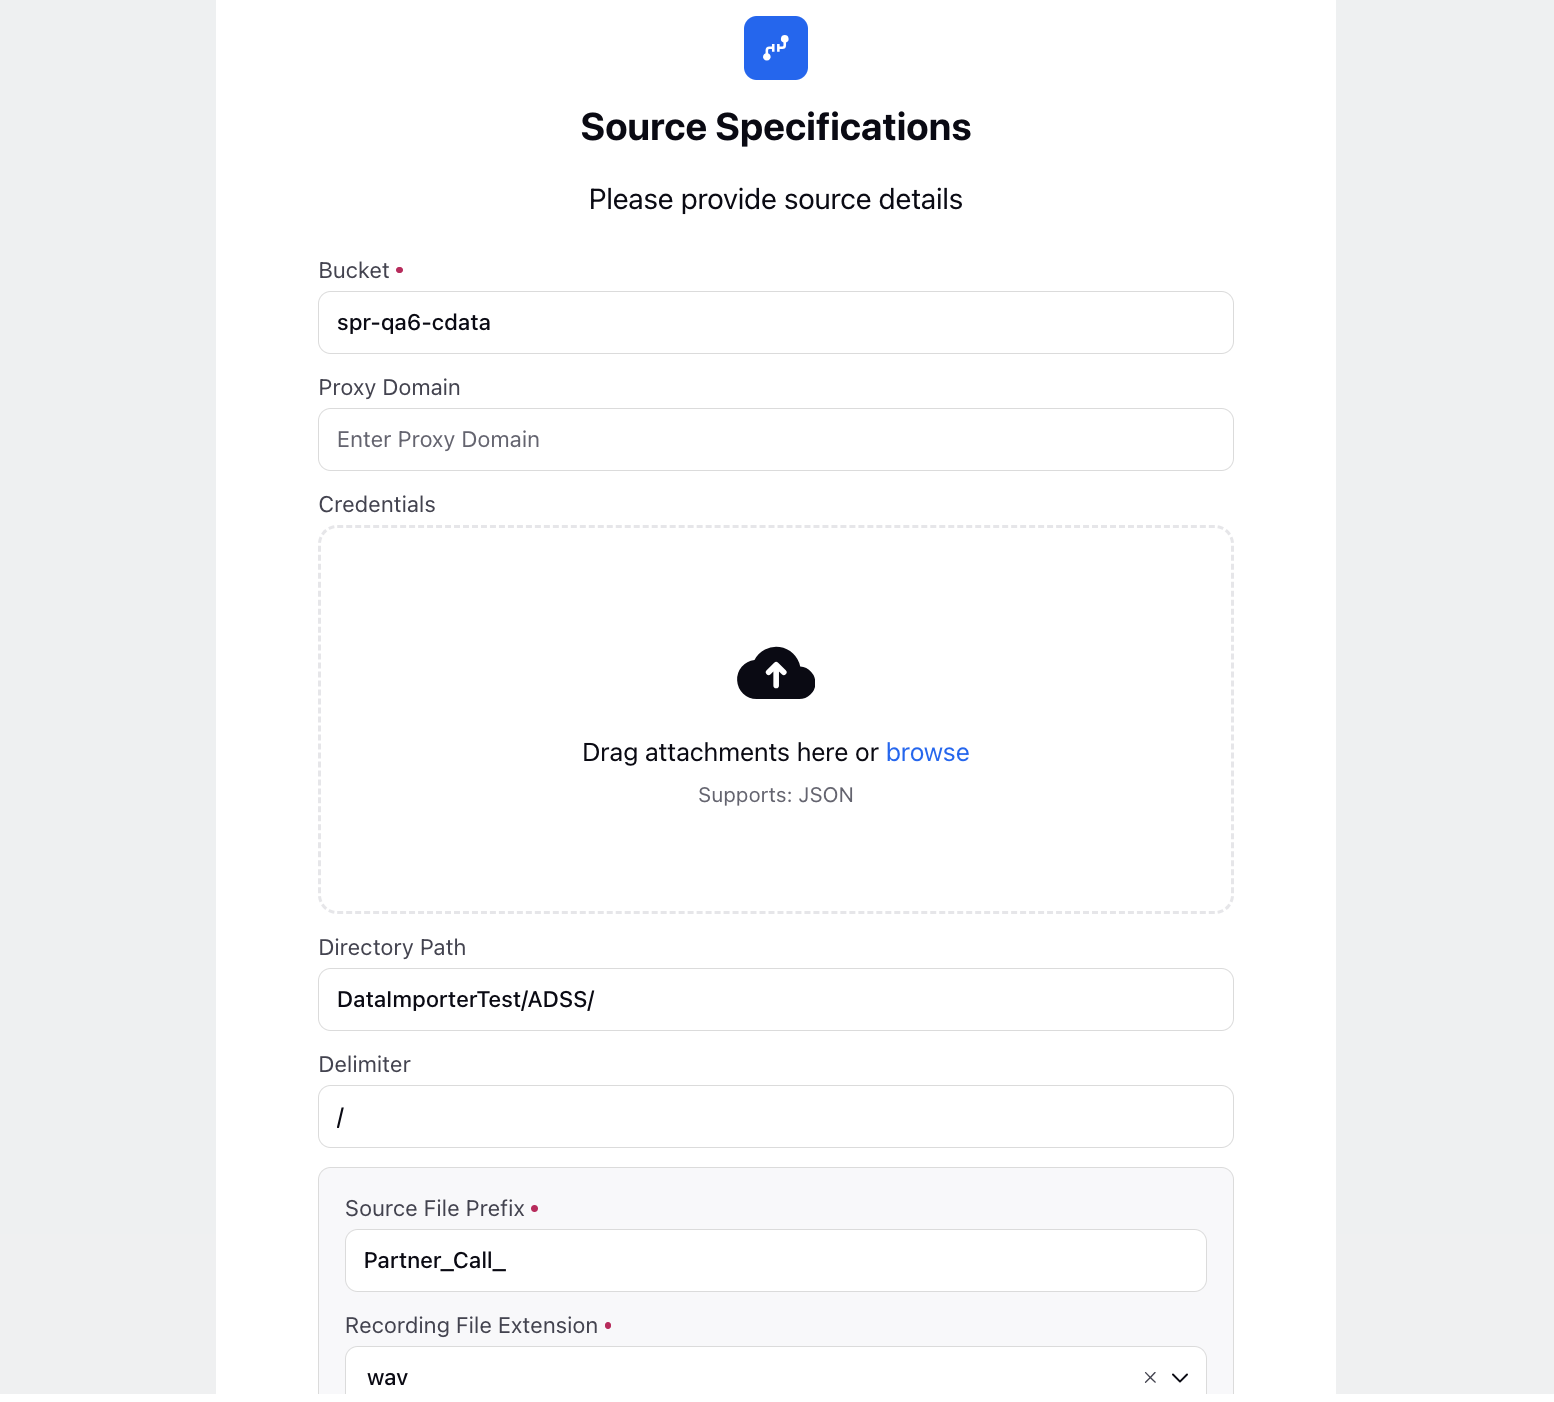
For GCS, follow these steps:
Bucket: Enter the name of the Google Cloud Storage bucket where your data files are stored.
Proxy Domain: If applicable, enter the proxy domain information for accessing GCS.
Credentials: Drag and drop attachments here for credential files, supporting JSON format.
Directory Path: Specify the directory path within the GCS bucket where the files are located. The default delimiter is /.
Delimiter: Define the delimiter used in the directory structure if different from the default /.
Source File Prefix: Provide a prefix that identifies the source files in the GCS bucket.
Metadata File Extension: Select the file extension for metadata files from the dropdown menu.
Metadata File - CSV Delimiter Type: Select the delimiter type for CSV metadata files from the dropdown menu.
Metadata File Prefix: Specify a prefix for metadata files associated with your data.
Messages File Prefix: Define a prefix for message files, if relevant to your data integration.
Messages File - CSV Delimiter Type: Choose the delimiter type for CSV files used in your data integration process.
Upload Sample File: Drag and drop attachments here. Supported file formats include ZIP and GZ, with a maximum size of 10.0 MB. For Live Chat, it should include both a metadata file and a message file. For Voice, ensure it includes both a metadata file and an audio file.
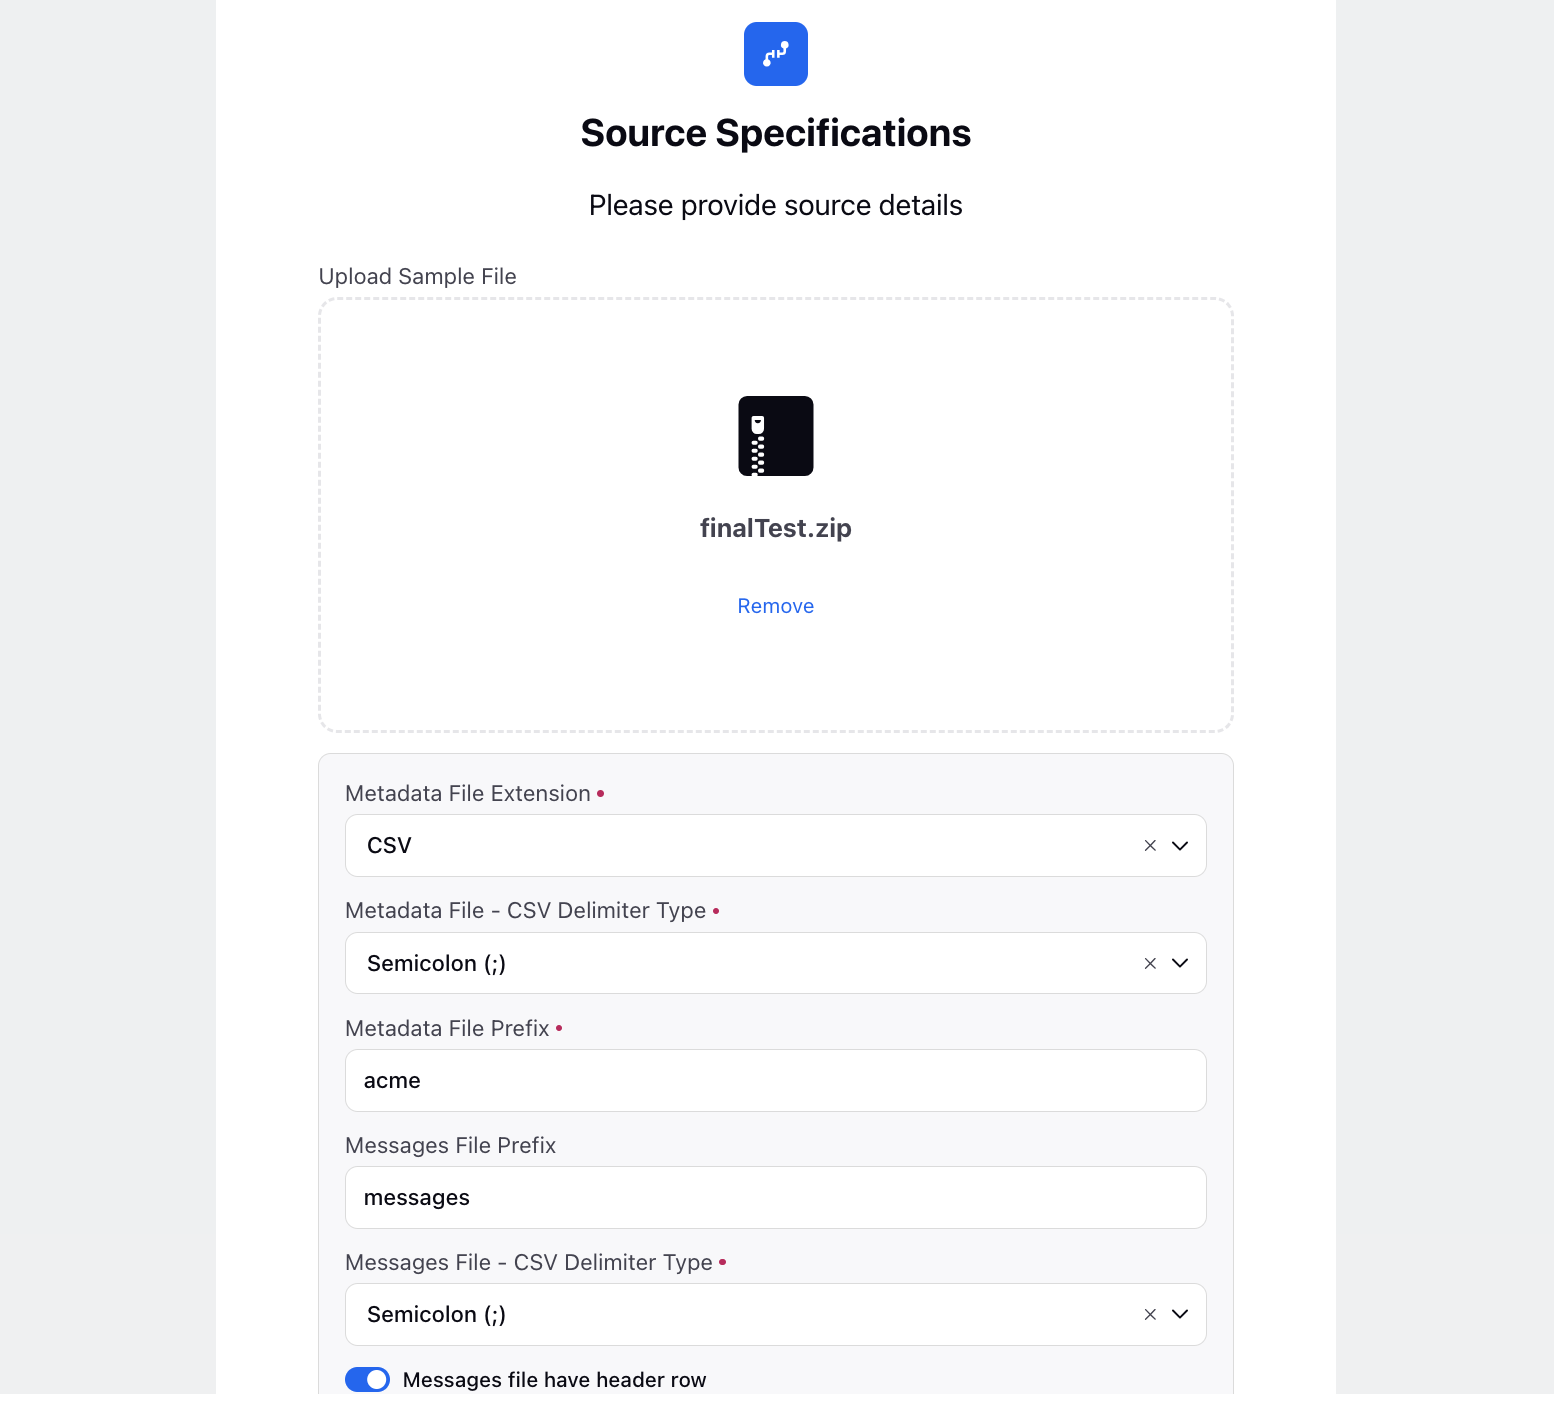
For File Upload, follow these steps:
Upload Sample File: Drag and drop attachments here. Supported file formats include ZIP and GZ, with a maximum size of 10.0 MB. For Live Chat, it should include both a metadata file and a message file. For Voice, ensure it includes both a metadata file and an audio file.
Metadata File Extension: Select the file extension for metadata files from the dropdown menu.
Metadata File - CSV Delimiter Type: Select the delimiter type for CSV metadata files from the dropdown menu.
Metadata File Prefix: Specify a prefix for metadata files associated with your uploaded data.
Messages File Prefix: Define a prefix for message files, if relevant to your data integration.
Messages File - CSV Delimiter Type: Choose the delimiter type for CSV files used in your data integration process.
Define Mapping
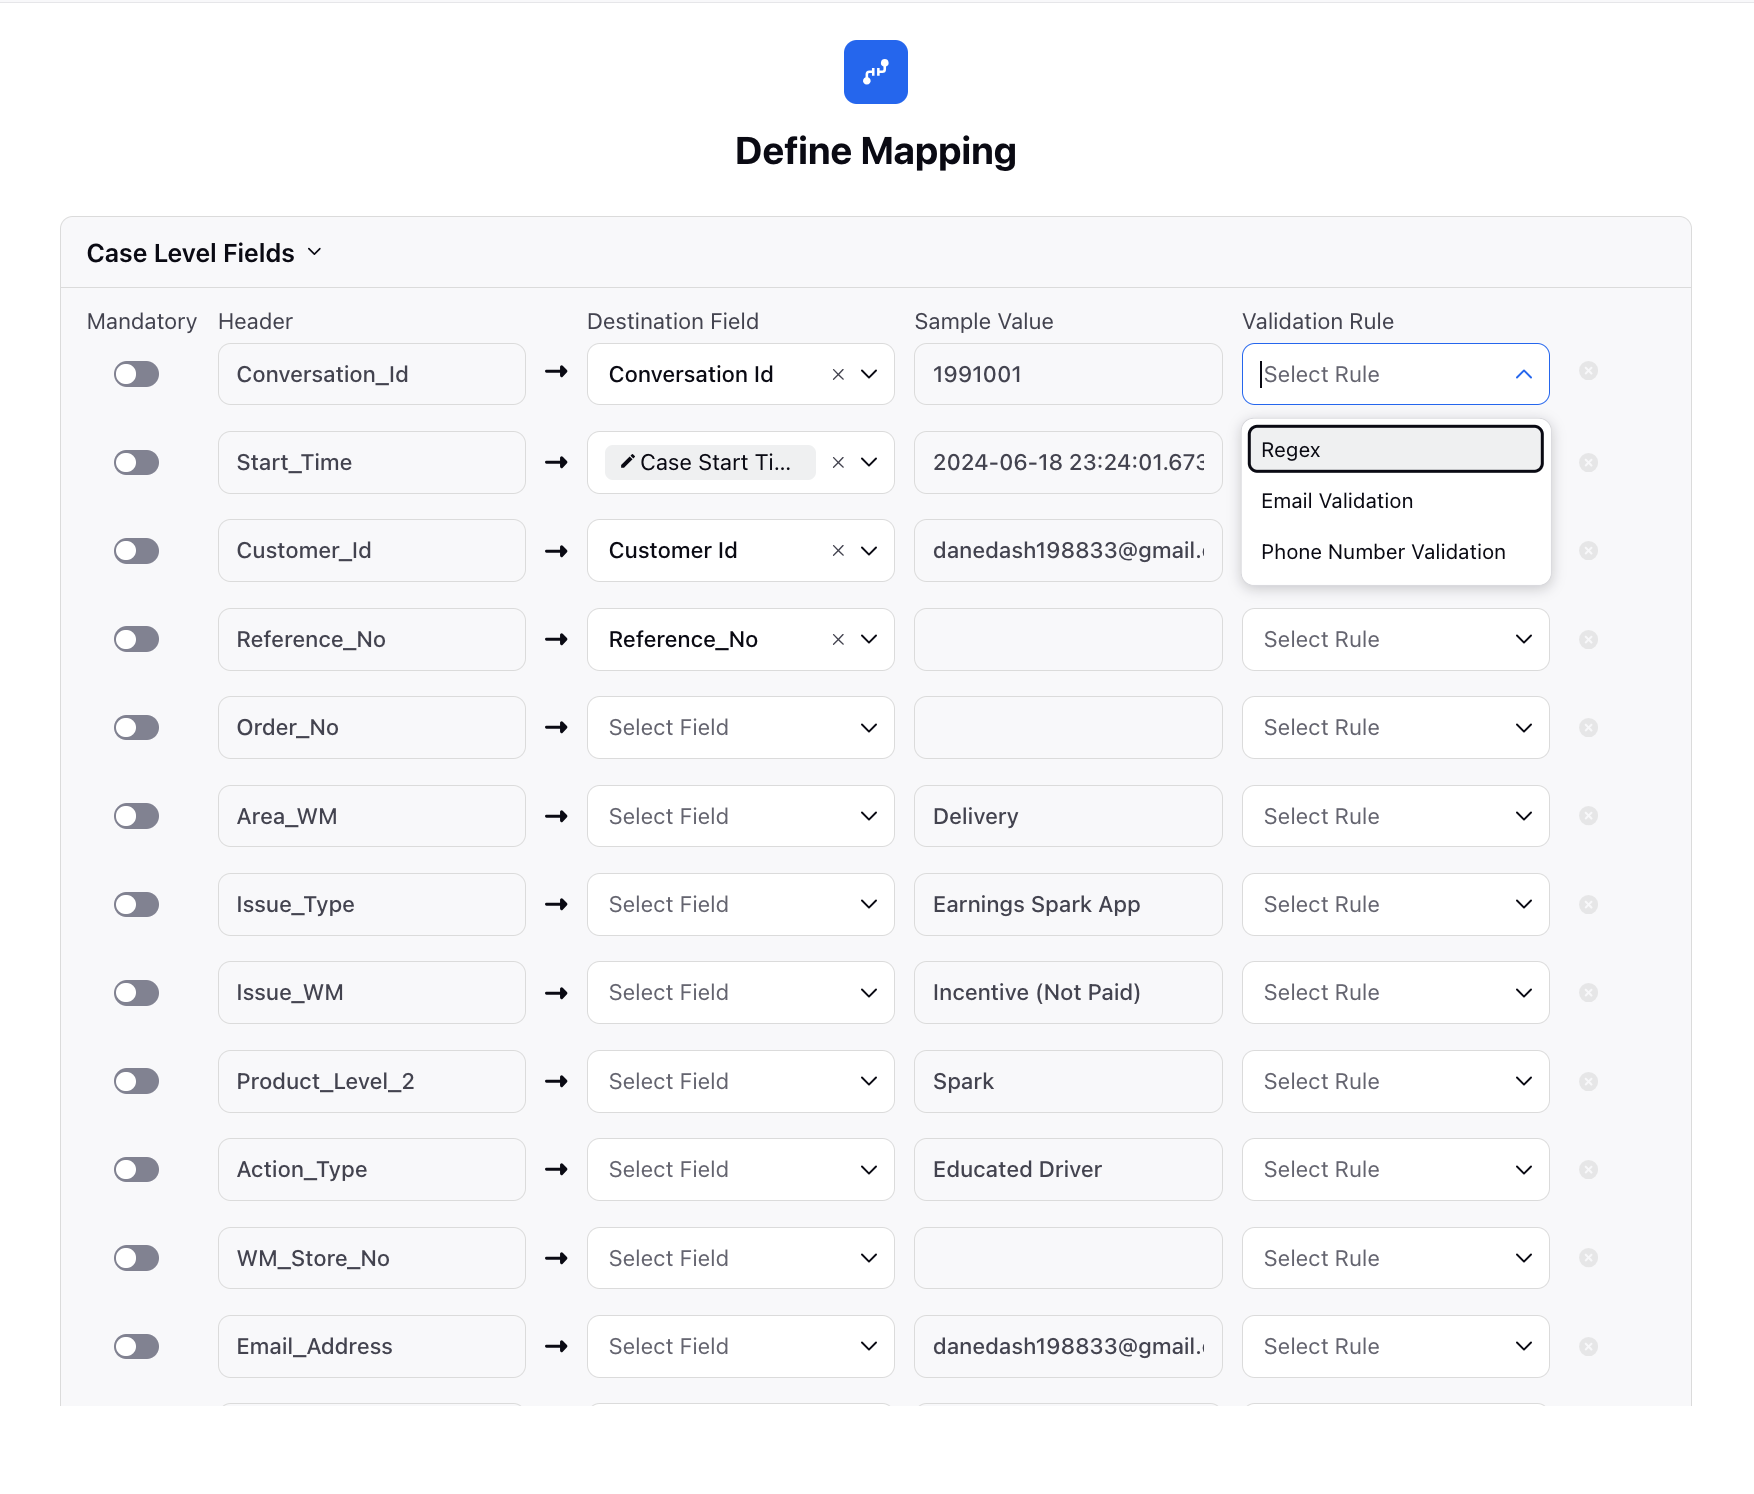
Once you have uploaded your files and configured the source specifications, proceed to the Define Mapping tab to map the columns from your uploaded files to the corresponding custom or standard entity fields within Sprinklr. Here's how you can configure mappings and apply validation rules:
Mapping Columns:
Match each column from your uploaded files to the appropriate custom or standard field in Sprinklr. This step ensures that data is accurately transferred and interpreted within the system.
Here are the standard fields for each type specified:
Live Chat Case
Case Level Fields
Conversation ID*
Customer ID
Case Start Time
Time Zone* - Time zone associated with the timestamps.
Date Time Format* - Format of the date and time.
Message Level Fields
Author Id - Every message has an author ID to determine if the message is sent by the agent or the customer.
If the customer ID in the metadata file matches the author ID in the message file, the message is sent by the customer; otherwise, it is sent by an agent (or bot).
External Agent ID - This refers to a customizable User custom field within Sprinklr that will store the External Agent ID from the message file. This field helps identify which agent sent each message.
Sprinklr matches the Author ID from the message file with the selected User custom field. If the Author ID in a message matches a value stored in the selected User custom field, Sprinklr retrieves the name or identifier of the agent associated with that Author ID.
Author Type
Values signifying customer message - Values indicating that the message originated from the customer.
Values signifying brand message - Values indicating that the message originated from the brand.
Customer ID
Message Text*
Message TimeStamp
Time Zone* - Time zone associated with the timestamps.
Date Time Format* - Format of the date and time.
Message ID
Voice Case
Unique Call ID*
Call Start Time
Time Zone* - Time zone associated with the timestamps.
Date Time Format* - Format of the date and time.
Call Language
Call Direction
Values signifying inbound calls: Indicate calls initiated by external parties (customers) towards the brand.
Values signifying outbound calls: Indicate calls initiated by the brand towards external parties (customers).
Agent Id
External Agent ID - This refers to a customizable User custom field within Sprinklr that will store the External Agent ID from the metadata file. This field helps identify which agent handled the voice case.
Sprinklr matches the Agent ID from the metadata file with the selected User custom field. If the Agent ID in a message matches a value stored in the selected User custom field, Sprinklr retrieves the name or identifier of the agent associated with that Agent ID.
Customer Id
*Fields marked with asterisks signify mandatory fields that must be provided for successful data import or processing.
Validation Rules:
Regex Validation: Apply regular expression (Regex) patterns to validate specific formats or structures within your data. This ensures data consistency and accuracy according to predefined patterns.
Email Validation: Mark fields as requiring valid email formats. Entries failing this validation will not be imported unless corrected.
Phone Number Validation: Similarly, enforce valid phone number formats to ensure data integrity for phone-related fields.
Mandatory Fields:
Mark fields as mandatory if their values are essential for successful import. Entries lacking mandatory data will not be imported, helping maintain data completeness and quality within Sprinklr.
Click Next.
Share Settings
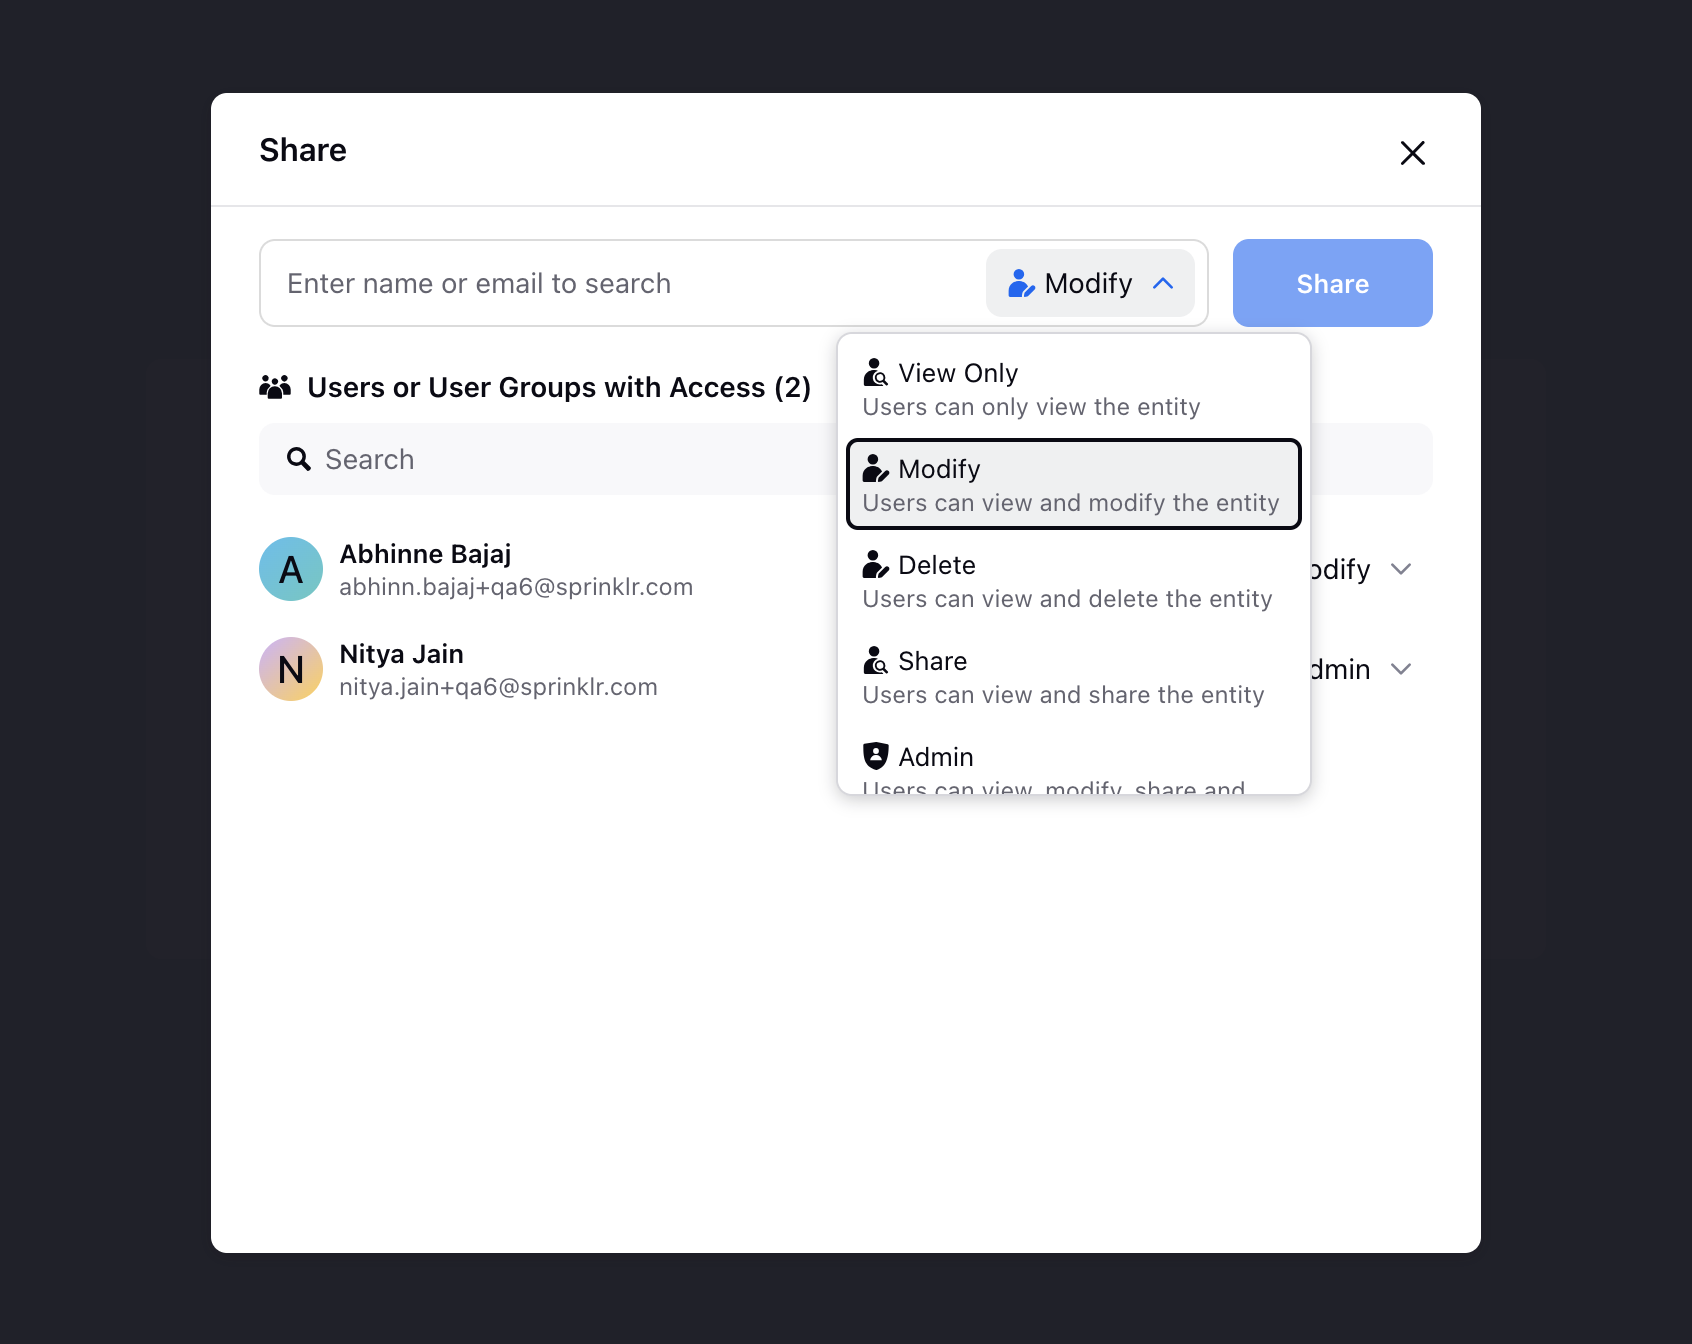
In Share Settings for the created data connector, you can specify users or user groups and assign the following permissions:
View Only: Users can only view the entity.
Modify: Users can view and modify the entity.
Delete: Users can view and delete the entity.
Share: Users can view and share the entity.
Admin: Users have full permissions to view, modify, share, run and delete the entity.
Notifications
You can notify users on the platform and via email about the successful run or alert them to errors for non-recurring connectors such as File Upload and SQL. Only the users with whom a connector is shared will be available for selection to receive notifications about connector activities.
.png)
Click Save at the bottom.
To Run Connector
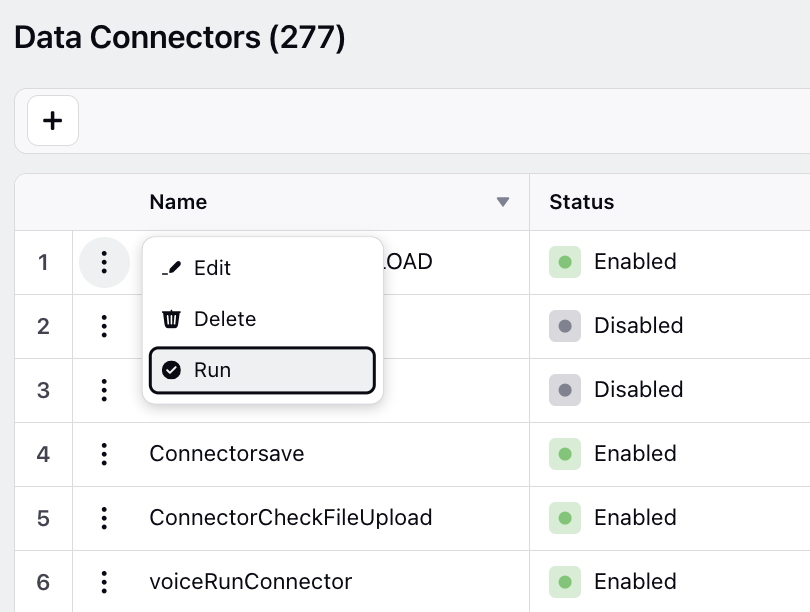
After creating a connector, you can run recurring connectors to test and run non-recurring connectors to create entities in the platform. Hover over the Options icon and select Run. Note that all users with whom the connector is shared will receive notifications of both failures and successes when the connector is run.
.png)