Bulk Import Assets
Updated
Bulk upload enables you to import up to 1,000 assets in a single action, streamlining the process of building your content library. Assets can be added via a .zip file or through direct URLs, offering greater flexibility in how you manage your uploads. This functionality now supports Post assets across LinkedIn, YouTube, Instagram, Facebook, and X (formerly Twitter), alongside the Media assets that were already supported on these channels.
Steps to Bulk Import an Asset
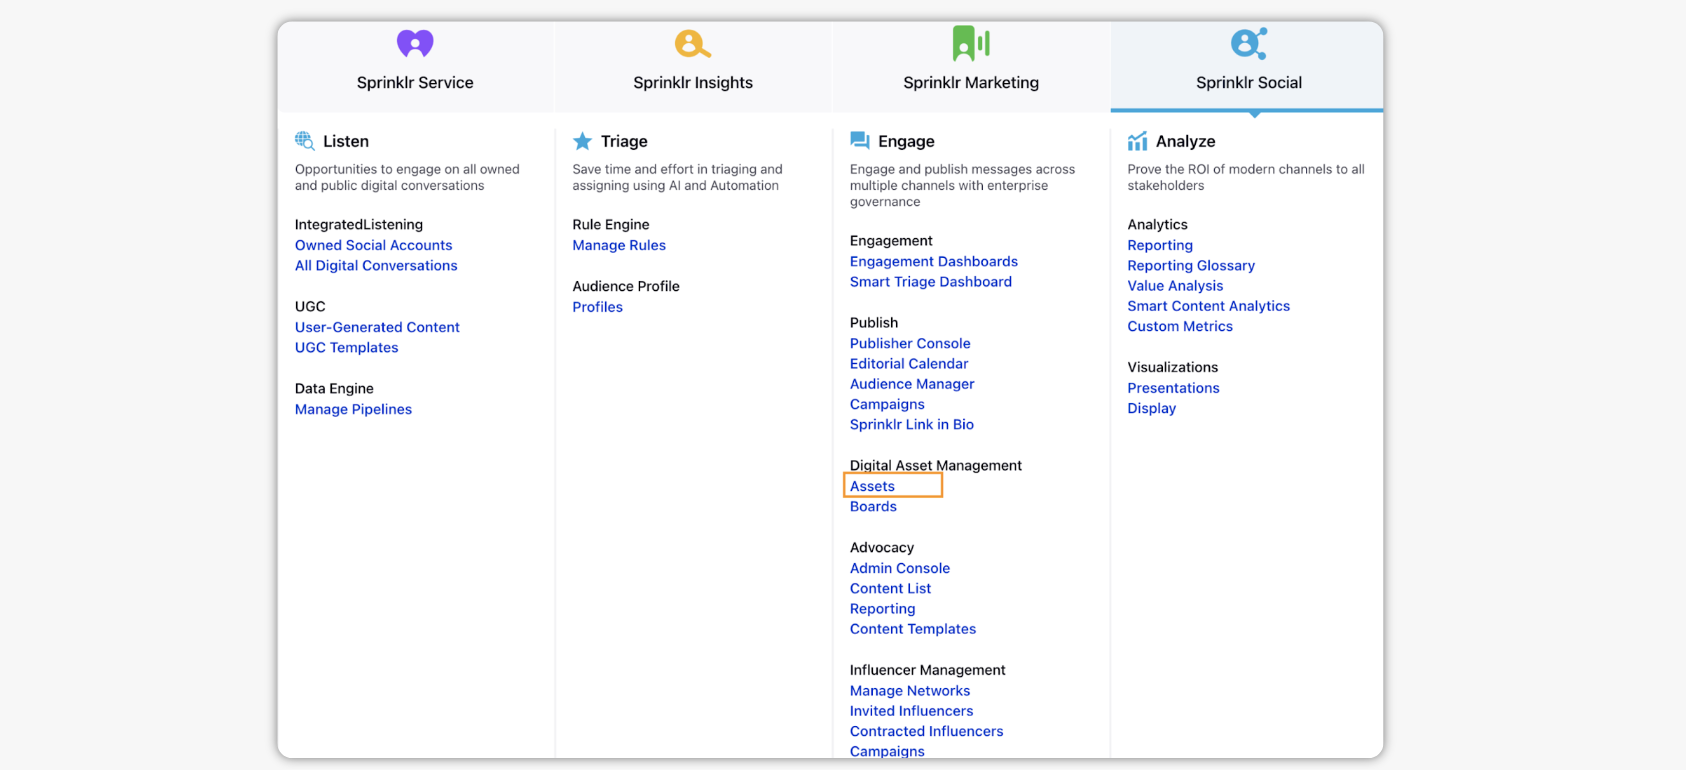
Click the New tab icon
and select Assets under Sprinklr Social.
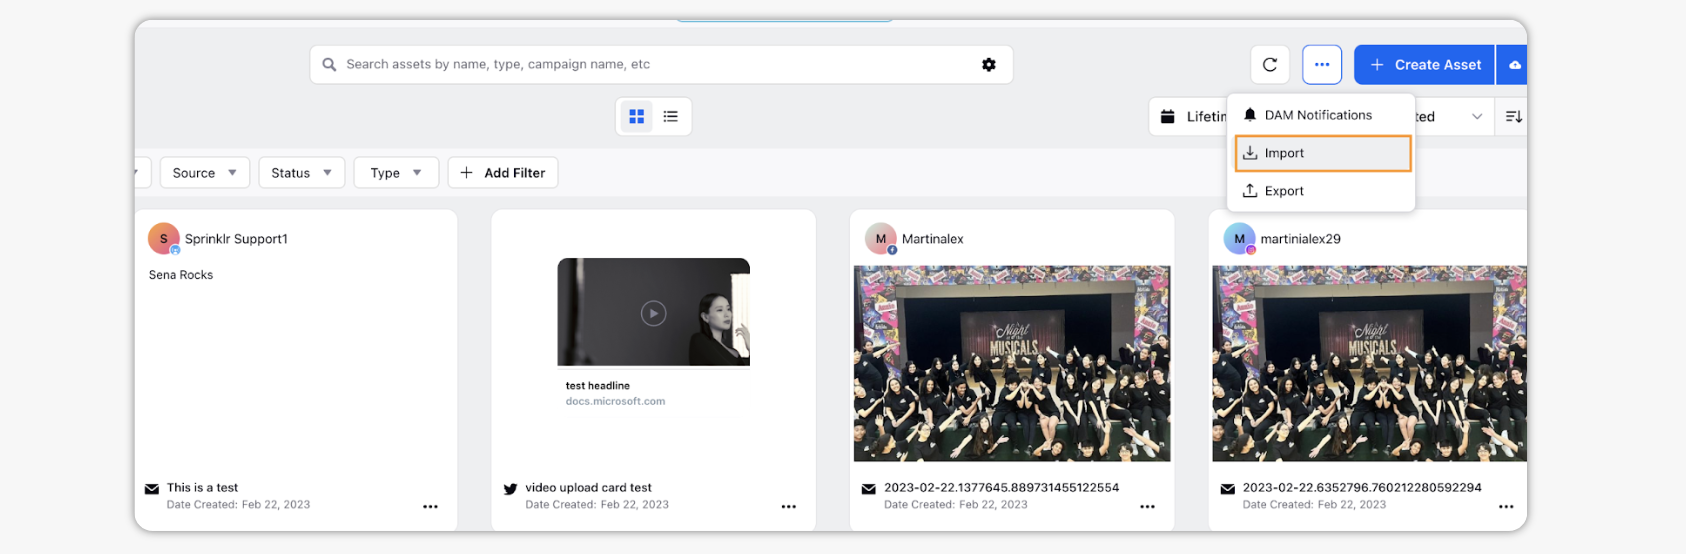
In the top right corner of the Asset Management window, click the Options icon, and select Import.
To import an excel file, drag and drop your file into the upload window or click Upload and select a file from your device.
Note: Click Download sample import file to download a template that can be used for your import.
If uploading assets using a .zip file, select Media Upload (.zip) and choose a .zip file with your corresponding assets below.
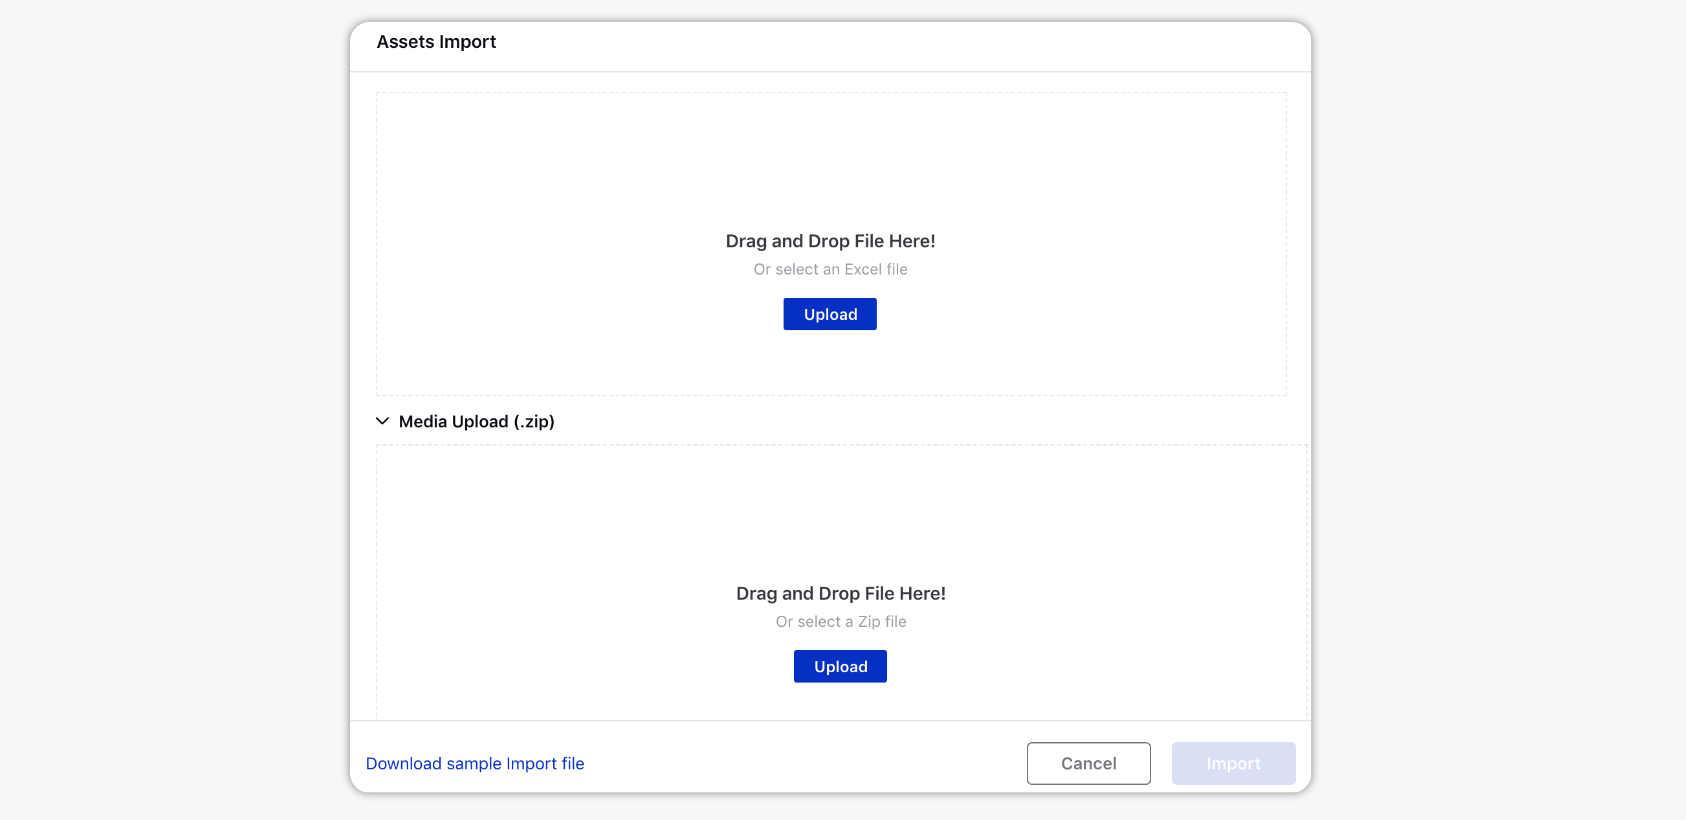
Click Import in the bottom right corner to initiate your asset upload. You will receive a notification when your import is complete.
Steps to Import Asset Fields
1. Media Assets
Below, you'll find the field descriptions present in the Media Asset Template and how they correspond to your asset information.
Note: The Media Asset Template for Import has the same Asset Fields as those in the Media Asset Template for Export. As a result, users do not require any adjustments to the Asset Export File. They need to simply update the asset custom properties and upload the same back to Sprinklr. This will help users to export assets and reimport very simple and less time consuming. |
Media Assets | |
Field | Description |
Asset ID | The ID within Sprinklr; do not fill in this column. |
Asset Name* | The name for your asset; this name is how the asset will appear in the Asset Manager. |
Asset Description | Here you can enter an optional description for your asset. |
Asset Type* | The type of asset you wish to upload; your options for Asset Type include: PHOTO, VIDEO, LINK, TEXT, RTFD, PDF, PRESENTATION, DOC, DOCX, EXCEL, ZIP, PSD, AUDIO, FLASH, HTML, SKETCH, FONT. |
Media Path* | The URL of the asset or the name of the asset file present in the zip folder (if the name of the asset file includes the file extension .png, .pdf, etc.). |
Asset Text | Enter content for the asset. |
Campaigns | Enter the Campaign you wish to associate your asset with. |
Available From | If setting a range of availability, the Available From field for the asset should be in the format: mm/dd/yyyy hh:mm:ss e.g. 04/25/2015 10:25:00 am GMT-08:00 |
Visible From | If setting a range of visibility, the visibility date for the asset should be in the format: mm/dd/yyyy hh:mm:ss e.g. 04/26/2015 10:25:00 am GMT-08:00 The Visible From date can be the same as the Available From. |
Expiry On* | If setting a range of availability, the expiration date for the asset should be in the format: mm/dd/yyyy hh:mm:ss e.g. 04/30/2015 10:25:00 am GMT-08:00 The Expiry On date should always be greater than the Available From date. |
Never Expire | Can be set to TRUE or FALSE to create assets with no expiration. |
Tags | Enter any tags to be applied to the asset. |
Asset Status* | The status that the asset will have upon upload: Approved, Draft, or Expired. |
Restricted | Enter User(s) or User Group(s), you want to restrict the asset from. |
Information | Enter the desired information related to the asset. |
Is Global | Can be set to TRUE or FALSE to share assets globally. |
Shared with Clients | Enter the names of Clients the asset should be shared with; separate multiple Clients by a comma. |
Shared with Client Groups | Enter the names of Client Groups the asset should be shared with; separate multiple Client Groups by a comma. |
Shared with Users - Emails | Enter the emails associated with Users with whom you wish to share the asset; separate multiple User emails by a comma. |
Shared with User Groups | Enter the names of User Groups the asset should be shared with; separate multiple User Groups by a comma. |
Custom Fields | If you have Custom Fields in your environment that can be applied to assets, you will see them in your downloaded Media Asset Template. Enter the name or names under each Custom Field to apply that field to the asset. |
Ignore | By entering "Yes" in the Ignore column, you can indicate that Sprinklr should ignore the asset details for a specific row. Ignored rows will not be uploaded in the Asset Manager. |
![]() Note: * symbol denotes mandatory fields
Note: * symbol denotes mandatory fields
2. Post Assets
Post Asset Support Across Channels
Standard posts are supported across all channels. However, each channel has specific limitations when it comes to bulk uploading via Excel:
LinkedIn supports bulk upload of only posts, which includes text, images, videos, but not polls posts via Excel. Poll posts remain supported via the UI.
YouTube supports only posts through Excel.
Facebook supports posts, stories, and reels through Excel.
Instagram also supports posts, stories, and reels. However, carousel posts are not supported.
X (formerly Twitter) supports messages, but threads are not supported for bulk uploads.
![]() Notes:
Notes:
1. For customers already using the existing process to create media assets, there’s no change—your current workflow remains unaffected. However, if you're interested in creating post assets, please review the additional columns that are relevant to that use case.
2. Multi-channel asset creation is no longer supported—each row can now be used for only one asset and one channel.
Create Post Assets
Post Assets follow the same guidelines as Media Assets. The field - Asset Name is mandatory for both. When uploading Post Assets, make sure to key in POST as the Asset Type (refer to the Media Assets table above for more details).
![]() Note: Steps to Download the Sample Import File: The sample file can be downloaded through the Asset Manager. To access it, navigate to: Options menu
Note: Steps to Download the Sample Import File: The sample file can be downloaded through the Asset Manager. To access it, navigate to: Options menu ![]() > Import > Download Sample Import File.
> Import > Download Sample Import File.

To create your post assets, refer to the table below—it provides a breakdown of each field and the corresponding acceptable values (descriptions) for uploading post assets.
Post Assets | ||
Field | Description | Comments |
Channel | Instagram, Facebook, LinkedIn, YouTube, Twitter | NA |
Type of Message | Post, Reel, Story, Video | Posts are only supported by Instagram, Facebook, LinkedIn, X (formerly Twitter); Reels are supported by Facebook and Instagram; Story is supported by Facebook and Instagram; Video is supported by YouTube Note: On X, a post is referred to as a Message. |
Message | Any string | Any string can be added as content of the post (post copy) |
Media Title | Any string | Media Title is applicable only to Facebook and YT Video Posts |
LinkedIn Share With | Public, Connections | Applicable to LinkedIn Assets |
LinkedIn Disable Comments | TRUE, FALSE | Applicable to LinkedIn Assets |
Instagram Add Collaborator | (username of existing user) | Applicable to Instagram Reel and Story |
Instagram Tag Users | (username of existing user) | Applicable to Instagram Reel |
Instagram Audio Name | Any string | Applicable to Instagram Reel |
YouTube Privacy | Private, Public, Unlisted | Applicable to Youtube Assets |
YouTube License | Standard YouTube License, Creative Commons - Attribution | Applicable to Youtube Assets |
YouTube Tags | Any string or collection of strings in comma separated fashion | Applicable to Youtube Assets |
YouTube Notify Subscribers for Post | TRUE, FALSE | Applicable to Youtube Assets |
YouTube Embed Video to Auto Play | TRUE, FALSE | Applicable to Youtube Assets |
YouTube Video is for Kids | TRUE, FALSE | Applicable to Youtube Assets |
X Who Can Reply | People you follow, Only people you mention | Applicable to X (formerly Twitter) Assets |