Create, edit and publish a Dynamic Image Template
Updated
With dynamic image templates, you can change the way product images are displayed in your campaigns, and use it across multiple products.
Dynamic Image Template is an effective tool when it comes to creating assets to be shared or published on various channels. This tool gives you a platform where you can easily combine various graphics layers and dynamic information. You can use dynamic image templates to incorporate desired changes in the post images.
Note: You can upload Custom Fonts while creating Dynamic Image Templates within Assets. Note that only OTF and TTF file formats can be uploaded. To add a custom font, simply click Add Asset in the top-right corner of the Creative Library window and upload your file. Do not use Font Family in the Create Asset menu to upload your font. |
To create a Dynamic Image Template
1. Click the New Tab icon. Under the Sprinklr Social tab, click Assets within Engage.
2. Click Create Asset in the top right corner of the All Assets window, and select Dynamic Image Template from the drop-down menu. For more information on template properties, refer to the Dynamic Image Template Properties.
3. On the Create Dynamic Image Template window, click the Canvas tab to adjust the canvas size depending on your social media account. For a sample preview of how your template can look appealing, see Sample Dynamic Image Templates.
4. You can add the following types of image elements:
Add Image - This allows you to add any static image from the media valet. You can use this to add static elements like brand logos, frames, image backgrounds, image banners, and stickers.
Add Dynamic Image - A dynamic image is an image placeholder that will allow the user to add the image while using the template.
Add Dynamic Text to Image - This allows you to apply different images/shapes to your templates based on dynamic text input.
Note:
|
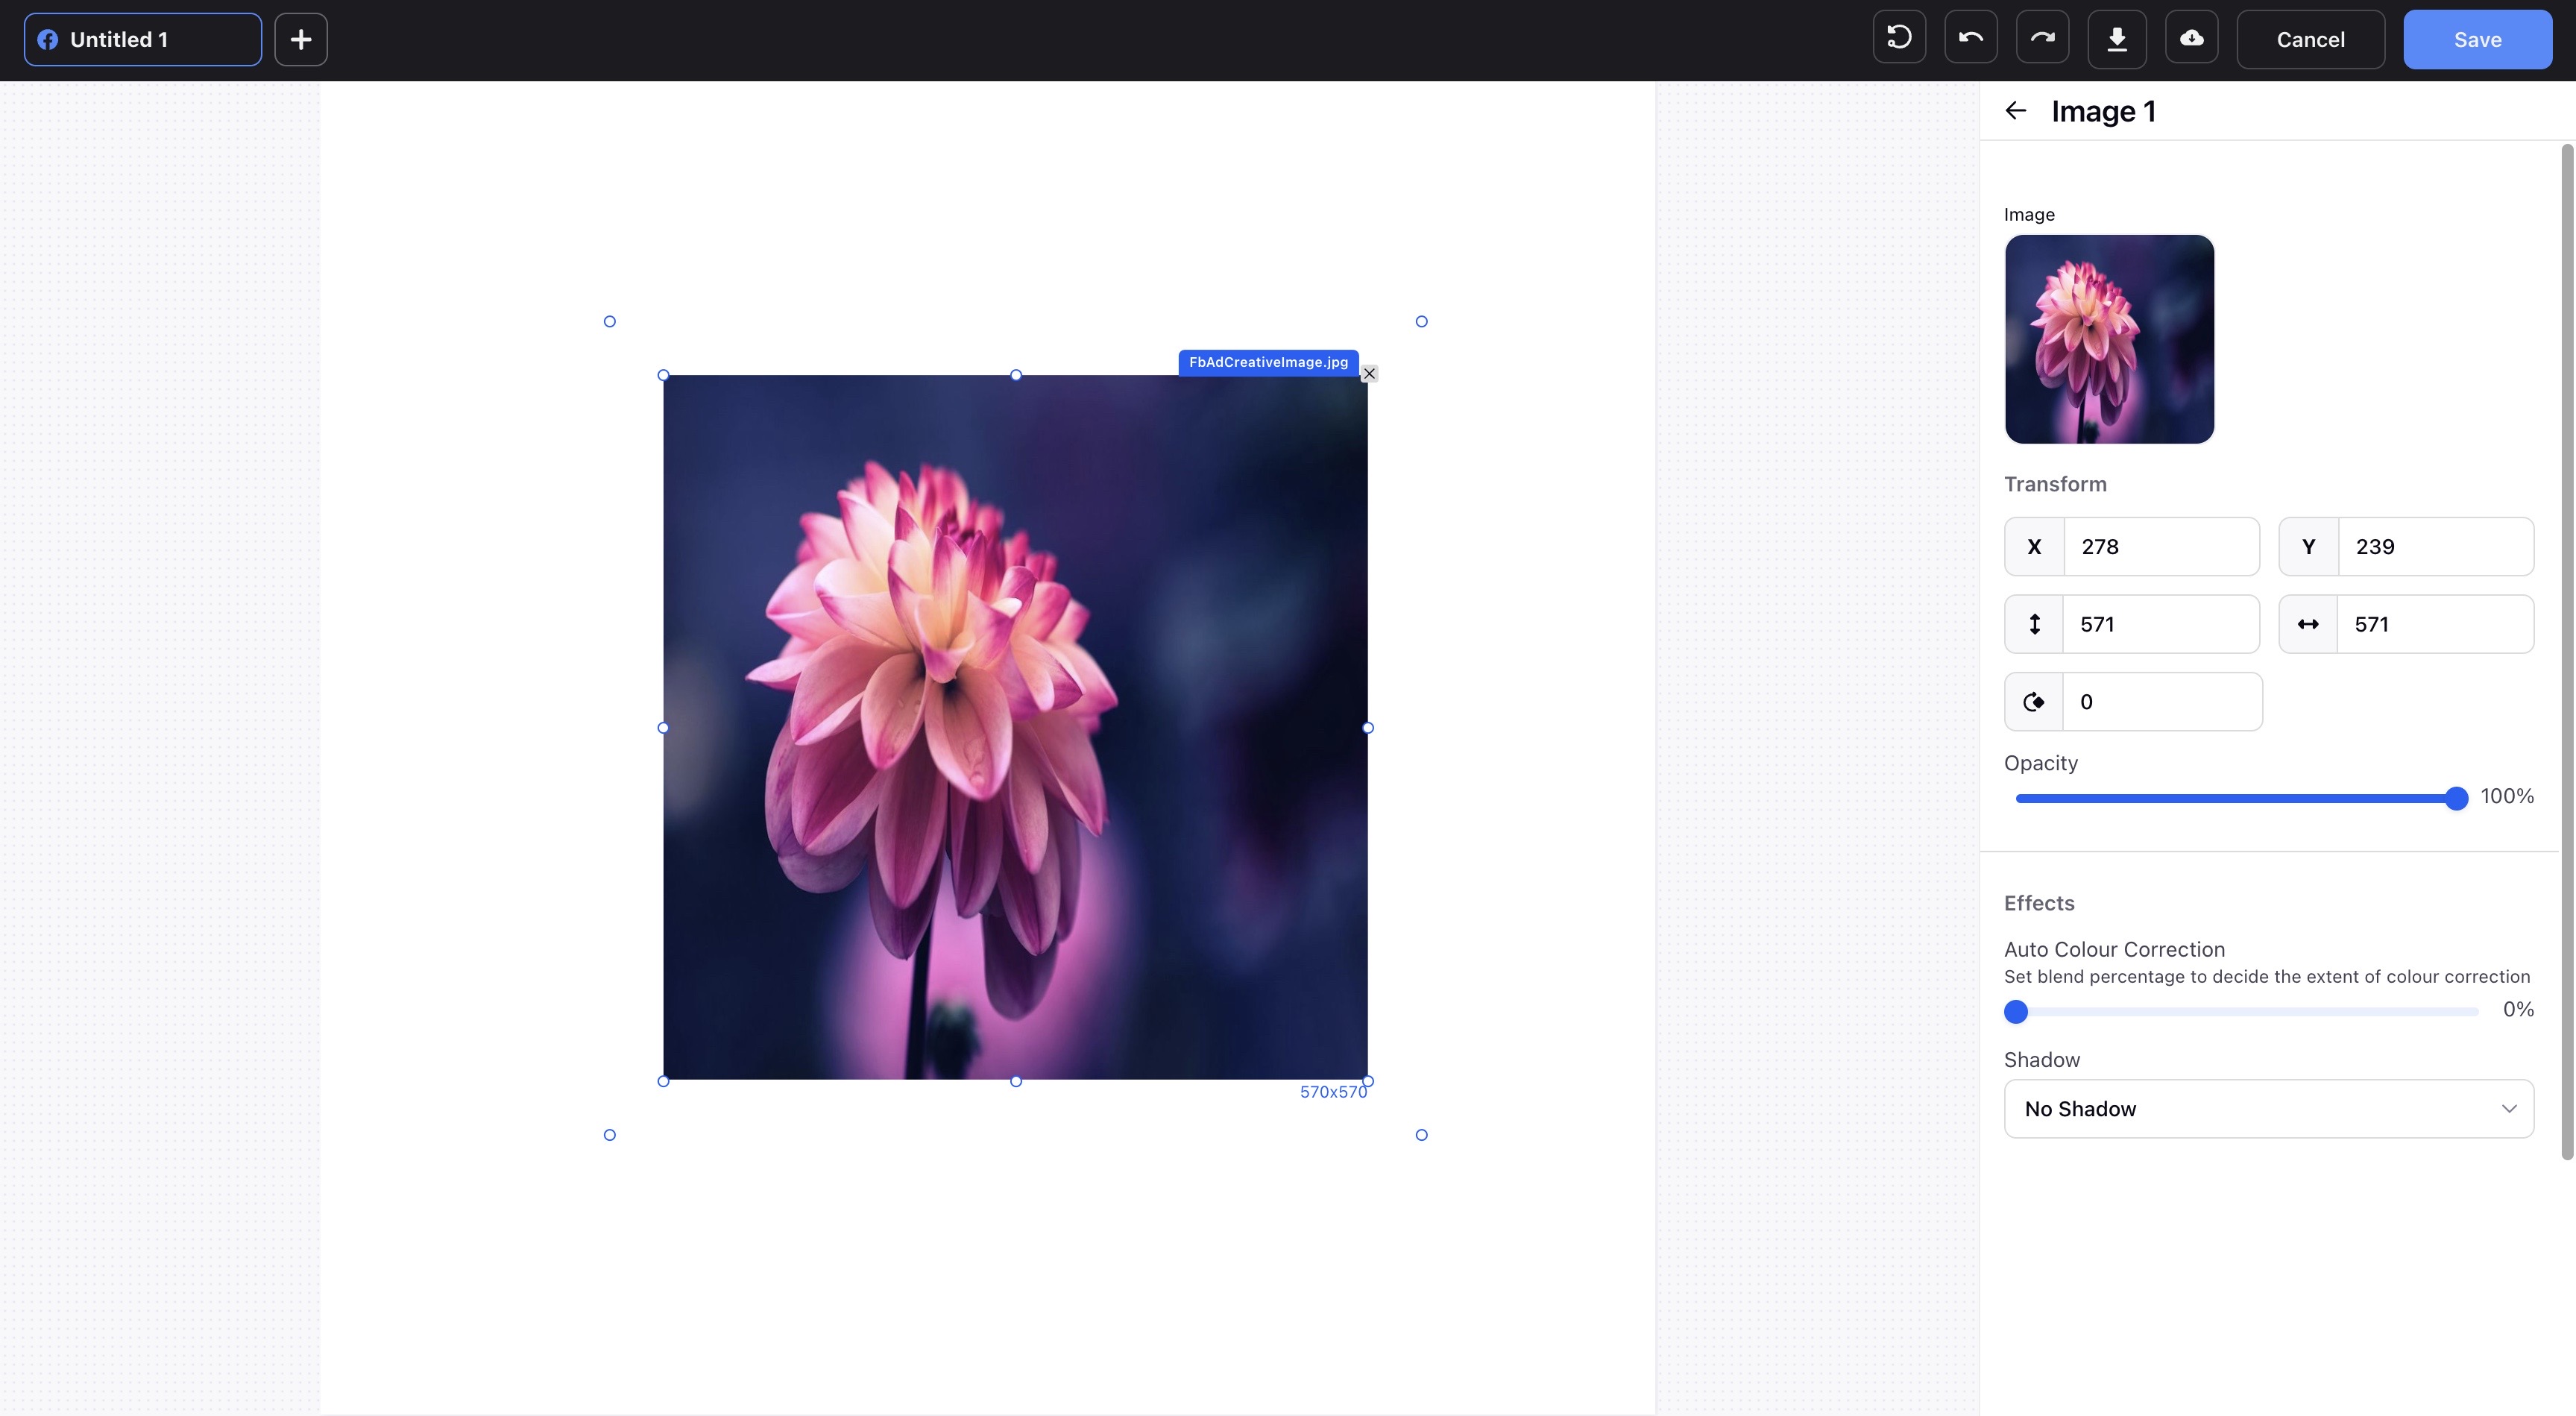 5. Click the Add Text tab to add text to your template using the options below. For example, you can add a static text of Price and a dynamic text for the amount based on the product. Character level formating can be done here i.e each letter can be formatted independentely .
Add Text - This allows you to add static text that does not change. Click on the text box placed on the canvas and enter the desired text.
Add Dynamic Text - This allows you to add dynamic text that the user can modify during image creation. You can leave different edit options to the user.
Note: You can select colors for the text for users, and the users can choose from the text colors you have selected.
You can leave the textbox empty. - This will allow the end user to fill in text dynamically. In this case, the user can fill in any text without any restriction.
You can use a Placeholder. - When you insert a Placeholder in the dynamic text that you leave for the use, you provide pre-defined options for them. This allows you to restrict options for the end user to fill in while using the template. The end user will not be able to fill in just any text that you may not approve.
Note | Any number of Placeholders can be added. Any number of Options can be added to a Placeholder. If the syntax of Placeholder is disturbed, you will have to remove the Placeholder and add again. |
6. Click the Add Shapes tab if you want to add different shapes to the template. You can then adjust the shape color, opacity, border-radius, and how you want them to appear on your template.
Tip:
|

7. You can also add mock images and text under the Mock Dynamic Element tab to check what your template will look like. Click Save in the bottom right corner.
Tip: If you use any elements in your Dynamic Image Template preview, the preview elements will be saved as the template thumbnail in the Asset Manager view or the thumbnail during the selection of templates. |
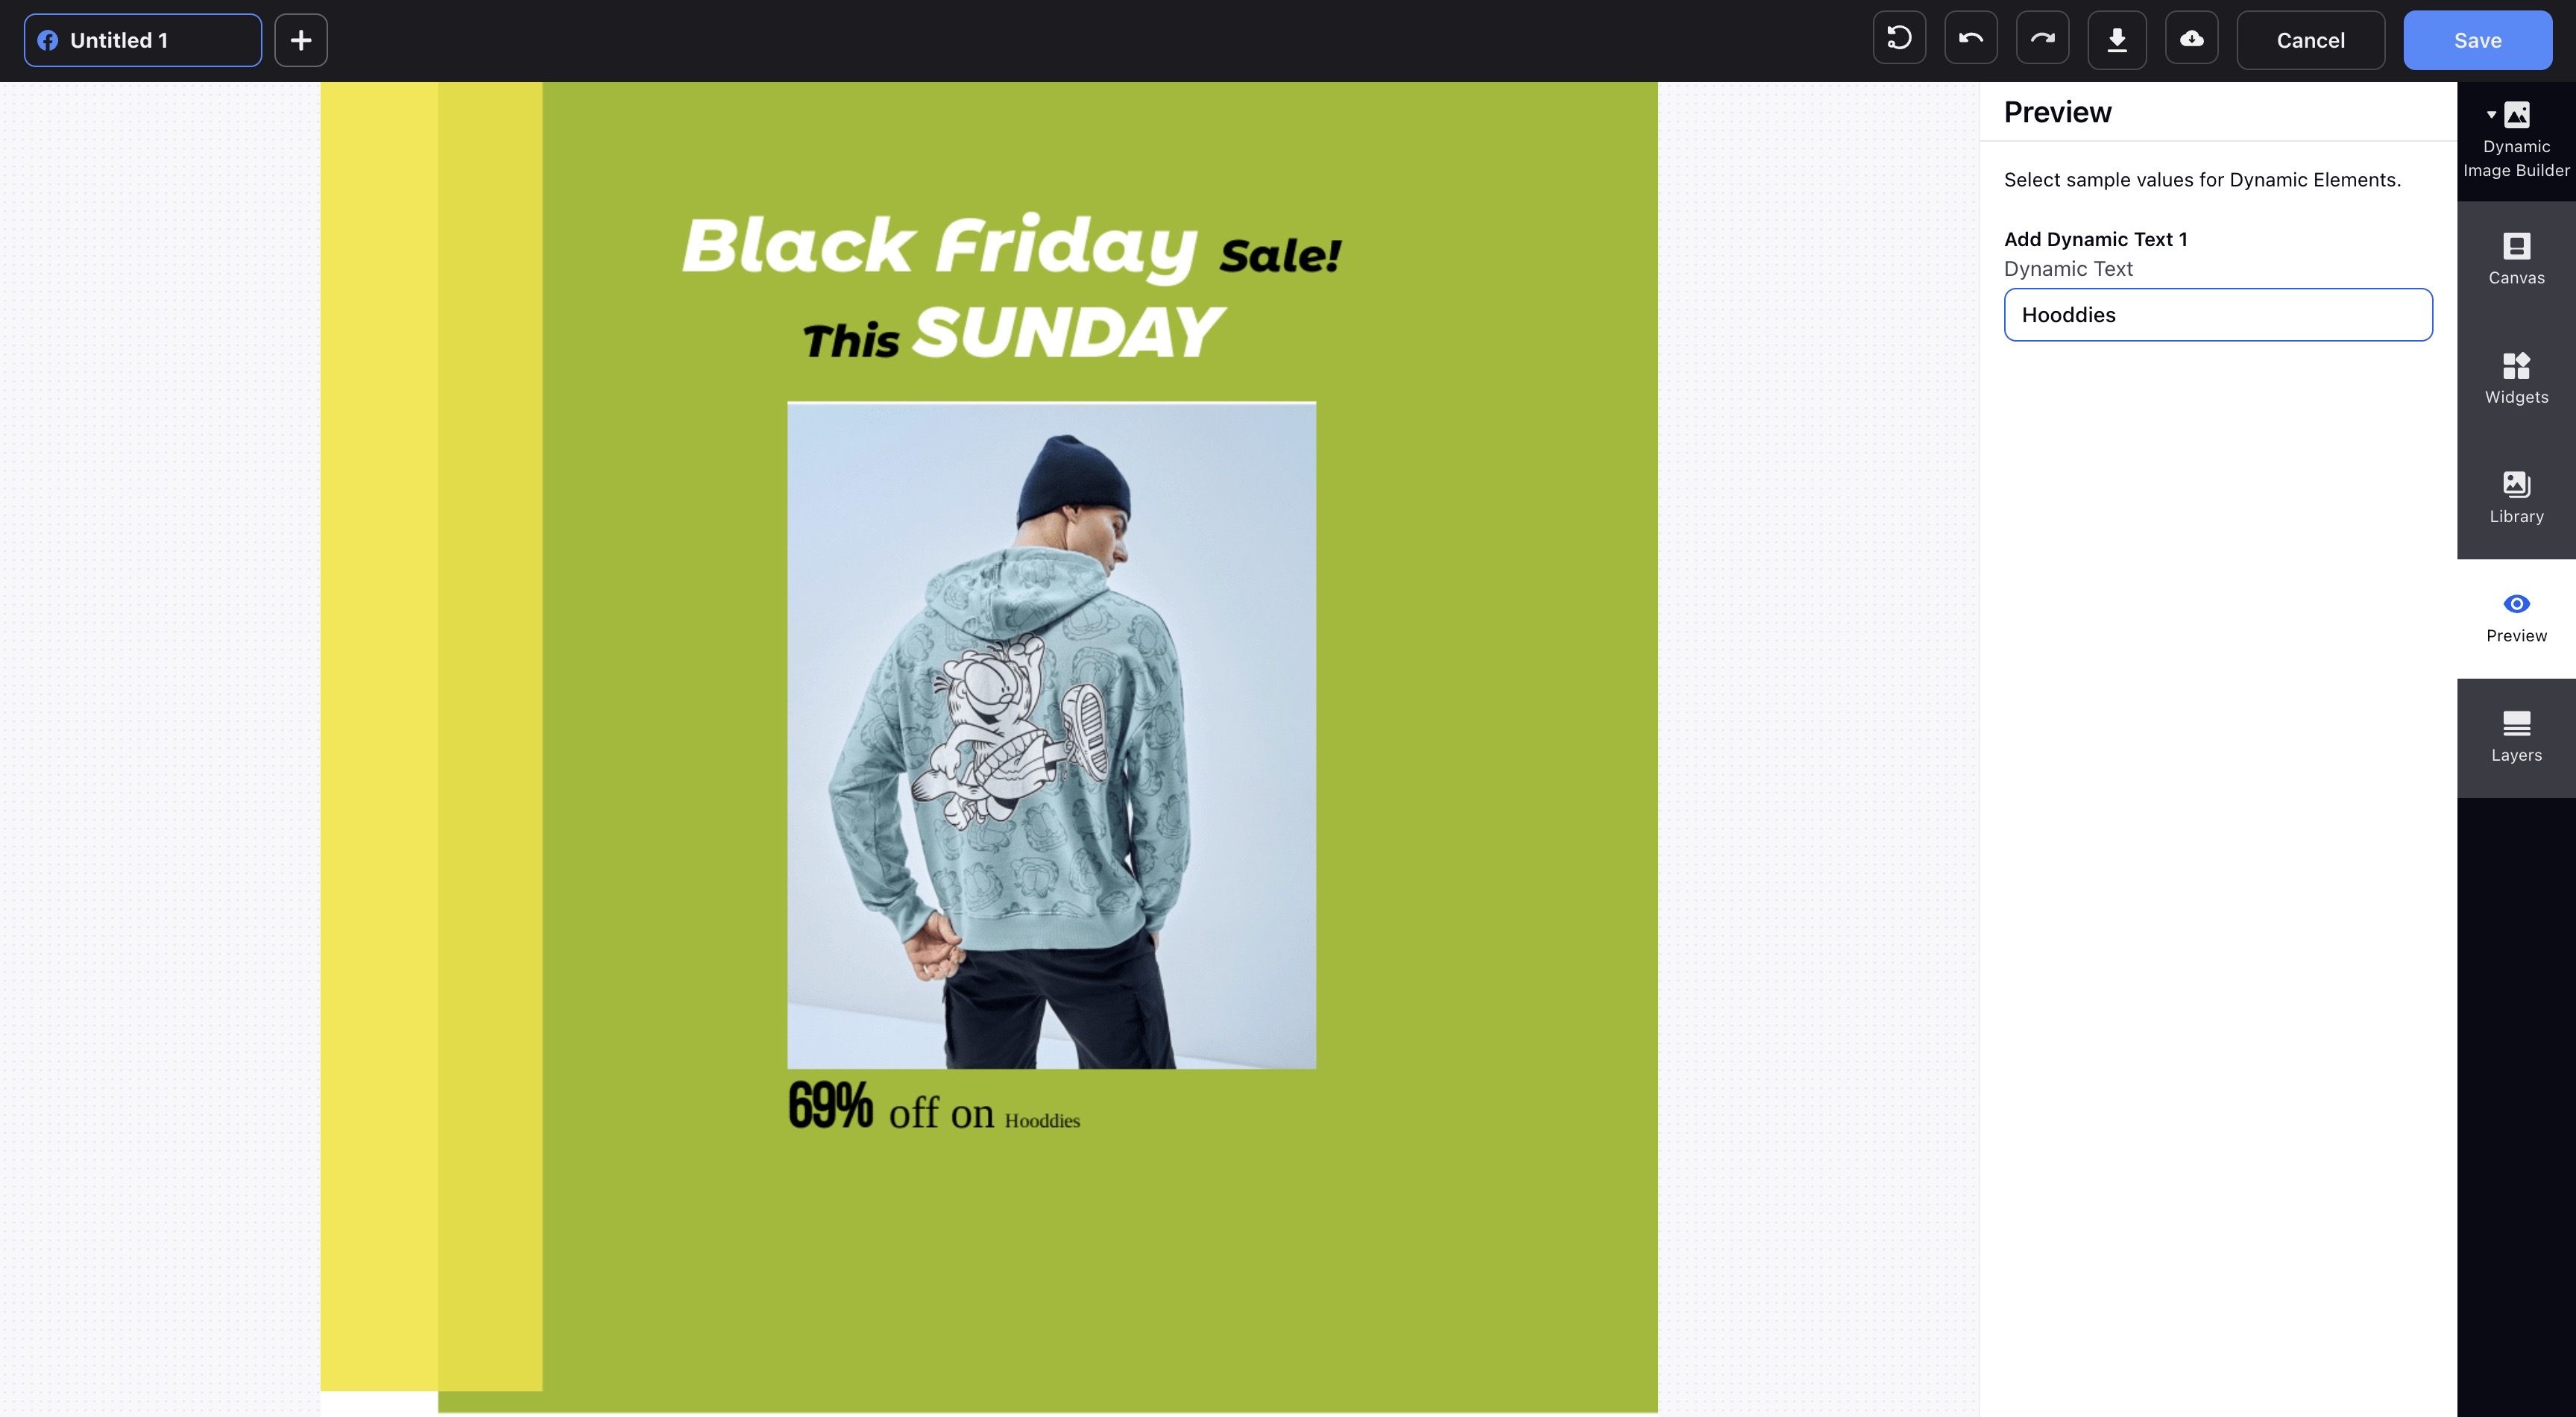
8. On the Save Template pop-up window, enter a name for the template in the Template Name field on the left pane. Once saved you will be automatically go to creative library.
To Edit a Dynamic Image Template
1. Click the New Tab icon. Under the Sprinklr Social tab, click Assets within Engage.
2. On the Asset Management window, hover over the desired Dynamic Image Template Options icon and select Edit Dynamic Image Template.
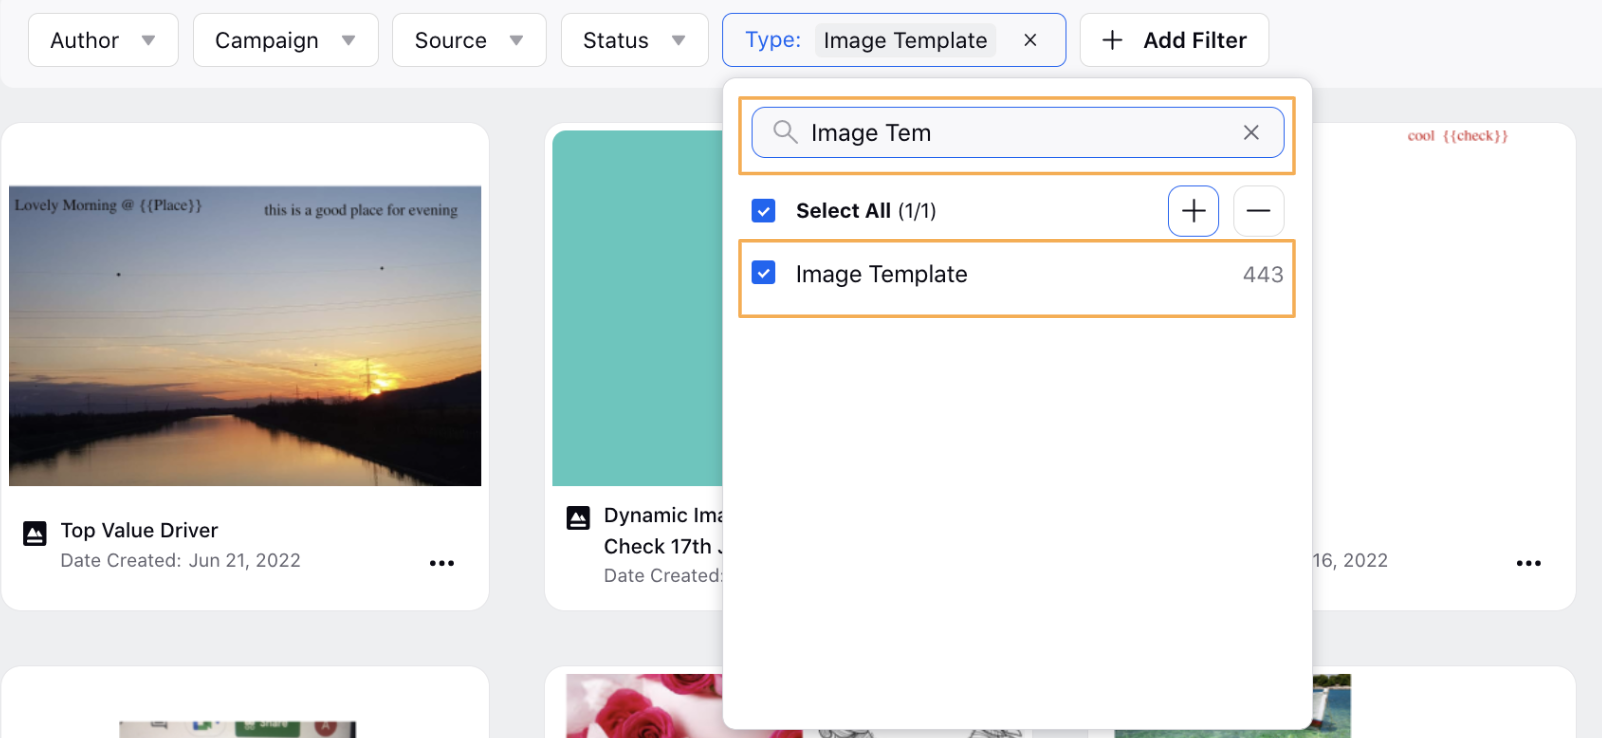
Tip: Apply a filter to load all your Dynamic Image Templates in the current Asset Manager view. Ensure that you are in the All Assets tab to apply the Image Template filter. |
3. On the Create Dynamic Image Template window, make the desired changes and click Save in the bottom right corner.
If the template you are editing has already been used on a Product Feed, you will get a warning message after saving the template. Once saved, the edited template will automatically be applied to the designated product feed.
To publish a Dynamic Image Template
Click the New Tab icon. Under the Sprinklr Social tab, click Assets within Engage.
Click the Type dropdown in the Menu bar. In the Search field, type Image Template.
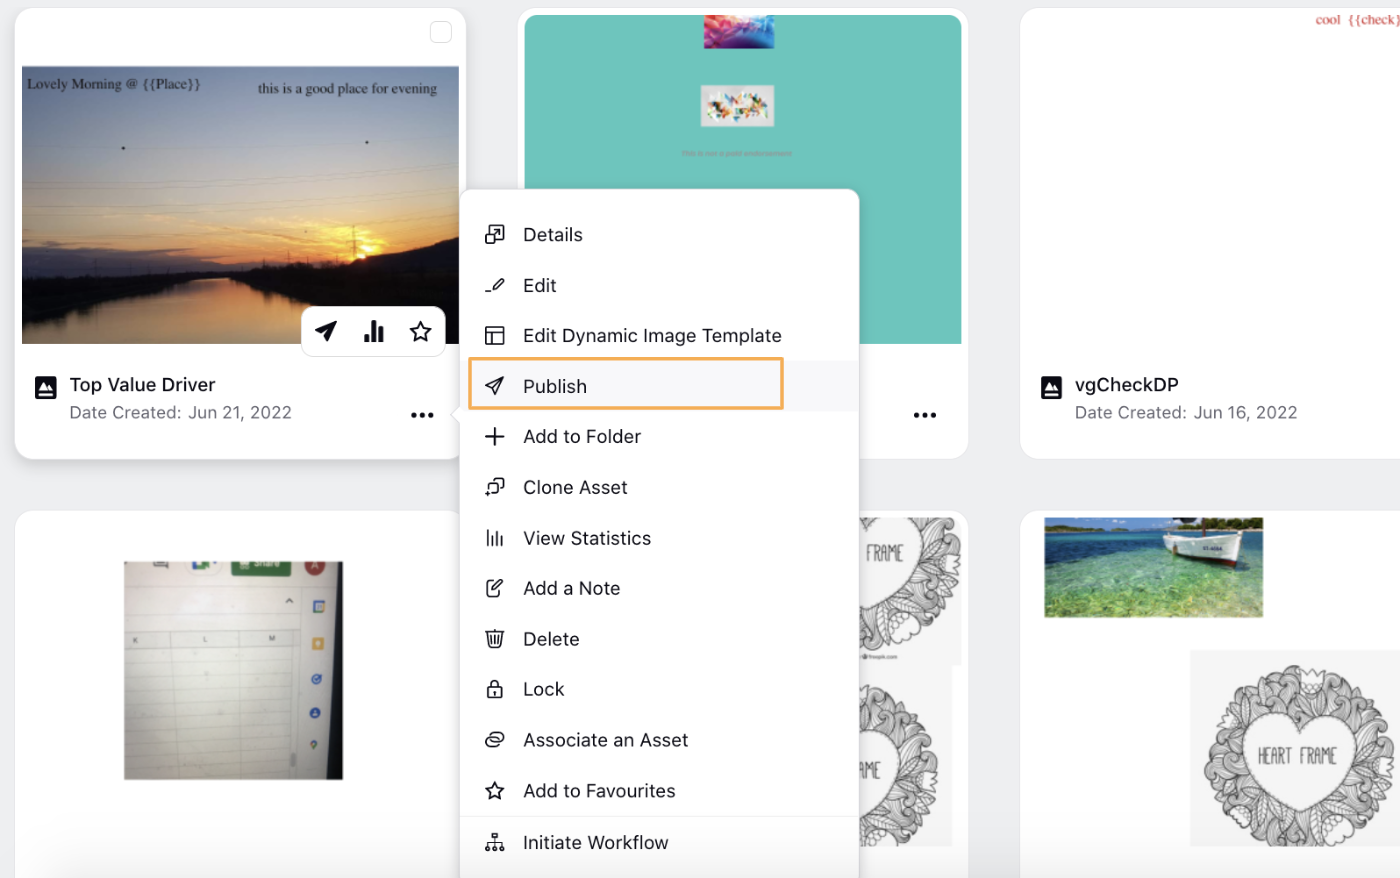
Hover over the Options icon on the Image Template you want to publish, and click Publish.
In the Create Image Using Dynamic Template window, enter a Name in the Image Name field.
Enter values for the other given fields ot Placeholders, as necessary.

Click Apply in the bottom right corner. The Create Post pop-up window opens.
Under Select Accounts, select the channel(s) from which you want to publish the image.
In the Content box, enter the content that you want to accompany the image in the post.
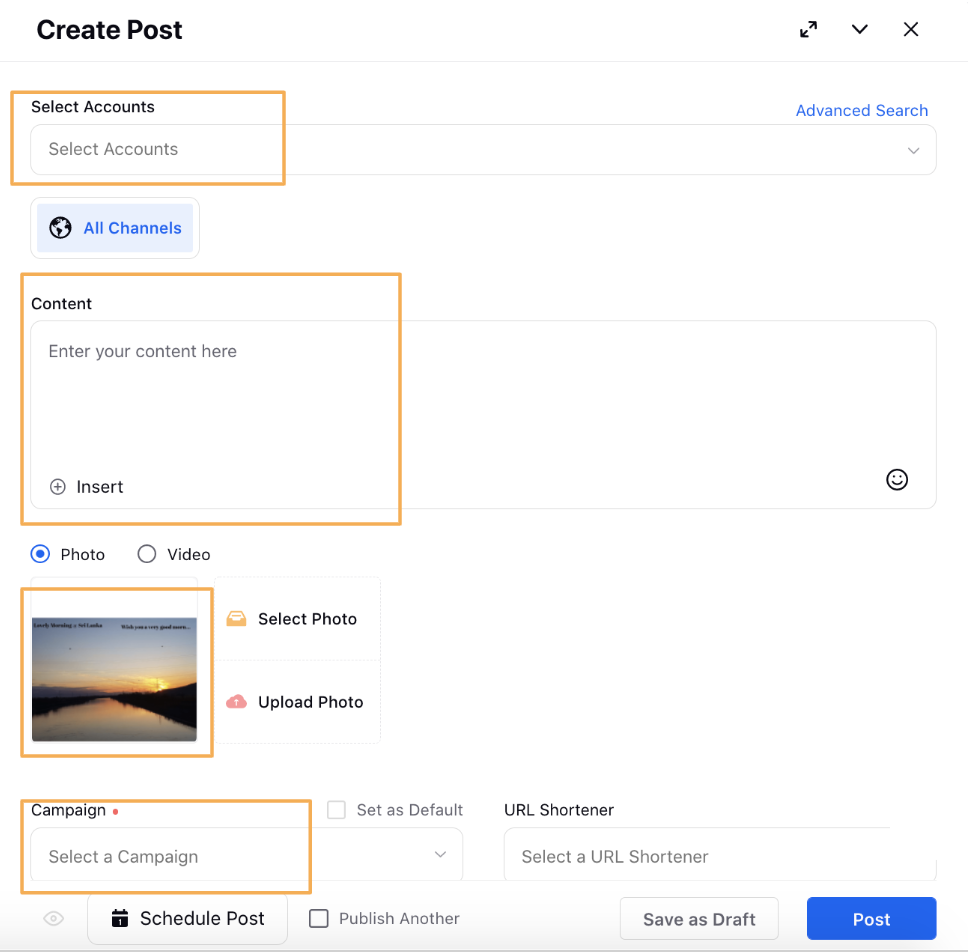
Under Campaign, select the campaign.
Click Save as Draft or Post, based on your preference. You can also schedule the post by clicking Schedule Post and selecting the date and time fpr publishing the post.
Dynamic Image Template Properties
Tabs | Properties | Description |
Canvas | ||
Canvas | Size | Enter the height and width of the canvas. |
Orientation | Choose between Portrait and Landscape orientations. | |
Aspect Ratio | Choose the required aspect ratio from the given options. | |
Add Image | ||
Add Image | Position | Enter the X and Y coordinates to align the image with respect to the canvas. |
Dimension | Enter the height and width of the image. | |
Opacity | Select or enter the desired percentage of opacity to change the transparency of the image. | |
Rotation | Enter a value to rotate the image in a Clockwise or Anticlockwise direction. | |
Add Dynamic Image | Position | Enter the X and Y coordinates to align the image with respect to the canvas. |
Dimension | Enter the height and width of the image. | |
Maintain Proportion | If this check box is clicked, on changing any one dimension, the other will automatically adjust to maintain a fixed ratio. | |
Opacity | Select or enter the desired percentage of opacity to change the transparency of the image. | |
Rotation | Enter a value to rotate the image in a Clockwise or Anticlockwise direction. | |
Add Dynamic Text to Image | Positon | Enter the X and Y coordinates to align the image with respect to the canvas. |
Dimension | Enter the height and width of the image. | |
Maintain Proportion | If this check box is clicked, on changing any one dimension, the other will automatically adjust to maintain a fixed ratio. | |
Opacity | Select or enter the desired percentage of opacity to change the transparency of the image. | |
Rotation | Enter a value to rotate the image in a Clockwise or Anticlockwise direction. | |
Script | Based on the logic in the script, an image will be pulled. Please contact your PS or SM to get the script. | |
Add Text/ Dynamic Text | ||
Add Text/ Dynamic Text | Position | Enter the X and Y coordinates to align the textbox with respect to the canvas. |
Font | Choose the Font Style and Size. | |
Text | Choose a Text Color, Alignment, Decoration, Transformation | |
Vertical Alignment | Choose if your text will be closer to the upper or lower border of the textbox. | |
Opacity | Select or enter the desired percentage of opacity to change the transparency of the text. | |
Rotation | Enter a value to rotate the textbox in a Clockwise or Anticlockwise direction. | |
Add Shapes | ||
Add Shapes | Position | Enter the X and Y coordinates to align the shape with respect to the canvas. |
Dimension | Enter the height and width of the image. | |
Color | Choose a color for your shape. | |
Border | Choose a Border Color and Width. If you choose the Rectangle Shape, then you can also define a Border Radius to curve the edges of the rectangle. | |
Opacity | Select or enter the desired percentage of opacity to change the transparency of the shape. | |
Rotation | Enter a value to rotate the shape in a Clockwise or Anticlockwise direction. | |
Mock Dynamic Elements | ||
Mock Dynamic Elements | - | You can also add mock images and text under the Mock Dynamic Element tab to check what your template will look like. If you use any elements in your Dynamic Image Template preview, the preview elements will be retained in the Asset Manager view or during the selection of templates. |
Others | ||
Other Properties | Overlay | If you add more than one element to the canvas, you can arrange those elements and choose what stays at the top and background. |