Third pane for assets
Updated
Asset third pane contains detailed information of an asset including asset id, name, type and status. You can quickly update asset details from the third pane provided with right access to the asset. You can collaborate on assets with your team members using notes and tasks on the asset to streamline content creation and usage. In this article, you will learn how to access the third pane and about properties fields added in it.
Steps to access Third Pane for Assets
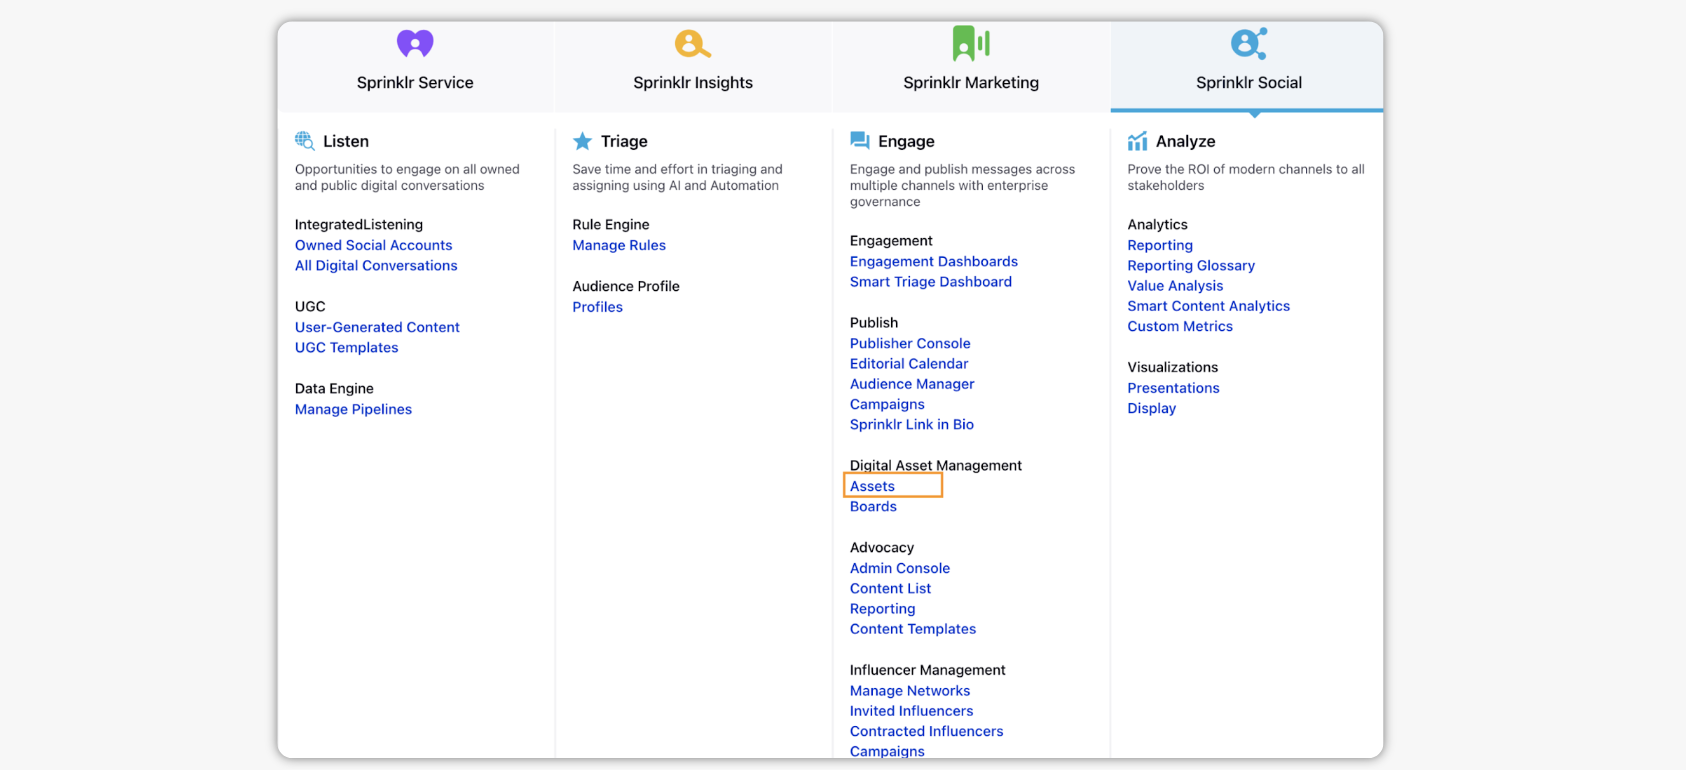
Click the New tab icon
and select Assets under Sprinklr Social.

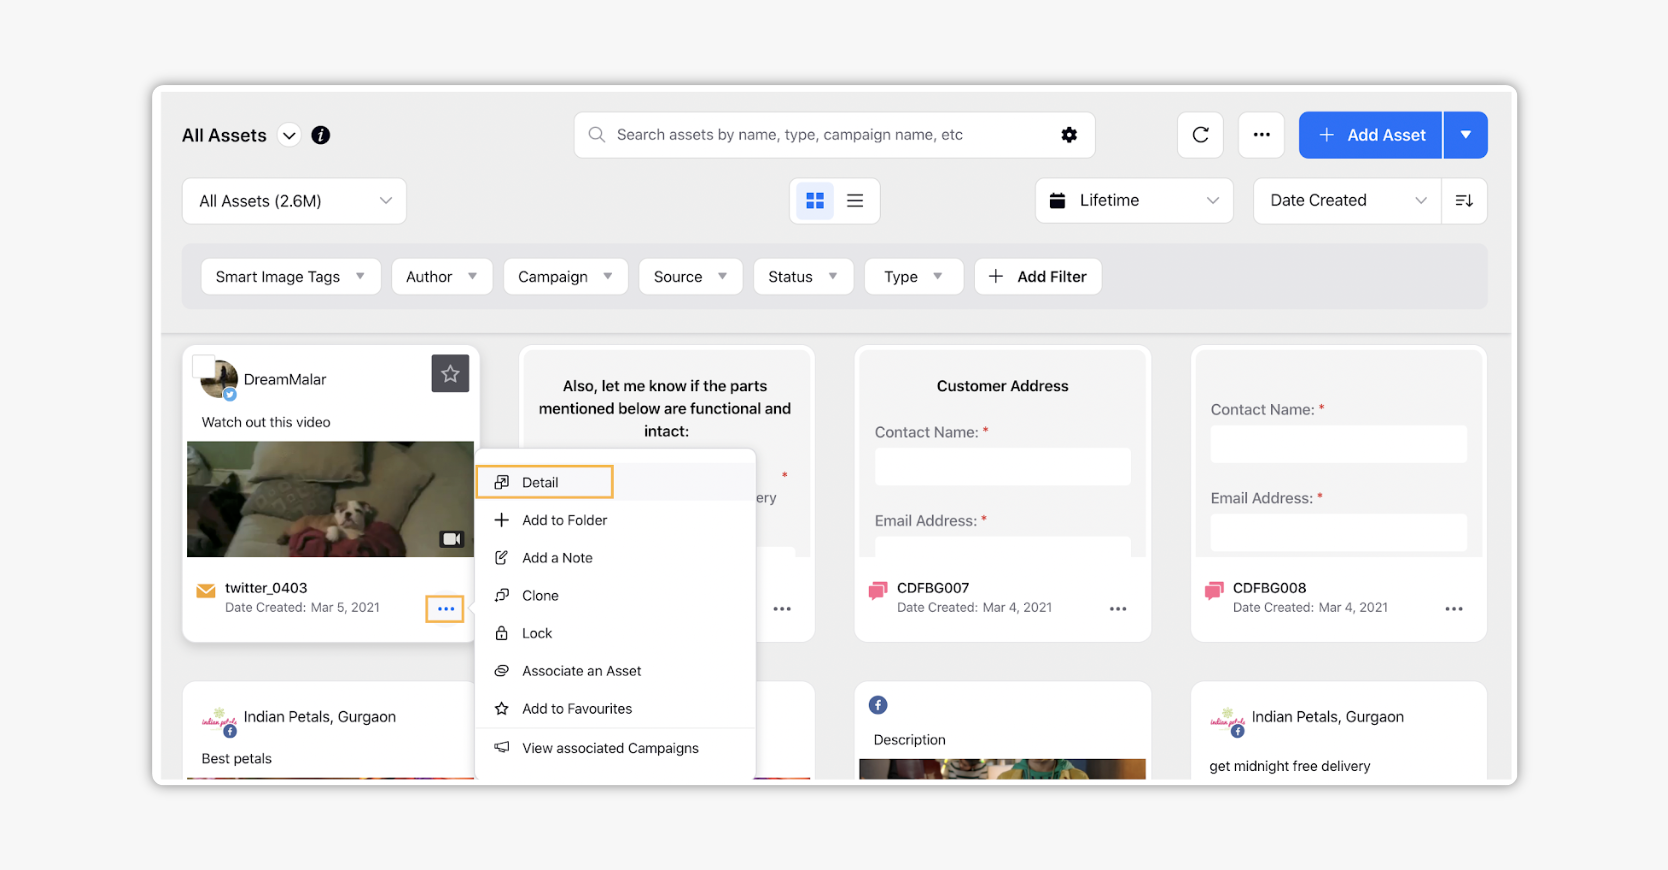
On the Asset Management window, hover over the Options icon
and select Detail. You can also double-click an asset to open details.

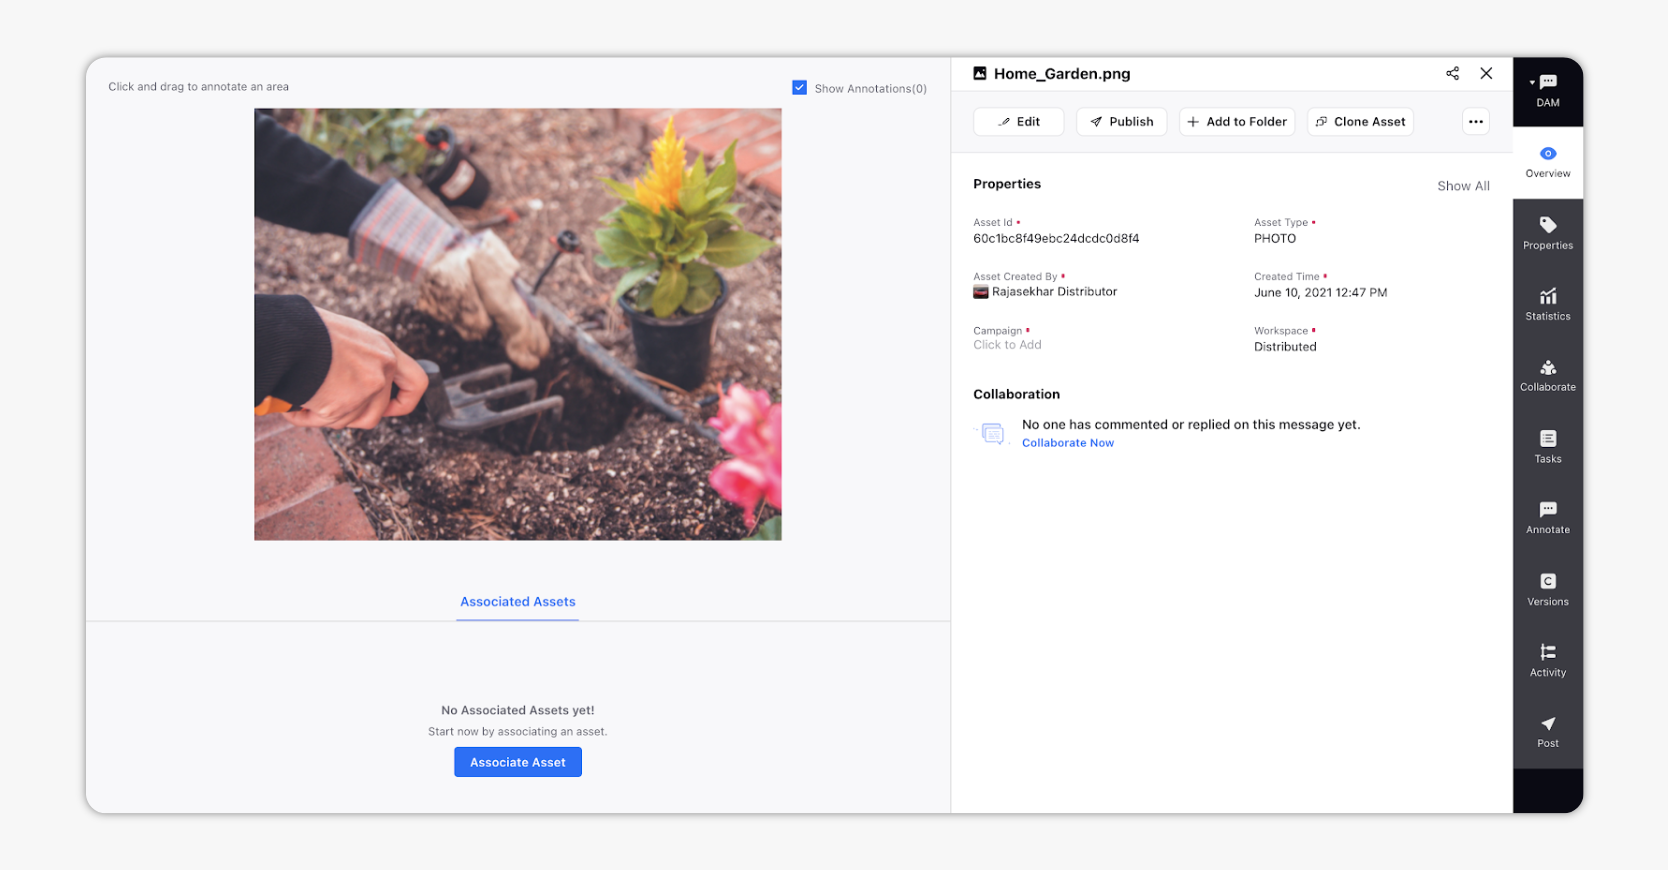
When you open an Asset's Details pane, information on the Asset will be organized into nine tabs. Below, we will take a look at each tab and the information you will find within.

Tab | Description |
Overview | View all properties associated with the asset. |
Properties | View and edit all the properties including system and general properties. |
Statistics | View all engagement and performance analytics associated with the asset. |
Collaborate | Collaborate with other team members through messages and attachments. While collaborating via notes, messages, and attachments, the notes field will expand on adding a long text. Additionally, you can address other users within the platform using an @mention. |
Task | View a record of tasks assigned to the asset. New tasks for the asset can be created from this tab. |
Annotate | View all the image markups made by co-authors. Collaborate and resolve issues. |
Versions | View all the different versions/aspects of the image assets which are created after their earliest form. |
Activity | View any changes or updates that are made to the asset. |
Post | The posts tab provides details for all the posts at various social channels associated with the image asset. |
Overview Tab
Within the Overview tab, you can view all the required or mandatory properties applied to the asset. Also, you can get a preview of the collaboration done on an entity within the Overview tab. This keeps you updated with the latest collaboration happening on the asset and enables you to:
Term | Description |
Asset Name | View the asset name. |
Copy Url | Using Copy Url capability, you can share assets externally to non-Sprinklr users. |
Edit | Click to edit the asset details. |
Publish | Click to publish the asset. |
Add to Folder | Click to add the asset to the desired folder |
Clone Asset | Create an asset with a similar message by cloning it. You can update the campaign, account, tag, and other details as per your requirement. |
Options icon | Hover over the Options icon to perform additional actions such as Lock, Initiate Workflows, etc. |
Properties | View the basic details of the asset such as Asset Created By, Asset Type, Status, Workspace, Campaign, etc. Switch to the Properties tab by clicking Show All. |
Collaboration | Get a preview of the collaboration happening on the asset. View and reply to the collaboration taking place on the message via notes and replies. Switch to the Collaborate tab by clicking Show All. |
Associated Assets | In the left pane of the window, you can view and update the assets associated with your asset. It will remain constant in the left pane, irrespective of the tab you are accessing. |
Properties Tab
View, add, and edit system and custom fields associated with the asset. All custom properties can be seen under their respective categories and will appear in the order as defined in the Custom Field settings. Note that properties with no category will show under the Others label.
Term | Description |
Edit | Click to edit the asset details. |
Properties | Click the desired properties and select the field from the drop-down menu. |
Statistics Tab
You can view asset stats including asset published count, Number of downloads, engagement rate in statistics tab
Term | Description |
Engagement | View all the engagement related to the published asset and how many it is downloaded. |
Collaborate Tab
While collaborating via notes, messages, and attachments, the notes field will expand on adding a long text. The notes box will expand up to 60% within the Collaborate tab as the note is being typed in.
While collaborating on an entity, you can also add and remove Emoji Reactions on comments and replies. This enables you to mark a comment as read without actually replying to it. Other users can also add the same emoji by clicking on the added emoji once more. Apart from this, you can also view the total count of emojis next to it.
Term | Description |
@Mentions | You can @mention users/user groups in the messages within the collaboration tab. Hover over the @mentioned user to view user details. Apart from this, you can also send a message to the @mentioned user. You can also restrict the users to not be able to @mention other users that don't share the same workspace as theirs; only the users within their workspace can be @mentioned in notes during collaboration. |
Add a Reply | You can add a reply to the messages made in the collaborate tab. |
Self Comment Actions | You can reply, edit, and delete a message added by you. |
Hide Replies | Click to hide replies on the message. You can still view the number of replies on a comment as Replies(n). |
Type a Message | Type a message for better collaboration between different team members. You can also attach media from Favorites, SAM, URL, UGC, etc. |
Versions Tab
In this tab, you can see all versions of changes done on your asset. You can preview the current version/aspect of the asset that is created after its earlier form using the Preview option.
Annotations Tab
In the annotation tab, you can find details related to annotations done by the user and other actions i.e. delete, resolve the annotation.
Term | Description |
Annotation Details | You can view the name of the author and the annotation made by him on the asset. |
Options Icon | Hover to Edit or Delete the annotation. |
Show Replies | Click to view replies on the annotation. |
Preview Icon | Click for a preview of the annotation. |
Resolve | Click Resolve to resolve the annotation. |
Tasks Tab
The UI remembers the Sort Criteria applied in the Tasks Tab of the third pane. For example - By default, tasks are sorted by Due Date. If you sort the tasks by Due Date then the next time you go to the Tasks Tab of a third pane the tasks will be sorted by Due Date.
Term | Description |
Task Filters | Filter tasks within this pane based on status and task designation. |
Task Tab Actions |
|
Task Details | View the details of the task. Click on a field to change it. |
Add Note | Click to add a note to the task. |
Task Actions |
|
Activity Tab
Under activity tab, You can view audit of all changes made on the asset & perform other actions ie refresh, export activity details.
Term | Description |
Sort Icon | Click to sort the activities in an ascending or descending order. |
Refresh Icon | Click to refresh the activities. |
Options Icon | Hover to Export the activity details. |
Activity Details | View all updates made on the Creative including task and note updates as well. |
Posts Tab
In the post tab, you can view all associated posts and perform other actions including apply post filters, search & refresh the posts.
Term | Description |
Post Filters | Filter associated posts within this pane based on status. |
Search Icon | Click to search through the posts. |
Refresh Icon | Click to refresh the posts. |
Post Details | View all the details associated with the posts. |
Internal Note: To hide the posts tab from the Asset detail pane, please get in touch with your Success Manager.DP Details: ENABLE_ACCESSIBLE_ACCOUNT_FILTER_FOR_POSTS_CONTENT_SEARCH partner level boolean DP.If the above DP is on, the user will not be able to view posts published for assets for the respective accounts.