How to Manage Ad Creatives in the Ads Creative Library
Updated
In the Ads Creative Library, you can execute various actions on your desired Paid Assets such as Editing, Deleting, Cloning, etc. In this article, we will brief you about these actions and how you can use them on your ad creatives.
To Manage Individual Ad Creatives
Click the New Tab icon
. Under the Sprinklr Marketing (Ads) tab, click Creative Library within Plan.
On the Digital Asset Manager (DAM) window, hover over the Options icon
in the bottom-right corner of the desired creative in grid view or Options icon
alongside the desired creative in list view to view the available actions. For more information, see Manage Creatives — Action Descriptions.
To Manage Ad Creatives In Bulk
On the Digital Asset Manager (DAM) window, hover over the creatives and select them in bulk by checking the boxes in the top-right corner of individual thumbnails.
You will find several actions you can take from the bottom Edit panel. For more information, see Bulk Actions — Descriptions.
Manage Creatives — Action Descriptions
Term | Description |
Detail | |
Edit | Click to edit the ad creative details. |
Publish | |
Add to Folder | Click to add the ad creative to a specific folder. You can also create a new folder by clicking + New Folder in the bottom-left corner of the Folders pop-up window. Learn more about folders in Organize DAM into Folders. |
Clone Asset | Click to create an exact copy of the ad creative. On cloning, you can edit your creative details such as Creative Name, Objective, Ad Account, Page, Destination Type, etc. |
View Statistics | Click to view the reporting statistics such as the Times Published, No. of Downloads, Total Engagements, etc. for a particular ad creative. |
Add a Note | Click to add a note to your desired ad creative and add an @mention to notify another teammate in the platform the note is directed towards them. |
Delete | Click to permanently remove the ad creative. |
Suggest | Click to 'suggest' an ad creative. When you Suggest an asset, you can send it to a Suggestion Queue where it can be reviewed and published. Suggesting content allows you to send assets that would make good outbound content to teams who can review and select assets to publish. For more information, see Suggest an Asset. |
Lock | Click to lock an ad creative. Once locked, an asset cannot be edited or deleted by any other user in the same Client, unless the asset is first unlocked. This permission provides an added level of governance and gives you the ability to protect assets from accidental alteration or deletion. |
Associate an Asset | Click to associate an asset to the existing ad creative. |
Add to Favorites | Click to add a particular ad creative to your favorites for quick access. |
Initiate Workflow | Click to initiate the creative workflow process. |
View Associated Campaigns | Click to view the campaigns associated with the creative along with their performance data in the Ads Manager and make changes accordingly. |
Bulk Actions — Descriptions
Term | Description |
Export | Click to take an export of your selected ad creatives in your desired format. For more information, see Export Ad Creatives. |
Share | Click to share the ad creatives across Workspace(s) and/or User/User group(s). |
Macro | Click to apply a macro to your selected ad creatives in bulk. This will allow you to execute multiple actions on the creatives with a single click. For more information on macros, see Add a Macro. |
Add to Folder | Click to add the ad creatives to a specific folder. You can also create a new folder by clicking + New Folder in the bottom-left corner of the Folders pop-up window. Learn more about folders in Organize DAM into Folders. |
Initiate Workflow | Click to initiate the creative workflow process. |
Delete | Click to permanently remove the ad creatives in bulk. |
Copy Channel Id(s) | Click to copy the Channel Ids of the selected ad creatives. |
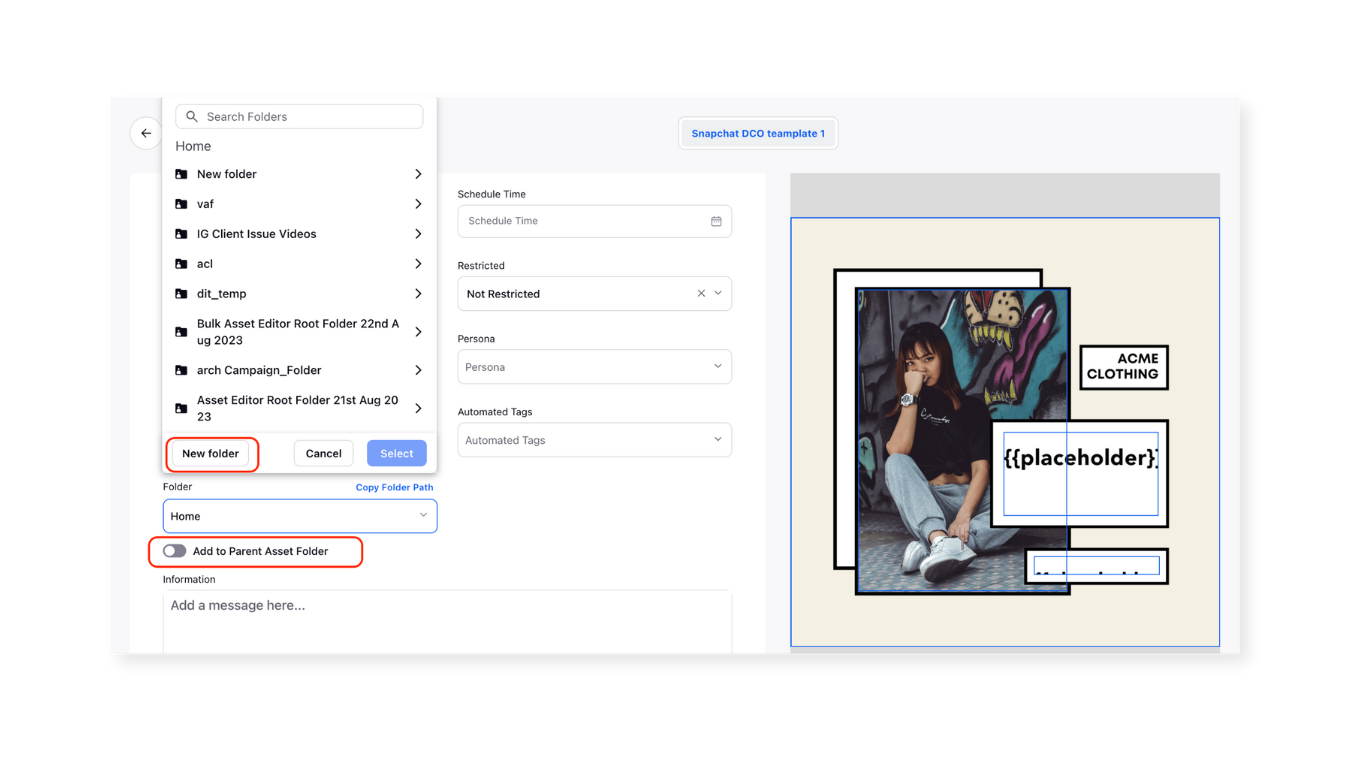
Folder creation — For Dynamic Templates
This feature is designed sort assets in folders while creating bulk assets from image and video templates. When users access the template creation process on the properties page, they can choose to either select an existing folder for the template or create a new one and assign the template to it.
For bulk image or video creation, users have the flexibility to specify a folder where all bulk assets will be saved. Alternatively, they can simply check a box to automatically place all child bulk assets in the parent template's folder.
