Manage Workloads in Sprinklr WFM
Updated
Workloads in Sprinklr’s WFM module are combinations of Channels, Queues, and Skills that are used to generate Forecast Scenarios (Run-time Model or Pre-trained Model). They can be configured for various channel types, such as voice calls, live chat, email, and more.
Workload Categorization
Workloads can be categorized based on their hierarchical structure. The following are the types of Workloads in Sprinklr WFM:
Independent Workloads: Independent Workloads have no associated Child Workloads. To create an Independent Workload, leave the Parent Workload field blank, and the Contains Child Workload toggle must be disabled while creating the Workload.
Parent Workloads: Parent Workloads have one or more Child Workloads linked to them. To create a Parent Workload, leave the Parent Workload field blank, and the Contains Child Workload toggle must be enabled while creating the Workload.
Child Workloads: Child Workloads are linked to a Parent Workload and operate as part of a hierarchical structure. To create a Child Workload, select a Workload in the Parent Workload field while creating the Workload.
This article outlines the essential steps for managing Workloads, including:
Creating Workloads
Editing Workloads
Cloning Workloads
Deleting Workloads
View the Audit Log of Workloads.
Create Workloads
Prerequisites for creating Workloads:
Sprinklr WFM should be enabled for the environment.
You must have access to Workforce Manager Persona App.
Create permission under the Workload section in the Workforce Management module.
Existing Staffing Preset, Business Hours, and User/User Group configuration.
Use Case:
Scenario: The holiday season is approaching, and the contact center expects a significant increase in customer inquiries.
Action: The Administrator creates a new Workload to ensure there are enough agents scheduled to handle the anticipated surge, maintaining high service levels and customer satisfaction.
Follow these steps to create a Workload:
Go to the Workforce Manager Persona App on the Launchpad.
Select Settings from the Left Pane to open the Governance page.
Go to Workloads to open the Workloads homepage.
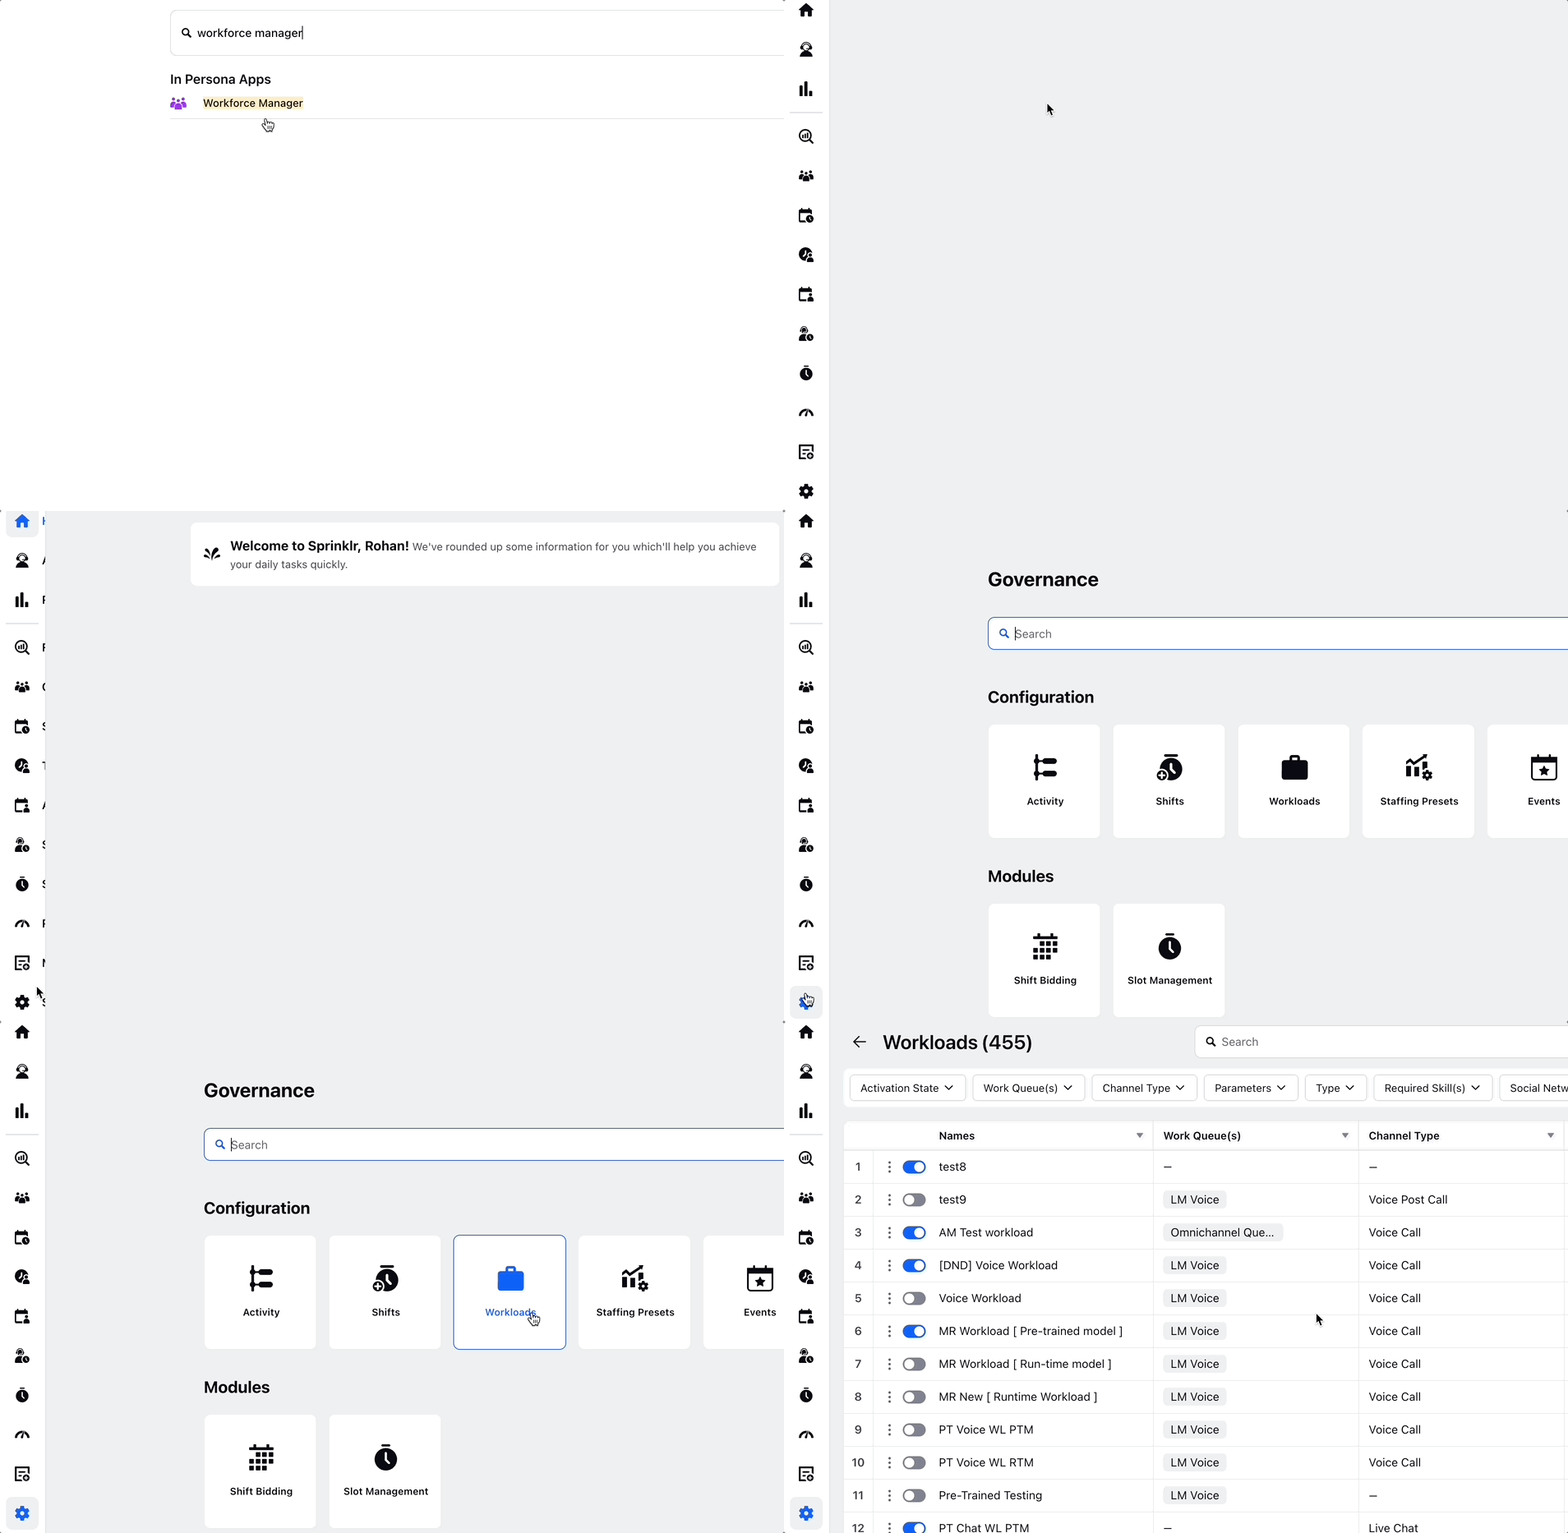
Click the +Create Workload button at the top-right of the page to open the Create Workload page.

Fill in the required fields on the Create Workload page. Fields marked with a red dot are mandatory. Below are the descriptions of the fields on this page:
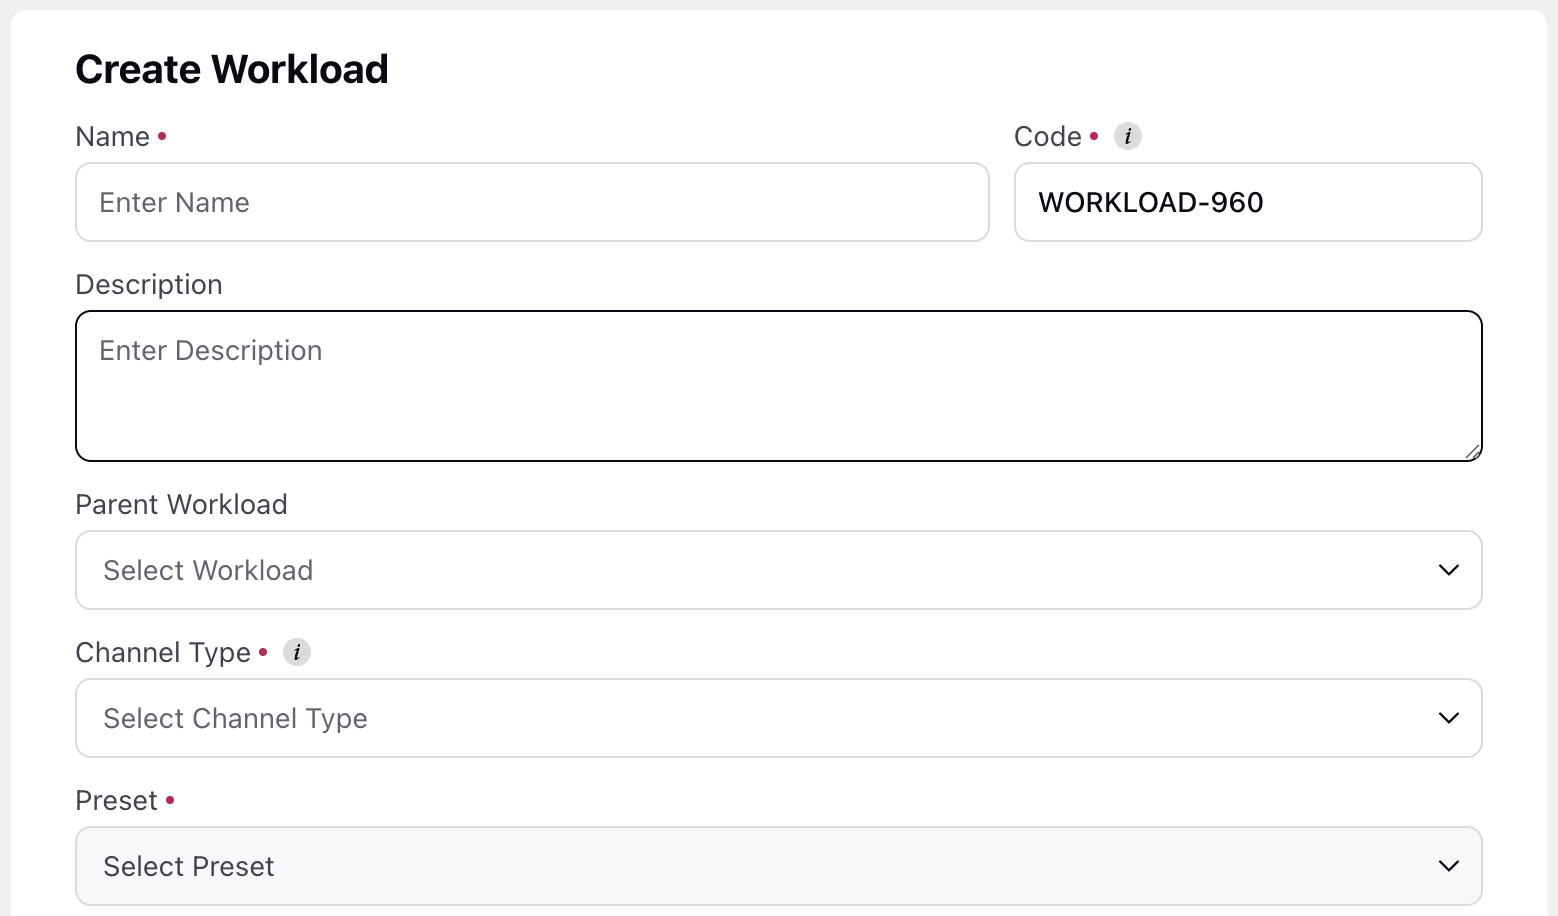
Name: Enter the name of the Workload. (Required)
Code: This field will automatically generate a unique alphanumeric code for the Workload, such as WORKLOAD-62, for easy identification. However, you can also enter your own unique code if needed. (Required)
Description: Enter a brief description of the Workload.
Type: Select the type of Workload. (Required)
Runtime Model: This option is suitable for contact centers already using the Sprinklr Service module for inbound and outbound traffic. Selecting the runtime model allows Sprinklr to refer to the data within the Sprinklr Service system, such as volume passing through the platform, to generate the Workload.
Pre-trained model: This option is suitable when you need to import data from external sources, such as your previous customer care/ telephony platform. In the pre-trained model, data is manually shared with Sprinklr, and Sprinklr’s offline model training platform generates the AI model that will be mapped against the Workload.
Parent Workload: If this Workload is a parent Workload, leave this field blank. If this Workload is intended to be a child of another parent Workload, select the appropriate parent Workload.
Note: Only one parent Workload can be selected.
Note: Selecting a Workload will make the Contains Child Workload toggle inaccessible.
Channel Type: Select the channel type for which the Workload. (Required)
Note: When a Parent Workload is selected during the creation of a Child Workload, the Channel Type is automatically set to match the Parent Workload and cannot be changed.
Preset: Select a Staffing Preset that will be used for the Workload. (Required)
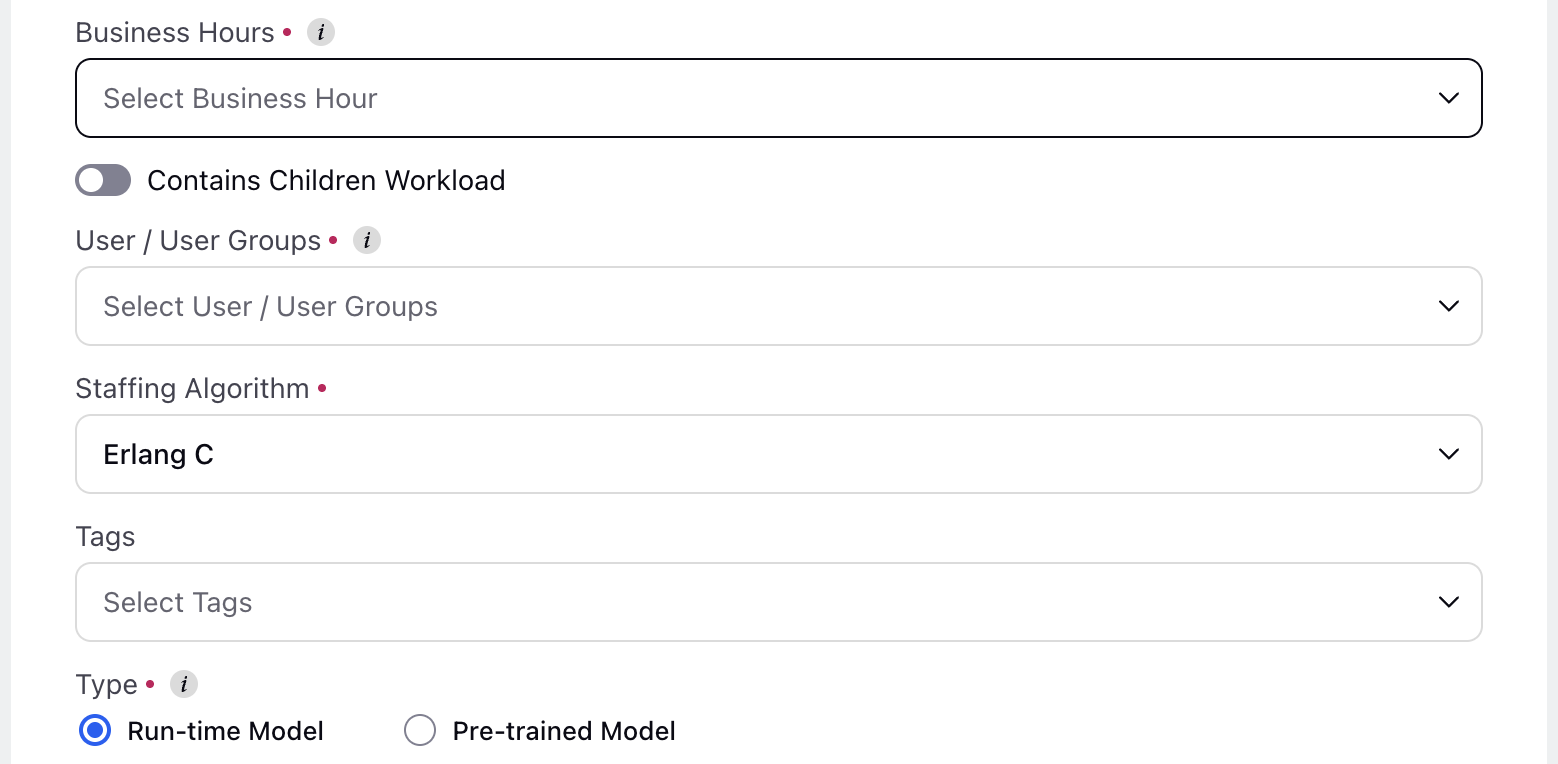
Business Hours: Select the suitable working hours for the Workload. You can only choose from pre-configured Business Hours. (Required)
Contains Child Workload: Enable this toggle if the Workload being created is a parent Workload.
Note: This toggle is accessible only when a Workload is not selected in the Parent Workload field above.
User/User Groups: Select the Users and/or User Groups who are part of the Workload. (Required)
Note: This field is visible only if the Contains Child Workload toggle is disabled.
Tag: Select tag(s) that can be used for filtering.
Select the parameters and associated Reporting Metric in the Data Sources section. Refer to the Configure Data Sources for Workloads section below for detailed steps.
Note: When a Parent Workload is selected during the creation of a Child Workload, the Data Sources section is automatically populated with the Parent Workload's Data Sources details. These details can be changed.
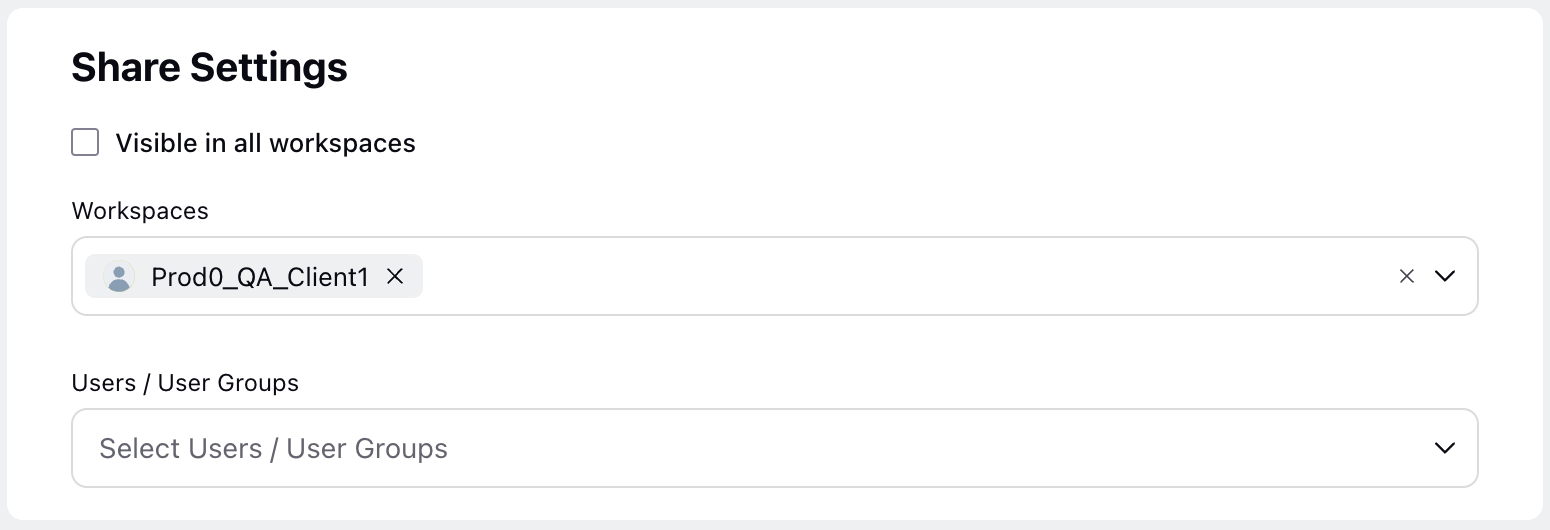
Visible to all users: Select this checkbox if you want to share the Workload with all available Users.
User/User Groups: Select the User(s)/User Group(s) with whom you want to share the Workload. This field will be accessible only if the Visible to all users checkbox is not selected.
Click the Save button at the bottom right of the page.
Configure Data Sources for Workloads
You can configure the Contact Volume and Average Handling Time (AHT) parameters in the Data Sources section. This is the data historic data that will be considered for Forecast Scenario generation. For each parameter, you can configure up to two Reporting Metrics, and for each Reporting Metric, you can select multiple filters.
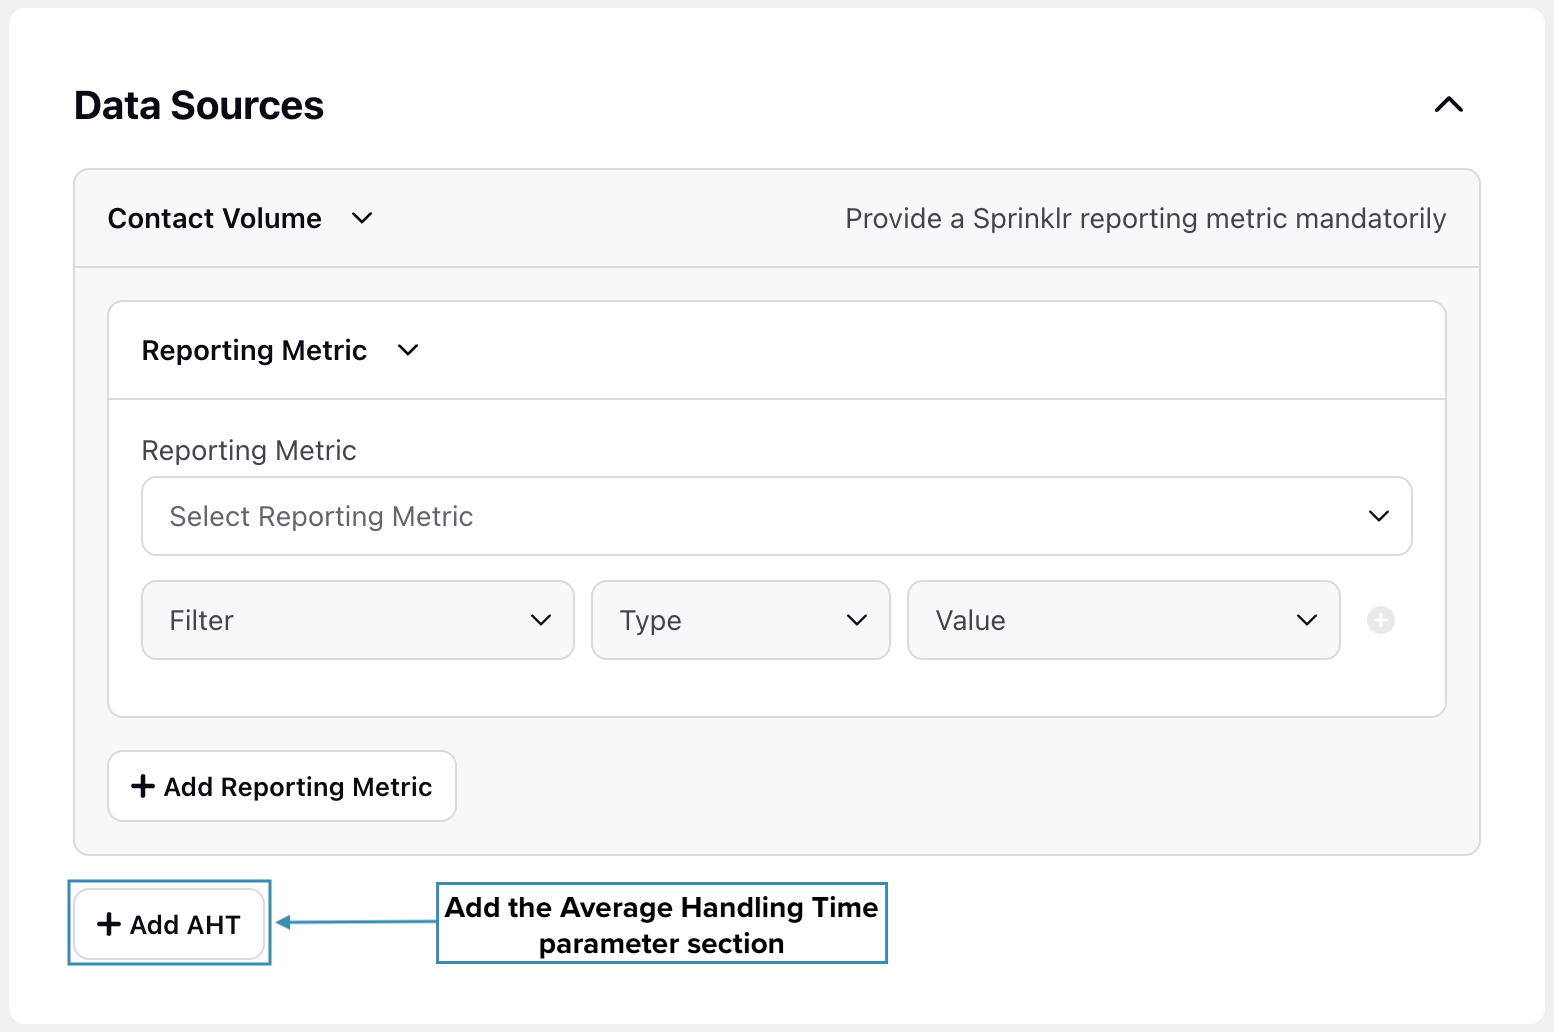
By default, the Contact Volume section is expanded. To view the Average Handling Time (AHT) section, click the Add AHT button.
Configuring Standard Sprinklr Reporting Metrics
The process to configure standard Sprinklr Reporting Metrics is the same for both Contact Volume and Average Handle Time. Follow the steps mentioned below to define the Workload's data:
Source Type: Select Sprinklr Reporting. (Required)
Reporting Metric: Choose the metric whose data you want to consider for the Workload.
The table below lists the available standard Reporting Metrics for Contact Volume and Average Handle Time.
Contact Volume | Average Handling Time (AHT) |
Work Queue Assignment Count | Average Handle Time (Voice) (Per Assignment) |
User Assignment Count | Avg. Handling Time (Per Assignment) |
Total Calls (Per Assignment) | WFM AHT Value |
Total Calls (Customer PoV) | - |
Total Offers to Agents | - |
WFM Volume Value | - |
Once the required Reporting Metric is selected, you must configure the corresponding filter (multiple filters can be selected per Reporting Metric). Select the filter from the list from the list to apply to the parametric dataset for real-time model training. You can select from the following filters:
Work Queue ID (A Workload must have at least one selected Queue)
Skills
Channel
Direction (Inbound and/or Outbound)
Then select the condition for the filter. Containing checks if the selected filter applies to the dataset. Not Containing checks if the selected filter does not apply to the dataset.
Configuring Reporting Metrics Using Custom Entity
The process to configure Workloads using Custom Entity is the same for both Contact Volume and Average Handle Time. Follow the steps mentioned below to define the Workload's data:
Source Type: Select Custom Entity. (Required)
Custom Entity: Select the created Custom Entity. Refer to this article for detailed steps on creating Custom Entities for Workforce Management. (Required)
Date Field: Select the field in the chosen Custom Entity that provides the timestamp for run-time training. Only fields with the type set to Date or Datetime are available in the list. (Required)
Reporting Metric: Select the Reporting Metric. Only fields with the type set to Number are available in the list.
Once the required Reporting Metric is selected, you must configure the corresponding filter (multiple filters can be selected per Reporting Metric). Select the filter from the list from the list to apply to the parametric dataset for run-time model training. The available filter options will depend on mapped fields.
This completes the process of creating a Workload.
Enable/Disable Workloads
Prerequisites for enabling/disabling Workloads:
Sprinklr WFM should be enabled for the environment.
You must have access to Workforce Manager Persona.
Edit permission under the Workload section in the Workforce Management module.
Follow these steps to enable/disable Workloads:

Go to Workforce Manager persona on the Launchpad.
Select Settings from the Left Pane to open the Governance page.
Go to Workloads to open the Workload homepage.
Click the toggle switch in the Name column to enable or disable the Workload.
This completes the process of enabling/disabling a Workload.
Edit Workloads
Prerequisites for editing Workloads:
Sprinklr WFM should be enabled for the environment.
You must have access to Workforce Manager Persona.
Edit permission under the Workload section in the Workforce Management module.
Use Case
Scenario: A sudden product issue leads to an unexpected spike in incoming traffic volume.
Action: The Administrator edits the existing Workload to adjust agent schedules and increase coverage, ensuring that customer concerns are addressed promptly and efficiently.
Follow these steps to edit a Workload:

Go to Workforce Manager persona on the Launchpad.
Select Settings from the Left Pane to open the Governance page.
Go to Workloads to open the Workloads homepage.
Hover over the vertical ellipsis (⋮) icon corresponding to the Workload you want to edit. This will show a list of options.
Select Edit from the list of options to open the Edit Workload page.
Update the necessary details for the selected Workload. The fields are the same as those used when creating a Workload.
After entering the updated details, click the Save button at the bottom right of the page to save the Workload with new details.
This completes the process of editing a Workload.
Clone Workloads
Prerequisites for cloning Workloads:
Sprinklr WFM should be enabled for the environment.
You must have access to Workforce Manager Persona.
Clone permission under the Workload section in the Workforce Management module.
Use Case
Scenario: Last year’s successful Black Friday sale had an effective Workload configuration.
Action: The Administrator clones the previous Workload to replicate the successful strategy for this year’s sale, ensuring the contact center is well-prepared to handle high incoming traffic.
Follow these steps to clone a Workload:

Go to the Workforce Manager Persona App on the Launchpad.
Select Settings from the Left Pane to open the Governance page.
Go to Workloads to open the Workloads homepage.
Hover over the vertical ellipsis (⋮) icon corresponding to the Workload you want to clone. This will show a list of options.
Select Clone from the list of options to open the Workload creation page with all details from the original Workload prefilled.
The name of the cloned Workload will default to "Clone of Original_Workload_Name", which you can modify as needed. A new Code or Workload ID will be automatically assigned to the cloned Workload.
Click the Create button after configuring the cloned Workload.
This completes the process of cloning a Workload.
Share Workloads
Prerequisites for sharing Workloads:
Sprinklr WFM should be enabled for the environment.
You must have access to Workforce Manager Persona.
Share permission under the Workload section in the Workforce Management module.
Follow these steps to share a Workload:
Go to Workforce Manager persona on the Launchpad.
Select Settings from the Left Pane to open the Governance page.
Go to Workloads to open the Workloads homepage.
Hover over the vertical ellipsis (⋮) icon corresponding to the Workload you want to share. This will show a list of options.
Select Edit from the list of options to open the Edit Workload page.
Scroll down to the Share Settings section, where you can select the User/User Group(s) with whom the Workload has to be shared.
Visible to all users: Select this checkbox if you want to share the Workload with all available Users.
Users/User Groups: Select the User(s)/User Group(s) you want to share the Workload with. This field will be accessible only if the Visible to all users checkbox is not selected.
Click the Save button at the bottom right of the Edit Workload page to save your share settings.
This completes the process of sharing a Workload.
Export Workloads
Follow these steps to export Workloads:
Go to the Workforce Manager Persona App on the Launchpad.

Select Settings from the Left Pane to open the Governance page.
Go to Workloads to open the Workloads homepage.

Click the Export button at the top right of the page to open the Export Workloads dialog box.
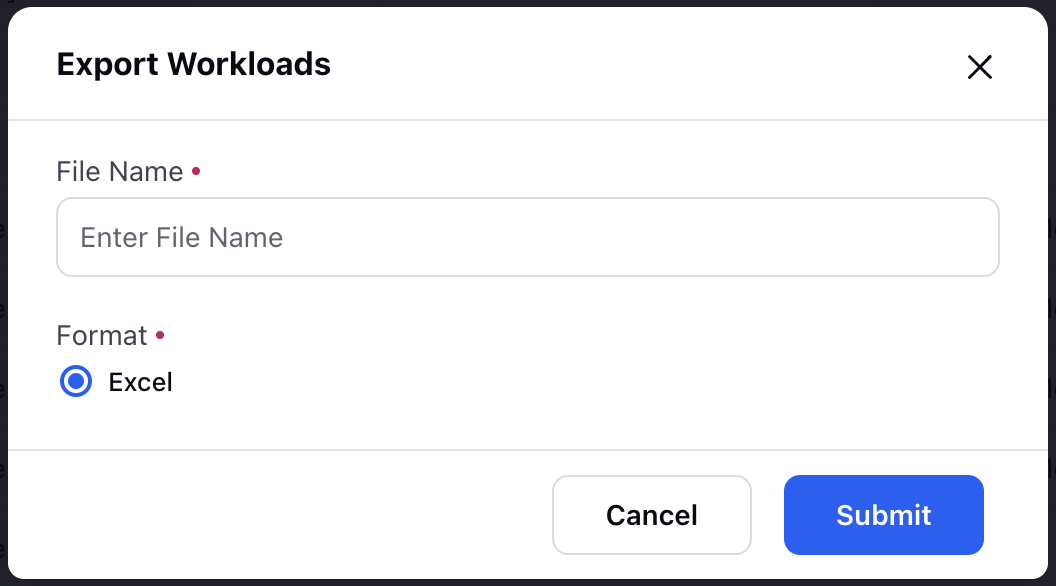
Enter the name of the export file in the File Name field. The format of the export file will be Excel (.xlsx).
Click the Submit button to create your export request.
You will receive a toast notification confirming your export request. Once the request is completed, you will receive a system notification and an email at your Sprinklr email address with a link to download the export file.
This completes the process of exporting Workloads.
Delete Workloads
Prerequisites for deleting Workloads:
Sprinklr WFM should be enabled for the environment.
You must have access to Workforce Manager Persona.
Delete permission under the Workload section in the Workforce Management module.
Use Case
Scenario: A special campaign has ended, and the associated Workload is no longer needed.
Action: The Administrator deletes the outdated Workload to keep the system organized and focused on current operations, reducing clutter and potential confusion.
Follow these steps to delete a Workload:

Go to Workforce Manager persona on the Launchpad.
Select Settings from the Left Pane to open the Governance page.
Go to Workloads to open the Workloads homepage.
Hover over the vertical ellipsis (⋮) icon corresponding to the Workload you want to delete. This will show a list of options.
Select Delete from the list of options to open the Delete Workload dialog box.
Click the Submit button at the bottom right of the dialog box. This action cannot be undone.
Note: If Pre-trained type Workloads are deleted, the associated custom AI model will also be permanently deleted and cannot be undone.
This completes the process of deleting a Workload.
View Audit Logs of Workloads
Prerequisites for viewing audit logs of Workloads:
Sprinklr WFM should be enabled for the environment.
You must have access to the Workforce Manager Persona App.
View permission under the Workload section in the Workforce Management module.
Follow these steps to view the audit log of a Workload:

Go to Workforce Manager persona on the Launchpad.
Select Settings from the Left Pane to open the Governance page.
Go to Workloads to open the Workloads Record Manager.
Hover over the vertical ellipsis (⋮) icon corresponding to the Workload whose audit log you want to be view. This will show a list of options.
Select View Audit Logs from the list of options to open the Activity window from the Third Pane, displaying all changes made to the Workload, including who made them and when.
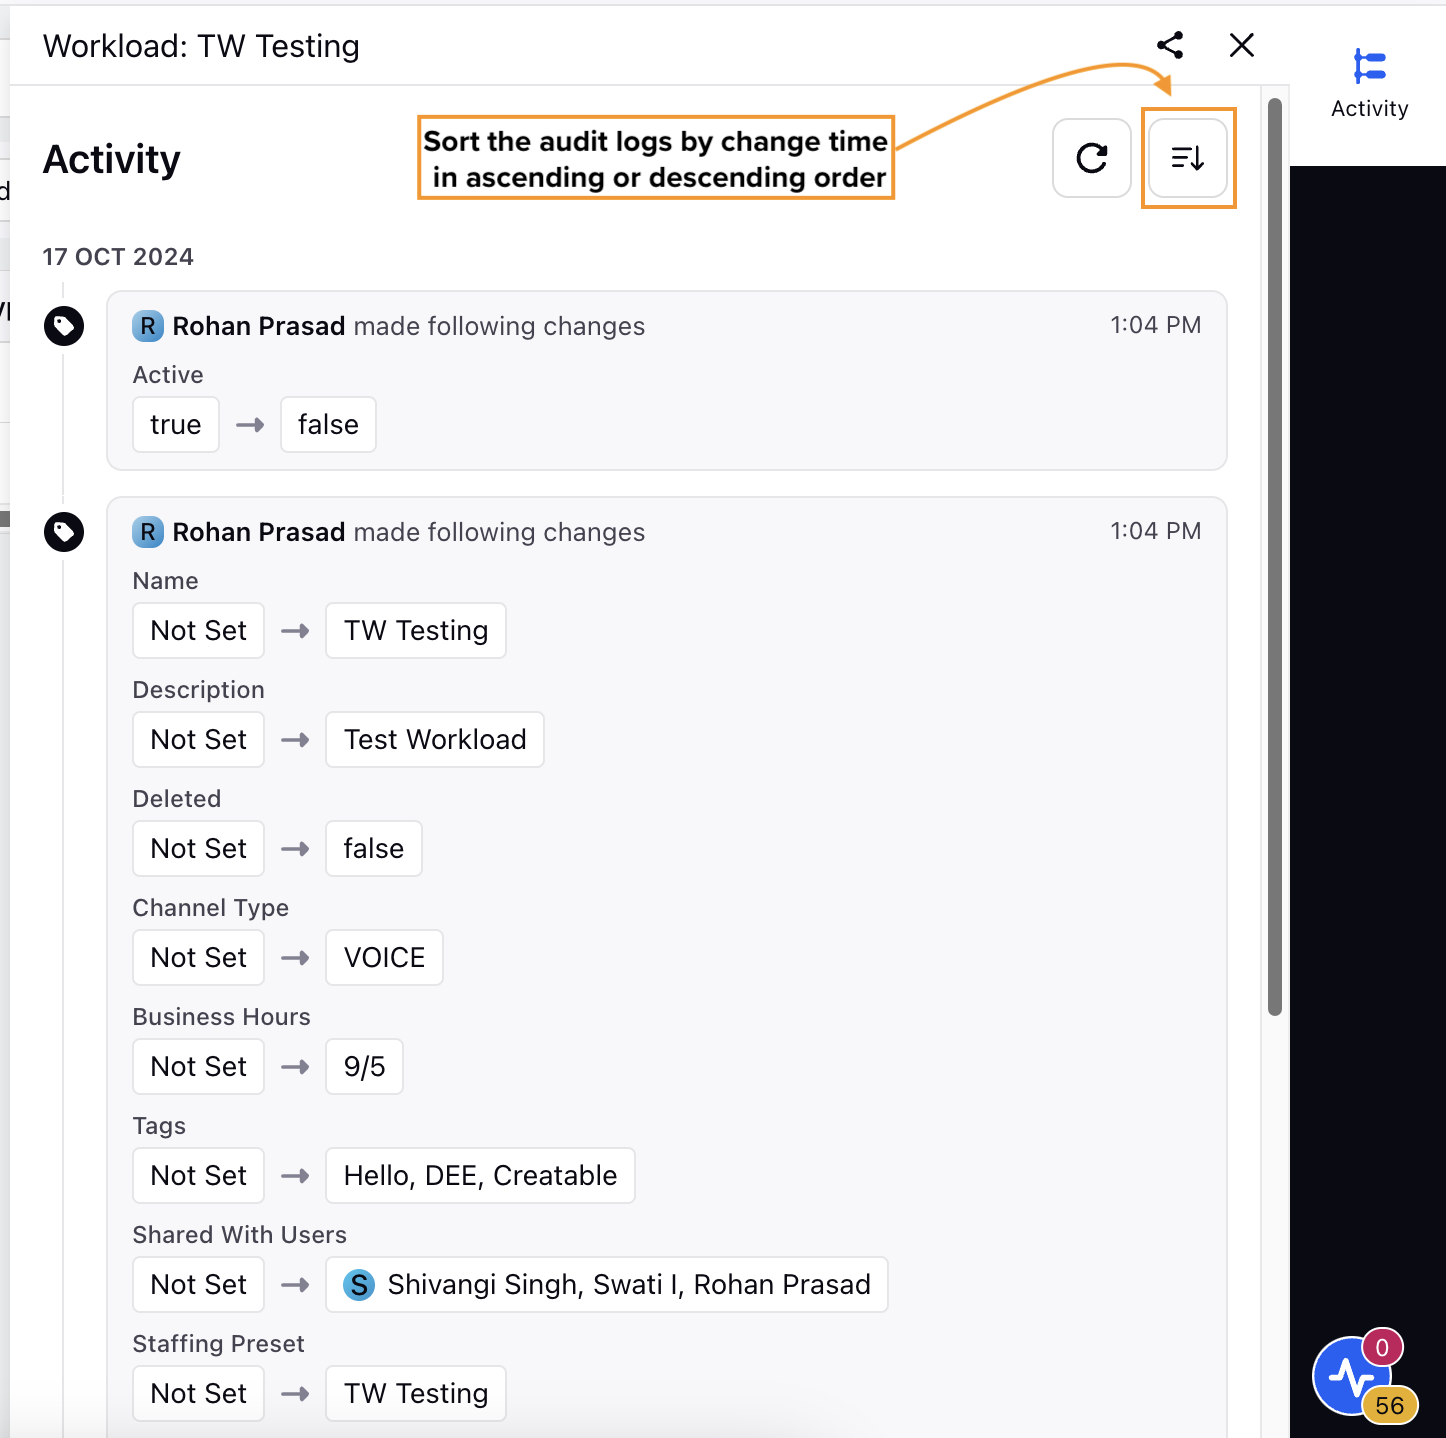
This completes the process of viewing the audit log of Workloads.