PII Masking and Data Protection
Updated
The Personally Identifiable Information (PII) Masking in Sprinklr refers to the process of identifying and securing sensitive personal information with the platform to ensure compliance with data privacy regulations (like GDPR, CCPA) and protect user data from unauthorized access.
It involves hiding or obfuscating personal data such as names, email addresses, phone numbers, credit card details, or any information that can identify an individual in Universal case messages or transcripts and Voice recordings. It helps to safeguard user privacy, and reduce the risk of data breaches or misuse.
Also, whenever PII is masked, a marker is displayed on the recording timeline at the corresponding message timestamp in the case analytics view.
Enablement Note: To learn more about getting this capability enabled in your environment, please work with your Success Manager.
Permissions
To use this PII Data Masking feature, you need to have the view, create, edit, and delete permissions. You may efficiently develop, manage, and mask templates in accordance with the requirements with these permission.
Note: There are distinct permissions for each of the following assests.
Universal Message Masking
Survey Masking
AI Data Masking
The permissions for each of the assets are clearly seperated. You need to have permission of each of the asset seperately to view the respective Masking page. For example, the Survey Masking page will only be visible if you have the Survey Masking Template permission under CFM App.
To navigate to the PII Masking permissions page,
On the Launchpad, under the Settings section of the Platform Modules section, click All Settings.
On the left navigation pane, click My Settings.
Click on the Permissions tab on the top of the page.
From the left navigation pane, expand Role level Permissions. The permission for each of the following assets are defined seperately and will be available in the mentioned location:
Universal Message Masking - Navigate to Conversation > Universal Message Masking Template
Survey Masking - Navigate to CFM App > Survey Masking Template
AI Data Masking - Navigate to AI+ Studio > AI Data Masking
Scroll and select Masking Configuration. You will see permissions for the overall PII Masking feature.
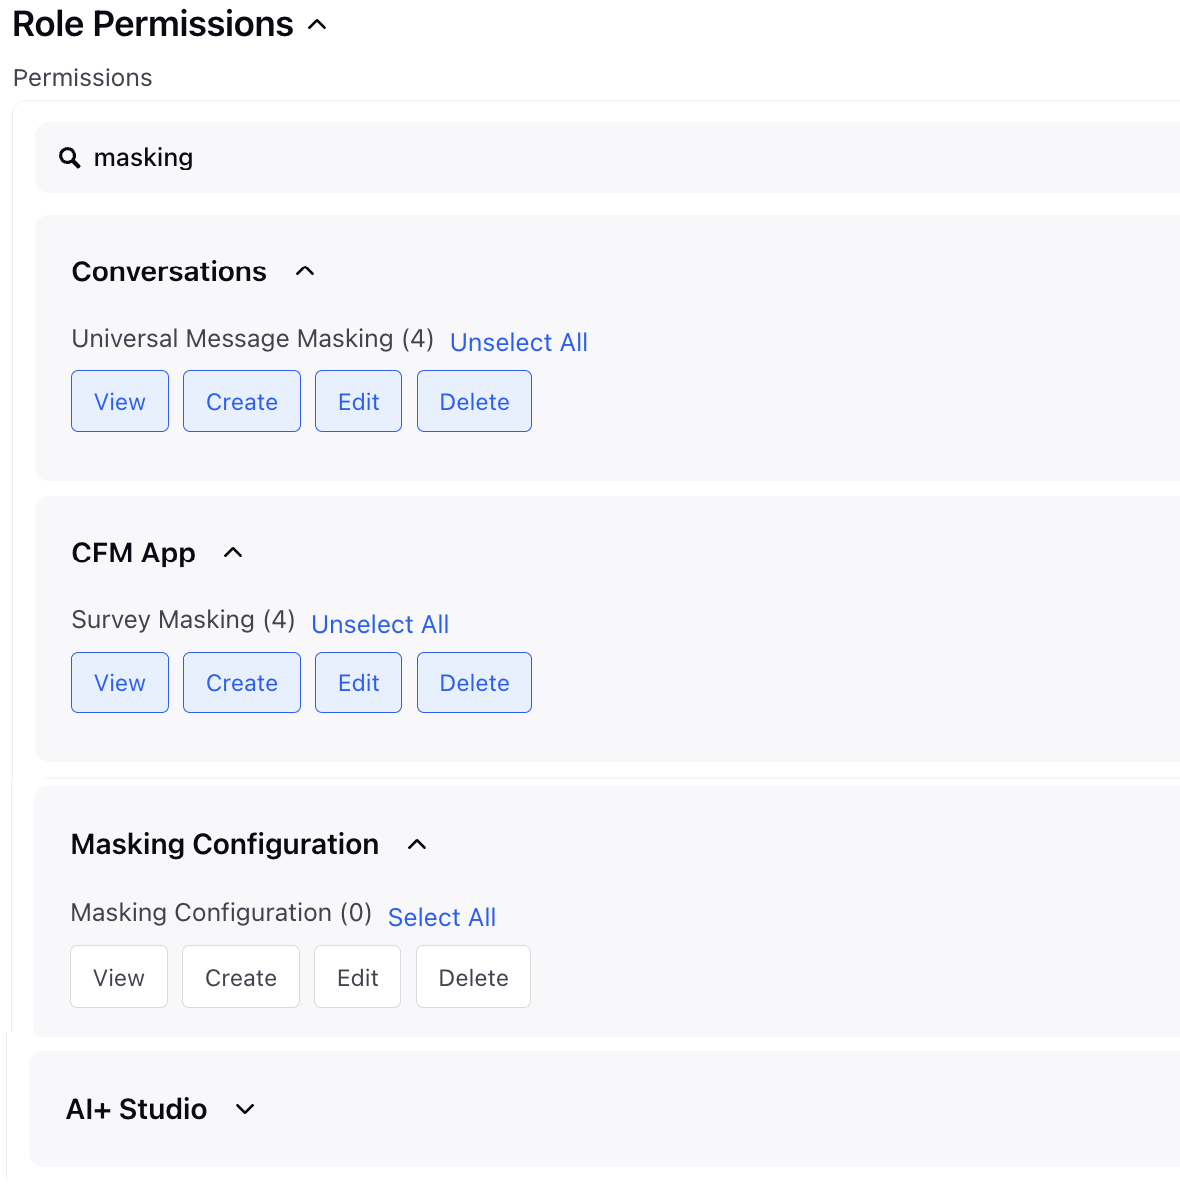
The permissions will include:
View
Edit
Create
Delete
For more information on these permissions, refer to the Permissions table.
Note: To enable this feature, use the DP SETTING_ENTITY_V2_ENABLED.
The following table describes the definitions of the permissions listed.
Permissions | Definition |
View | The View permission determines whether a user or role can access and view unmasked sensitive data classified as PII. The View permission is a user or role-based control. |
Create | The Create permission determines whether a user or role has the ability to define, configure, or apply new masking rules and policies for PII data within a system. This permission is critical for ensuring that masking is implemented securely and consistently across sensitive data. |
Edit | The Edit permission allows users or roles to modify existing masking rules, policies, or configurations related to protecting PII data. The permission ensures that only authorized personnel can update how sensitive data is masked, balancing flexibility with security. |
Delete | This permission allows authorized users or roles to remove existing masking rules, policies, or configurations. This permission is critical and must be tightly controlled, as deleting masking rules can expose sensitive PII data, and impact with compliance with data privacy regulations. |
Accessing PII Masking page
Note:
If the SETTING_ENTITY_V2_ENABLED DP is enabled, access the PII Masking page from All Settings > General > Audit and Compliance.
If the SETTING_ENTITY_V2_ENABLED DP is not enabled, access the PII Masking page from All Settings > Platform Settings > Manage Customer > Masking.
Steps to access PII Masking page when new settings DP is enabled,
On the Launchpad, under the Settings section of the Platform Modules section, click All Settings.
On the left navigation pane, under General, select Audit and Compliance.
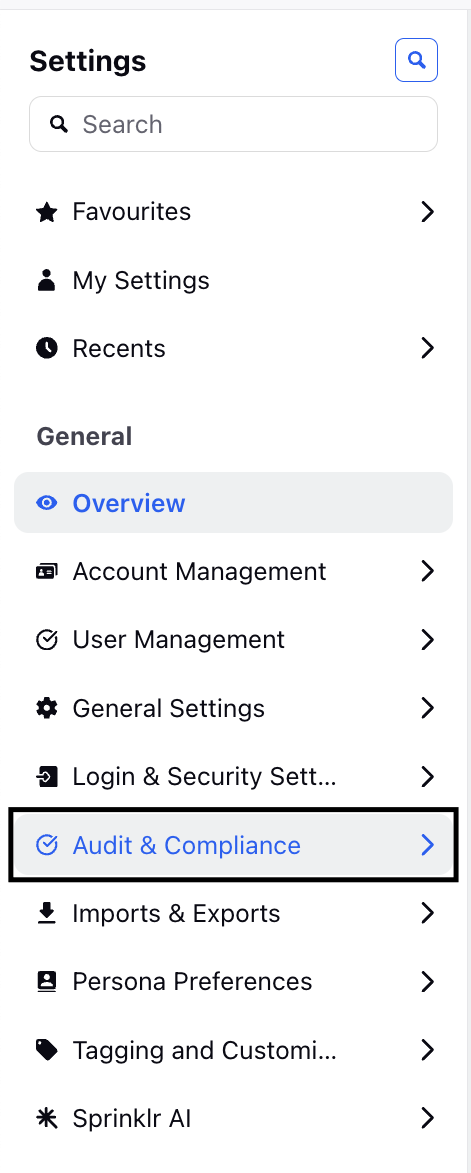
From the left navigation pane, select the required type of masking that you want to create. The following masking options are available.
Universal Message Masking
Survey
AI Data Masking
The Masking Templates page is displayed.

Select +Add Masking Template. The Create Masking Template page is displayed.
Note: You will be able to view and access the PII Data Masking options only if you have relevant view and access permission for each of the options. For more information on Permissions, refer to Permissions section.
Steps to access PII Masking page when new settings DP is not enabled,
On the Launchpad, in the Platform Modules section, under the Settings option, select All Settings.
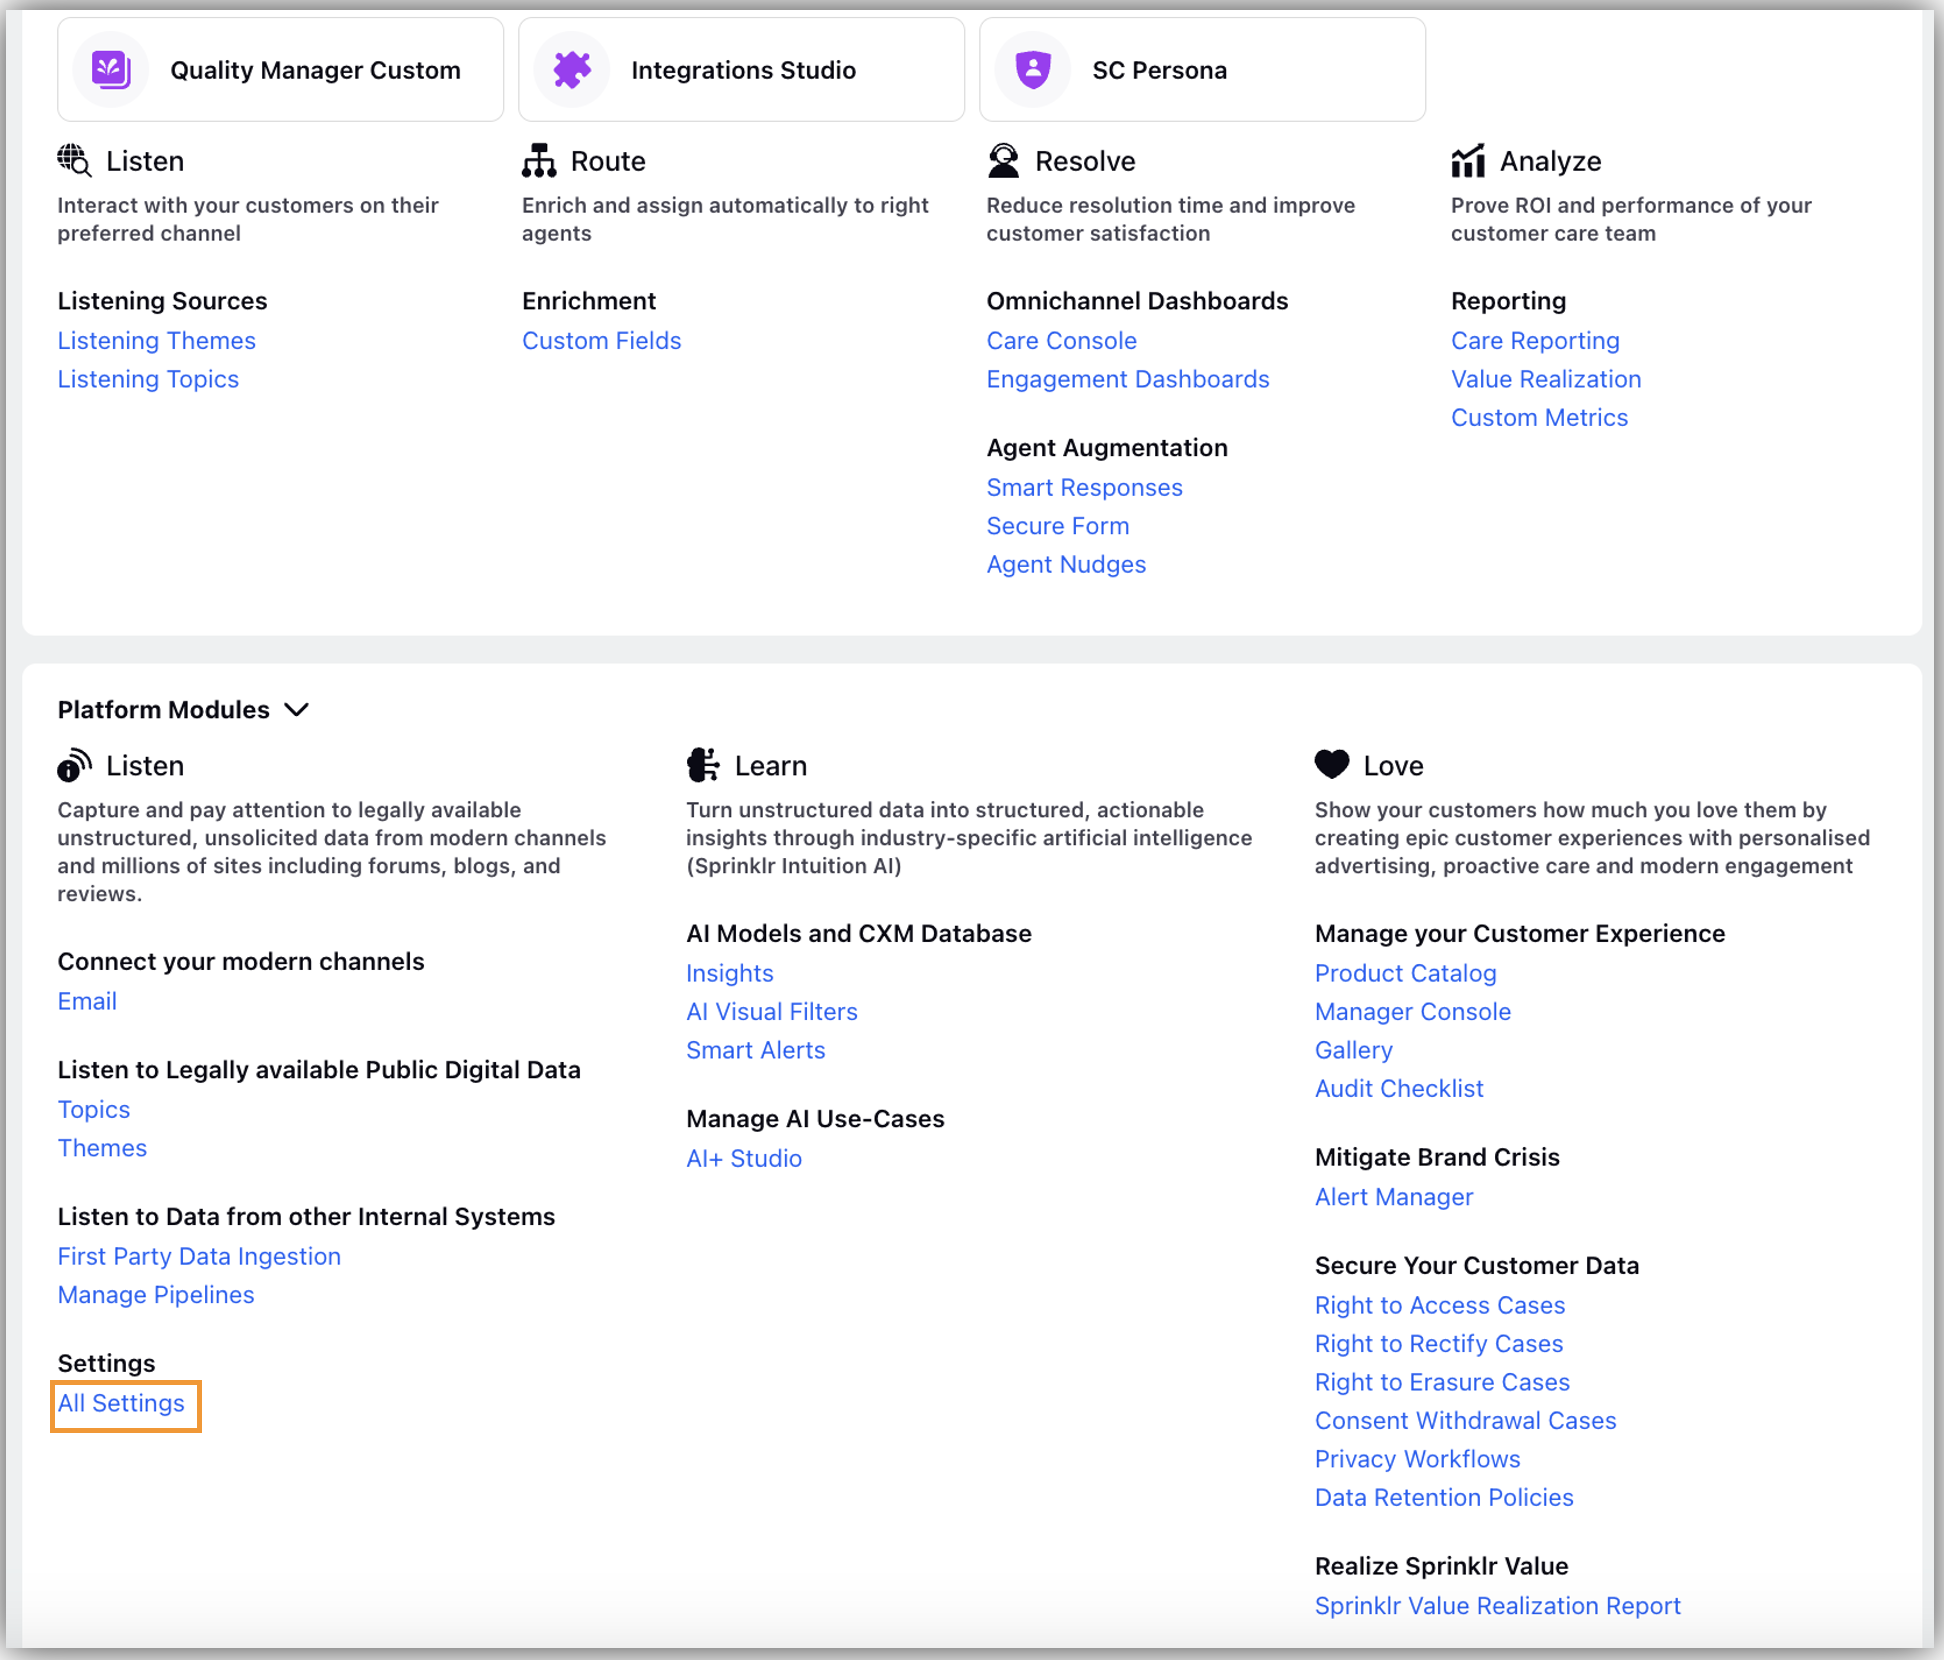
On the Platform Settings page, select Manage Customer from the left navigation pane and then click Masking.
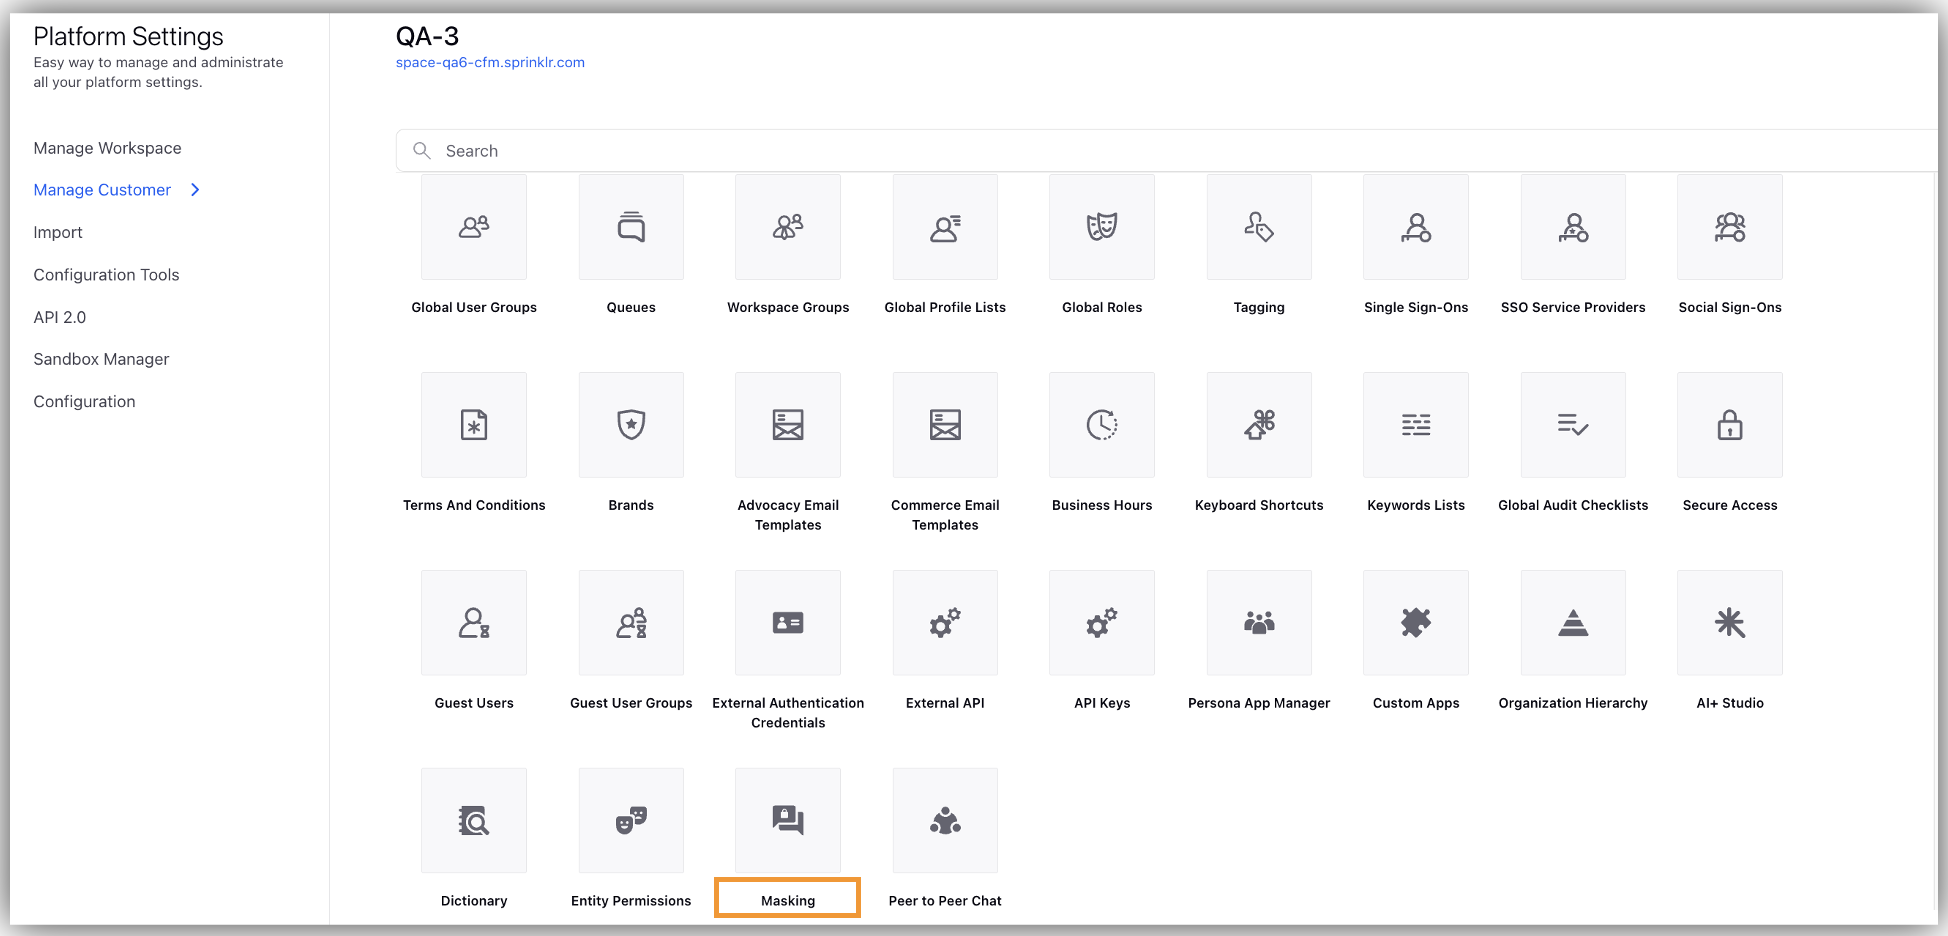
The Masking Templates screen lists the templates shared with the user. Based on the granted permission, you can Create, Edit or Delete a template by clicking on the three dots next to the template.

Creating Masking Template
On the Masking Templates page, click +Add Masking Template. The Create Masking Template page is displayed.

Enter the Name of the Masking Template.
Enter a brief description of the Masking Template in the Description box.
Toggle the Enable for voice Channels to enable the masking for voice interactions. This toggle remains disabled if the masking is enabled for digital messages.
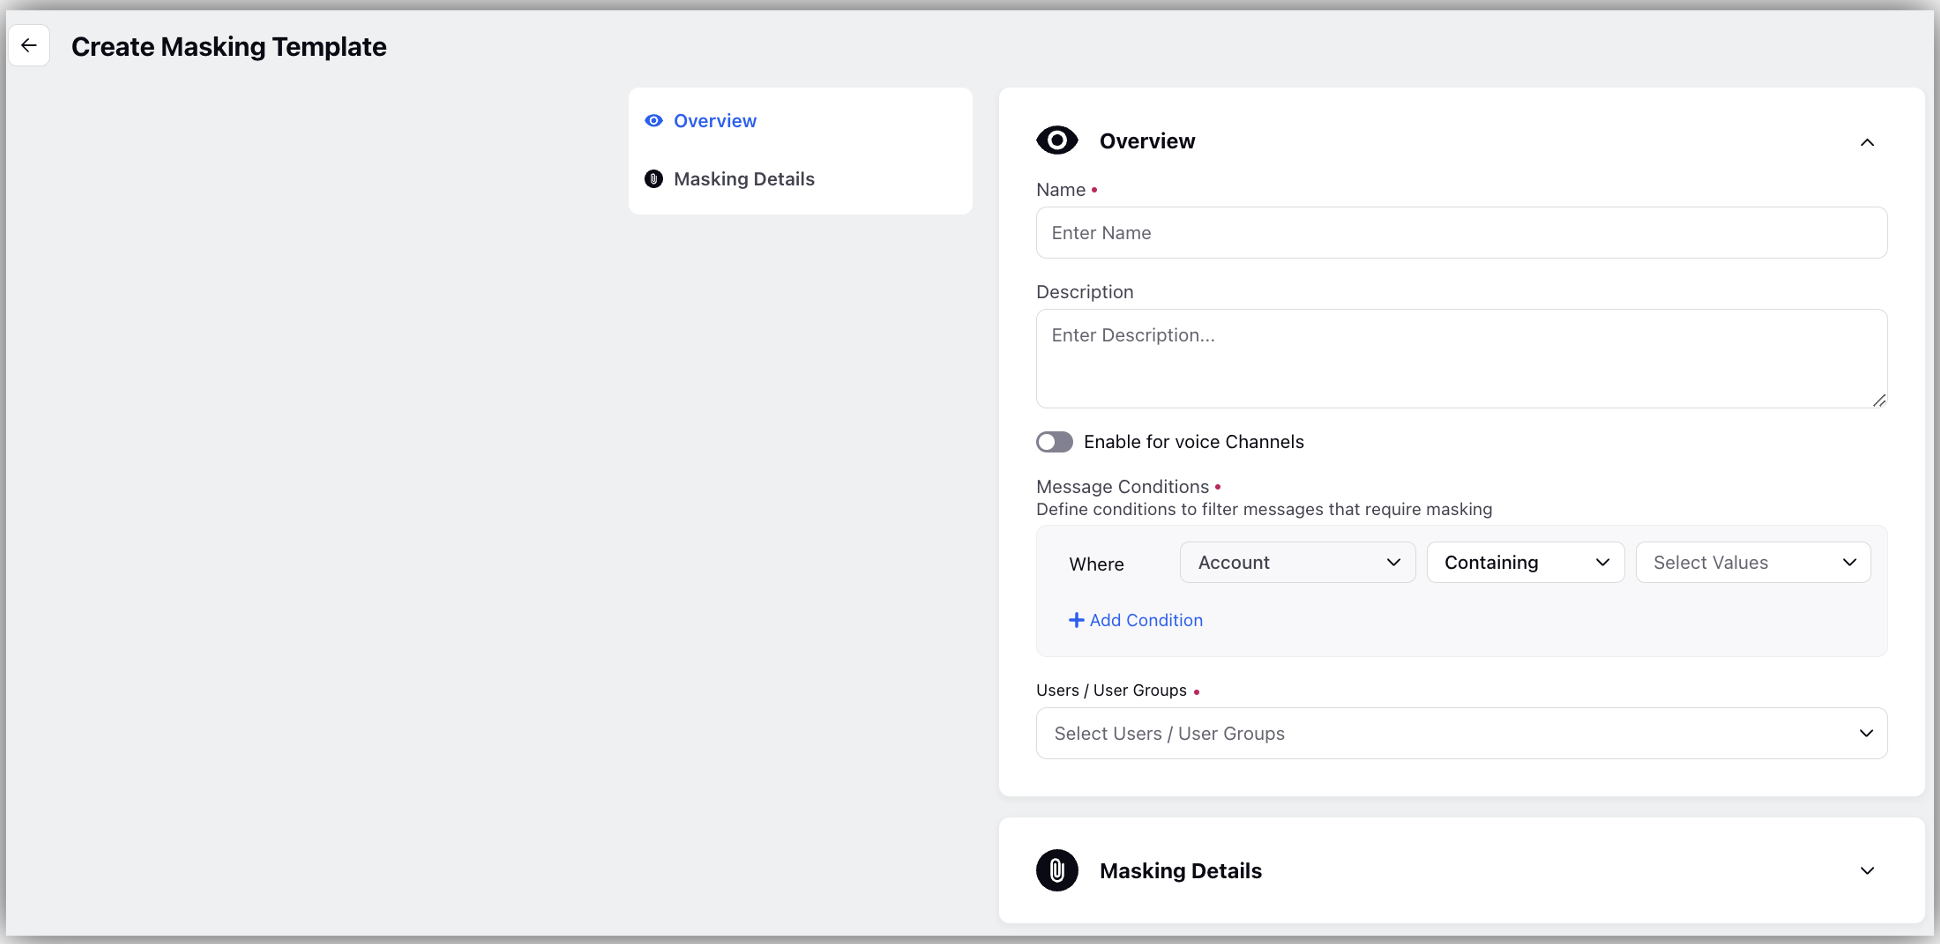
In the Message Conditions section, you can define various conditions based on which messages are filtered that require masking.
Where: Depending upon whether the Enable for voice Channels toggle is enabled or disabled, various options will get populated in the Accounts drop-down. Select Attributes, Operator, and Values. If enabled, voice accounts will get populated, else digital social accounts will apear in the dropdown.
Note: t is mandatory to select atleast one Account from the Select Values drop-down list.
+ Add Condition: Clicking on this will populate another row of filters next to AND to Select Attribute, Operator and Values. You can select one of the following attributes from the Select Attribute dropdown:
Message Type: Defines the type of messages you want to mask.
Channels: Masks messages from a specific channel.
In Fan Post: Marking it True will mask the Fan messages. Marking it False will mask the Brand messages instead.
Using User/User Groups drop-down, you can select the user or user groups with whom you want to share the masking details.
To select the preferred type of masking, Under the Approach section, enable the AI Based toggle to involve the use of artificial intelligence to automatically identify and obscure sensitive information within user-generated content, or enable the Regex Based toggle to identify and obscure sensitive information by matching specific patterns in text.
Select a condition from the Mask after time dropdown that determines when to perform masking.
Select a masking character from the Masking Character dropdown.
Select the Type of Masking, Permanent or Conditional.
Under Additional Settings, enable the Mask Audio toggle to mask the audio along with its transcript.
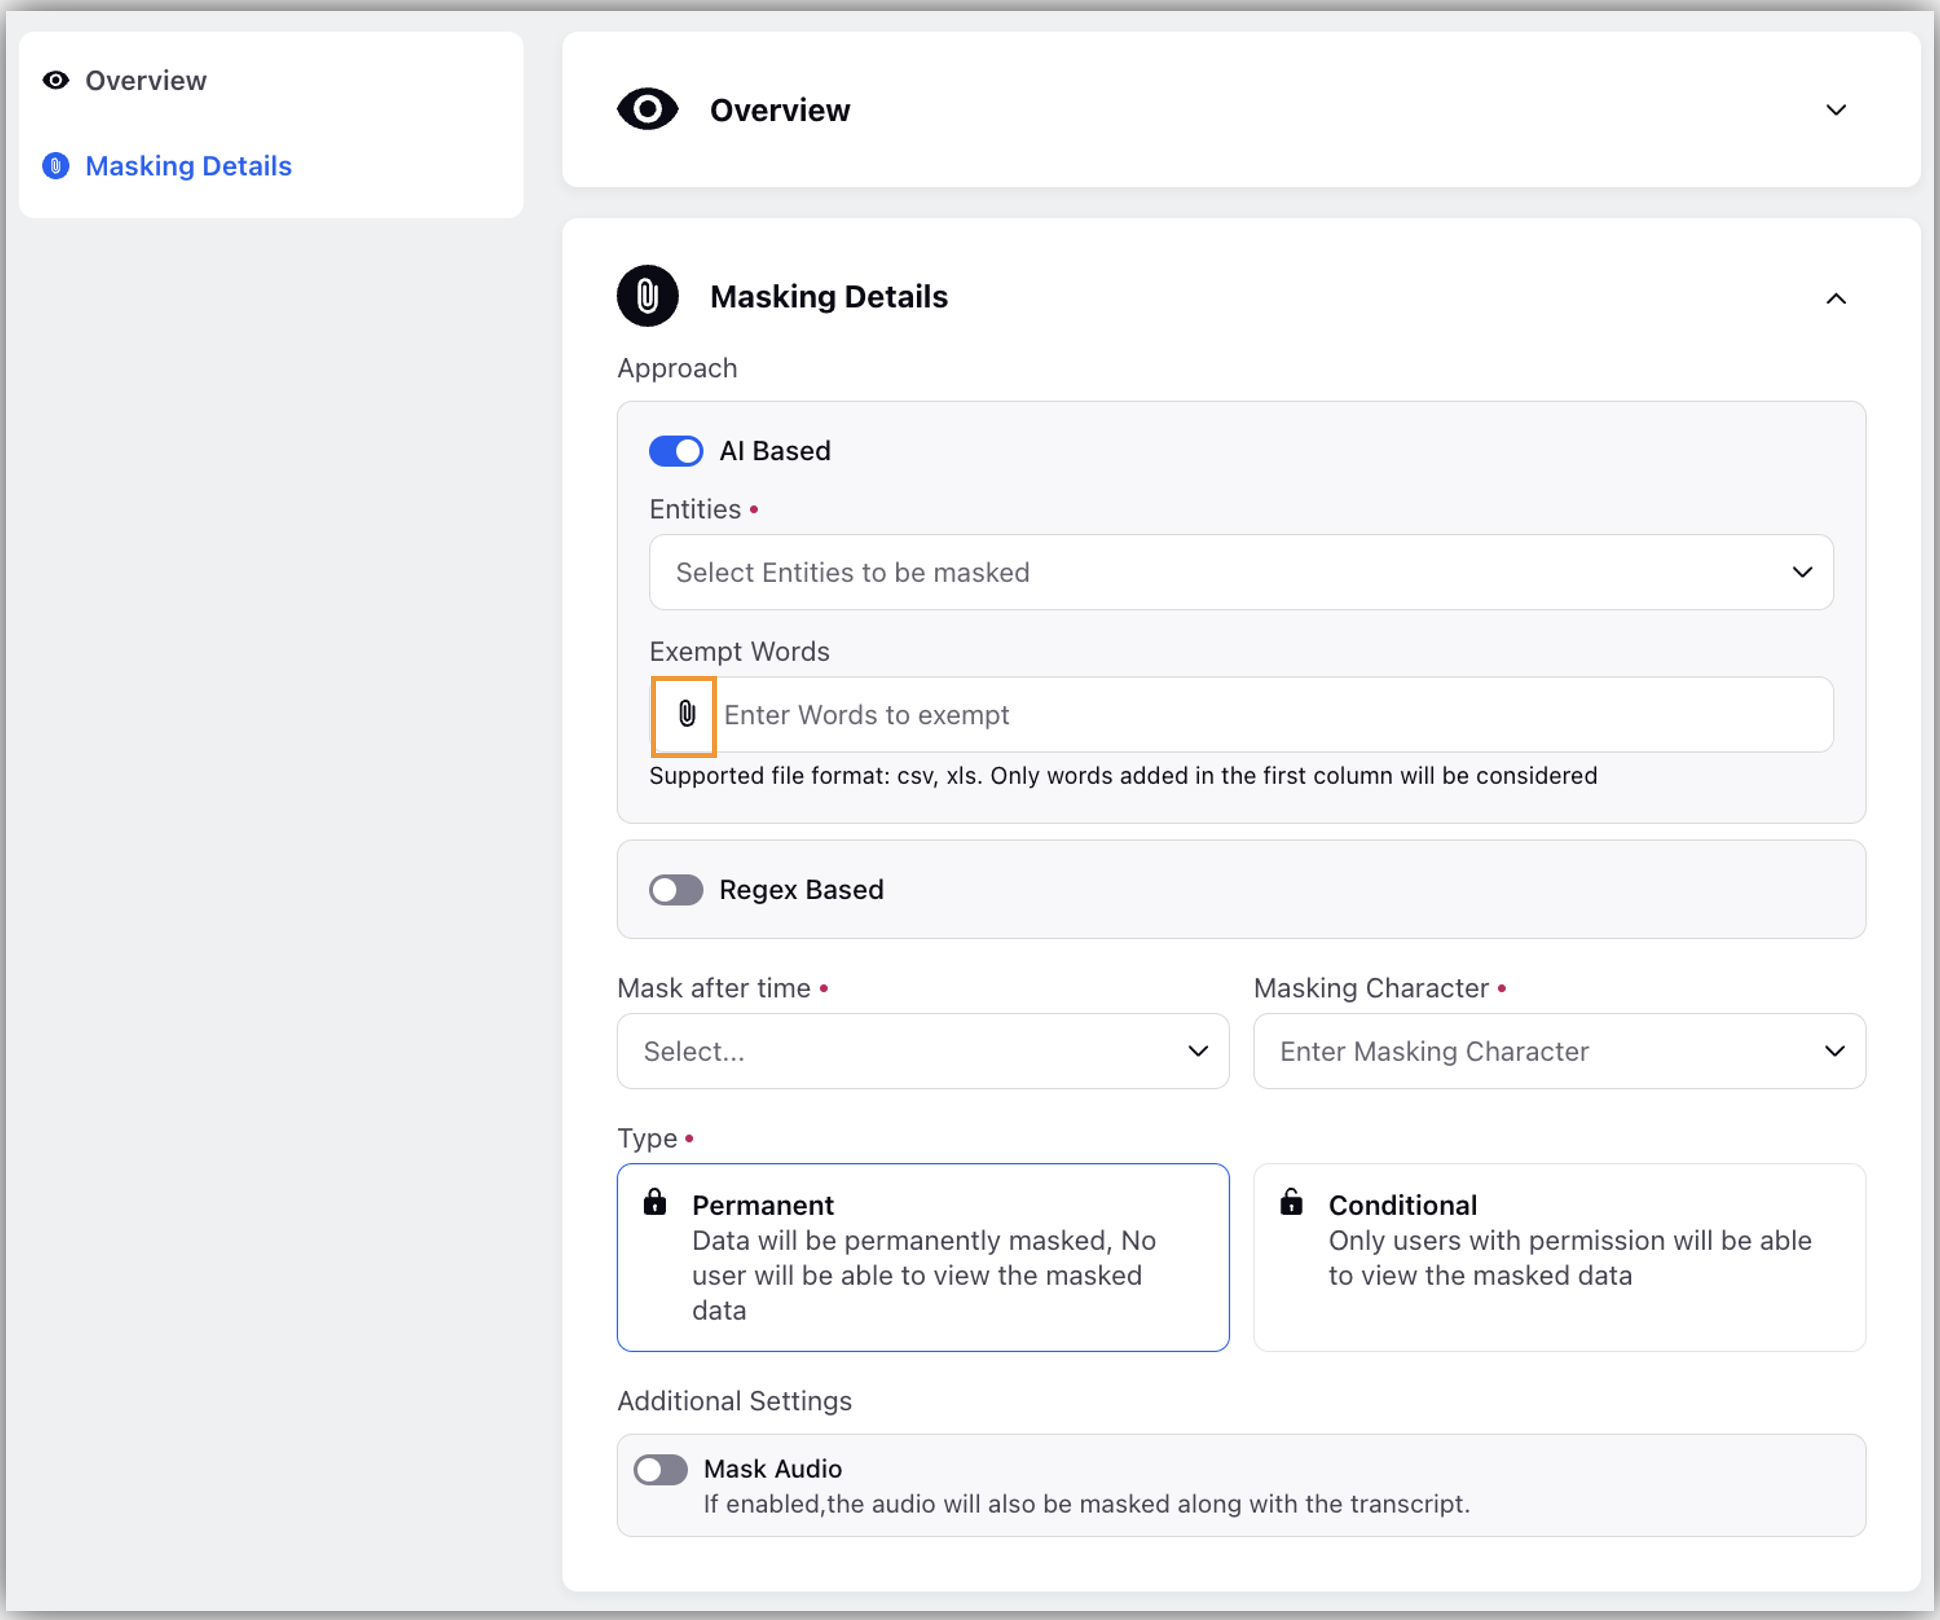
The following table provides information on the parameter names and their description available on the Masking Details screen:
Parameter Name | Description |
Approach |
|
Mask after time | Select the condition that determines the time to perform masking. From the dropdown, you can select one of the following:
|
Masking Character |
|
Type | There are two types of Masking that are supported in Sprinklr:
|
Additional Settings | Mask Audio: Parts of an audio recording containing sensitive information (For example, names, phone numbers, credit card details) are automatically detected and masked with beep sounds, during or after the conversation, if the Mask Audio toggle is enabled. Additionally, visual markers appear on the recording timeline to highlight these masked segments, aligning with the PII-masked segments message in the Case Analytics view.
Access to Masking Audio for certain segment is controlled by the dynamic property. To enable this feature in your environment, contact your Success Manager. Alternatively, you can submit a request at tickets@sprinklr.com. |
UI capabilities
Search - Quickly search for specific masking template using relavant keywords.
Refresh - Reload the data to view updated information.
Manage Columns - Helps arrange the columns displayed on the page.
Performing PII Unmasking
Perform the following steps to unmask PII:
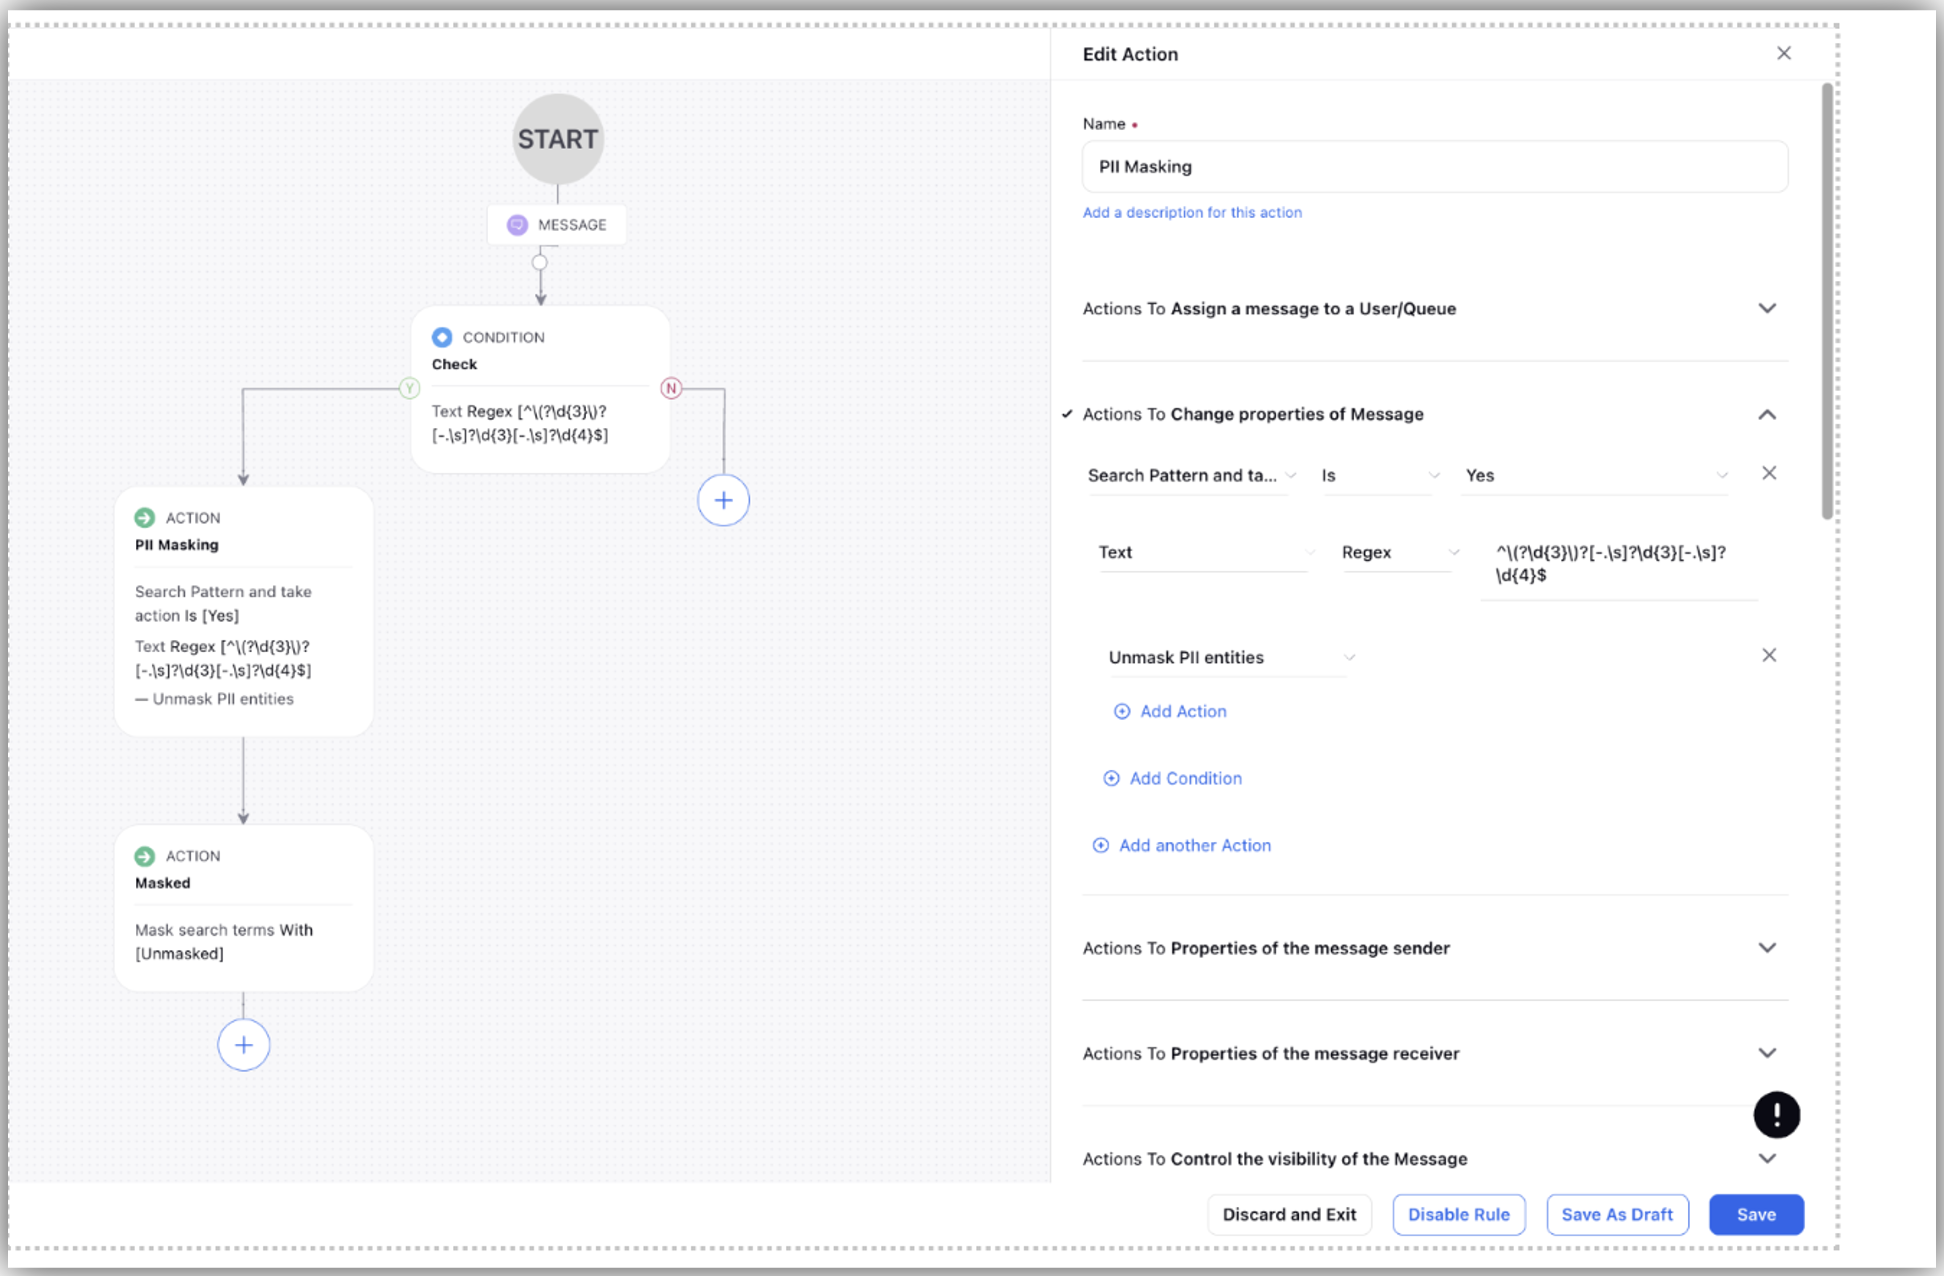
Create a rule. Under Change Properties of Message, select the Search Pattern and Take Action and set the value to Yes.
In the associated Text field, input the specific regex pattern representing sensitive information that you wish to unmask in digital and voice conversations.
Once you've defined the pattern, click Add Action. From the list of actions, choose Unmask PII entities. This action will identify any masked sensitive information matching the specified pattern and unmask it accordingly.
Click Save.
