Manage Schedule Policies
Updated
The Scheduling Policy builder allows you to configure and manage work schedules for agents, ensuring optimal coverage and adherence to labor laws. This feature allows you to efficiently plan shifts, manage day-offs, and ensure fair distribution of working hours, enhancing workforce productivity and compliance. This article covers the steps required to access, configure, and utilize the Scheduling Policy builder.
Prerequisites
Before using the Scheduling Policy builder, ensure the following:
Sprinklr WFM (Workforce Management) should be enabled for the partner on the environment.
Access to the Sprinklr Service platform and Workforce Manager Persona App.
Appropriate user permissions, such as View, Create, Edit, Delete, and Clone, to access and configure scheduling policies.
Create Schedule Policy
Follow these steps to create a Schedule Policy:

Go to Workforce Manager persona on the Launchpad. Alternatively, search for 'Workforce Manager' on the Launchpad search bar.

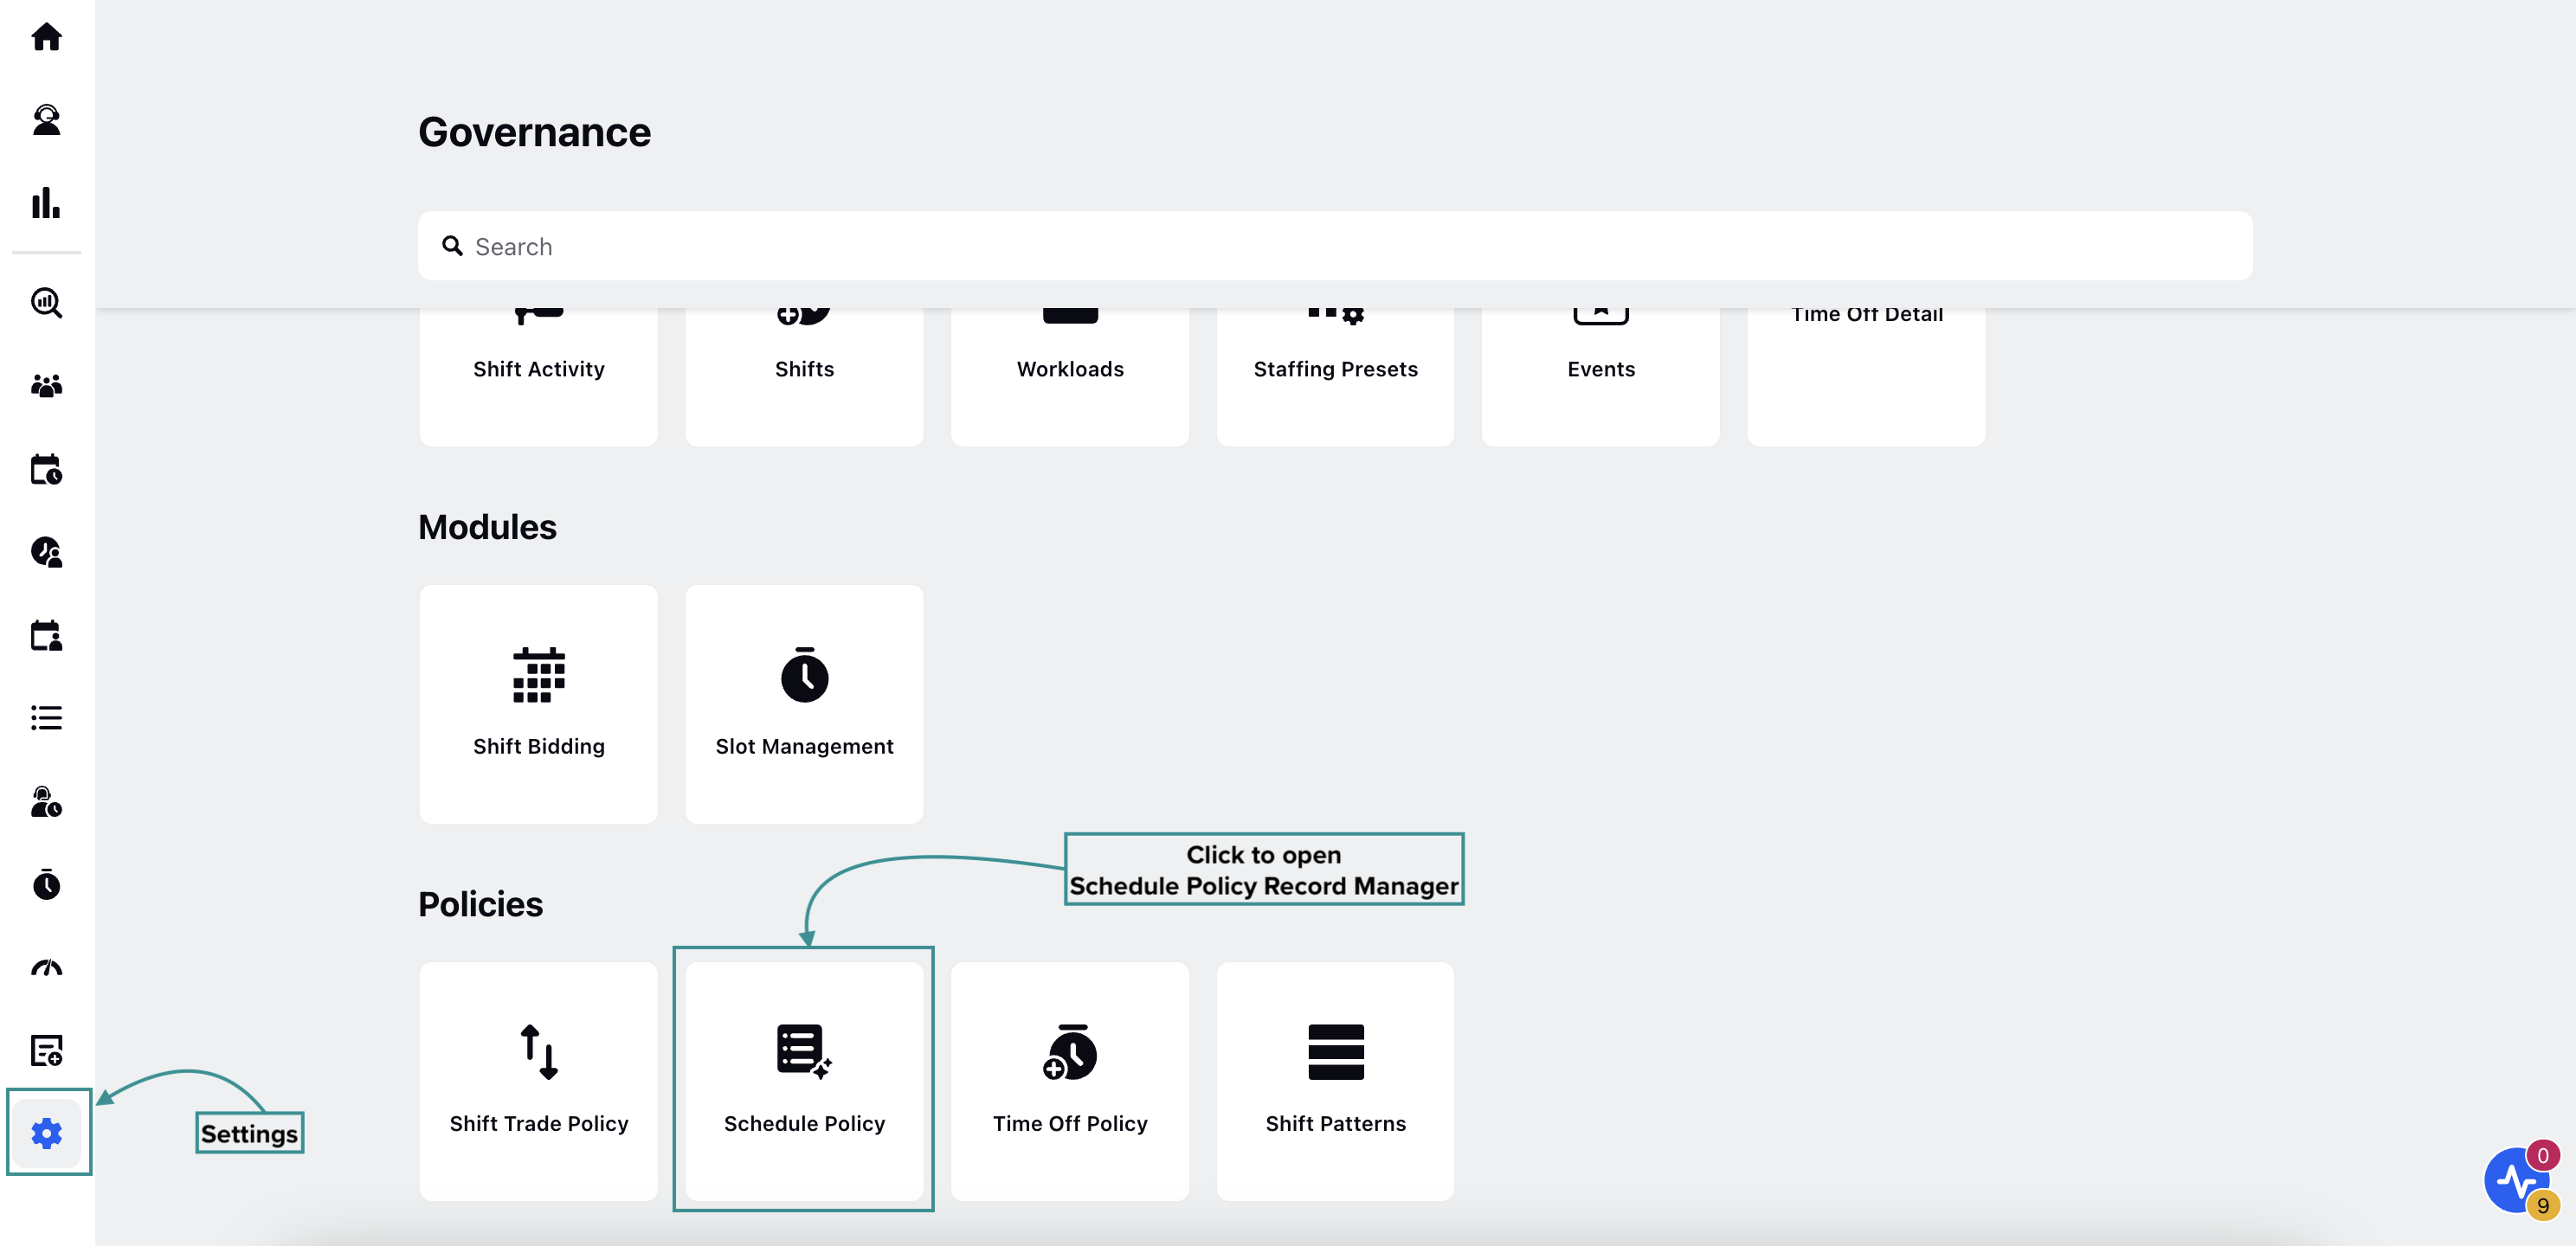
Select Settings from the Left Pane to open the Governance page.
Go to Schedule Policy under the Policies section to open the Schedule Policy Record Manager.

Click the +Policy button at the top right of the page.
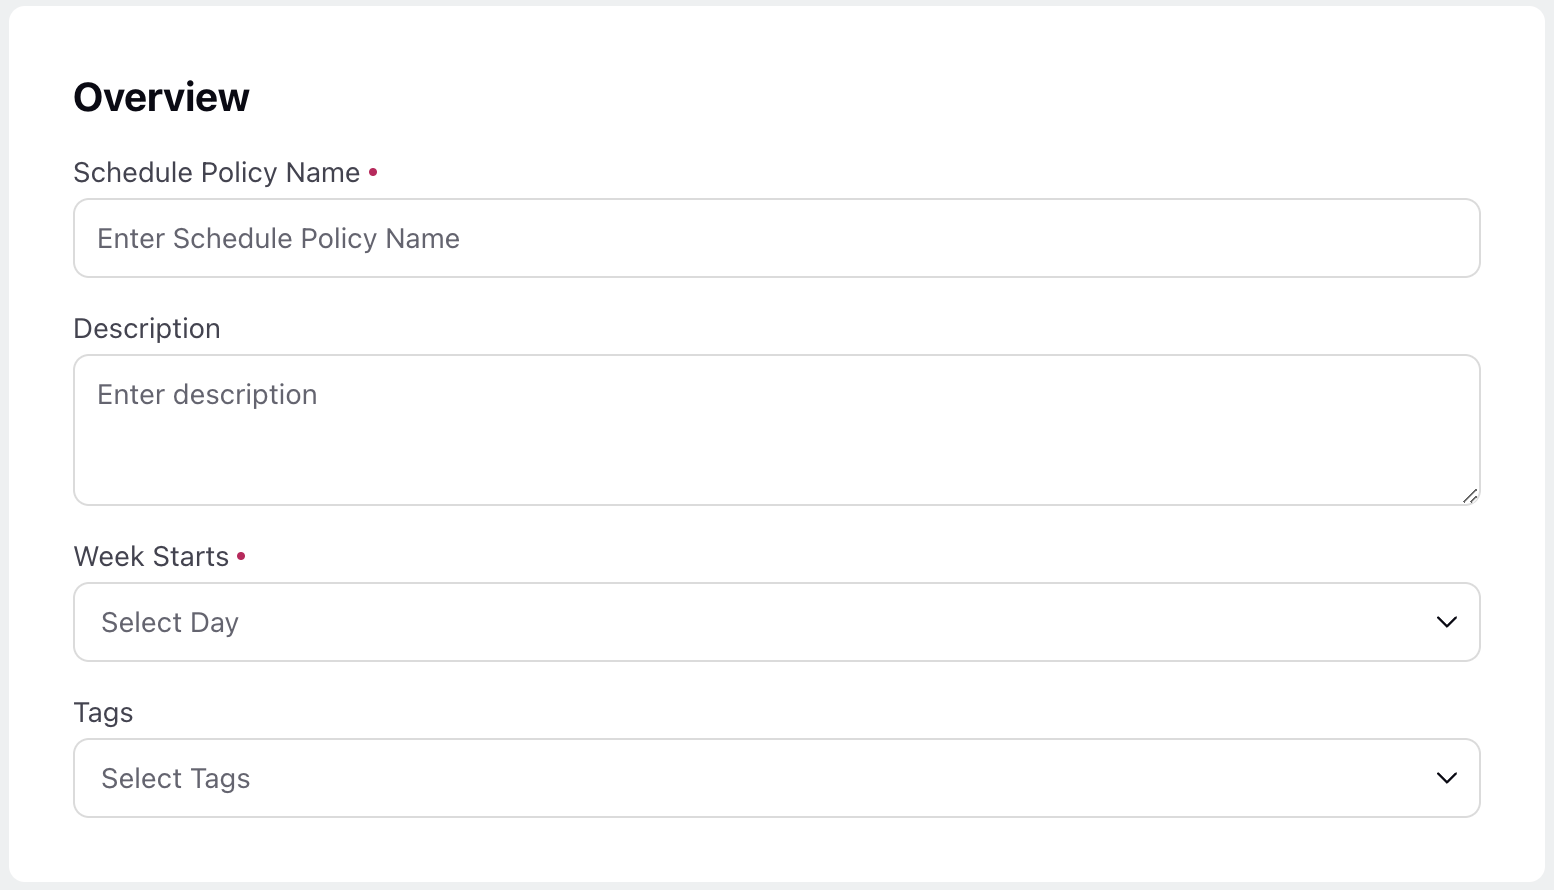
Fill in the required fields in the Overview section. Fields marked with a red dot are mandatory. Below are the descriptions of the fields on this page:

Schedule Policy Name: Enter the name of the Schedule Policy. (Required)
Description: Describe the Schedule Policy.
Week Starts: Select on which day the week will start. (Required)
Tags: Select the tag(s) from the list for easy identification of the Schedule Policy.
Click the Next button to open the Policy Details page.
On the Policy Details page, select one from the following Policy types in the Policy Types field:
Work Contract (Refer to Work Contract Policy Type section below for configuration steps.)
Day Off (Refer to Day Off Policy Type section below for configuration steps.)
Assignment (Refer to Assignment Policy Type section below for configuration steps.)
Click the Next button at the bottom right of the page to open the Share Settings page.
Fill in the required fields on the Share Settings page. Below are the descriptions of the fields on this page:
Visible in all workspaces: Select this checkbox if you want to share the Schedule Policy with all available Workspaces.
Workspaces: Select the Workspace(s) you want to share the Schedule Policy with. This field will be accessible only if the Visible in all workspaces checkbox is not selected.
Users/User Groups: Select the User(s)/User Group(s) with whom you want to share the Schedule Policy. This field will be accessible only if the Visible in all workspaces checkbox is not selected.
Click the Save button at the bottom right of the page to create the Schedule Policy.
Work Contract Policy Type

Total Daily Work Duration: Specify the minimum and maximum duration, in Minutes or Hours, that agents can work per day. (Required)
Note: For the Total Daily Work Duration, Total Weekly Work Duration, and Consective Working Period fields, the minimum value must be at least 1 and the maximum value cannot be less than the minimum value.
Total Weekly Work Duration: Specify the minimum and maximum duration, in Minutes or Hours, that agents can work per week. (Required)
Consecutive Working Period: Enter the minimum and maximum number of days agents can consecutively work. (Required)
Proficiency: Enter the agent's proficiency. Available options are 0, 0.25, 0.5, 0.75, and 1, with 1 selected by default. It is used to calculate Schedule FTEs Staffing Metric while viewing Schedule Scenarios. (Required)
Agent Work Mode Split: Specify the percentage distribution between agents’ work modes (Work from Home and Work from Office). The system assigns agents to each mode based on the defined percentages. By default, it is set to 100% Work from Office. (Required)
Staffing Metric Calculation Using Proficiency
Scenario 1: Break Spillover from Previous Interval
Interval: 9:00 to 9:30 AM
Total agents scheduled: 10
Situation: Agent A has a break ending at 9:10 AM with a Proficiency of 1.
Calculation: Agent A is productive for 20 out of 30 minutes in the interval. The contribution to effective count will be [(Actual Working Period/Scheduled Working Period) * Proficiency].
Hence, Agent A's effective contribution will be [(20/30) * 1] = 0.67 and the Scheduled FTEs count will be 9.67 (9 + 0.67).
Scenario 2: Multiple Agents with Different Proficiency and Activities
Interval: 2:00 to 2:30 PM
Total agents scheduled: 5
Situation: Agent A, with a Proficiency of 1, has a break from 2:15 to 2:30 PM. Agent B, with a Proficiency of 0.75, has a break from 2:10 to 2:20 PM.
Calculation: Agent A is productive for 15 out of 30 minutes while Agent B is productive for 20 out of 30 minutes. Using the above expression, Agent A and Agent B's effective contributions are 0.5, each. And hence, the Schedule FTEs count will be 4 (3 + 0.5 + 0.5).
Day Off Policy Type

Day Off Policy Type: Choose whether the Day Off Policy should be Static or Dynamic. Static policies let you select specific combinations of days on which Days Off can be assigned. Dynamic policies allow you to define the number of days off per week and set the minimum gap between them. Based on the configured settings, the system will automatically assign the actual Day(s) Off. (Required)
Note: The Day Off Policy Type will determine the fields available. For Static policies, the Select Days to schedule Day Off will be available, while for Dynamic policies, Day(s) Off Per Week and Gap Between Days Off fields will be available.
Select Days to schedule Day Off: Select the mandatory days off per week. Mandatory days off are specific days agents must take off from work each week. These days are predetermined, cannot be altered by the agents, and are not deducted from earned Time Offs. (Required)
Note: The Select Days to schedule Day Off field is configured using logical expressions. For example, if you want to configure either Saturdays or Sundays as a mandatory weekly Day Off, select Sunday in one row, set the logical operator to 'OR', and select Saturday in the second row. Similarly, if you want to configure either Sundays or Tuesdays as a mandatory weekly Day Off, select Sunday in one row, set the logical operator to 'OR', and select Tuesday in the second row. Similarly, if you want to configure both Saturdays and Sundays as mandatory weekly Days Off, select Sunday in one row, set the logical operator to 'AND', and select Saturday in the second row.
Note: Once an operator ("OR" or "AND") is selected, the same operator will be applied to any subsequent rows or row groups added.
Day(s) Off Per Week: Specify the minimum and maximum number of weekly days off agents can apply per week. (Required)
Note: : For the Day(s) Off Per Week and Gap Between Days Off fields, the minimum value must be at least 1 and the maximum value cannot be less than the minimum value.
Gap Between Days Off: Specify the minimum and maximum number of days required between consecutive days off. (Required)
Assignment Policy Type
The Assignment Schedule Policy defines the frequency at which Shifts can be assigned to agents. You can configure the Shift assignment to follow the patterns created in existing Shift Patterns and choose if they should follow a fixed pattern or rotation pattern.

Pattern Rotation: Choose whether the selected week of the Shift Pattern should repeat every week or rotate cyclically each week. (Required)
The following options are available:
Fixed Pattern: This option assigns Shifts from the Shift Pattern as defined in the Starting Week field every week.
Rotational Pattern: This option assigns Shifts from the Shift Pattern in a cycle, starting from the week defined in the Starting Week field. The cycle depends on the number of patterns included in the selected Shift Pattern.
Shift Pattern: Select the Shift Pattern from which Shifts are to be assigned. (Required)
Click the View Pattern button to quickly view the configuration of the selected Shift Pattern.
Starting Week: Select the week of the shift pattern on which, or from which, the Shift assignment should begin.
Shift Configurations: Choose if the Shift assignment should have consistent or inconsistent start times.
The following options are available:
Inconsistent Shift Start Time
Consistent Shift Start Time.
Shift Tolerance: Specify the allowable variance in the Shift start time, in minutes or hours.
Consistent Shift Period: Specify the number of consecutive days or weeks during which the Shift will consistently start at the same time.
Note: The Shift Tolerance field is visible when Inconsistent Shift Start Time is selected in the Shift Configurations field.
Note: The Consistent Shift Period field is visible when Consistent Shift Start Time is selected in the Shift Configurations field.
Minimum Gap Between Consecutive Shifts: Specify the minimum interval between consecutive Shifts (in hours or minutes). (Required)
This completes the process of creating a Schedule Policy.
Assign Schedule Policy to Agents
Schedule Policies can be assigned to or modified for users individually or in bulk from the Agent Performance dashboard.
Prerequisites for assigning Schedule Policies to agents:
Sprinklr WFM should be enabled for the environment.
You must have access to the Workforce Manager Persona App.
Existing Schedule Policy and the required Policy Type(s).
Follow these steps to assign Schedule Policies to agents:

Go to the Workforce Manager Persona App on the Launchpad. Alternatively, search for 'Workforce Manager' on the Launchpad search bar.

Select Agents from the Left Pane to open the Agent Performance dashboard.

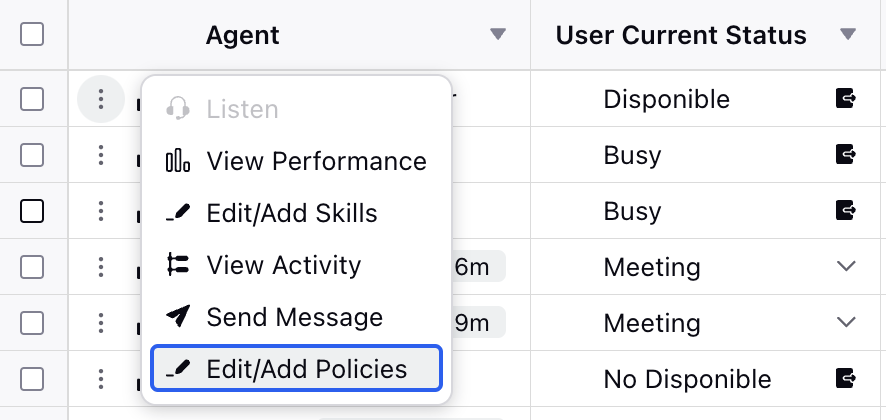
Hover over the vertical ellipsis (⋮) icon corresponding to the agent you want to assign the Schedule Policies to. This will show a list of options. Select Edit/Add Policies from the list of options to open the Policy Assignment page.

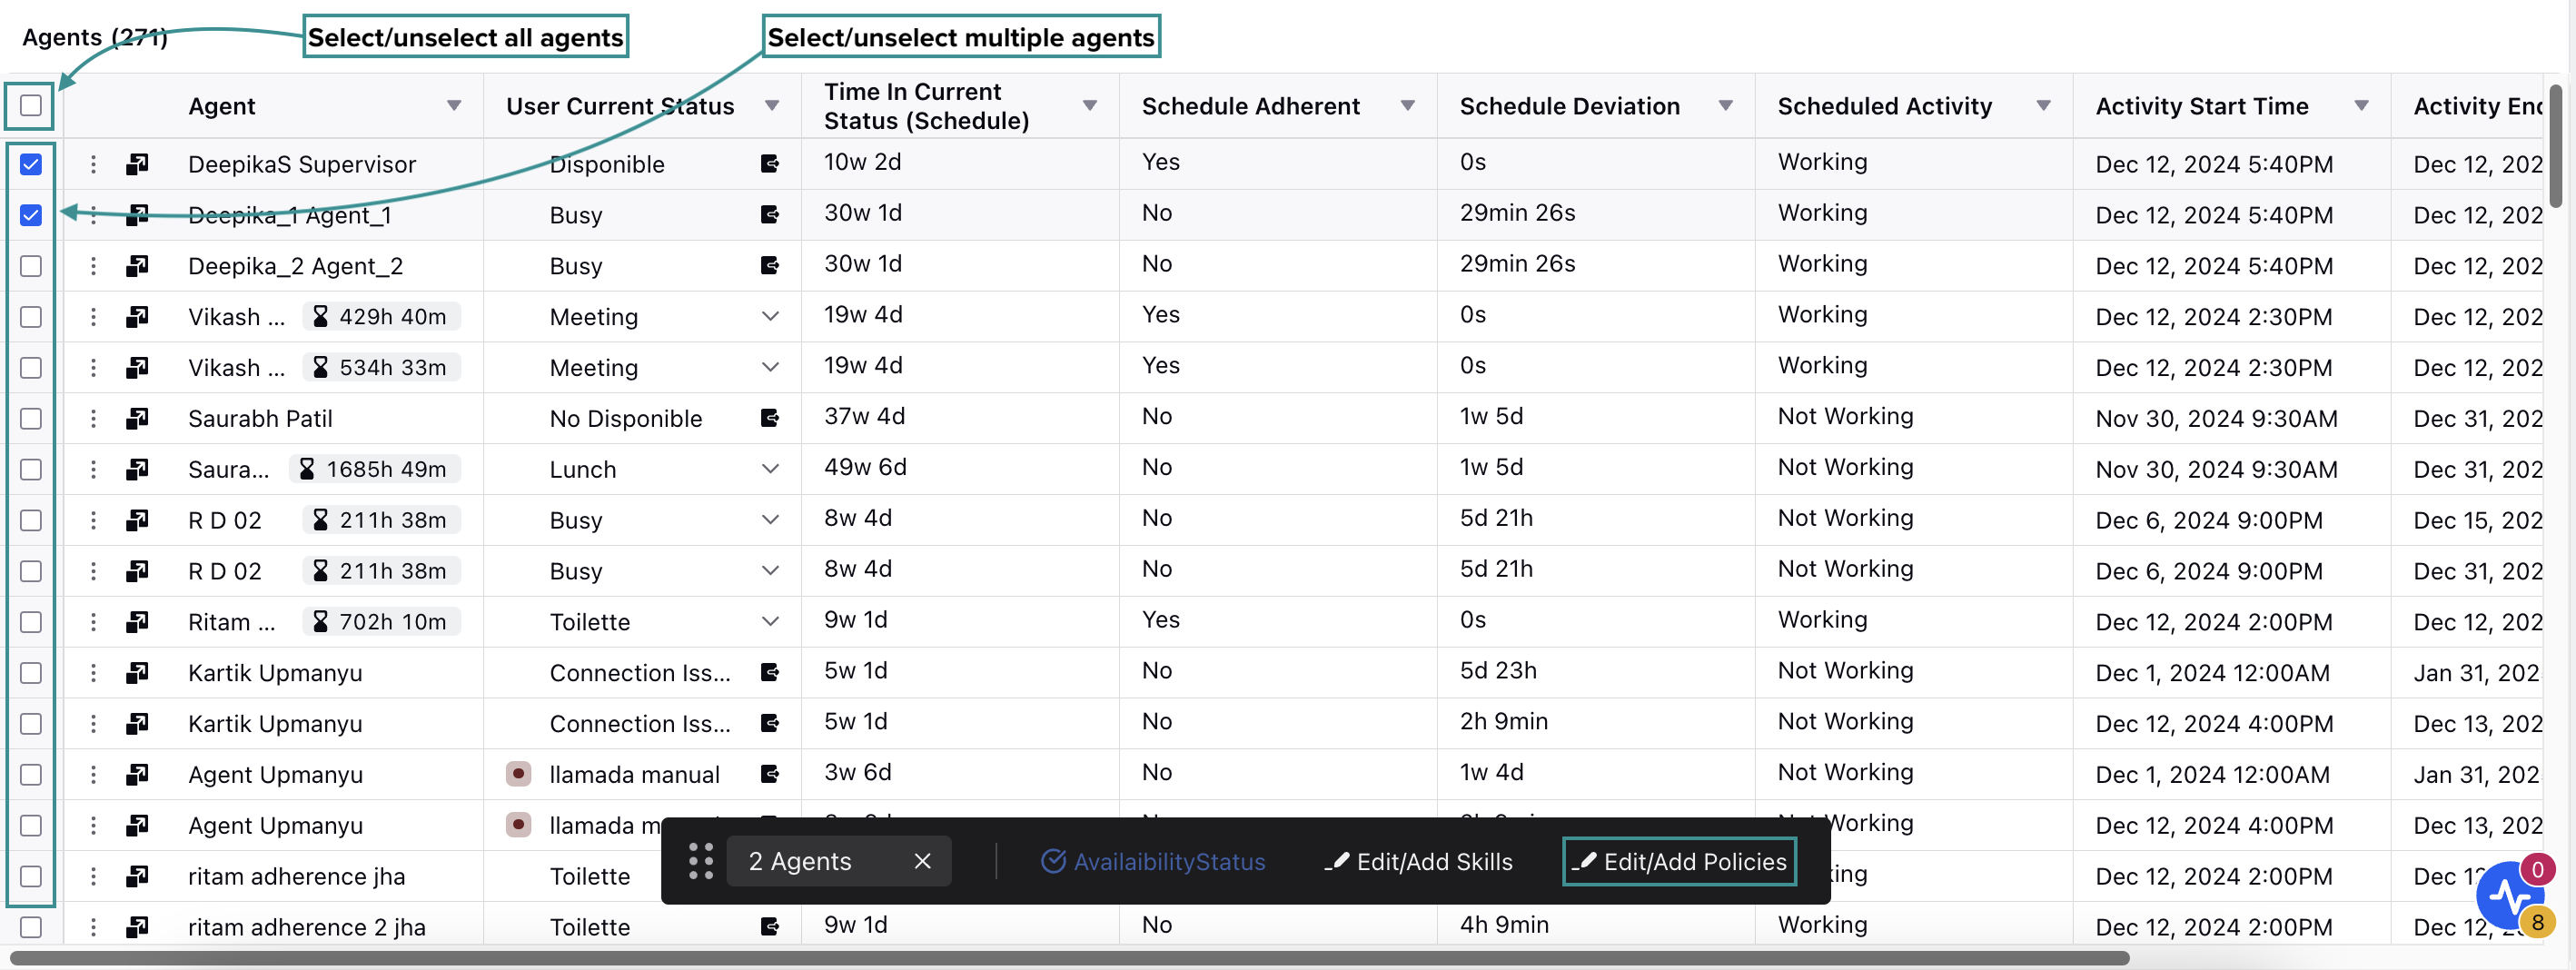
Alternatively, select the agent(s) to whom you want to assign the Schedule Policies by clicking the checkbox next to their names. To select all agents on the dashboard, click the top checkbox. Selecting the checkbox will display a toolbar at the bottom of the page. Select Edit/Add Policies from the toolbar to open the Policy Assignment page.
The Policy Assignment page is divided into Work Contract, Assignment, Day Off, and Shift sections. Each section is designated for the types of Schedule Policies and has the following fields:
Policy Name: Select the existing Schedule Policy from the list where the required Policy Type is configured. Multiple policies can be assigned by clicking the "+Policy" button.
Note: For each Schedule Policy type, an agent can have only one policy assigned for a given date range.
Agents: This field shows the agents to whom the selected Schedule Policy will be assigned. If multiple agents are selected, you can add or remove agents from the list as needed.
Start Date: Enter the date from which the Schedule Policy will be applied to the selected agent(s).
End Date: Enter the starting date after which the Schedule Policy will not be applicable to the selected agent(s).
After selecting the required Schedule Policies and Policy Types and configuring their start and end dates, click the Save button at the bottom right of the page to save your selections.
This completes the process of assigning Schedule Policies to agents.