Manage Schedule Scenarios
Updated
Schedule Scenarios are utilized to create agent schedules in Sprinklr WFM. They are designed to align with business hours, shifts, and defined activities, following scheduling guidelines such as maximum weekly working hours, preferred shifts, week-offs, and shift rotation rules. Schedule Scenarios integrate essential elements such as business hours, upcoming holidays, and agents’ time off into their decision-making process.
This section outlines the following essential steps for managing Schedule Scenarios:
Create Schedule Scenarios
Publish/Unpublish Schedule Scenarios
View Schedule Scenarios
Share Schedule Scenarios
Delete Schedule Scenarios
Export Schedule Scenarios
View the Activity Log of Schedule Scenarios
Version History of Schedule Scenarios.
Capabilities of Schedule Scenarios
Workforce Managers can create and publish Schedule Scenarios that can be auto-generated.
Workforce Managers can update the Schedule Scenarios as part of their Intraday Management activities.
Workforce Managers can import Schedule Scenarios.
Workforce Managers can view if the Schedule Scenarios violate any of the business constraints.
Create Schedule Scenarios
Note: Some of the fields mentioned below might vary from what you see in your environment as they are Dynamic Property (DP) controlled. Contact your Success Manager to enable them.
Schedule Scenarios can be Automatic, Manual, or Imported. Automatic scenarios offer advanced features such as applying custom Rules and considering agents’ Shift Preferences. Imported scenarios are ideal when schedules are managed externally.
Create Automatic Schedule Scenarios
Prerequisites for creating Automatic Schedule Scenarios:
Workforce Management should be enabled for the environment.
You must have access to the Workforce Manager Persona App.
View and Create permissions under the Scheduling section in the Workforce Management module.
Existing Workloads, Shifts, and Activities.
All agents in the scope must have a Schedule Policy (Work Contract, Assignment, and Day Off) assigned.
All selected Workloads must have data published in the Master Forecast for all intervals in the selected date range.
Follow these steps to create a Schedule Scenario in Sprinklr WFM:

Go to the Workforce Manager Persona App.

Select Scheduling from the Left Pane to open the Schedules Record Manager.
Click the +Create Schedule button at the top right of the page to open the Create Schedule page.
Fill in the required fields on the page. Fields marked with a red dot are mandatory. Below are the descriptions of the fields on this page:
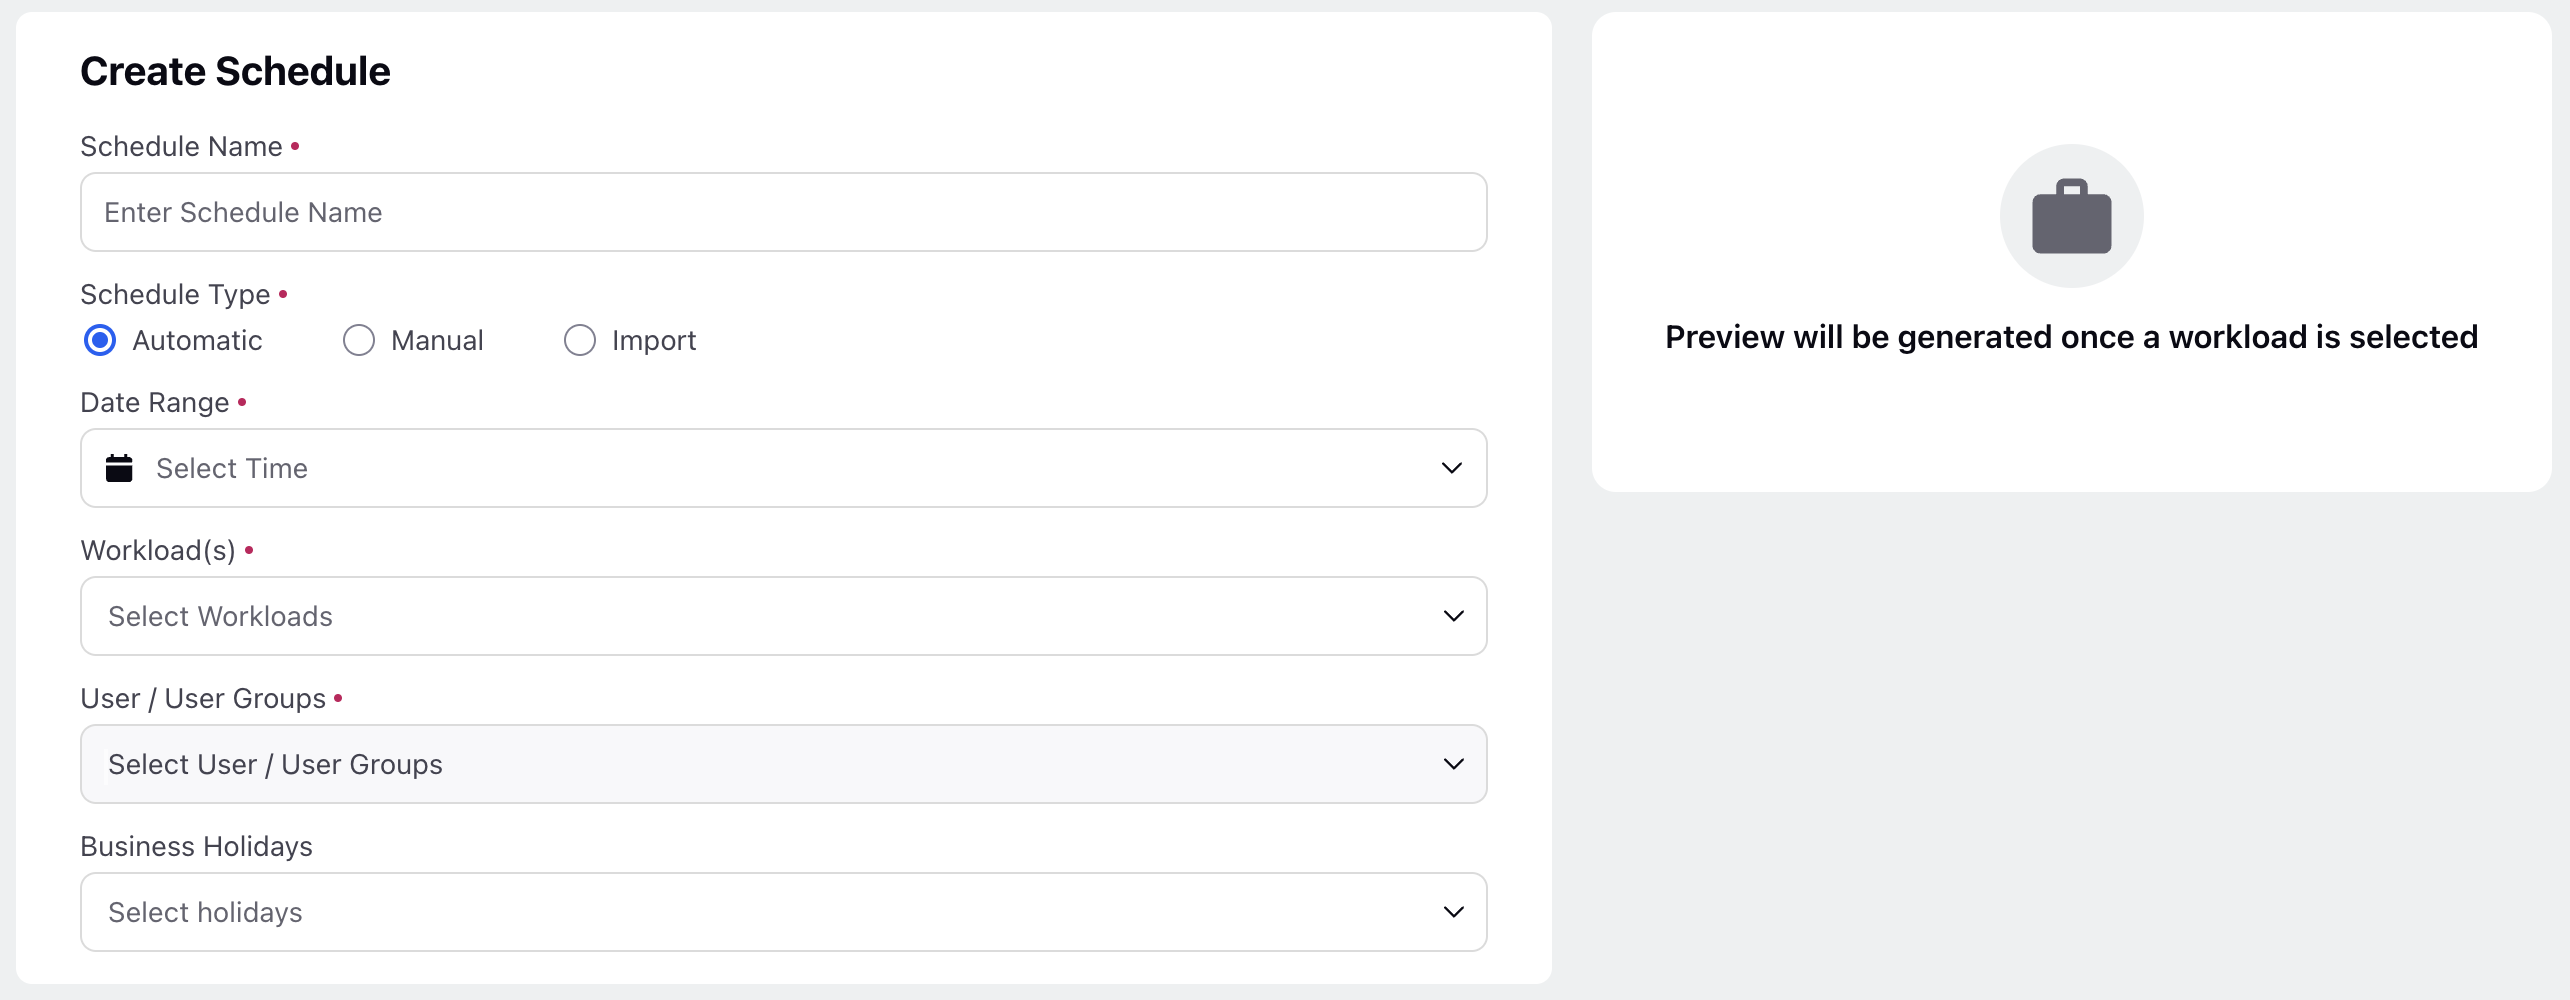
Schedule Name: Enter the name of the Schedule. (Required)
Schedule Type: Select Automatic, which means the system will automatically fetch the required data from the Master Forecast and retrieve qualifying agents based on the Workload configuration. (Required)
Date Range: Enter the date and time duration for which the Schedule will be created. (Required)
Workload(s): Select the Workload(s) to be considered for the Schedule. Multiple Workloads can be selected simultaneously. (Required)
All the users who are a part of the work queue would automatically appear once the Workload is selected.
Note: Only Independent and Child Workloads are available for selection in the list.
User/User Group(s): Once the Workload is selected, all users or user groups associated with the work queue will automatically be displayed. If you wish to add new users, you can only add users who are part of the selected Workload/Work Queue.
Note: This ability of resolving Users from User Groups is DP Controlled.
Business Holidays: Select the business holidays that should be considered for the Schedule.
Rules: Select the relevant custom rule(s) from Rule Engine to be applied on the Schedule Scenario.
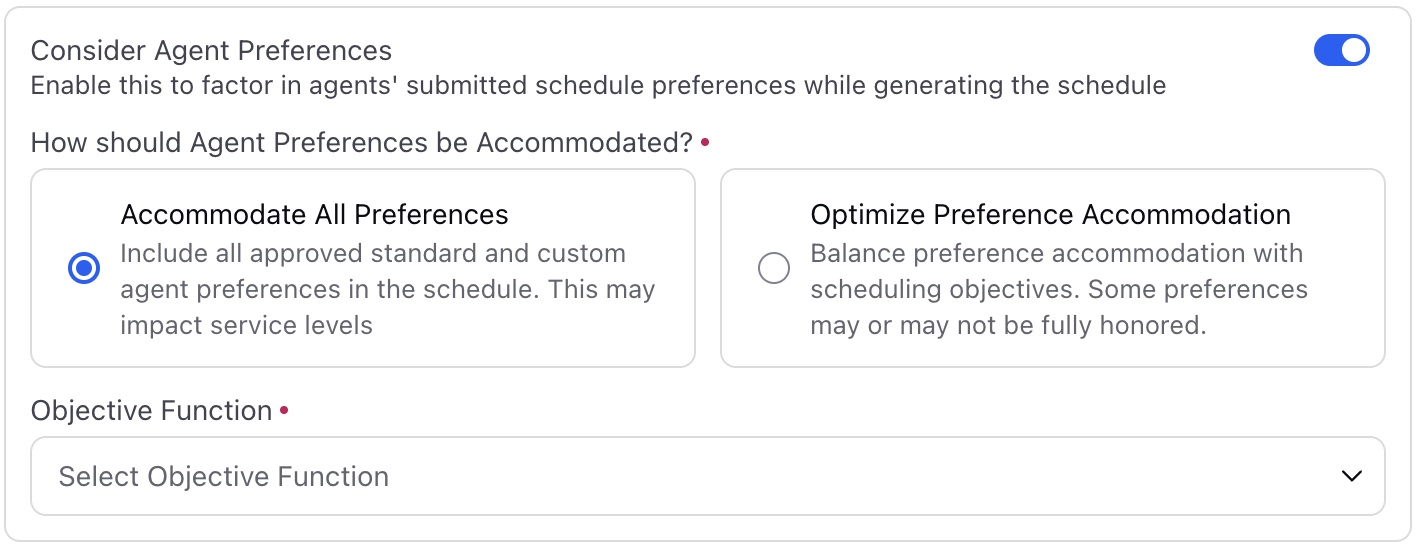
Consider Agent Preferences: Enable this toggle to incorporate the Agent Preferences submitted by agents while generating the Schedule Scenario. This toggle is disabled by default.
How should Agent Preferences be Accommodated?: Choose if the system should prioritize Service Level Goal or agents' Preferences while generating the Schedule Scenario. (Required)
The following options are available:
Accommodate All Preferences: Select this option to incorporate all approved standard and custom Agent Preferences in the Schedule Scenario. This may negatively impact the Service Level.
Optimize Preference Accommodation: Select this option for a balanced approach while applying Shift Preferences. It accommodates some preferences while maintaining service level targets. Note that not all Agent Preferences may be fully honored.
Objective Function: Select Service Level Goal. (Required)
Consider Agent Work Mode: Enable this toggle to consider the work modes (Work from Office or Work from Home) for agents, as per the Work Contract-type Schedule Policy. This toggle is disabled by default.
Maximum Seating Capacity for Work from Office: Specify the maximum number of agents who can be assigned to Work from Office in any given interval. (Required)
Click the Create button at the bottom right to create the Schedule.
Once the schedule is created, you will receive a on screen pop-up that the schedule has been created. After that, the schedule will go into a Processing state.

Once the processing is complete, the schedule goes into a Draft state and becomes ready to view.
Note: Click Refresh to update the status of the Schedule.

Create Manual Schedule Scenarios
Prerequisites for creating Manual Schedule Scenarios:
Sprinklr WFM should be enabled for the environment.
You must have access to the Workforce Manager Persona App.
Create permission under the Scheduling section in the Workforce Management module.
Existing Workloads, Shifts, and Activities.
Follow these steps to create a Manual Schedule Scenario:

Go to the Workforce Manager Persona App.

Select Scheduling from the Left Pane to open the Schedules Record Manager.
Click the +Create Schedule button at the top right of the page to open the Create Schedule page.
Fill in the required fields on the page. Fields marked with a red dot are mandatory. Below are the descriptions of the fields on this page:
Schedule Name: Enter the name of the Schedule Scenario. (Required)
Schedule Type: Select Manual to configure the Schedule Scenario manually. (Required)
Date Range: Enter the date and time duration for which the Schedule Scenario will be created. (Required)
Workload(s): Select the Workload(s) to be considered for the Schedule. Multiple Workloads can be selected simultaneously. (Required)
Note: Only Independent and Child Workloads are available for selection in the list.
User/User Group(s): Once the Workload is selected, all Users and User Groups associated with the Work Queue will automatically be displayed. You can manually select or deselect any User or User Group from the list as needed. (Required)
Business Holidays: Select the business holidays that should be considered for the Schedule.
Click the Create button at the bottom right to create the Schedule.
Once the schedule is created, you will receive a on screen pop-up that the schedule has been created. After that, the schedule will go into a Processing state.

Once the processing is complete, the schedule goes into a Draft state and becomes ready to view.
Note: Click Refresh to update the status of the Schedule.

Import Schedule Scenarios
Prerequisites for importing Schedule Scenarios:
Sprinklr WFM should be enabled for the environment.
You must have access to the Workforce Manager Persona App.
Create permission under the Scheduling section in the Workforce Management module.
Existing Workloads, Shifts, and Activities.
Follow these steps to import a Schedule Scenario:

Go to the Workforce Manager Persona App.

Select Scheduling from the Left Pane to open the Schedules Record Manager.
Click the +Create Schedule button at the top right of the page to open the Create Schedule page.
Fill in the required fields on the page. Fields marked with a red dot are mandatory. Below are the descriptions of the fields on this page:
Schedule Name: Enter the name of the Schedule Scenario. (Required)
Schedule Type: Select Import. (Required)
Upload Schedule: Upload the import Schedule Scenario template file with the requirede details. (Required)
Timezone: Select the timezone for the schedule being imported. (Required)
Date Pattern: Select the format in which the dates will be entered in the Shift Start Date column of the Excel file to be uploaded. (Required)
Time Format: Select the format in which the time will be entered in the Shift Start Time and Activity Start Time columns of the Excel file to be uploaded. The options are 12-Hour and 24-Hour formats. For example, you can enter the time in the 12-hour format (for instance, 02:30 PM) or the 24-hour format (for instance, 14:30). (Required)
Duration Format: Select the format in which the time duration will be entered in the Shift Duration and Activity Duration columns of the Excel file to be uploaded. The options are Hours, Minutes, and Hours & Minutes. (Required)
Hours: Enter the duration in hours only.
Minutes: Enter the duration in minutes only.
Hours & Minutes: Enter the duration using both hours and minutes, such as 08:30 for eight hours and thirty minutes.
Important Considerations for Importing Schedule Scenario
The following headers are mandatory in the file (Do not modify the header, including their case):
Column | Description | Remarks |
Unique Id | This column must contain the unique identifier for this Schedule. | - |
Shift Start Date | This column must contain the date of the start of the Shift. | The format should match the format selected in the Date |
Workload | This column must contain the Workload ID of the Shift. | This field will automatically generate a unique alphanumeric code for the Shift, such as SHIFT-65, for easy identification. However, you can also enter your own unique code if needed. |
Shift Code | This column must contain the Shift code. | - |
Shift Start Time | This column must contain the time at the Shifts will | The format should match the format selected in the Time |
Shift Duration | This column must contain the time duration of the Shifts. | The format should match the format selected in the Duration Format field. |
Activity Code | This column must contain the Activity codes for the respective Shifts. | - |
Activity Start Time | This column must contain the time at which the Activity will start. | The format should match the format selected in the Time |
Activity Duration | This column must contain the time duration of the Activity. | The format should match the format selected in the Duration |
Error Codes While Importing Schedule Scenarios
While importing Schedule Scenarios, if the uploaded file contains errors, the system generates an error file that provides detailes on the detected issues in the uploaded file.

You can download the error file by hovering over the 'i' icon in the Status column next to the failed Schedule Scenario in the Schedules Record Manager, and clicking the Download Error File button. The file contains two tabs: Data and Errors. The Data tab highlights problematic cells in red, while the Errors tab lists the affected cells along with detailed error descriptions. You may encounter any of the following errors:
Error Description | Error Description |
Import file contains invalid header names | Empty rows for all columns |
Import file misses a mandatory column | Null, Blank, or NA values in mandatory fields |
Import file contains duplicate columns | Leading or trailing spaces in any cell values |
Column ordering mismatch | Invalid date formats in Shift Start Date |
Leading or trailing spaces in headers | Invalid time formats in Shift Start Time or Activity Start Time |
Unexpected extra columns that are not recognized | Activity Start Time earlier than Shift Start Time |
Missing required fields | Activity Duration exceeds Shift Duration |
Duplicate records for the same user and date | Overlapping activity durations within the same shift |
Daylight Saving Time (DST) issue | Invalid shift duration values |
Start time formatted as a formula | Activities assigned to a shift that doesn't exist |
Workload column missing | Incorrect activity durations |
Unrecognized workload names | Cells formatted incorrectly |
Shift Start Time column missing | Formulas present in any cell instead of values |
Activity Code missing | Non-UTF-8 encoding causing special character issues |
Shift duration not aligned with assigned activities | - |
This completes the process of creating a Schedule Scenario.
Publish Schedule Scenarios
Prerequisites for publishing Schedule Scenarios:
Sprinklr WFM should be enabled for the environment.
You must have access to the Workforce Manager Persona App.
View and Publish permissions under the Scheduling section in the Workforce Management module.
Follow these steps to publish a Schedule Scenario:

Go to the Workforce Manager Persona App.

Select Scheduling from the Left Pane to open the Schedules Record Manager.
Click the View Schedule (eye icon) button corresponding to the Schedule Scenario to be published. This will open a detailed view of the Schedule Scenario.

Click the Publish button at the top right of the page to open the Publish Schedule window.
In this window, you can configure the duration for which the Schedule Scenario should be published. This allows you to publish only specific portions of the Schedule Scenario within the overall scheduled date range, even if the scenario was created for a longer duration.
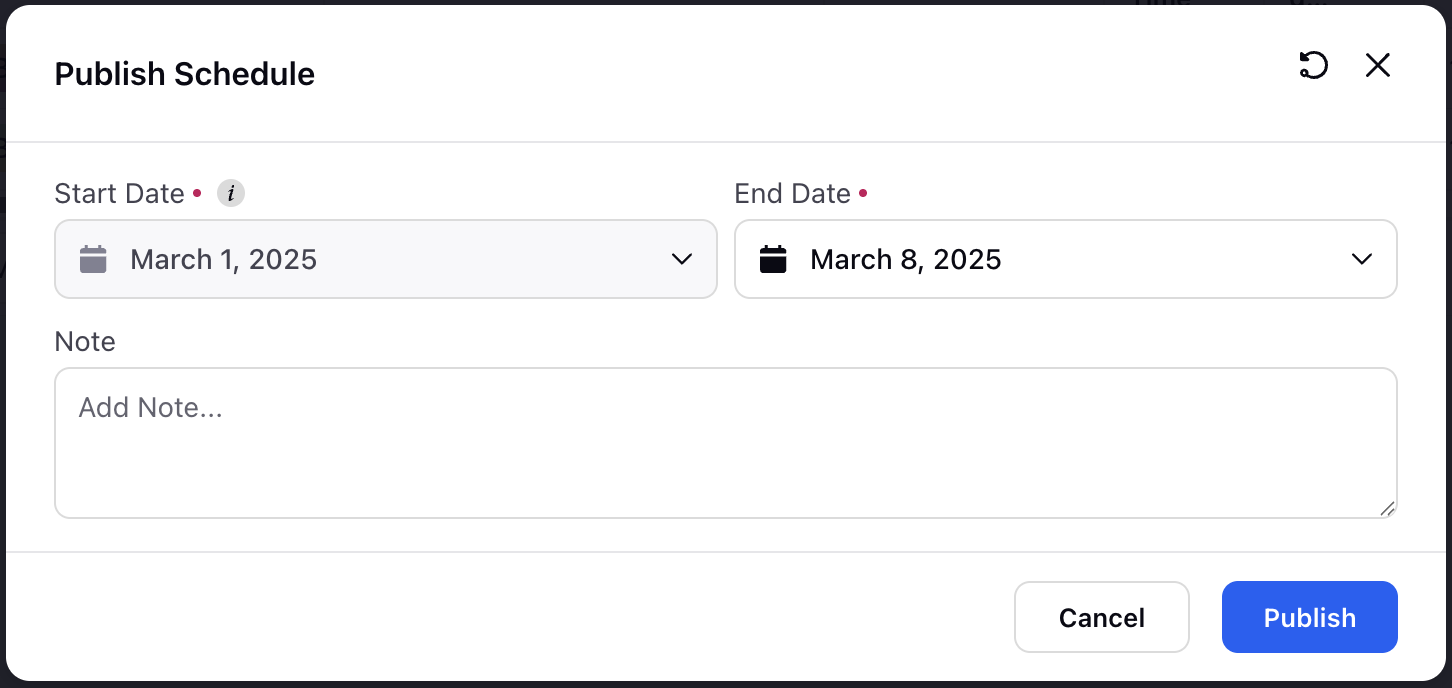
The Start Date field in the window has the same date as the start date of the Schedule Scenario.
Enter the duration for which you want to publish the Schedule Scenario in the End Date field. This date cannot exceed the last date for which the Schedule Scenario was created.
You can optionally add a note for the Schedule Scenario in the Note section.
Click the Publish button in the Publish Schedule window to publish the Schedule Scenario for the specified date range.
Note: All Alerts must be resolved to successfully publish a Schedule Scenario.
This completes the process of publishing a Schedule Scenario.
Unpublish Schedule Scenarios
Prerequisites for publishing Schedule Scenarios:
Sprinklr WFM should be enabled for the environment.
You must have access to the Workforce Manager Persona App.
Release permission under the Scheduling section in the Workforce Management module.
Already published Schedule Scenario.
Follow these steps to unpublish a Schedule Scenario:

Go to the Workforce Manager Persona App.

Select Scheduling from the Left Pane to open the Schedules Record Manager.
Click the View Schedule (eye icon) button corresponding to the Schedule Scenario to be unpublished. This will open a detailed view of the Schedule Scenario.

Click the More Actions (ellipsis icon) at the top right of the page to show a list of options.
Select the Move to Draft option to open the Move to Draft confirmation box. The Move to Draft option will be available only if the Schedule Scenario is already published.

Click the Submit button in the confirmation box to unpublish the Schedule Scenario and move it to the Draft status. This will remove it from agents' schedules and the Master Schedule.
Note: For older Schedules Scenarios, the Move to Draft function won't work unless they are published again.
This completes the process of unpublishing a Schedule Scenario.
Optimize Schedule Scenarios
Schedule Optimization enables automated changes to agent schedules by modifying Activities, Shift placements, and optimizing Time Offs while strictly adhering to the defined Schedule Policies. This feature minimizes staffing imbalances (overstaffing and understaffing) and ensures effective workforce distribution.
Follow these steps to optimize a Schedule Scenario:
Go to the Workforce Manager Persona App.
Select Scheduling from the Left Pane to open the Schedules record manager.

Hover over the vertical ellipsis (⋮) icon corresponding to the Schedule Scenario that you want to optimize. This will show a list of options.
Select Optimise from the list of options to open the window to optimize the Schedule Scenario.
Alternatively, you can View a Schedule Scenario, click the More Actions button at the top right and select Optimise Schedule from the dropdown menu. This will also open the window to optimize the Schedule Scenario.

Fill in the required fields on the page. Fields marked with a red dot are mandatory. Below are the descriptions of the fields on this page:
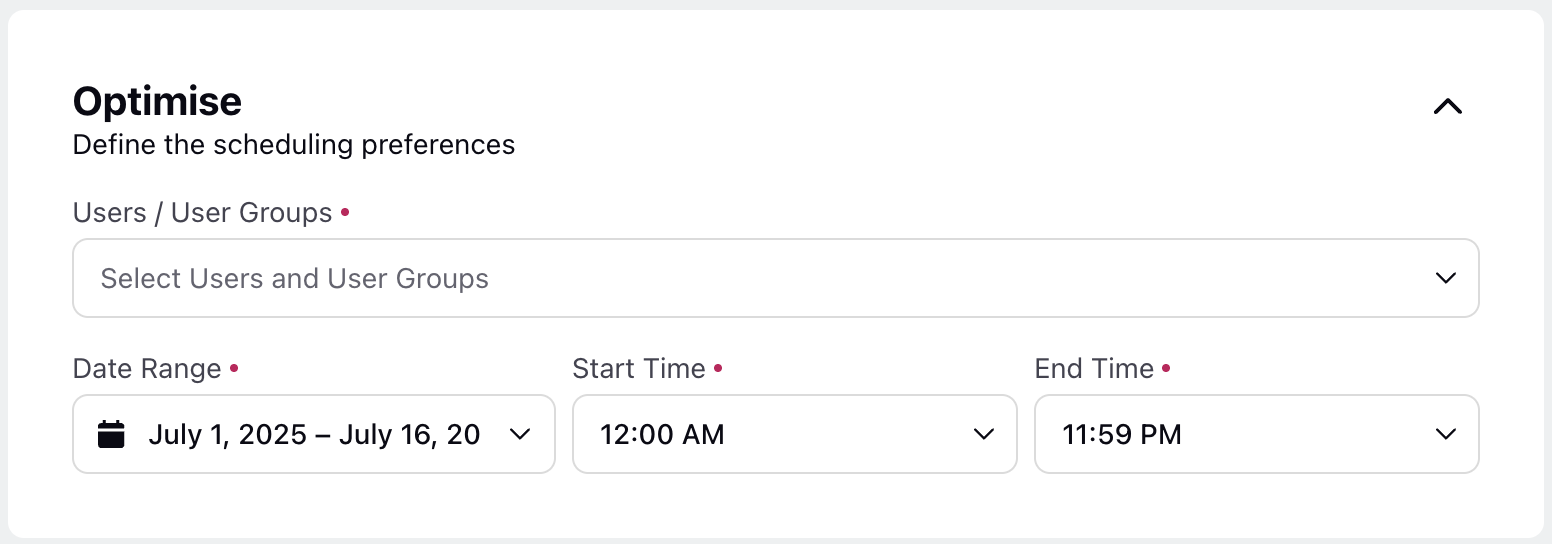
Users / User Groups: Select the Users and/or User Groups whose schedule needs to be optimized. You can only choose from the Users and User Groups part of the Schedule Scenario. (Required)
Date Range: Specify the interval for which the Schedule Scenario should be optimized. This interval must be within the date range of the Schedule Scenario. (Required)
Start Time: Specify when the schedule should start. (Required)
End Time: Specify when the schedule should end. (Required)
Adjustment Rules
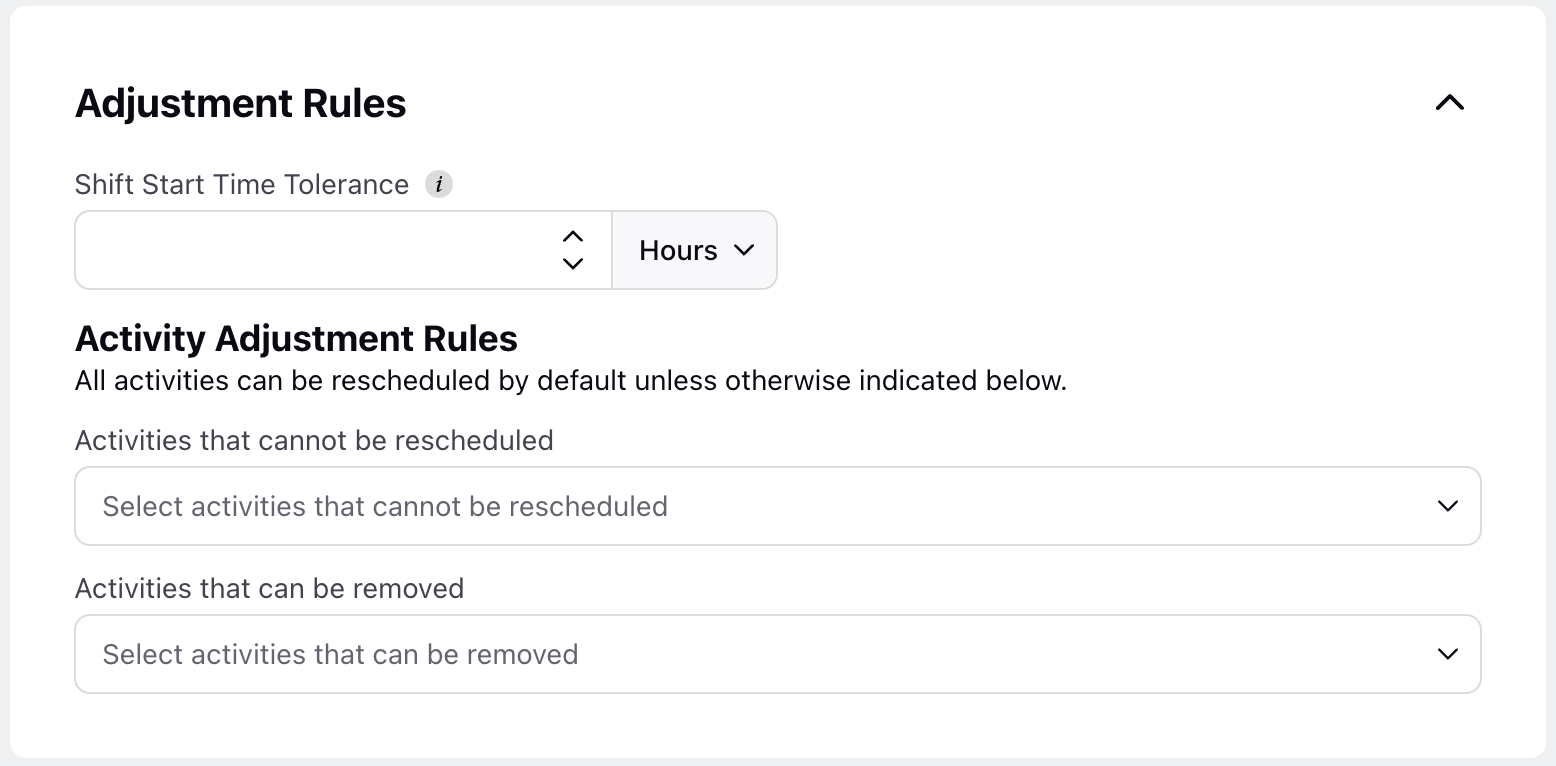
Shift Start Time Tolerance: Specify the maximum deviation, in hours or minutes, allowed from the scheduled Shift start time. (Required)
Activity Adjustment Rules
Activities that cannot be rescheduled: Select the Activities that cannot be rescheduled when optimizing the Schedule Scenario.
Activities that can be removed: Select the Activities that can be removed when optimizing the Schedule Scenario.
Note: All Activities can be rescheduled by default unless specified otherwise in the above fields.
Click the Save button.
This action will move the Schedule Scenario to the Processing state. Once optimization is complete, it will remain in the Draft state. After a Schedule Scenario is successfully optimized, its Staffing Metrics will display the updated details. You can then review the optimized Schedule Scenario and choose to publish it. Upon publishing, the new version of the Schedule Scenario will be created in the Published state.
Note: If the Schedule Scenario Optimization fails for any reason, it will be indicated by a red icon in the Status column of the Schedules Record Manager.

Share Schedule Scenarios
Prerequisites for sharing Schedule Scenarios:
Sprinklr WFM should be enabled for the environment.
You must have access to the Workforce Manager Persona App.
Share permission under the Scheduling section in the Workforce Management module.
Follow these steps to publish a Schedule Scenario:

Go to the Workforce Manager Persona App.

Select Scheduling from the Left Pane to open the Schedules Record Manager.
Hover over the vertical ellipsis (⋮) icon corresponding to the Schedule Scenario that you want to share. This will show a list of options.
Select Share from the list of options to open the window to share the Schedule Scenario.
Fill in the fields on the window. Below are the descriptions of the fields on this window:
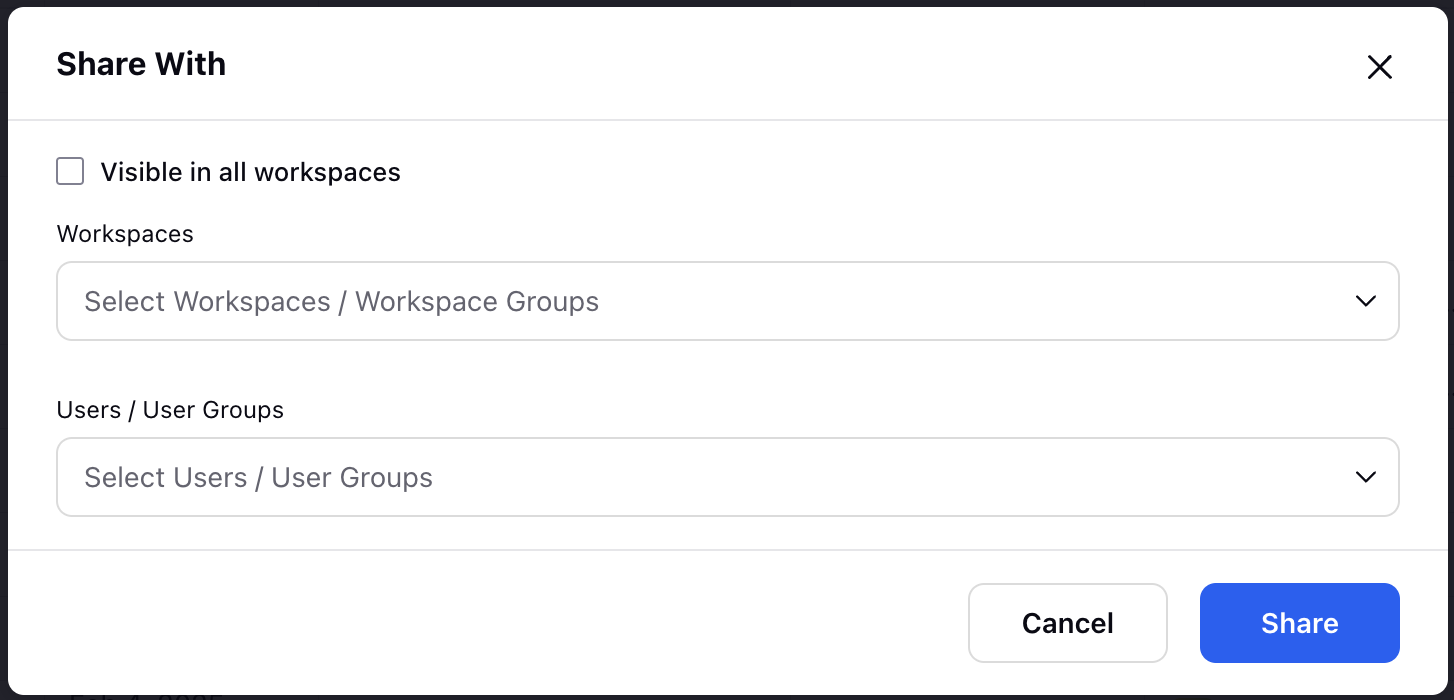
Visible in all Workspaces: Select this checkbox if you want to share the Schedule with all available Workspaces. This option is selected by default.
Workspaces: Select the Workspace(s) you want to share the Schedule Scenario with. This field will be accessible only if the Visible in all Workspaces checkbox is not selected.
User/User Groups: Select the User(s)/User Group(s) with whom you want to share the Schedule. This field will be accessible only if the Visible in all Workspaces checkbox is not selected.
Click the Share button at the bottom right of the window. This will share the Schedule Scenario with the selected Workspace(s) and User(s)/User Group(s).

You will receive a toast notification confirming the sharing of the Schedule Scenario.
Clone Schedule Scenario
Prerequisites for cloning Schedule Scenarios:
Sprinklr Workforce Management must be enabled for the environment.
You must have access to the Workforce Manager Persona App.
The Schedule Scenario must be shared with you.
Clone permission under the Scheduling section in the Workforce Management module.
Follow these steps to clone a Schedule Scenario:
Go to the Workforce Manager Persona App.
Select Scheduling from the Left Pane to open the Schedules record manager.
Hover over the vertical ellipsis (⋮) icon corresponding to the Schedule Scenario you want to clone. This will show a list of options.
Select Clone from the list of options to open the Clone Schedule dialog box.
Fill in the fields in the Clone Schedule dialog box. Below are the descriptions of the fields in the dialog box:
Name: Enter the name of the cloned Schedule Scenario. It will be named “Copy of <Original Schedule Scenario Name” by default. (Required)
Time Range: Specify the start date for the cloned Schedule Scenario. The end date will be automatically calculated based on the duration of the original scenario. For example, if the original Schedule Scenario spans 20 days and you select July 1st as the start date for the clone, the end date will automatically be set to July 20th. (Required)
Click the Submit button to create a clone of the Schedule Scenario with the specified name and time range.
This completes the process of cloning a Schedule Scenario.
Delete Schedule Scenarios
Prerequisites for deleting Schedule Scenarios:
Sprinklr WFM should be enabled for the environment.
You must have access to the Workforce Manager Persona App.
Delete permission under the Scheduling section in the Workforce Management module.
Follow these steps to delete a Schedule Scenario:

Go to the Workforce Manager Persona App.

Select Scheduling from the Left Pane to open the Schedules Record Manager.
Hover over the vertical ellipsis (⋮) icon corresponding to the Schedule Scenario that you want to delete. This will show a list of options.
Select Delete from the list of options to open the Delete Schedule window.

Click the Submit button on the window to delete the Schedule Scenario.
Export Schedule Scenarios
Prerequisites for exporting Schedule Scenarios:
Sprinklr WFM should be enabled for the environment.
You must have access to the Workforce Manager Persona App.
Export permission under the Scheduling section in the Workforce Management module.
Follow these steps to export a Schedule Scenario:

Go to the Workforce Manager Persona App.

Select Scheduling from the Left Pane to open the Schedules Record Manager.
Click the View Schedule (eye icon) button corresponding to the Schedule Scenario to be exported. This will open a detailed view of the Schedule Scenario.

Click the More Actions (ellipsis icon) at the top right of the page to show a list of options.
Select Export from the list of options to open the Export Schedule window.
Fill in the fields on the window. Fields marked with a red dot are mandatory. Below are the descriptions of the fields on this window:
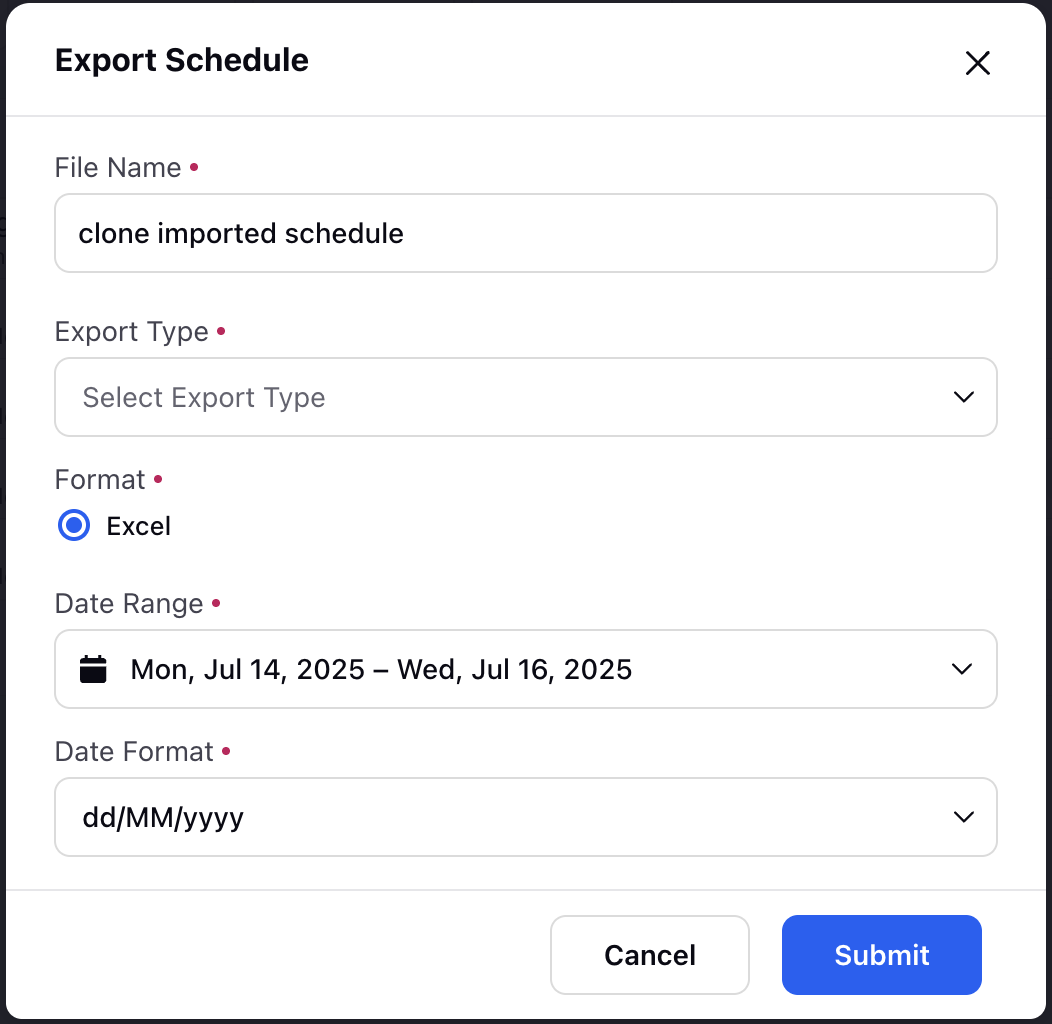
File Name: Enter the name of the file with which the Schedule Scenario will be exported. (Required)
Export Type: Choose between Intraday View and Multi-day View. (Required)
Date Range: Enter the date and time duration for which the Schedule Scenario will be exported. (Required)
Date Format: Select the desired format for the dates in the exported file. (Required)
Format: Excel will be selected by default. (Required)
Click the Submit button at the bottom right of the dialogue box to submit the Schedule Scenario export request.
After some time, you will receive a platform notification containing the link to download the report. Open the link to download a zip folder containing the report.
View the Activity Log of Schedule Scenarios
Activity Logs of Schedules provide a detailed record of all scheduling tasks, including changes, approvals, and updates. This log helps ensure transparency, accountability, and efficient management of Workforce Managers, and make informed decisions based on historical data.
Follow these steps to view the activity log of a Schedule:

Go to the Workforce Manager Persona App.

Select Scheduling from the Left Pane to open the Schedules Record Manager.
Click the View Schedule (eye icon) button corresponding to the Schedule for which you want to view the activity log. This will open a page with details of the Schedule.

Click the Open third pane button at the top of the page to show the Schedule details from the Third Pane.
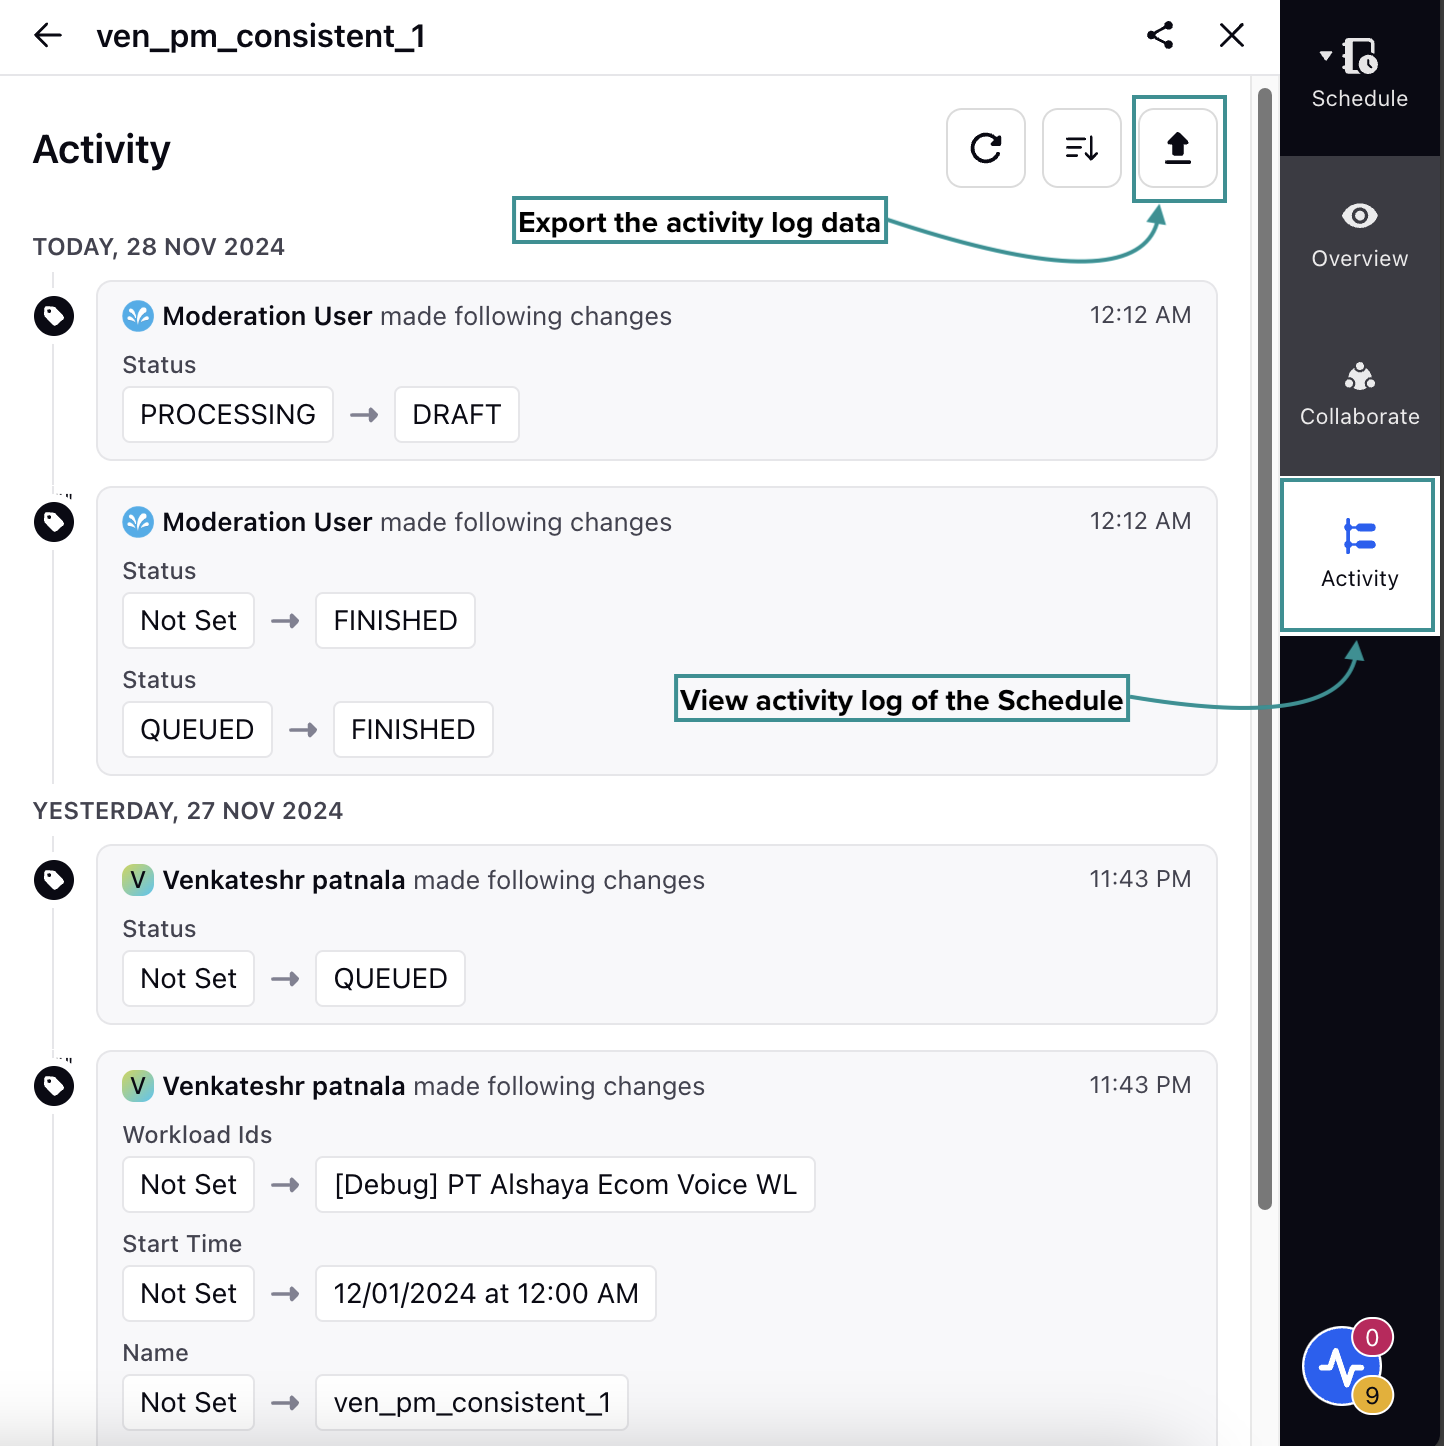
Click the Activity tab in the Third Pane. This will show the activity log of the Schedule.
You can view all previously published versions of the Schedule from the Activity tab. You can refresh the data, sort it by the date of updates in ascending or descending order, and export the activity log data.
Version History of Schedule Scenarios
Versioning support for Scheduling in Sprinklr enhances user control and flexibility. It lets you view previously published versions of the Schedules, providing a clear history of changes.
Follow these steps to view the version history of a Schedule:

Go to the Workforce Manager Persona App.

Select Scheduling from the Left Pane to open the Schedules Record Manager.
Click the View Schedule (eye icon) button corresponding to the Schedule for which you want to view the version history. This will open a page with details of the Schedule.

Click the Open third pane button at the top of the page to show the Schedule details from the Third Pane.
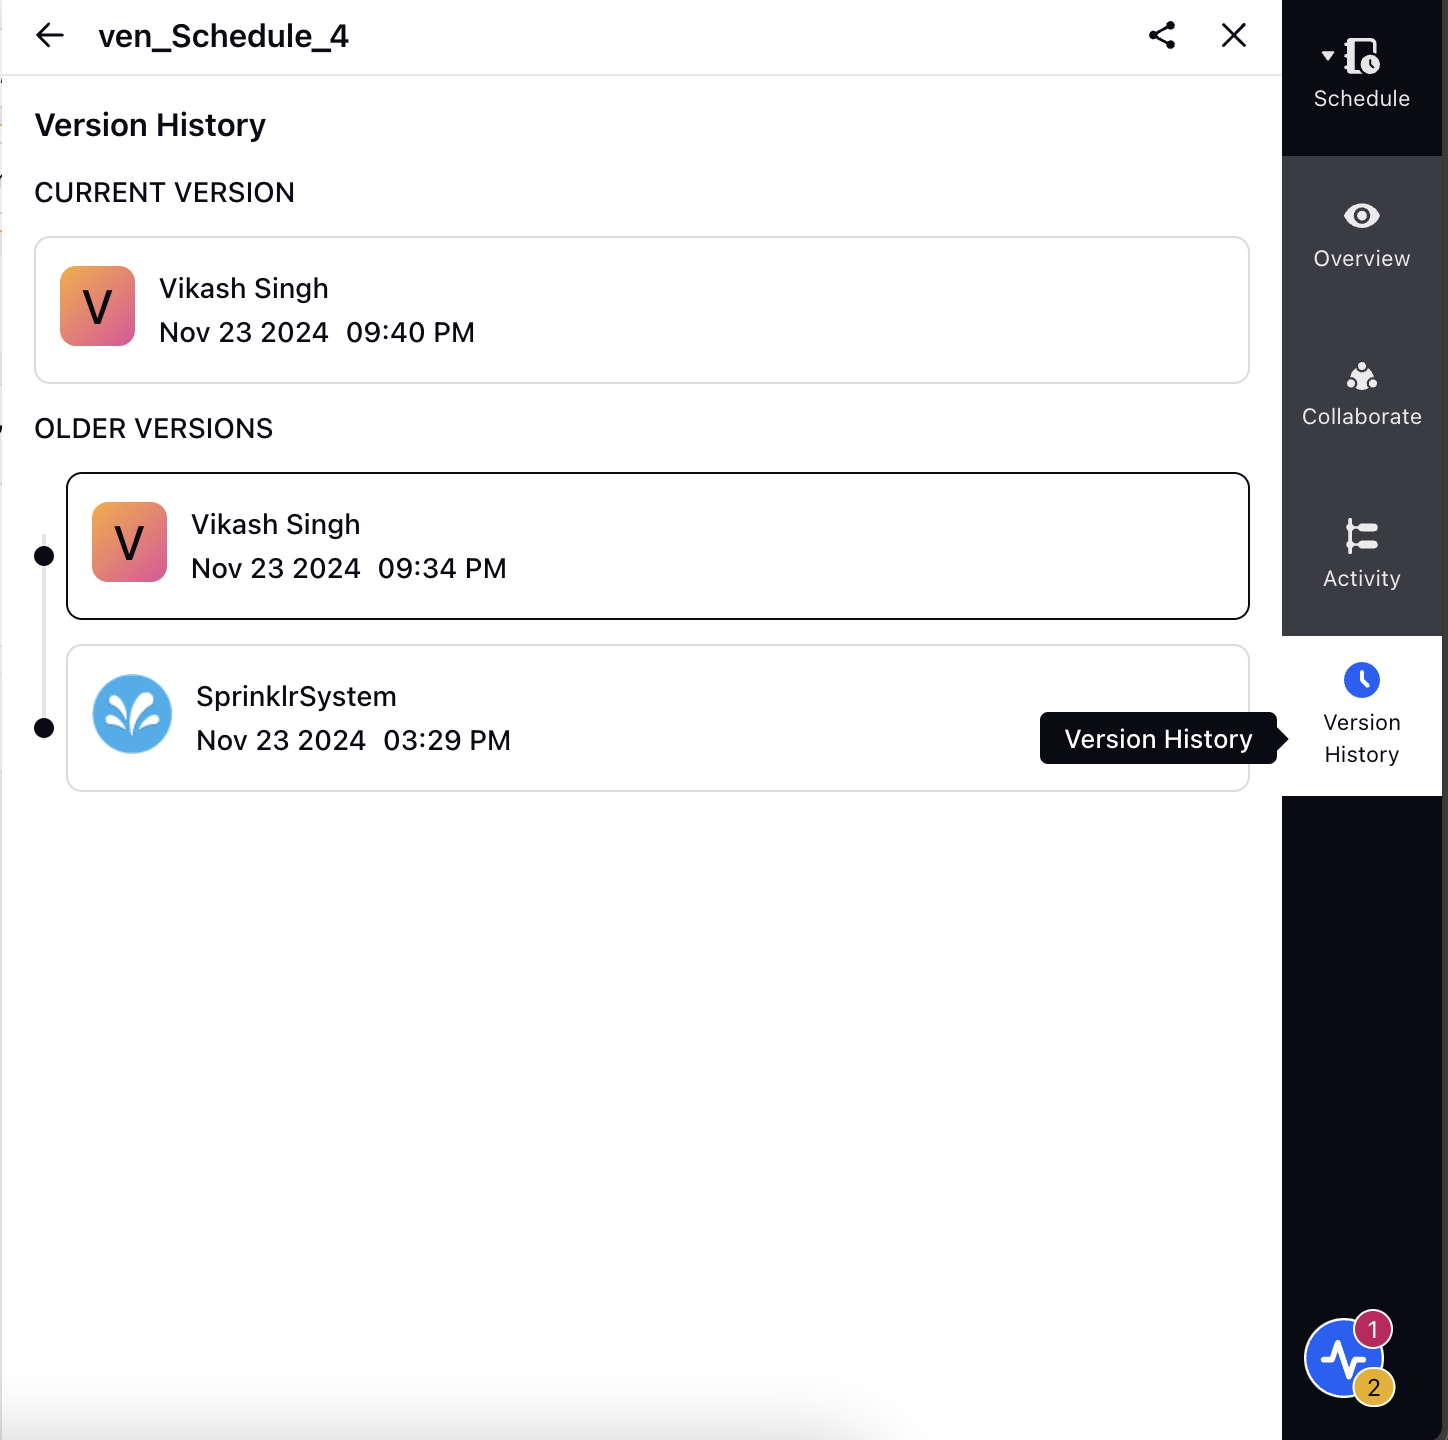
Select the Version History tab in the Third Pane. This will show all available versions of the Schedule.
All available past versions of the Schedule will be shown under the 'Older Versions' section. Select the version from this section to show the details of that version of the Schedule. This will show a notification banner indicating that data from a previous version is being displayed.

The banner has the Switch to latest version and Restore version buttons.
Switch to latest version: This button shows the details of the current version of the Schedule.
Restore version: This button restores the data of the older version. Clicking it will open the Restore Version confirmation box.
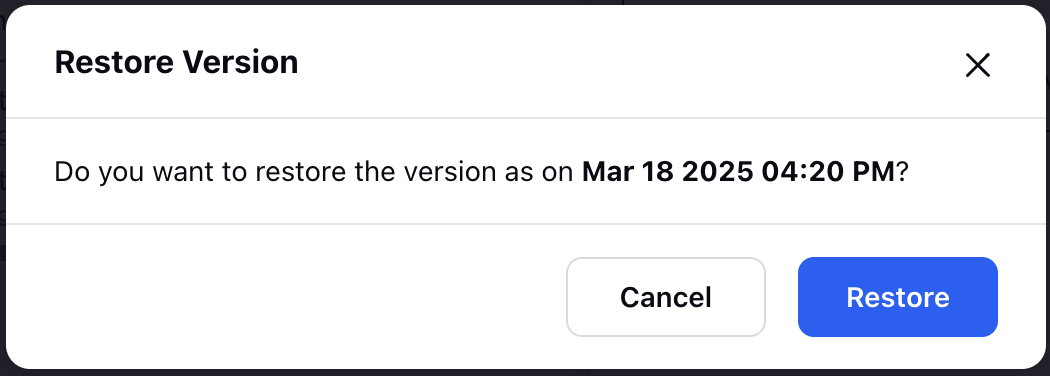
Click the Restore button to restore the data of the previous version. A platform notification will be sent to all agents whose schedules have been impacted.
Note: Restoring the selected Schedule Scenario version will not make the changes visible in the Master Schedule. To reflect the updates in the Master Schedule, you will need to publish the Schedule Scenario again.