Update Schedule Scenarios
Updated
This page discusses how updates can be made for Schedule Scenarios.
Prerequisites for updating Schedule Scenarios:
Sprinklr WFM should be enabled for the environment.
You must have access to the Workforce Manager Persona App.
View, Publish, and Edit permissions under the Scheduling section in the Workforce Management module.
Note: You can Redo any changes by using the CTRL + Y keyboard shortcut. (You can redo up to 5 recent changes). You can also Undo by using the CTRL + Z keyboard shortcut(You can undo up to 5 recent changes).
Add or Remove Agents from the Schedule Homepage
Adding or removing agents from the Schedule page is crucial for maintaining operational efficiency and flexibility. This functionality allows Workforce Managers to quickly adapt to changing demands, such as unexpected absences or surges in traffic. By easily adjusting the schedule, Workforce Managers can ensure optimal staffing levels, improve service quality, and enhance employee satisfaction.
Add Agents from the Schedule Homepage
When agents are added, the Staffing levels will update in real-time, ensuring that the displayed values are accurate. This real-time adjustment is crucial for maintaining operational efficiency. The following metrics may change accordingly:
Scheduled Agents
Effective Agents
Difference in Required Agents
Predicted SLA.
These updates help accurately reflect the current Staffing situation and predict service levels, allowing for better management and planning.
Follow these steps to add agents to a Schedule from the Schedule homepage:

Go to the Workforce Manager Persona App on the Launchpad. Alternatively, search for 'Workforce Manager' on the Launchpad search bar.

Select Scheduling from the Left Pane to open the Schedules Record Manager.
Click the View Schedule (eye icon) button corresponding to the Schedule to which the agent(s) must be added. This will open a page with details of the Schedule.

Click the ellipsis (…) icon at the top right of the page to show a list of options.
Select Add Agents from the list. This will open the Add Agents dialog box.
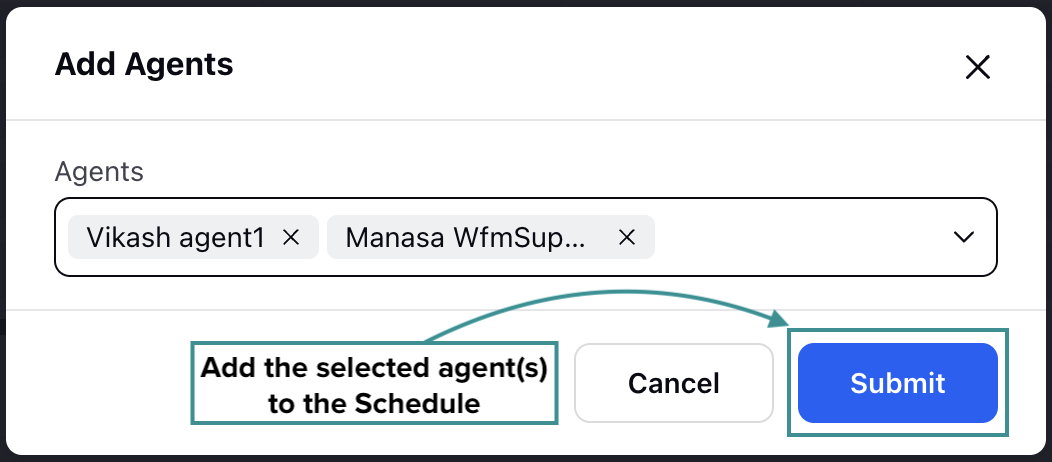
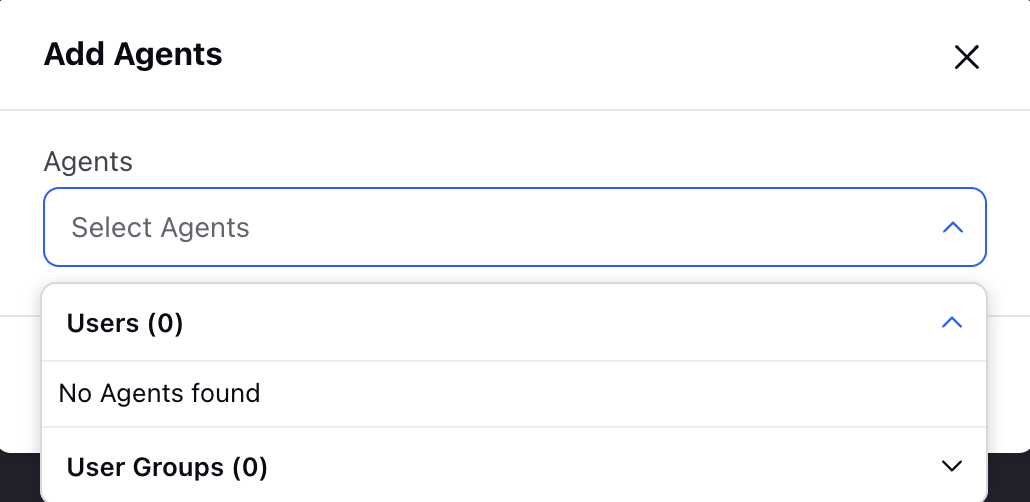
In the Agent field, search for the agent(s) you want to add to the Schedule. You can select and add multiple agents simultaneously by selecting User Group.
Click the Submit button to add the selected agent(s) to the Schedule. This button is accessible only if at least one agent is selected.

You will receive a toast notification confirming the addition of the agent(s) to the Schedule.
Remove Agents from the Schedule Homepage
When agents are removed, the Staffing levels will update in real time, ensuring that the displayed values are accurate. This real-time adjustment is crucial for maintaining operational efficiency. The following metrics may change accordingly:
Scheduled Agents
Effective Agents
Difference in Required Agents
Predicted SLA.
These updates help accurately reflect the current Staffing situation and predict service levels, allowing for better management and planning.
Follow these steps to remove agents from a Schedule from the Schedule homepage:

Go to the Workforce Manager Persona App on the Launchpad. Alternatively, search for 'Workforce Manager' on the Launchpad search bar.

Select Scheduling from the Left Pane to open the Schedules Record Manager.
Click the View Schedule (eye icon) button corresponding to the Schedule to which the agent(s) must be added. This will open a page with details of the Schedule.

On this page, hover over the vertical ellipsis (⋮) icon corresponding to the agent’s name. This will show the Remove Agent option. Select the Remove Agent option to remove the agent from the Schedule.
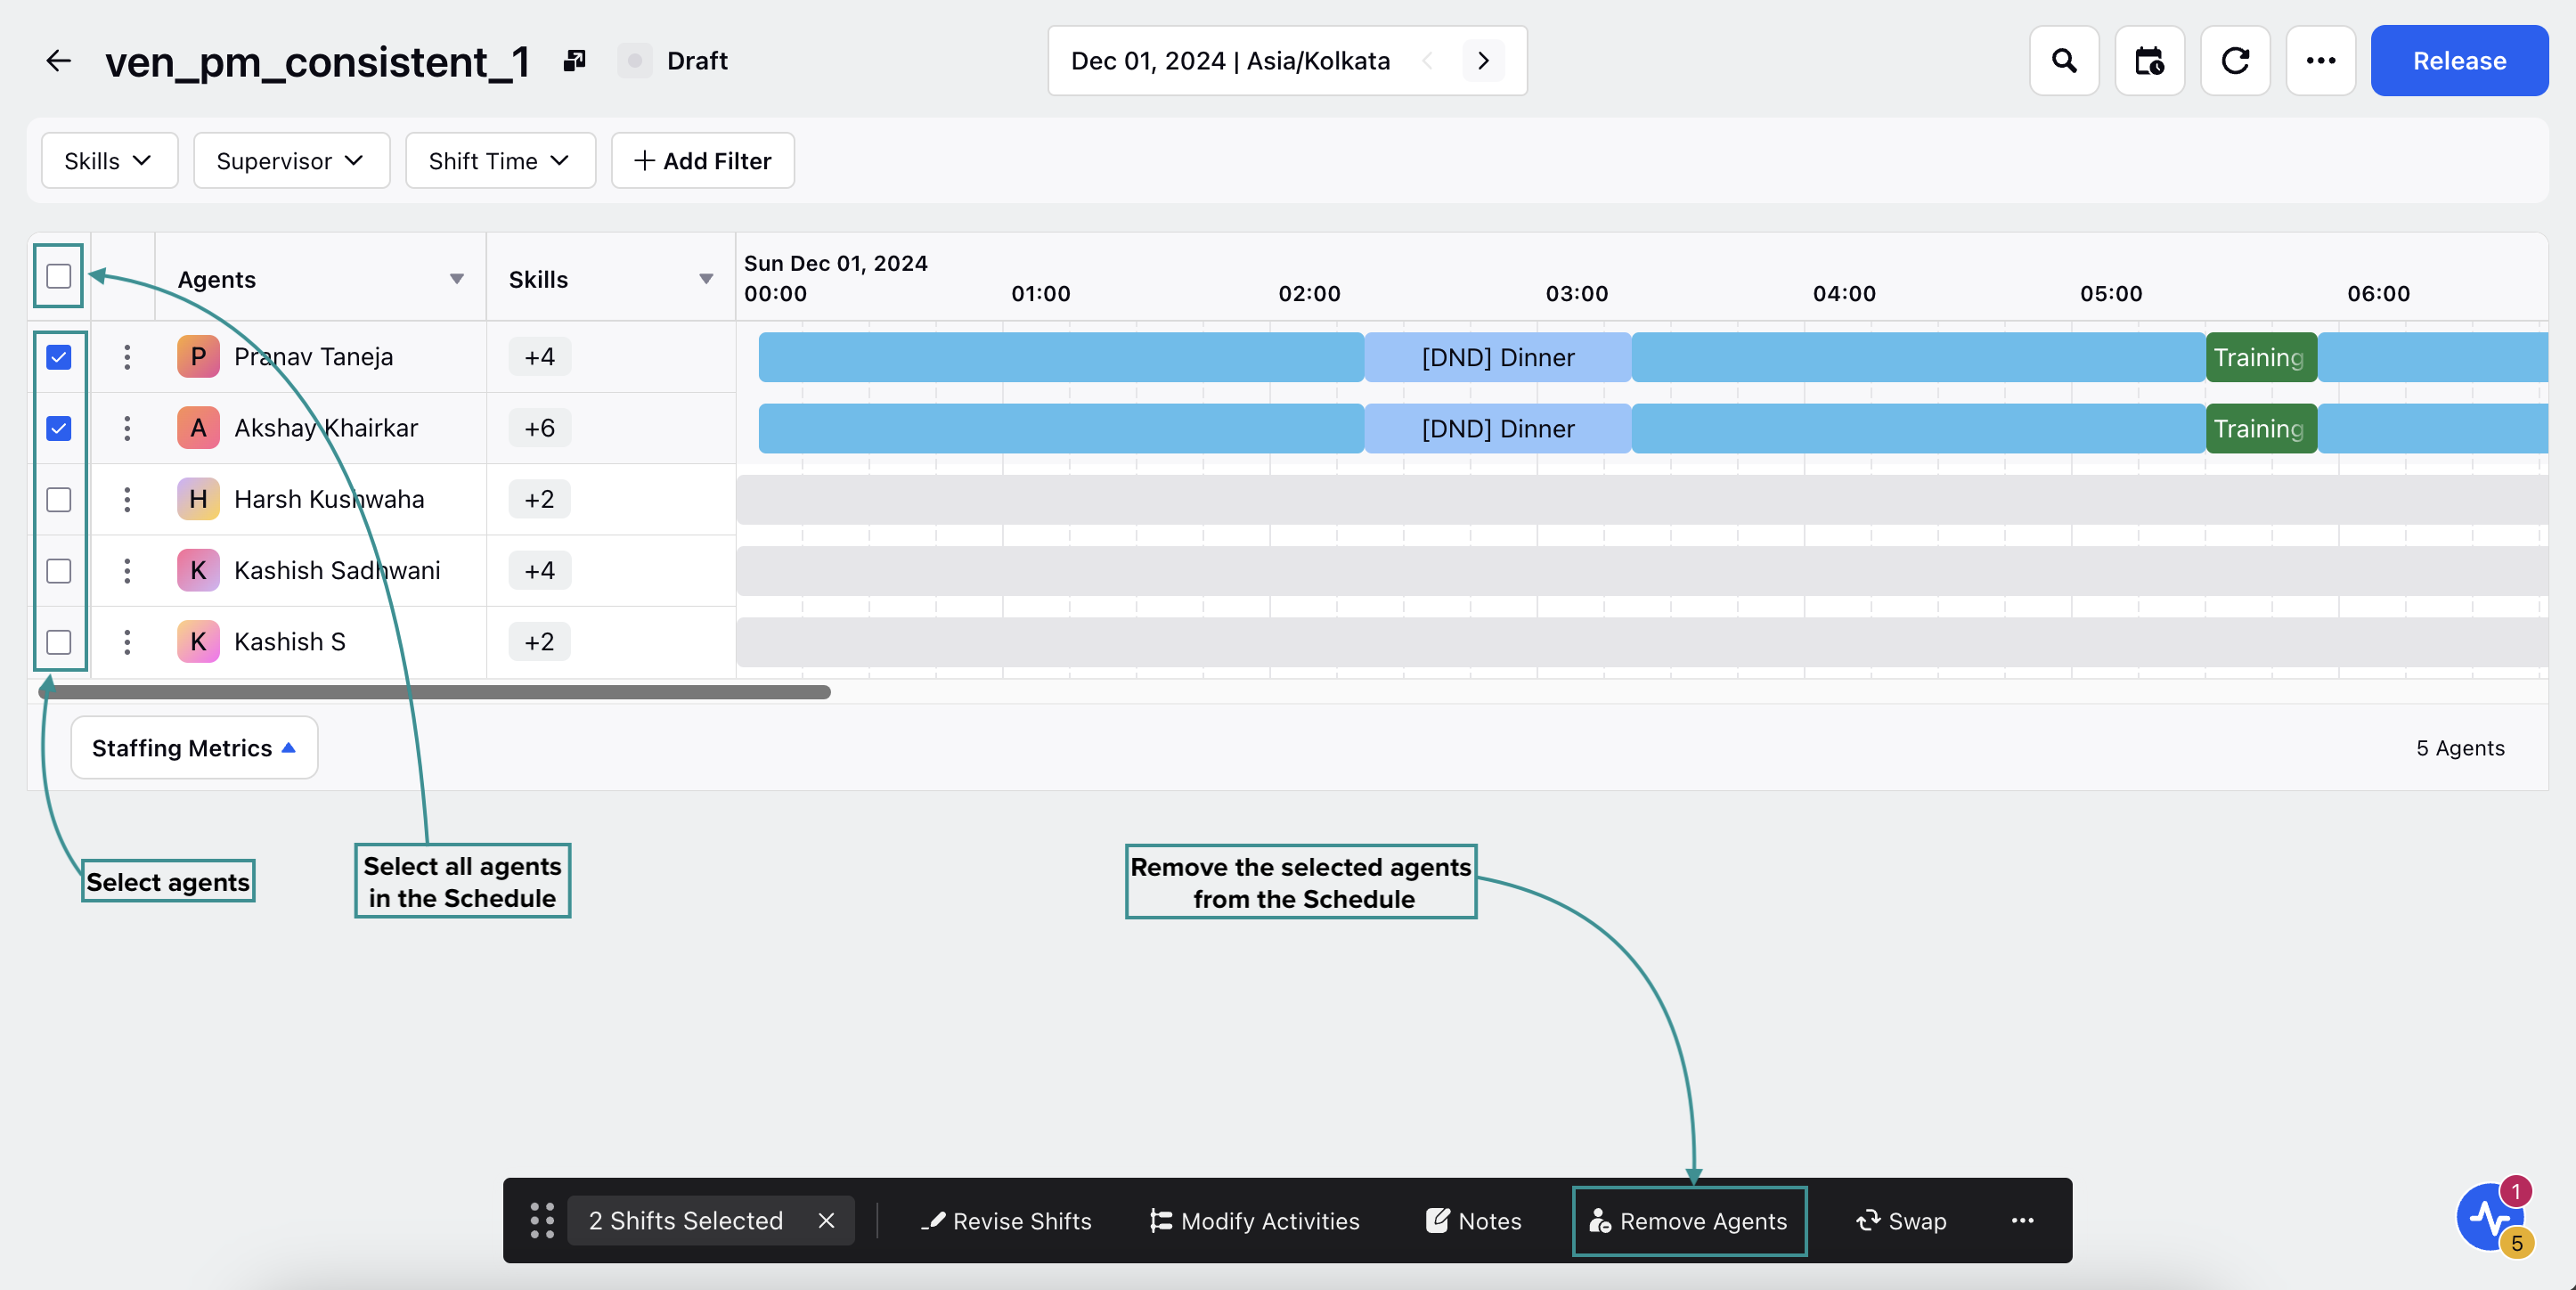
You can also remove multiple agents simultaneously. Select the agents to be removed from the Schedule, which will show a toolbar at the bottom of the page. Click the Remove Agents button to remove the selected agents from the Schedule. Click Remove on the pop-up modal to confirm removal of the agent.


You will receive a toast notification confirming the removal of the agent(s) from the Schedule.
Drag-and-Drop Activities from the Catalog to Shifts in Intraday View
The Scheduling page in Intraday View improves user efficiency by introducing drag-and-drop functionality for Activities from the integrated catalog. Click the Add Activities icon at the top and select Activities from the catalog on the right, which are represented as distinct blocks with color coding and abbreviated names.
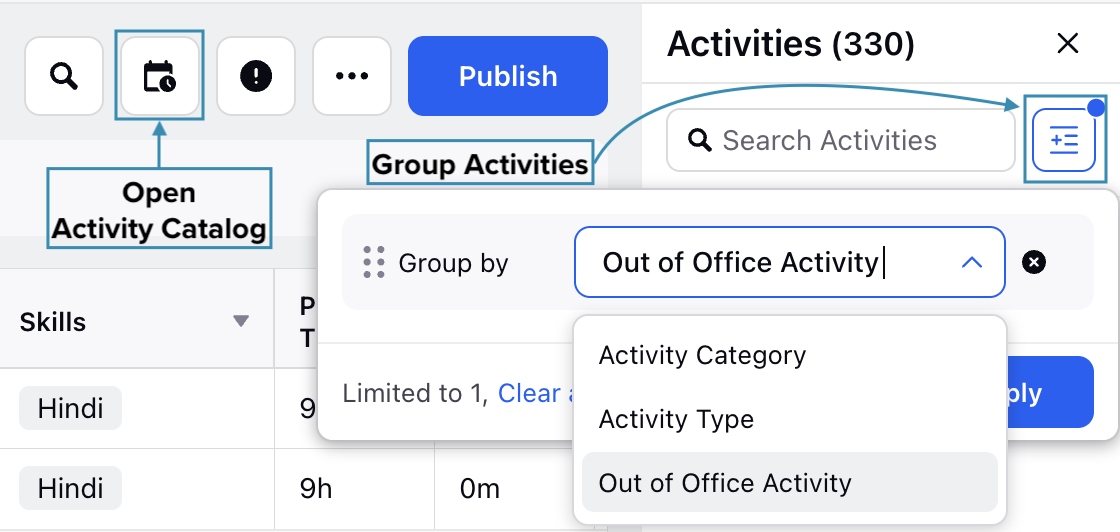
You can group Activities in the Activity Catalog by the following characteristics to make navigation easier:
Activity Category (In Office or Out of Office Activities).
Activity Type (Paid or Unpaid Activities).
Out of Office Activity (Time Off Activity or Not Included in Time Off).
Additionally, the total number of Activities under each group will also be shown in the Activity Catalog.

Drag these Activities to the desired agent's shift at the preferred time. Hovering over an activity displays its full name for clarity.
Assigning Out of Office Activity
When dragging and dropping an Out-of-Office activity from the Activity Catalog, click the arrow next to the activity and enable the Apply to Entire Shift toggle to assign it to the entire Shift.

The priority of the Out-of-Office Activity being dropped must be higher than or equal to any existing Activities within the Shift.
Activity Priority Handling
The system automatically overrides existing Activities based on their priority when dragging and dropping Activities from the catalog into an agent’s Shift. This ensures that higher-priority activities are always given preference. If the existing Activity has a higher priority than the one being dropped, it will not be overridden. A snackbar notification will appear to confirm this.

Note: A lower number indicates a higher priority. For example, a priority of 3 is higher than a priority of 4.
The following are some examples to better understand how the system handles this.
Scenario 1: Different Priorities, Same Duration
Activity 1: Priority 1, Duration 30 minutes.
Activity 2: Priority 2, Duration 30 minutes.
Current Schedule: Activity 2 is scheduled from 12:30 PM to 1:00 PM.
If you drag and drop Activity 1 into the same time slot, it will replace Activity 2 from 12:30 PM to 1:00 PM, because Activity 1 has a higher priority.
Scenario 2: Different Priorities, Different Durations
Activity 1: Priority 1, Duration 30 minutes.
Activity 2: Priority 2, Duration 45 minutes.
Current Schedule: Activity 2 is scheduled from 1:00 PM to 1:45 PM.
If you drag and drop Activity 1 to start at 1:10 PM, it will partially replace Activity 2 from 1:10 PM to 1:40 PM.
The updated schedule will look like this:
1:00 PM – 1:10 PM: Activity 2.
1:10 PM – 1:40 PM: Activity 1 (overrides Activity 2).
1:40 PM – 1:45 PM: Activity 2 resumes.
Activity Priority Handling When Resizing on the Timeline
When resizing an Activity to extend or shorten, and if it overlaps with other scheduled Activities, the system will check its priority. If the resized Activity has a higher priority, it will override the existing ones. However, if it has a lower priority than any overlapping Activities, the action will be blocked, and a snackbar notification will appear.
These priority rules apply when dragging and dropping an Activity to a different time slot within the same Shift. If the new placement overlaps with other Activities and the dragged Activity has a higher priority, it will replace the existing ones. If it has a lower priority and its start time overlaps with a higher-priority Activity, the action will be blocked, and a toast notification will appear.
Bulk Update Activities in a Schedule
You can simultaneously add or remove Activities for multiple agents within a Schedule. Modifying Activities for agents in a Schedule will not disrupt their existing Shifts. The system automatically detects and flags any overlapping Activities, raising a conflict.
Follow these steps to modify multiple Activities in a Schedule:

Go to the Workforce Manager Persona App on the Launchpad. Alternatively, search for 'Workforce Manager' on the Launchpad search bar.

Select Scheduling from the Left Pane to open the Schedules Record Manager.
Click the View Schedule (eye icon) button corresponding to the Schedule in which you want to modify Activities. This will open a page with details of the Schedule.
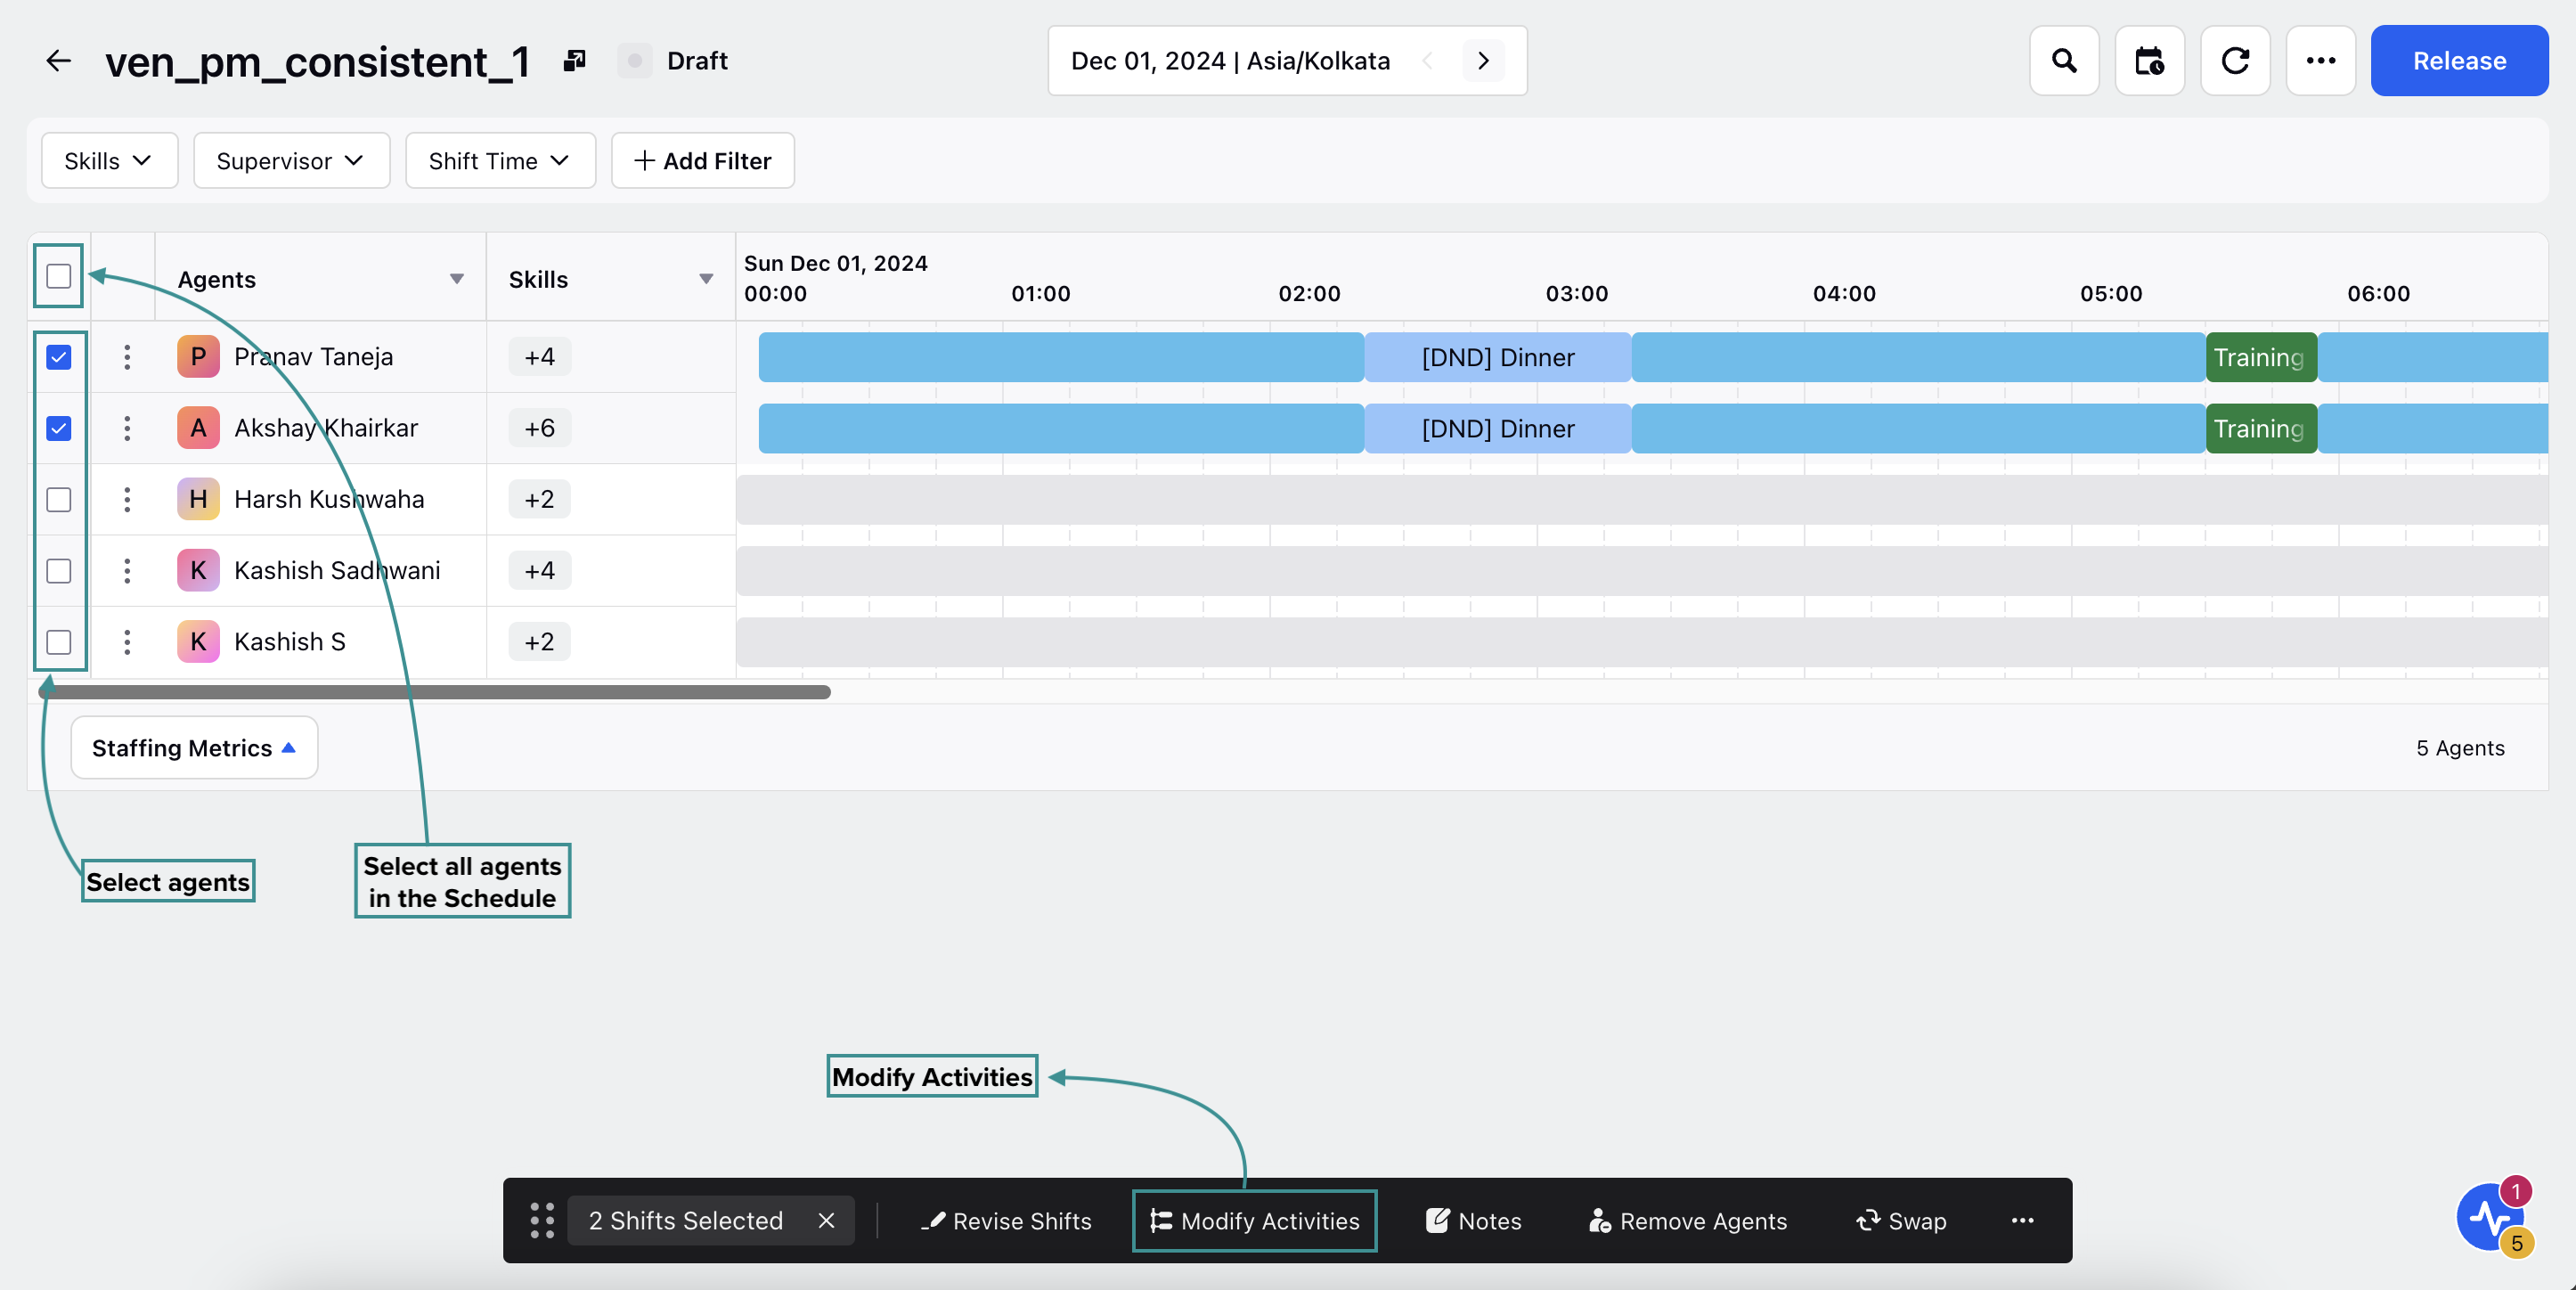
Select the agent(s) whose Activities you want to modify by clicking the checkbox next to their names. To select all agents in the schedule, click the top checkbox. Selecting the checkbox will display a toolbar at the bottom of the page.

Click the Modify Activities button from the toolbar to open the Modify Activity dialog box from the bottom right of the page.
The Modify Activity dialog box allows you to modify the Activities of the selected agents for the chosen schedule. This dialog box shows the Activities already assigned to the selected agent(s), if any, along with their Start Time and Duration.
Click the Remove value (“x” icon) button corresponding to each assigned Activity to remove them. Click the Save button at the bottom right of the dialog box to save your updates.
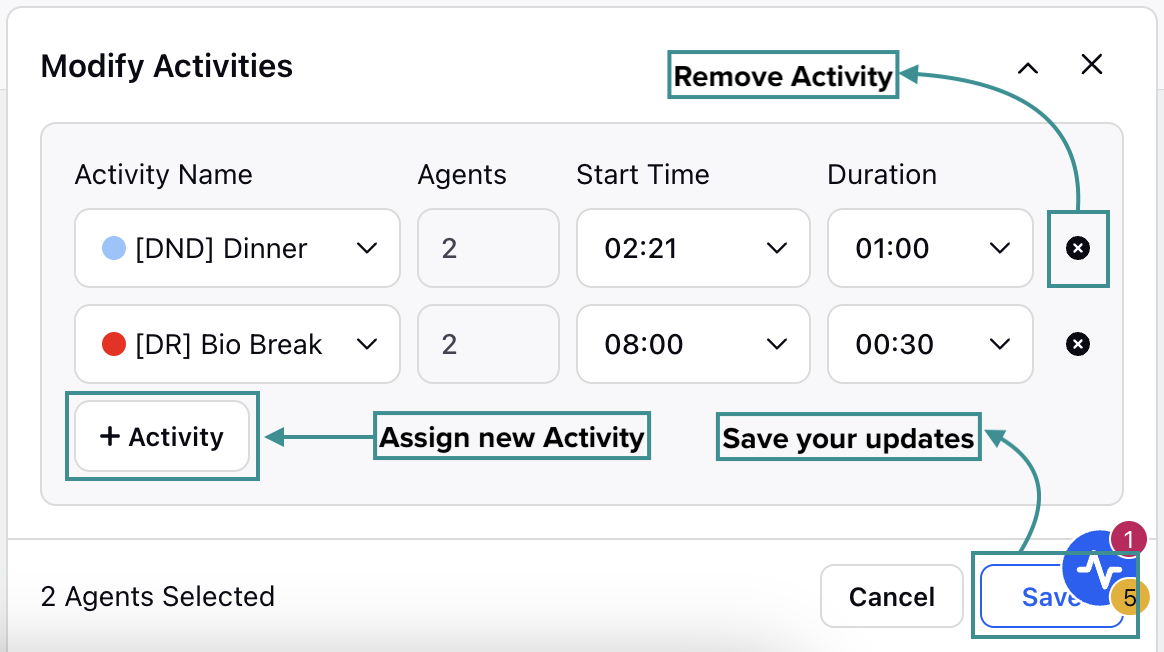
Click the “+ Activity” button in the dialog box to assign a new Activity to the selected agents. Select the Activity to be assigned from the Select Activity field, which lists all existing Activities in your Workspace. Specify when the Activity will start in the Start Time field and specify the duration of the Activity in the Duration field. Click the Save button at the bottom right of the dialog box after configuring the new Activity to save your updates.
Note: When assigning a new Activity, if the interval overlaps with any existing Activity, you won't be able to assign the new Activity. If multiple agents are selected and the system detects an overlap for some of them, the new Activity will not be assigned to those agents with detected overlaps. A Schedule Conflict Detected banner will be displayed in the dialog box with the name of the agent(s) with the detected conflict.
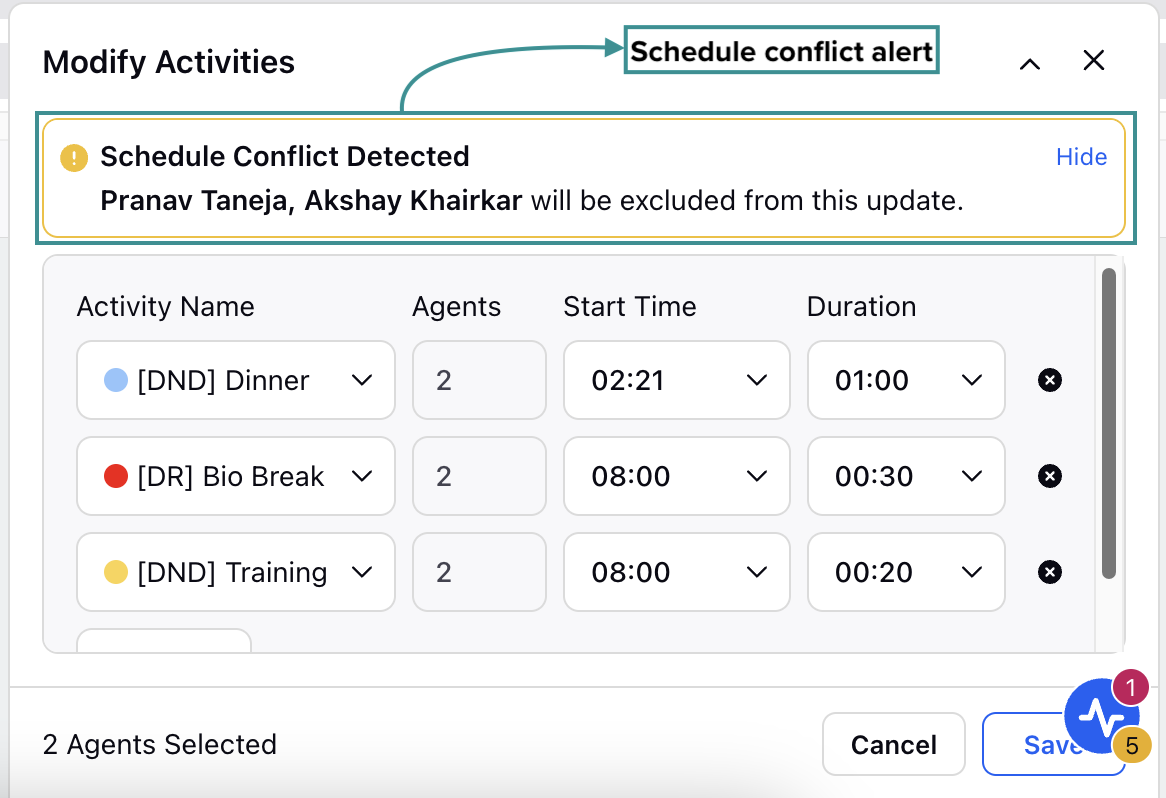
Note: New Activity cannot be assigned if it starts or ends outside the Shift duration. A Schedule Conflict Detected banner will be displayed in the dialog box with the name of the agent(s) with the detected conflict.
Note: Activities cannot be assigned to agents who are on a Day Off.
This completes the section on bulk updating Activities in a Schedule.
Swap Shifts Between Agents
You can swap or interchange Shifts between two agents within a Schedule Scenario to manage scheduling more effectively. Shifts can be swapped in both the Intraday view and the Multiday view:
In the Intraday view, you can swap Shifts between the agents for a single day.
In the Multiday view, you can swap Shifts across multiple days between the agents.
This feature allows Workforce Managers to quickly and accurately reassign Shifts between agents for a specific day or across a date range, reducing effort while respecting existing scheduling rules and constraints.
Follow these steps to swap Shifts between two agents:

Go to the Workforce Manager Persona App on the Launchpad.

Select Scheduling from the Left Pane to open the Schedules Record Manager.
Click the View Schedule (eye icon) button corresponding to the Schedule in which you want to swap Shifts. This will open the page with details of the Schedule Scenario.
Specify the date or date range within which the Shifts have to be swapped. Depending on this, the swapping will be performed in Intraday View or Multiday View.
Note: Shifts cannot be swapped if either agent has one or more approved Time Off entries during the selected period.
Swap Shift in Intraday View
In the Intraday view, select the checkbox next to the agents whose shifts you want to swap. A toolbar will appear on the screen.

Click Swap on the toolbar to exchange the Shifts between the selected agents. This will exchange the Shifts assigned to the agents for the selected day.
Swap Shifts in Multiday View
In the Multiday view, you can select multiple Shifts to be interchanged between the agents. When swapping multiple shifts between agents in the Multiday View, it is recommended to select a date range that includes all the intervals of the shifts you want to swap. An equal number of Shifts must be selected for each agent for the swap to be executed. A toolbar will appear on the screen upon selecting the agents.
Note: Shifts can only be swapped between agents if they fall on the same dates. For example, an agent’s shifts on September 9 and 10 can only be swapped with another agent’s shifts on those same dates.

Click Swap on the toolbar to exchange the Shifts between the selected agents. This will exchange the Shifts assigned to the agents for the selected days.
Bulk Update Shifts in a Schedule
Shifts can also be revised for multiple agents in a Schedule simultaneously.
Follow these steps to modify multiple Shifts in a Schedule:

Go to the Workforce Manager Persona App on the Launchpad. Alternatively, search for 'Workforce Manager' on the Launchpad search bar.

Select Scheduling from the Left Pane to open the Schedules Record Manager.
Click the View Schedule (eye icon) button corresponding to the Schedule in which you want to modify Shifts. This will open a page with details of the Schedule.
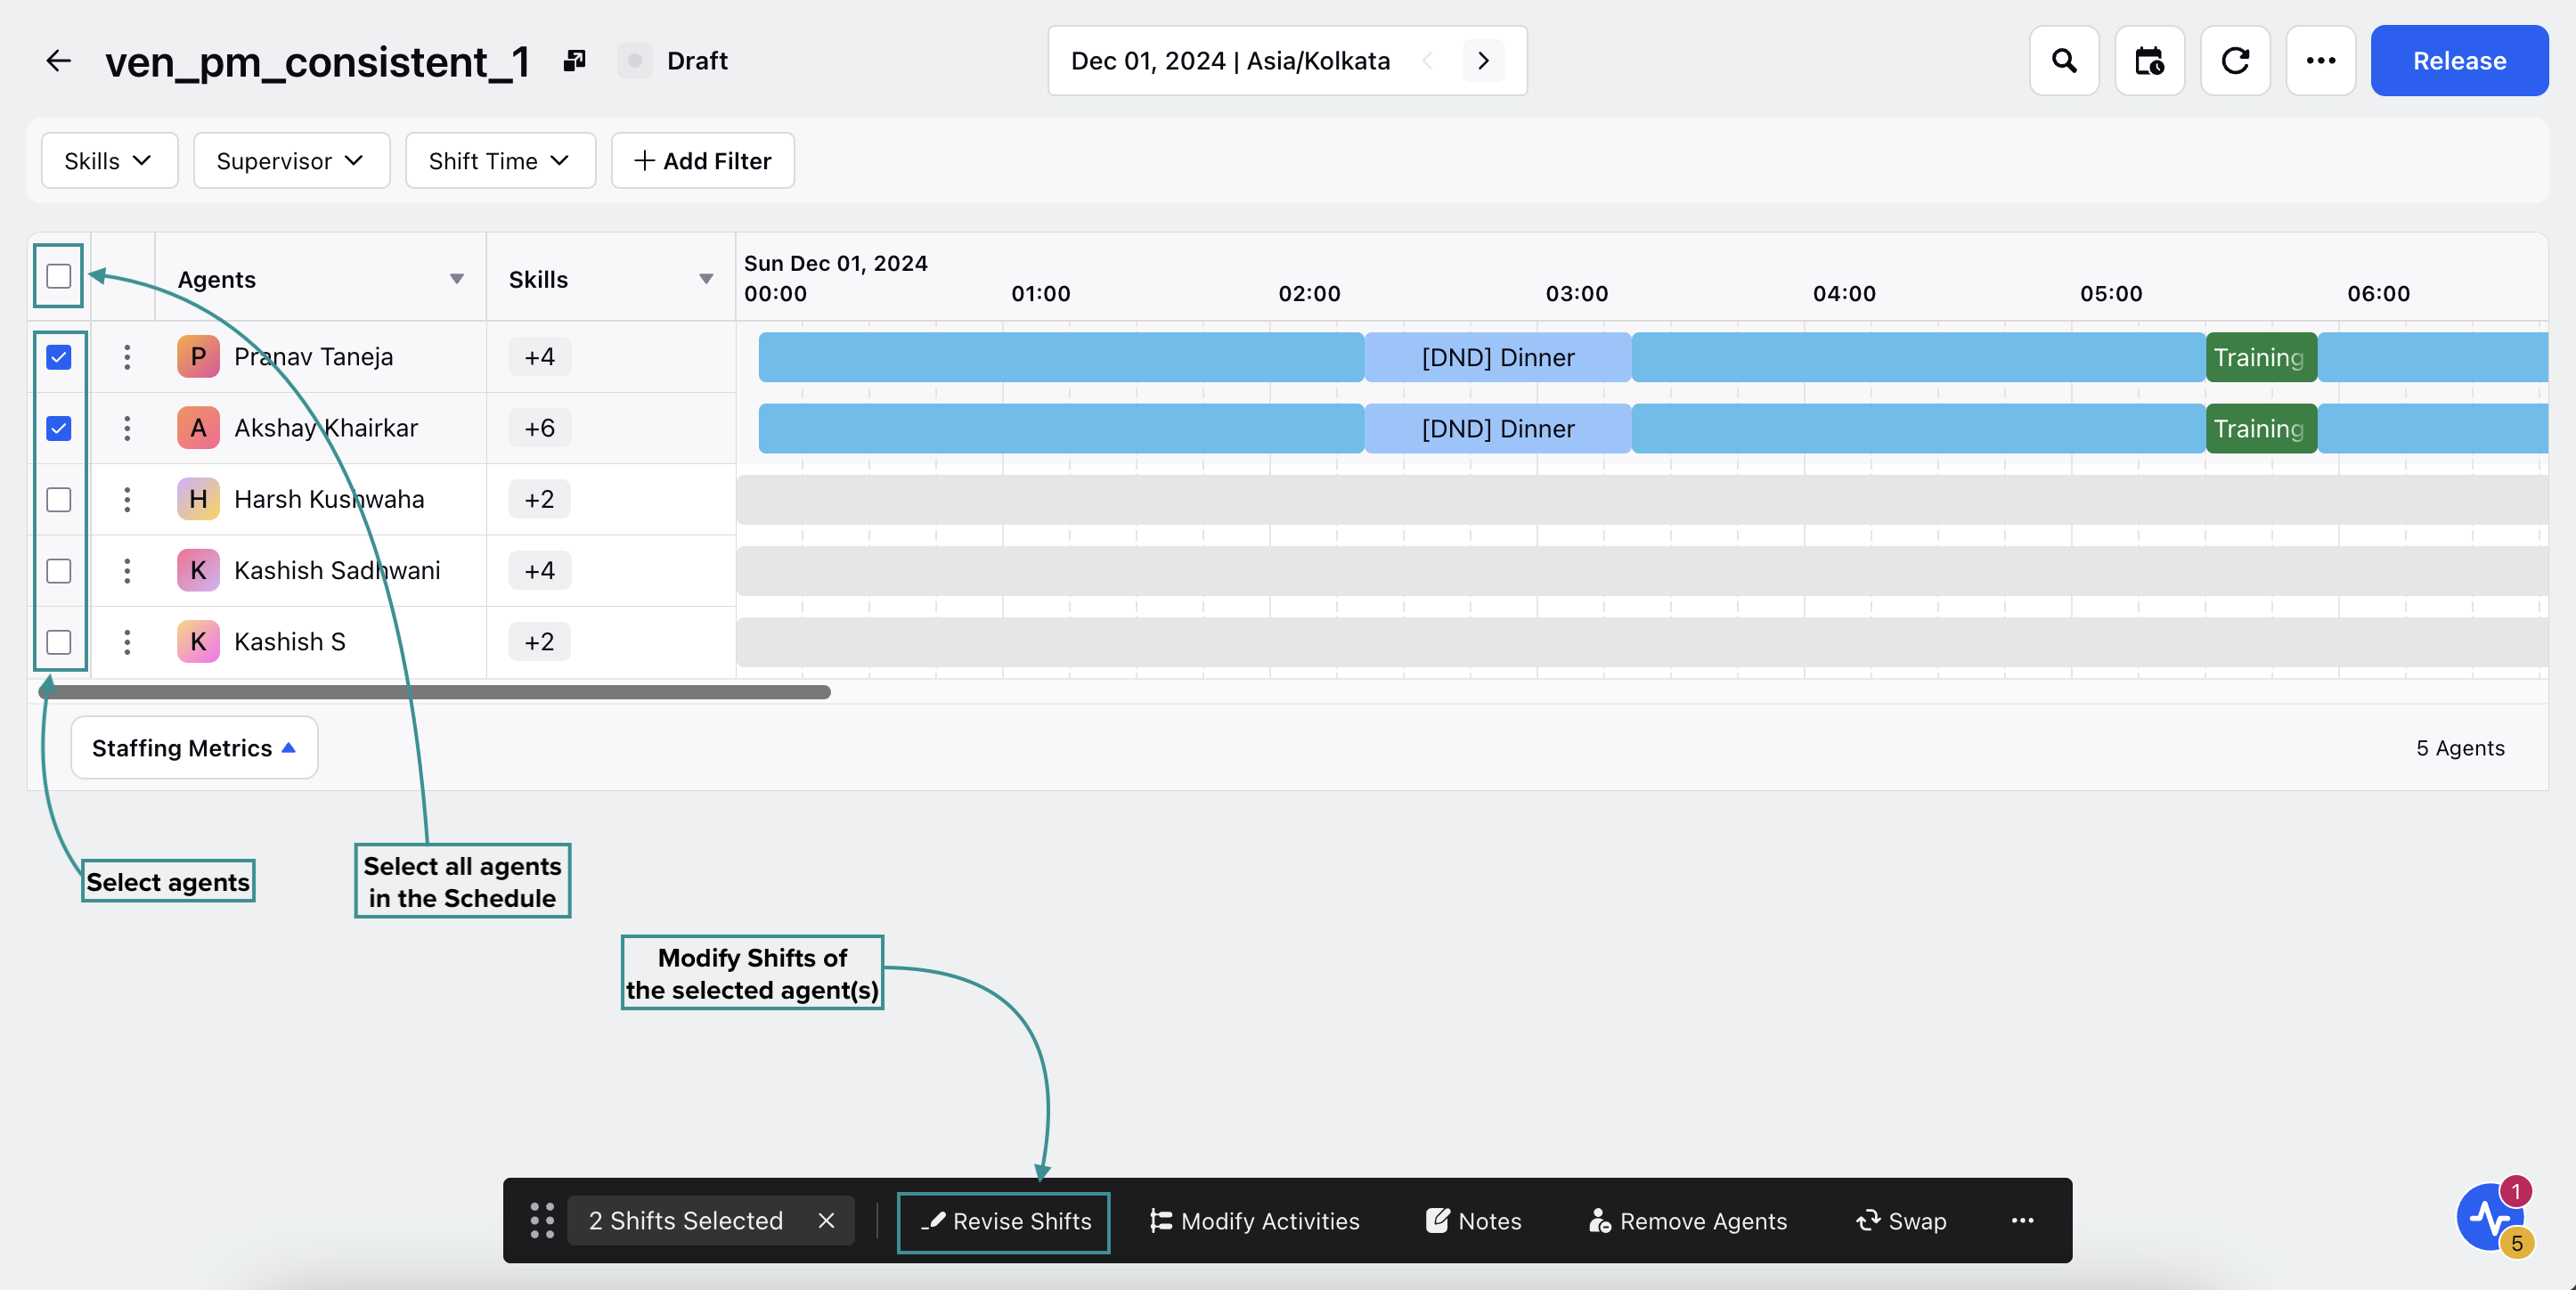
Select the agent(s) whose Shifts you want to modify by clicking the checkbox next to their names. To select all agents in the schedule, click the top checkbox. Selecting the checkbox will display a toolbar at the bottom of the page.
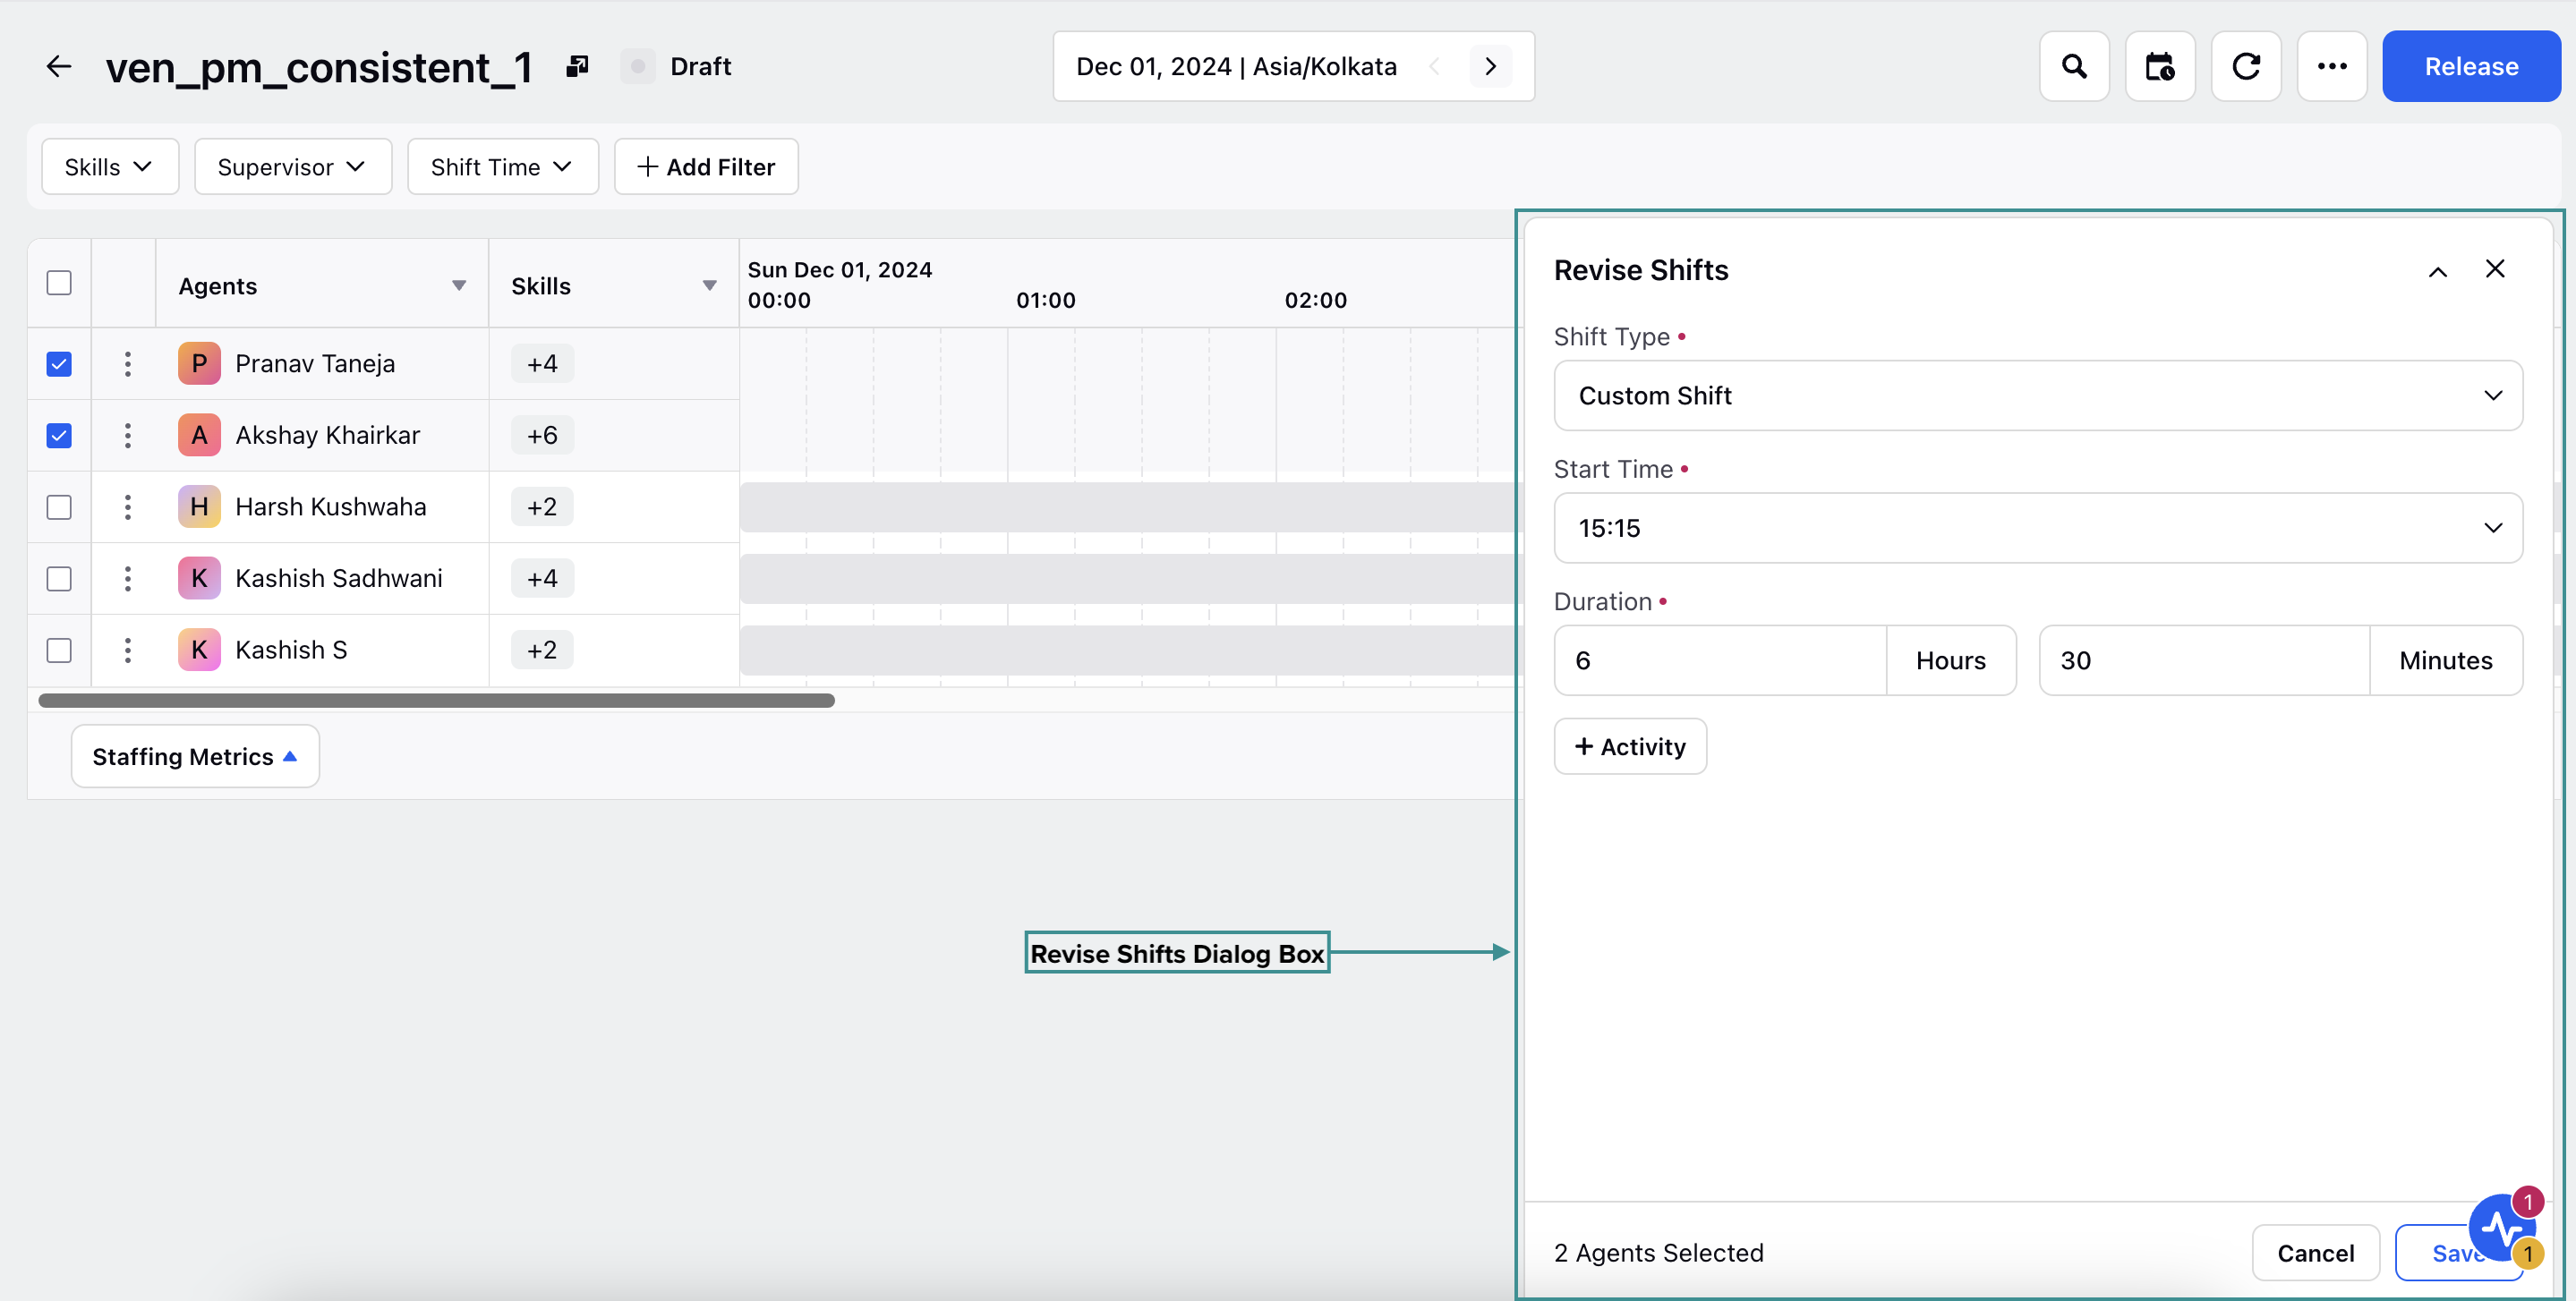
Click the Revise Shifts button from the toolbar to open the Revise Shifts dialog box from the bottom right of the page.
The Revise Shifts dialog box allows you to modify the Shifts of the selected agents for the chosen Schedule. In the Shift Type field, select the type of Shift to assign to the selected agents. The options are Custom Shift, Standard Shift, and Day Off.
Custom Shift
Choosing Custom Shift allows you to configure a new Shift from scratch. Select the agents’ work modes (Work from Home and Work from Office) in the Work Mode field. Specify the Shift start time in the Start Time field (using the 24-hour format) and the Shift duration in the Duration field (the Duration field consists of the Hours and Minutes sub-fields). For instance, consider a scenario where the Shift should start at 3:15 PM and last for 6 hours and 15 minutes. In this scenario, enter 15:15 in the Start Time field, 6 in the Hours sub-field, and 15 in the Minutes sub-field.
Note: A Shift configured through Custom Shift cannot be reused in other Schedule Scenarios. It is created as a one-time Shift for the specific Schedule Scenario.
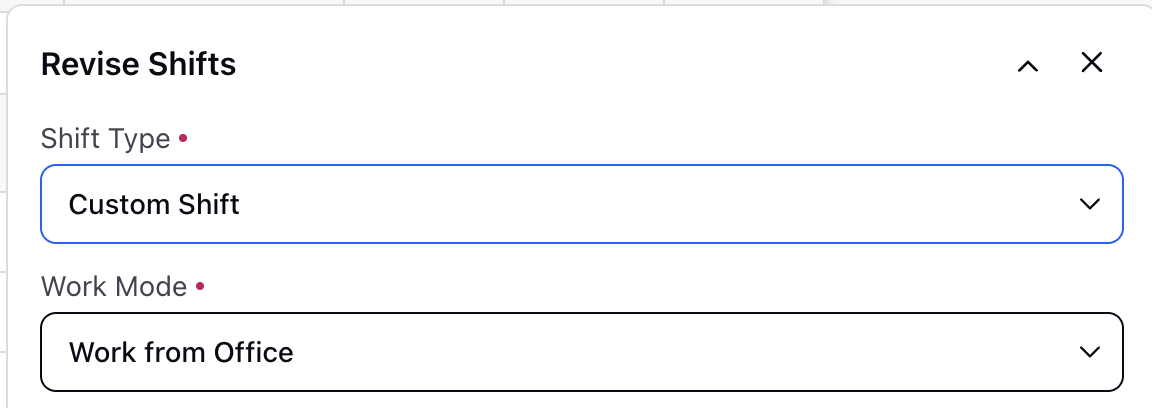
Click the “+ Activity” button to add Activities in the Shift, which will open a menu in the dialog box to configure the Activity. Select the Activity to be assigned from the Select Activity field, which lists all existing Activities in your Workspace. Specify when the Activity will start in the Start Time field (using the 24-hour format) and specify the
duration of the Activity in the Duration field (the Duration field consists of the Hours and Minutes sub-fields).
Note: Activities cannot be assigned if they start or end outside the Shift duration.
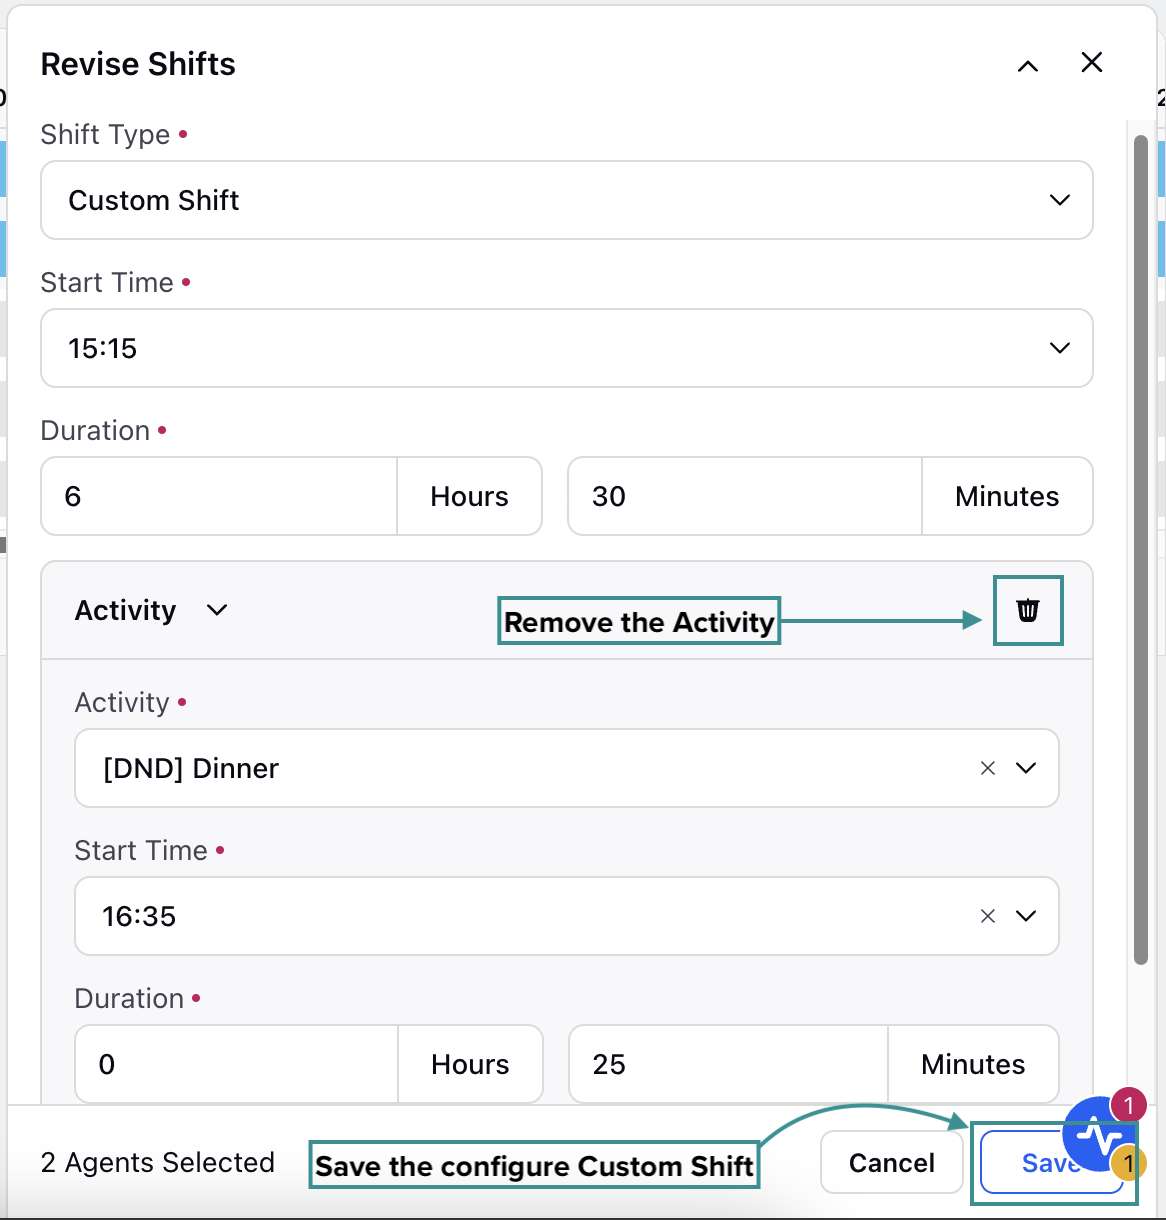
For instance, consider a scenario where the Activity should start at 4:35 PM and last 25 minutes. In this scenario, enter 16:15 in the Start Time field, 0 in the Hours sub-field, and 25 in the Minutes sub-field. After configuring the new activity, click the Save button at the bottom right of the dialog box to save your updates and assign the configured Shift to the selected agent(s).
Standard Shift
Choosing Standard Shift allows you to assign from the existing Shifts in your Workspace. Select the agents’ work modes (Work from Home and Work from Office) in the Work Mode field. Select an existing Shift from the list in the Shift field, which will automatically load the pre-configured data of the Shift, such as Shift duration and Activities. Select the Shift start time from the Start Time field, which lists either the exact start time or the interval during which the shift can start, depending on the original shift configuration.
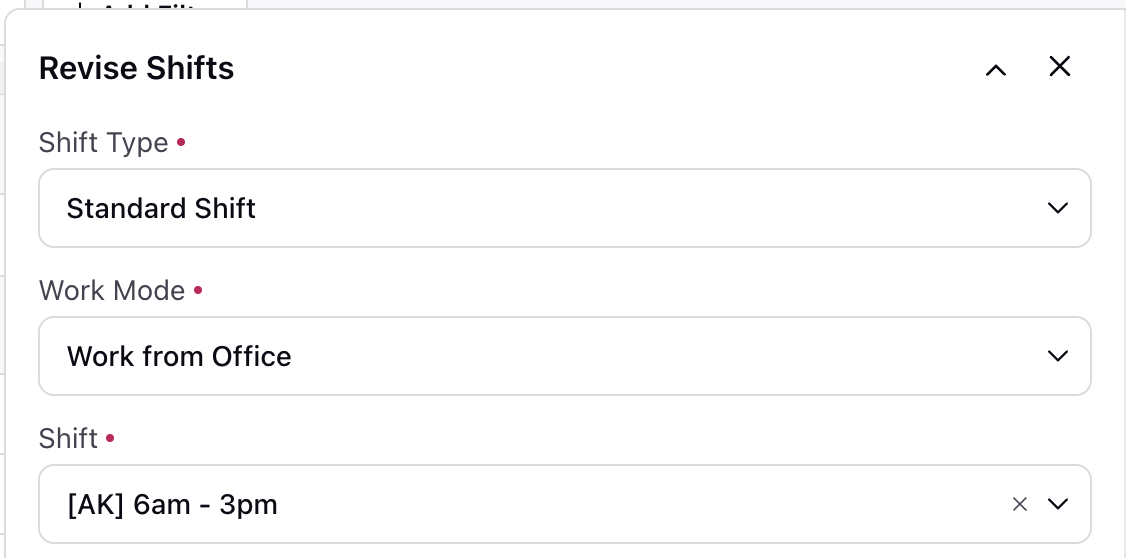
Activities that were already assigned to the Shift will also be displayed. They can be removed, and new Activities can also be added. Click the “+ Activity” button to add Activities in the Shift, which will open a menu in the dialog box to configure the Activity. Select the Activity to be assigned from the Select Activity field, which lists all existing Activities
in your Workspace. Specify when the Activity will start in the Start Time field (using the 24-hour format) and specify the duration of the Activity in the Duration field (the Duration field consists of the Hours and Minutes sub-fields).
Note: Activities cannot be assigned if they start or end outside the Shift duration.
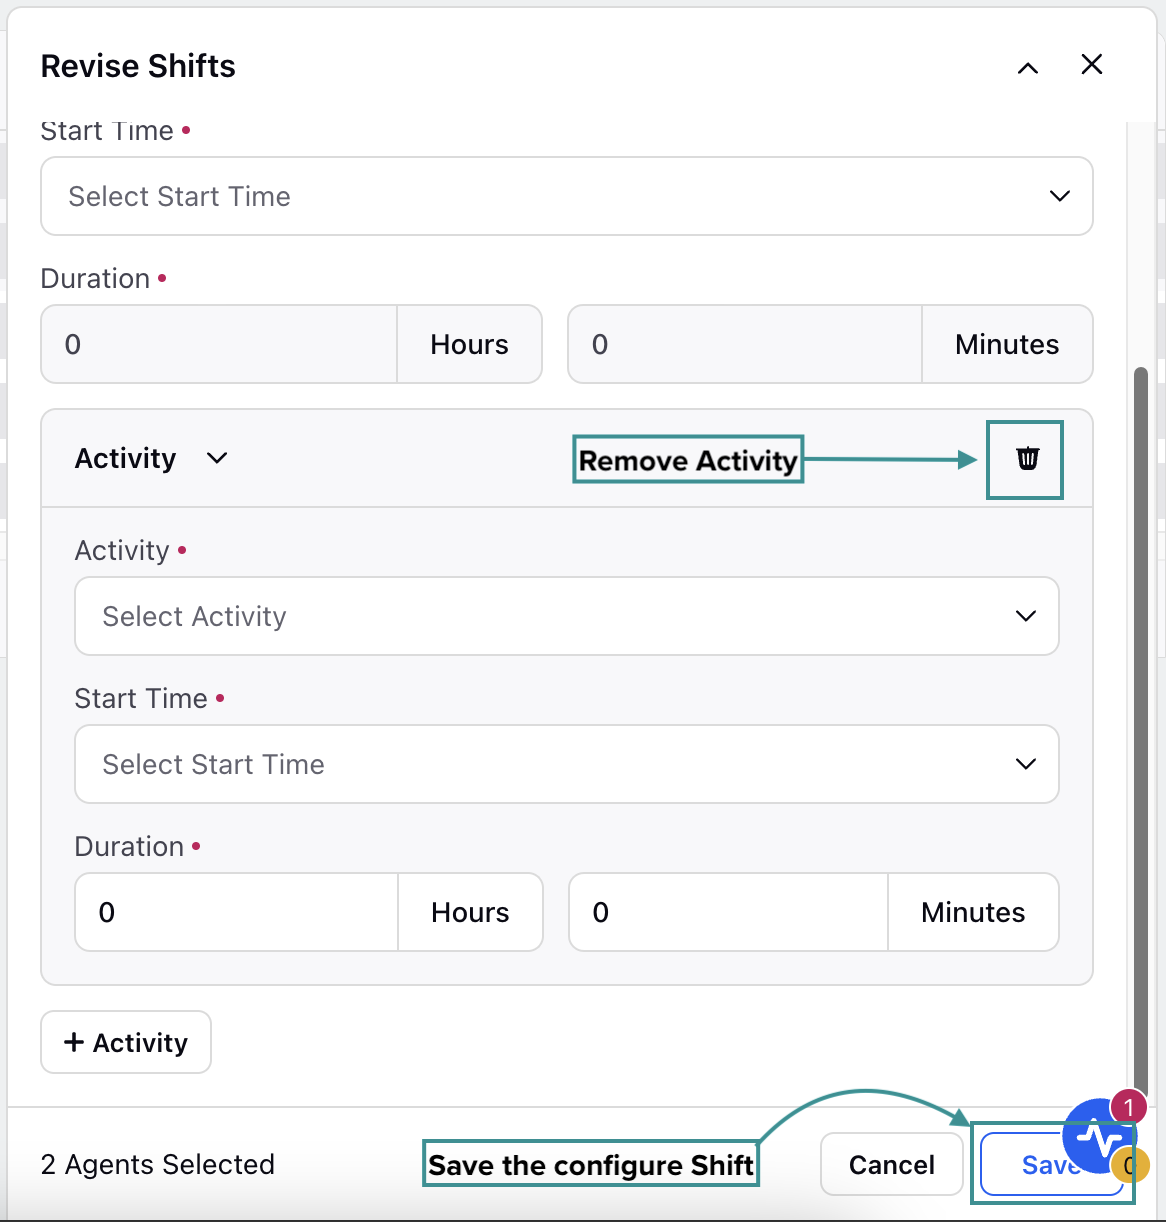
For instance, consider a scenario where the Activity should start at 4:35 PM and last 25 minutes. In this scenario, enter 16:15 in the Start Time field, 0 in the Hours sub-field, and 25 in the Minutes sub-field.
Click the Save button at the bottom right of the dialog box to save your updates and assign the configured Shift to the selected agent(s).
Day Off
Choosing Day Off in the Shift Type field will prevent the selected agent(s) from being assigned any Activities.
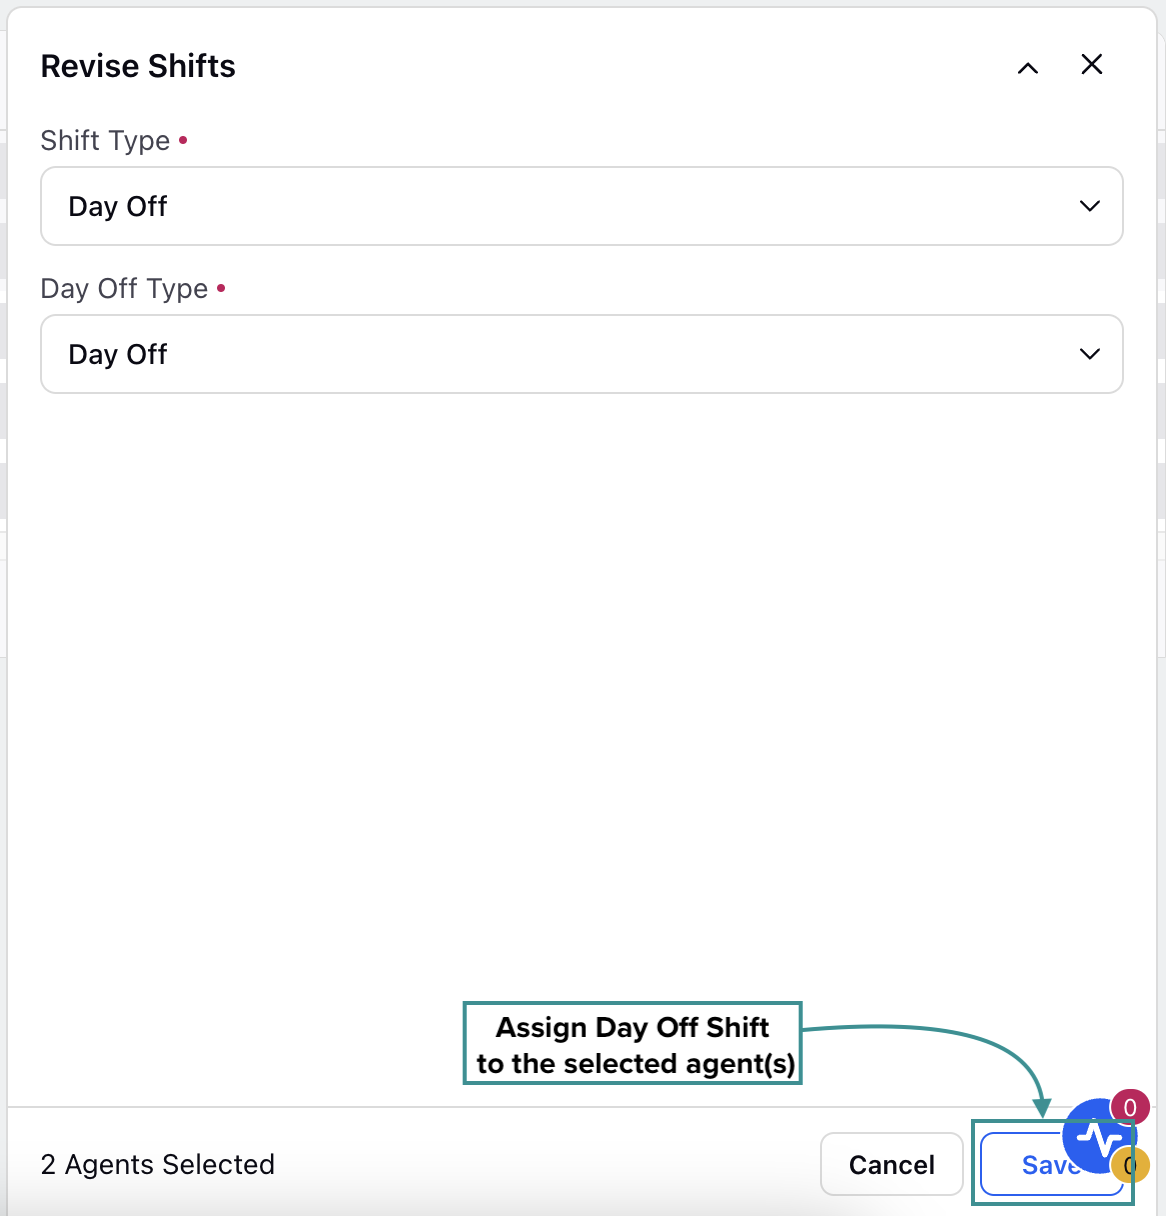
Click the Save button at the bottom right of the dialog box to save your updates and assign the configured Shift to the selected agent(s).
Optimize Schedule Scenarios
Schedule Optimization enables automated changes to agent schedules by modifying Activities, Shift placements, and optimizing Time Offs while strictly adhering to the defined Schedule Policies. This feature minimizes staffing imbalances (overstaffing and understaffing) and ensures effective workforce distribution.
Follow these steps to optimize a Schedule Scenario:
Go to the Workforce Manager Persona App.
Select Scheduling from the Left Pane to open the Schedules record manager.

Hover over the vertical ellipsis (⋮) icon corresponding to the Schedule Scenario that you want to optimize. This will show a list of options.
Select Optimise from the list of options to open the window to optimize the Schedule Scenario.
Alternatively, you can View a Schedule Scenario, click the More Actions button at the top right and select Optimise Schedule from the dropdown menu. This will also open the window to optimize the Schedule Scenario.

Fill in the required fields on the page. Fields marked with a red dot are mandatory. Below are the descriptions of the fields on this page:
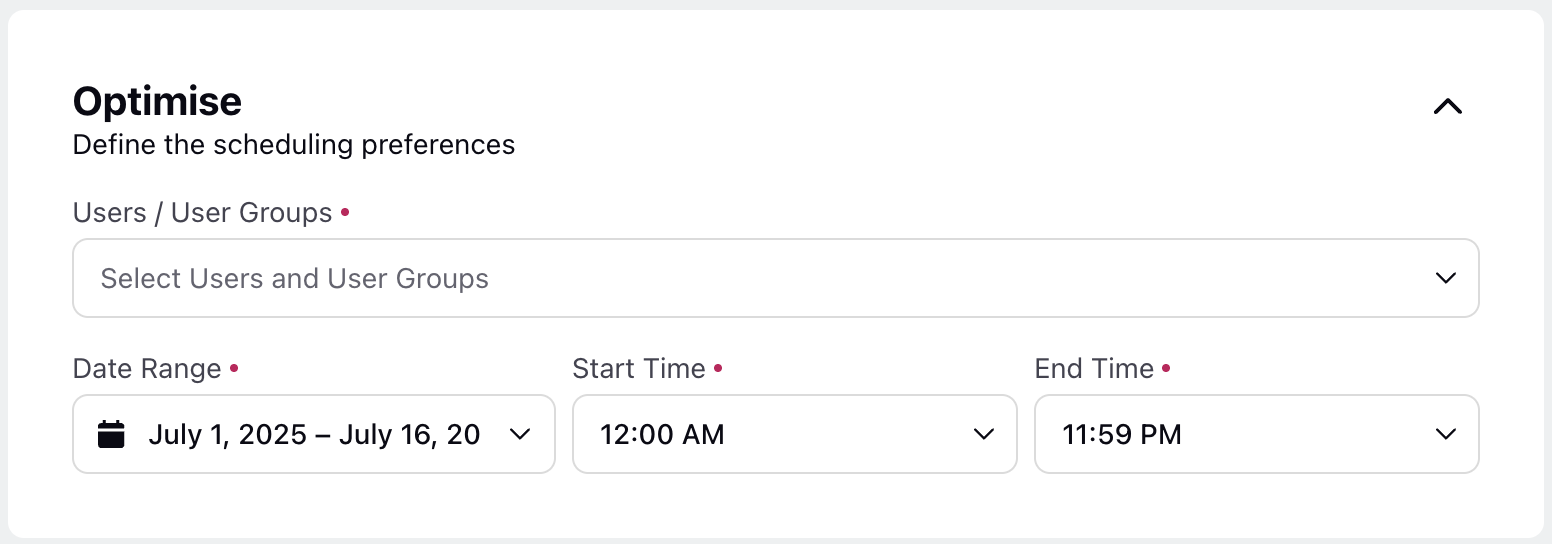
Users / User Groups: Select the Users and/or User Groups whose schedule needs to be optimized. You can only choose from the Users and User Groups part of the Schedule Scenario. (Required)
Date Range: Specify the interval for which the Schedule Scenario should be optimized. This interval must be within the date range of the Schedule Scenario. (Required)
Start Time: Specify when the schedule should start. (Required)
End Time: Specify when the schedule should end. (Required)
Adjustment Rules
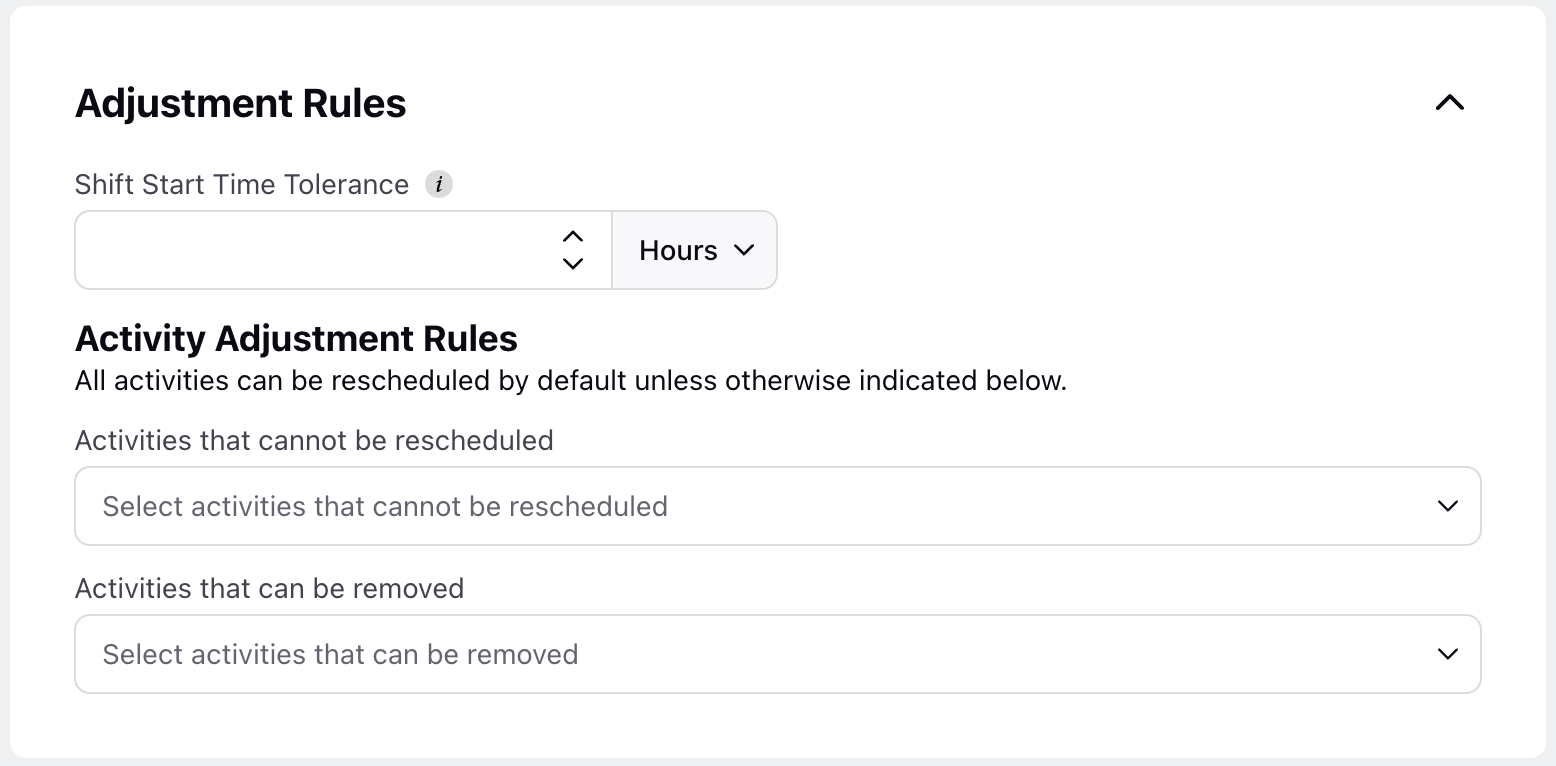
Shift Start Time Tolerance: Specify the maximum deviation, in hours or minutes, allowed from the scheduled Shift start time. (Required)
Activity Adjustment Rules
Activities that cannot be rescheduled: Select the Activities that cannot be rescheduled when optimizing the Schedule Scenario.
Activities that can be removed: Select the Activities that can be removed when optimizing the Schedule Scenario.
Note: All Activities can be rescheduled by default unless specified otherwise in the above fields.
Click the Save button.
This action will move the Schedule Scenario to the Processing state. Once optimization is complete, it will remain in the Draft state. After a Schedule Scenario is successfully optimized, its Staffing Metrics will display the updated details. You can then review the optimized Schedule Scenario and choose to publish it. Upon publishing, the new version of the Schedule Scenario will be created in the Published state.
Note: If the Schedule Scenario Optimization fails for any reason, it will be indicated by a red icon in the Status column of the Schedules Record Manager.

Add Notes on Agent’s Shifts
Follow these steps to add a note to an agent’s Shift:

Go to the Workforce Manager Persona App on the Launchpad. Alternatively, search for 'Workforce Manager' on the Launchpad search bar.

Select Scheduling from the Left Pane to open the Schedules Record Manager.
Click the View Schedule (eye icon) button next to the Schedule where the required agent Shift is available to add the note. This will open a page with details of the Schedule.
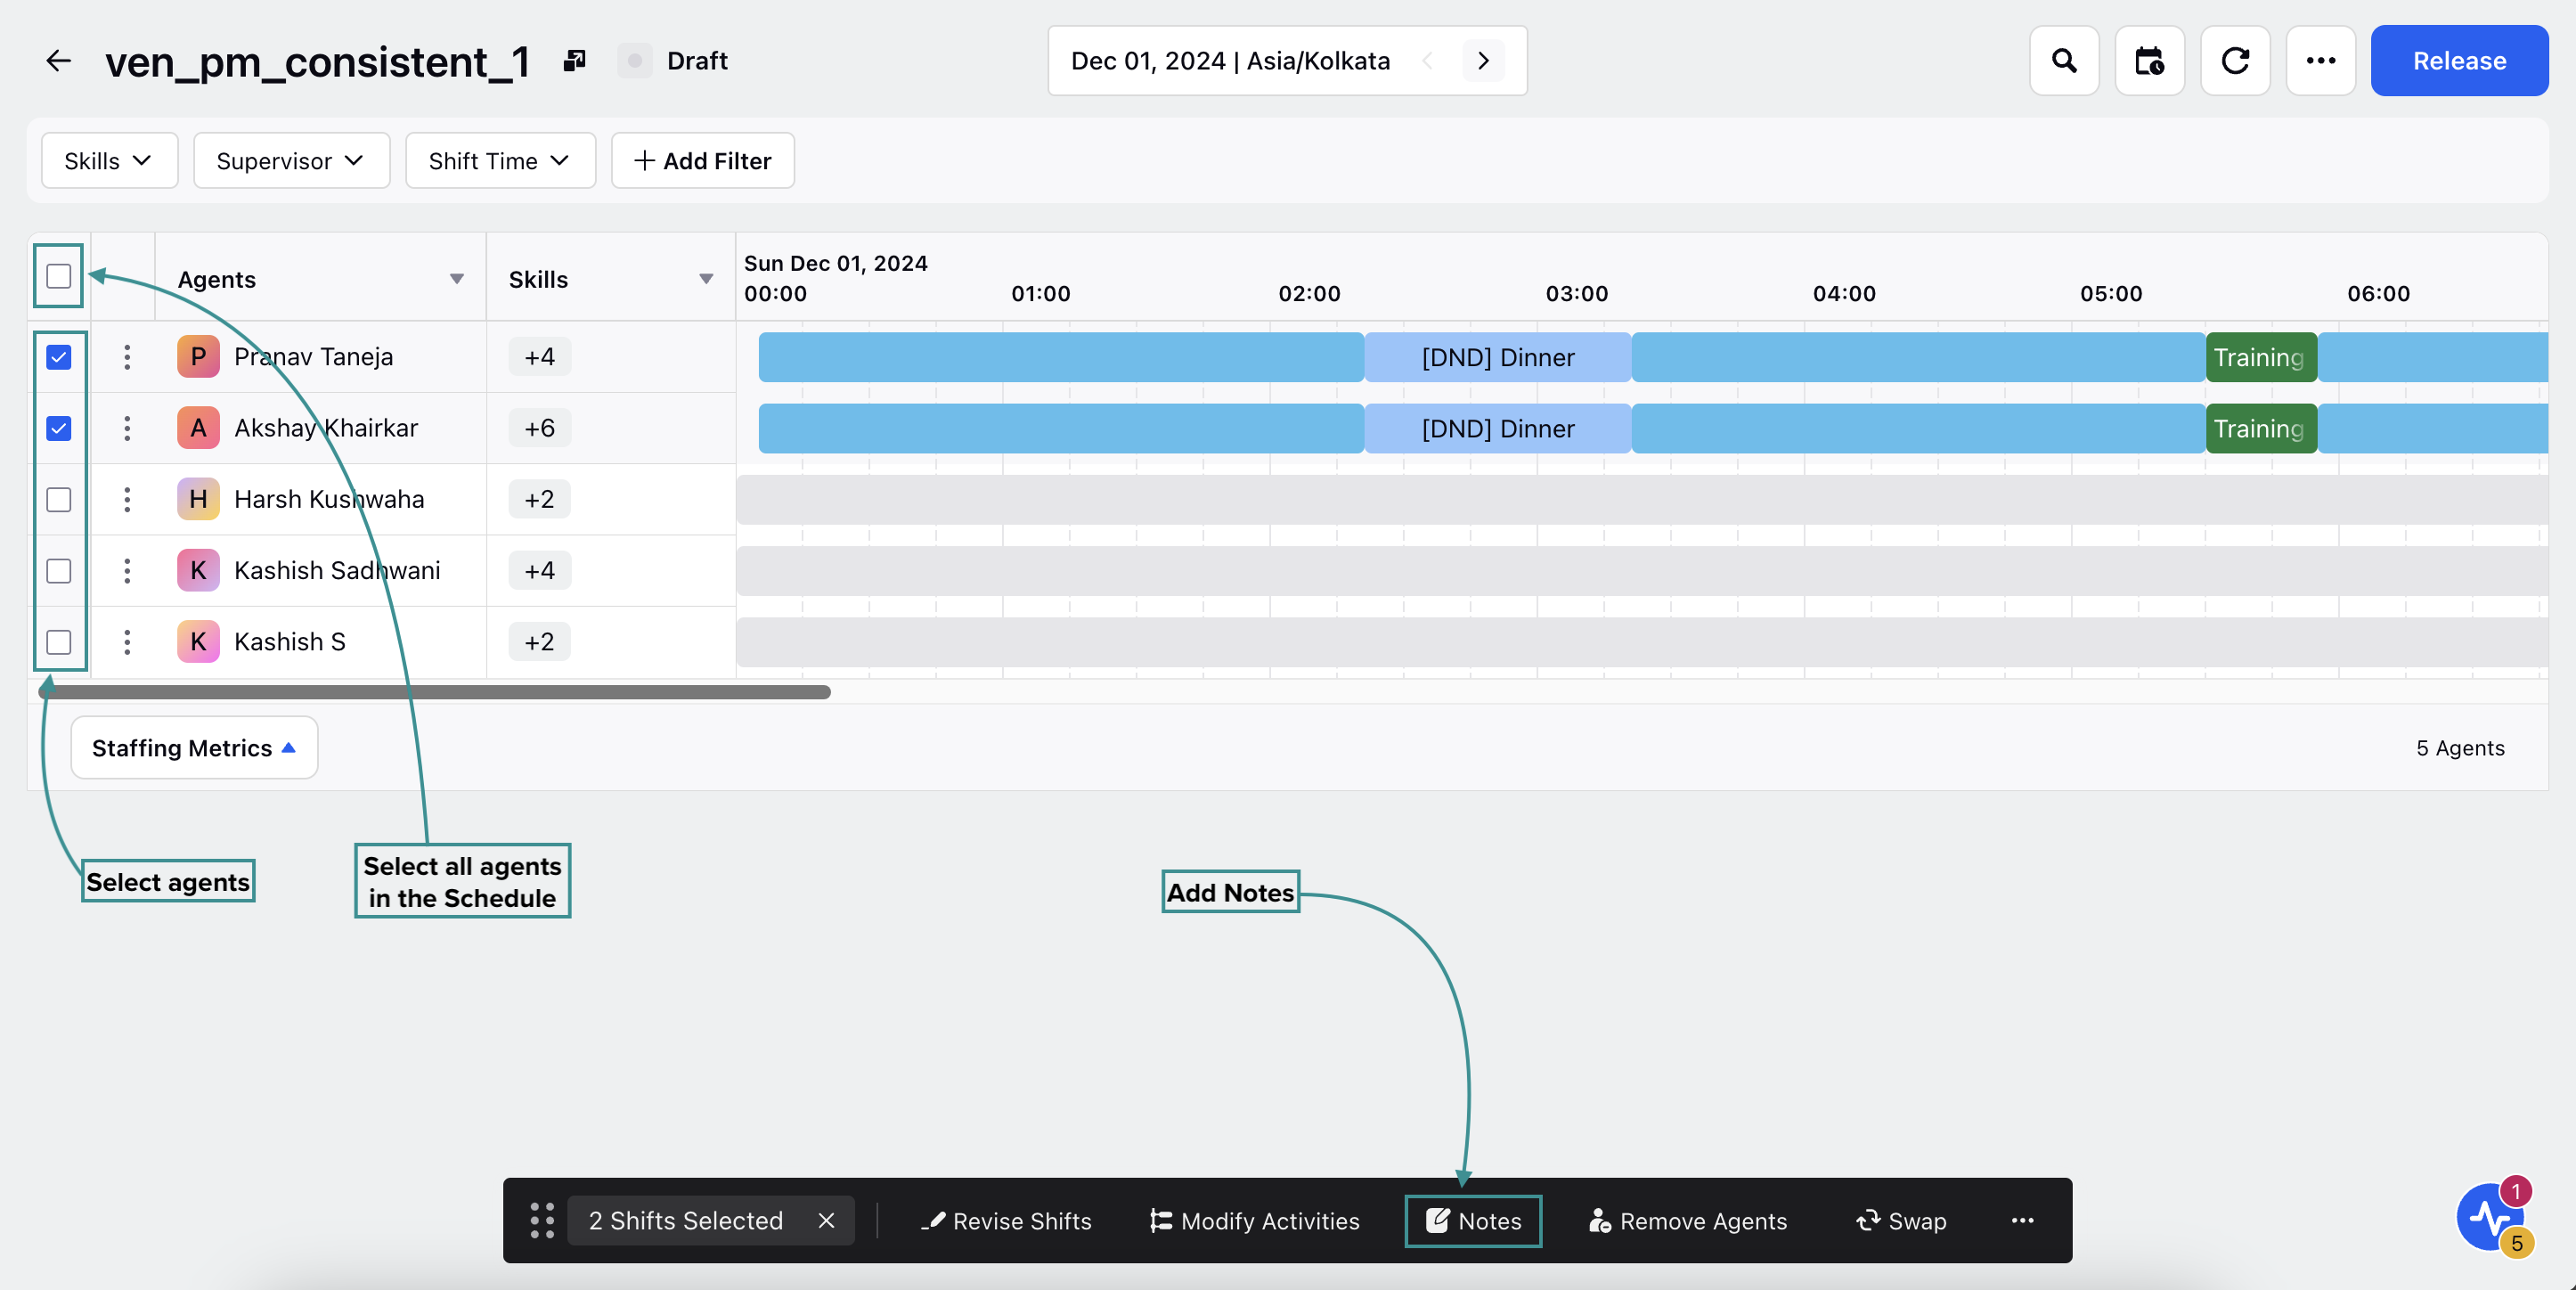
Select the agent(s) whose Shifts require notes by clicking the checkbox next to their names. To select all agents in the Schedule, click the top checkbox. Selecting the checkbox will display a toolbar at the bottom of the page.
Click the Notes button from the toolbar to open the Notes dialog box from the bottom right of the page.
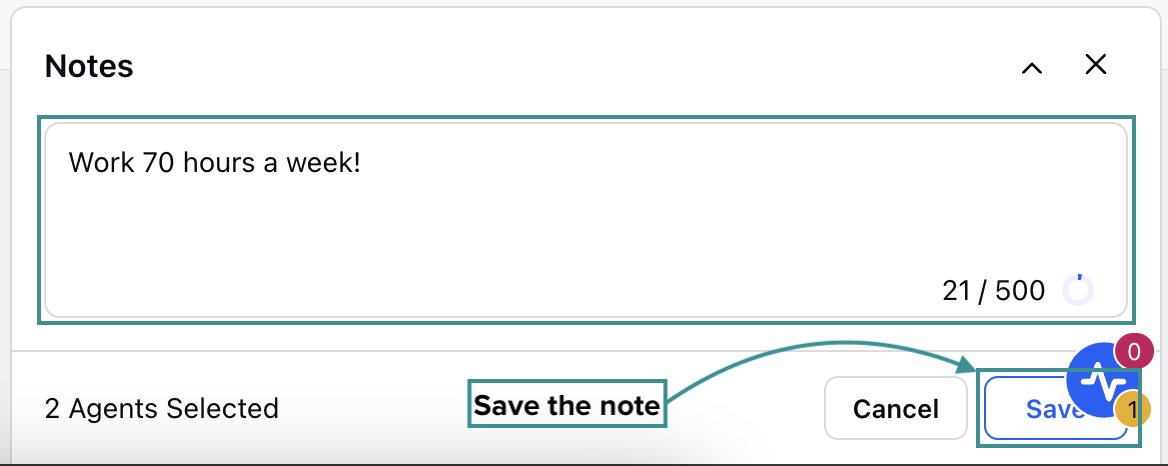
The Notes dialog box allows you to add Shift-level notes to one or multiple agents to provide Shift-specific information after creating the Schedule. For example: "You have been assigned a late shift today due to heavy call volumes." Enter the note in the dialog box and click the Save button.
Workforce Managers can view any existing note for an agent’s Shift by hovering over the Shift duration on the Scheduling page.

When the agent checks their “My Schedule” page, any Shift-level notes added will be visible throughout the day on their calendar.
If the Shift is edited to reflect new start and end times, the note will update accordingly and remain attached to that specific Shift for the day. The note is Shift-specific and not tied to any particular agent, and the note will persist with every update made to the Shift. For example, if Shifts A and B are traded between agents, the note originally attached to Shift A will remain with Shift A, regardless of which agent it is now assigned to.