Opt-out of WhatsApp Messages in Sprinklr through Journey Facilitator
Updated
Sprinklr allows your customers to opt out of WhatsApp Messages in case they want to unsubscribe. You can remove the user’s profile permanently from the profile list and the user will not receive any future messages. This enables you to manage opt-out requests from your customers.
Before You Begin
You need to create a custom field and set up a rule which will remove the user’s profile from the profile list.
Create Custom Field
Create an Inbound Rule
To Create a Custom Field
Click the New Tab icon. Under Platform Modules, click Custom Fields within Unify section.
In the top right corner of the Custom Fields window, click Add Custom Field.
On the New Custom Field window, fill in the required details.
Select Picklist as the Custom Field Type. You can select only one value from the available options while applying this type of Custom Field.
Provide a Name - Opt-Out/Unsubscribe to your custom field.
Search and select Profile from the Asset dropdown menu.
In the Set Values section, you can enter Yes and No as the desired value types.
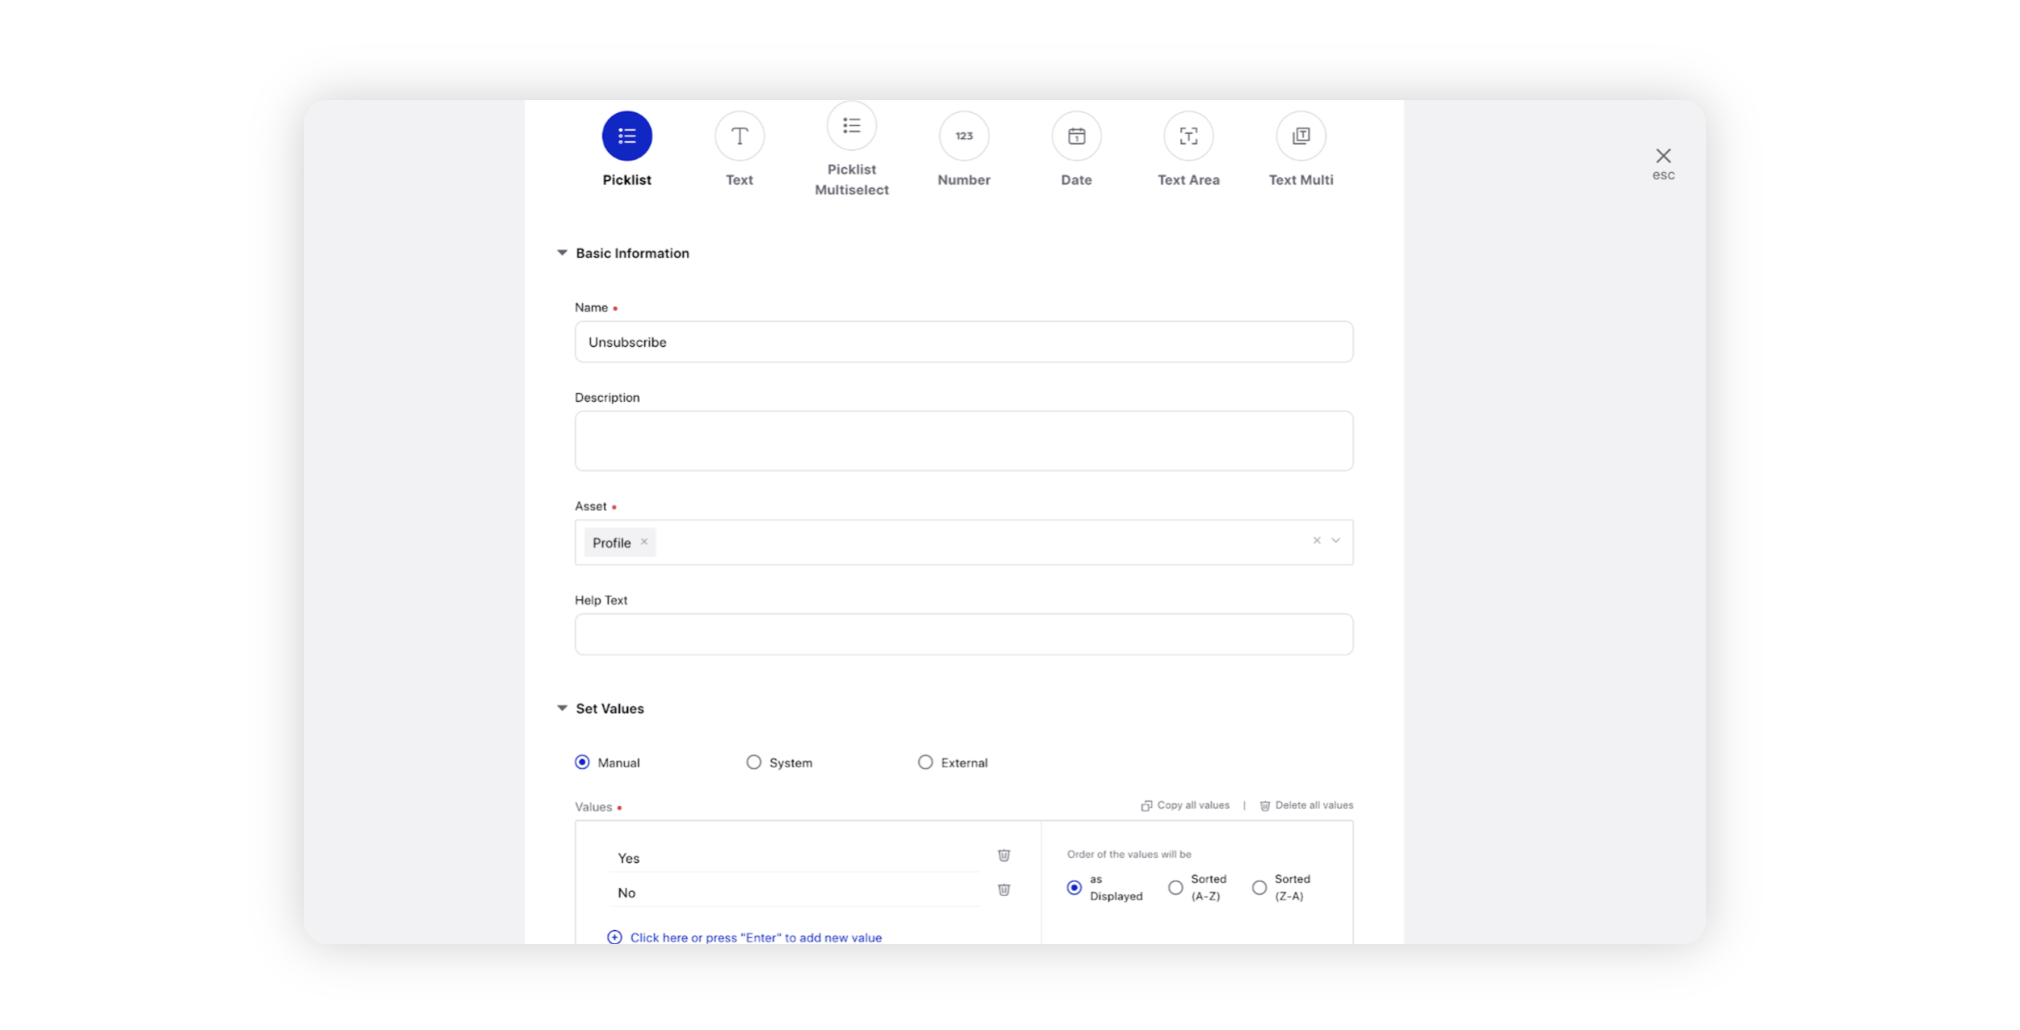
In the Visibility Control section, you can set the visibility of your custom field as per your requirement.
Click Save in the bottom right corner.
To Create an Inbound Rule
Creating an Inbound Rule will help you set desired conditions and actions to Unsubscribe a user from WhatsApp Messages.
If a user replies to a WhatsApp message with the keyword “UNSUBSCRIBE” you can set up a rule to remove the user’s profile from the profile list. Removing a user from the profile list ensures that they no longer get future WhatsApp Messages.
The rule is triggered based on the user’s reply. If the text contains the keyword “UNSUBSCRIBE”, the rule triggers and the user will no longer receive any future messages.
Click the New Tab icon. Under Platform Modules, click Rule Engine within Collaborate section.
In the top right corner of the Rule Engine window, click Create New Rule.
On the New Rule window, provide a Name and an optional Description for your new rule. For example - Unsubscribe.
Set the Rule Scope to Workspace or Customer.
Search and select Inbound from the Context dropdown menu. It determines which type of asset the Rule will be executed upon.

Fill in the other details as per your requirement. To know more, see Create a Rule.
Click Next at the bottom. You will be directed to Rule Engine Builder.
On the Rule Engine Builder window, click the Addition icon and select Add Condition.
In the Edit Condition pane, to define Message Source, select Account from the Condition dropdown under the Conditions Applies to "The source of the Message" section.
Search and select the desired WhatsApp account from the Value field.
To define Message Properties, set the following conditions and values.
Post Type > is > Fan Post
Text > contains > UNSUBSCRIBE
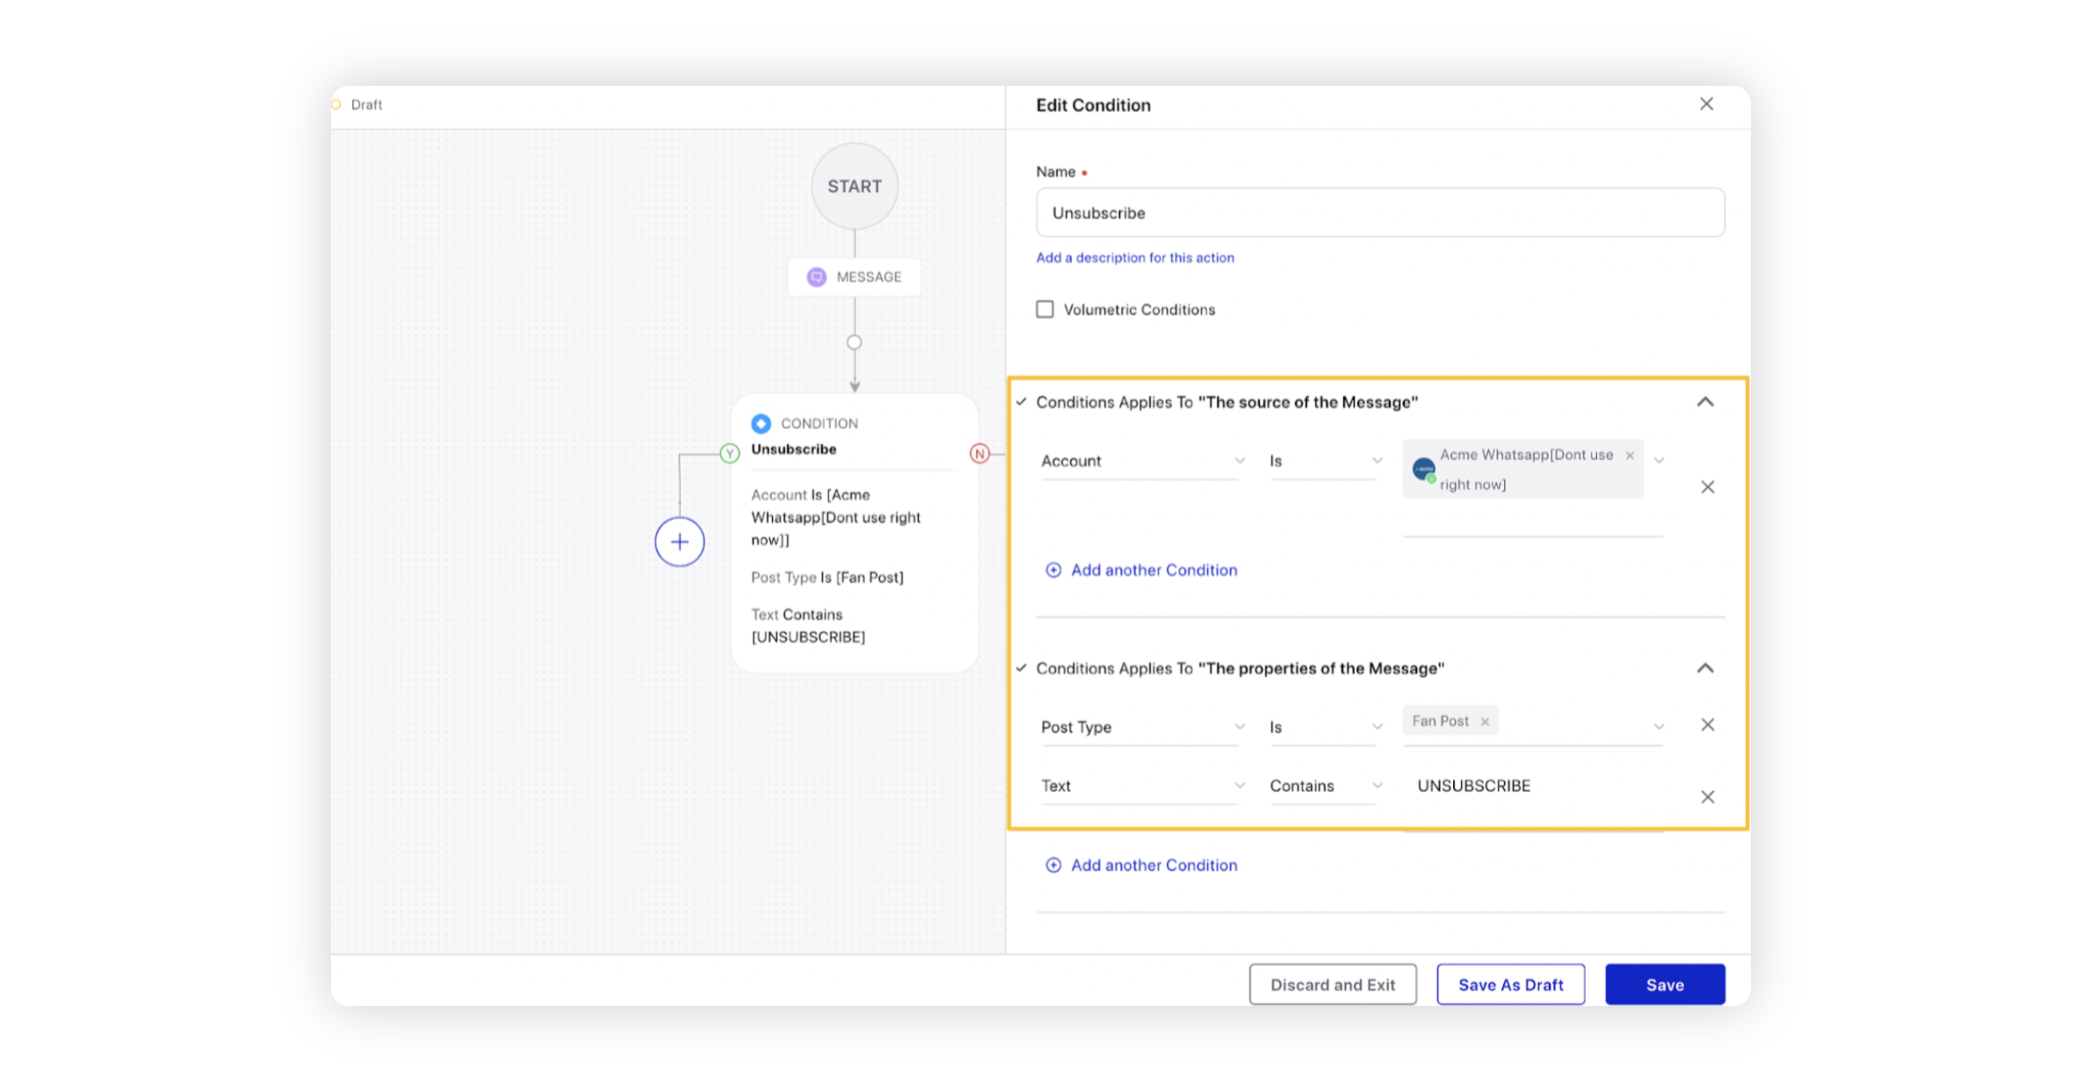
Click the Addition icon on the Yes branch of the condition and select Add Action.
In the Edit Condition pane, select Add a Note from the Action dropdown under the Actions to “Change properties of Message” section.
Enter Unsubscribed in the Value field.
Search and select the Partner Profile List you wish to unsubscribe for the Remove from Partner Profile Lists action under the Actions to “Properties of the message sender” section. This will remove the subscriber from the Partner Profile List.
Click Add another Action and search and select the Opt-Out/Unsubscribe custom field created earlier and set Yes as the value type.
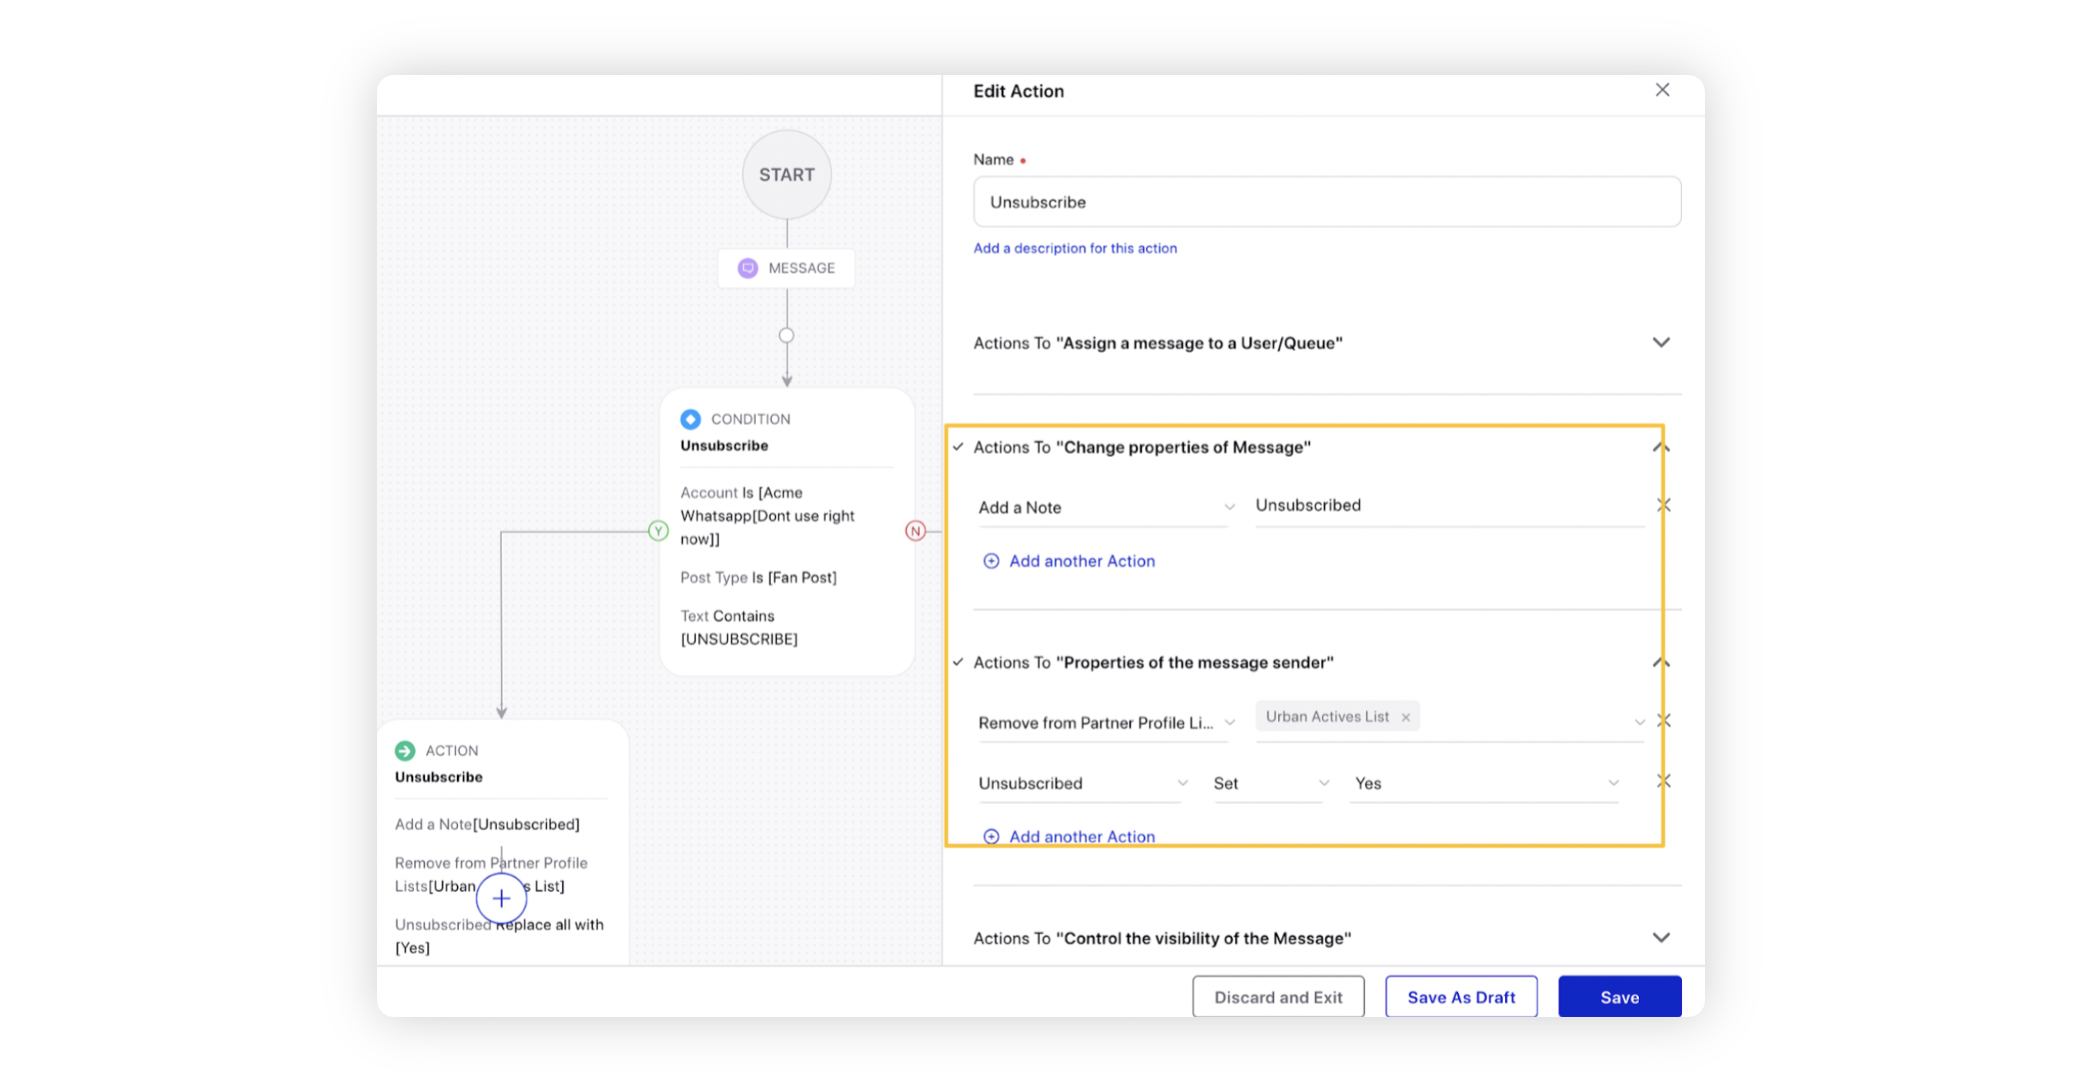
Click Save in the bottom right corner.
Create an Asset for Journey using the HSM Template
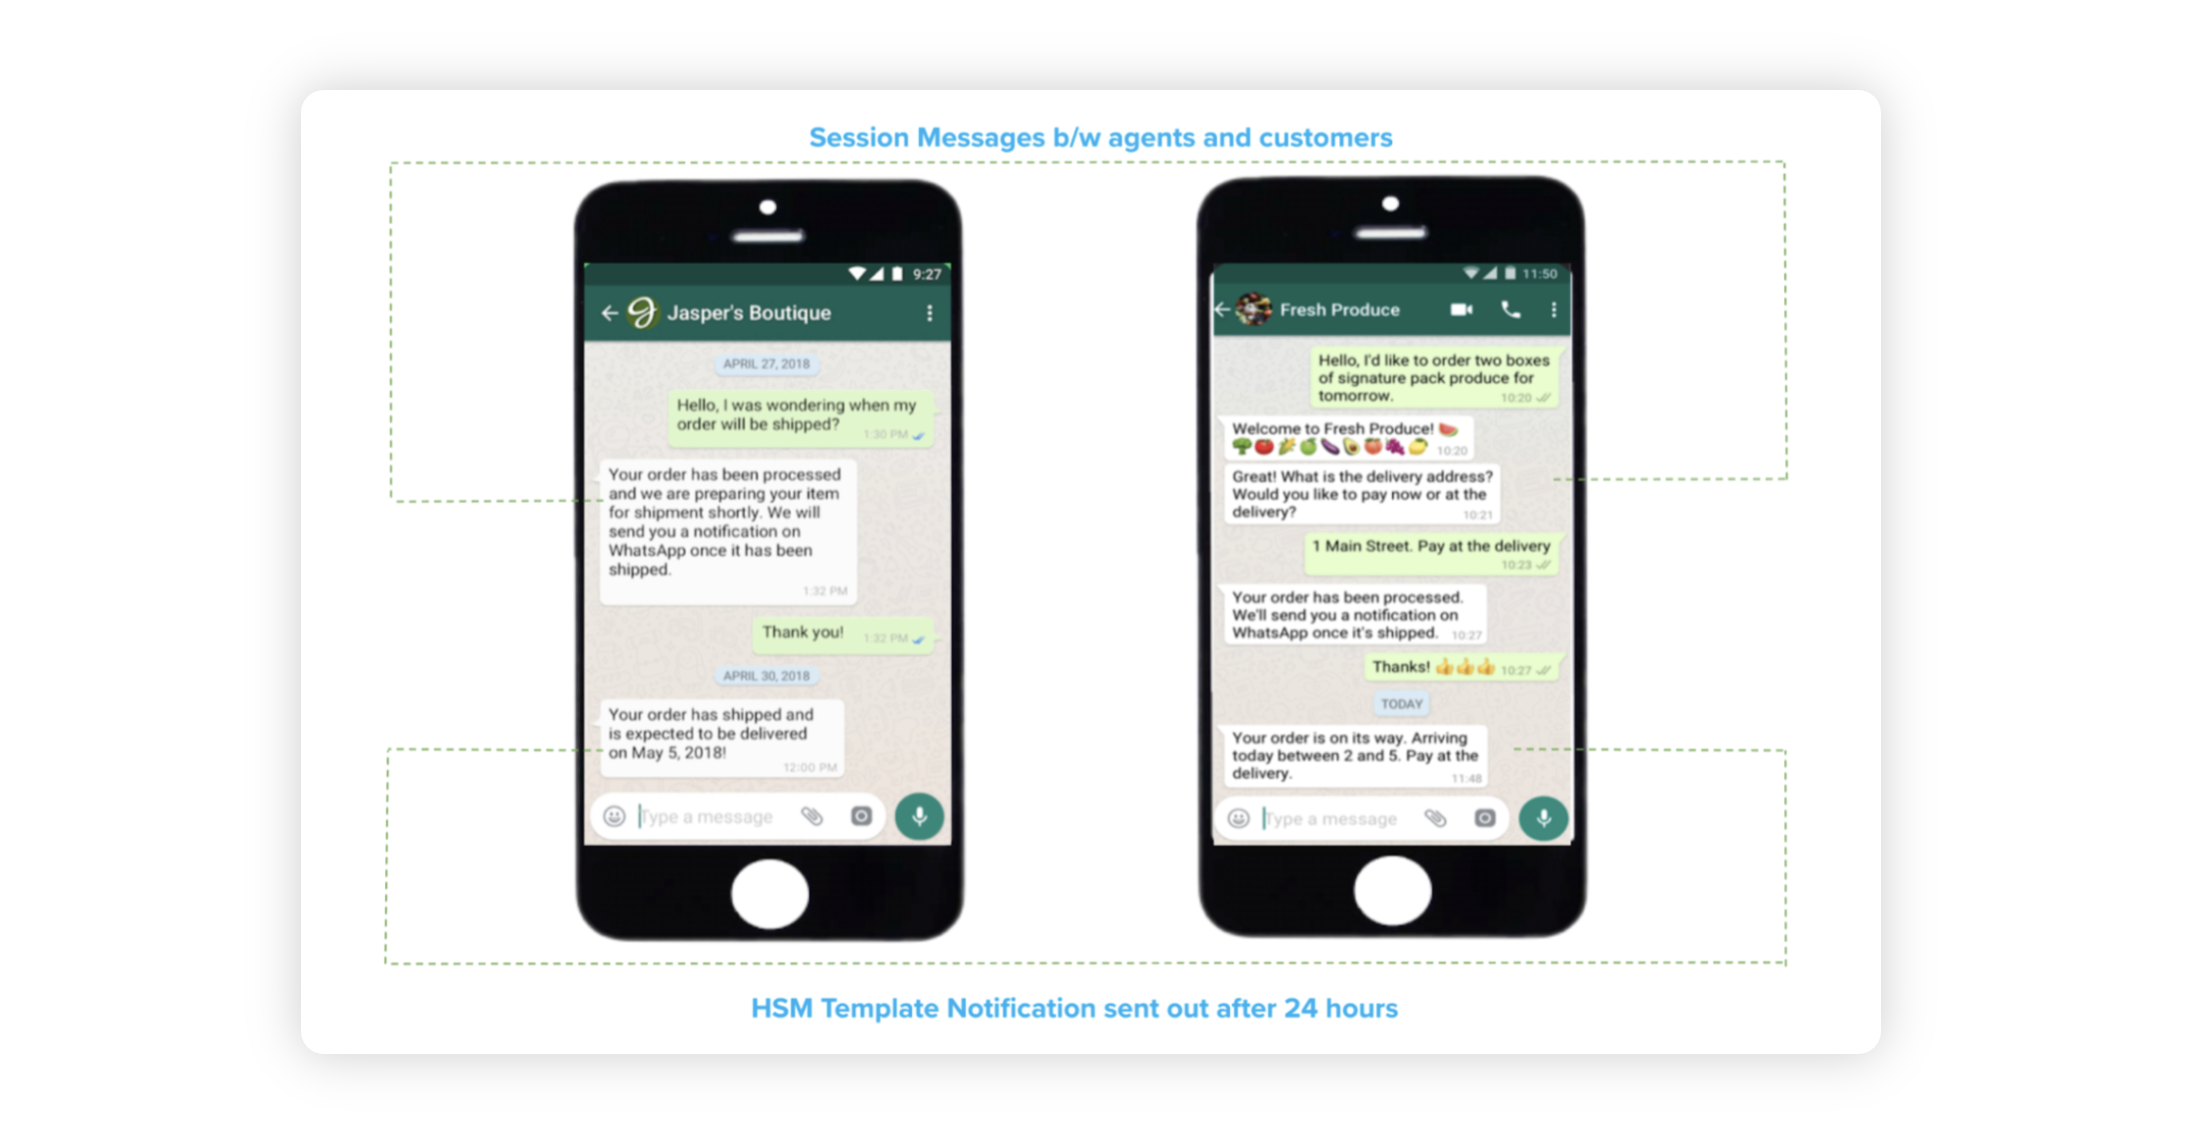
A template message (also known as a Highly Structured Message or HSM) is a special message type that must be used for any business-initiated or re-engagement conversations via the WhatsApp channel.
HSM is mainly created for sending notifications to customers. Notifications are business-initiated templated messages that can be sent anytime. They enable you to:
Deliver important, timely messages during your customer’s path to purchase.
Send messages anytime without any 24 hours time restriction.
Continue the conversation with the customers who respond to your notification.
Note
|
To Create HSM Template for WhatsApp Business with UNSUBSCRIBE keyword
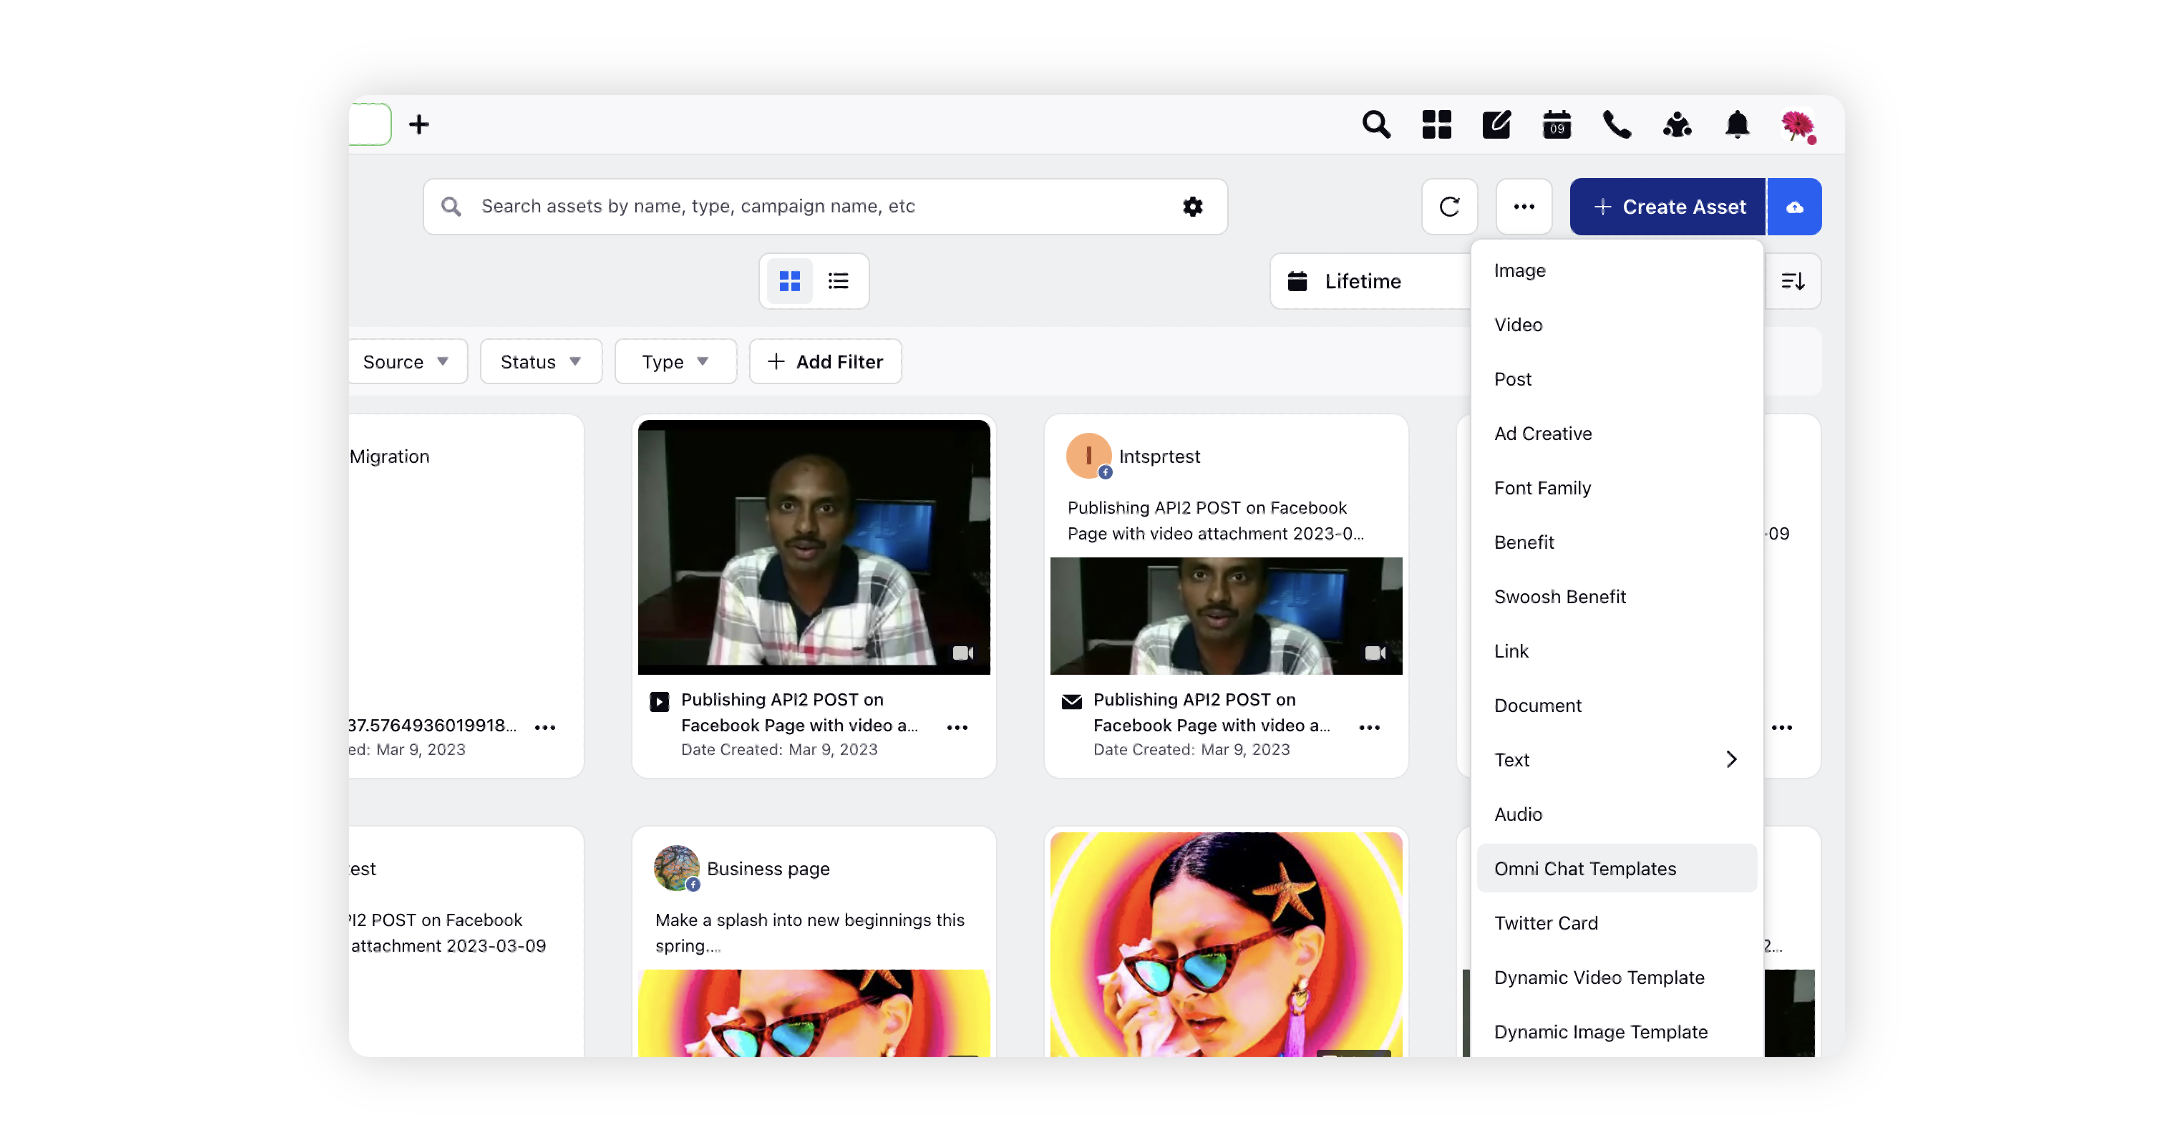
Click the New Tab icon. Under the Sprinklr Marketing tab select the Marketing section, then click Digital Asset Management within Plan.
In the top right corner of the Asset Management window, click the Create Asset icon and select Omni Chat Templates from the dropdown.
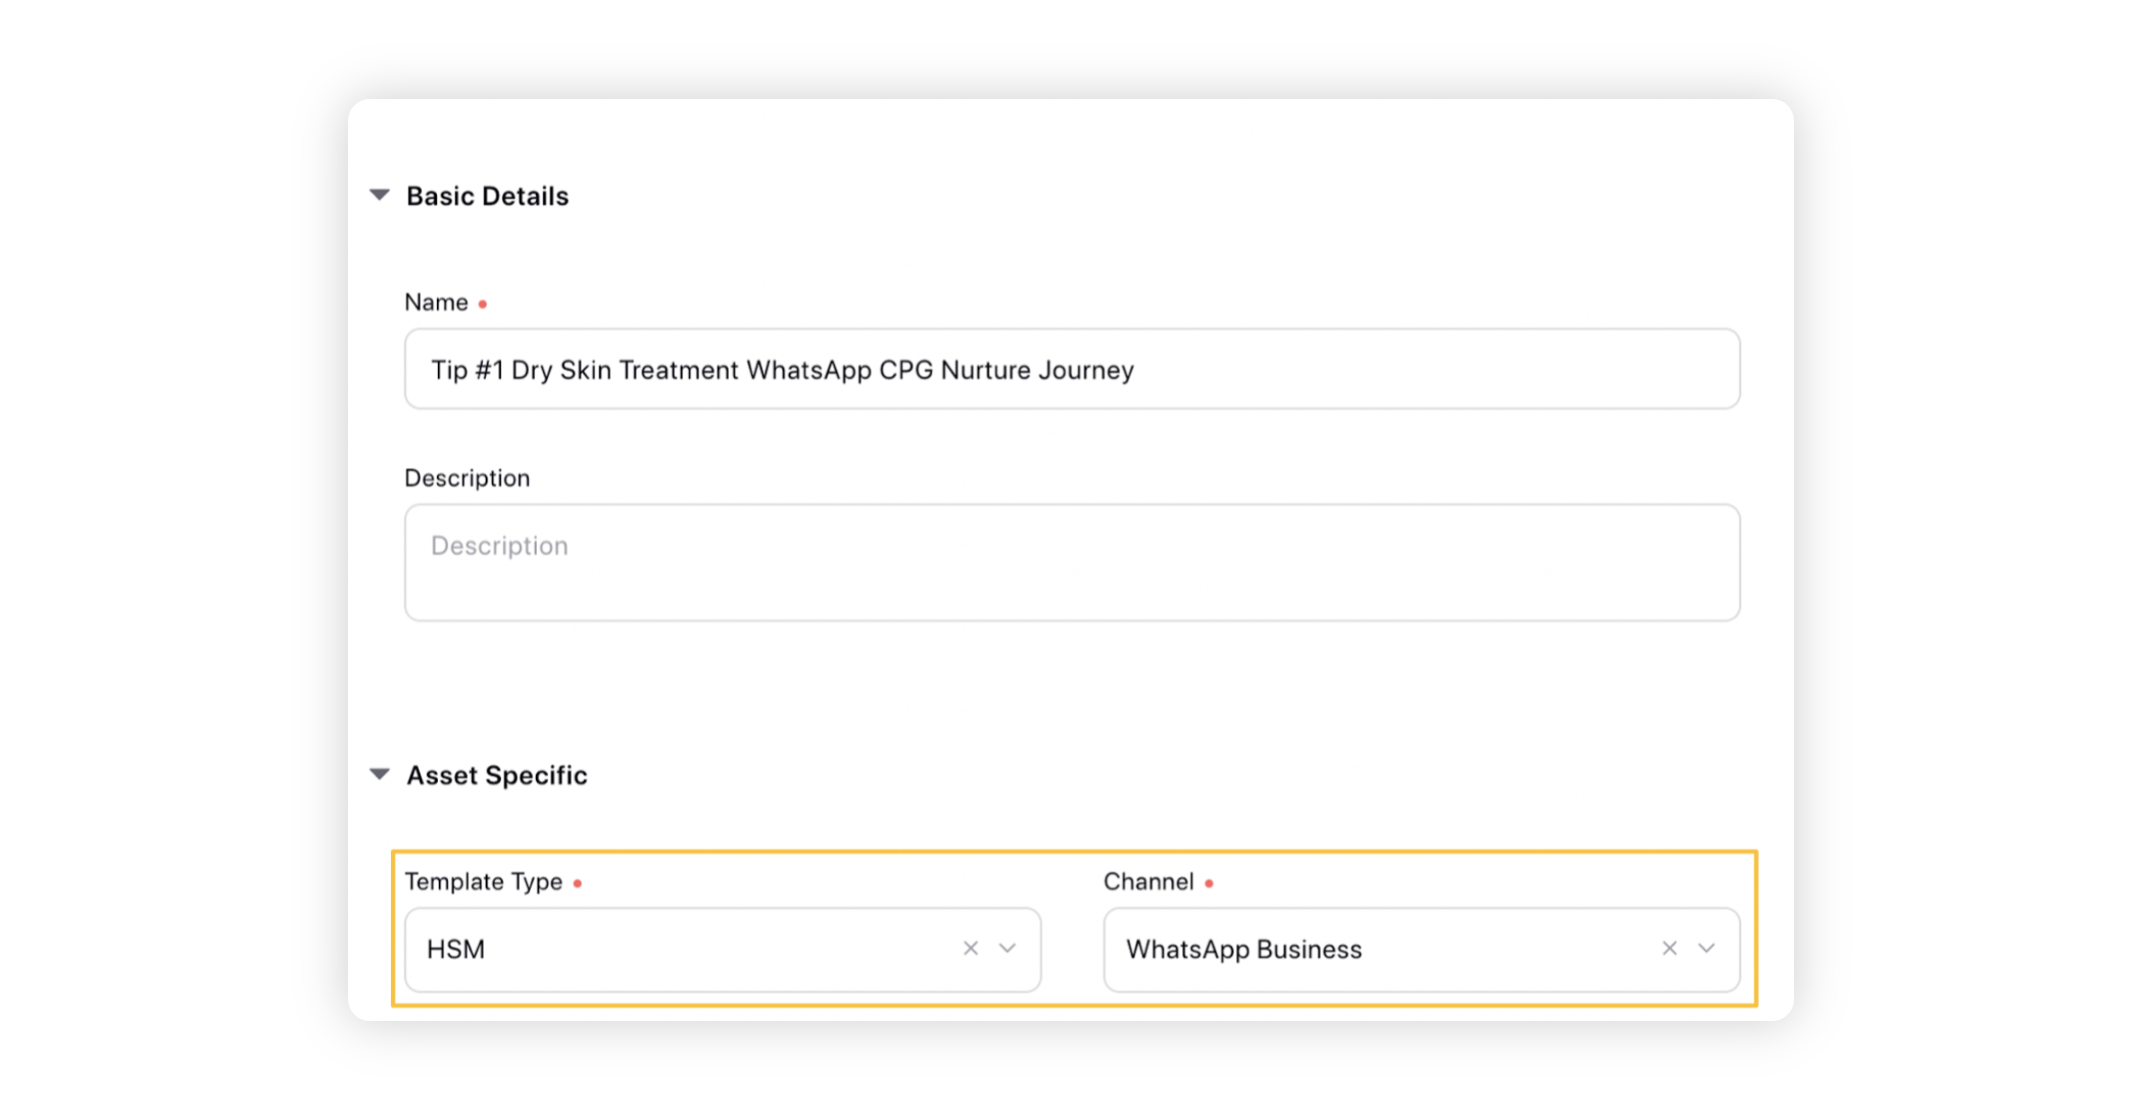
On the Create New Asset window, provide a Name and Description for the asset in the respective fields under the Basic Details section.
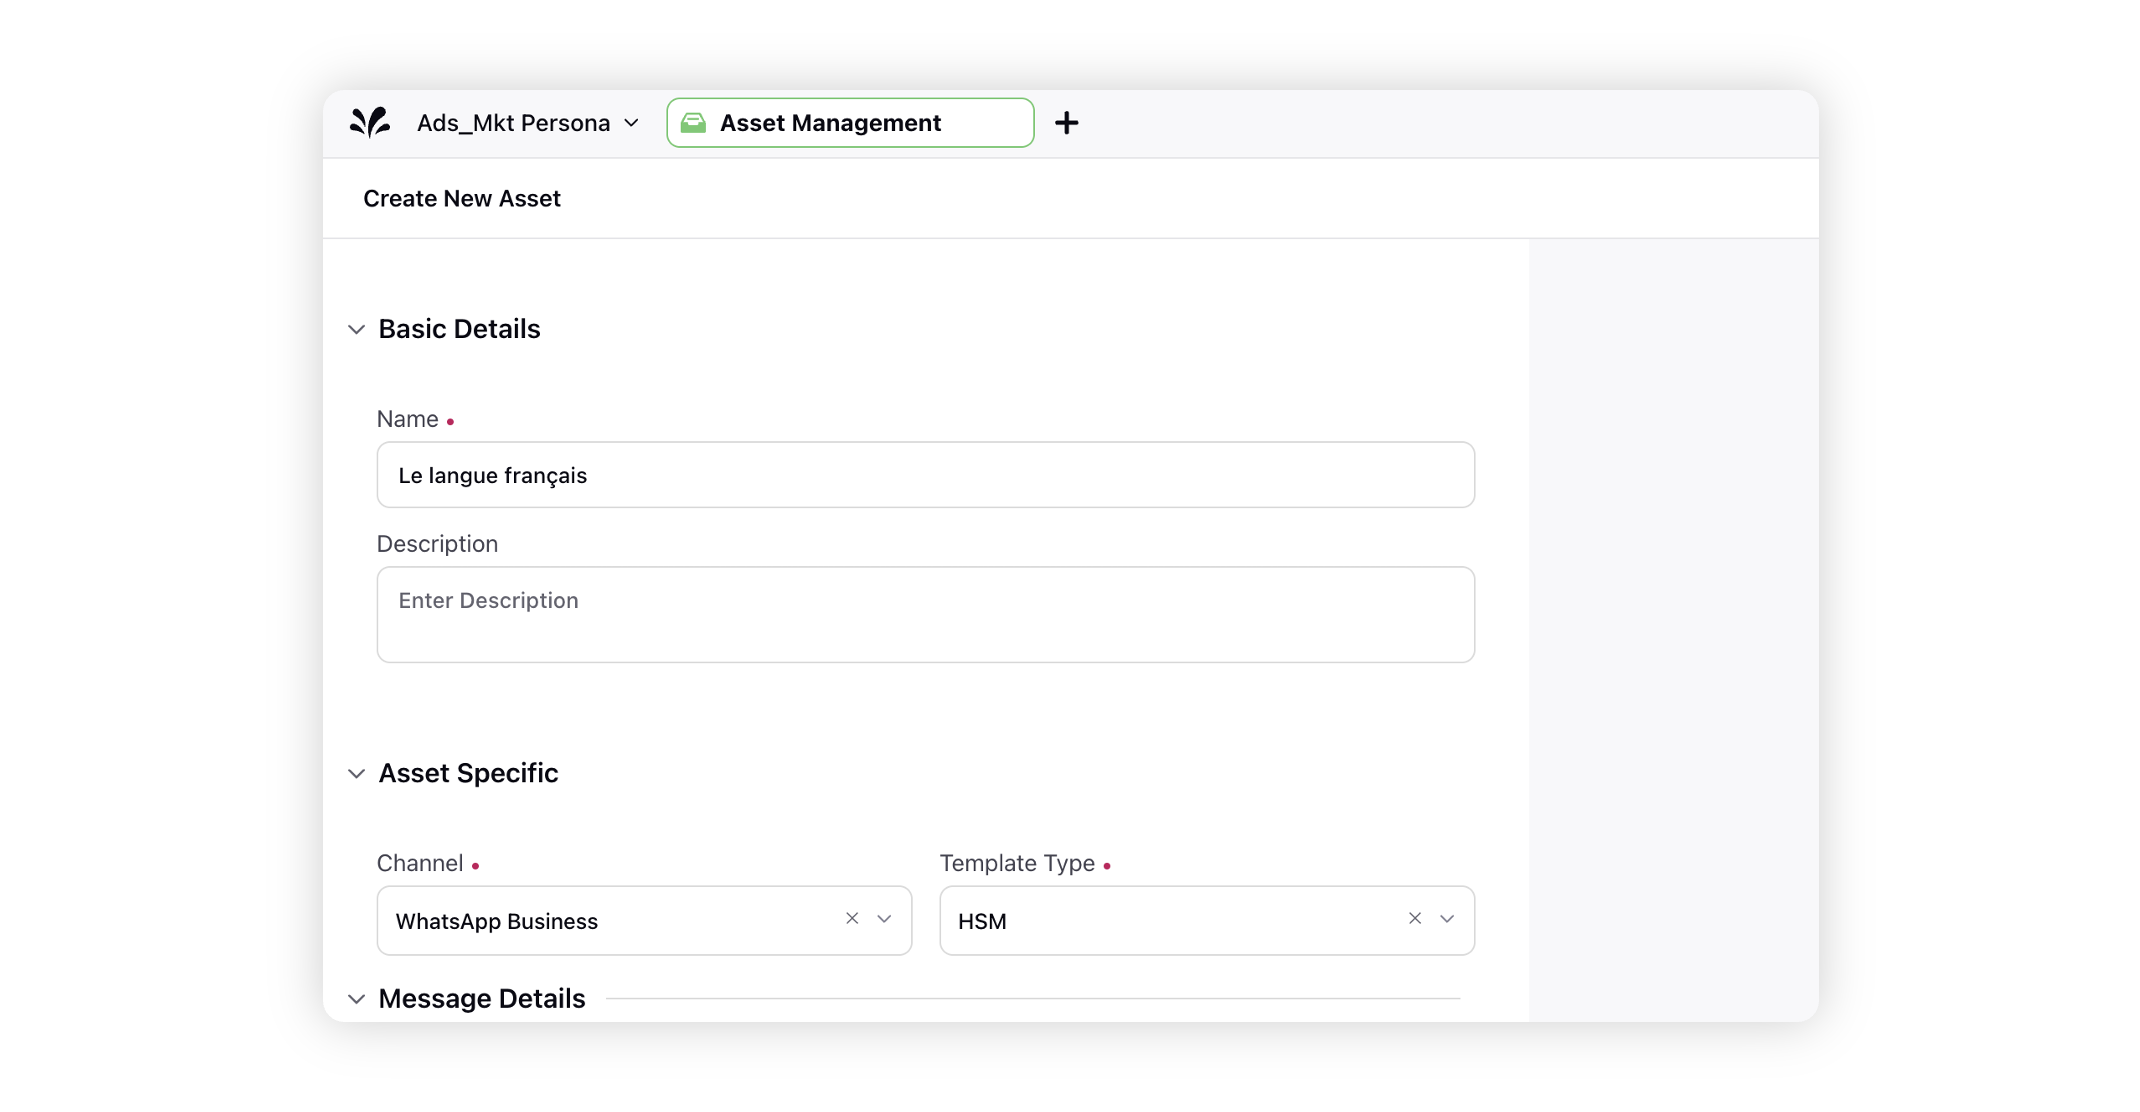
Under the Asset Specific section, select HSM from the Template Type dropdown and WhatsApp Business from the Channel dropdown.
Under the Message Details section, select Image as the Header Type. You can either select the image from SAM, Media Valet or Upload it.
In the Message field, you can enter your text.
In the Footer field which will be shown beneath the message enter the following text:
Type UNSUBSCRIBE to stop receiving further message
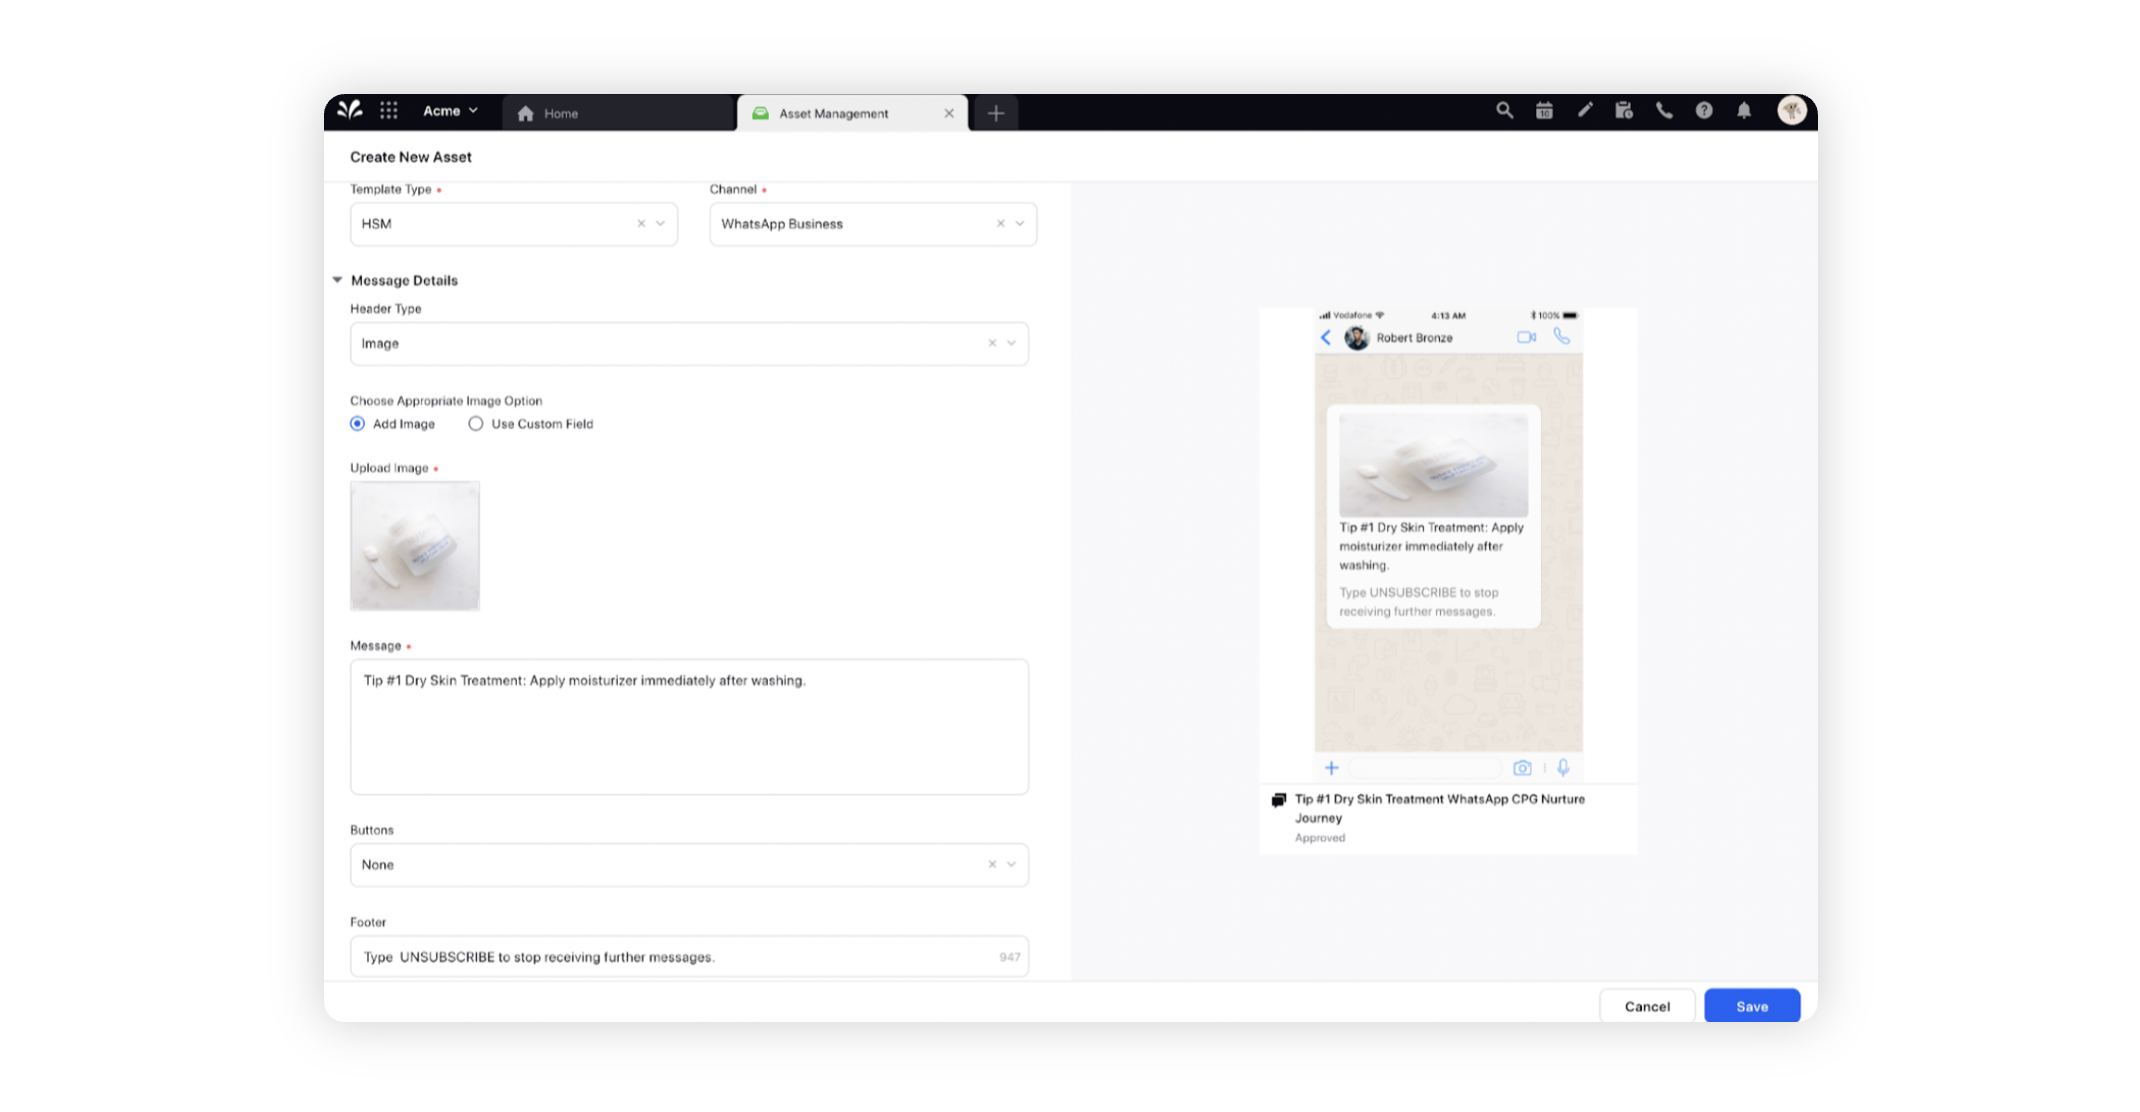
Click Save in the bottom right corner.
Note
|
Tip Develop an internal operational policy for your team members who create journeys to ensure that the same keyword is used consistently by everyone. |
To know more about HSM Template creation for WhatsApp Business, see Create HSM Template for WhatsApp Business.
To build a WhatsApp journey with unsubscribe flow
Sprinklr’s Journey Facilitator helps you create unified, omni-channel customer journeys using a visual, state-of-the-art flow builder. The customer journey flow is the visual representation of the pattern that you are mapping to communicate with the customers across different channels.
Note:
|
Click the New Tab icon. Under the Sprinklr Marketing tab select the Marketing section, then click Journey Facilitator within Publish.
In the top right corner of the Journey Facilitator window, click Create Journey.
Fill in the basic details and settings required to get the journey started. Under the Select Audience section, search and select for the Audience Segment(s) which includes the corresponding profile lists/profiles that are meant to receive the messages.
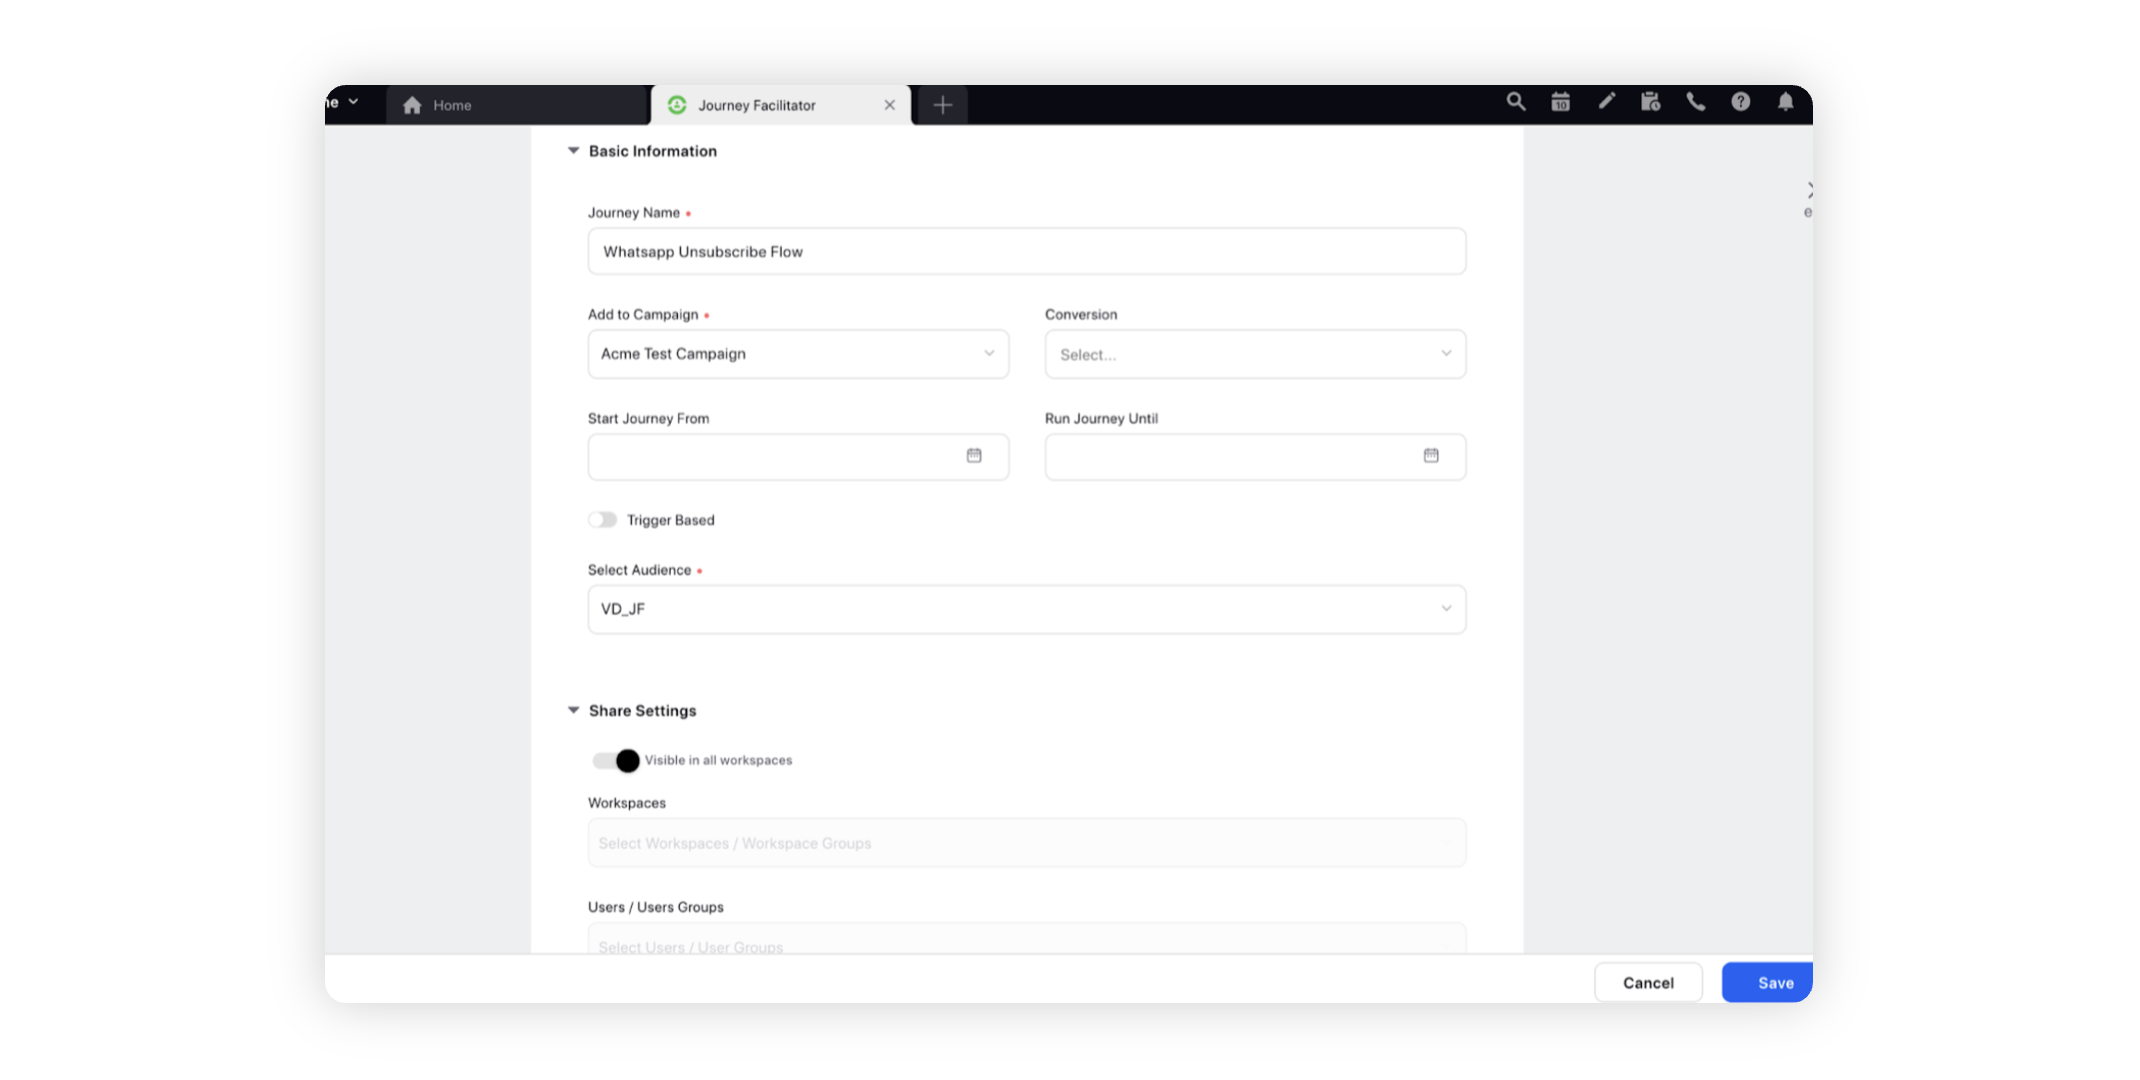
Click Save and proceed. You will be redirected to Journey Builder.
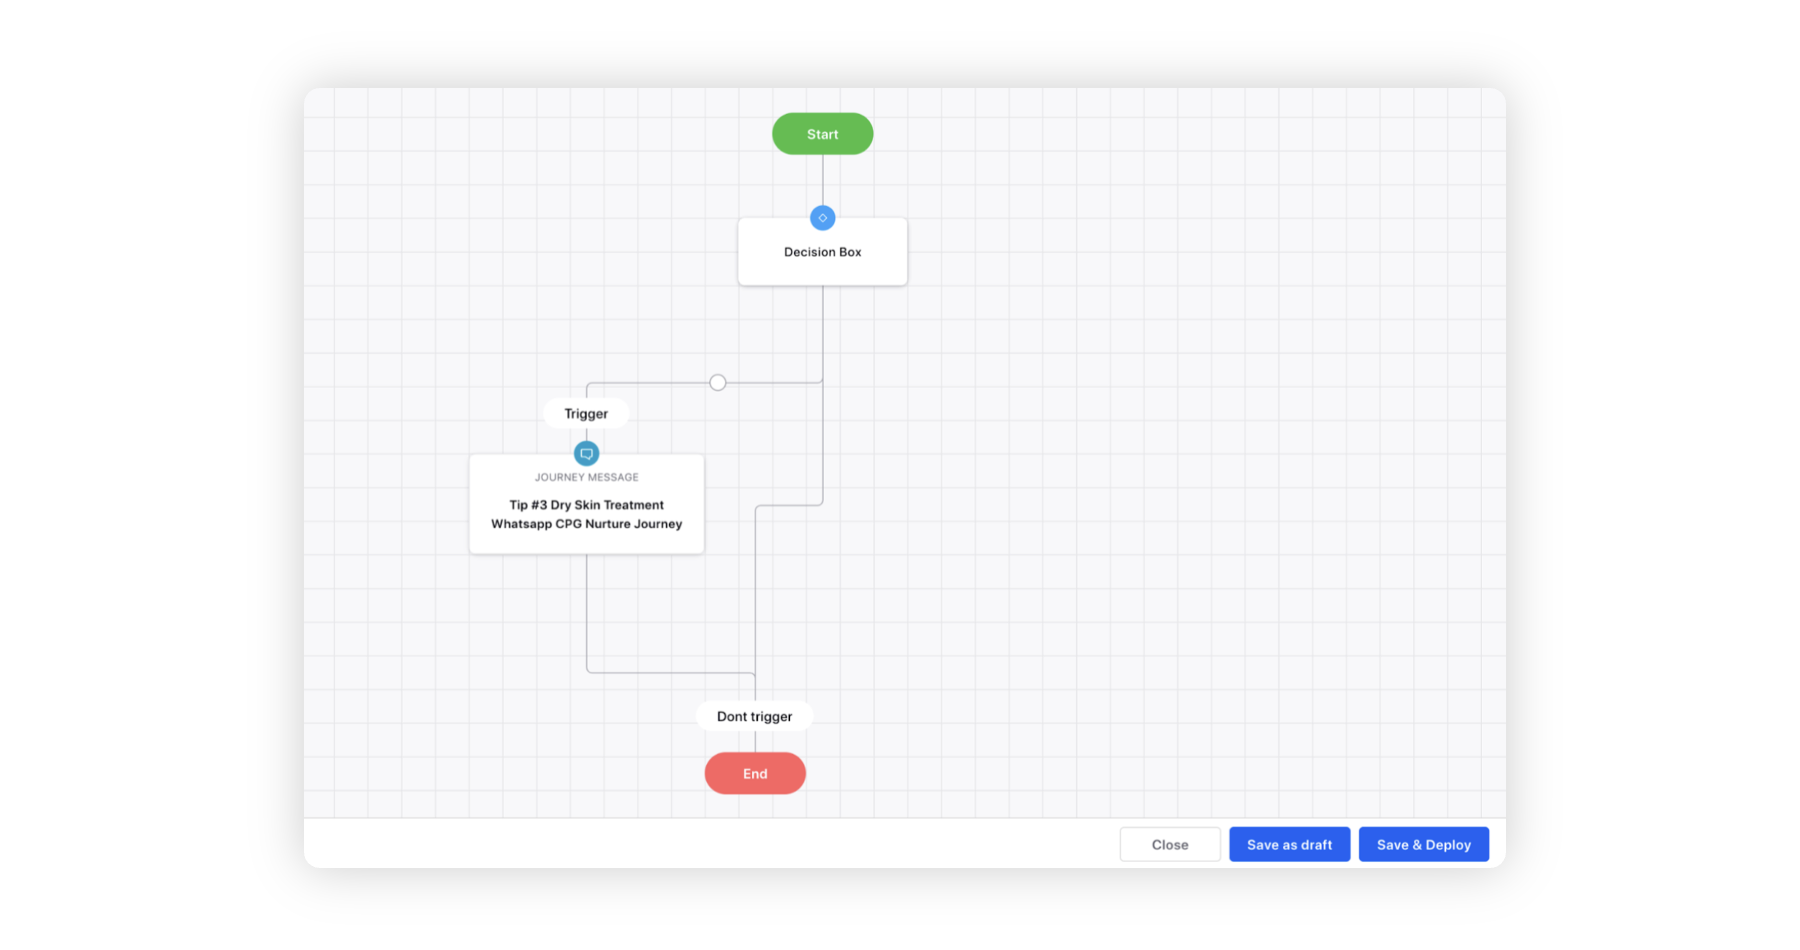
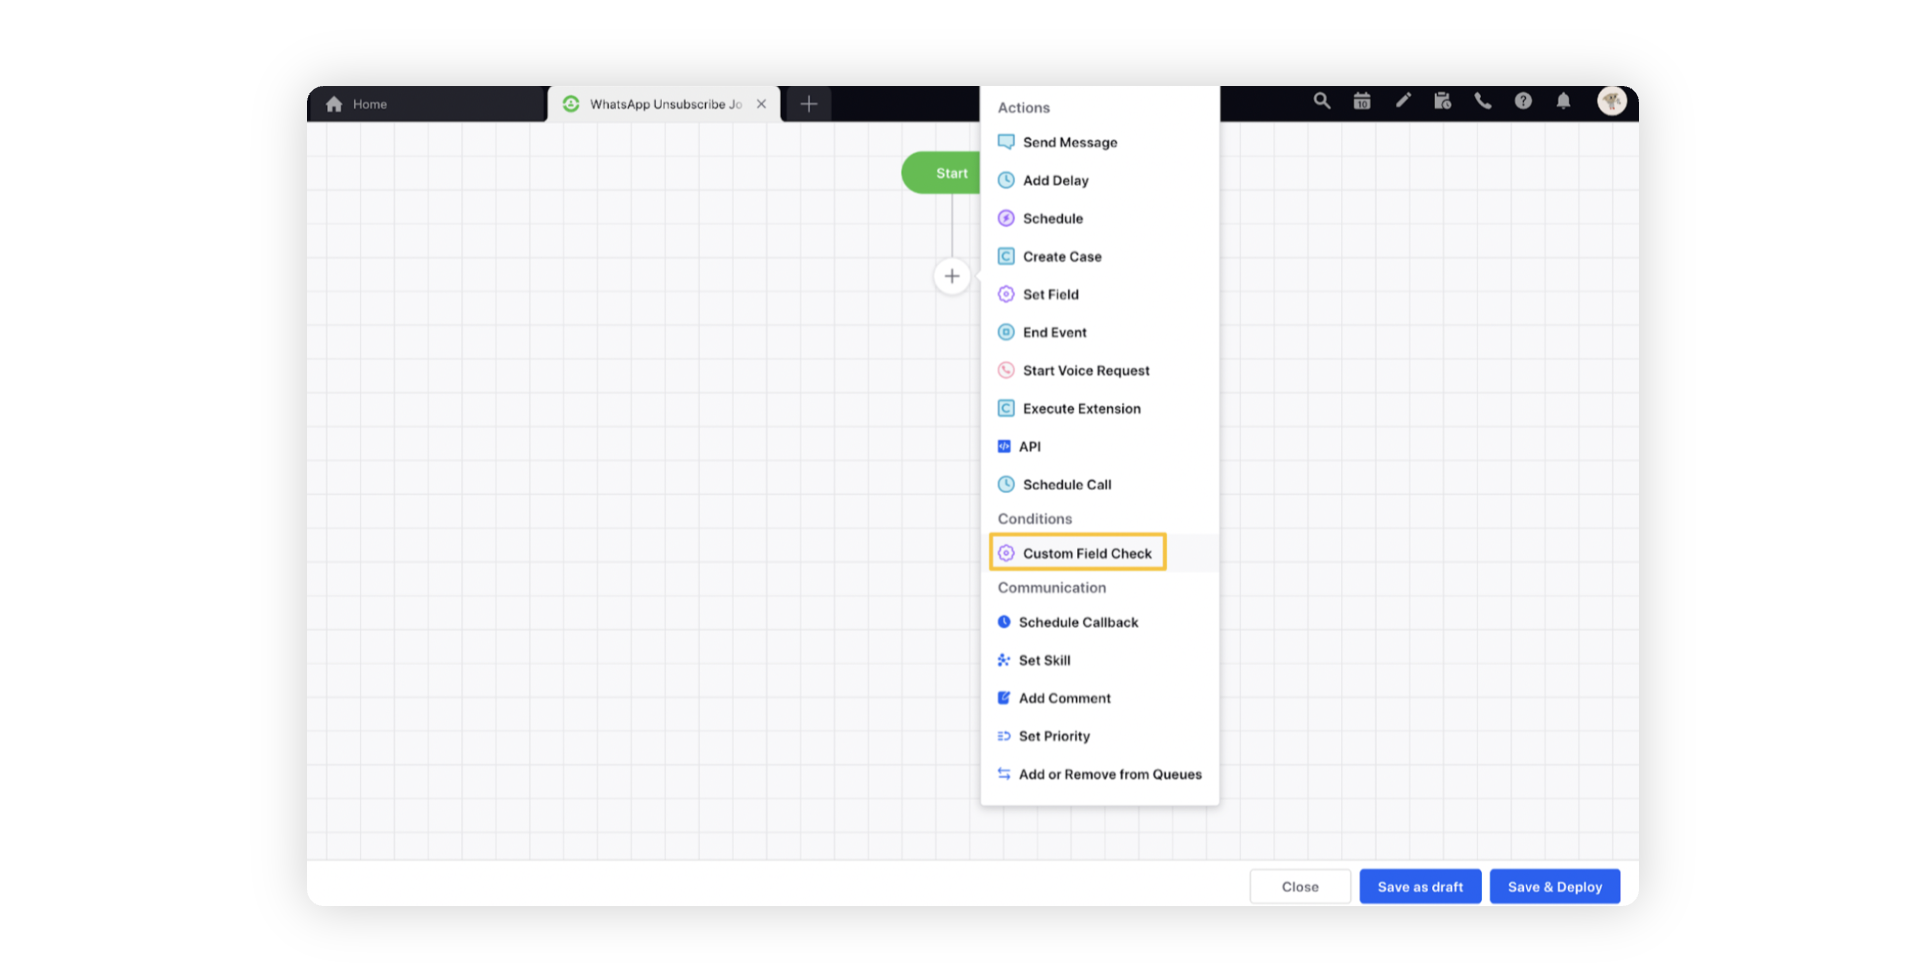
On the Journey Builder window, click the Addition icon and select Custom Field Check as the Condition type.
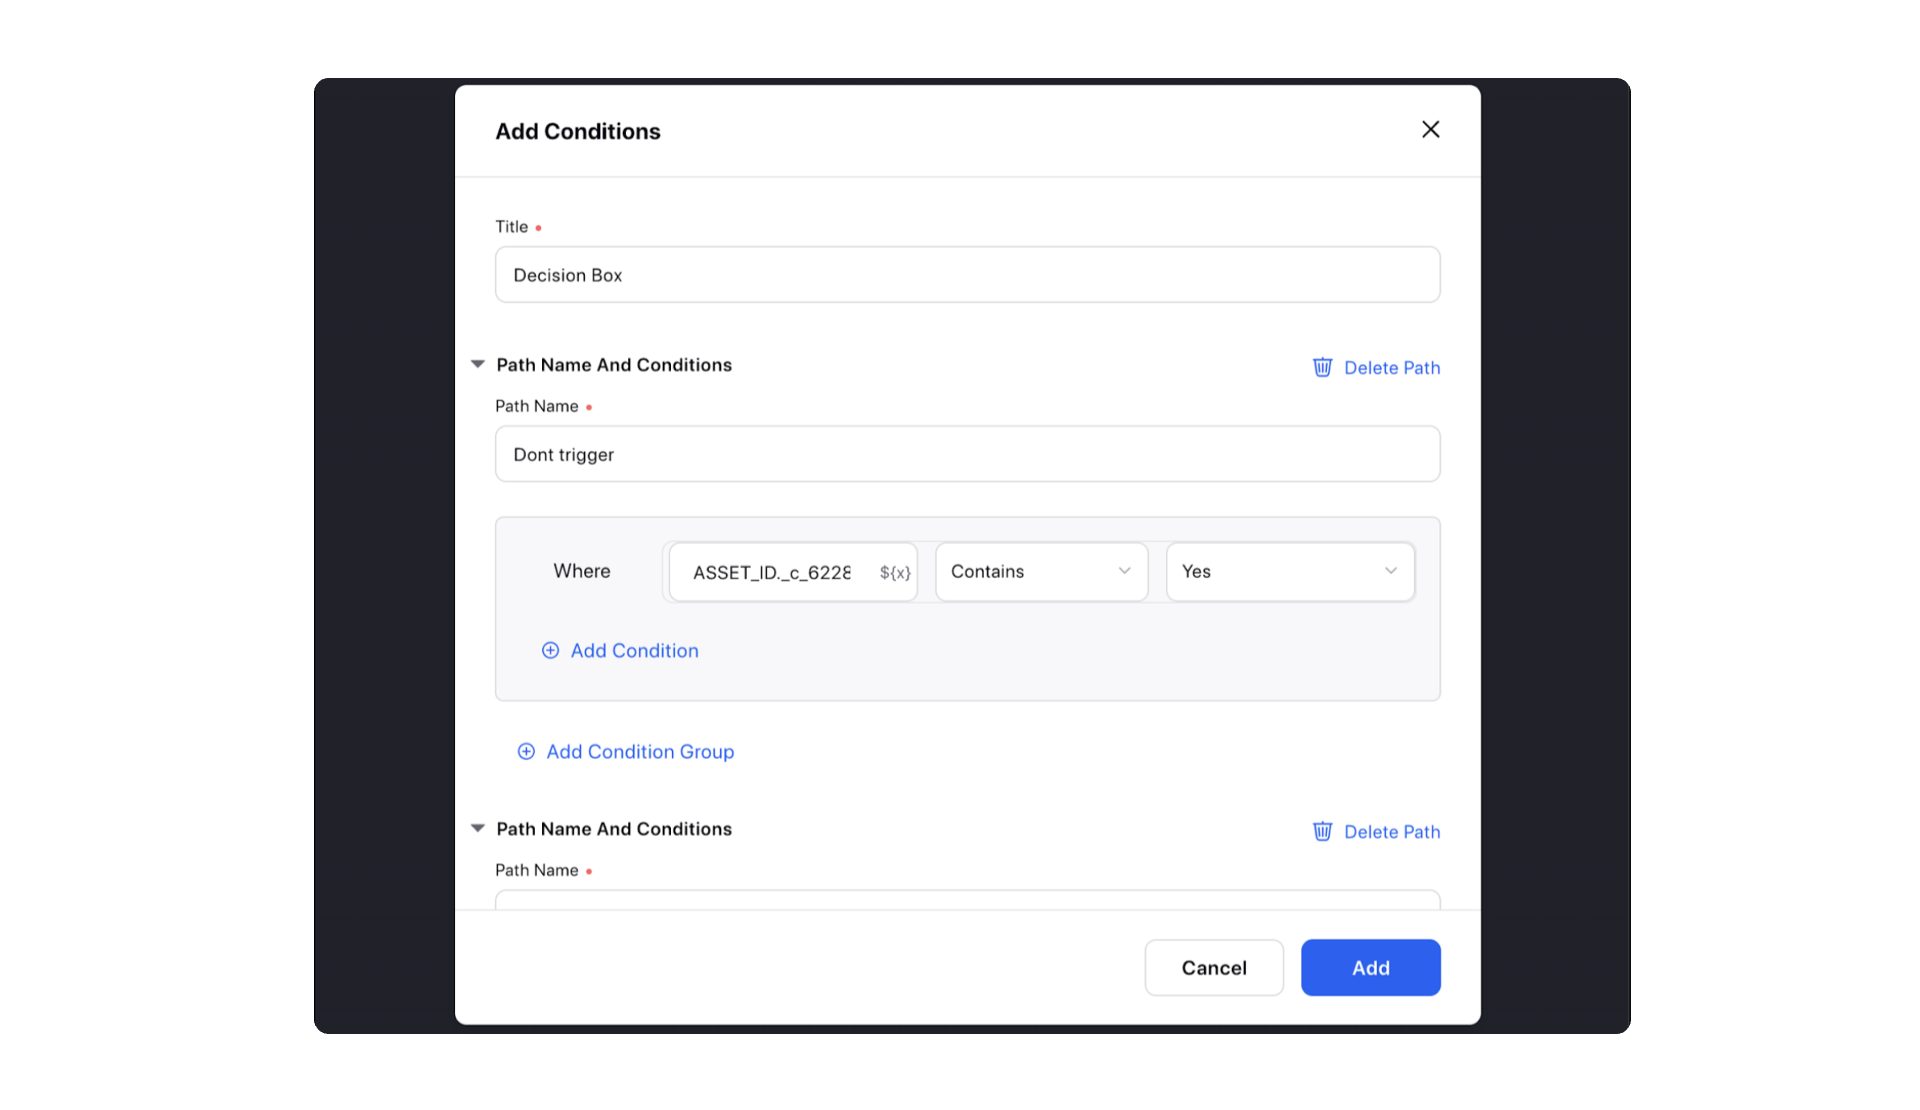
On the Add Conditions pop-up window, provide a Title and set Path Name and Conditions for your journey.
You can create the following paths in the WhatsApp Unsubscribe Flow journey:
Path Name - Do Not Trigger
Enter Value or select from Resources available in the Where dropdown by clicking the ${x} symbol.
Select Containing as the Operator type.
Select Yes from the Value dropdown.
Path Name - Trigger
Enter Value or select from Resources available in the Where dropdown by clicking the ${x} symbol.
Select Not Containing as the Operator type.
Select Yes from the Value dropdow.
Click Add in the bottom corner.
Click the Addition icon on the Trigger path action and select Send Message as the Action type.
On the Select Message pop-up window, search and select the desired message from Add from DAM, Favorites, Add from UGC, Add from URL, Upload Media, and Dynamic Image.
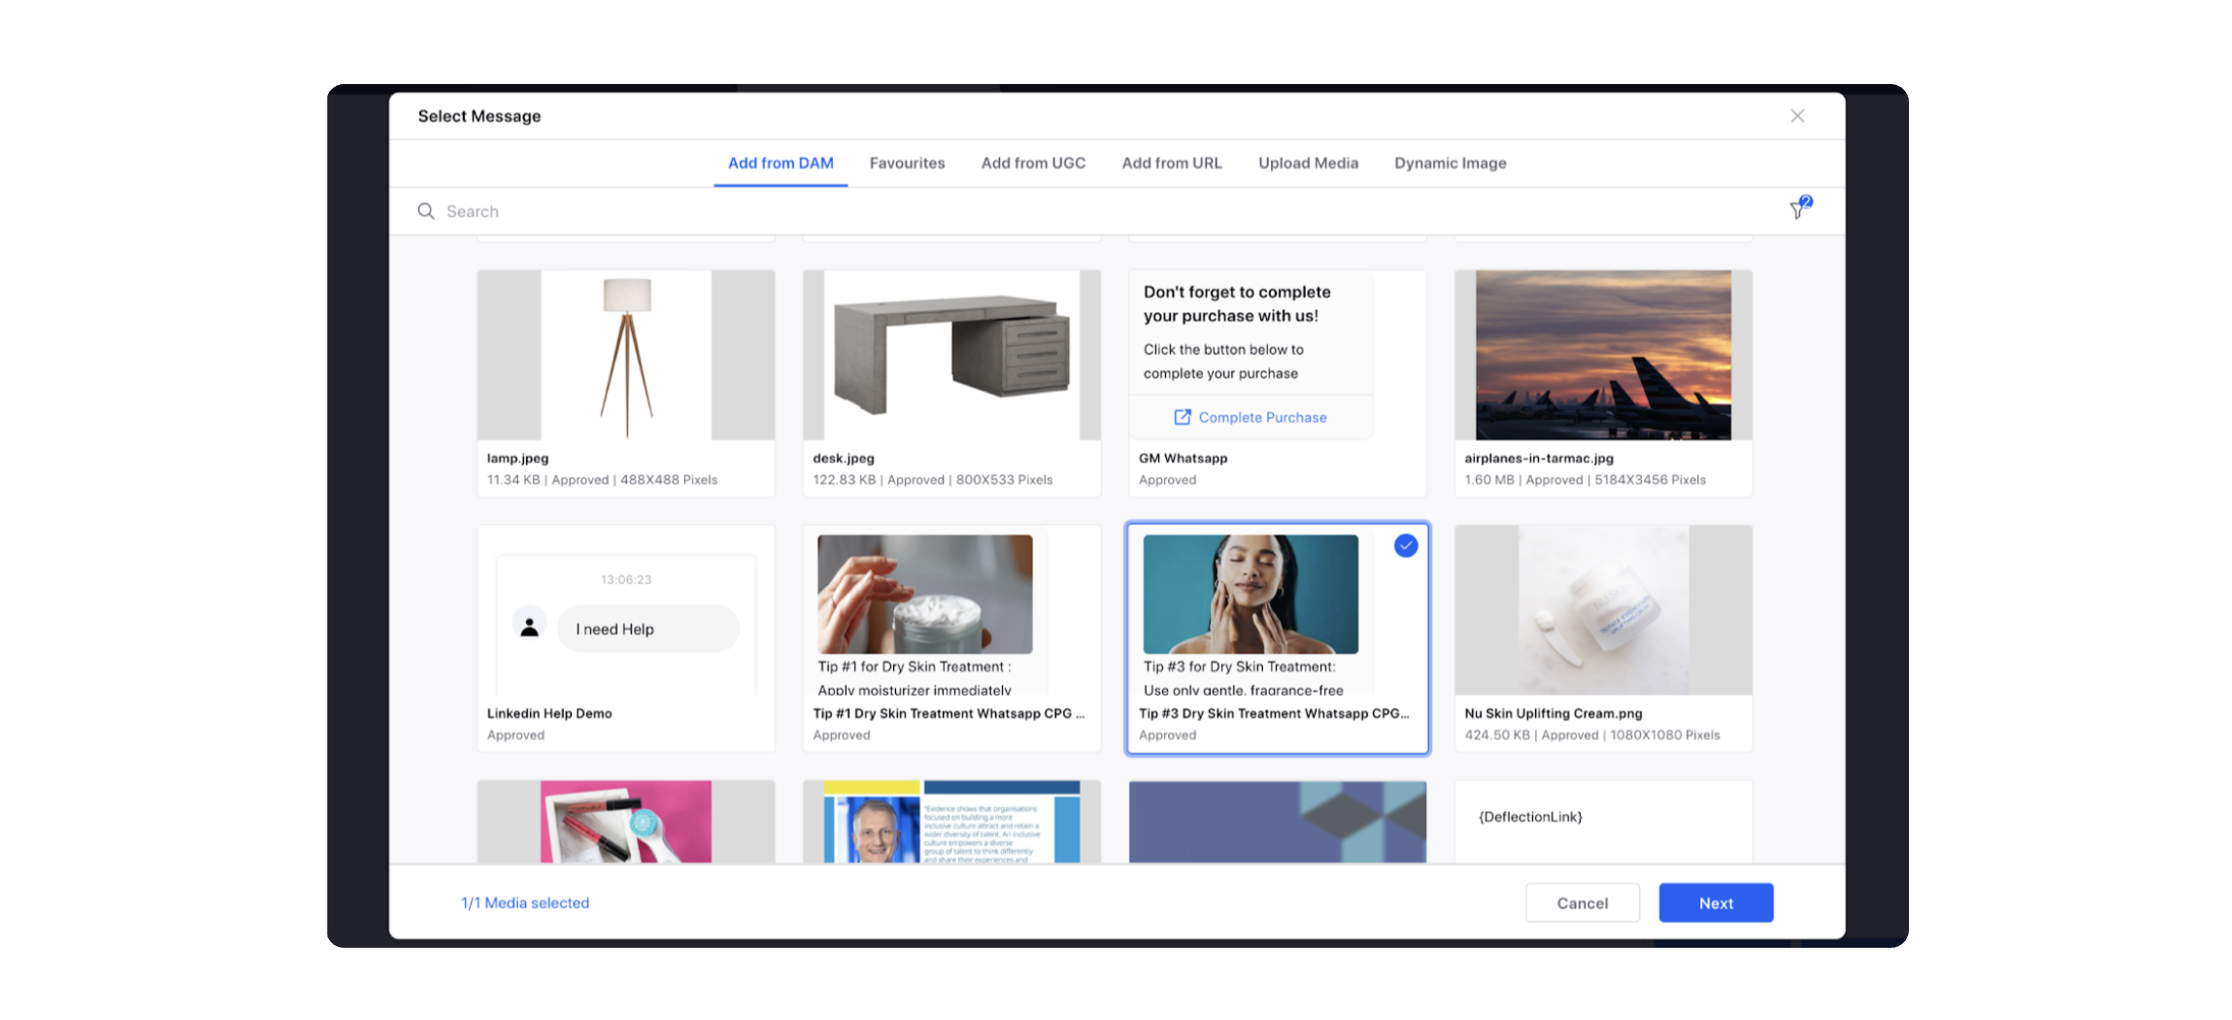
Click Next.
Similarly, click the Addition icon on the Don’t Trigger path action and select End as the Action type.