Publishing on Linkedin
Updated
Sprinklr gives you a smarter way to manage your presence on the world’s largest professional social networking site, LinkedIn. You can leverage your LinkedIn account in the best possible way using Sprinklr's social publishing tool. It allows you to easily schedule and publish content, target a specific audience, and engage with your followers on LinkedIn.
This article describes how to publish to LinkedIn Profile, LinkedIn Company Pages, and LinkedIn Showcase Pages and perform LinkedIn Share Targeting. LinkedIn Showcase pages act similar to LinkedIn Company Pages, and therefore, all the publishing capabilities within Sprinklr for Company pages are true for Showcase pages, too.
Note:
|
To Publish to LinkedIn
Click the New Tab icon
. Under the Sprinklr Social tab, click Quick Publish within Engage.

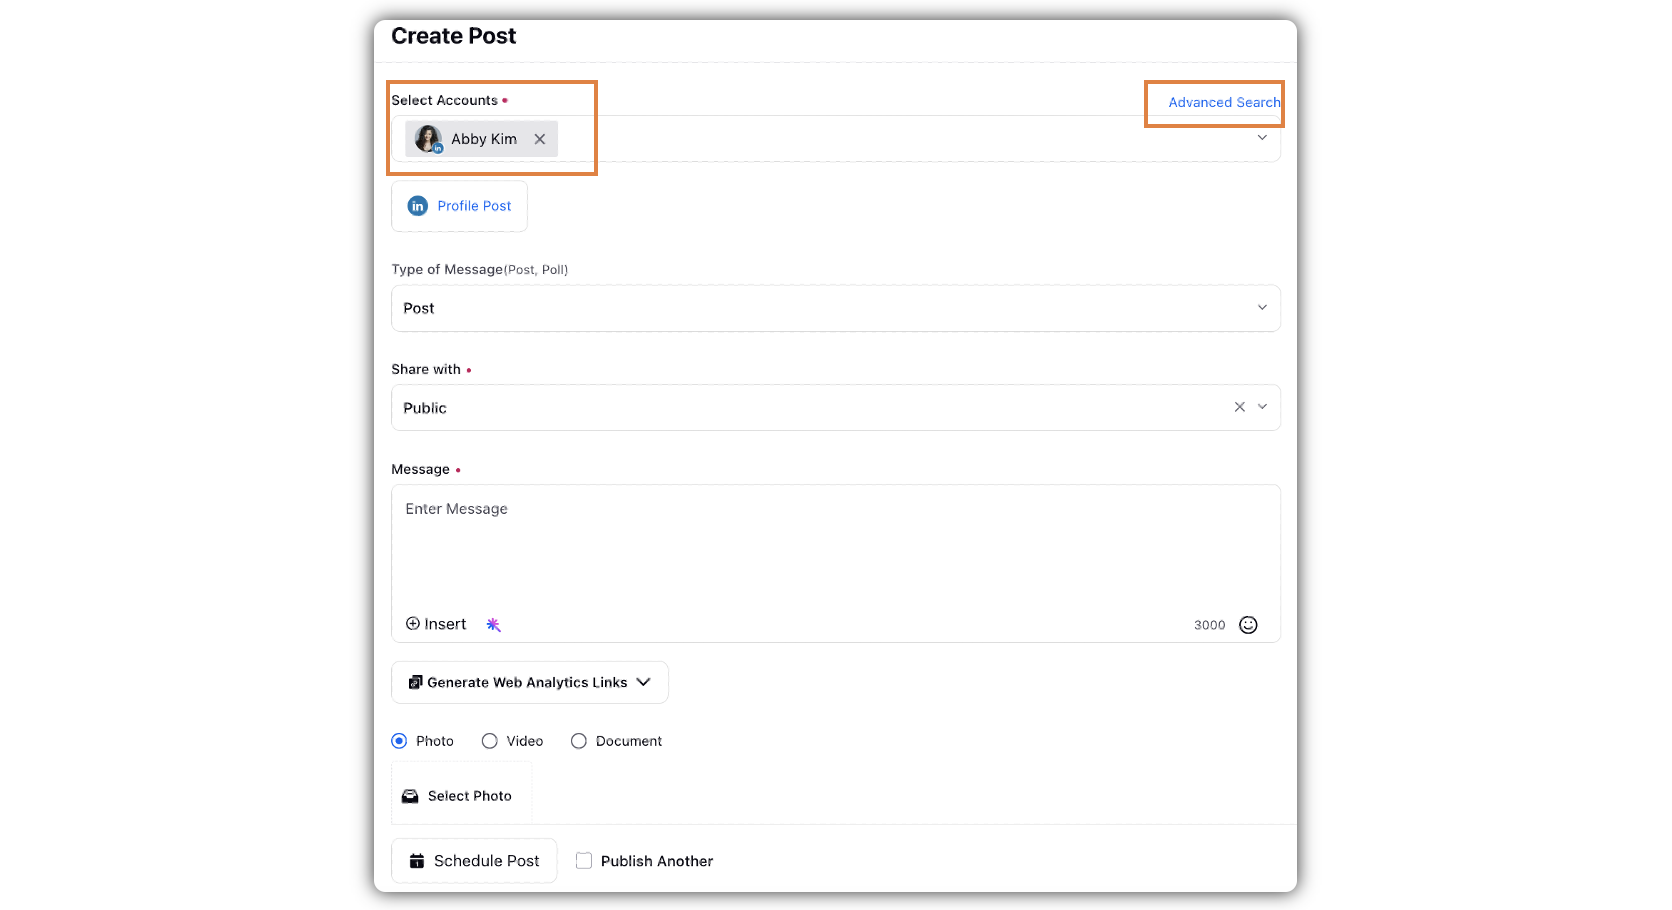
In the Create Post window, search and select the required LinkedIn Profile account(s) / LinkedIn Company account(s) in the Select Accounts field. You can also use Advanced Search to narrow your searches by a series of various filters.

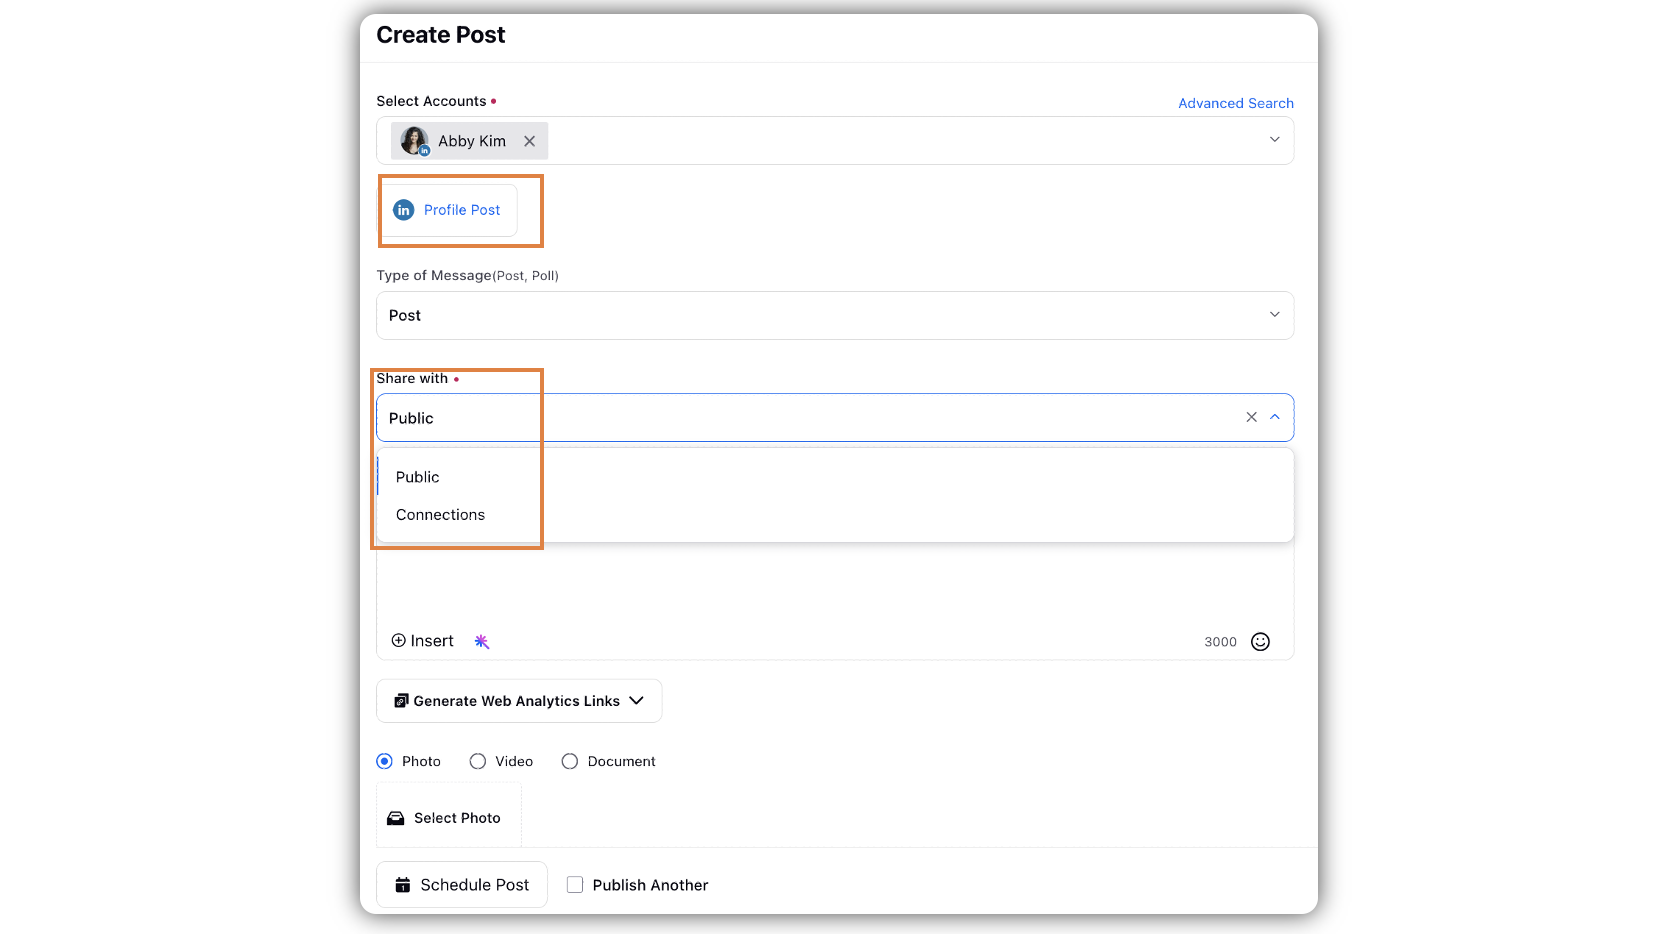
Optional step for LinkedIn Profiles only: Once you have selected the LinkedIn Profile account you would like to publish to, select Share with from the drop-drop menu for Profile Post.

The following options are available:
Public
Connections
Enter the content for the post in the Message box.
For LinkedIn company & profile account, you can @mention LinkedIn accounts in your posts. Type "@" and then begin typing a LinkedIn company account name in the box. You’ll then see a drop-down list of potential company accounts you can mention. Select the desired LinkedIn company account(or profile account) you want from the list and continue typing your message.
Note: For LinkedIn profile accounts, you can only mention those profiles which have prior interaction in Sprinklr.
Additionally, within the Message box, enter # followed by text (example: #flower). Based on the first letter that you enter in the Message box. You will be able to view and select the recently used hashtags under RECENTLY USED.
You can also add Custom Links, Content Placeholders, previously created Text Templates, or YouTube Videos to the post by clicking the Insert icon in the bottom left corner of the Message box.
Click the Emoji Picker icon from the Message box to open the emoji menu. Use the icons at the top to browse categories, or search the emoji. Click your chosen emoji, and it'll be added to your message.
Either — click Photo to add a photo from the Media Uploader (or Upload Photo to select media to upload from your device)
Note: You can publish upto 20 images for a multi-photo post.
To add an alt text for the photo, enter the text in the Write alt text here field. (Alt Text character limit - 4086. Recommended length is less than 120 characters).
After adding the video, you can Add Caption and Change Thumbnail for the video.
Note: The capability to add ot edit thumbnails is permission-controlled. You must have the Update Thumbnail permmission.
Or — click Video to add a photo from the Media Uploader (or Upload Video to select media to upload from your device).
To add a title & description for the video, enter the text in the Write title here... message space alongside to the video.
Check the Add the Call to Action & URL only if you plan to use this post as an Ad later box.
Next, select the Call to Action from the drop-down list and enter the desired Website URL.
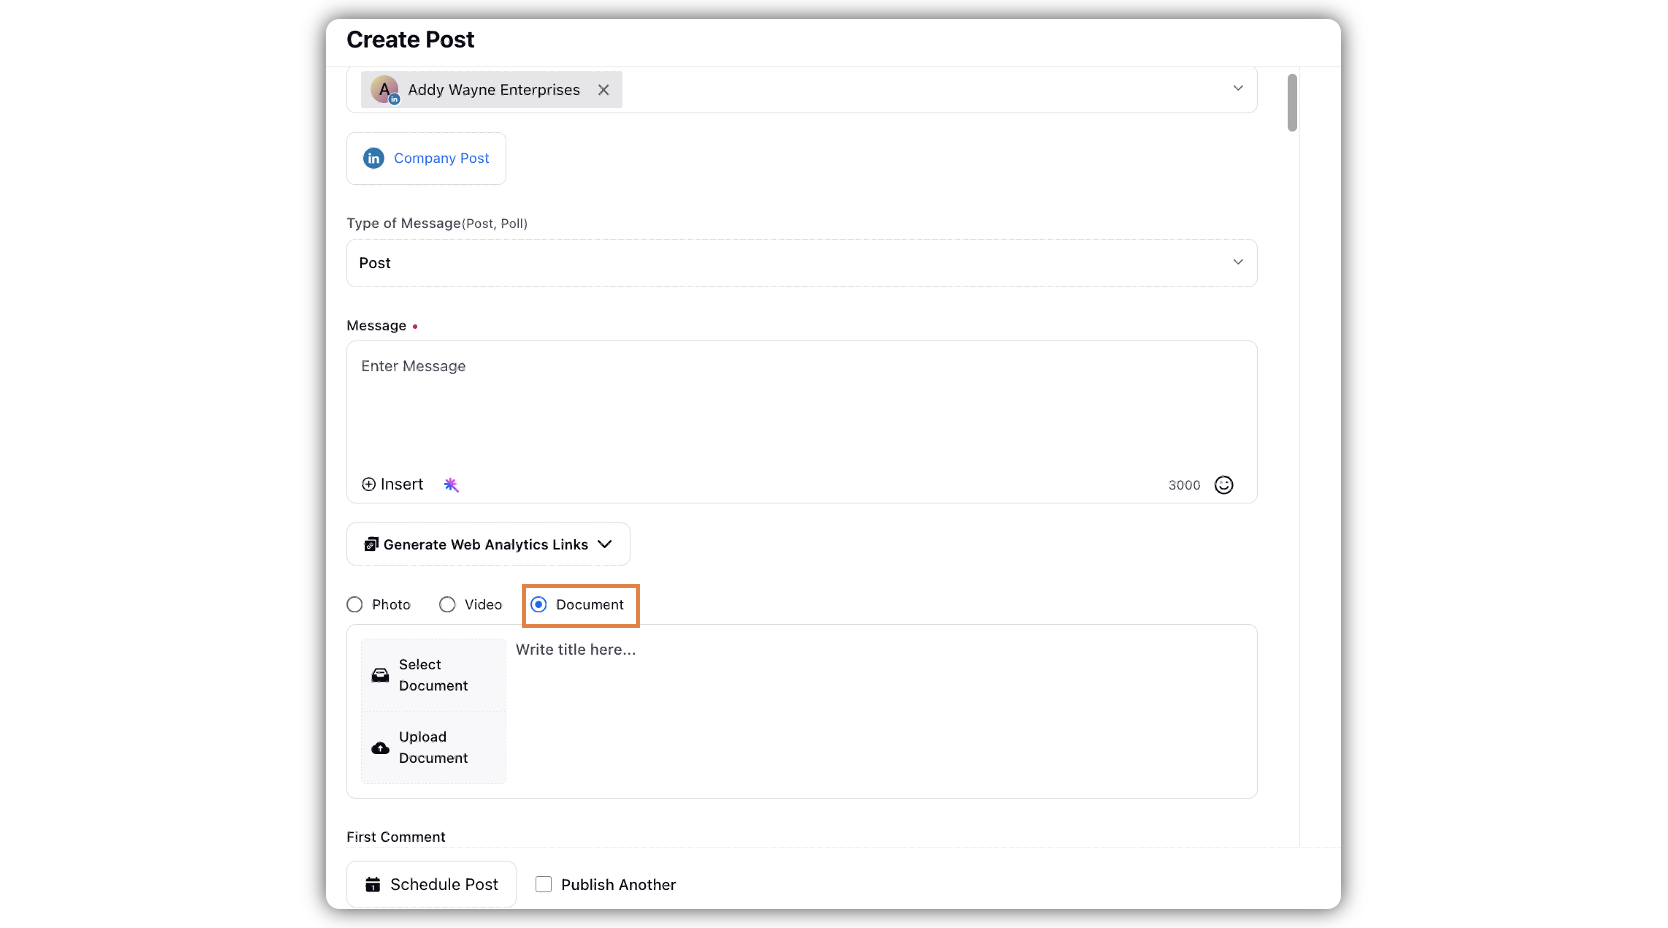
Or - click Document to publish a document in the post. Click Select Document to add the document from the Media Uploader. Click Upload Document to add the document from your device.)
Note: The maximum size limit for each supported file format is as follows:
PDF (Portable Document Format): Maximum size allowed is 100 MB (Maximum 300 pages).
PPT/PPTX (Microsoft PowerPoint Presentation): Maximum size allowed is 100 MB (Maximum 300 pages).
DOC/DOCX (Microsoft Word Document): Maximum size allowed is 100 MB (Maximum 300 pages).

Note: After you have uploaded the document, you can make changes to the post content, but the document cannot be edited.
Under First Comment, enter the comment(may include links, names, promotional content, etc.).

Click Add Targeting to target your followers.
Note: If you have enabled Add Targeting, you need to disable First Comment. Otherwise, it will show an error message. You can choose between these options.
Select a campaign from the Campaign and Sub-Campaign drop-down menu to associate your post with. You can also set your campaign as default by clicking Set as Default.
You can select URL Shortener to shorten every link that you paste into your message. This helps you make the most of the character limit. Similarly, you can select Tags and Social Bars from the drop-down menu.
Apply the desired Properties to the post.
Under Approval, set an Approval Type for your post. You can also add an Approval Note.
Optional Step: The preview of the post will render on the right pane. Also, you can click the Preview icon in the bottom left corner if you have minimized the Create Post window.
Click Post in the bottom right corner to publish the post on the selected LinkedIn account immediately. If you are not ready to publish and want to save your post as a draft, click Save as Draft.
You can also schedule your post for a future date and time by clicking the Schedule Post in the bottom left corner. Select the month, date, and time of publishing. Click Apply to save your changes.
Optional Step: To continue publishing the post, check the given Publish Another box at the bottom left corner.
To Add Caption to the Video
After you've selected a video, click the Options icon
in the top right corner of the video and select Add Captions.
In the Add Video Captions pop-up window, click Add New Language and search your desired language from the drop-down menu.
Next, click Add Captions file here alongside the desired language to upload the subtitles for the video.
Click Save in the bottom right corner of the Add Video Captions pop-up window.
To Change Thumbnail of the Video
After you've selected a video, click the Options icon
in the top right corner of the video and select Change Thumbnail.
In the Media Uploader window, select the Prominent Frame for the video.
Click Use this frame in the bottom right corner of the Media Uploader window.
LinkedIn Share Targeting
LinkedIn Share Targeting enables you to specify an audience to broadcast your post. You can segment your target audience by location, industry, etc. For each target, you may specify values to limit the distribution of the share to members matching that target within the category.
Note:
|
After clicking Add Targeting, either click Select from Saved Target Audiences to select a pre-existing Audience Targeting asset. Or else, click Create New Audience to create a new preferred audience.
Select from Saved Target Audiences in the top left corner of the Target Audience window, to choose a saved target audience. From the list of the saved audience in the Target Audience window, check the audience you want to target and click Add Selected in the bottom right corner of the Target Audience window to add the target audience for your post.
To create a new audience select Create new Audience in the top right corner of the Target Audience window. You are required to fill the following fields:
Fields
Description
Function
Select a function(s) from the drop-down list.
Location
Search and select the regions from the drop-down list. Note that Geography is deprecated. The Location will enable customers to target millions of new geolocations, including counties and cities, providing a more comprehensive and accurate geo-targeting experience.
Industry
Search and select the industries from the drop-down list.
Language
Search and select the languages from the drop-down list.
Seniority
Select job seniority(s) from the drop-down list.
Company Size
Select a company size(s) from the drop-down list.
Save this Target Audience for Future
Check the box to save created target audience for the future.
Once you have entered all the required fields, click Set Target Audience in the bottom right corner to confirm your audience.