Assignment Engine Details
Updated
The Assignment Engine is used to assign incoming cases or messages to specific teams or agents based on various criteria, such as language, priority, or customer profile. This feature is useful for optimizing case management workflows and ensuring that cases are assigned to the most appropriate team or agent based on their availability and skillset.
![]() Note: The Rule Engine and the Assignment Engine are legacy techniques for assigning cases to the agents.
Note: The Rule Engine and the Assignment Engine are legacy techniques for assigning cases to the agents.
Assignment Enginve V/S Rule Engine
Instead of using the Rule Engine to assign messages or cases to the agents, now you can assign messages to agents through the Assignment Engine. When a message or case comes in, it is put into a work queue. Then, through Rule Engine action, the work queue is assigned to the agents. Assignment Engine makes it easier to assign messages to all the agents through the work queue. Now all agents can have a distributed workload and work more efficiently and effectively.
On the other hand, the Rule Engine is a more flexible and customizable feature that allows users to set up rules and conditions for automating workflows. The Rule Engine can be used to automatically assign cases or messages, but it can also be used for other types of automation, such as sending automated responses, creating alerts, or initiating other types of actions based on specific conditions or events.
Overall, while both the Assignment Engine and Rule Engine are used for managing cases and messages, they serve different purposes. The Assignment Engine is primarily used for automating case assignment workflows, while the Rule Engine is a more flexible and customizable feature that can be used for a variety of automation workflows.
How does Assignment Engine assign Cases?
When a message comes from a new customer, the assignment engine follows some criteria to assign the agents. A new customer is when A customer who has never messaged and is messaging for the first time or a customer who has sent a message after the expiration of Stickiness Time Out.
Note Stickiness Time Out is the time limit that you set in your work queue for agents to respond to a new message or a follow-up message. In other words, the message and the follow-up messages are stuck to one agent until the Stickiness Wait Time Out expires. This helps the agents to have the background information of a follow-up message and respond more efficiently and effectively. |
Here are the criteria for assigning messages or cases to the agents:
Criteria | Agent Assigned | |
When one agent has the least workload | The agent with the least number of messages is assigned the new message. | |
When two or more agent has spare capacity but has an equal current load | The agent who hasn't been unassigned or assigned a message for the longest is assigned the new message. For example, if an agent was unassigned a message at 9.00 a.m and another agent was unassigned a message at 11.00 a.m, then, the agent who got done at 9.00 a.m will be assigned the new message. | |
When all agents in the work queue are busy | The message will wait in the work queue and is assigned when an agent gets free OR if you configure Assign Backups in the Work Queue, the message is assigned to the backup agent.
|
When a follow-up message comes from an old customer, the assignment engine follows some criteria to assign the agents. An old customer means:
A customer whose previous message was assigned within the stickiness wait timeout.
Criteria for assigning messages or cases to the agents
Criteria | Agent Assigned |
When the checkbox is unchecked to consider an assignee's capacity when assigning inside the stickiness timeout limit | |
When a follow-up message comes, and the agent who was assigned the previous message has spare capacity | The follow-up message is assigned to the same agent who was assigned the previous message. |
When a follow-up message comes and the agent who was assigned the previous message has full capacity. | The follow-up message is assigned to the same agent who was assigned the previous message irrespective of his capacity status. |
When the checkbox is checked to consider an assignee's capacity when assigning inside the stickiness timeout limit | ||
When a follow-up message comes outside "Active Conversation Time" and the agent who was assigned the previous message has spare capacity | The follow-up message is assigned to the same agent who was assigned the previous message and overrides the "Active Conversation Time" criteria. | |
When a follow-up message comes outside "Active Conversation Time" and the agent who was assigned the previous message has full capacity | The follow-up message will wait in the holding queue of the same agent who was assigned the previous message for a defined amount of time. If the agent gets free within the defined time, he is assigned the message, or else, it is assigned to the next available agent.
| |
When a follow-up message comes inside "Active Conversation Time" and the agent who was assigned the previous message has spare capacity | The follow-up message is assigned to the same agent who was assigned the previous message. | |
When a follow-up message comes inside "Active Conversation Time" and the agent who was assigned the previous message has full capacity | The follow-up message is assigned to the same agent who was assigned the previous message irrespective of his capacity status. | |
When a follow-up message comes outside "Stickiness Wait Time Out" and the agent has full capacity. | This message is NOT considered as a follow-up message as it is outside the "Stickiness Wait Time Out" and is treated as a new message. | |
To Add a work Queue
Under the Sprinklr Service tab, select Assignment Engine within Route.
On the Assignment Engine window, select Skill Based Routing or Queue Based Routing from the dropdown in the top left corner.
On the next window, click Add Work Queue in the top right corner and select Work Queue Type as either Message, Case, or Task.
On the New Message/Case/Task Work Queue window, enter the configuration details. For more information, see New Message/Case/Task Work Queue — Field Descriptions.
After creating a work queue, on the Assignment Engine window, double-click the work queue to open the details in the third pane. Here, you can see pending and in-progress messages/cases in that particular queue, the assignment failures, and all the assignees in alphabetical order. These pending and in-progress cases/messages can be clicked which will open an extended pane along with the opened third pane where you will be able to take actions.
You can also filter the assignees based on their availability status. You can select multiple statuses.
New Message/Case/Task Work Queue - Field Descriptions
Terms | Description | |||||||
Work Queue Name | Enter the work queue name. The work queue name is the name or label of the work queue. The work queue is a queue that holds messages or cases for assignment. Assignees are configured for a work queue. | |||||||
Select assignees | Select assignees from User or User Groups who will take messages from this work queue. This is used to configure which users/user groups should get the message or case from the work queue in question. | |||||||
Define Capacity of each assignee (only for Queue based) | Enter the capacity of how many messages each assignee can work at once. The recommended capacity is 3 per assignee. | |||||||
Select the status when assignees should be available | Select status so that the agents are assigned the work accordingly. For example, if an agent's status is "Offline" and another agent's status is "Available", then the agent with "Available" status is assigned. | |||||||
Sort Works By | Select to assign the messages/cases on the basis of - Work Queue Assignment Time - To assign the messages/cases based on the time when they were first added to the work queue. - Last Unresponded Fan Message Time (Only for Cases) - To assign the cases based on the last unresponded fan message time. | |||||||
Stickiness Timeout | Select the number of Minutes, Hours, Days, Weeks, Months, Years. After every message or case, the next message or case within the stickiness timeout is considered as a follow-up message or case and is assigned to the same agent. | |||||||
Consider assignee's capacity when assigning inside the stickiness timeout limit? | Check the check-box to consider an assignee's capacity.
| |||||||
Select rules to execute when work is assigned | Select rules which should work on the message after it is assigned. | |||||||
Business Hours | Set business hours for wait time calculation. For example, if you set business hours as "India Business Hours IST (9am-7pm)" and your customer sends a message out of business hours then a notification with the expected wait time will be sent to the customer. | |||||||
Workspaces | Select the desired workspaces/workspace groups in which the work queue will be visible. | |||||||
Users/User Groups | Select the desired users/user groups with whom the work queue will be shared. | |||||||
Assign Backups (only for Queue based) | Select a queue for which the primary queue (added above) will act as a backup, i.e assignees from the primary queue will work on the selected queue when the backlog of the primary queue is zero. | |||||||
Header backup assignment order (only for Queue based) | If there are two backup queues and the order is selected as manual order then messages or cases from the first backup queue will be first assigned to the user. if the order is selected as fifo then the assignment will be based on the creation time of case. | |||||||
Add Backup Queue (only for Queue based) | Click to expand. Select Queue: Select a backup queue from the dropdown. You can add multiple queues. So, when there are no pending cases in the primary queue (added above), the cases from these queues will be assigned. Select Assignees: Select assignees from the dropdown. These users should be the part of Primary Queue. | |||||||
Advanced Configuration (only for Queue based) | Set the desired limit to the total number of messages in the waiting queue that comes in on a daily basis. You can also set the limit depending upon the channel the messages are coming in. Also, the priority of the messages can be changed as per the time the messages are coming in the queue so that no messages go unseen or un-replied. User Filters: Use filters as desired to limit the number of messages in the work queue. User Sorts: Sort messages/cases in ascending or descending order |
To Create a column in Engagement Dashboard for Cases
Within Engagement Dashboards, you can create a case management column for work queues to have a comprehensive view of all the cases that are in the specific work queues. This will allow you to maintain and view inbound volume while streamlining case processing workflows.
Click the New Tab icon. Under the Sprinklr Service tab, click Engagement Dashboards within Resolve.
Next, select the desired Engagement Dashboard.
In the top right corner of the Engagement Dashboard window, click Add column.
Search and select Case Management on the Add New Column window.
From the left pane of the Add New Case Management Column window, select Work Queue as the type of column.
From the left pane of the Add New Case Management Column window, select Work Queue as the type of column.
Fill in the required fields. For more information, see Work Queue Column — Field Descriptions. Note that the preview of the column will render on the right side of the window.
Fill out any Custom Properties per your needs. By configuring properties, you can specify to include or exclude cases based on the properties that have been applied to the cases, for example, status, tags, priority, case type, etc.
After you've provided all the details for your column, click Create Column at the bottom to create the new column. Upon creation, your column will be available in the current dashboard.
To Create a queue rule to take actions on cases
Click the New Tab icon. Under Governance Console, click Manage Rules within Platform Setup.
In the top right corner of the Rule Engine window, click Create New Rule.
On the New Rule window, enter a name and description for the rule. Select Customer from the Rule Scope and Queue from the Context dropdown. For more information, see Create a Rule.
Click Next at the bottom.
On the Rule Builder window, click the Addition icon to Add Condition. Enter a Name for the condition in the Edit Condition pane in the right.
Under Condition Applies To "The cases attached to the messages", select Work Queues from the Condition dropdown and the desired queues from the corresponding dropdown to take actions on the cases in these queues.
On the Rule Builder window, click the Addition icon on the Yes branch of the condition and select Add Action to add an action.
On the Edit Action pane in the right, enter a Name for the action and add actions as required, for example, assign cases in the selected work queues to users.
Click Save in the bottom right corner to finalize the rule.
Select Work Queue in Rule Engine
Create a new rule or select an existing rule by clicking th icon at the left and select edit.
In Add Action, under Actions To "Assign a message to User/Queue", select Assign To Work Queue. To select from the work Queue option appears.
Select the Work Queue that you had configured.
Priority Rank Assignment
Priority Rank Assignment helps to prioritize the assignment of messages and/or cases using the rule engine. It allows you to define priority level criterions for assigning all the inbound messages or cases in a queue depending on your business requirements. You can also create a message or case tags based on priority to visually indicate their priority. This allows you to easily filter messages or cases in the engagement dashboard column and respond in accordance with their priority.
Priority can be used to change the order of message or case assignment when the assignment is done using queue (for a message) or case update (for case) rule and a trigger. The trigger runs on the waiting queue and assigns the message or case based on the defined conditions.
For instance, if cases without priority ranks are waiting in a queue to be assigned, the ones with the least priority could be assigned first as compared to the ones that need immediate attention. However, cases with priority ranking help in the assignment based on the ranks of each case.
You can configure the assignment of priority to messages or cases in four ways:
Assign priority to messages or using rules
Assign priority to Cases using rules
Assign priority to messages or cases using macros
Use priority during the assignment with triggers
Note: While using Unified Routing and Assignment Engine for assigning a message/case, the messages/cases with the highest rank will be assigned first. Priority rank needs to be enabled for messages and cases. To learn more about enabling this feature in your environment, please contact your Success Manager. |
To Assign Priority to Messages using Rules:
Click Create New Rule, in the upper right corner and Add a condition then select Add Action to configure the Rule Actions. Enter the name of the action and an optional description in the Name and Description fields respectively.
Under Actions to "Change properties of Message", select Priority from the Action drop-down list and set its rank as desired.
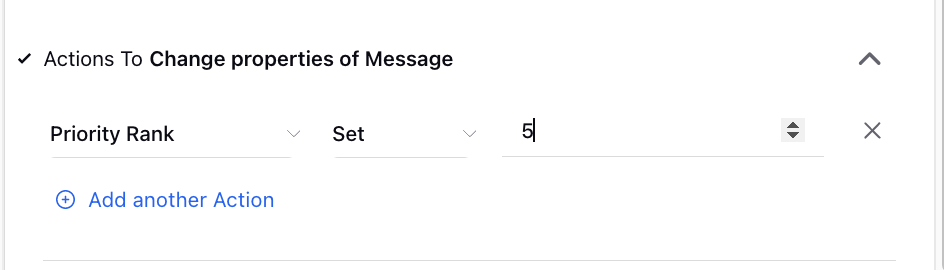
Note: The values you set as the Priority Rank have to be an integer and can be negative or positive, including zero. For ranks, see Best Practices. Select Inbound,Queue or Case Update in Context when creating a new rule to set the priority of messages |
To Assign Priority to cases using rules
Click Create New Rule and an action under action to Universal Case.
Under Actions to "Universal case", select Priority from the Action drop-down list and set its rank as desired.
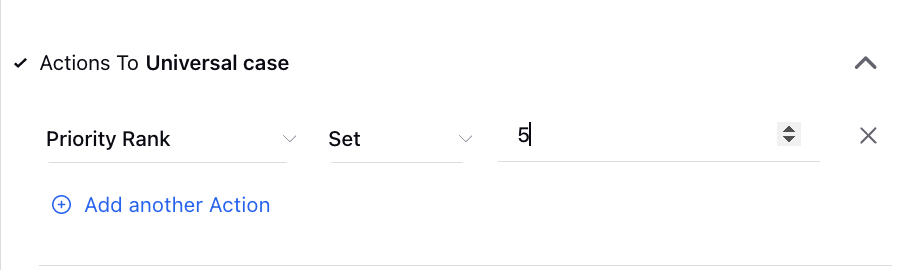
Note: The values you set as the Priority Rank have to be an integer and can be negative or positive, including zero. For ranks, see Best Practices. |
To Assign Priority to Messages or Cases using Macros
A message or a case macro can be created to set the priority of a message or case.
Under the Governance Console tab, click Macros within Platform Setup.
Click Create Macro in the upper right corner. For more information on creating a macro, see Add a Macro.
Select Priority Rank from the Action drop-down list and set its desired rank in the Value field under Set Actions.
To Use Priority during Assignment with triggers for message assignment
Under the Governance Console tab, click Manage Rules within Platform Setup.
Hover over the Options iconext to the rule and click Edit or click Create New Rule in the top right corner.
Click the Options icon in the upper right corner and select Manage Triggers.
In the Manage Triggers pane, click Create New.
Set the details of the trigger. For more information on how to set a trigger, see Rule Triggers.
Under Trigger Conditions, select two conditions from the Condition drop-down list for message assignment:
Priority Assignment Order - It assigns messages based on either ascending or descending order of priority assigned to the messages in the queue.
Assignment Order - It assigns messages either in ascending or descending order based on the message creation time.
Click the checkbox next to Enable Trigger to put your trigger into effect and click Add Trigger.
Based on the conditions set in the trigger, the following behaviors are observed.
Conditions Set | Behavior |
Only Priority Assignment Order is set |
|
Only Assignment Order is set |
|
Both Priority Assignment Order and Assignment Order is set |
|
None is set |
|
To use priority during assignment with triggers for Case Assignment
Click the New Tab icon . Under the Governance Console tab, click Manage Rules within Platform Setup.
Hover over the Options iconnext to the rule and click Edit.
Click the Options iconin the upper right corner and select Manage Triggers.
In the Manage Triggers pane, click Create New.
Set the details of the trigger. For more information on how to set a trigger, see Rule Triggers.
Under Trigger Conditions, you can select three conditions from the Condition drop-down list for configuring a case assignment order:
Priority Assignment Order - It assigns cases based on either ascending or descending order of priority assigned to the cases in the queue.
Assign By - There are 5 'times' that can be used in a case to assign:
Latest fan message association time - Time when the latest fan message was added to the case.
Case creation time - Time when the case was created.
Case modification time - Time when the last case modification was done. Modifications include anything that changes in the case including custom fields, messages being added or removed, the processing clock started on the case, notes on the case, etc.
Message association update time - Time when the last message (fan/brand) was added to the case.
Latest profile AUM Sn created time - Time when the last message was added to the case from a profile.
Assignment Order - It assigns messages either in ascending or descending order based on the message creation time.
Click the checkbox next to Enable Trigger to put your trigger into effect and click Add Trigger.
Based on the conditions set in the trigger, the following behaviors can be observed. The default behavior for messages is ascending message creation time while for cases, it is descending case creation time.
Conditions Set | Behavior |
Only Priority Assignment Order is set |
|
Only Assignment Order is set |
|
Both Priority Assignment Order and Assignment Order is set |
|
None is set |
|
Note When a queue or case has messages with or without priority, the messages without priority are taken as the last priority and are assigned once all the priority messages have been assigned. |
Best Practices
When you use integers to rank the priority, make sure to use a small number of priority ranks. For example, 2 - 5 priority ranks.
When you use integers to rank the priority, avoid the use of consecutive integers to set priority. This helps to give space to add priority ranks in between them when needed. For example, 1,5,10 priority ranks
Priority ranks can be negative, zero, or positive. But prefer using positive ranks to avoid confusion later.
For messages, always set both 'Priority Assignment Order' and 'Assignment Order' to be specific and avoid confusion later.
For cases, always set all of the three - 'Priority Assignment Order', 'Assignment Order', and 'Assign by' to be specific.
To visually show priority on messages and cases, you can create a message tag and/or a case tag. The message tags can be created under Manage Customer and Manage Workspace. However, the case tags can only be created under Manage Customer.
To Create Tags
Click the New Tab icon . Under the Governance Console tab, click All Settings within Platform Setup.
Select Tagging.
Click the Dashboard Menu icon in the upper left corner. Under Manage Customers, select Tagging.
Click Add Tag in the upper right corner.
Select the tag type for either a message or a case under Select Tag Type.
Enter a tag name and add an optional tag icon in the Tag Name and Tag Icon fields, respectively.
Set an optional color code for your message or case tag in the Color Code field. You can also enter a label for your message tag in the Tag label field.
Select the criteria as Priority Rank from the Criteria drop-down menu and set its value in the Value field.