Configure Salesforce Connector in Sprinklr Marketplace
Updated
This guide provides step-by-step instructions on how to configure the Salesforce Connector in Sprinklr.
Salesforce Users
In the Salesforce User tab, you can:
Add an additional Salesforce User by clicking the Add Salesforce User icon.
Select a Default Salesforce User from the drop-down menu and click Save.

Configure Connector Settings (Optional)
This section explains how to configure the Salesforce Connector settings in Sprinklr, including setting up notifications and enabling key functionalities.
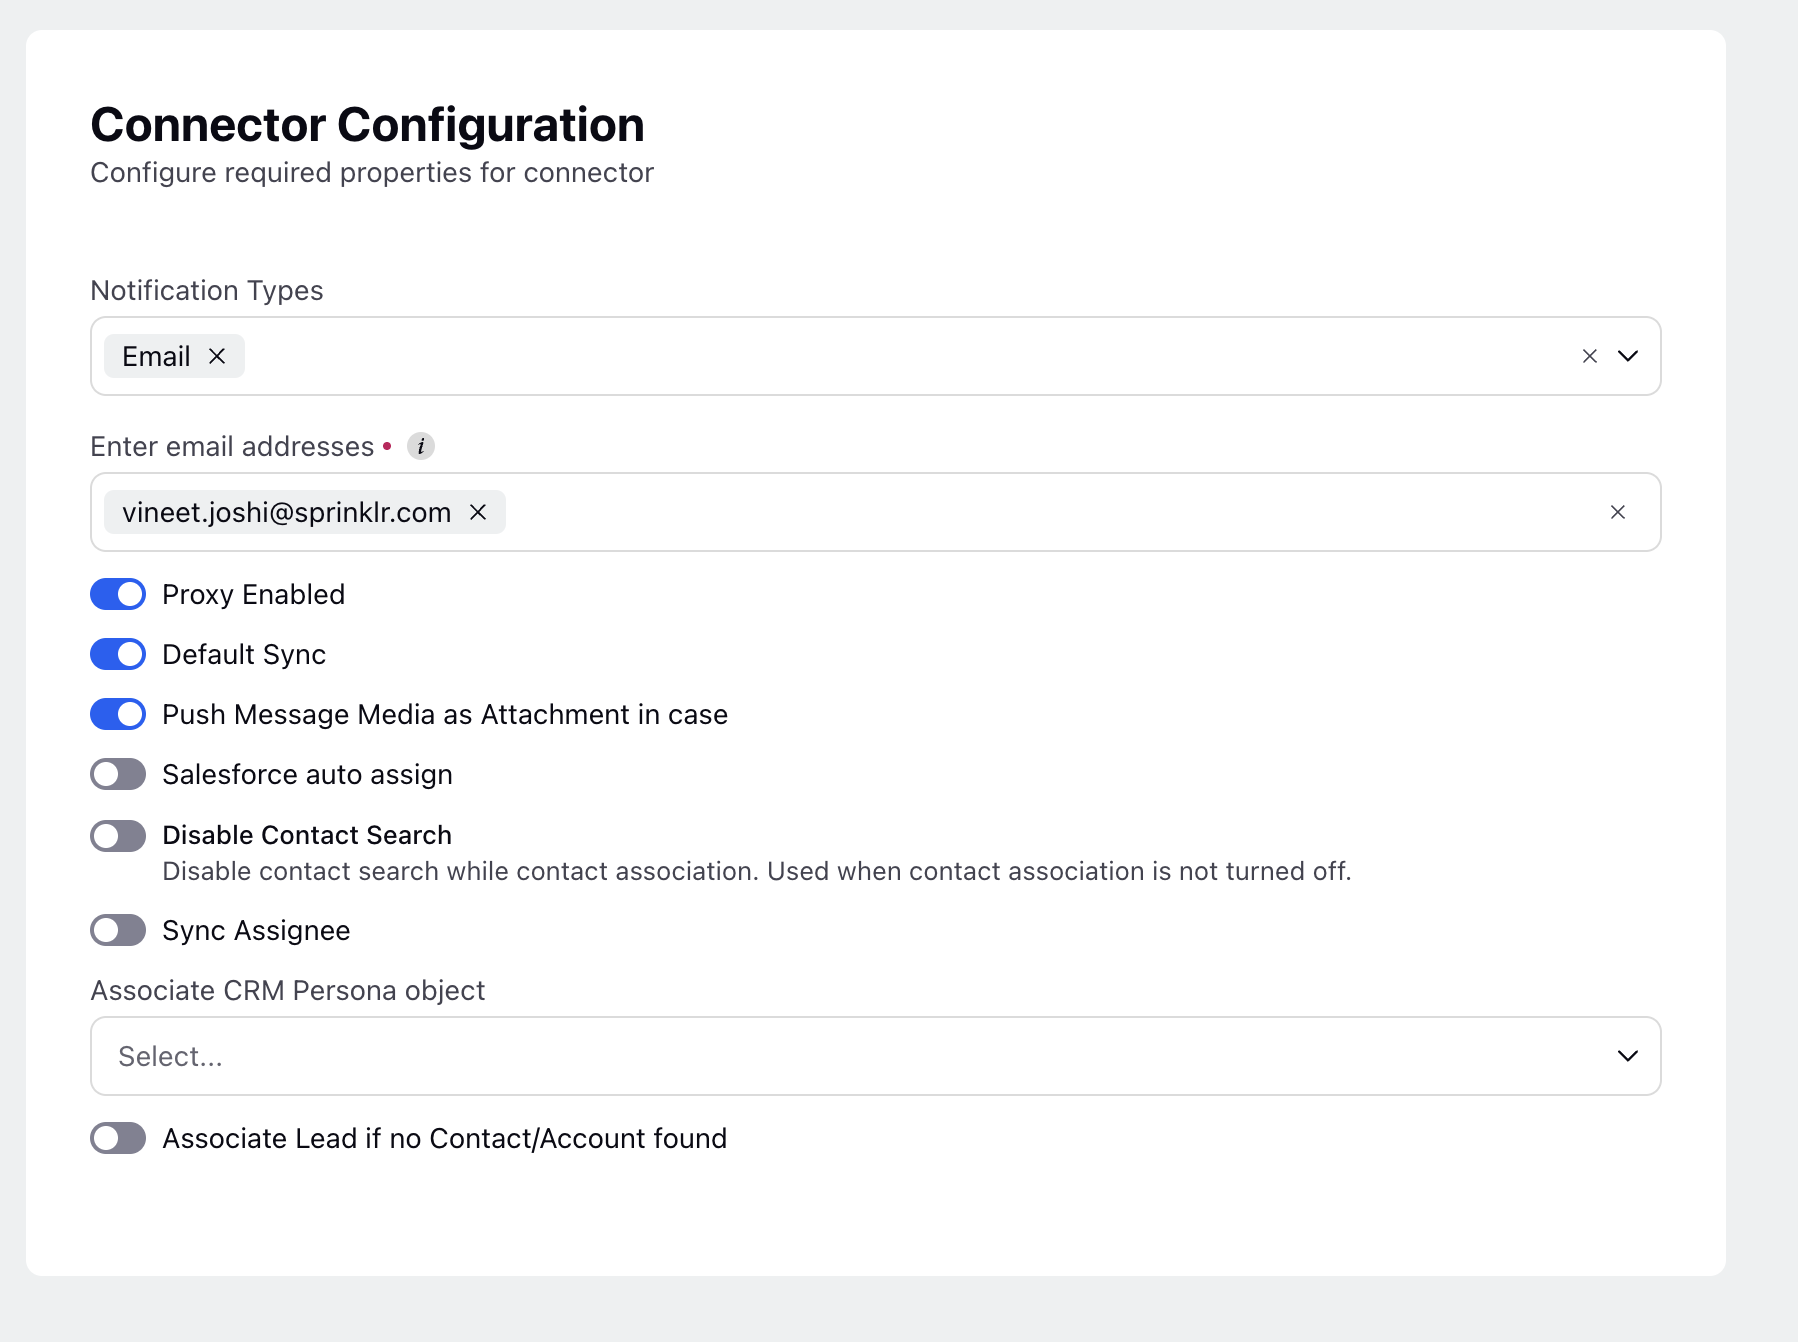
Notification Type
This is an optional setting that enables you to trigger alerts through email.
In the Connector Configuration tab, navigate to the Notification Types section.
From the drop-down list, select Email as the notification type.
Enter Email Addresses
In the Enter email addresses field, enter the email addresses where notifications should be forwarded. You can enter multiple email addresses as needed.
Enable Additional Functionalities
In the Connector Configuration tab, you can enable or disable the following advanced options based on your integration requirements. These toggles allow you to fine-tune how data is synchronized between Sprinklr and Salesforce.
1. Proxy Enabled
Use this option to route all connector API calls through a proxy server.
When to enable: If your organization requires API traffic to pass through specific proxy IP addresses for security, monitoring, or compliance purposes.
2. Default Sync
This setting controls whether certain case fields are synced by default.
When enabled: The Subject, Description, and Status fields will always be synchronized between Sprinklr and Salesforce—even if explicit field mappings are not configured.
Use case: Ensures essential case details are synced even during minimal setup.
3. Push Message Media as Attachment in Case
Enable this toggle to include media files (such as images, videos, or documents) from customer conversations as attachments in the corresponding Salesforce case.
Use case: Helps agents in Salesforce access full case context, including visual proof or supporting files from digital conversations.
4. Salesforce Auto Assign
By default, Salesforce applies active assignment rules whenever a case is created or updated.
When enabled: This toggle disables those rules, allowing you to control how cases are assigned in Salesforce.
Use case: Prevents Salesforce from overriding the assignee specified by Sprinklr.
5. Disable Contact Search
This setting turns off the automatic contact search in Salesforce during case creation or contact association.
When Enabled: The connector will not attempt to match incoming records with existing Salesforce contacts.
6. Sync Assignee
This toggle synchronizes the case assignee between Sprinklr and Salesforce.
How it works: If a case is assigned to a user in Sprinklr, the corresponding Salesforce case will be assigned to the mapped Salesforce user. For more details, refer to User Mapping in CRM Integration.
Use case: Ensures consistent case ownership across platforms and supports unified workflows.
7. Associate CRM Persona Object (Contact/Account)
Automatically associates each Sprinklr case with a matching Contact or Account record in Salesforce.
Use case: Links support cases to the right CRM entities, enabling agents to access full customer context and history.
8. Associate Lead if No Contact/Account Found
If no matching Contact or Account is found during case creation, this setting allows the connector to associate the case with a Lead instead.
Use case: Ensures that cases are not orphaned and are still linked to a CRM persona, supporting better lead nurturing and follow-up.
After configuring these settings, your Salesforce Connector will be set up according to your business requirements.
Configure Case Mapping
This section explains how to configure case mapping between Sprinklr and Salesforce, including field mapping, screen layouts, and record type selection.
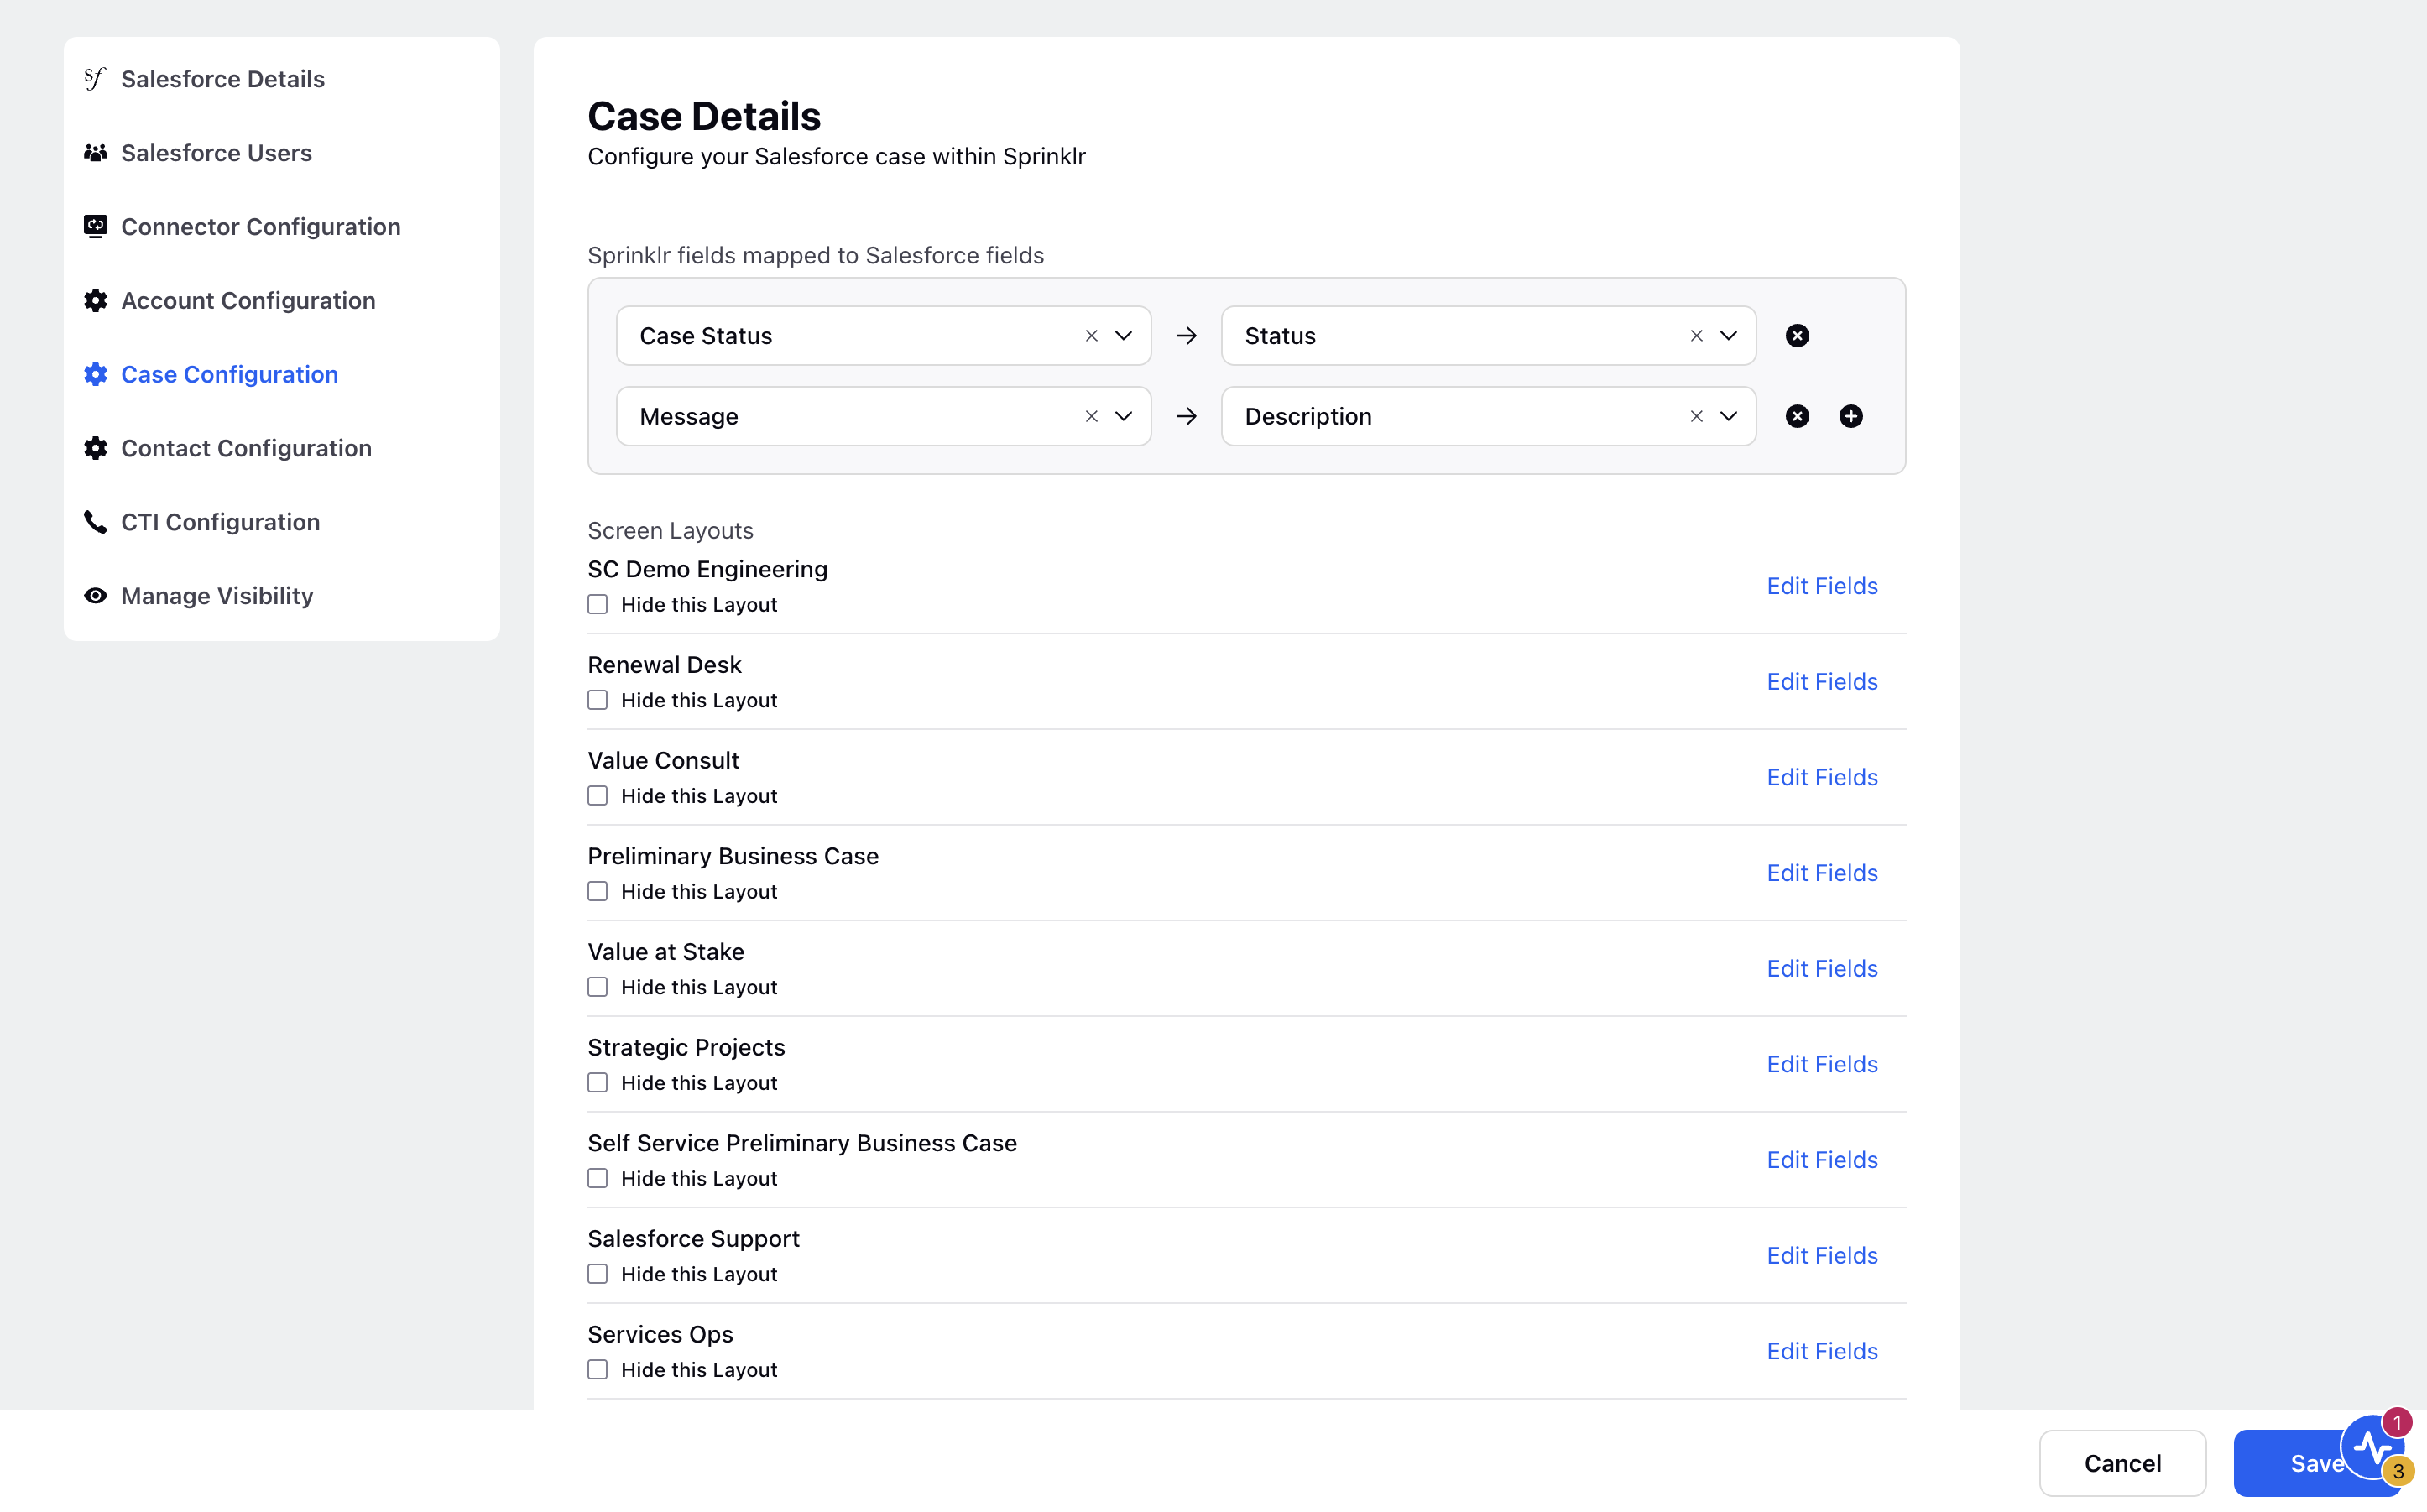
Map Sprinklr Fields to Salesforce Fields
Field mapping ensures that data collected in Sprinklr is accurately transferred to the relevant fields in Salesforce.
Steps to Configure Field Mapping:
In the Case Configuration tab, navigate to the Sprinklr fields mapped to Salesforce fields section.
Select a Sprinklr Field from the drop-down menu.
Choose the corresponding Salesforce Field from the drop-down menu to establish the mapping.
To map additional fields, click the Add (+) icon and repeat the process.
Customize Screen Layouts
Custom screen layouts allow you to control how case data is presented to agents in the UI. You can define which fields are editable and which are dynamic based on business rules.
Steps to Edit Screen Layout:
In the Screen Layouts section, click Edit Fields, next to the layout you want to customize.
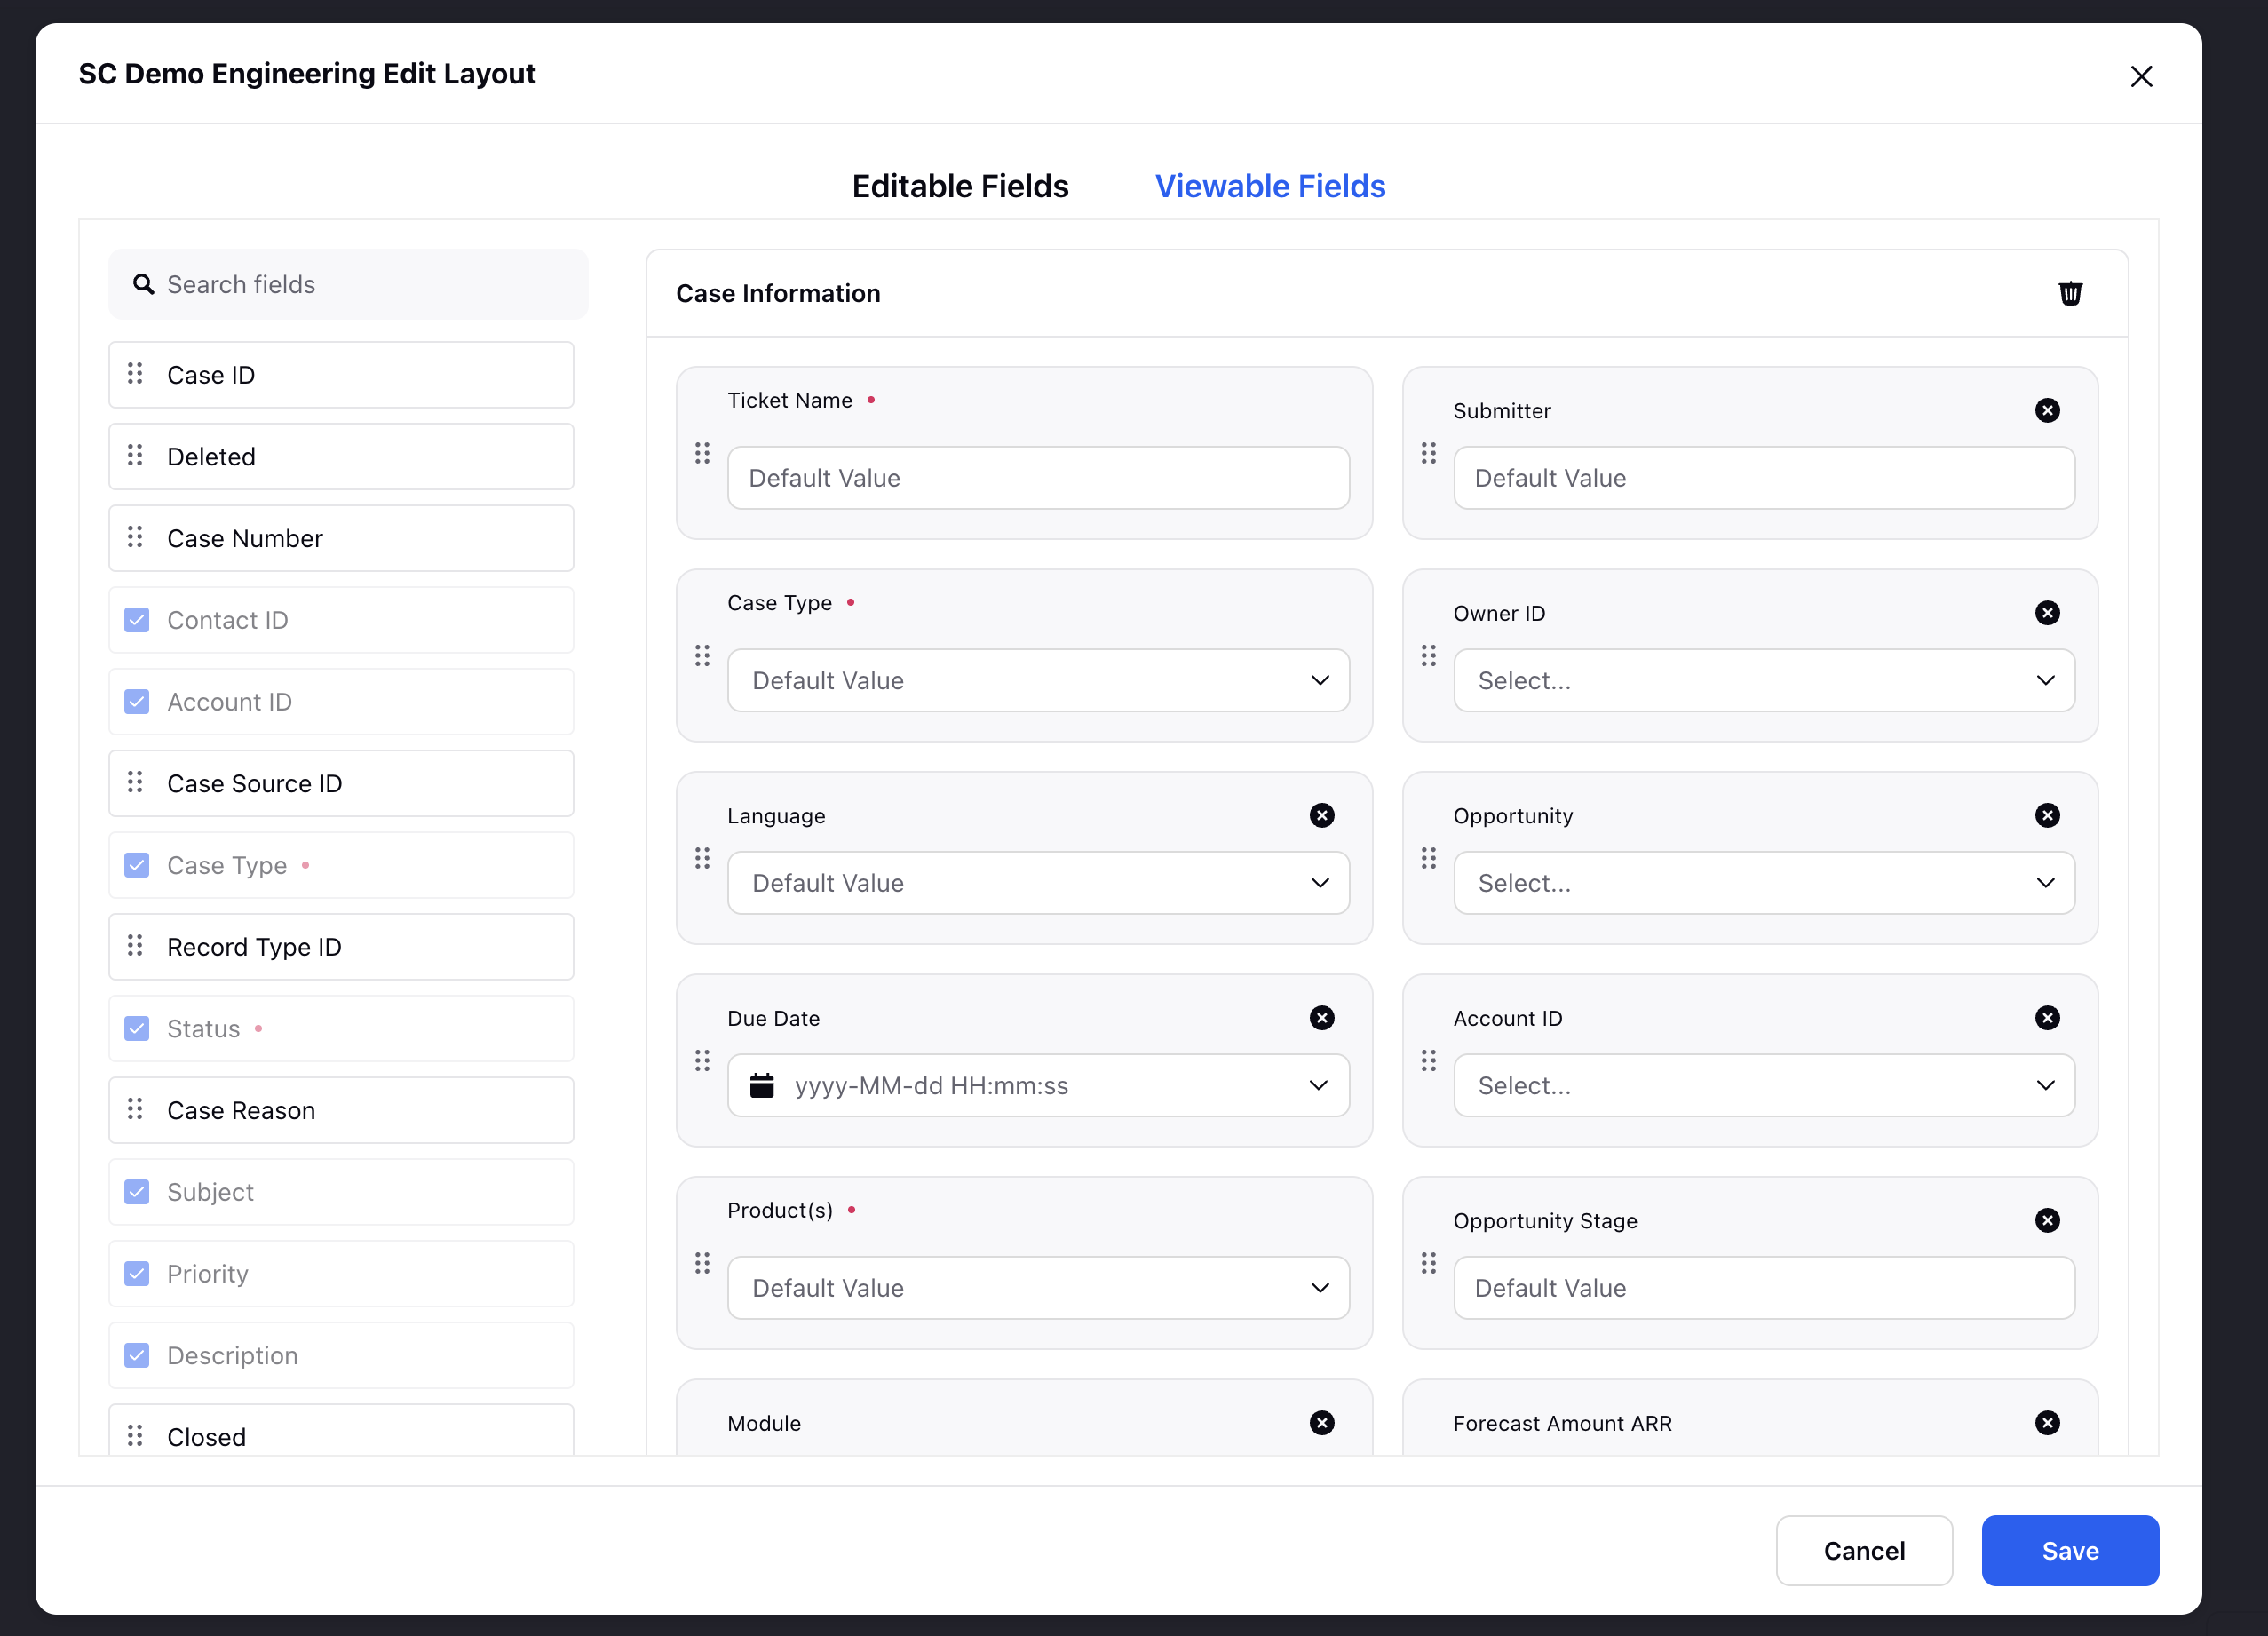
In the Edit Layout window, configure the following:
Editable Fields – These are fields that agents have to edit while sending the case manually to Salesforce through 'Send Case to Salesforce' feature in Sprinklr.
Use editable fields for inputs that may evolve during the customer interaction.Viewable Fields – These are read-only fields that agents in Sprinklr can see related to the associated Salesforce case.
Use these to maintain data integrity while still giving agents access to important reference information.Once all fields are set according to your requirements, click Submit in the bottom-right corner of the Case Edit Layout window.
Default Account/Contact Record Type
When creating a new case via the Sprinklr–Salesforce Connector, it’s important to associate the case with the right type of CRM entity— an Account or a Contact in Salesforce.
The Default Account/Contact Record Type setting allows you to specify whether a Contact or an Account should be used as the primary record type when associating a customer with a newly created case.
Steps to Configure Record Type:
In the Default Record Type section, select a record type from the drop-down menu.
The available record types for case creation include:
Account: Use this when your support process is centered around businesses or organizations. Cases will be associated primarily with Account-level information.
Contact: Use this when your support process focuses on individual customers. The case will be tied to a specific person in Salesforce.
Note: You must have the selected record types already configured in Salesforce. Otherwise, case creation may fail or lead to incorrect associations.
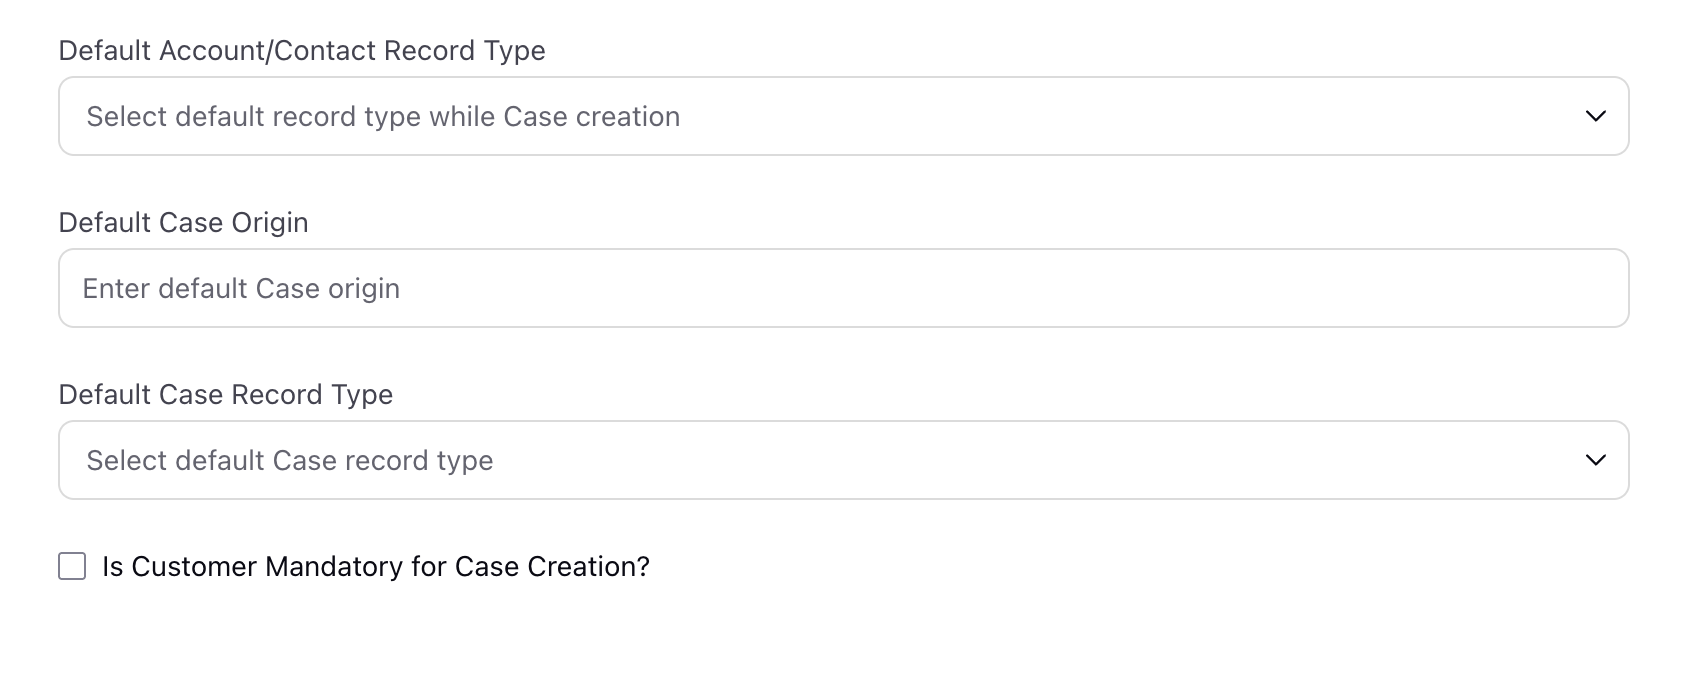
Default Case Origin
Defining the default Case Origin helps categorize and route cases based on where they came from (e.g., Email, Web, Social, Chat).
Steps to Configure:
Choose a value (such as Social Media) for the Default Case Origin field. This value will be applied to all cases created via the connector unless specified otherwise.
Best Practice: Align origin values with your Salesforce picklist options to avoid sync errors.
Default Case Record Type
In Salesforce, Record Types allow you to define different business processes, picklist values, and page layouts for the same object (such as a Case). Each record type can represent a different category of service requests—such as Technical Support, Billing Issues, or Product Feedback.
The Default Case Record Type setting in the connector ensures that every new case created via Sprinklr is automatically assigned a specific record type in Salesforce. This classification is essential for applying the correct workflows, page layouts, and automation rules within Salesforce.
Select the default record type for cases to ensure they are classified correctly within Salesforce.
Example:
If you select Customer Support as the default record type, every case created through Sprinklr will be treated as a Customer Support request in Salesforce—unless overridden manually or by automation.
Tip: Always align this setting with your Salesforce configuration. If the record type is incorrectly set or doesn’t exist in Salesforce, case creation may fail or trigger errors.
Set Customer Requirement for Case Creation
You can choose whether linking a customer (Account or Contact) should be mandatory when creating a new case.
To enable customer requirement:
Check the Is Customer Mandatory for Case Creation? checkbox.
Leave the box unchecked if cases can be created without associating a customer.
Consideration: Making customer association mandatory improves traceability and context but may limit case creation if customer data is missing.
After completing these configurations, your case mapping setup will ensure proper synchronization between Sprinklr and Salesforce.
Configure Account Mapping
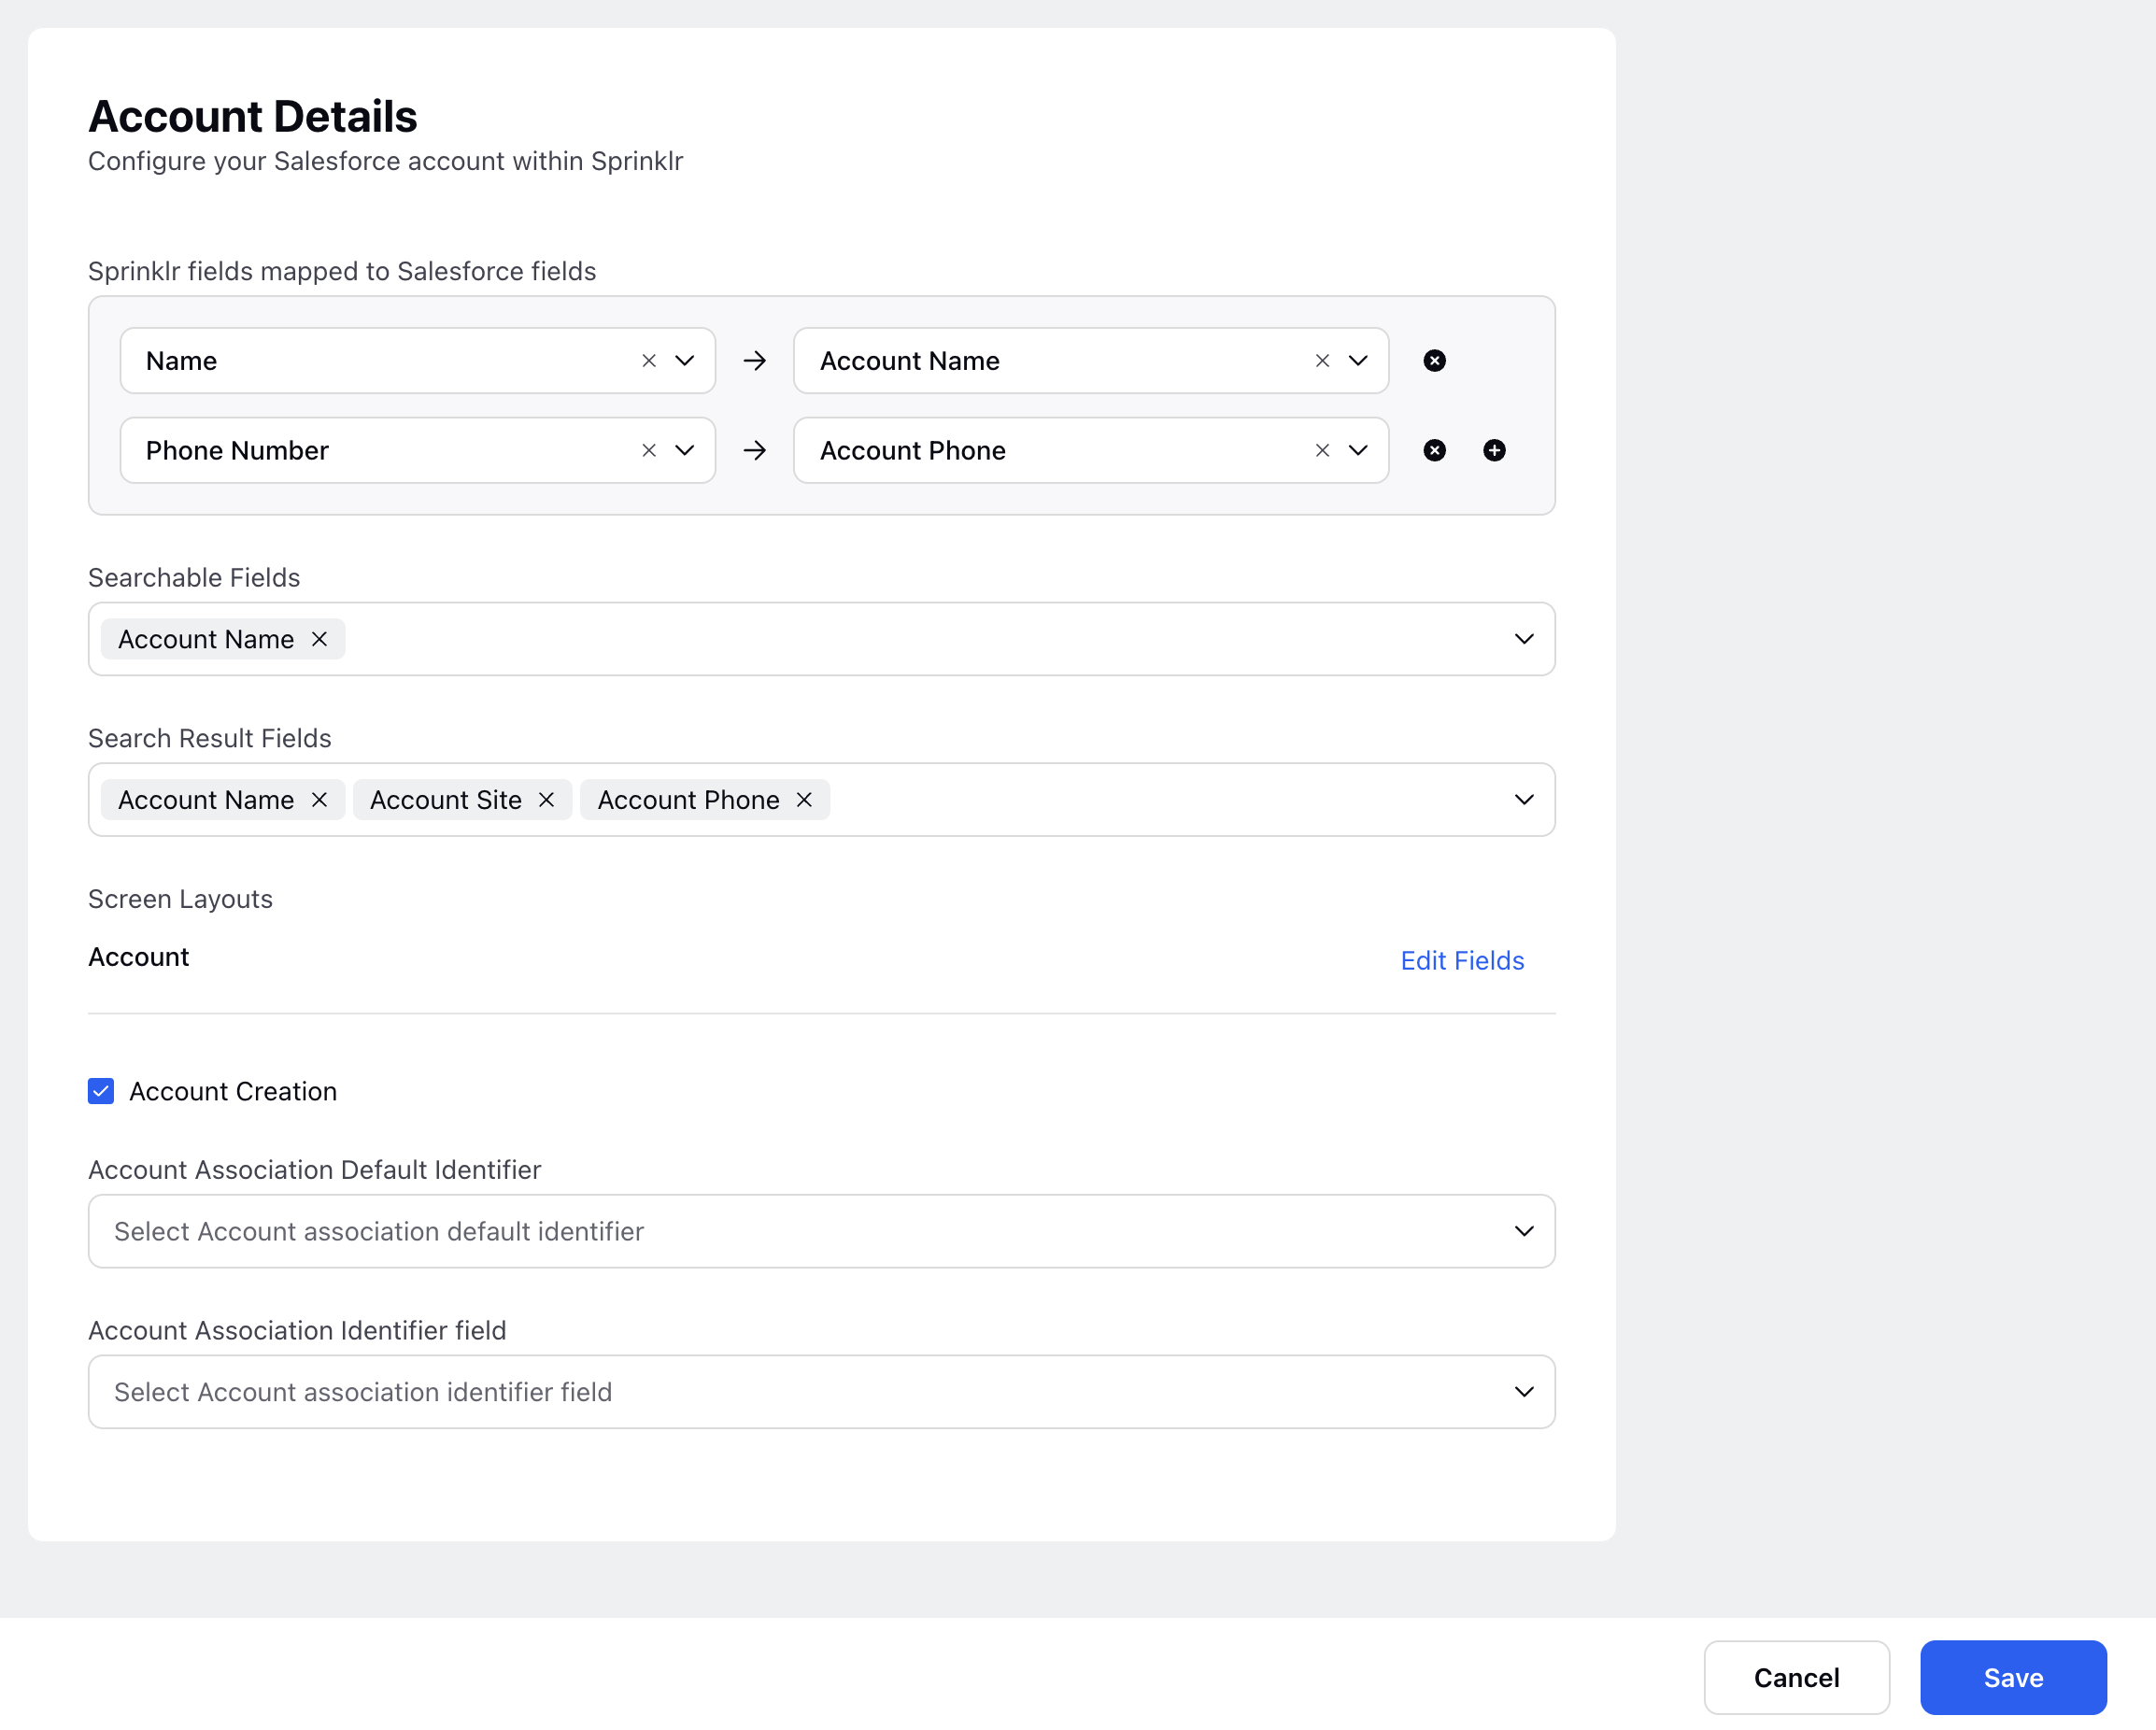
The Account Configuration window allows you to configure and synchronize Sprinklr Profile with Salesforce account. This ensures seamless integration and accurate synchronization of account data between the two platforms.
Map Sprinklr Fields to Salesforce Fields
This mapping ensures that data captured in Sprinklr is correctly transferred to the relevant fields in Salesforce. Field mapping is essential for accurate case creation, contact association, and lead management in Salesforce.
Steps to Map Fields:
In the Account Configuration tab, locate the Sprinklr fields mapped to Salesforce fields section.
From the drop-down menu, select a Sprinklr Field that you want to sync.
In the adjacent drop-down, select the corresponding Salesforce Field to establish the mapping.
To map additional fields, click the Add (+) icon and repeat the process.
Configure Searchable and Result Fields
When sending a case to Salesforce, agents may need to search for existing accounts or contacts. You can configure which fields Sprinklr uses during this search and what results are displayed.
Steps to Configure:
In the Searchable Fields section, select the fields Sprinklr should use when searching for Saleforce accounts.
For Example: Account Name, Email, Phone NumberIn the Search Result Fields section, select the fields that should appear in the search results returned to the user.
For Example: Account Name, Account Site, Account Phone
Customize Screen Layouts
This section lets you define how fields are displayed and interacted with when viewing or editing account information in Sprinklr.
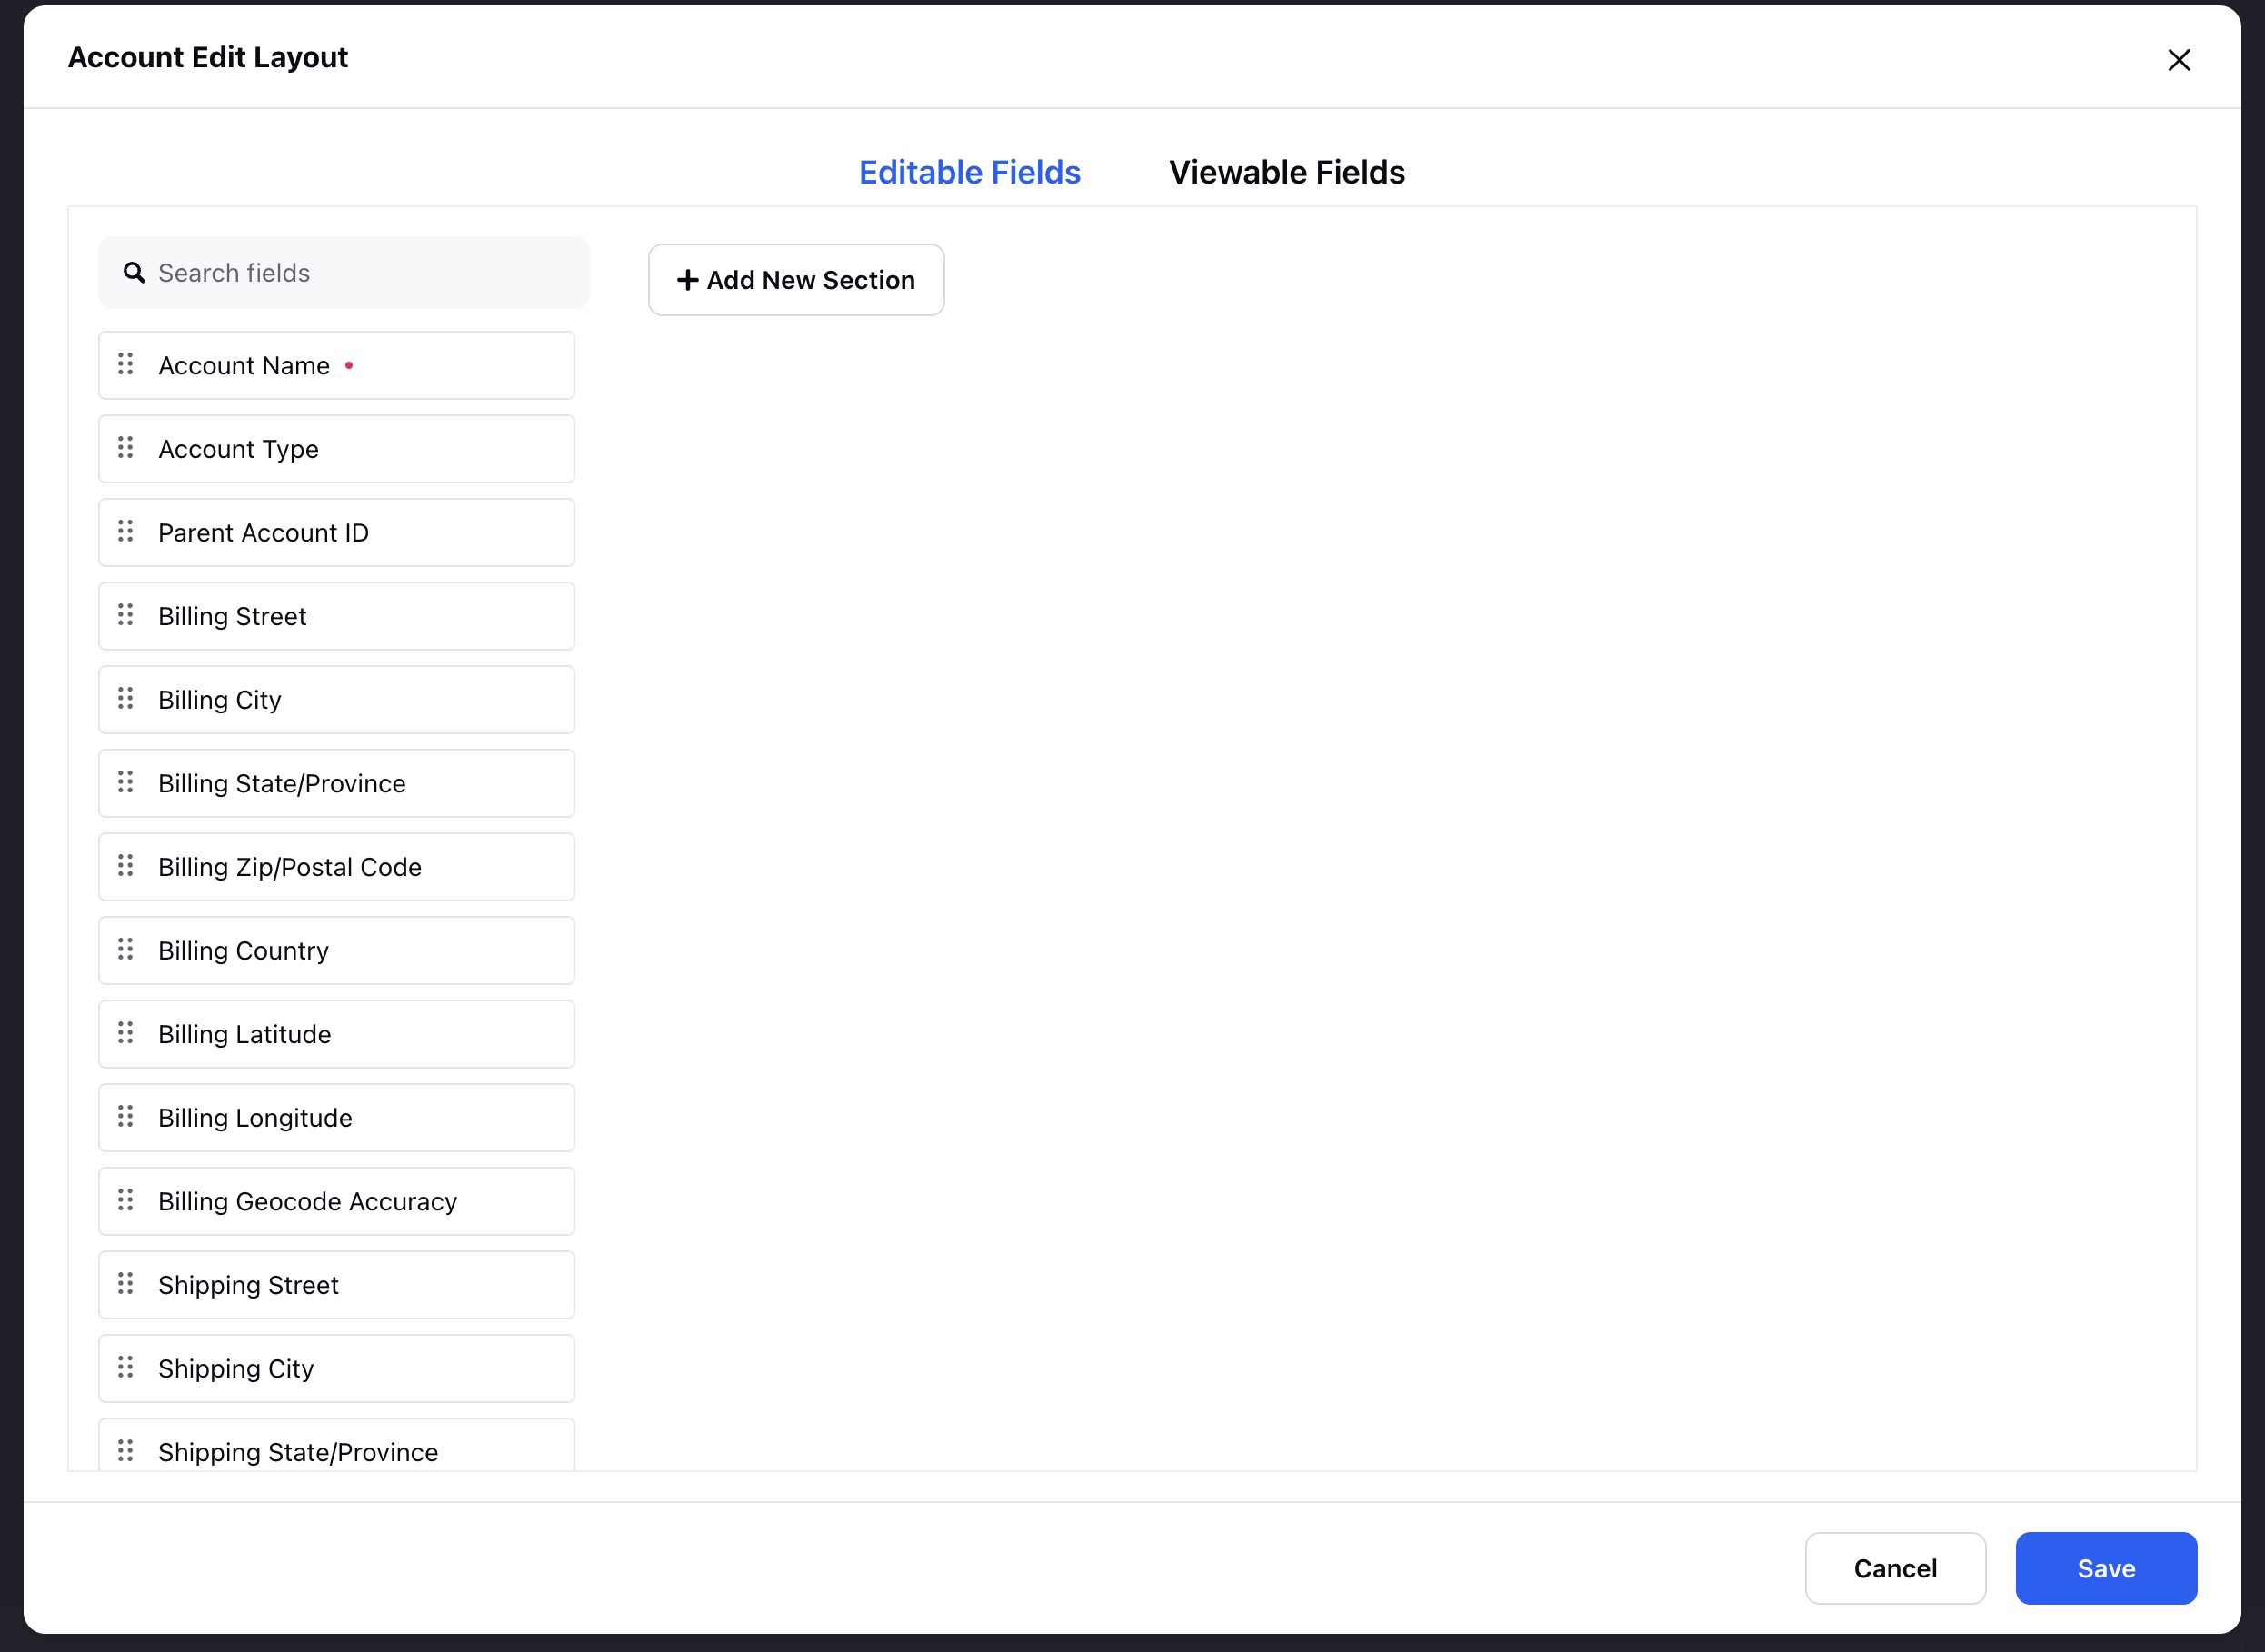
In the Screen Layouts section, click Edit Fields next to the layout you want to customize.
In the Account Edit Layout window, define the following:
Editable Fields – These are fields that agents have to edit while sending the case manually to Salesforce through 'Send Case to Salesforce' feature in Sprinklr.
Use editable fields for inputs that may evolve during the customer interaction.Viewable Fields – These are read-only fields that agents in Sprinklr can see related to the associated Salesforce case.
Use these to maintain data integrity while still giving agents access to important reference information.Once all fields are set according to your requirements, click Save button in the bottom-right corner of the Account Edit Layout window.
Account Creation and Association
Account Creation (Checkbox): Enable this checkbox to allow automatic creation of new accounts when a matching account is not found in the system. If disabled, only existing accounts can be associated.
Account Association Default Identifier: Select the primary identifier used to associate incoming data with an existing account. This ensures consistency in linking records within your CRM system. You can select among the Name, Email or Phone as default identifier.
Account Association Identifier Field: Choose the specific field within the selected identifier type for mapping and association.
After completing these configurations, your Sprinklr account will be properly mapped to Salesforce, ensuring seamless data synchronization.
Configure Contact Mapping
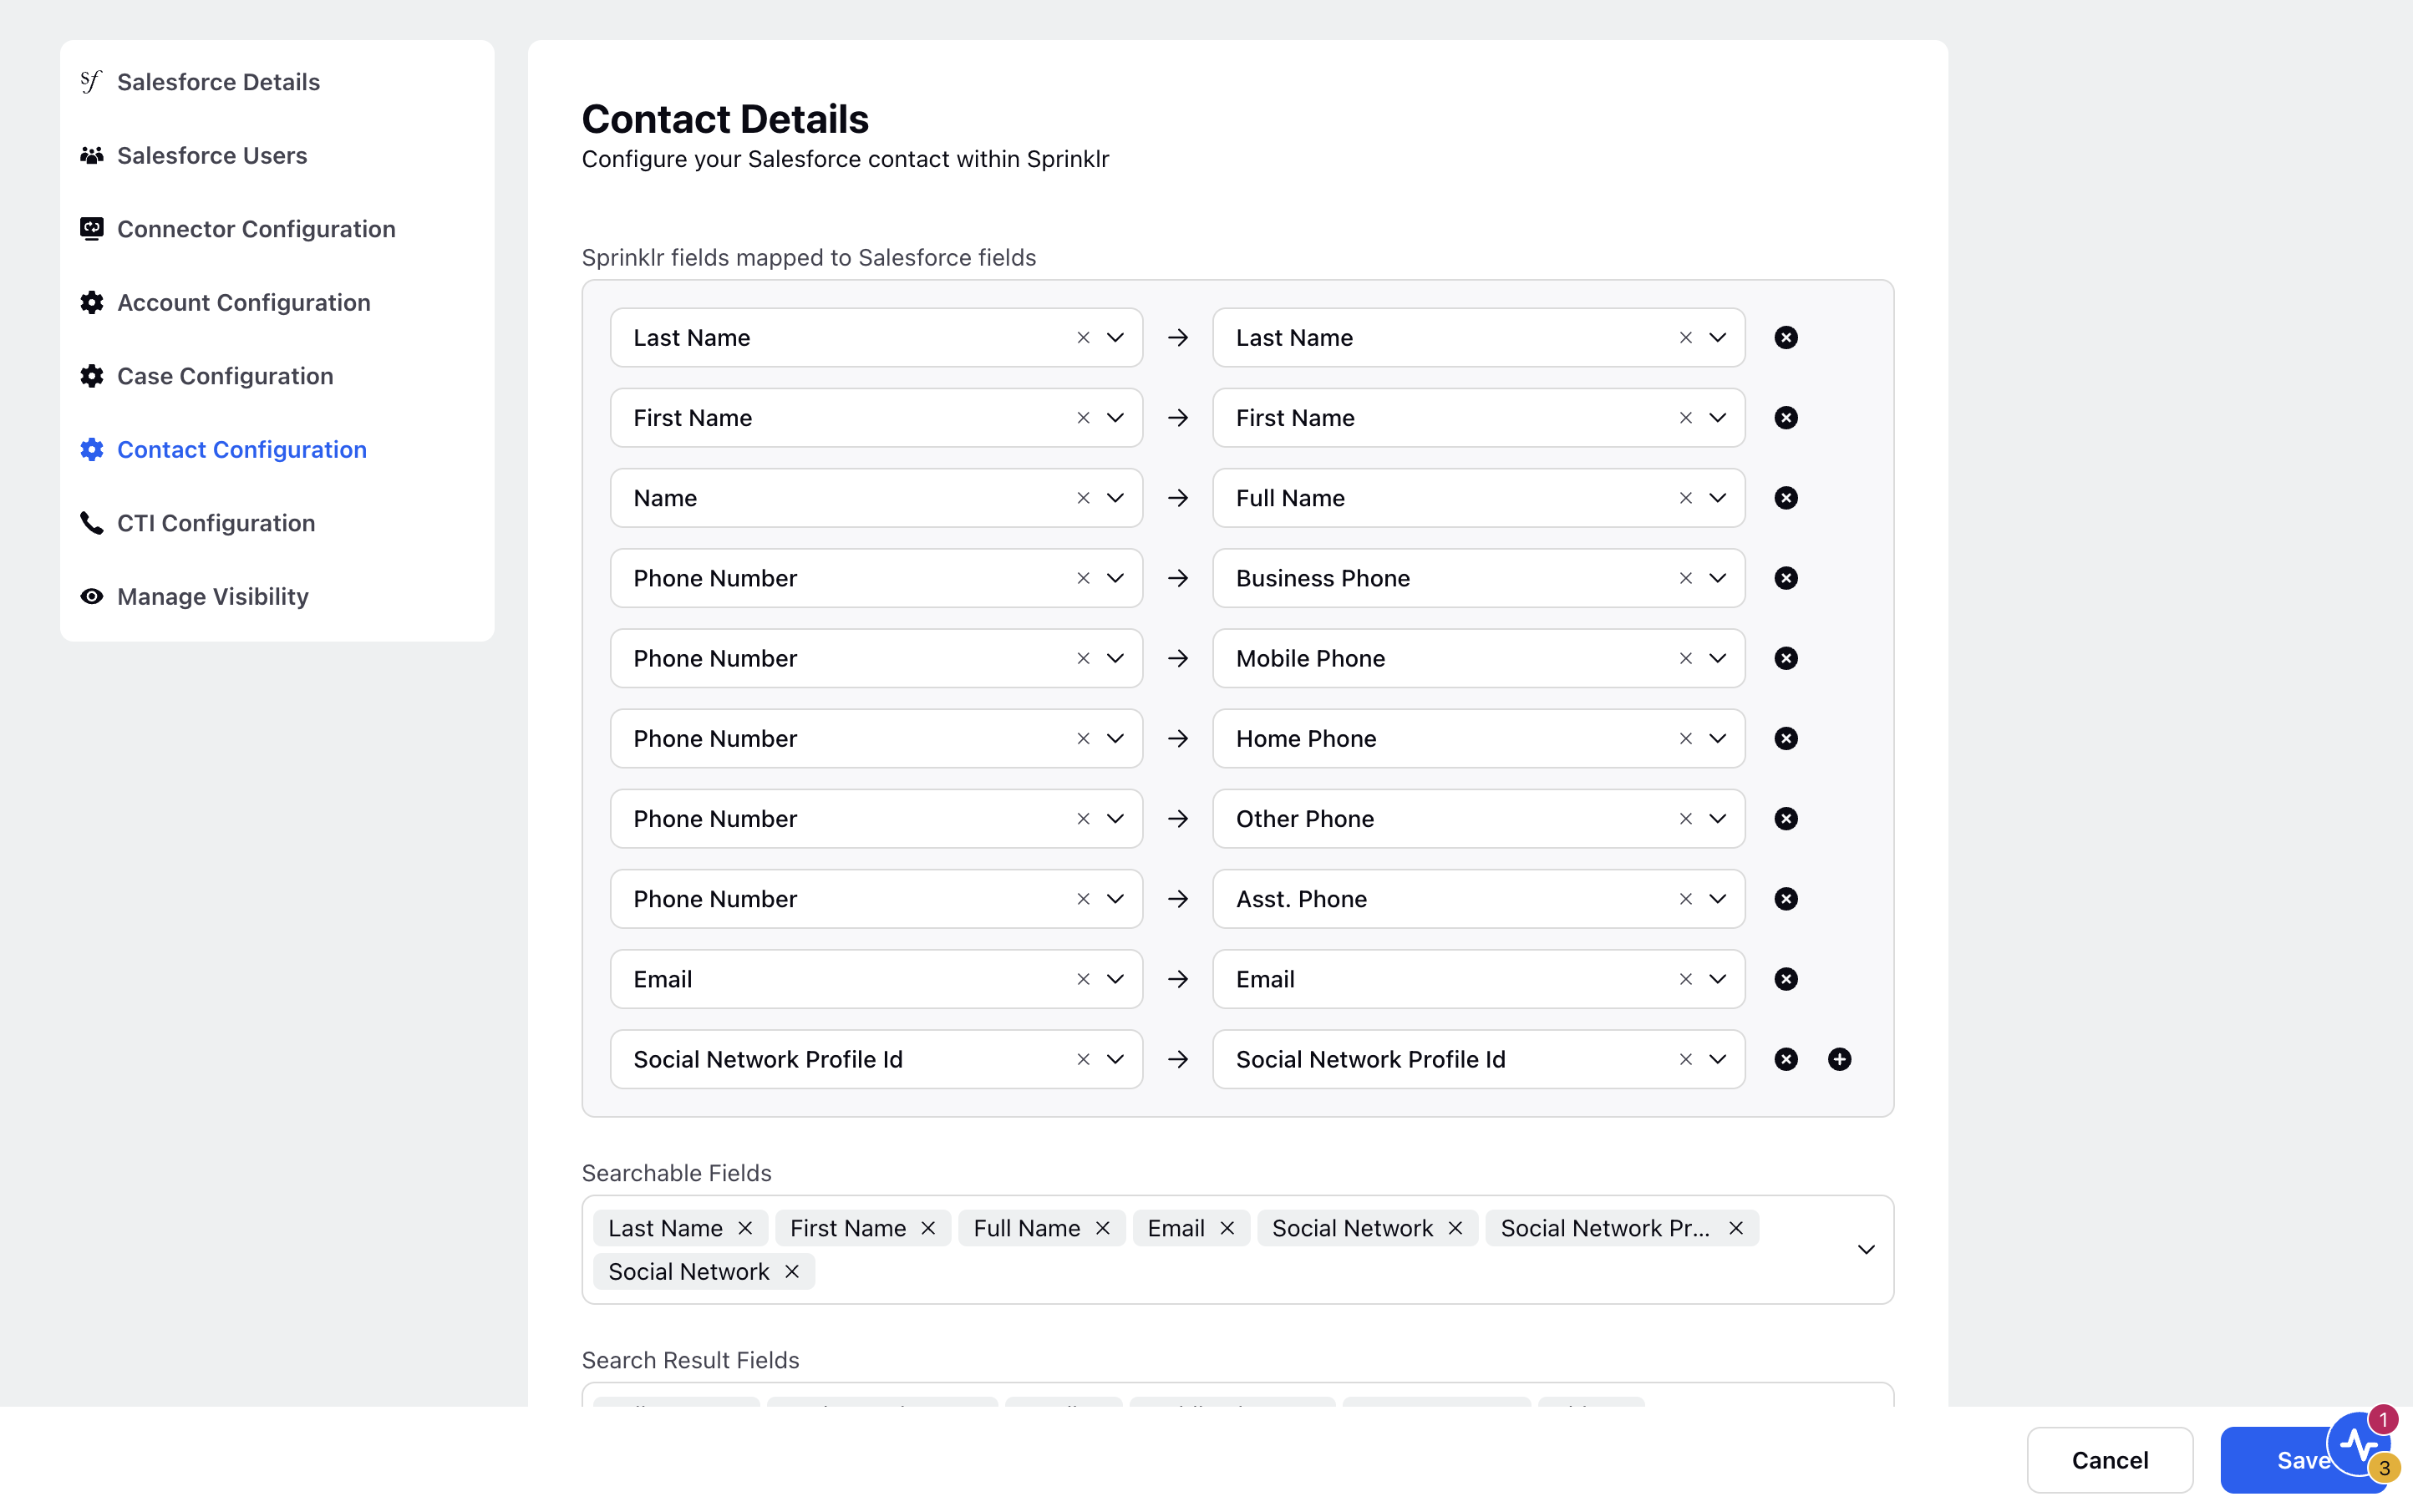
This section explains how to map contact-related fields between Sprinklr and Salesforce, define search and display behavior, and set up default contact association rules. These configurations ensure accurate identification, display, and synchronization of customer contact data between both platforms.
Map Sprinklr Fields to Salesforce Fields
Field mapping ensures that customer contact information is consistently transferred between Sprinklr and Salesforce.
To map contact fields:
In the Contact Configuration tab, navigate to the Sprinklr fields mapped to Salesforce fields section.
Select a Sprinklr Field from the drop-down menu.
Choose the corresponding Salesforce Field from the drop-down menu to establish the mapping.
To map additional fields, click the Add (+) icon and repeat the process.
Configure Searchable Fields
In the Searchable Fields section, select which Sprinklr fields should be used when searching for contacts in Salesforce (e.g., Email, Phone Number).
In the Searchable Result Fields section, select the fields you want to display in the search results when a contact lookup is performed (e.g., Full Name, Email, Account Name).
Example: A support agent searching with an email address can view contact matches along with their associated accounts in the results.
Customize Screen Layouts
Customizing the screen layout controls which fields are visible and editable during contact creation or association.
To configure the layout:
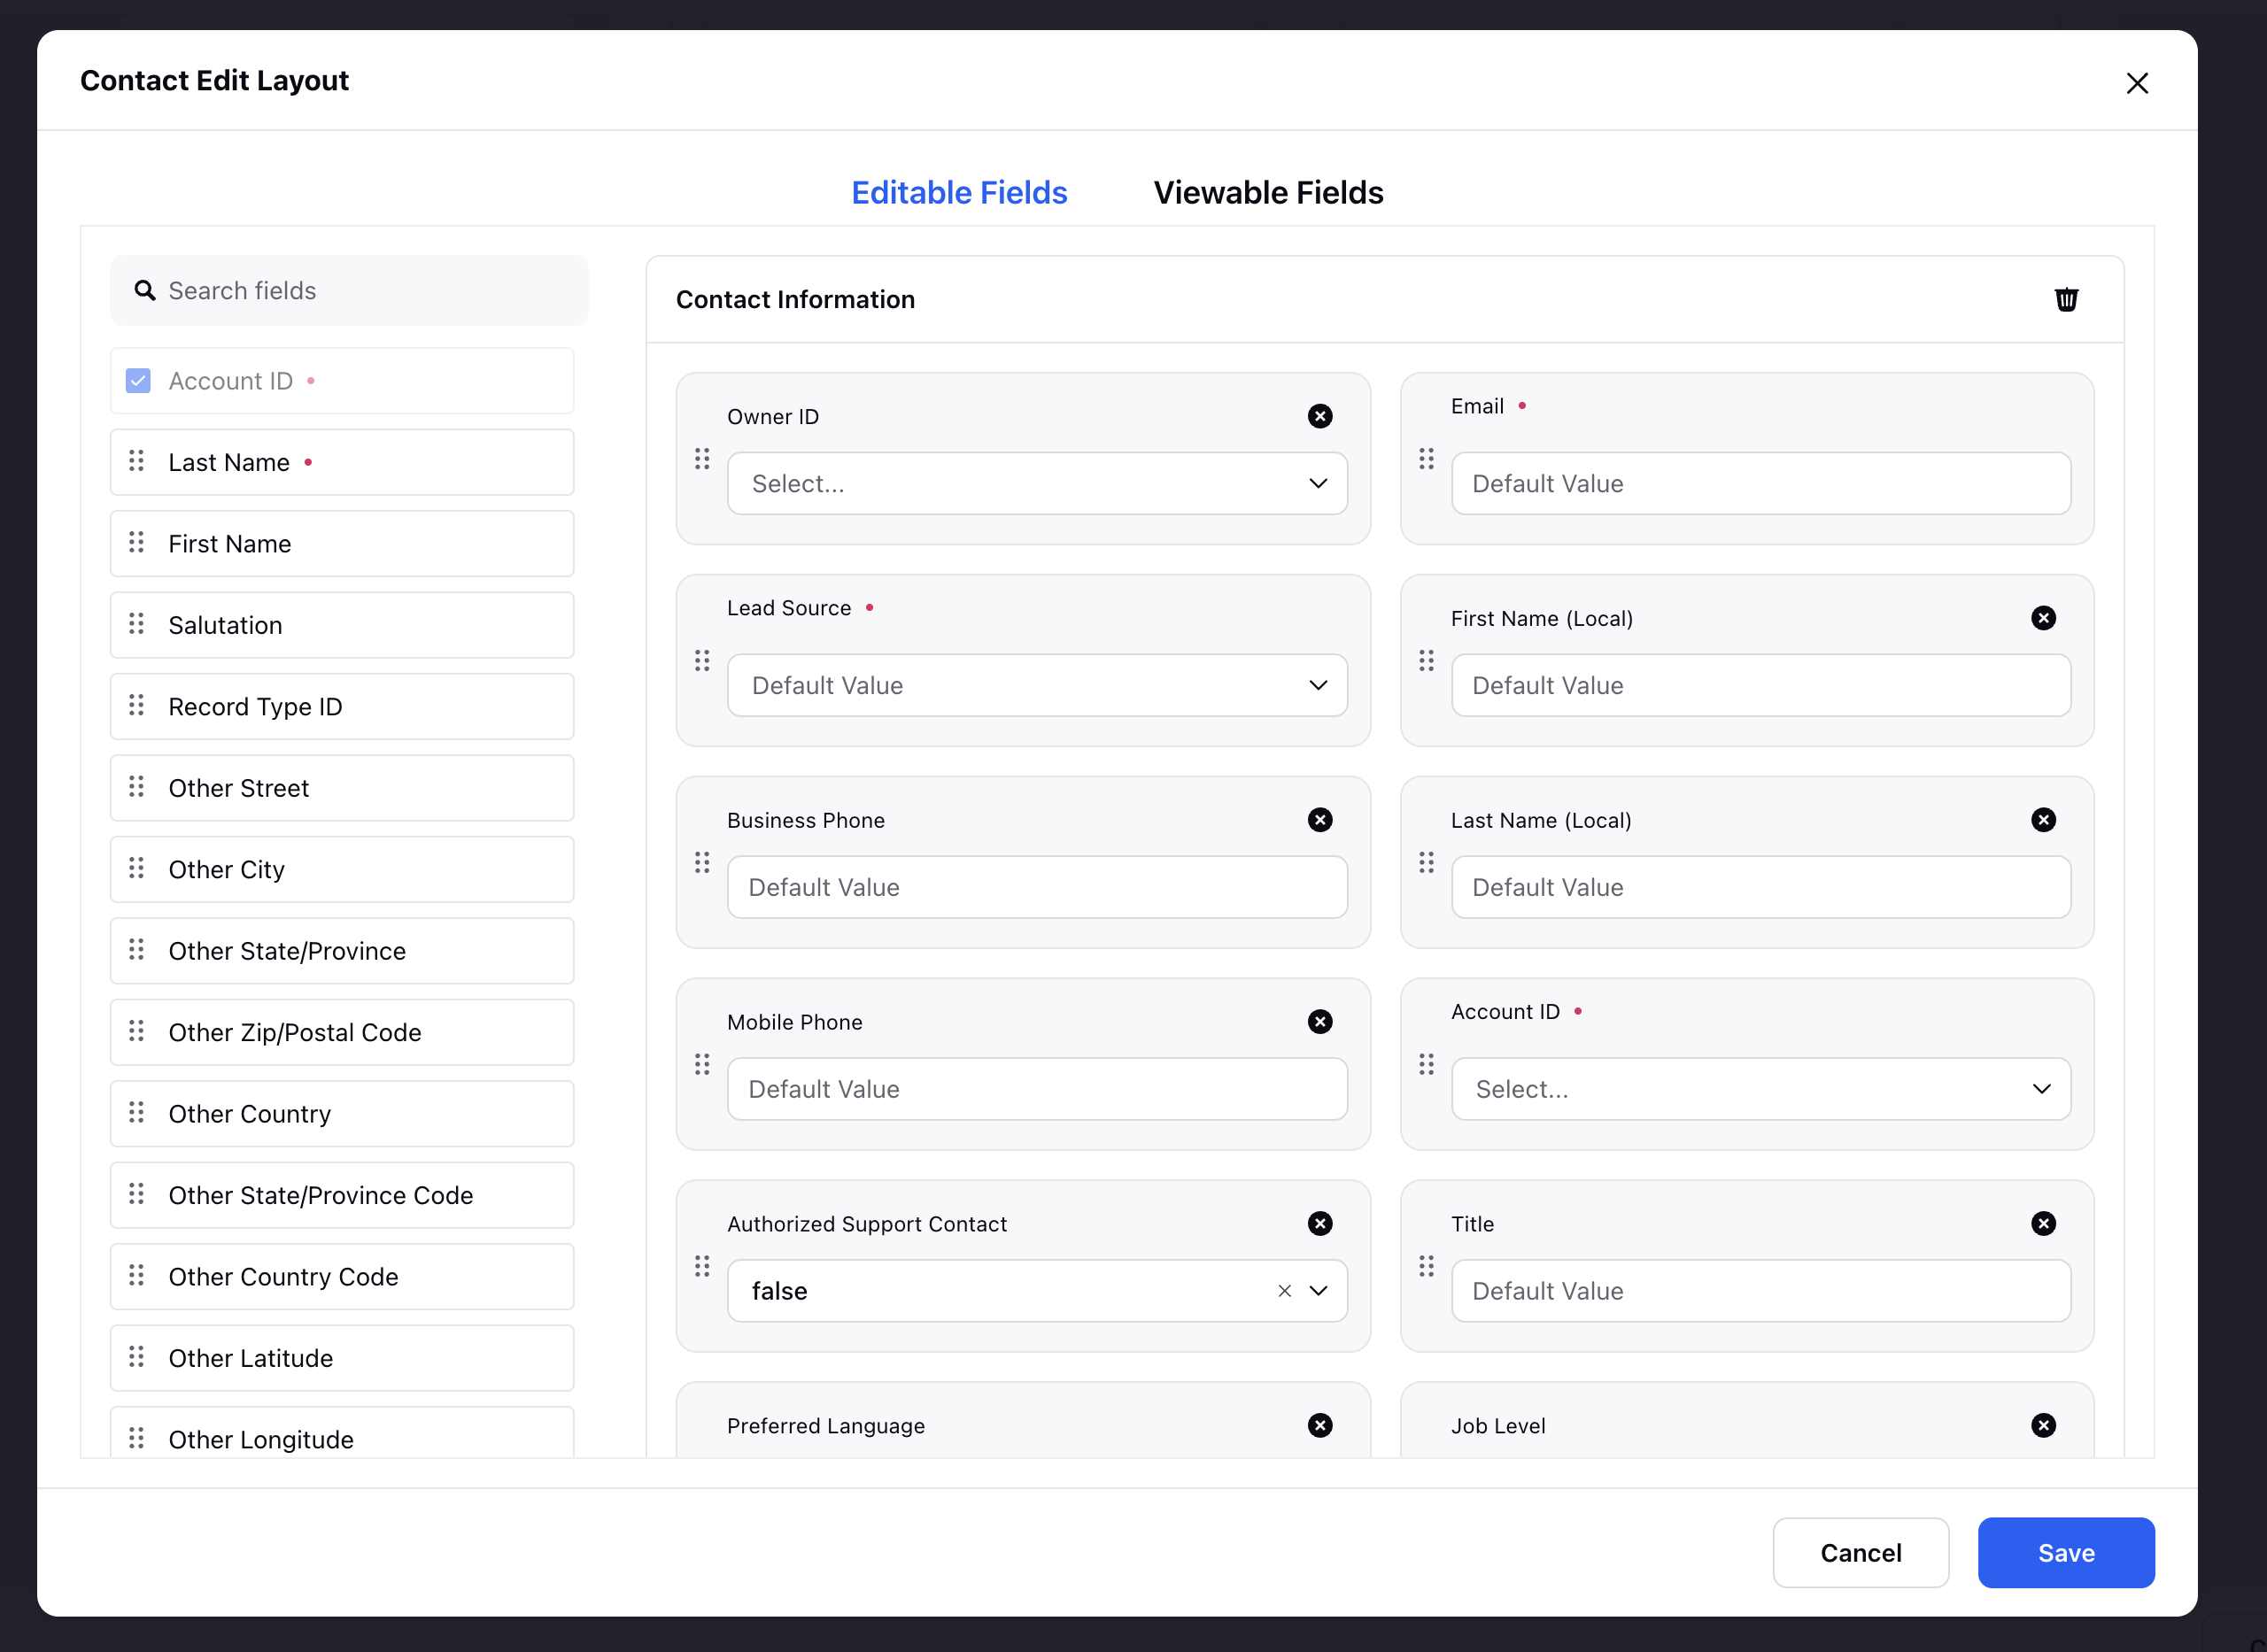
In the Screen Layouts section, click Edit Fields.
In the Contact Edit Layout window, define the following:
Editable Fields – Fields that that agents can modify directly (e.g., Phone, Mailing Address).
Viewable Fields – Fields that are read-only and provide context without allowing edits (e.g., Salesforce Contact ID).
Once all fields are set according to your requirements, click Submit in the bottom-right corner of the Contact Edit Layout window.
Set Account Requirement for Contact Creation
Define whether linking a Contact to an Account is mandatory.
To make an account mandatory during contact creation, check the Is Account Mandatory for Contact Creation? box.
Leave the box unchecked if this requirement does not apply to your use case.
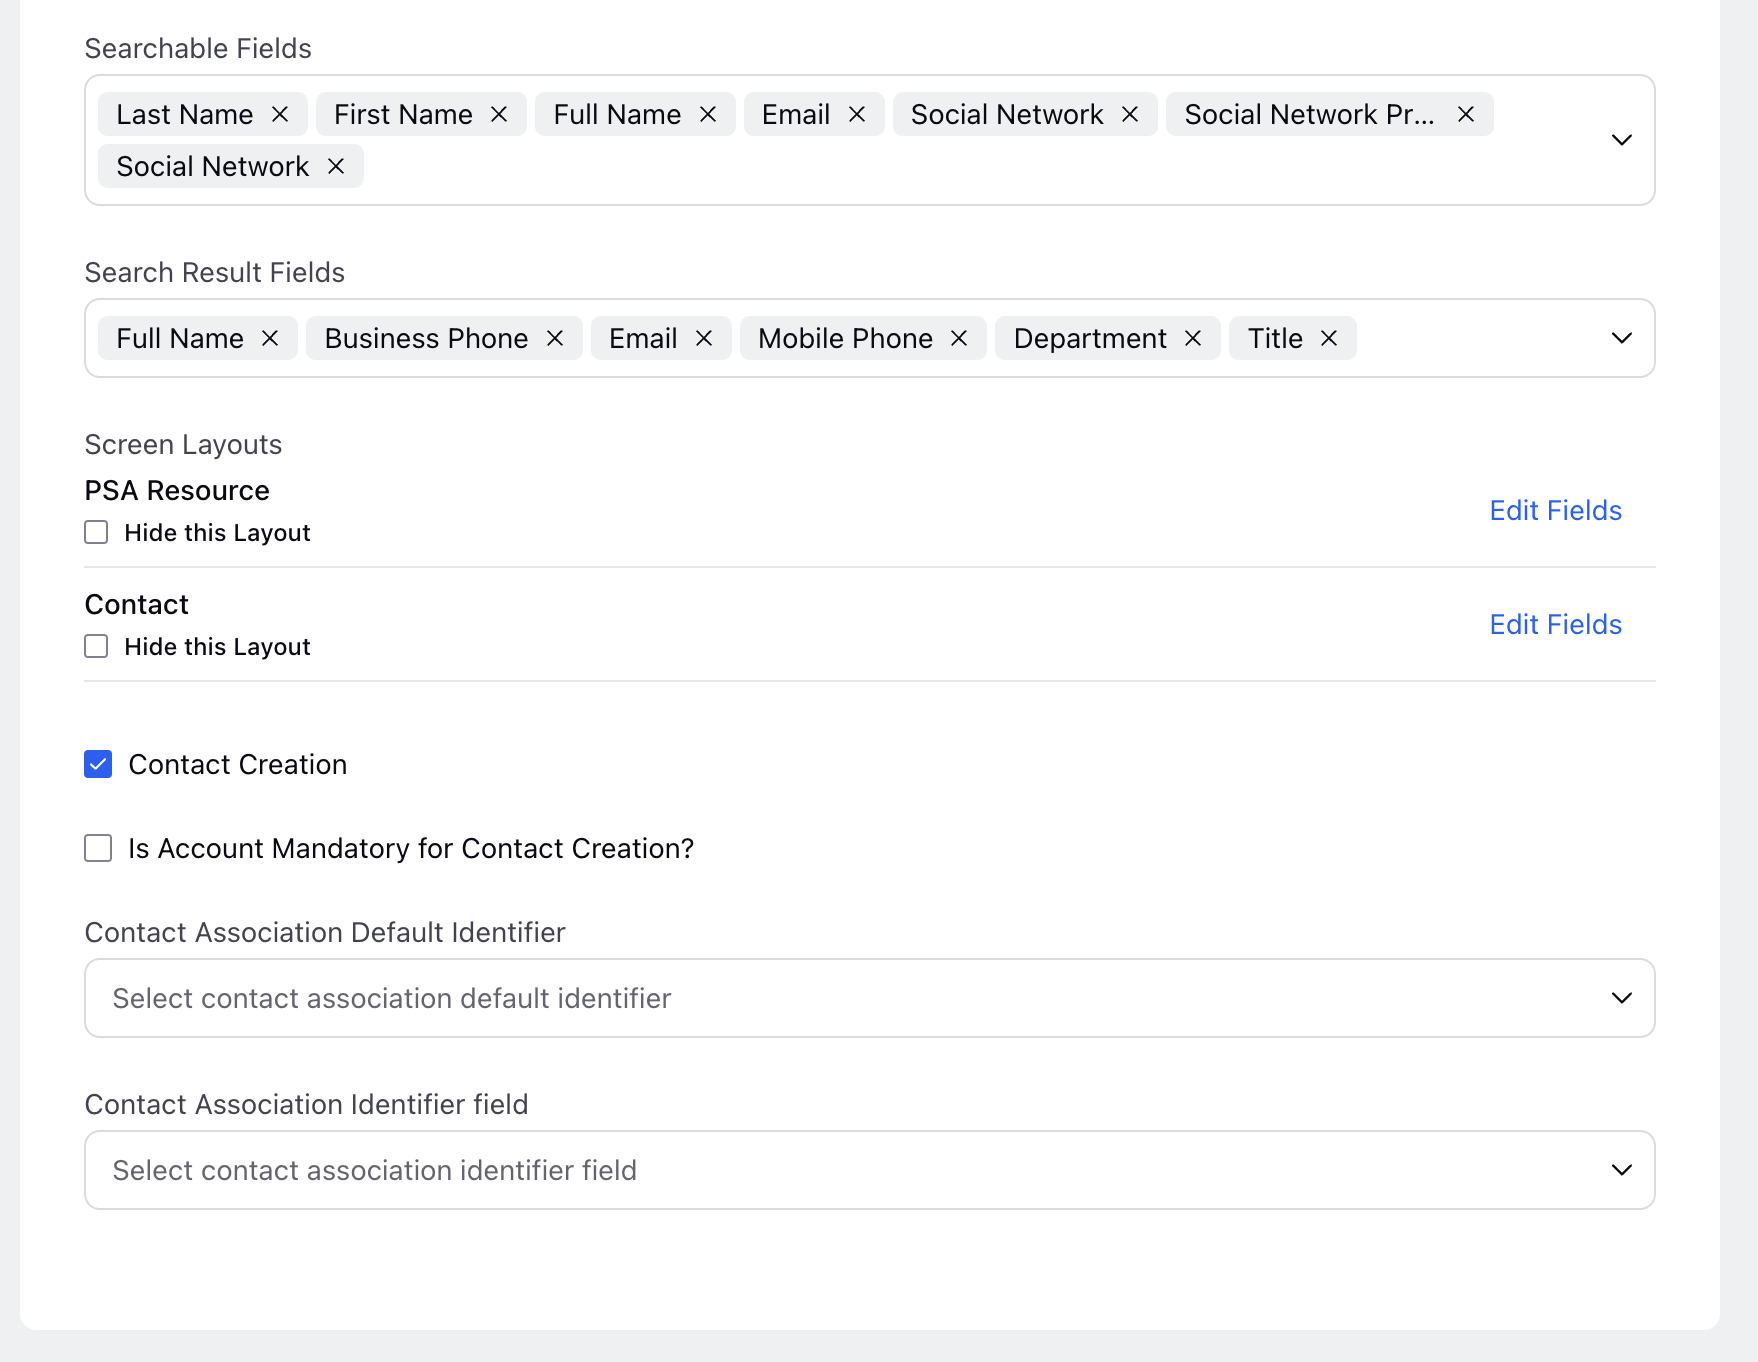
Contact Creation and Association Settings
These settings control how new contacts are created and how incoming messages are matched to existing Salesforce contacts.
Contact Creation (Checkbox): Enable this checkbox to allow automatic creation of new contacts when a matching contact is not found in the system. If disabled, only existing contacts can be associated.
Contact Association Default Identifier: Select the primary identifier used to associate incoming data with an existing account. This ensures consistency in linking records within your CRM system. You can select among the Name, Email or Phone as default identifier.
Contact Association Identifier Field: Choose the exact field within the selected identifier type for mapping and association (e.g., email_address if "Email" is selected as the identifier type).
This setup ensures proper contact association between Sprinklr and Salesforce.
CTI Configuration (Optional)
The CTI Configuration window allows you to configure the settings for the Computer Telephony Integration (CTI) adapter. This setup ensures seamless interaction between Sprinklr and your CRM system during inbound and outbound calls.
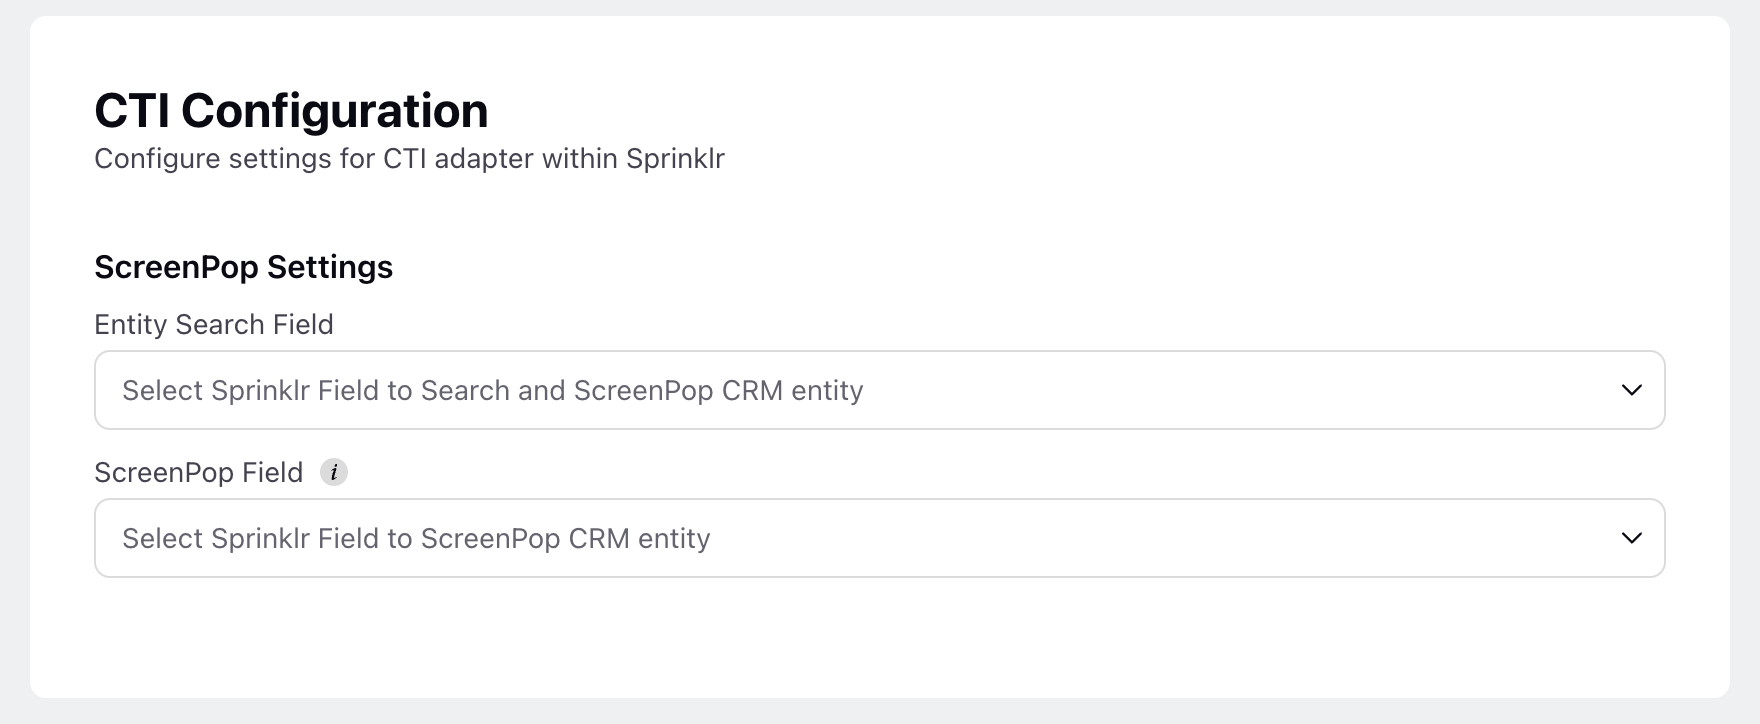
ScreenPop Settings
ScreenPop settings determine how CRM records are retrieved and displayed when a call is received or placed.
1. Entity Search Field
Select the Sprinklr Field that will be used to search for CRM entities when a call is initiated.
This field helps identify and fetch the relevant customer or account details from the CRM.
2. ScreenPop Field
Choose the Sprinklr Field that will trigger the ScreenPop of a CRM entity.
When a match is found based on the selected Entity Search Field, the system will display the relevant CRM record using the defined ScreenPop Field.
By configuring these settings, agents can access customer information in real-time, improving efficiency and customer interactions.
Manage Visibility Settings
This section explains how to manage the visibility of the Salesforce configuration across workspaces, users, and groups.
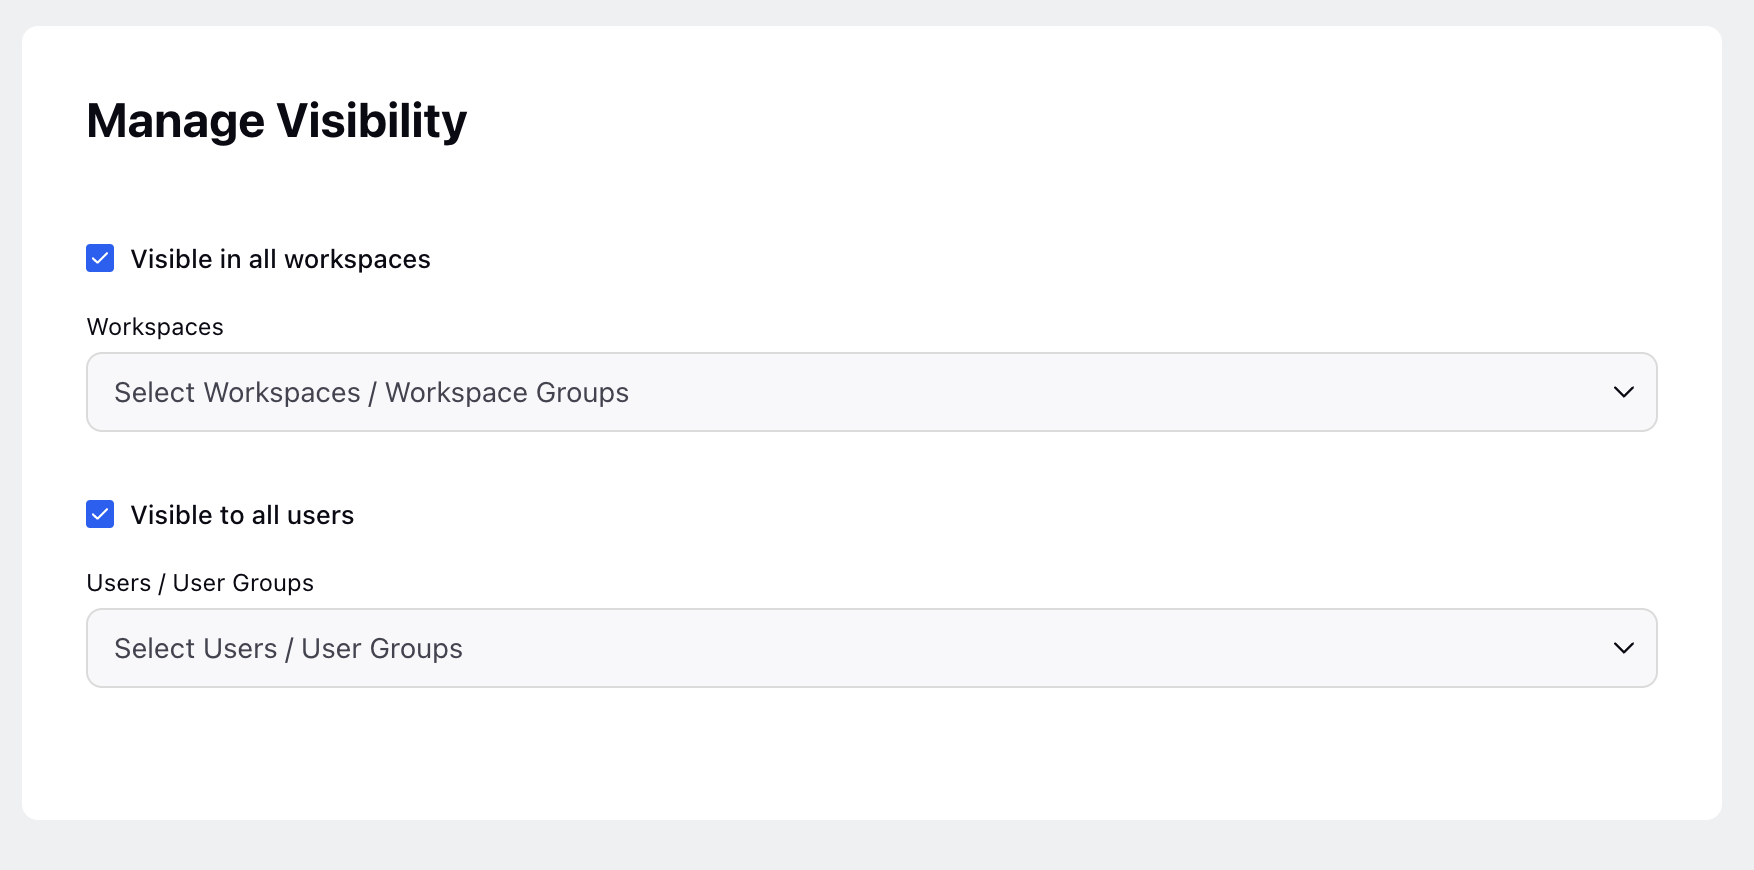
1. Configure Visibility Options
In the Manage Visibility tab, select the visibility settings for the Salesforce configuration.
To make the configuration accessible across all workspaces, check the Visible in All Workspaces box.
To restrict access to specific workspaces, select the appropriate Workspaces from the drop-down menu.
To grant access to specific users or user groups, select the relevant User/User Groups from the drop-down menu.
2. Save the Configuration
Click Save in the bottom-right corner to apply the Salesforce configuration settings.
After completing these configurations, your Salesforce Connector will be properly set up to manage contact mapping and visibility in Sprinklr.