Configure Time Off Policies
Updated
Time Off in Sprinklr WFM refers to periods when agents are not working, typically for rest, personal matters, or vacations. Time Off policies are essential for defining how different Time Off types will function. These policies govern various aspects, such as accrual rates, approval requirements, and carryovers. By setting up and maintaining these policies, you can ensure an efficient process for handling time off requests and maintaining capacity plans.
This section outlines the essential steps for managing Time Off Policies, including:
Creating Time Off Policies
Enable/Disable Time Off Policies
Editing Time Off Policies
Cloning Time Off Policies
Sharing Time Off Policies
Deleting Time Off Policies.
Create Time Off Policies
Prerequisites for creating Time Off Policies:
Sprinklr WFM should be enabled for the environment.
You must have access to the Workforce Manager Persona App.
Create permission under the Time Off Policy section in the Workforce Management module.
Follow these steps to create Time Off Policies:

Go to the Workforce Manager Persona App on the Launchpad.

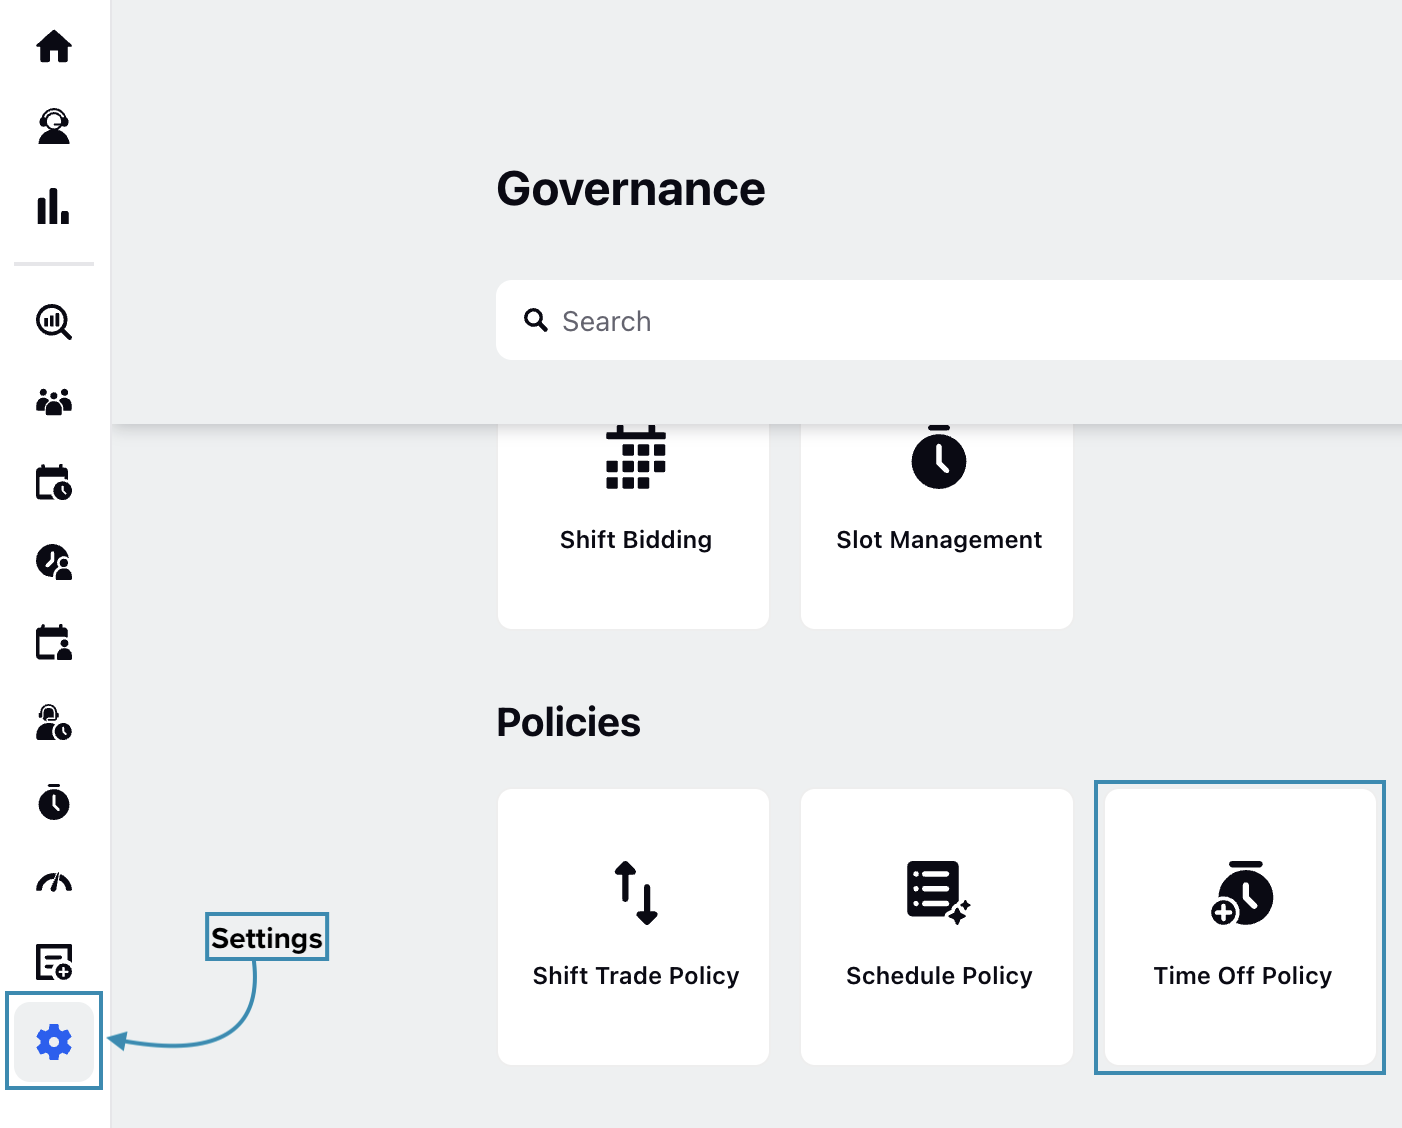
Select Settings from the Left Pane to open the Governance page.
Go to Time Off Policy to open the Time Off Policy Record Manager.

Click the “+Time Off Policy” button at the top right of the page to open the page where you can create new Time Off Policies.
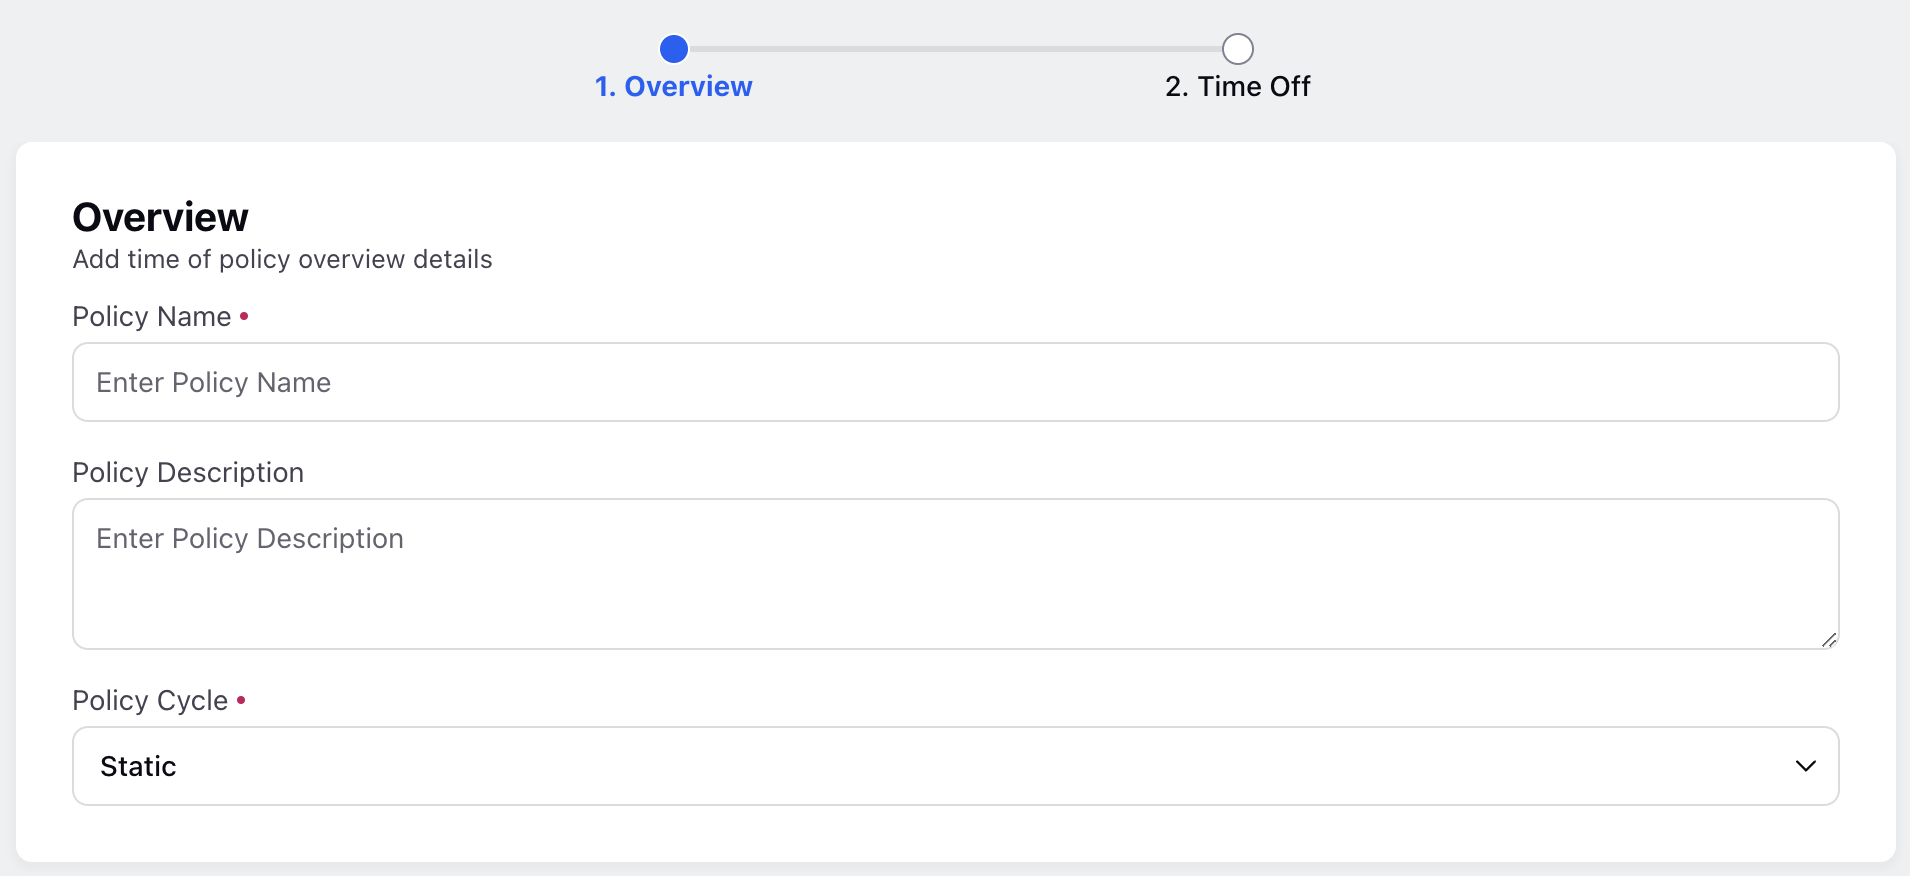
Fill in the required fields on the Overview page. Fields marked with a red dot are mandatory. Below are the descriptions of the fields on this page:

Policy Name: Enter the name of the Time Off Policy. (Required)
Description: Provide a brief description of the Time Off Policy.
Policy Cycle: Choose if the Time Off Policy cycle should be Static or Dynamic. A Static policy cycle means that when assigning this Time Off Policy to agents, you must specify the date range during which the policy will be active. A Dynamic policy cycle means the Time Off Policy duration will be set automatically based on the agents' date of joining with the default duration of 1 year. (Required)
Click the Next button at the bottom right of the page to open the Policy Details page.
Fill in the required fields on the Policy Details page. Fields marked with a red dot are mandatory. Below are the descriptions of the fields on this page:

Time Off Type: Select the Time Off type to which the Time Off Policy will apply. The list will show existing Time Off types in your environment. Refer to this article for details on creating Time Off types. (Required)
Note: Unless specified otherwise, the units of the fields in this section will be the same as those selected while creating the Time Off type.
Time Off Allocation Rules
This section details the allocation rules for the selected Time Off type. It covers how the Time Off accrues over time, the limits on how much can be carried over to the next period, and the conditions under which the accrued time off will expire.
Fixed Balance: Specify the lump sum Time Off balance that must be allocated to agents at the start of the policy.
Accrual Quantity: Enter the amount of the Time Off type to be allocated to agents based on the frequency specified in the Accrual Frequency field.
Note: The following Accrual Frequency and Accrual happens on fields will be visible only when the Accrual Quantity field is specified.
Accrual Frequency: Choose the frequency (Weekly or Monthly) at which the amount of the Time Off type will be allocated to agents. (Required)
Accrual happens on: Select when the accrued Time Off quantity will be allocated to agents. If Weekly is selected in the Accrual Frequency field, select the day of the week (for example, Monday or Tuesday) on which the accrued Time Off quantity will be allocated to agents.
If Monthly is selected in the Accrual Frequency field, select the day of the month (for example, 1st of Month or 2nd of Month) on which the accrued Time Off quantity will be allocated to agents. (Required)
Maximum Carry Over: Enter the maximum amount of unused Time Off that will be carried over to the next cycle of the Time Off Policy.
Max Allocation: Specify the maximum balance of the Time Off that agents can accumulate. This will include any past carried-over balance that they bring. Any credit exceeding this limit will automatically expire.
Time Off Expiry: Specify the duration after which the allocated/accrued Time Off will expire. It can be specified in Days or Months.
Note: Accrued Time Offs will expire after the specified interval from the date of credit of the Time Off balance.

Reminder Message: Provide a message that will be sent to agents as a reminder when their allocated/accrued Time Off is about to expire. This field is visible only when a value is entered in the Time Off Expiry field.
Send Prior to Expiry Date: Specify the timing for agents to receive reminders before their Time Off expires. You can set the reminder to be sent a certain number of Days or Months prior to the expiry date. This field is visible only when a value is entered in the Time Off Expiry field.
Time Off Request Rules
This section outlines the guidelines for agents to request the selected Time Off. It includes the number of requests that can be made within a given interval, the required advance notice for submitting requests, and if the Time Off requires supporting documents.

Time Off Duration: Enter the minimum and maximum duration agents can request at a time for the Time Off type. (Required)
Maximum Time Off Requests Allowed: Enter the quantity of Time Off agents can request within a given period. The interval can be configured Per Month, Per Week, or Per Day.
Start Day of the Week: Select the day of the week on which the week must start. This field is visible only when the interval is set to Per Week. (Required)
Time Off Notice: Enter how far in advance agents must request this Time Off type before the intended period. It can be specified in Hours or Days.
Time Off Request Window: Enter the window, starting from the current date, for which agents can apply for this Time Off type. For example, enter 3 months to allow casual leave to be requested for any day within 3 months.

Business Hours: Select the business hours from the list of pre-existing business hours on your environment for the Time Off Policy.
Business Holiday List: Select the business holidays list from the list of pre-existing business holidays for the Time Off Policy. Agents cannot request Time Off on these business holidays.
Allow Backdated Time Off: Enable this option to allow agents to apply for a Time Off in the past. If enabled, you must enter the maximum time (in Days or Hours) in the past for which agents can request Time Off in the Maximum Lookback Duration field.
Requires Supporting Document: Enable this option to require agents to attach supporting document(s) when requesting Time Off.
Time Off Approval Rules
This section outlines the approval workflow for Time Off requests. You can configure requests to be automatically accepted, require supervisor approval, or go through a tiered approval process involving multiple levels of approval.

Approval Workflow: Select how Time Off requests will be approved once they are created by agents. (Required)
Requires approval by the Supervisor: Select this option if the agent’s supervisor or manager must approve the Time Off request. It is selected by default.
Tiered Approval (multiple approvals): Select this option if multiple people must approve the Time Off request. Refer to this article on how to create Tiered Approvals.
Auto Approval: Select this option to automatically approve the Time Off request without the need for manual intervention.
Click the Add Policy button to configure other Time Off types.
Click the Create button at the bottom right of the page to save the Time Off Policy with the specified configurations of the Time Off types.
After creating a Time Off Policy, you need to enable it. The following section explains how to enable/disable Time Off Policies.
Enable/Disable Time Off Policies
Prerequisites for enabling/disabling Time Off Policies:
Sprinklr WFM should be enabled for the environment.
You must have access to the Workforce Manager Persona App.
Create permission under the Time Off Policy section in the Workforce Management module.
Existing Time Off Policy.
Scenario: The contact center decides to temporarily suspend the personal days policy due to a high volume of customer service requests. The Workforce Manager disables the personal days policy, ensuring that agents cannot request personal days during this period. Once the volume decreases, the policy is re-enabled.
Follow these steps to enable or disable a Time Off Policy:
Navigate to the Time Off Policy Record Manager.

Click the toggle switch in the Policy Name column corresponding to the Time Off Policy to enable or disable the Time Off Policy.
This completes the process of enabling or disabling a Time Off Policy. Once the Time Off Policy is created and enabled, you need to assign it to agents. This is necessary so that the configured allocation, request, and approval rules apply to them.
Edit Time Off Policies
Prerequisites for editing Time Off Policies:
Sprinklr WFM should be enabled for the environment.
You must have access to the Workforce Manager Persona App.
Edit permission under the Time Off Policy section in the Workforce Management module.
Existing Time Off Policy.
Scenario: The contact center updates its annual leave policy to increase the number of days off for agents. The Workforce Manager edits the existing annual leave policy to reflect the new rules, ensuring that the changes are applied.
Follow these steps to edit a Time Off Policy:
Navigate to the Time Off Policy Record Manager.

Hover over the vertical ellipsis (⋮) icon corresponding to the Time Off Policy you want to edit. This will show a list of options.
Select Edit from the list of options.
Update the necessary details for the selected Time Off Policy. The fields are the same as those used when creating a Time Off Policy.
After entering the updated details, click the Save button at the bottom right of the page to save the Time Off Policy with new details.
This completes the process of editing Time Off Policies.
Clone Time Off Policies
Prerequisites for cloning Time Off Policies:
Sprinklr WFM should be enabled for the environment.
You must have access to the Workforce Manager Persona App.
Clone permission under the Time Off Policy section in the Workforce Management module.
Existing Time Off Policy.
Scenario: A new branch of the contact center is opening in a different region, and the manager wants to replicate an existing Time Off Policy with minor adjustments. The Workforce Manager uses the cloning feature in the WFM module to duplicate the current Time Off Policies, then makes the necessary adjustments before applying them to the new branch.
Follow these steps to clone a Time Off Policy:
Navigate to the Time Off Policy Record Manager.

Hover over the vertical ellipsis (⋮) icon corresponding to the Time Off Policy you want to clone. This will show a list of options.
Select Clone from the list of options to open the Clone Time Off Policy dialog box.

Enter the name for the cloned Time Off Policy in the Policy Name field.
Click the Clone button in the dialog box to create a cloned version of the Time Off Policy.
This completes the process of cloning Time Off Policies.
Share Time Off Policies
Prerequisites for sharing Time Off Policies:
Sprinklr WFM should be enabled for the environment.
You must have access to the Workforce Manager Persona App.
Share permission under the Time Off Policy section in the Workforce Management module.
Existing Time Off Policy.
Follow these steps to share a Time Off Policy:
Navigate to the Time Off Policy Record Manager.

Hover over the vertical ellipsis (⋮) icon corresponding to the Time Off Policy you want to share. This will show a list of options.
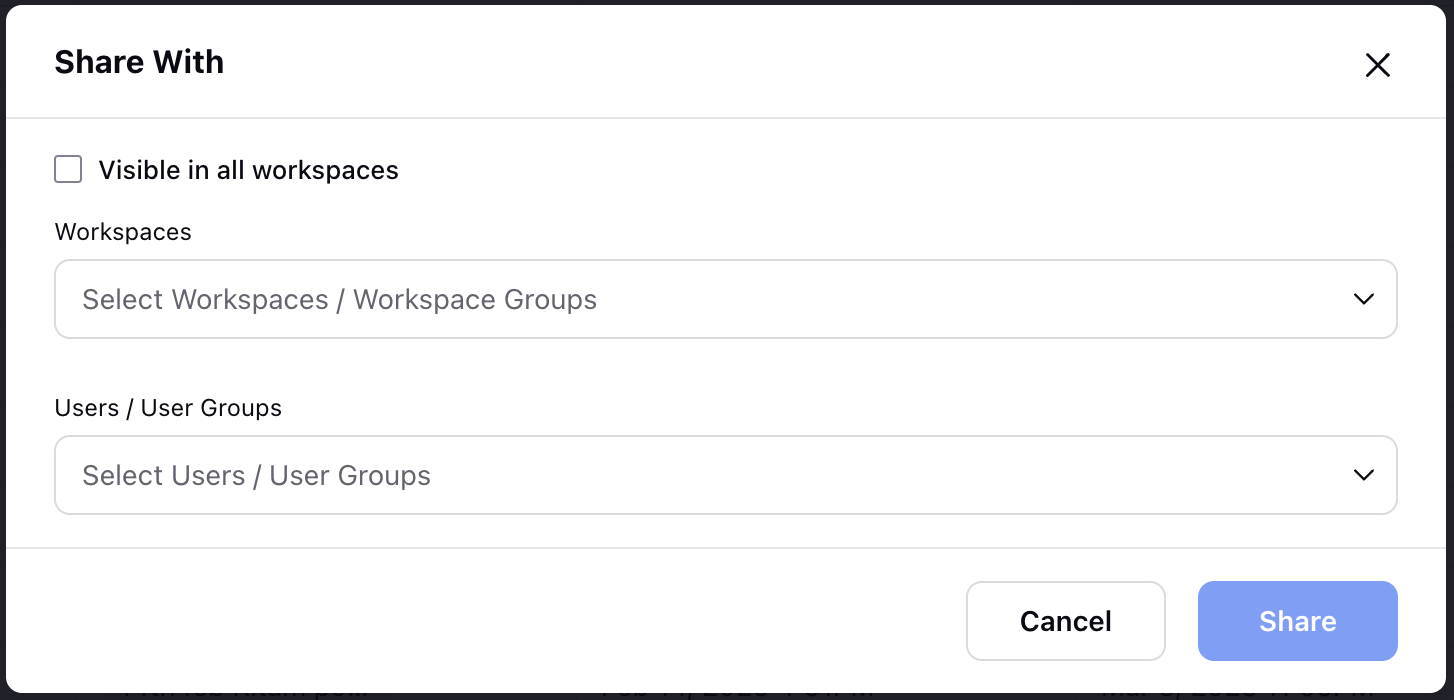
Select Share from the list of options to open the Share With dialog box.
Fill in the fields in the dialog box:

Visible in all workspaces: Select this checkbox if you want to share the Time Off Policy with all available Workspaces.
Workspaces: Select the Workspace(s) you want to share the Time Off Policy with. This field will be accessible only if the Visible in all workspaces checkbox is not selected.
Users/User Groups: Select the User(s)/User Group(s) with whom you want to share the Time Off Policy. This field will be accessible only if the Visible in all workspaces checkbox is not selected.
Click the Share button in the dialog box. This will share the Time Off Policy with the selected Workspace(s) and User(s)/User Group(s).
This completes the process of sharing Time Off Policies.
Delete Time Off Policies
Prerequisites for deleting Time Off Policies:
Sprinklr WFM should be enabled for the environment.
You must have access to the Workforce Manager Persona App.
Delete permission under the Time Off Policy section in the Workforce Management module.
Existing Time Off Policy.
Scenario: The contact center decides to eliminate a specific Time Off Policy that is no longer relevant. The Workforce Manager deletes the outdated Time Off Policy, ensuring it is no longer available for agents to request.
Follow these steps to delete a Time Off Policy:
Navigate to the Time Off Policy Record Manager.

Hover over the vertical ellipsis (⋮) icon corresponding to the Time Off Policy you want to delete. This will show a list of options.
Select Delete from the list of options to open the Delete Leave Policy dialog box.

Click the Submit button in the dialog box. This action cannot be undone.
This completes the process of deleting Time Off Policies.
Note: When deleting Time Off Policies, consider the following factors:
If the Time Off Policy is enabled and assigned to agents, it cannot be updated or deleted.
If the Time Off Policy is enabled but not assigned to any agent, it can be edited but not deleted.
If the Time Off Policy is disabled and not assigned to any agent, it can be edited and deleted.