iOS
Updated
This article walks you through the step-by-step process of integrating Sprinklr Live Chat into your WebView application.
Step 1 - Getting Started
1. Creating Live Chat Controller, Adding Live Chat URL and Injecting JavaScript to Listen to WebView Events
appId=60c1d169c96beb5bf5a326f3_app_950954: Indicates the Live Chat application ID. Reach out to the Sprinklr Services team at tickets@sprinklr.com to get the correct App ID.
device=MOBILE: Indicates that the page is mobile responsive.
enableClose=true: Indicates that a close button has been added to the Live Chat. When the user taps the close button, the onClose SDK callback is triggered. To use this functionality, set enableClose to true beforehand.
zoom=false: Indicates that zoom has been disabled inside the WebView.
skin=MODERN: Indicates that the Live Chat widget is using the modern theme.
webview=true: Indicates that the Sprinklr implementation is running inside a WebView. Based on this flag, WebView-specific functionality (such as downloading attachments) can be handled separately.
![]() Note: To identify the environment where your Sprinklr instance is deployed (for example, prod, prod2, prod4), contact your Success Manager or reach out to Sprinklr Support at tickets@sprinklr.com.
Note: To identify the environment where your Sprinklr instance is deployed (for example, prod, prod2, prod4), contact your Success Manager or reach out to Sprinklr Support at tickets@sprinklr.com.
let liveChatUrl = "http://prod-live-chat.sprinklr.com/page?appId=60c1d169c96beb5bf5a326f3_app_950954&device=MOBILE&enableClose=true&zoom=false"; // example URL, use the one provided by Sprinklr
![]() Note: See Example Projects.
Note: See Example Projects.
Injecting JavaScript to Listen to Chat Events
let jsString = """(function() {window.sprChat('onLoad', (error) => {if(!error) {window.webkit.messageHandlers.onLoadError && window.webkit.messageHandlers.onLoadError.postMessage("");}});window.sprChat('onClose', () => {window.webkit.messageHandlers.Close && window.webkit.messageHandlers.Close.postMessage("");});window.sprChat('onUnreadCountChange', (count) => {window.webkit.messageHandlers.OnUnreadCountChange && window.webkit.messageHandlers.OnUnreadCountChange.postMessage(count);});window.sprChat('onExternalEvent', (event) => {window.webkit.messageHandlers.OnExternalEventReceived && window.webkit.messageHandlers.OnExternalEventReceived.postMessage(event);});})();""" //js to inject inside webview to listen to close, webview load, notification count events and handle external events
override func viewDidLoad() {super.viewDidLoad()// defining delegate method names for js eventslet contentController = WKUserContentController()contentController.add(self, name: "Close")contentController.add(self, name: "onLoadError")contentController.add(self, name: "OnUnreadCountChange")contentController.add(self, name: "OnExternalEventReceived")let jsScript = WKUserScript(source: jsString, injectionTime: .atDocumentEnd, forMainFrameOnly: false)contentController.addUserScript(jsScript) // inject js inside webviewlet webConfiguration = WKWebViewConfiguration()webConfiguration.userContentController = contentController;webConfiguration.websiteDataStore = WKWebsiteDataStore.default();// this is required to allow video streaming through webviewwebConfiguration.allowsInlineMediaPlayback = true;let preferences = WKPreferences()preferences.javaScriptEnabled = true;webConfiguration.preferences = preferenceslet screenSize = UIScreen.main.boundslet screenWidth = screenSize.widthlet screenHeight = screenSize.heightwebView = WKWebView(frame: CGRect(x: 0, y: 0, width: screenWidth, height: screenHeight), configuration: webConfiguration) // Setting webview frame to use full device dimensionswebView.uiDelegate = selfwebView.navigationDelegate = selflet url = URL(string: liveChatUrl)!let urlRequest = URLRequest(url: url)webView.load(urlRequest) //Adding live chat url to webviewview.addSubview(webView)}func userContentController(_ userContentController: WKUserContentController, didReceive message: WKScriptMessage) {// edit: changed fun to funcprint(message.name)if ((message.name == "Close")){dismiss(animated: true) // Close view controller}if(message.name == "onLoadError") {// You can show some ui error}if(message.name == "OnUnreadCountChange") {// You can show the notification count using this, message.body will give count to you}if(message.name == "OnExternalEventReceived") {// Handle external event here}}
2. Adding Permissions for Media Upload/Download
Include the following permissions in Info.plist file:
<key>NSCameraUsageDescription</key><string>Messenger app requires access to the camera to capture the photos.</string><key>NSMicrophoneUsageDescription</key><string>Messenger app requires access to the microphone to record video.</string><key>NSPhotoLibraryUsageDescription</key><string>Messenger app requires access to the photos library.</string>
3. Initialize Messenger
Sprinklr Messenger can be initialized for both unauthenticated (anonymous) and authenticated users:
For Anonymous Users
If a user is not logged into your mobile app, you can open Live Chat without passing user information. An anonymous user profile will be created in Sprinklr.
For Authenticated Users
If a user is already logged into your mobile app, you can pass the authenticated details securely to the chat to authenticate the user on the chat itself. This process is called pre-authentication. In pre-authentication, you can pass the following information securely from the mobile app to the chat.
You can use two types of WebView URLs:
Without Hash Expiry: The hash does not expire.
With Hash Expiry: The hash expires after a specified period of time.
WebView URL (Without Hash Expiry):
URL Parameters:
user_id="pass required value": Indicates the ID that is passed to the user’s profile.
user_firstName="pass required value": Indicates the first name that is passed to the user’s profile.
user_lastName="pass required value": Indicates the last name that is passed to the user’s profile.
user_profileImageUrl="pass required value": Indicates the profile image URL that is passed to the user’s profile.
user_email="pass required value": Indicates the email ID that is passed to the user’s profile.
user_phoneNo="pass required value": Indicates the phone number that is passed to the user’s profile.
user_hash="pass required value": Indicates the hash generated for the user’s profile.
![]() Note: If you want to pass more values, use user context i.e. scenario 3.
Note: If you want to pass more values, use user context i.e. scenario 3.
To know the procedure of how to generate hash, see the How to Generate userHash section below.
WebView URL (With Hash Expiry):
URL Parameters:
user_id="pass required value": Indicates the ID that is passed to the user’s profile.
user_firstName="pass required value": Indicates the first name that is passed to the user’s profile.
user_lastName="pass required value": Indicates the last name that is passed to the user’s profile.
user_profileImageUrl="pass required value": Indicates the profile image URL that is passed to the user’s profile.
user_email="pass required value": Indicates the email ID that is passed to the user’s profile.
user_phoneNo="pass required value": Indicates the phone number that is passed to the user’s profile.
user_hash="pass required value": Indicates the hash generated for the user’s profile.
user_hashCreatedOn="pass required value": It indicates the timestamp (in epoch milliseconds) when the hash was generated. The hash will only be valid within the configured expiry window (default: ±1 minute), after which it will be considered invalid.
![]() Note: If you want to pass more values, use user context i.e. scenario 3.
Note: If you want to pass more values, use user context i.e. scenario 3.
To know the procedure of how to generate hash, see the How to Generate userHash section below.
How to Generate userHash?
The userHash is a generated HMAC (Hash-based Message Authentication Code). Sprinklr uses the sha256 hash function for HMAC generation. To create the userHash, you need to generate an HMAC for a concatenated string of user details, with each detail separated by an underscore (_).
You can generate either a userHash without expiry or a userHash that expires after a specified time.
User Details Without Hash Expiry
userId_firstName_lastName_profileImageUrl_phoneNo_emailExample String (Without Hash Expiry):
12345_John_Doe_https://example.com/profilePic.jpg_9876543210_John.Doe@example.com
User Details With Hash Expiry
For a userHash with expiry, include an additional timestamp (hashCreatedOn) indicating when the hash was created:
userId_firstName_lastName_profileImageUrl_phoneNo_email_hashCreatedOnExample String (With Hash Expiry):
12345_John_Doe_https://example.com/profilePic.jpg_9876543210_shane.warne@gmail.com_1753948567000Sample code for generating the HMAC is available for the following languages:
Note:
firstName, hash and one of email or phoneNumber are mandatory
User details are supposed to be concatenated to form a string, separated by underscore as shown below:
userId_firstName_lastName_profileImageUrl_phoneNo_emailIf you don’t have a few values, you need not send anything but keep the underscores as is. For example, let’s say you don’t have profileimageUrl, there will be 2 underscores after lastName. The string will be as shown below:
userId_firstName_lastName__phoneNo_email
Step 2 - Configurations
1. Localization Support
To achieve localization in Live Chat via WebView approach, you can pass certain “locale” string in query parameters of URL; this will be in addition to ones discussed in Step 1.
In the above URL, locale=en: It indicates the locale which you want to send for this app ID.
2. Opening Live Chat with Different Landing Screen
To open Live Chat in different states at different locations, you can pass the relevant string in the query parameters of URL; this will be in addition to ones discussed in Step 1.
Scenario 1: Directly landing on the home screen
Scenario 2: Directly landing on the new conversation screen
In the above URL:
scope=CONVERSATION: It indicates the the scope of live chat is limited to conversation screen
landingScreen=NEW_CONVERSATION: It indicates the landing screen i.e. new conversation is opened
Scenario 3: Directly landing on the last conversation screen
In the above URL:
scope=CONVERSATION: It indicates the the scope of live chat is limited to conversation screen
landingScreen=LAST_CONVERSATION: It indicates the landing screen i.e. last conversation is opened
![]() Note: Setting landingScreen=LAST_CONVERSATION allows brands to get users to land the customer on the last interacted open conversation. If there are no open conversations, the customer lands on a new conversation window
Note: Setting landingScreen=LAST_CONVERSATION allows brands to get users to land the customer on the last interacted open conversation. If there are no open conversations, the customer lands on a new conversation window
3. Passing User Contextual Information to Live Chat from Mobile
Scenario 1: Capture customer context from the mobile app on all cases of the user
Sometimes you might want to pass some contextual information in case custom fields for all conversations started by the user. (clientContext)
In the above URL,
context_fieldId = “pass required value”: It indicates the context which is passed to all cases of user.
Scenario 2: Update the profile context from mobile app on profile of user
Sometimes you might want to capture some context on the profile/user during the conversation or after the conversation. (userContext)
In the above URL,
userContext_fieldId = “pass required value”: It indicates the context which is passed to profile of user.
4. Blocking URLs That Do Not Contain the Live Chat Domain and Opening Them in an External Browser
let domainsToWhiteList = ["prod-live-chat.sprinklr.com", "live-chat-static.sprinklr.com"] // urls to whitelistfunc webView(_ webView: WKWebView, decidePolicyFor navigationAction: WKNavigationAction, decisionHandler: @escaping (WKNavigationActionPolicy) -> Void) {let url = navigationAction.request.urllet host = url?.hostvar isWhitelistUrl = false;for domain in domainsToWhiteList {if((host?.hasPrefix(domain)) ==true) {isWhitelistUrl = true}}if let url = navigationAction.request.url,!isWhitelistUrl,UIApplication.shared.canOpenURL(url) {UIApplication.shared.open(url)print(url)print("Redirected to browser. No need to open it locally")decisionHandler(.cancel)} else {print("Open it locally")decisionHandler(.allow)}}
5. Add Support to Download Attachment
When a user taps the Download button in Live Chat, they are redirected to a URL which contains the fileUrl and fileName parameters.
The URL can have the following formats:
livechat-app:url=${fileUrl}?fileName=${fileName}: When there are no query parameters present in fileUrl, add fileName as a new query parameter.
“livechat-app:url=${fileUrl}&fileName=${fileName}: When there are query parameters present in fileUrl already, add fileName as an extra query parameter.
You need to intercept the requests that have URLs starting with the livechat-app: prefix and parse these URLs to properly download the attachment. The steps to parse are:
Strip the livechat-app:url= prefix.
From the remaining URL, extract and remove the fileName query parameter. Use its value to name your file.
Using the remaining URL to fetch and download content.
![]() Note: While extracting the fileURL, remove the fileName query parameter from the original query. If it’s not removed, a signature mismatch may occur, resulting in a SignatureDoesNotMatch or BlobNotFound error.
Note: While extracting the fileURL, remove the fileName query parameter from the original query. If it’s not removed, a signature mismatch may occur, resulting in a SignatureDoesNotMatch or BlobNotFound error.
For example, when receiving a URL like “livechat-app:url= https://prod-sprcdn-assets.sprinklr.com/1234/sample.pdf?signature=XYZ&fileName=sample_name.pdf”, follow these steps.
Remove the prefix to get “https://prod-sprcdn-assets.sprinklr.com/1234/sample.pdf?signature=XYZ& fileName=sample_name.pdf”
Extract the fileName query parameter and name the file sample_name.pdf.
Use the remaining URL “https://prod-sprcdn-assets.sprinklr.com/1234/sample.pdf?signature=XYZ” to download the file.
func webView(_ webView: WKWebView, decidePolicyFor navigationAction: WKNavigationAction, decisionHandler: @escaping (WKNavigationActionPolicy) -> Void) {let url = navigationAction.request.url;var urlString = url?.absoluteString;if(urlString == nil){urlString="";}if (urlString != nil && urlString!.starts(with: "livechat-app:")) {let strippedUrl = urlString.replacingOccurrences(of: "livechat-app:url=", with: "")if var urlComponents = URLComponents(string: strippedUrl) {var fileName: String?if let queryItems = urlComponents.queryItems {for queryItem in queryItems {if queryItem.name == "fileName" {fileName = queryItem.valuebreak}}}urlComponents.queryItems = urlComponents.queryItems?.filter { $0.name != "fileName"}let cdnUrl = urlComponents.url?.absoluteString ?? ""// put your download logic here}return;}decisionHandler(.allow);}
Step 3 - Push Notifications
For more information on mobile push notifications, refer to Push Notifications in Mobile.
Prerequisite
Android: Google service.json file
iOS: APNS certificate (P12) along with its credentials
![]() Note: Consider the following points:
Note: Consider the following points:
Google service.json file can be different for staging/prod env
APNS certificate (P12) and its credentials must be different for staging/prod env
If you are testing the push notification setup on prod mobile application (iOS), ensure to use test flight build
If the Google service.json file is different for sandbox/prod env and you are testing the push notification setup on prod mobile application (Android), ensure to use test flight build
Configuration
To enable push notifications, raise a support ticket to tickets@sprinklr.com with the following information:
Google service.json file
APNS certificate (P12) along with its credentials
Live Chat AppID
Partner ID
Env
1) Register for Push Notifications
You can register the messenger for sending push notifications by providing push token received from apns/fcm as below:
![]() Note: Registration must only be initiated after the load is complete.
Note: Registration must only be initiated after the load is complete.
Create a function in the following way and pass token, deviceId and deviceName as arguments to it to register your device for push notification.
func asString(jsonDictionary: AnyObject) -> String {do {let data = try JSONSerialization.data(withJSONObject: jsonDictionary, options: .prettyPrinted)return String(data: data, encoding: String.Encoding.utf8) ?? ""} catch {return ""}}@objc func onRegister(sender : UIButton){let clientContext = ["mobileClientType": "IPHONE", "appVersion": "1", "deviceId": "123", "deviceName": "IPHONE_DEVICE", "deviceToken": "8A72039D97781CBC69263C833D9C7DA2BC09A14FEA35444A25CAC29CB127408D"] as AnyObjectlet stringifiedJson = asString(jsonDictionary: clientContext);let jsonString = "(function() {"+"window.sprChat('registerDevice'," + stringifiedJson + ");})();"webView.evaluateJavaScript(jsonString);}
2) Unregister for Push Notifications
To stop receiving notifications, deregister your device as shown below:
func asString(jsonDictionary: AnyObject) -> String {do {let data = try JSONSerialization.data(withJSONObject: jsonDictionary, options: .prettyPrinted)return String(data: data, encoding: String.Encoding.utf8) ?? ""} catch {return ""}}@objc func onUnregister(sender : UIButton){let clientContext = ["mobileClientType": "IPHONE", "appVersion": "1", "deviceId": "123", "deviceName": "IPHONE_DEVICE"] as AnyObjectlet stringifiedJson = asString(jsonDictionary: clientContext);let jsonString = "(function() {"+"window.sprChat('unregisterDevice'," + stringifiedJson + ");})();"webView.evaluateJavaScript(jsonString);}
3) Handle Messenger Push Notifications
Once you have registered for messenger push notifications, then you might receive notifications from your platform as well as messenger. To check if notification is messenger notification you can check as below:
![]() Note: When the user is on the Live Chat app, they will always receive the Live Chat messenger push notifications. However, you can define whether users should receive the messenger notifications when they are on the brand app and not the Live Chat app. That is, the brand app is in the foreground and the Live Chat app is running in the background.
Note: When the user is on the Live Chat app, they will always receive the Live Chat messenger push notifications. However, you can define whether users should receive the messenger notifications when they are on the brand app and not the Live Chat app. That is, the brand app is in the foreground and the Live Chat app is running in the background.
To do that, you can check whether the notification is a Live Chat notification and handle it according to brand requirements. For example, you can choose not to display Live Chat notifications when the user is on the brand app.
let et = userInfo["et"] as? Stringlet isMessengerNotification = et == "LIVE_CHAT_MOBILE_NOTIFICATION";if (isMessengerNotification) {handleNotification(userInfo: userInfo);}
Once you have identified if the notification is messenger notification you need open the messenger and call handle notification method as described below:
@objc func handleNotification(userInfo : NSDictionary){let stringifiedJson = asString(jsonDictionary: userInfo);let jsonString = "(function() {"+"window.sprChat('onNotification'," + stringifiedJson + ");})();"webView.evaluateJavaScript(jsonString);}
Troubleshooting
This section lists the common issues and their resolutions:
Issue 1: Sprinklr WebView URL Not Working
Check if the network connection is properly established. To verify, try loading google.com within your WebView.
Check whitelisng is done properly in the Live Chat builder in Sprinklr platform.
Steps: Sprinklr Service > Live Chat Care > “ three dots” next to your Live chat Application > Edit > Application Configuration Screen

Check example URLs are loading like https://prod0-live-chat.sprinklr.com/page?appId=app_1000073145
Issue 2: Live Chat not Showing Up When Passing Authenticated User Details
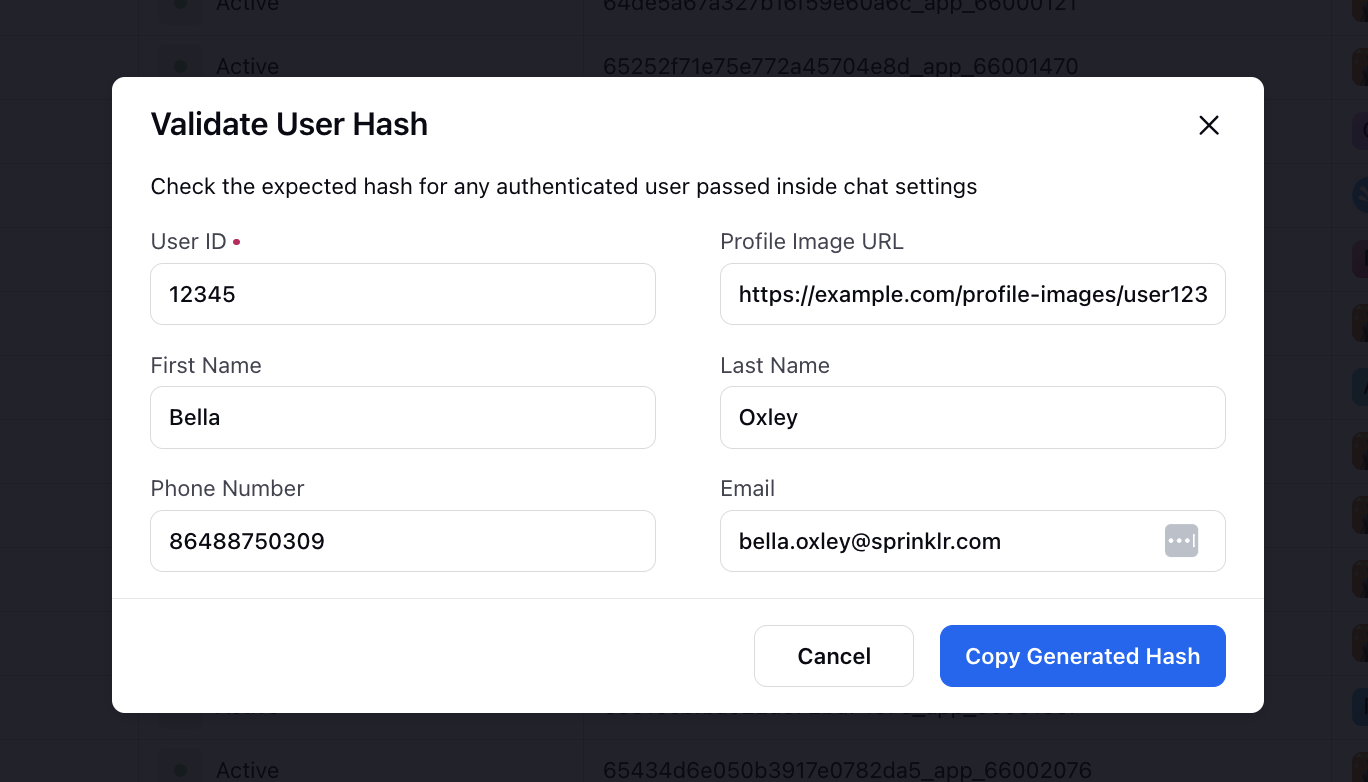
Check the expected hash for any authenticated user passed inside chat settings.
Hover over the Options icon alongside your Live Chat Application and select Validate User Hash.

On the Validate User Hash window, enter User ID, Profile Image URL, First Name, Last Name, Phone Number and Email. Click Copy Generated Hash and verify it with the hash generated by you.
Issue 3: Attachment Icon Not Working
Check if the user has the necessary permission like camera and photo
Check step 1.3
Issue 4: No Sound During Audio/Video Calls
If you are unable to hear any sound in an audio/video call, make sure that you have added the following configuration to the WebView:
webView.configuration.mediaTypesRequiringUserActionForPlayback = []