Organic Split (A/B) Testing on Sprinklr
Updated
Overview
A/B testing for organic content on social media is a method used by brands to compare two or more versions of a post, creative, or message to determine which performs better in terms of engagement, reach, or conversions. By systematically testing variations of content, brands can optimize their social media strategy, improving the effectiveness of their posts based on real-time audience feedback and interactions.
![]() Note: This capability will be available after the 19.8.1 Release.
Note: This capability will be available after the 19.8.1 Release.
A/B Testing - what it is
For brands, A/B testing is essential for fine-tuning social media content to maximize its impact without the added cost of paid advertising. For example, a brand might create two versions of a Facebook post featuring different videos, captions, or hashtags. By posting these variations to a smaller segment of their audience, the brand can analyze which version garners higher engagement, such as likes, comments, and shares. The winning version can then be rolled out to the broader audience, ensuring the highest possible engagement rates. This iterative process helps brands make data-driven decisions, refining their content strategies to better connect with their audience and achieve their marketing objectives.
You can create up to 4 variants with different parameters such as media file, thumbnail, title, and description, and select a winning metric like number of plays, impressions, link clicks, average time watched, etc. Once the test ends, the winning variant will be visible to the entire audience and on the brand account timeline.
Business Use Cases
Sprinklr allows you to try split testing or A/B Testing for the posts you publish on Sprinklr. A/B testing allows you to run a test on up to four variants of the same post, and use the one your audience likes most, based on parameters specified by you. During the test, the posts are made visible to a subset of your audience, but not published. When the test ends, the winning post is published, visible to your full audience.
Limitations(channel)
![]() Note: Currently, this functionality is available only for Organic Facebook video posts and reels.
Note: Currently, this functionality is available only for Organic Facebook video posts and reels.
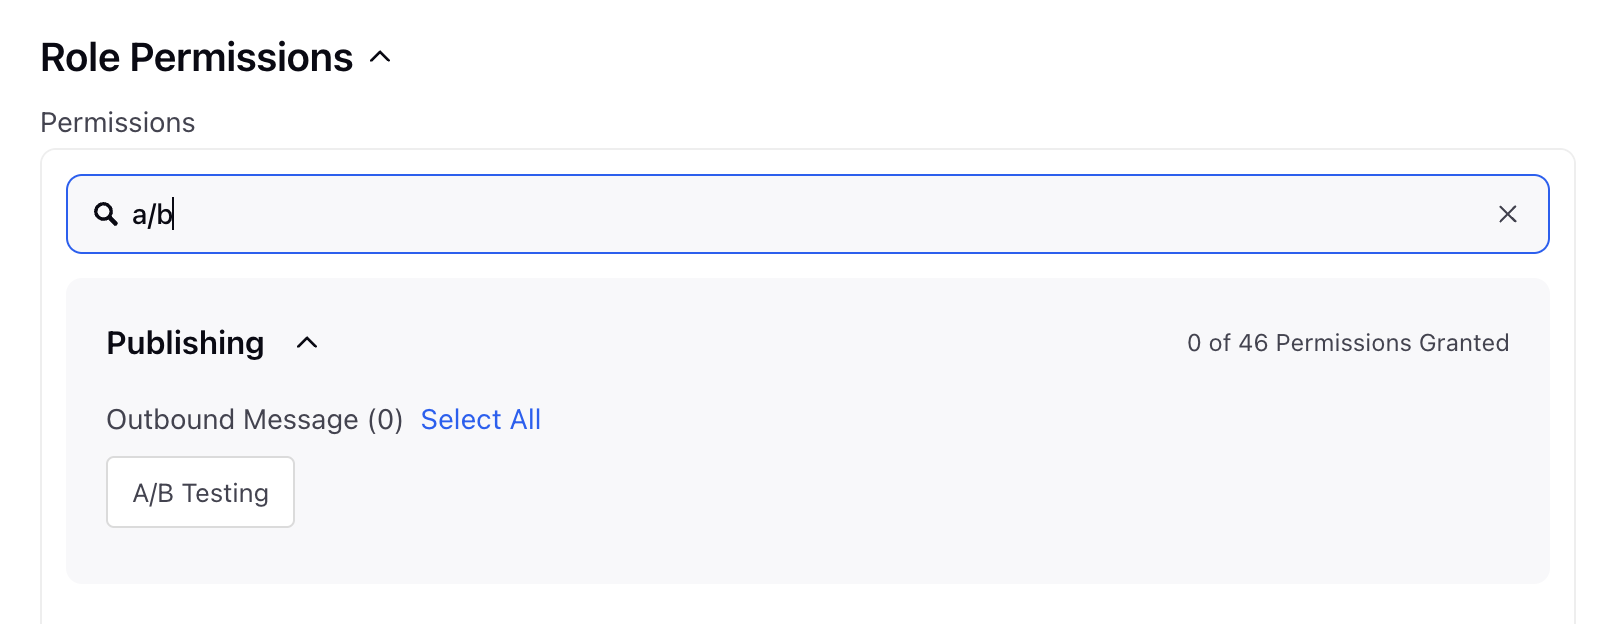
Permissions required
![]() Note: This capability is permission controlled. Make sure that you have the due permission to carry out A/B Testing on Sprinklr.
Note: This capability is permission controlled. Make sure that you have the due permission to carry out A/B Testing on Sprinklr.
Permission name: A/B Testing (under Publishing/Outbound Message/)
Steps to Run Split Testing or A/B Testing on Sprinklr
Click the New Tab icon
. Under Sprinklr Social, click A/B Testing within Engage.
In the A/B Testing window, click Create A/B Test in the top right corner.
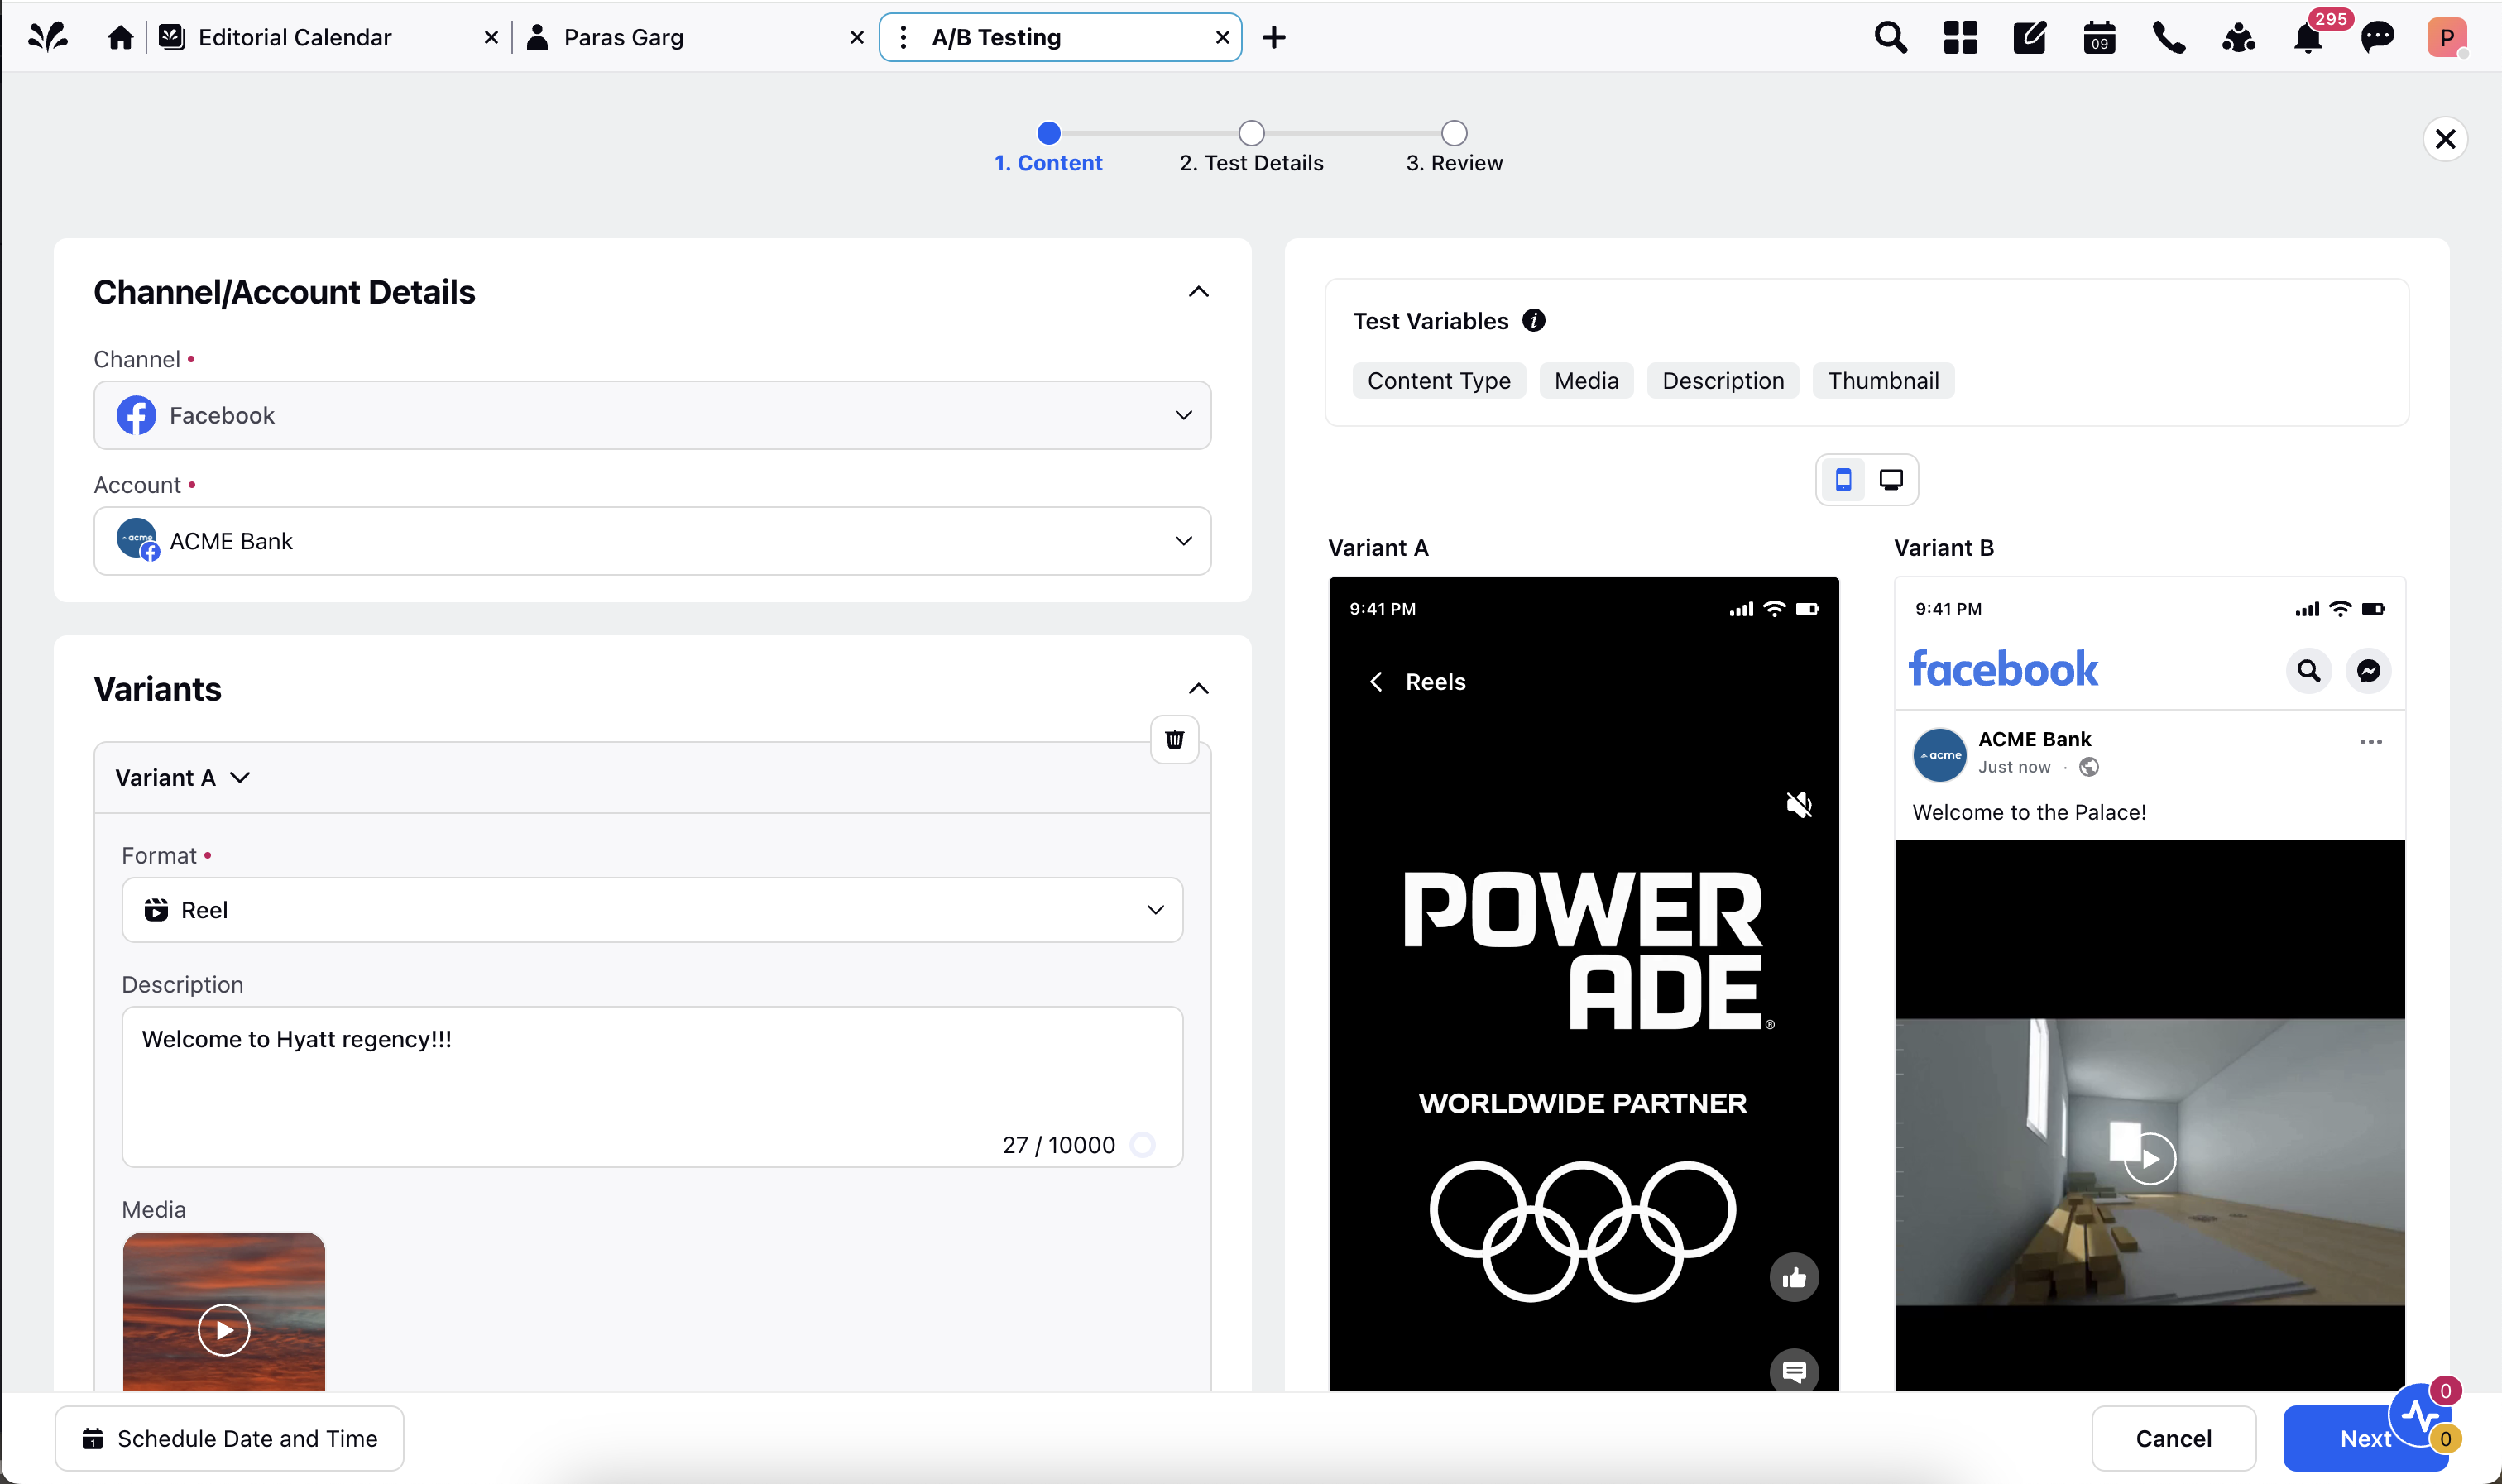
Select the Channel from the given dropdown.
Select the Account from the given dropdown.
Under Variant, select the Format to choose the post type.
Fill in the other required details.
Click the Add Variant icon to add another variant of the post, and follow the same process to create a variant. You can view the preview of all the created variants in the right pane.
 Note: You can create a maximum of 4 variants.
Click Next in the bottom right corner.
In the Test Details tab, enter the Test Name.
Select the Key Metric from the given dropdown. Check the available metrics here.
Select Tiebreaker Version based on your preference. The version you select here will be chosen for publishing, in case there is a tie between versions.
In the Review tab, check the test summary.
Click Create Test in the bottom right corner to run the test instantly. Click Schedule Date and Time, and select Date and Time to schedule the test. You can also save the test as draft for future use by clicking Save as Draft.
List of Available Metrics
Average time watched
Comments
People reached
Unique impressions
Link Clicks
Reactions
Reel plays
Shares
1-minute videoo views
Steps to Set Test Duration
While creating the test, you can set the test duration in the end in the Review tab.
Click Schedule Date and Time in the bottom left corner.
Click Test Duration, and set the duration of the test from the dropdown.

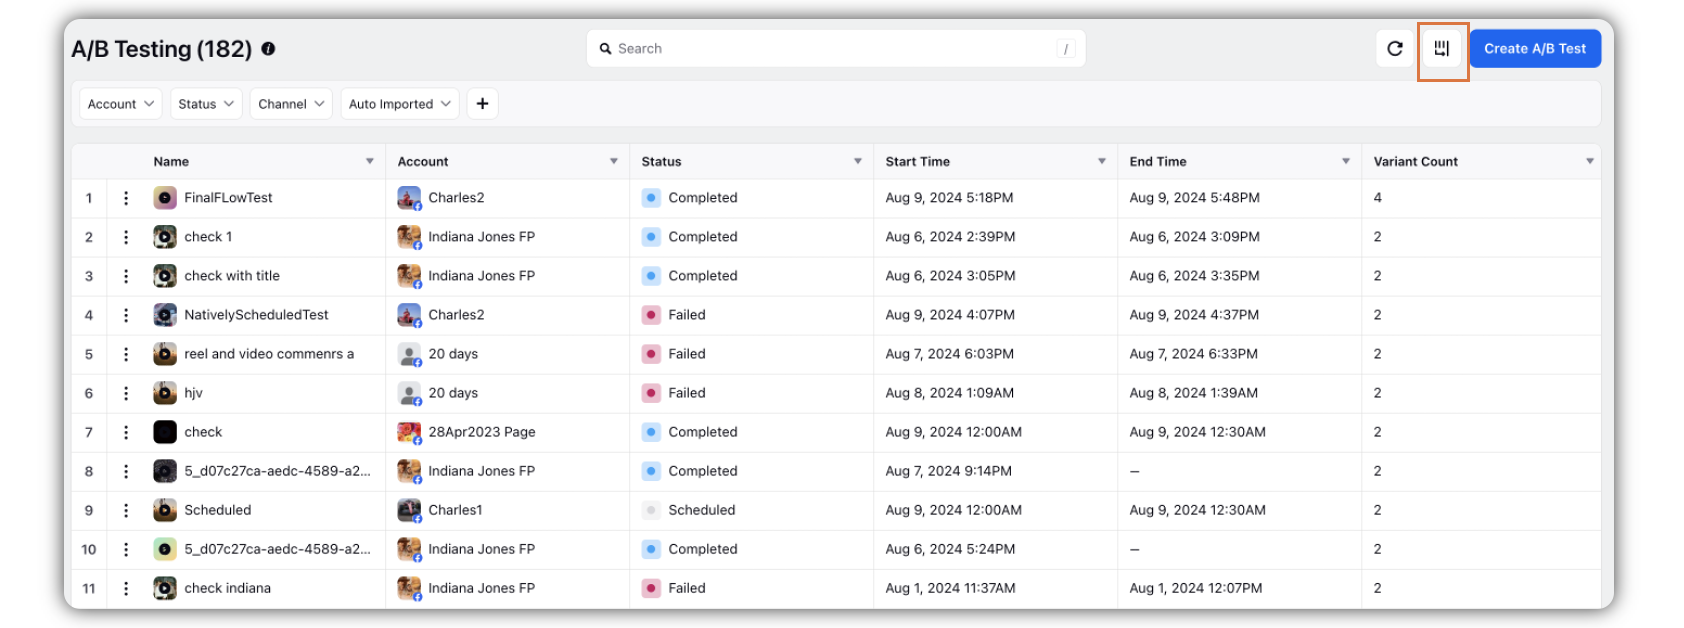
The A/B Testing screen or the Record Manager
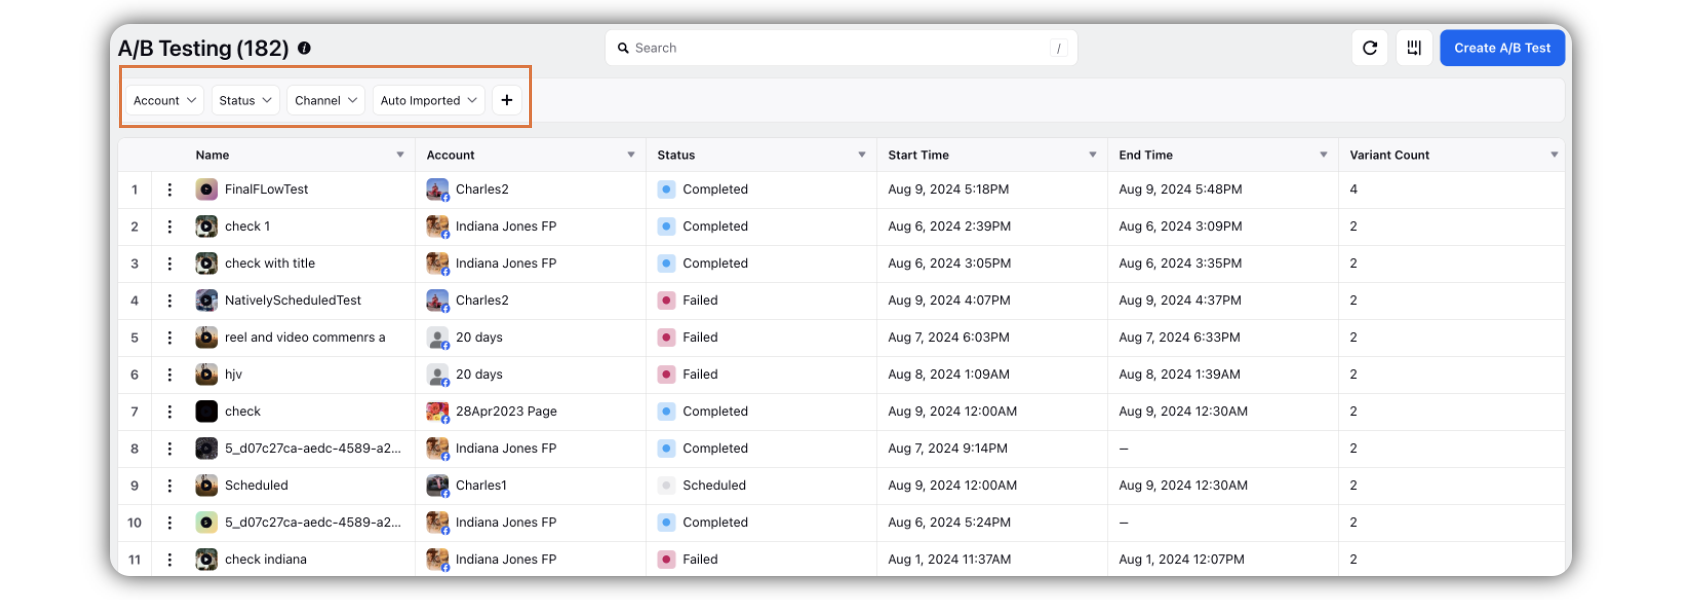
You can view all your tests in the screen here in the A/B Testing screen or the Record Manager.
Details of A/B Tests that you can view here are:
Status (Sent, Scheduled, Draft, Failed)
Account (from which the test has been implemented)
Start Time (Test launch time)
End Time (Test end time)
Variant Count (Number of variants)
Winning Metric (Metric with maximum response)
![]() Note: To check the details of any test, double-click it; you can view the details in the third pane that opens.
Note: To check the details of any test, double-click it; you can view the details in the third pane that opens.
Filters in the A/B Testing screen or the Record Manager
You can filter the tests using the quick filters in the top menu bar. You can also add filters based on your preference.
Manage Columns in the A/B Testing screen or the Record Manager
Click the Manage Columns icon the top right corner.
Toggle on/off the column names, based on your preference.
Drag up or down the column names to determine the sequence of the columns in the Record Manager.
Click Apply.
View Test Results
![]() Note: You can view results for tests that are either Live or Completed.
Note: You can view results for tests that are either Live or Completed.
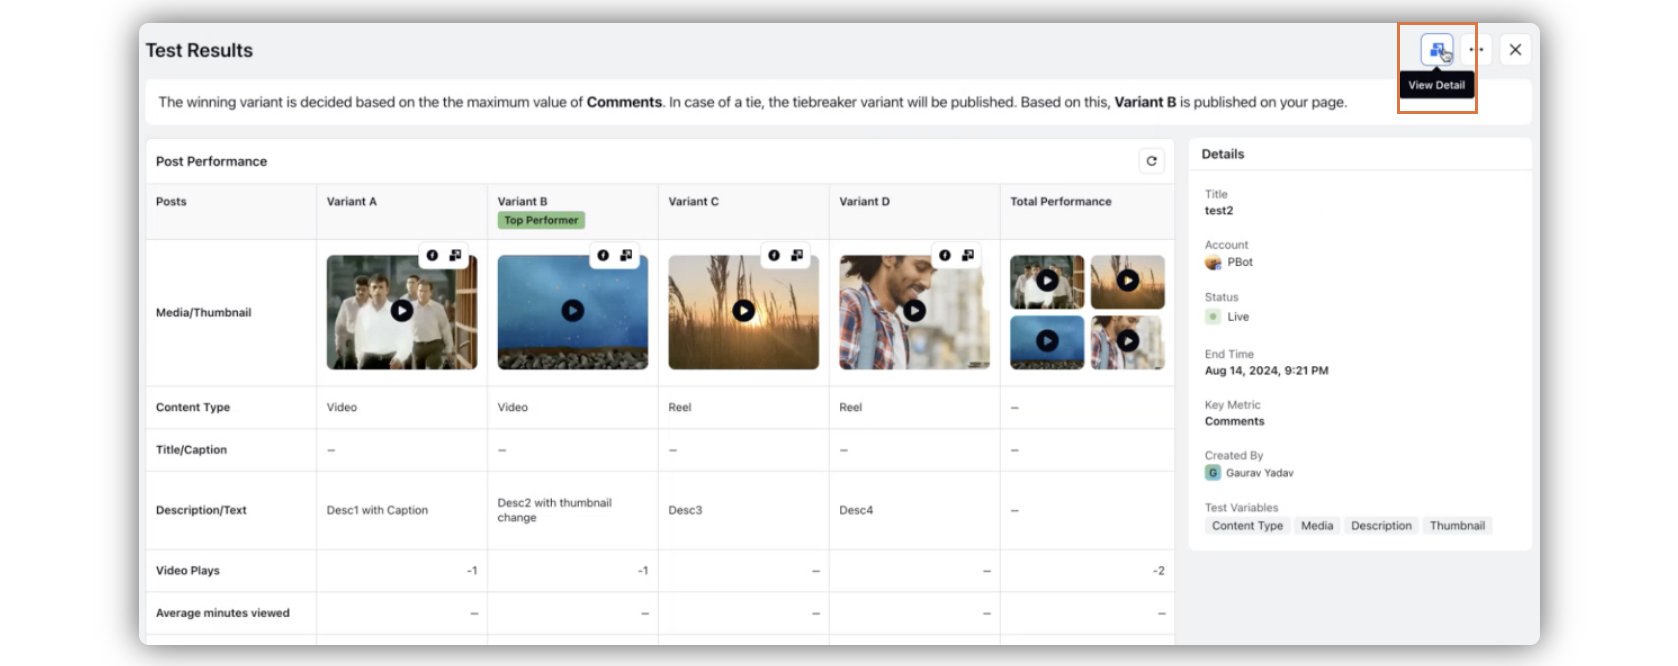
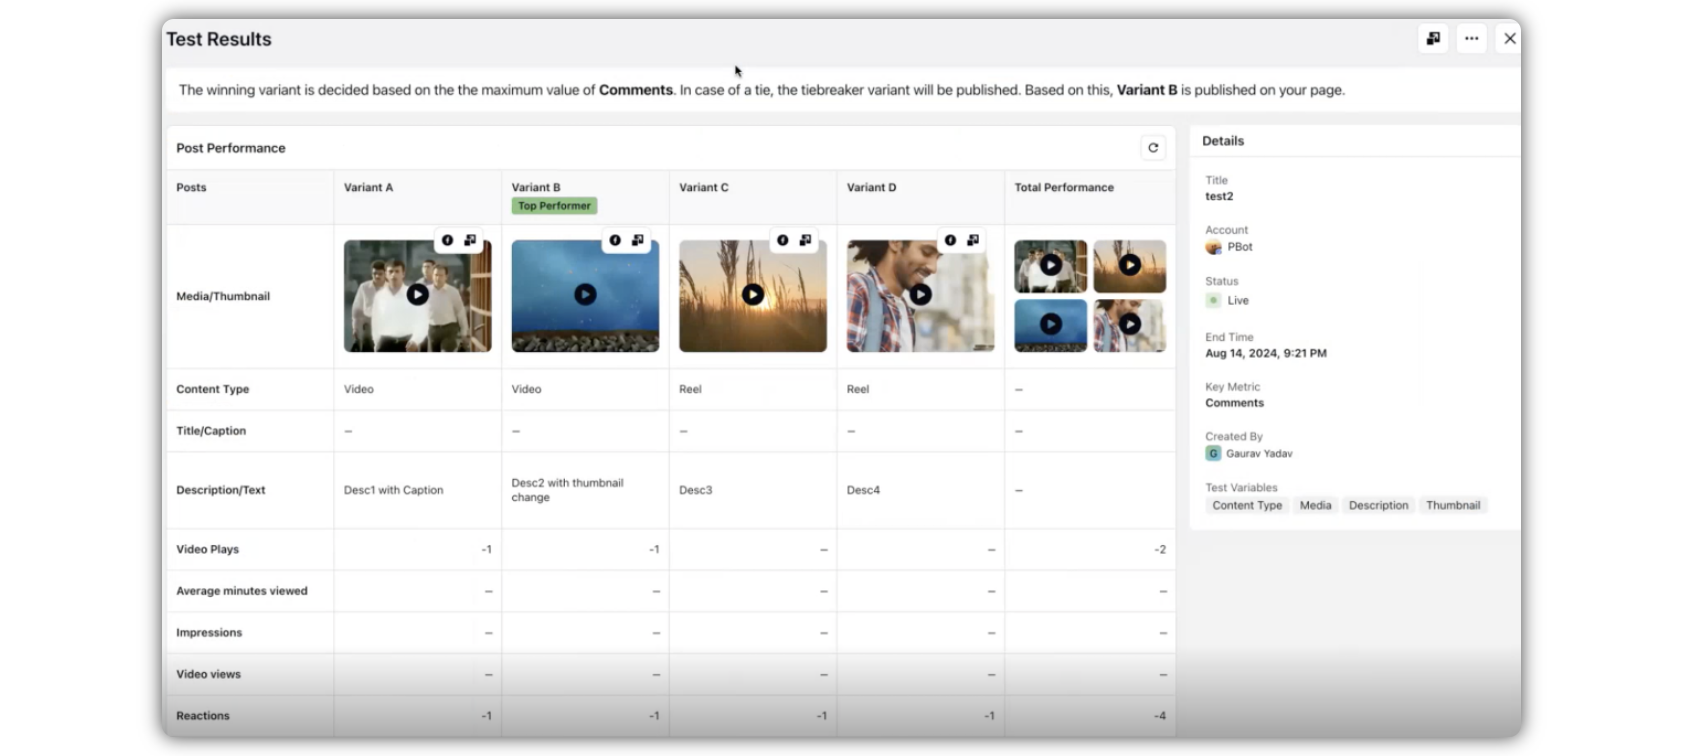
Hover over the Options icon beside the test name, and select View Test Results.
In the Test Results window, you can view the Post Performance. You can view the values for each mentioned metrics.
The winner post variant will appear with a green Top Performer tag.
The winning metric will appear with a green tick icon.
View Post in Native (Permalink)
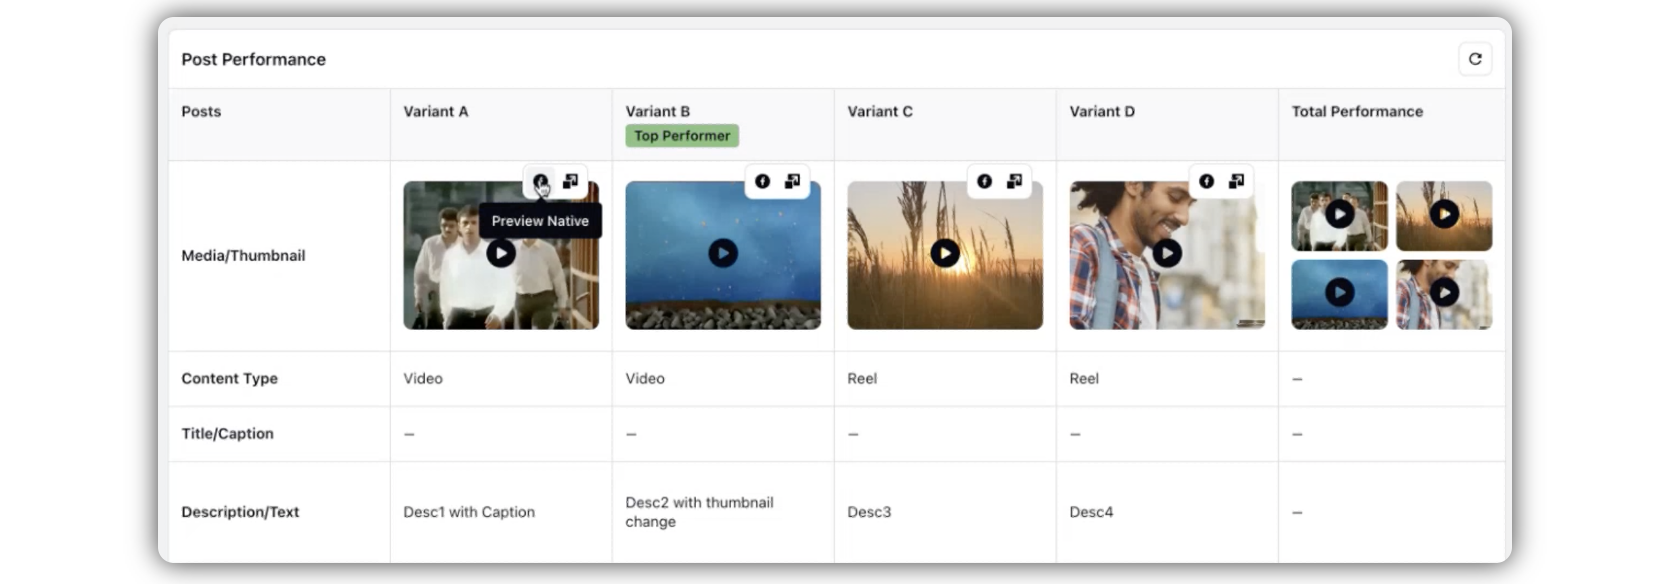
Hover over the Options icon beside the test name, and select View Test Results.
In the Test Results window, you can view the Post Performance. Click the Preview Native icon to view the post in native.
View Post (Variant) in the Third Pane
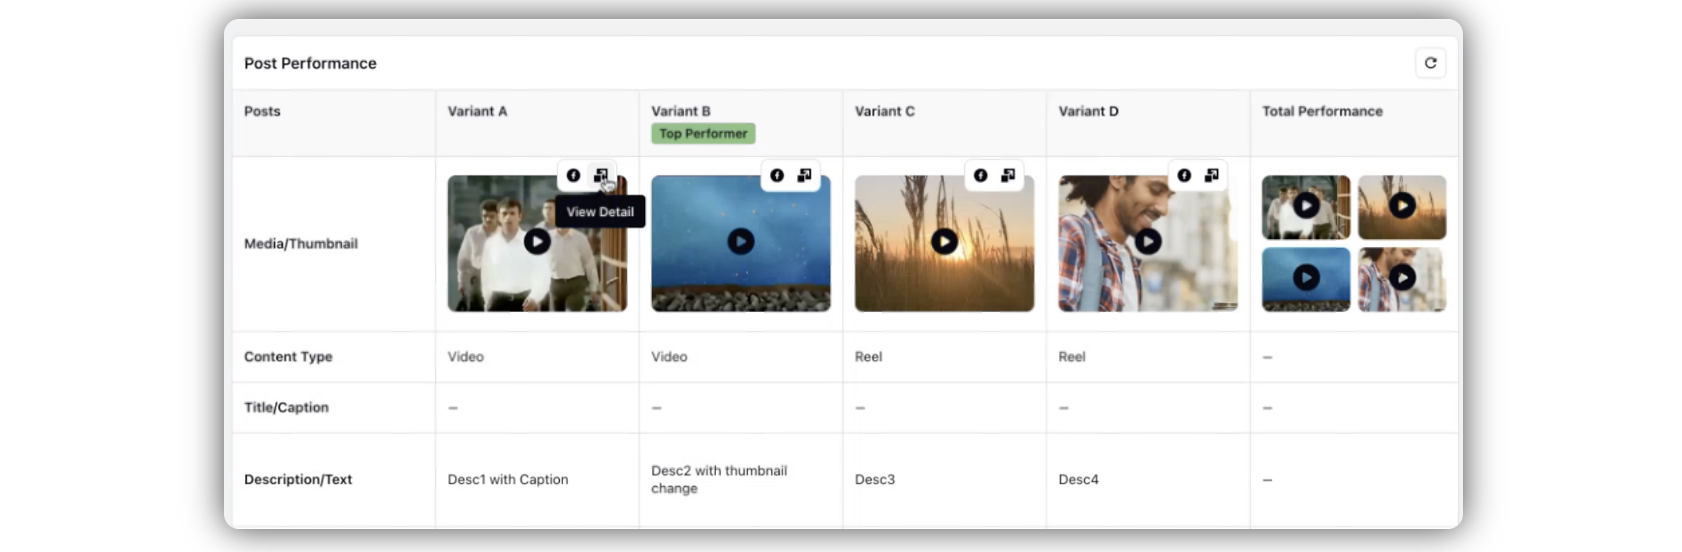
Hover over the Options icon beside the test name, and select View Test Results.
In the Test Results window, you can view the Post Performance. Click the View Detail icon to view the post in the third pane.
View Post (Original/Mother) in the Third Pane
Hover over the Options icon beside the test name, and select View Test Results.
In the Test Results window, you can view the Post Performance. Click the View Detail icon in the top right corner to view the post in the third pane.