Proactive alerts on anomalies identified by Sprinklr's AI.
The new Listening alert module covers alert configuration for all the data powered by the Listening data source. The following modules are covered in the same –
Listening Insights alerts
Product Insights alerts
Location Insights alerts
The key sections of the alert form in these modules are explained below –
Listening Smart Alerts
Tab #1 – Create Smart Alerts
Term
Description
Alert Name
Enter a name for the alert you are creating
Add description
Enter the description (optional) for the alert you are creating
Add tags
Select the tags (optional) for the alert you are creating
Module
Select the module you want to create an alert for – choose Listening.
Alert type
Select the alert type: Smart Alert, to create a smart alert
Alert dimensions
The alert dimension filters will power the data on which alerts will be triggered
Select Filter
Select the desired dimension as a filter.
Select Type: Select the type – containing, not containing, or exists
Select Value: Enter/select the value for your dimension.
For example, if you select the Topic dimension, the values would be the topics. Or, if you select the Sentiment dimension, the values would be Negative, Neutral, Positive, and Uncategorized.
Note: Please choose any one of the following mandatory dimensions: Topics, Topic Groups, Topic Tags, Themes, Theme Tags, Keyword Query, Keyword List, and Keyword List Tag.
Add New Filter
Click this option to add a new filter. You can add as many filters as you want to source the data and narrow it down to only the most relevant set
Entity combination type
Choose entity combination type –
Alert on Individual entities: Select this option to create a single alert for all the entities that you have selected as filters.
Alert on all entities combined: Select this option to create a single alert for all the entities that you have selected as filters.
Note: You can select one or multiple smart alert types. Each selection will save a new time series for the same data filters added in the alert.
Choose time range aggregation for Smart alerts anomaly detection
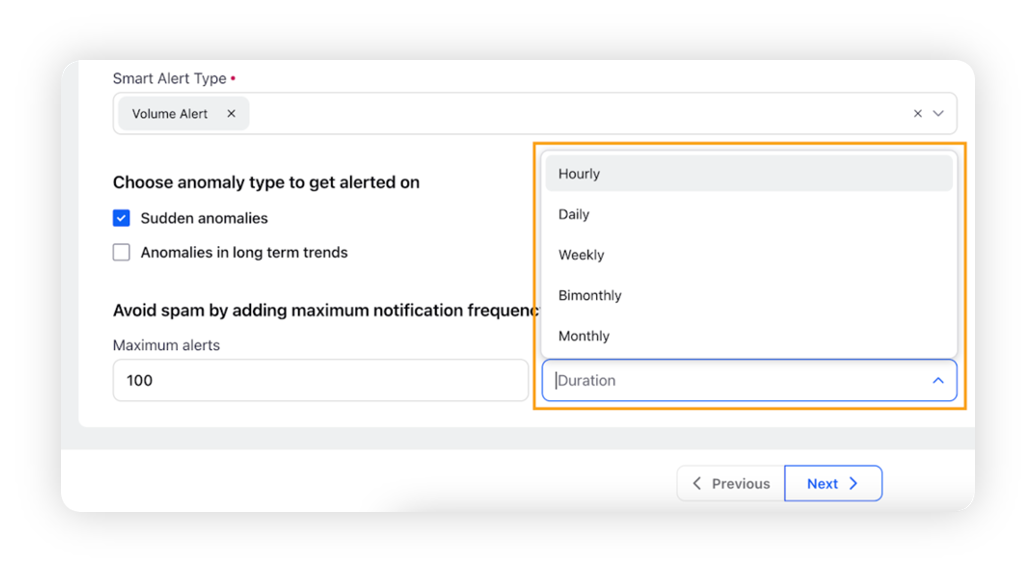
Choose anomaly type to get alerted on –
Sudden Anomalies: Keep this option checked to get alerted on sudden spikes/drops in the time series. The aggregation of data is done at minutes/hourly level for this type
Anomalies in long-term trends: Keep this option checked to get alerted on spikes/drops in long-term trends typically aggregated on both; a weekly and monthly basis
Note: Both options are checked by default when a new alert is created.
Avoid spam
You can avoid spam by adding maximum notification frequency.
Maximum alerts: Enter the number of alerts, e.g. 100
Duration: Select the duration in the dropdown options
Note: If the frequency is reached, there will be no more alerts till the time resets. You can miss out on alert-worthy trend shifts in such a case. Please fill in the details with caution.
Note: You can select one or multiple smart alert types. Each selection will save a new time series for the same data filters added in the alert.
Choose time range aggregation for Smart alerts anomaly detection
Choose anomaly type to get alerted on –
Sudden Anomalies: Keep this option checked to get alerted on sudden spikes/drops in the time series. The aggregation of data is done at minutes/hourly level for this type
Anomalies in long-term trends: Keep this option checked to get alerted on spikes/drops in long-term trends typically aggregated on both; a weekly and monthly basis
Note: Both options are checked by default when a new alert is created.
Avoid spam
You can avoid spam by adding maximum notification frequency.
Maximum alerts: Enter the number of alerts, e.g. 100
Duration: Select the duration in the dropdown options
Note: If the frequency is reached, there will be no more alerts till the time resets. You can miss out on alert-worthy trend shifts in such a case. Please fill in the details with caution.
Select the users and/or user groups whom you intend to alert on the anomaly.
External email address
You can add external users as alert recipients by entering their email addresses.
Note: You can add multiple external email addresses by simply pressing the Enter button after every email address you enter.
Delivery details
Mobile notification
This permits Sprinklr to send mobile notifications to any user who has their mobile details configured within Sprinklr. This is selected by default
SMS notification
Select this option to send SMS to the intended recipients. You can also choose to enter customized text in the Add SMS Text field. In case this field is left blank, the default SMS text will be sent.
Note: This option will be visible only for partners having SMS functionality enabled.
Email notification
This permits Sprinklr to send emails to the entered addresses. This is selected by default.
Exclude retweets in email
In case you do not want to receive retweets as part of the alert email body, you can opt out from here. This is unselected by default.
Include timestamp
Selecting this option will also show the timestamp along with the email subject. The timestamp also shows the default timezone in brackets (GMT).
You can change the timezone in the email subject and in the "detected time" shown in the email body at the partner level by raising a support ticket. It is not configurable in the user interface.
Enablement note: To learn more about getting this capability enabled in your environment, please work with your Success Manager.
Customize mailing details
This option is selected by default –
Add custom subject line: Enter a custom subject for easy identification of alert email.
Sender email address: Enter an email address of your organization or group which will appear as an alias for easy identification of email.
Refine alert e-mail based on other parameters
Select this checkbox to further refine the alerts which you receive in your inbox. The following options can be chosen from:
Mentions: Get an alert on an anomaly where the mentions count matches the entered condition.
Alert Severity: Severity is a system-assigned value for each anomaly that is proportional to the variation in a trend shift. The bigger the shift, the higher the severity rating of the alert. Severity is assigned on a scale of 1 to 10. This is not applicable for the Engagement Alert type.
Alert Longevity: Longevity is used to measure the persistence of anomalies. If longevity is set to greater than 2, you will get alerted as soon as three alerts are detected on the trend of your set dimensions. This is not applicable for Average Star Rating Alert and Average Experience Score Alert types in Location Insights and Product Insights modules.
Alert Severity Increase: Get notified only when the severity of an anomaly is higher than the last detected anomaly.
Total Retweets: Get alerted on anomalies in engagement trends of tweets for which the retweet count matches the set condition. Only applicable for Engagement Alert type in the Listening module
Retweets Gained: Refine your alerts by focusing only on Tweets that have gained a fixed number of retweets from the last time. Only available for Engagement Alert type in the Listening module
Add to queue
Click the checkbox to enable this option –
Partner queue: To add the Smart Alert into a partner queue, select the desired pre-configured queue. You can select multiple partner queues here.
Client queue: To add the Smart Alert to a client queue, select the desired pre-configured queue. You can select multiple client queues here.
Choose entity combination
From the Create Smart Alert window, you can create alerts in two ways –
Alert on individual entities
Alert on all entities combined
These two ways are customized for each module. This section will cover how both of these configurations work for each module – Listening, Location Insights, and Product Insights.
For Listening
If you choose this option, a separate alert will be created for –
Each Topic (if you select topic conditions)
Each Theme (if you select theme conditions)
Each Topic and Theme combination (if you select both topic and theme conditions)
To explain this further, below are 3 possible scenarios –
Scenario 1: If you create an alert with a Topic containing Air Arabia, Air France, then you will get two alerts – one for each topic.
Scenario 2: If you create an alert with a Theme containing Customer Service, Damaged Baggage, then you will get two alerts – one for each theme.
Scenario 3: If you create an alert with the below conditions –
In Scenario 3, there are four possible combinations. You will get four different alerts; one for each combination –
One alert for (Air Arabia AND Customer Service)
One alert for (Air Arabia AND Damaged Baggage)
One alert for (Air France AND Customer Service)
One alert for (Air France AND Damaged Baggage)
Note: The above behavior remains the same when you choose Topic Group, Topic Tag, or Theme Tag and use the option – Alert on Individual Topics and Themes.
If you choose this option, a separate alert will be created for
All Topics (if you select topic conditions)
All Themes (if you select theme conditions)
All combinations of Topics and Themes (if you select both topic and theme conditions)
To explain this further, below are 3 possible scenarios:
Scenario 1: If you create an alert with a Topic containing Air Arabia, Air France, then you will get one alert for all mentions from both topics combined.
Scenario 2: If you create an alert with a Theme containing Customer Service, Damaged Baggage, then you will get one alert for all mentions from both the themes combined.
Scenario 3: If you create an alert with the below conditions –
In Scenario 3, there is a single time series configured which triggers one alert with the Boolean equivalent of:
One Alert for – (Air Arabia AND Customer Service) OR (Air Arabia AND Damaged Baggage) OR (Air France AND Customer Service) OR (Air France AND Damaged Baggage).
For Product/Location Insights
The below logic works for the Product Insights and Location Insights alerts. For example, let us assume that a brand has 10 products configured –