Creating and Managing Announcements
Updated
Supervisors can use the Announcements screen to send one-to-many communications to their team members or direct reports. They can monitor the status of the announcement to track whether an agent has read the announcement or not. Additionally, they can analyze reporting metrics for announcements to monitor and measure the effectiveness of their announcements.
Creating Announcements
To create an announcement, follow these steps:
1. Open the Supervisor Console persona app from the Launchpad.
2. In the left pane, click Announcement.
3. In the top-right corner of Announcements, click Create Announcement to create a new announcement.

4. The Create Announcement window will appear where you can provide the desired details as explained below.

Announcement creation form details:
Field | Description | |
Media | Image can be attached with the Announcement. | |
Title and Description | The title and the description of the Announcement. | |
Confirmation Text | Confirmation text that is used by the agent as an acknowledgement. | |
Start Date | Refers to the specific date and time when the announcement will commence. This indicates when the announcement becomes active and starts appearing on the agent screen.
| |
Expiry Date | Signifies the date and time after which the announcement will no longer be displayed as a notification on the agent screen. Once the expiry date and time are reached, the announcement will cease to appear, effectively ending its visibility to agents. | |
Repeat Announcement | Turn on the toggle to allow announcements to be repeated according to the specified settings. Repeat every: Specify the frequency at which the announcement should repeat. This setting determines how often the announcement will occur, such as every hour, day, minute, etc. End after: Specify the total number of times the announcement should repeat before automatically ending. Once the specified number of occurrences is reached, the repetition will cease.
| |
Workspaces and User/User Groups | Set users for whom the announcement is intended. The users must have the All Users Accessible permission to view the Workspace option. When the Supervisor Team is specified within the user creation window, the corresponding users and user groups will be visible here. | |
Send as Email | Dispatch the announcement via email to the chosen recipients. You can customize the subject line of the email as per your preference. Users can click "Open Sprinklr" in the email to be redirected to the persona's homepage.
|
5. Once you've completed filling in the details, you can view a preview on the right side of the screen. You have the option to switch between viewing the preview as it would appear in Sprinklr or as an email. After reviewing, click the Save button at the bottom to confirm and save your changes.

Recieving Announcements
Agents would get platform notifications for the announcement. All the platform notifications are also sent via email or SMS based on agent’s notification settings. The announcements will appear as a pop-up on agents' screens. They can take the following two actions on the announcement:
Acknowledge: This indicates that the agent has read and acknowledged the announcement.
Dismiss: The agent can choose to dismiss the announcement and choose a reminder to be set for the same announcement.
Monitoring Announcements
Supervisors can monitor and measure effectiveness of their announcements by analyzing the reporting metrics. These include total users who read the announcement, read time, acknowledgment rates, Click-Through Rate (CTR) (number of times links were clicked), and more. These insights enable supervisors to optimize future announcements for improved reach, engagement, and impact.
![]() Note: The announcements reporting metrics feature is currently in Limited Availability. To enable this feature in your environment, reach out to your Success Manager. Alternatively, you can submit a request at tickets@sprinklr.com.
Note: The announcements reporting metrics feature is currently in Limited Availability. To enable this feature in your environment, reach out to your Success Manager. Alternatively, you can submit a request at tickets@sprinklr.com.
To monitor announcements, follow these steps:
1. Open the Supervisor Console persona app from the Launchpad.
2. In the left pane, click Announcement.
3. On the Announcements screen, locate the announcement you want to monitor.
4. Click the Open Details icon. The third pane will open where you can track the reporting metrics.

The following table describes the reporting metrics for announcements:
Metrics | Description |
User Engagement Metrics | |
Number of Announcements Read/Unread | Read: The number of users who have opened and viewed the announcement. Unread: The number of users who have not yet opened the announcement. |
Number of Announcements Acknowledged | The total number of announcements that the user has acknowledged or confirmed as read. A user can typically acknowledge an announcement by clicking an Accept button or similar action. This metric shows how many announcements the user has actively engaged with. |
Total Users Who Read an Announcement | The total number of unique users who have viewed or interacted with the announcement. This metric helps gauge the reach and visibility of the announcement. |
Number of Links Clicked in an Announcement | The total number of times the user has clicked on links provided within the announcement. This helps track user interest and engagement with the specific content or call-to-action embedded in the announcement. |
Click Through Rate (CTR) | The percentage of times a link within the announcement was clicked, relative to how many times the user saw the announcement. CTR is calculated by dividing the number of link clicks by the number of times the user viewed the announcement. A high click rate indicates effective content or call-to-action links in the announcement. |
Average Time Spent Reading Announcements | The average time that users spent reading or interacting with the announcement. This helps to understand the engagement level of users with the content. A longer time spent might indicate more interest or thorough reading, while a shorter time could suggest quick browsing or low engagement. |
Announcement Metrics | |
Announcement Title | The title or name of the announcement. It serves as a brief description or identifier of the announcement content. This helps in distinguishing between various announcements in a report. |
Announcement Creator | The individual or team responsible for creating and distributing the announcement. This is important for accountability and tracking the source of various announcements. |
Announcement Start/Expiry Date | Start: The date and time when the announcement was created Total duration for which the announcement has been configured. Expiry: The date and time when the announcement is no longer valid or accessible to users. |
Number of Announcements Sent | Total number of announcements created by user. |
Announcement Frequency | The number of times the same announcement was shown to a user. This could occur if the announcement is sent multiple times as a reminder or if it is part of a recurring campaign. Tracking the repeat count can provide insight into whether repeated exposure impacts user engagement or acknowledgment. |
Modifying Announcements
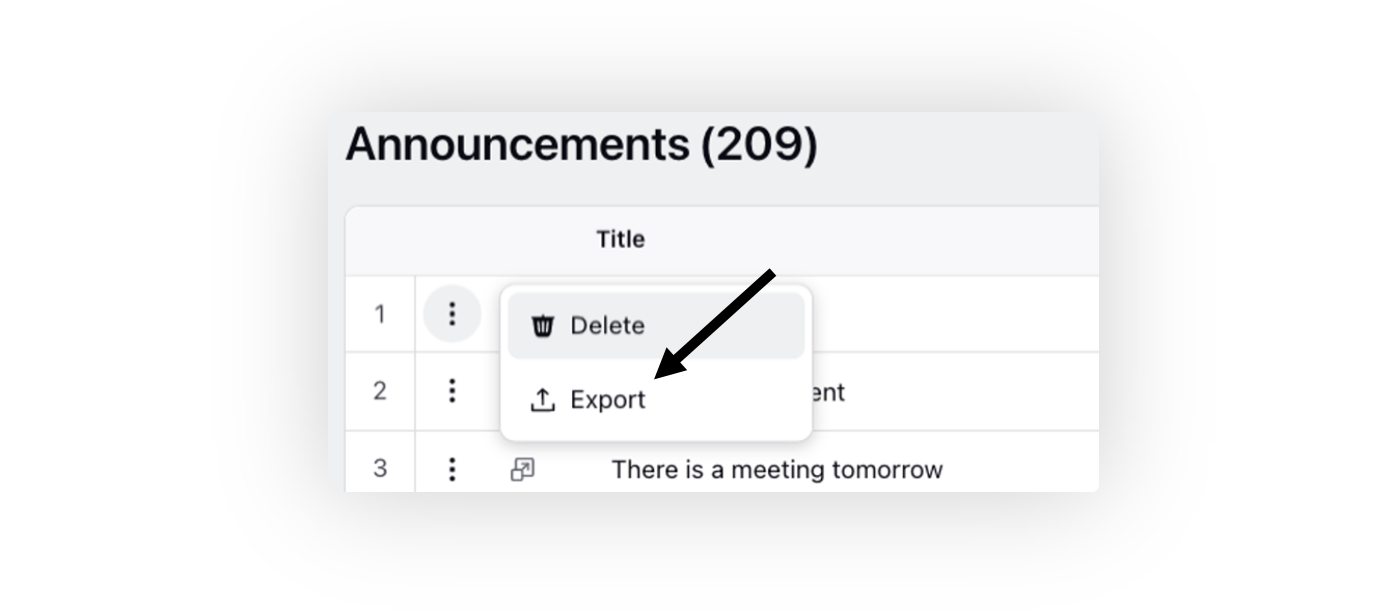
Delete an Announcement
Hover over the Options icon and select Delete to delete an announcement.

Export an Announcement
Hover over the Options icon and select Export to export the announcement in Excel.
Edit Expiry Date of Announcements
From the Announcements window, you can change the Expiry Date of the announcement by double-clicking the expiry date of a particular announcement.
Add/Remove Columns
You can add/remove the columns by clicking on manage columns on the top right. Toggle the important parameters you would like to view.

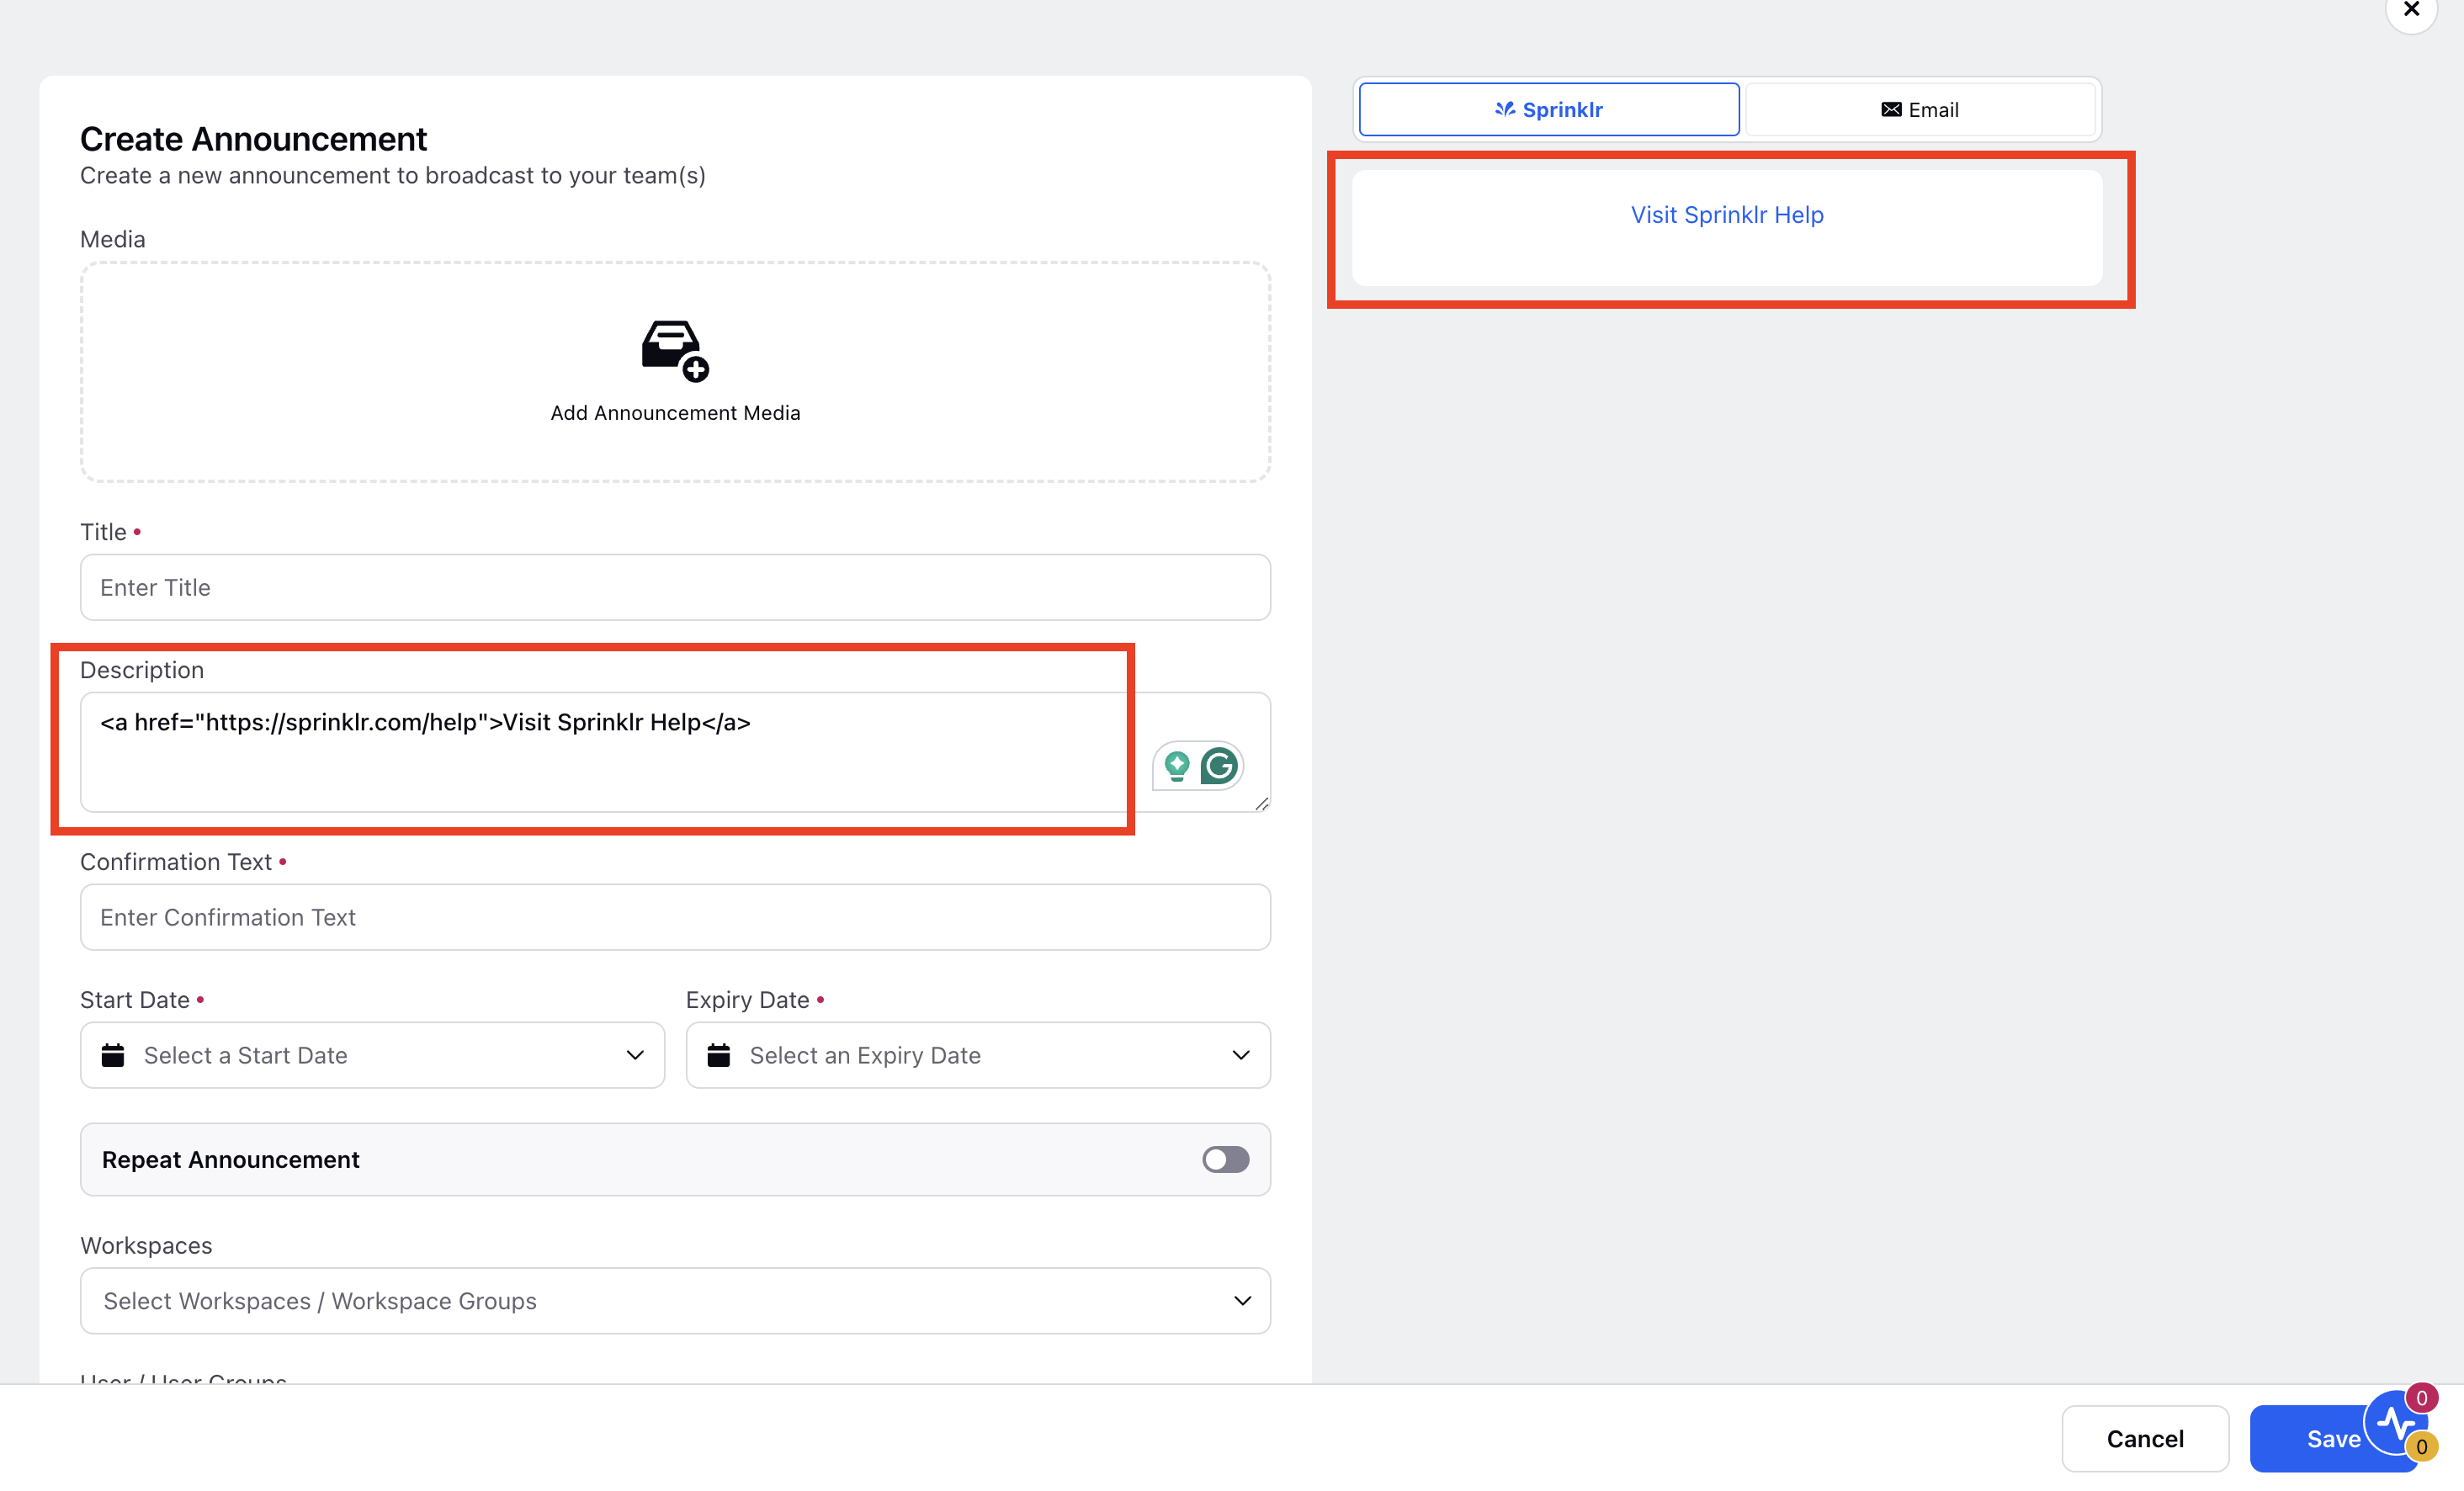
To Display the Content of the Annoucements as Hyperlink, type an HTML template in the Description Box of the announcement:
<a href="https://sprinklr.com/help">Visit Sprinklr Help</a>
In this example, the link is https://sprinklr.com/help, and the displayed text in the announcement is Visit Sprinklr Help. When users click on this text, they will be redirected to the specified URL.
To Restrict the List of User / User Groups
To Restrict the list of Users / User Groups shown while creating the Announcements, enable the below DP
ANNOUNCEMENT_APPEND_DYNAMIC_USER_GROUPS_ENABLED
Thus, when this DP is enabled then Announcement Creator will see a restricted list of only those Users / User Groups who are present as their My Team or My Reportees.
If this DP is not Enabled then by default list of All Users / User Groups will be shown while Announcement creation.
When All Users Accessible Permisson is given and this DP is ON then user can send announcement to any user or user group along with My Team and My Reportee's filter present.