Send Estimated Wait time to Customers using an Auto Response Rule
Updated
You can configure an auto-response rule to send estimated wait time to customers so that they have a fair idea of the time their queries will be answered in by the live agent.
Send the expected wait time to your customers for their case or message. When configured via Rule Engine, the wait time will be sent to your customers automatically in auto-response. Therefore, customers who have requested to engage with a live agent can have realistic exceptions for wait time to receive a response from a live agent.
You can also create an asset to send the wait time of the case/message basis skills of the agents.
To send the auto-response with the wait time, you will need to follow the steps below:
Create Asset Template with Placeholders
Create a Rule Using the Template
Create a Rule to Send Estimated Wait Time Updates Recursively
To create a text template
Under the Sprinklr Social tab, click Assets within Engage.
In the top right corner of the Asset Management window, click Add Asset.
Hover over Add Text in the Add Asset dropdown and select Simple Text.
On the Create New Asset window, fill in the required details. In the Content field within the Asset Specific section, enter the placeholders for data you want to send. You can add these placeholders for messages and cases:
wq_MESSAGE:WAIT_TIME: The Round Off (approximate) time period for the message waiting in the queue.
wq_MESSAGE:WAIT_TIME_EXACT: Exact wait time of the message.
wq_MESSAGE:PIQ: The position of the message that is waiting in the queue.
wq_CASE:WAIT_TIME: The Round Off (approximate) time period for the case waiting in the queue.
wq_CASE:SKILL_WAIT_TIME: The Round Off (approximate) time period for the case waiting in the queue based on the skills of the agents.
wq_CASE:WAIT_TIME_EXACT: Exact wait time of the case.
wq_CASE:SKILL_WAIT_TIME_EXACT: Exact wait time of the case based on the skills of the agents.
wq_CASE:PIQ: The position of the case that is waiting in the queue.
wq_CASE:SPIQ: The position of the case that is waiting in the queue basis the skills of agents.

Round off criteria
If the wait time is predicted in minutes, then it will be sent in the multiples of 5, for instance, if the wait time is 11 hours 33 minutes, then it will be sent as 11 hours 35 minutes.
If the wait time is >= 12 hours, then the minutes associated will not be sent, for instance, if the wait time is 14 hours 35 minutes, then it will be sent as 15 hours and if it is 14 hours 25 minutes, then the wait time would be 14 hours.
If the wait time is >= 1 day and 12 hours, then the wait time will get increased by 1-day, for instance, if the wait time is 1 day 15 hours, then the wait time that will be sent is 2 days. If the wait time is >= 1-day, then only no. of days will be sent, for instance, if the wait time is 1 day 1 hour, then the wait time will be sent as 1-day.
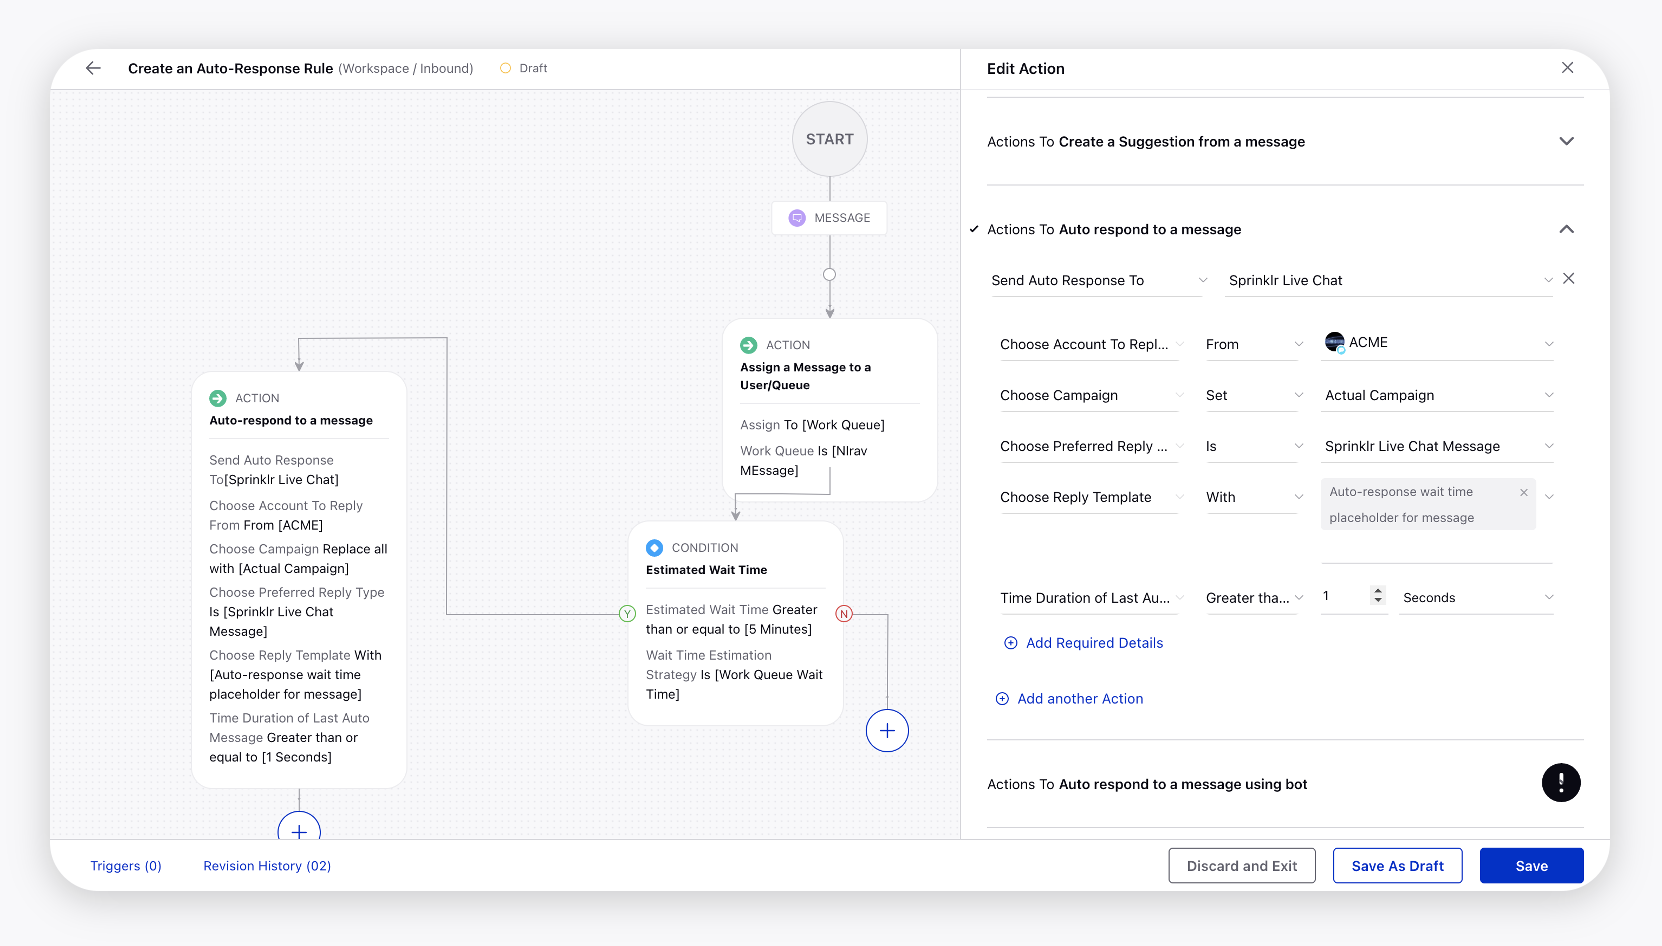
To create an auto-response rule
Create a queue/case update rule for the assignment of cases if it's not already configured. If you have an existing queue rule set up for assignment, add the below conditions just after every action in Assign to Work Queue as illustrated below.
Under Actions To Assign a message to a User/Queue, select Assign from the Action dropdown and Work Queue from the corresponding dropdown. Next, select the Work Queue action and the desired work queue.
Click Save in the bottom right corner to save the action.
Under Condition Applies To The properties of the Message, select Estimated Wait Time from the Condition dropdown and the desired time period from the corresponding dropdown.
Next, for the Wait Time Estimation Strategy condition, select a strategy from either Work Queue Wait Time or User Handling Time.
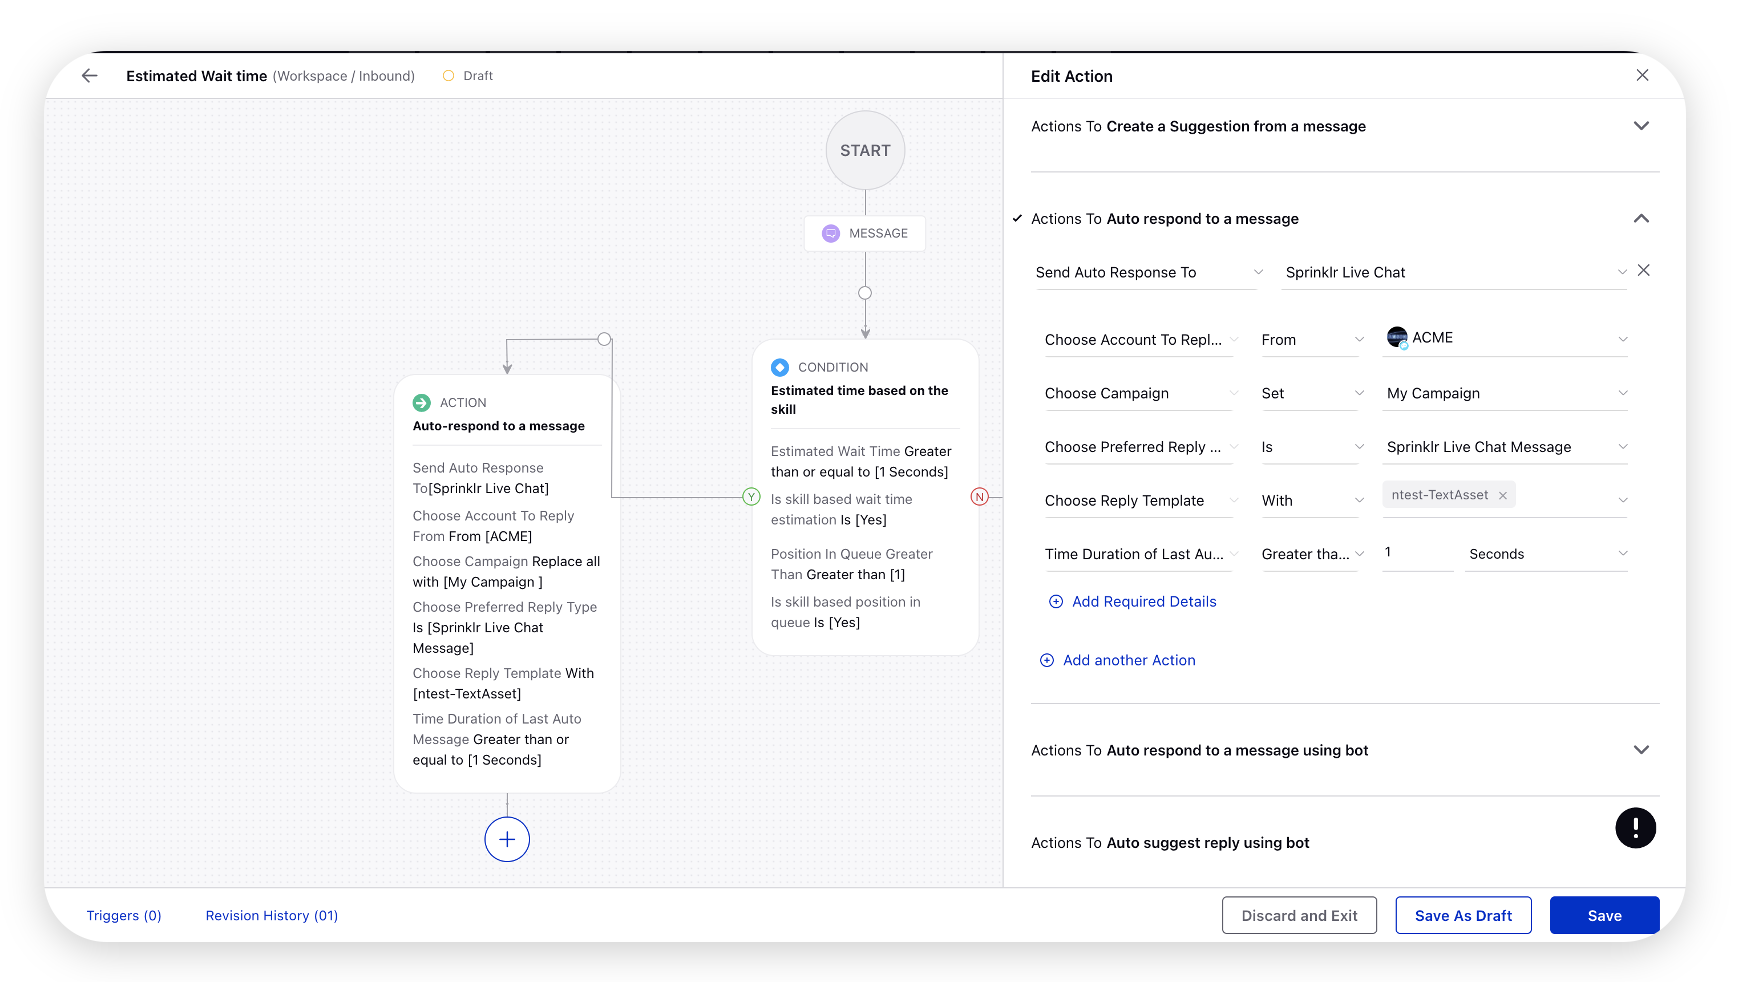
Under Actions to Auto Respond to a message, select Send Auto Response To from the Action dropdown the desired channel from the corresponding dropdown.
To reply wait time to customers, you can select Choose Preferred Reply Type and it will vary depending on the channel selected.
Click Choose Template next to the Choose Reply Template field. On the Media Uploader window, select the wait time template from DAM and click Add.
Define the time duration of the last auto-message. You can select Greater than or equals, Greater than, or Equals from the Operator dropdown. Add a number in the Input Number field. You can define time duration in Seconds, Minutes, Hours, Days, Months, Weeks, Months, or Years.
Create a rule to send the wait time basis on the skills of agents in the queue
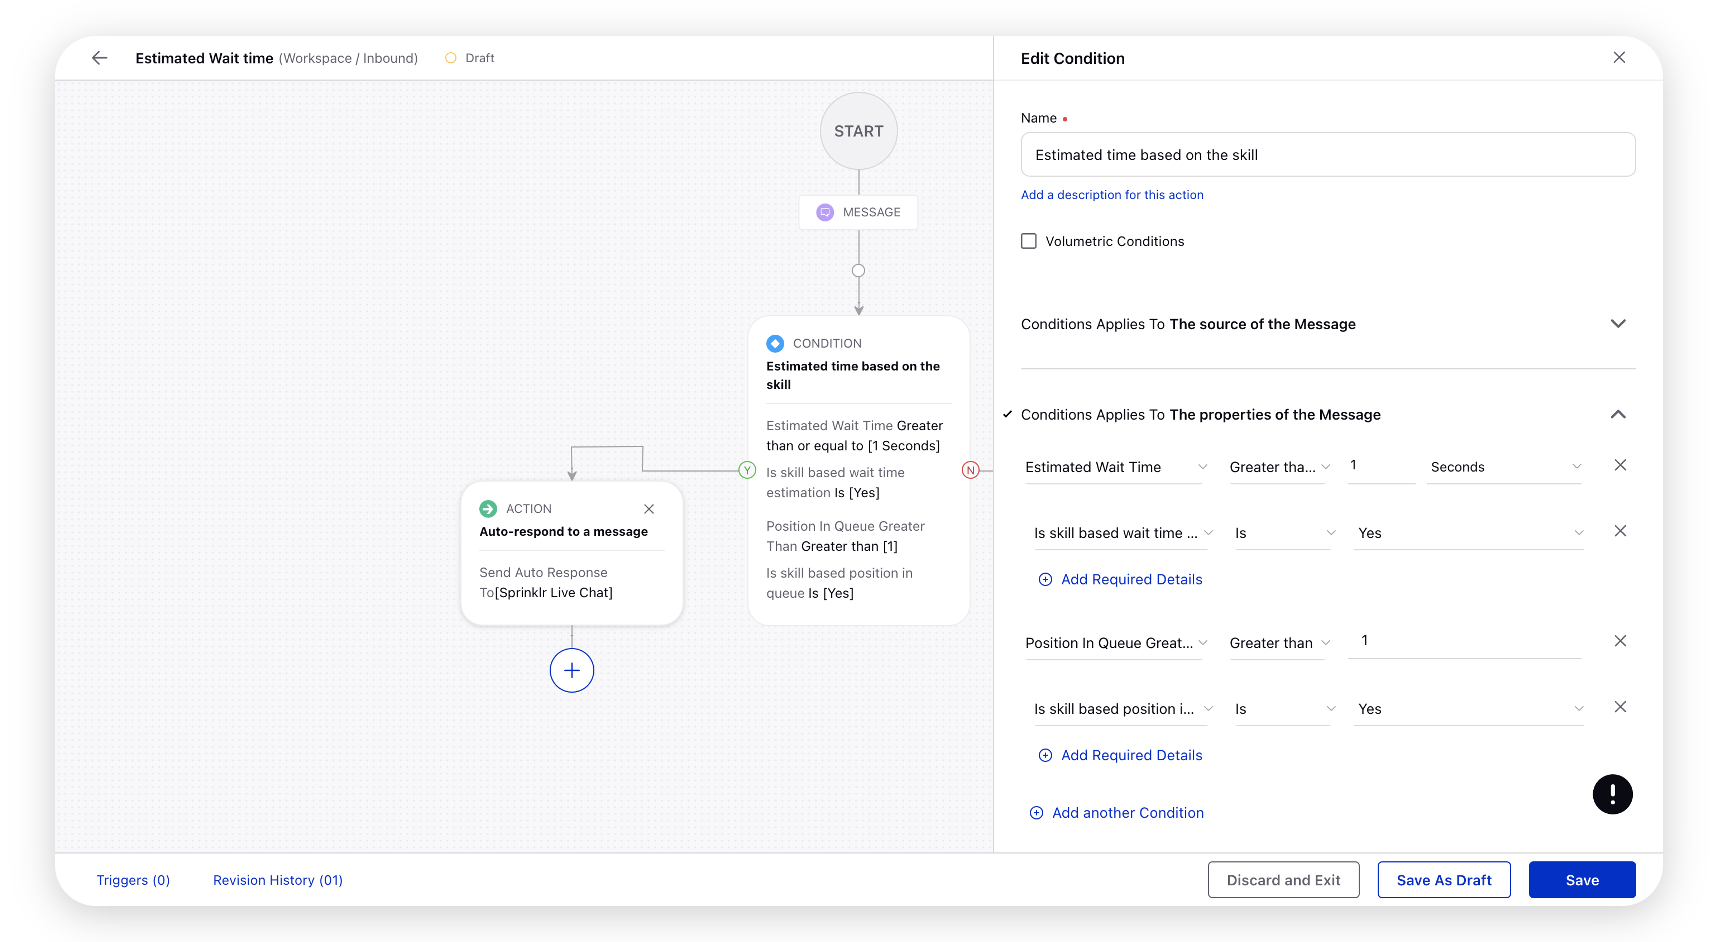
On the Rule Builder window, click the Addition icon and select Add Condition.
On the Edit Condition pane, provide a Name to your condition.
Under Condition Applies To The properties of the Message, select Estimated Wait time from the Condition dropdown and the desired time duration from the corresponding dropdown. Next, select the condition Is skill based wait time estimation is as Yes.
Add another condition as Position in Queue Greater Than and the corresponding value. Next, add another condition, Is skill based position in Queue is as Yes.
Click the Addition icon corresponding to the Yes value of the condition and select Add Action.
To send estimated wait time updates recursively
You can also send the wait time updates to your customers recursively. For example, if the wait time that you first sent was 20 mins, you can configure a rule and set the relative % as 50, so to send the updates recursively i.e. first update after 10 minutes, then 5 minutes, and so on until a brand agent engages with them.
Create a Case Update rule and choose actions "Copy Action Source" and "Copy Action Destination" under Actions To Copy properties from source to destination, to copy Estimated Wait Time (User Handling Time) or Estimated Wait Time (Work Queue Wait Time) into a Case/Message custom field.
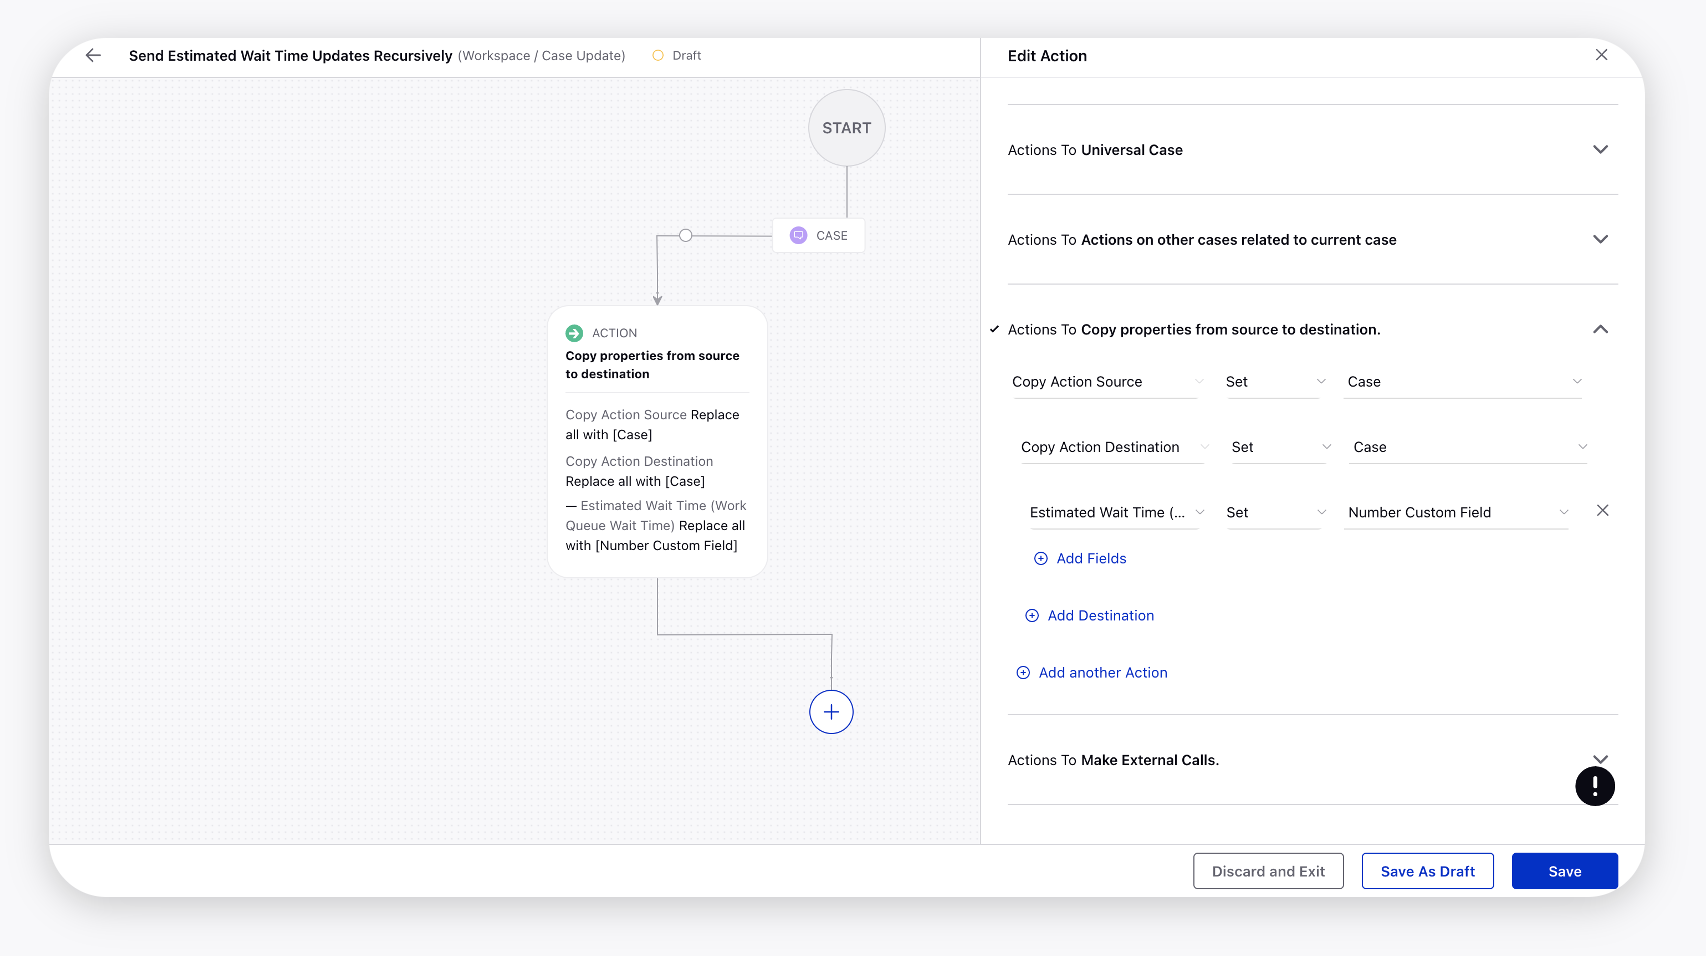
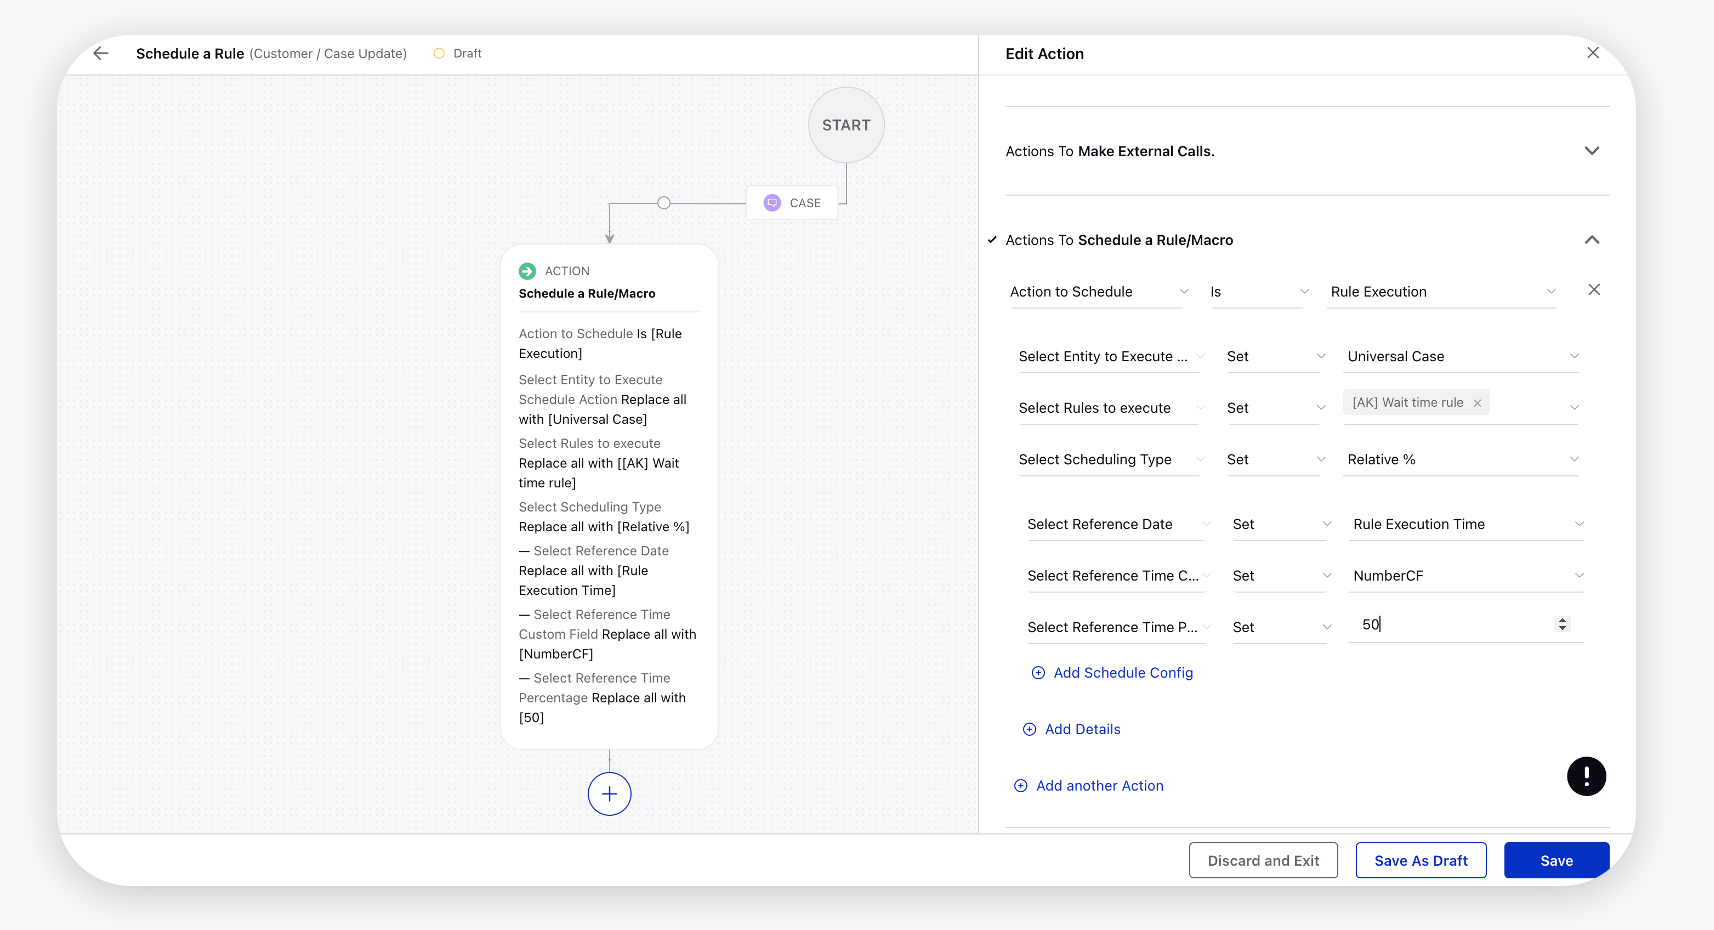
Next, within the same rule or by creating a new rule, set the Schedule a Rule action. Under Actions
To Schedule a Rule/Macro, select Actions to Schedule from the Action dropdown and Rule Execution from the corresponding dropdown.
Select Entity to Execute as Schedule Action as Universal Case.
Select Rules to execute as the wait time auto-response rule for which you want to send the updates.
Select Scheduling Type as Relative % to send the updates based on the percentage you set.
Select Reference Date as Rule Execution Time and Select Reference Time as the custom field where you copied the wait time.
Select Reference Time Percentage as desired, for example, 50.
Display Estimated Wait Time to Customers in Different Languages:
The wait time which is sent to the customers is in English language by default, For Example: 15 Minutes, 1 Hour 10 minutes.
Therefore, if we want to show these labels (hours, minutes, seconds) in any different language, then, you can do that by changing the configuration to %%[wq_case:WAIT_TIME-:-ar_SA] from wq_CASE:WAIT_TIME. This is for Arabic Language.
If you want to translate in other languages, then you can use below codes:
en_US : English (US)
en_GB : English (UK)
ja_JP : Japanese
ko_KR : Korean
it_IT : Italiano
tr_TR : Turkish
pt_PT : Portugese (Brasil)
nl_NL : Dutch
ru_RU : Russian
fr_FR : French
es_ES : Spanish
zh_CN : Chinese