How to Create a Contact Driver Model
Updated
A Contact Driver Model is a collection of contact drivers designed to cater to specific use cases within an organization's operations. For instance, consider a scenario where the contact drivers for customer support interactions differ from those for after-sales service inquiries. In such cases, distinct sets of contact drivers and models are necessary to accurately identify and categorize the primary drivers behind each type of interaction.
By implementing separate contact driver models for various use cases, organizations can tailor their contact driver analysis to suit the unique requirements of each scenario. This approach allows for the creation of customized sets of contact drivers optimized for specific contexts, ensuring that the system accurately captures and analyzes the most relevant factors influencing customer interactions.
To Create a Contact Driver Model
Navigate to the Governance section within the Conversational Analytics Persona.
Click on Contact Driver Models to access the Contact Driver Models window.
On the Contact Driver Models window, locate and click the + Contact Driver Model option located in the top right corner.

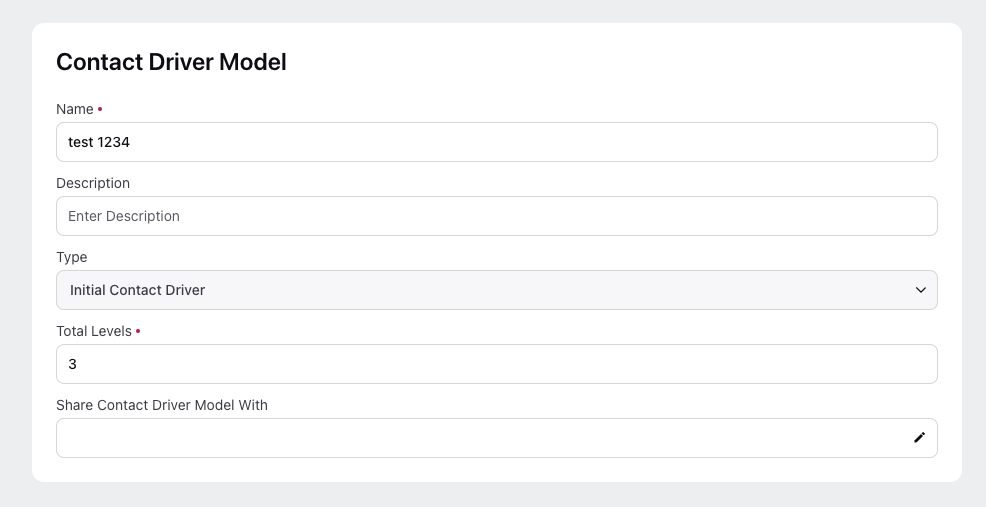
On the Contact Driver Model window that appears, provide the following details:

Name: Enter a descriptive name for the Contact Driver Model.
Description: Optionally, provide a brief description or overview of the Contact Driver Model.
Type: Define the type of the contact driver that the model identifies.
Initial Contact Driver:
This type represents the primary issue or inquiry initially reported by the customer or user, which prompts them to contact customer service or support.
It captures the initial reason behind the customer's interaction and serves as the starting point for addressing their needs or concerns.
For example, if a customer contacts support regarding a technical issue with a product, the initial contact driver might be "Technical Support Request." It is selected by default.
Total Levels: Specify the number of hierarchical levels of contact drivers you want to capture within the model. Each level represents a different degree of granularity or specificity in categorizing customer interactions.
For example, if you set "Total Levels" to 3, it means that you intend to capture contact drivers across three levels of detail or categorization within the model. Each subsequent level provides more detailed information about the customer's inquiry or issue.
Note that you can add up to 10 levels. Here's how it might look in practice:
- Levels = 2
Purchase Intent -> Product Questions
- Levels = 3
Product Issues -> Display Issues -> Display Broken
- Levels = 4
System Issues -> Connectivity Issues -> Bluetooth Issue -> Bluetooth not pairing
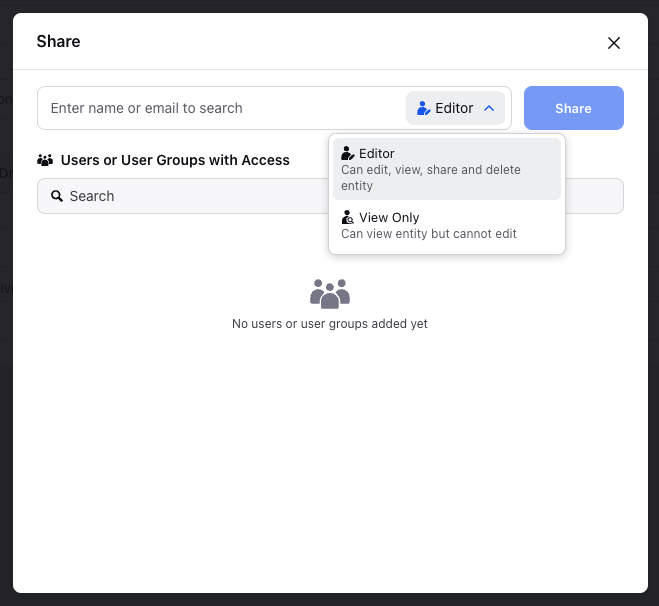
Select the Share permission from the Share Contact Driver Model With drop down list.

Enter the name or email of the Users or User Groups for which the permission needs to be shared.
Click on Editor to select between the Editor and View Only permissions.
Editor - This permission allows you to edit, view, share and delete an entity.
View Only - This permission allows you to view the entity buy you cannot edit it.
Click Share.
Click Save at the bottom.