Add a Custom Field
Updated
In this article, we will cover the steps to add a new custom field in Sprinklr.
Steps to add a Custom Field
Click the New Tab icon. Under Governance Console, click Custom Fields within Platform Setup.
In the top right corner of the Custom Fields window, click Add Custom Field.
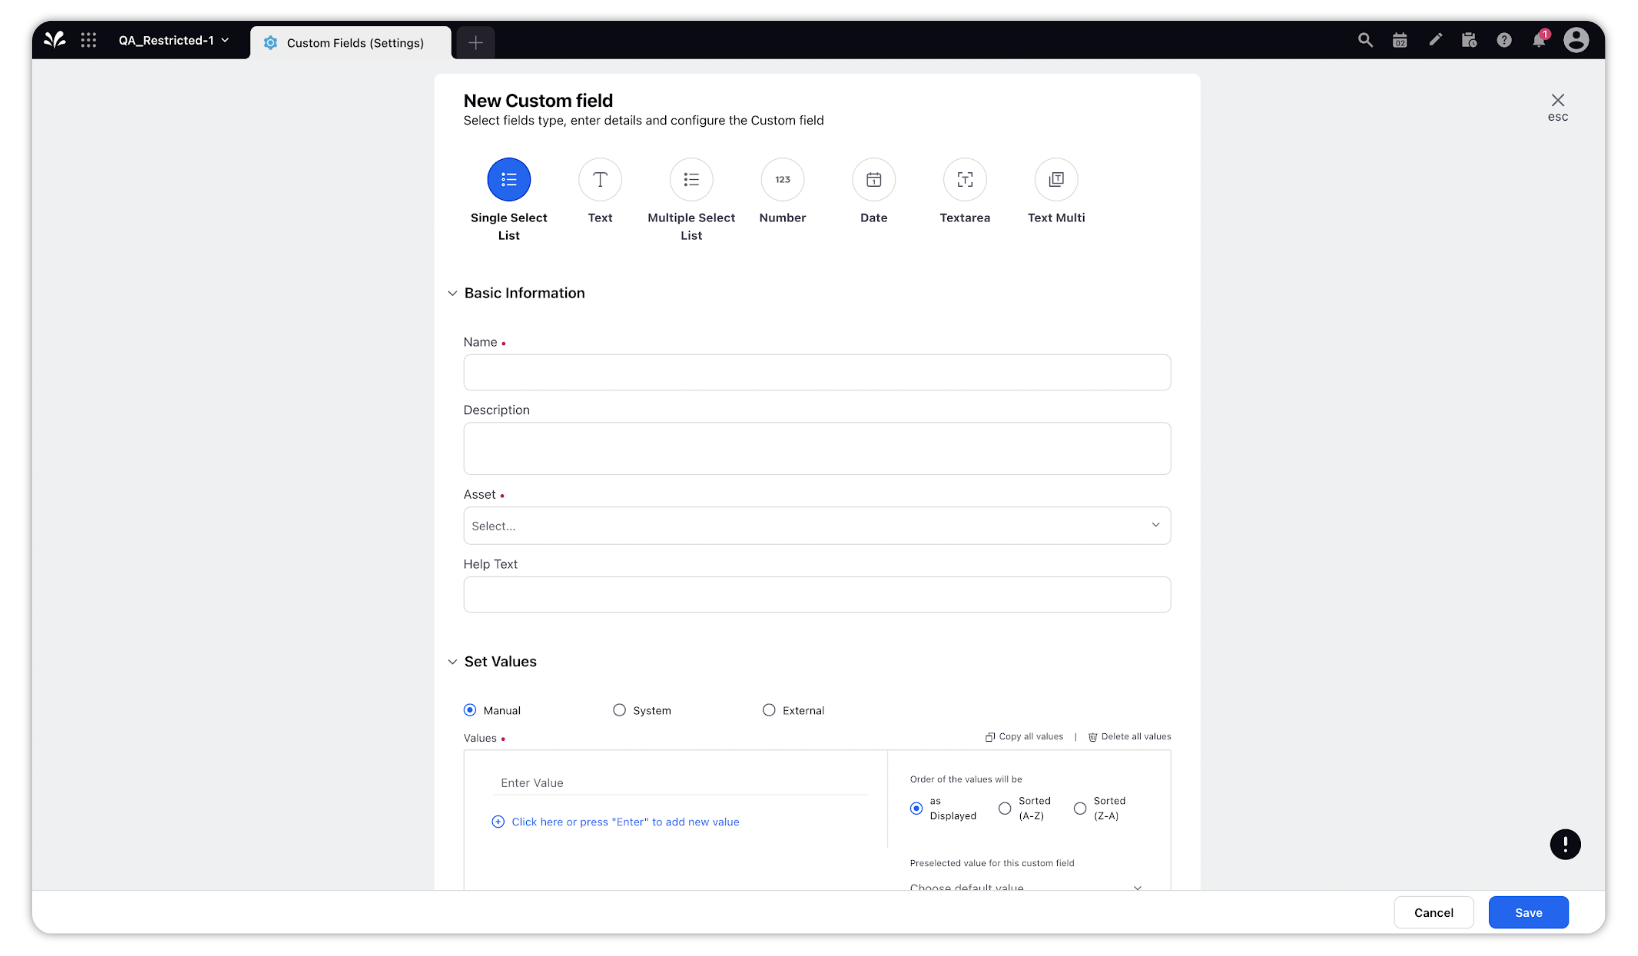
On the New Custom Field window, fill in the required details. For more information, see Custom Field — Field Descriptions.
Click Save in the bottom right corner.
Custom Fields — Field Descriptions
Term | Description |
Basic Information - Enter Custom Field Information | |
Custom Field Type
| Select a Custom Field type. You can select from:
Note: Within the multi picklist custom fields, we have added the “select all” option that will allow you to apply all the CFs values instead of adding them one by one individually. Enablement note: To learn more about getting this capability enabled in your environment, work with your Success Manager. Apply rich text formatting such as bold, italic, underline, strikethrough, bullets, etc. to Text Area type custom fields. The formatting will be visible in the Advanced Publisher, Production Dashboards, and entity Third Pane. However, within the Production Dashboards, the formatting will be available in the inline edit mode only. Enablement note: To learn more about getting this capability enabled in your environment, work with your Success Manager. |
Name | The name of the field. |
Description | Write a description not exceeding 500 characters. |
Asset | Select Asset(s) to which the custom fields will be related. The Assets are Account, Outbound Message, Message, Profile, Media Asset, User, Workspace (Client), Campaign, Sub-Campaign, Community Product, Paid Initiative, Ad Set, Ad Variant, Case, Knowledge Base Content, Work Queue, Survey, Dialer Profile, and Task. |
Help Text | Help text will be shown with the custom field to help the user understand the field. This additional information related to the custom field will appear for the user if you hover over the tooltip |
Category | Setting a category helps arrange custom properties in an organized manner. |
Timezone
| Set Timezone (only for Date type Custom Fields) which will be displayed in Production Dashboards, entities Third Pane, Advanced and Quick Publisher, Filters in Editorial Calendar, and Production Dashboards. Enablement note: To enable Timezone for Date type custom fields, work with your Success Manager. |
Value Validation Control (Only for Text, Text Area, Text Multi) | |
Enablement note: To learn more about getting this capability enabled in your environment, work with your Success Manager. |
Any | Select when no validation is needed. |
URL | Select if the validation is to be done for URL. |
Email | Select if the validation is to be done for email ids. |
Validate through RegEx (Regular Expressions) | Select RegEx if the validation is very particular in nature i.e. based on the length and type of characters. |
Set Values - Select Manual, System or External to set values | |
Preferences | You can select only one preference. The preferences are:
|
Manual | Define values manually. |
Values | To define a value, add it in a new line. |
Preselected value for this custom field (Default Value) | Define the default value for the custom field. This value will be pre-populated in the field. |
Select a field that determines what values will be surfaced if the field is selected. This allows you to surface only relevant options based on what the entity is. For example, if you select Task Type as the controlling field, you can select the controlling field value of Approval task and then set the value of new custom field to show only Approve and Reject as your options if the task is an Approval Task. | |
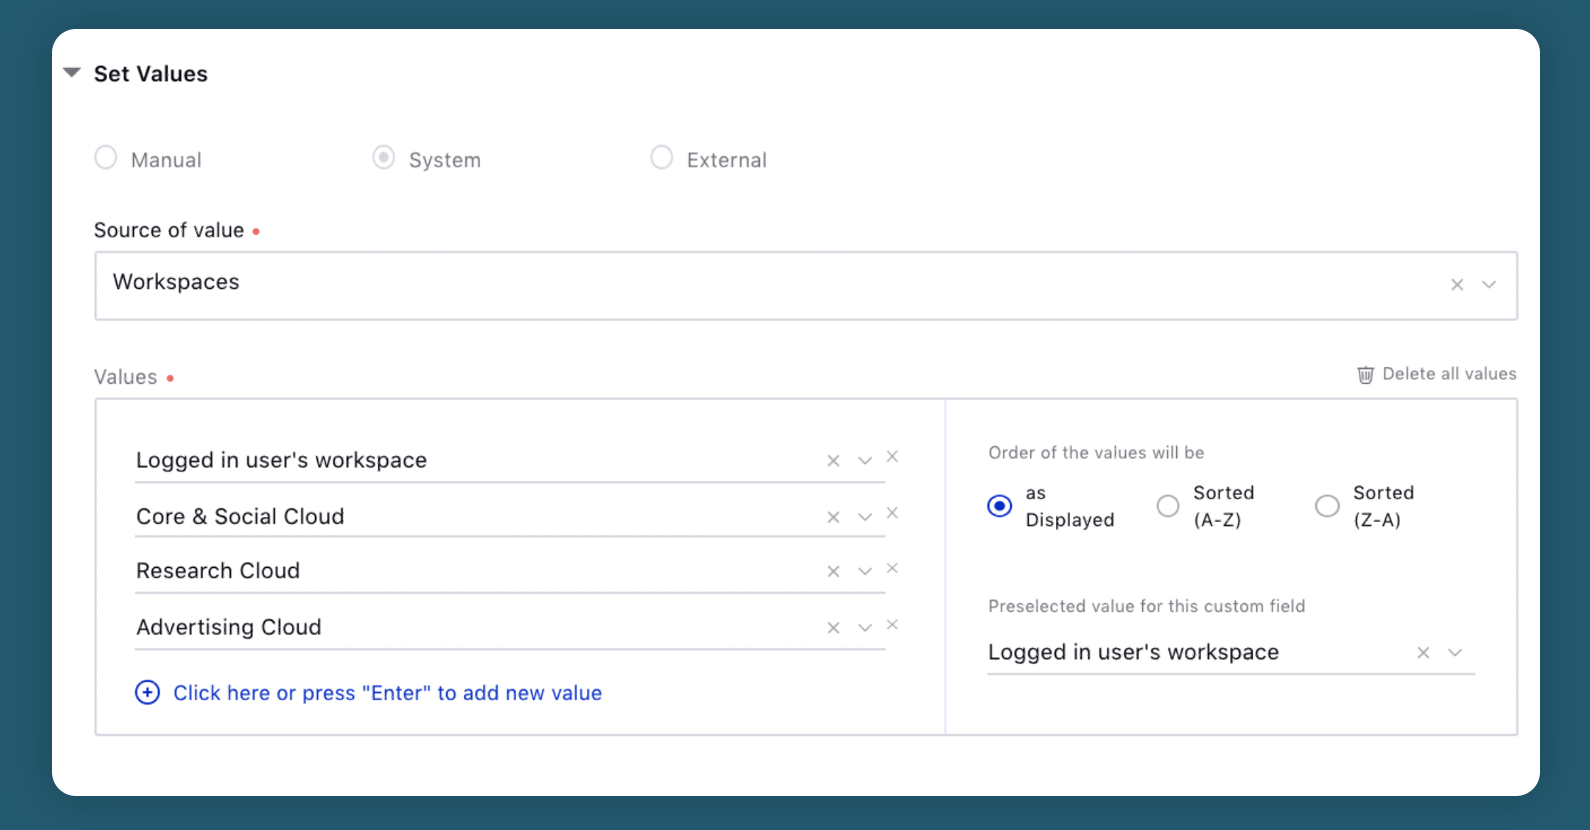
System | Import from Sprinklr assets. |
Source of value | Select the value source from the drop-down menu. |
Values | Select values from the drop-down menu. |
Preselected value for this custom field (Default Value) | Defines the default value for the custom field. This value will be pre-populated in the field. |
External | Import from an external source. |
Source | Select the source. Enablement note: To learn more about getting this capability enabled in your environment, work with your Success Manager. |
Visibility Control - Select Visibility Preferences | |
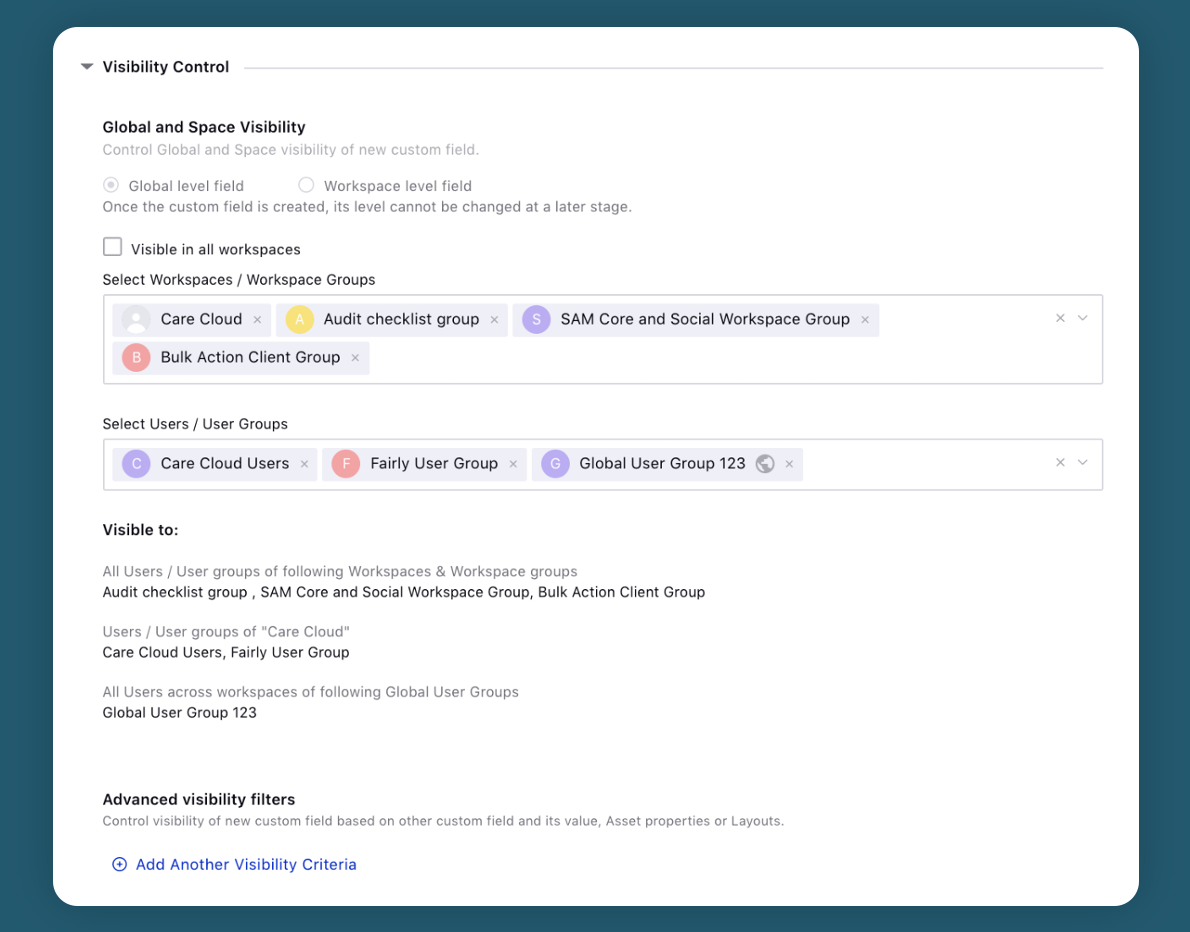
Visible in all workspaces | Selecting Visible In all Workspaces will allow visibility for all users across all workspaces. |
Select Workspaces / Workspace Groups | Selecting Workspaces/Workspace Group(s) will allow visibility for all the users within the specified Workspace(s). |
Select Users / User Groups | Selecting User/User Group(s) will allow visibility for only the specified user(s) or user group(s). |
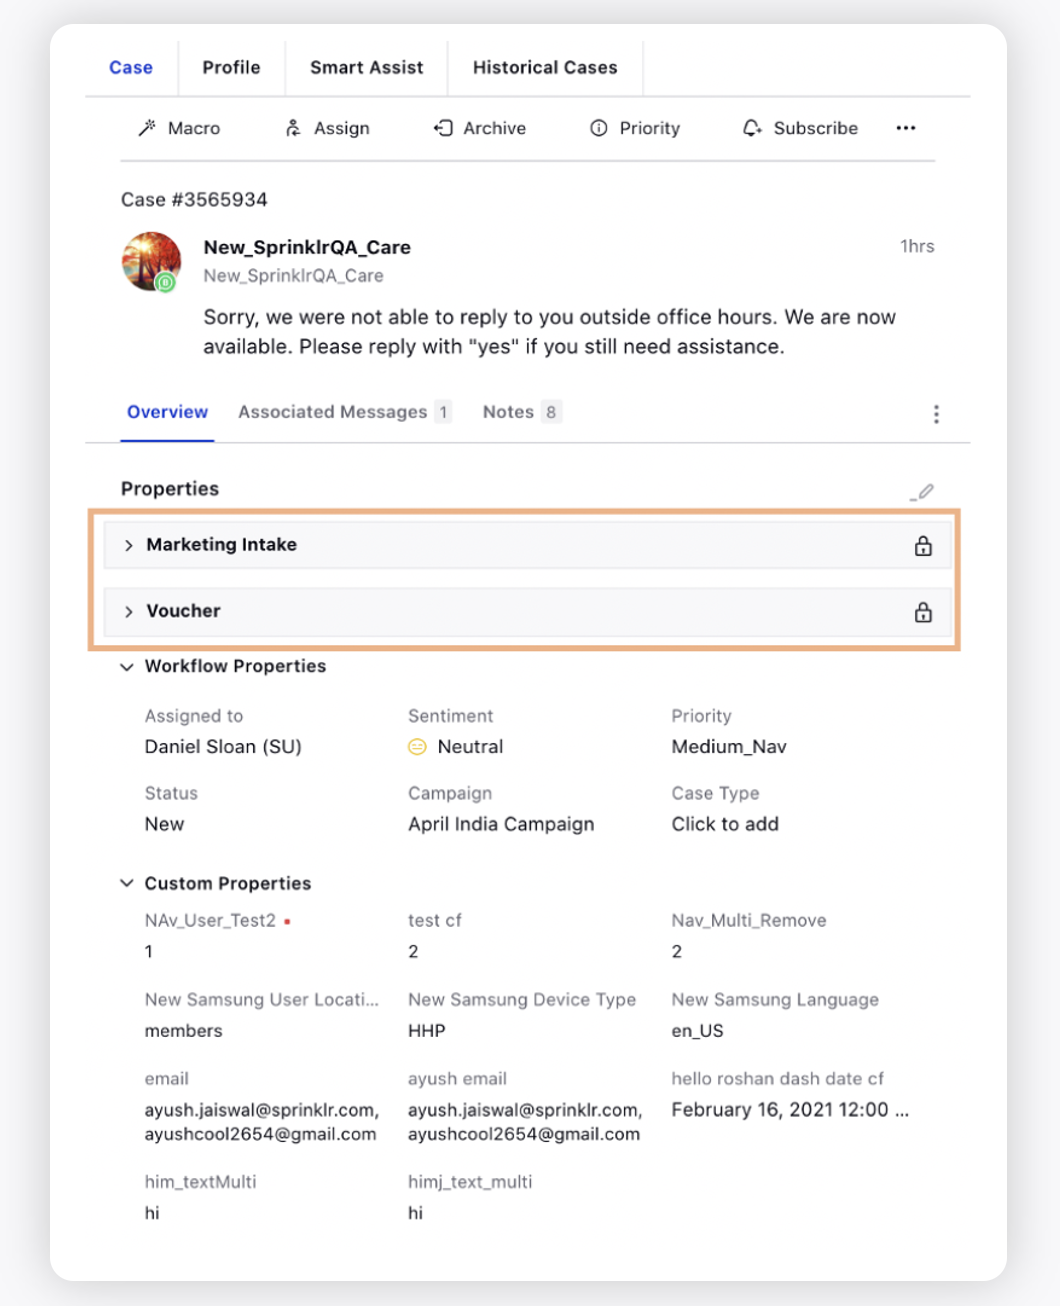
is Secure (for Case) | If a field is marked as secure then this will be displayed in a separate collapsed section within the Overview section. Every action to expand the collapsed section will be logged for audit. |
Advanced visibility filters | Control visibility of new custom field based on other custom field and its value, Asset properties or Layouts. |
Asset Level Configuration - Asset level configuration edited from here will only work in Space | |
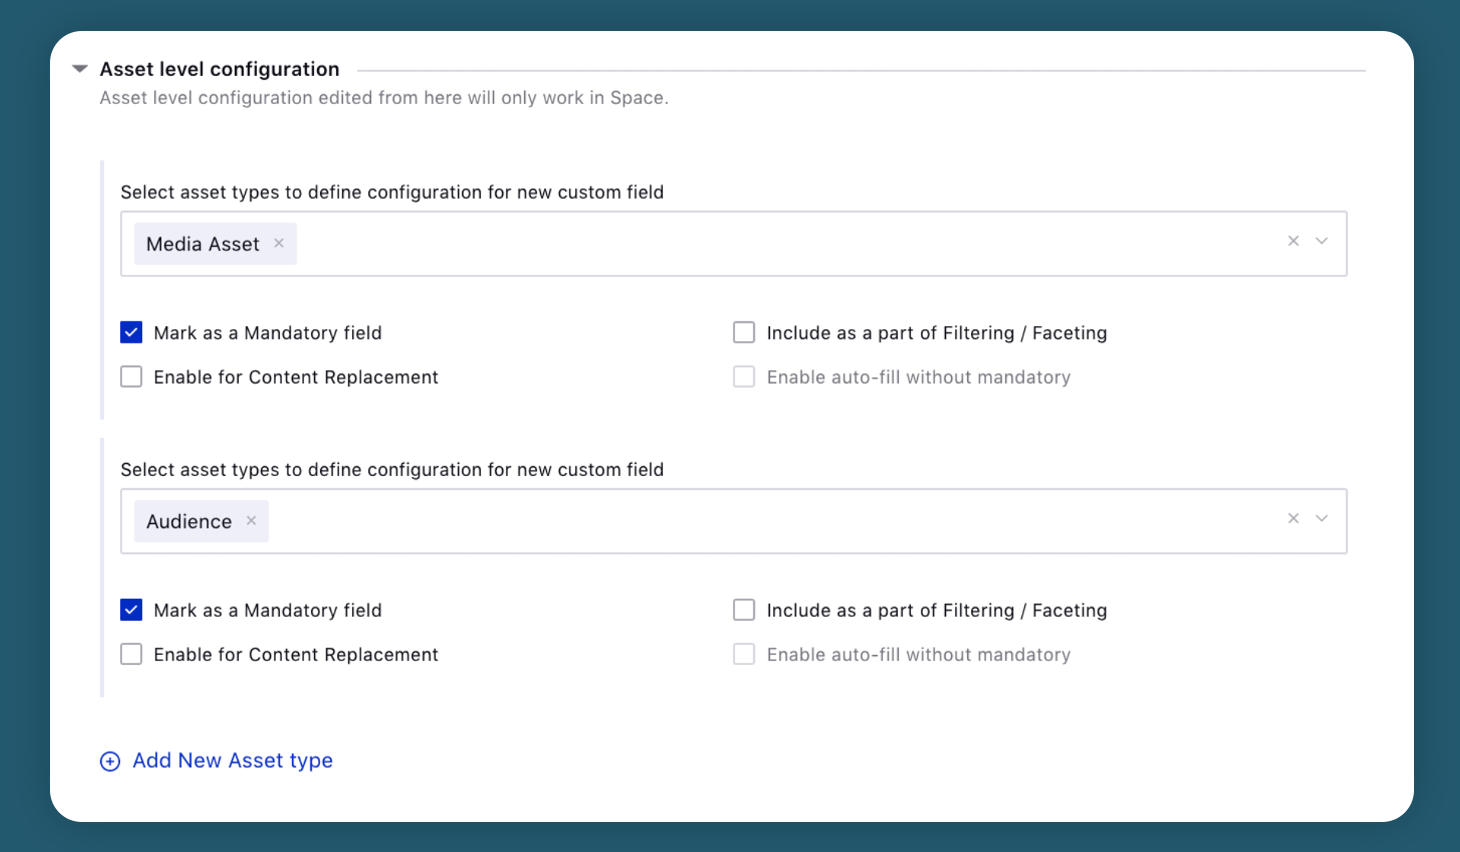
Select asset types to define configuration for new custom field | Select the asset type from the drop-down menu. |
Preferences | You can select one or multiple preferences. The preferences are:
|