Create and Manage Webhook Subscription in Sprinklr
Updated
A webhook (also called a web callback or HTTP push API) enables third-party services to send real-time updates to your app. Updates are triggered by some event that occurs and the data is delivered to you immediately as it happens. When you receive the request, you handle it with some custom logic, like storing the data in a database or sending an email. Webhooks are also referred to as “Reverse APIs,” unlike typical APIs where you would need to poll for data very frequently in order to get it in real-time. This makes webhooks much more efficient for both providers and consumers.
In Sprinklr, you can create webhook subscriptions on the following entities:
Entity | Types |
Case | Case Deleted, Case Updated, Case Created, and Message Association Change |
Message | Message Received, Message Updated, Message Deleted, Message Engagement Updated, Message Published, Message Publish Failed, Message Sent for Approval, Message Read, and Message Delivered |
Workflow | Workflow Updated |
Profile | Profile Created, Profile Updated, Profile Deleted, and Profiles Merged |
Activity | Audience Activity |
Draft | Draft Created, Draft Updated, and Draft Scheduled |
Campaign | Campaign Created, Campaign Updated, and Campaign Deleted |
Comment | Comment Created and Comment Updated |
Sam (Asset Management) | Asset Created, Asset Updated, and Asset Deleted |
Task | Task Create, Task Update, and Task Delete |
User | User Create and User Update |
Thread Control | Thread Control Updated |
For example, you can create a webhook subscription for Case Create. Whenever a new case gets created, the webhook gets triggered and you will get the event notification immediately. You can even use the different sets of available authorization to protect your data.
To Create Webhook Subscription
Click the New Tab icon
. Under the Governance Console, click All Settings within Platform Setup.
In the Platform Settings window, click API 2.0in the left pane and select Webhooks in the right pane.
In the Webhooks window, click Add Webhook in the top right corner.
In the Add Webhook window, fill in the required details. For more information, see Add Webhook — Field Descriptions.
Click Save in the bottom right corner to create a webhook subscription.
Add Webhook — Field Descriptions
Terms | Description |
Basic Details | |
Name | Enter a name for the Webhook. |
Description | Enter a description of the Webhook |
Authentication | |
Authentication Type | Select the Authentication type from the drop-down menu. The following options are available: |
Application Id | Enter the Application ID for the Salesforce authentication. |
Pre-Shared Key | Enter a pre-shared key. |
Callback URL | Enter a Callback URL. Sprinklr will make a request to that URL to deliver the updates – so it needs to be reachable over the internet. For more information, see To Verify Webhook Callback URL. |
Via Proxy | Check the box to trigger webhooks from Proxy IPs. |
Subscription Details | |
Subscription | Select a Subscription from the drop-down. The following options are available:
|
Customise subscription with following Attributes | Select attribute Is/Is not to apply a filter on subscription. |
Add New Attribute | Click to add a new attribute to the subscription. |
Add New Subscription | Click to add a new subscription to the webhook. |
To Verify Webhook Callback URL
In case of any change (eg. Case Update) in data of the object and field of the taken webhook subscription. Sprinklr will make a request to the given Callback URL to deliver the updates, so it needs to be publicly reachable over the internet.
In the Add Webhook window, within the Authentication section enter the URL in the Callback URL field.
Click Verify Webhook in the extreme right corner of the Callback URL. A pop-up message saying that “I have successfully verified callback URL” will appear in the bottom for a few seconds if the URL is correct.
Tip
To try out the Verify Webhook option, you can generate a webhook using webhook.site. It will be a Public URL, so be aware that anyone having the URL handy can access the data.
To Manage Webhooks
Click the New Tab icon
. Under the Governance Console, click All Settings within Platform Setup.
In the Platform Settings window, click API 2.0in the left pane and select Webhooks in the right pane.
In the Webhooks window, hover over the desired webhook's Options icon
and select the desired option from the drop-down menu. The following options are available:
Details
Edit
Delete
Activate
Deactivate
Webhook Authentication Types
With Pre-Shared Key
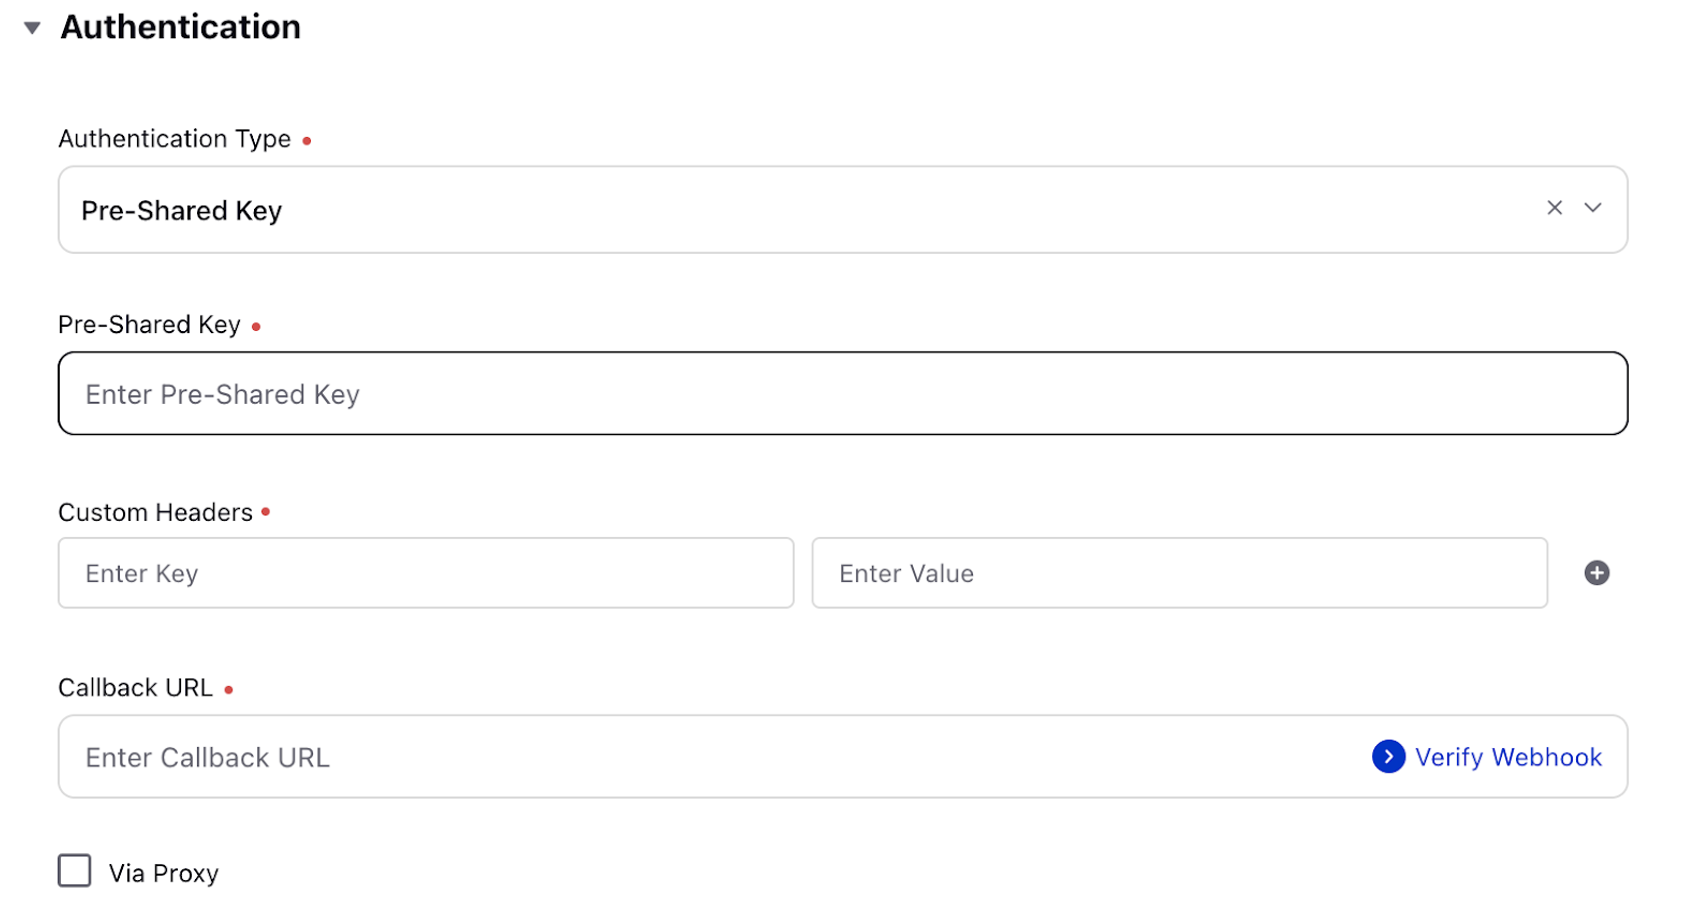
Pre-Shared Key: User-generated, authorization key that can be used to confirm if the request is valid. The payload is signed with the pre-shared key using (SHA256) and added to the header with key X-Hub-Signature.
Custom Headers: Any additional headers that the user wants to receive in the webhook response.
Public URL
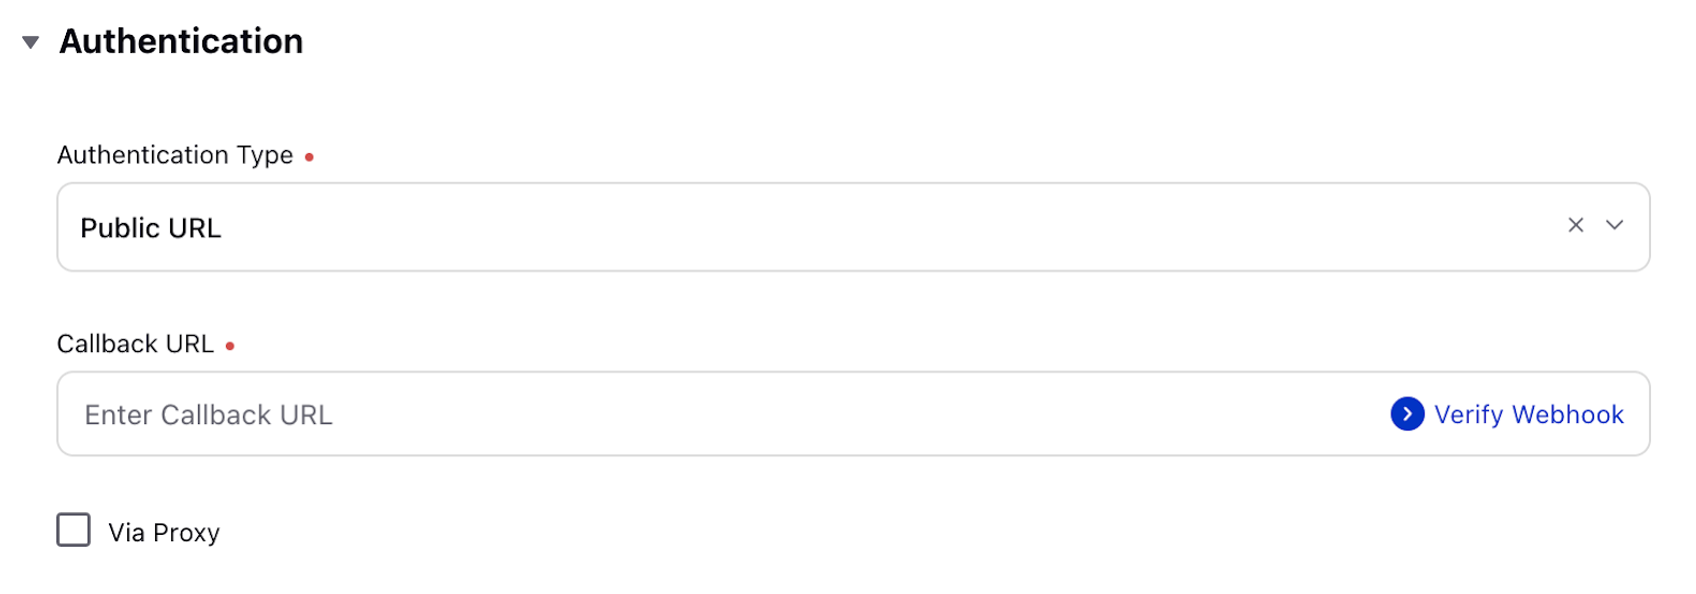
Callback URL: Sprinklr will make a request to that URL to deliver the updates – so it needs to be reachable over the internet. For testing, you can generate callbackUrl using webhook.site.
Basic Authentication
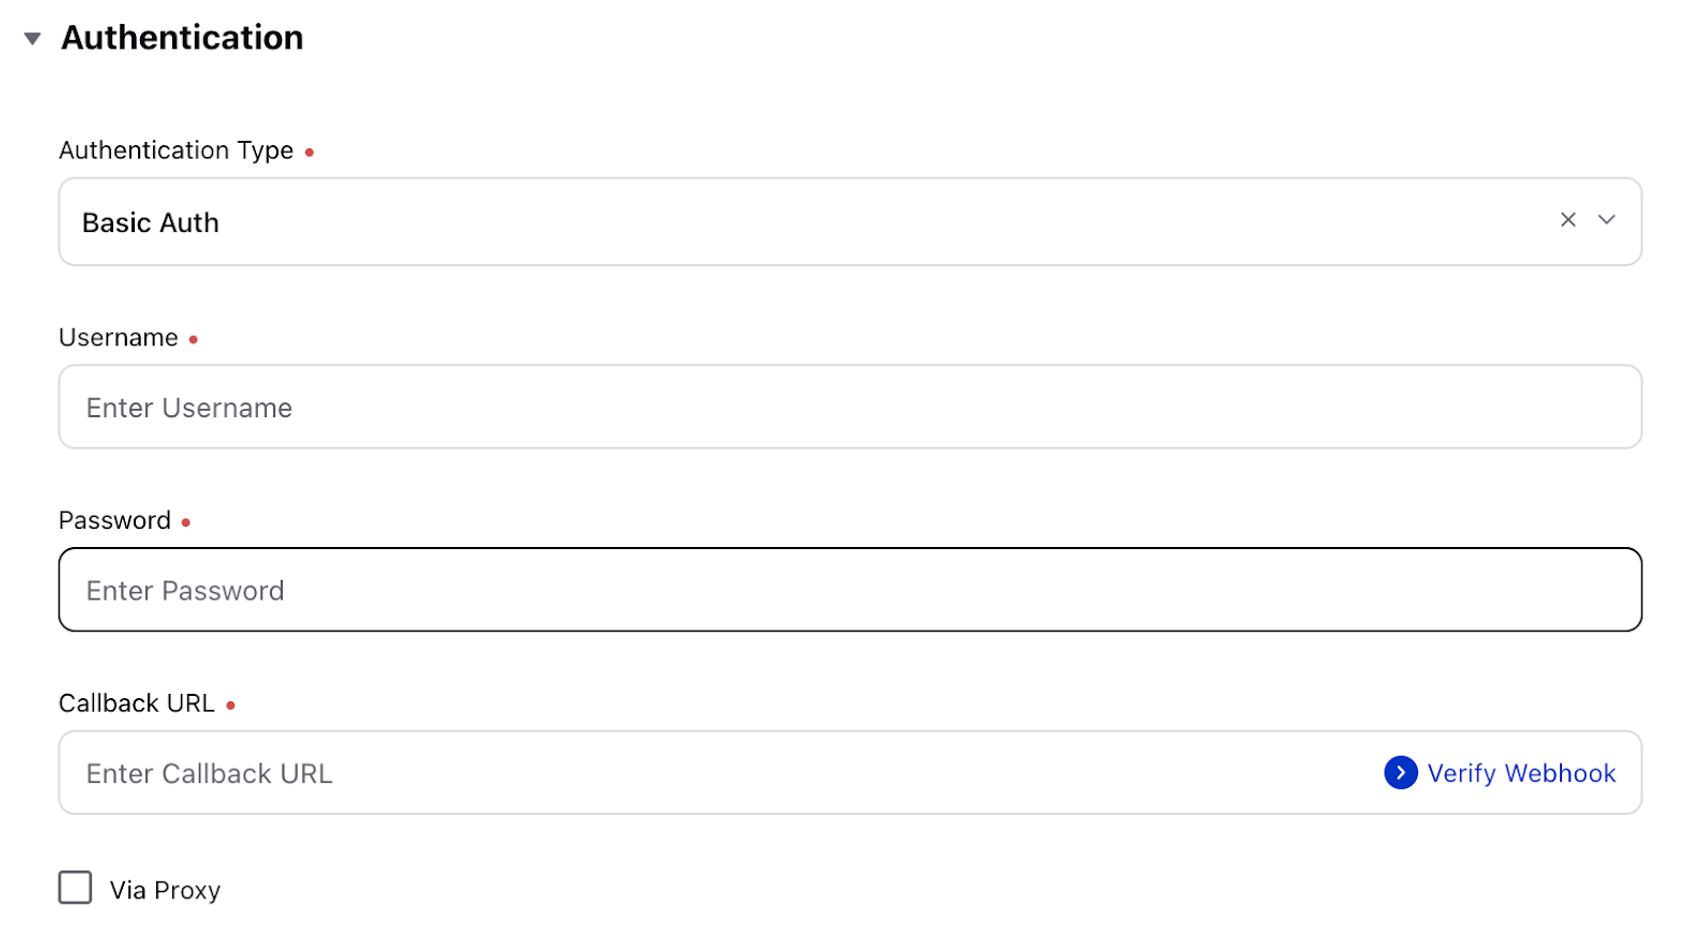
Username: User-generated username. When webhook data is sent, the basic username is included in the headers of the webhook request
Password: User-generated password.
The webhook request contains the following header: Authorization: Basic <base64-encoded-username:password>
Oauth 2.0

Grant Type: client credentials
Token URL: The URL on your OAuth 2.0 server where Sprinklr can send authentication requests to obtain an access token. Example: https://your-auth-server.com/oauth/authorize
Client ID: API key
Client Secret: API secret
Grant Type: password credentials
Username: user-generated username
Password: user-generated password
Token URL: The URL on your OAuth 2.0 server where Sprinklr can send authentication requests to obtain an access token. Example: https://your-auth-server.com/oauth/authorize
Client id: API key
Scope: Enter the scope of the webhook in which you want to authenticate.
Client secret: API secret
Client authentication: send as basic auth header/send client credentials in body
Callback url: Sprinklr will make a request to that URL to deliver the updates – so it needs to be reachable over the internet. For testing, you can generate callback Url using webhook.site.
External Authentication Credentials Type
![]() Note: This feature is controlled by a Dynamic Property. Kindly reach out to your Success Manager to enable this feature in your environment. Alternatively, you can also raise a ticket at tickets@sprinklr.com.
Note: This feature is controlled by a Dynamic Property. Kindly reach out to your Success Manager to enable this feature in your environment. Alternatively, you can also raise a ticket at tickets@sprinklr.com.
The External Authentication Credentials option streamlines the webhook integration process by linking webhooks to preconfigured authentication credentials.
Previously, users were required to create separate authentication records for each webhook—even when the authentication details were identical. This approach led to redundancy and increased setup time.
With this enhancement, you can:
Select from a list of existing authentication credentials directly.
Avoid duplicating authentication configurations for webhooks that use the same credentials.
Ensure consistent credential management and easier maintenance across webhook integrations.
This centralized approach reduces setup effort, minimizes configuration errors, and improves the scalability of your webhook integrations.
Select the External Authentication Credentials option from the Authentication Type dropdown to select a preexisting authentication type.
Choose the authentication method that aligns with your integration needs.

For more details, refer to Add an External Authentication Credential in Sprinklr .
Marketplace Apps Authentication
To use credentials from a Marketplace App, select Marketplace Apps from the Authentication Type dropdown. Then, choose the marketplace app whose credentials you want to use.
![]() Note: Currently, only Salesforce apps are supported for Marketplace Apps Authentication.
Note: Currently, only Salesforce apps are supported for Marketplace Apps Authentication.
