Queue Group Monitoring
Updated
Queue groups are collections of queues that are grouped based on certain parameters. They are particularly useful for managing a large number of work queues efficiently. Instead of handling work queues individually, you can organize them into queue groups for streamlined management.
Note: Queue grouping is currently available for limited users. To enable this feature in your environment, reach out to your Success Manager. Alternatively, you can submit a request at tickets@sprinklr.com.
Create a Queue Group
To group work queues, first create a Work Queue Custom Field and tag all relevant work queues with it. Then, contact your Success Manager or email tickets@sprinklr.com to request the creation of a pivot view for the Work Queue Custom Field.
Monitor Queue Groups
After the queue groups are created, you can monitor them from the Queues screen of Supervisor Console.
To monitor a queue group, follow these steps:
1. Open the relevant Supervisor Console persona app from the Launchpad.
2. In the left pane of Supervisor Console, click Queues to access the queue groups view.
3. To view the individual work queues in a queue group, click the expand (![]() ) icon in front of the queue group name.
) icon in front of the queue group name.
4. To monitor a queue group, click the Monitor Queue Group (![]() ) icon corresponding to the queue group name. This opens a detailed view displaying the Queue Summary and Agents List.
) icon corresponding to the queue group name. This opens a detailed view displaying the Queue Summary and Agents List.
Note: If a queue is not part of any queue group, it will be shown individually.

The following parameters are shown in Queue Summary while monitoring a queue group:
Parameter | Description | Operator |
Pending Count | The total number of cases pending in the queue group. | Sum |
In Progress Count | The total number of cases that are in progress in the queue group. | Sum |
% of Calls Answered Within SLA | The percentage of calls answered within SLA. | Sum |
Total Calls | The total number of calls in a queue group. | Sum |
Total Calls Taken | The total number of calls taken by agents. | Sum |
Total Abandoned Calls | The total number of calls abandoned. | Sum |
% SLA | The percentage of calls answered within the SLA. | Average |
Average work queue wait time | The average wait time for cases in the work queue. | Average |
% Abandoned Calls | The percentage of calls abandoned that came into the queue. | Average |
Oldest Call Waiting Time | The oldest unassigned call of the queue. | Maximum |
Logged On + Activated | The number of agents who are logged in to Sprinklr and are activated in the Work Queue.
| Sum |
Agents Available | The agents who have Consumed Capacity as 0. They can be assigned any type of case based on the queues routing configuration, skills, availability status, and other criteria.
| Sum |
Legend
Sum: Displays the total sum of the parameter from all individual work queues within the queue group.
Average: Displays the average value of the specified parameter from all individual queues within the queue group.
Maximum: Displays the highest value of the specified parameter from all individual queues within the queue group.
Quick Filters
Supervisors can create quick filters based on various criteria such as languages, work queue tags, work queues, and more. These quick filters allow supervisors to identify relevant queue groups quickly and easily for monitoring. Supervisors can also perform actions on the quick filters such as saving, searching, updating, and more.
To create or save a quick filter, follow these steps:
1. Open the Supervisor Console persona app from the Launchpad.
2. In the left pane of Supervisor Console, click Queues.
3. Click the Filters icon (![]() ) located at the top-right corner. The Add Filter icon will appear above the dashboard.
) located at the top-right corner. The Add Filter icon will appear above the dashboard.

4. Click the Add Filter (+) icon. Define the filter based on your requirements.

5. Click Apply.
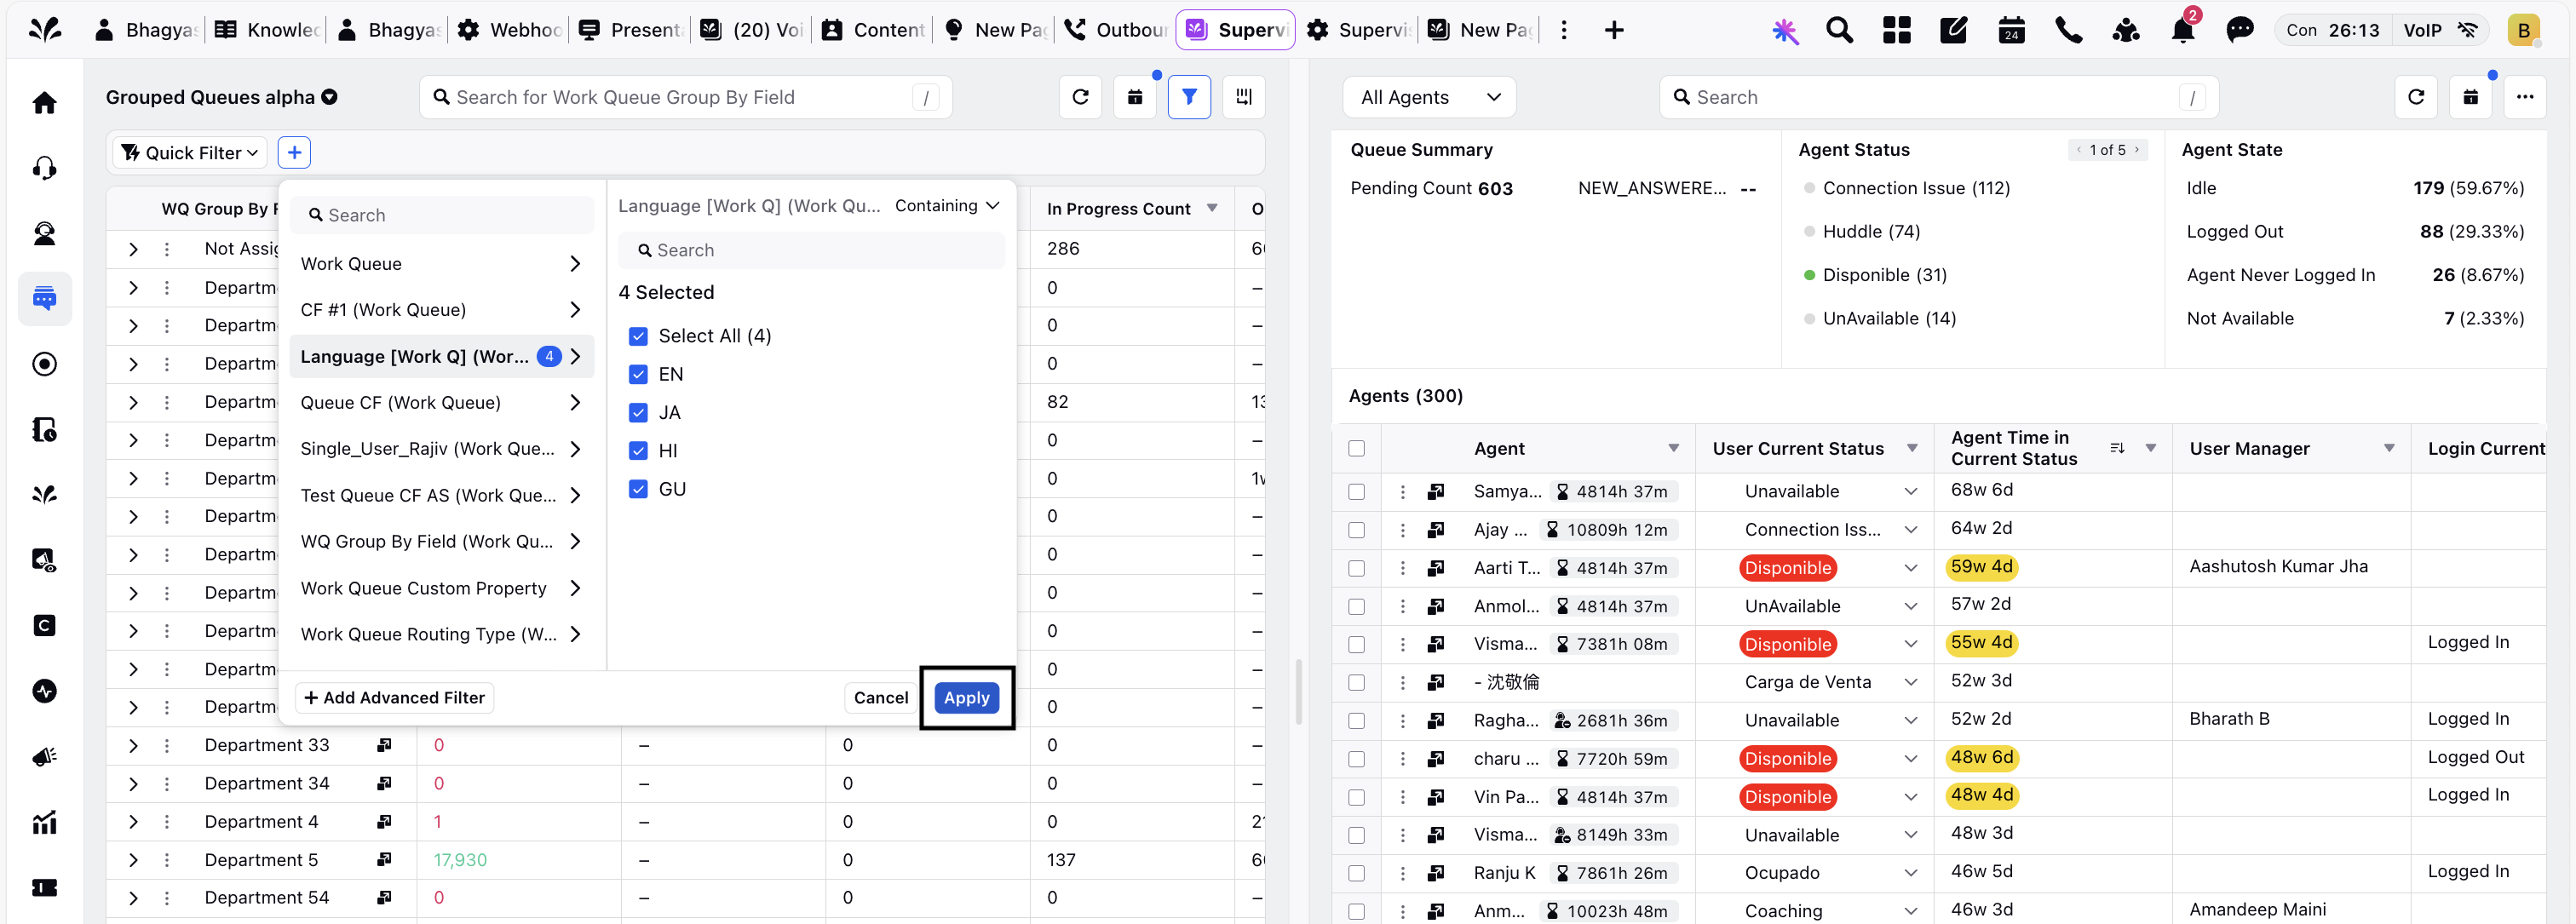
6. To save the applied filter, click the Save button located at the top-right corner. The New Quick Filter dialog box is displayed.

7. Enter a name for the filter and click Submit.
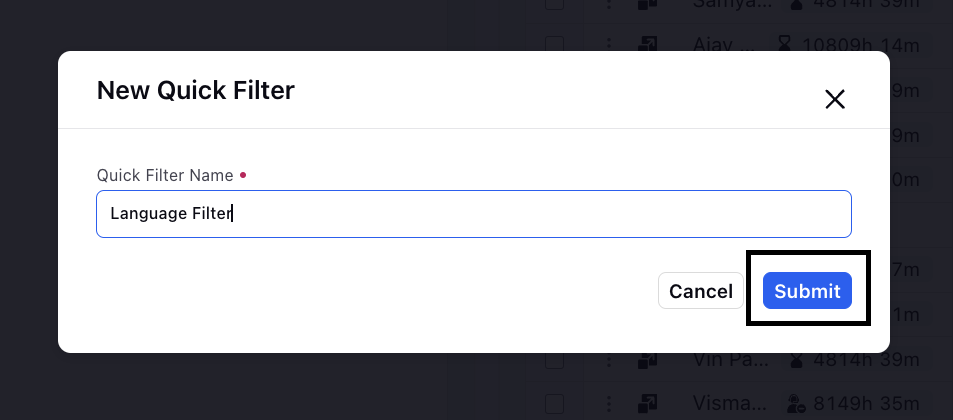
The filter you created will now appear in the Quick Filter dropdown.
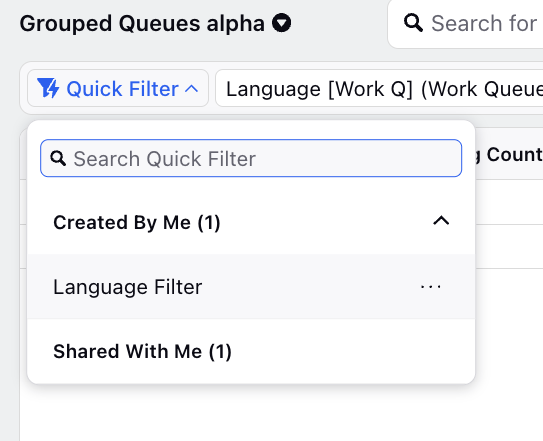
You have now successfully created a quick filter for your grouped queues.
Agent Queue-Activation Manager
The Agent Queue-Activation Manager enables you to quickly activate or deactivate agents from specific Queues. This is particularly useful when agents are part of multiple Work Queues. The ability to manage agent activation from a single page helps supervisors efficiently allocate resources and ensure adequate staffing for each Work Queue.
Note: Agent Queue-Activation Manager is currently available for limited users. Please contact your Success Manager to get this feature enabled in your environment.
Follow these steps to navigate to the Agent Queue-Activation Manager:
1. Go to the relevant Supervisor Console Persona App on the Launchpad. Explore standard Supervisor Console Persona Apps.
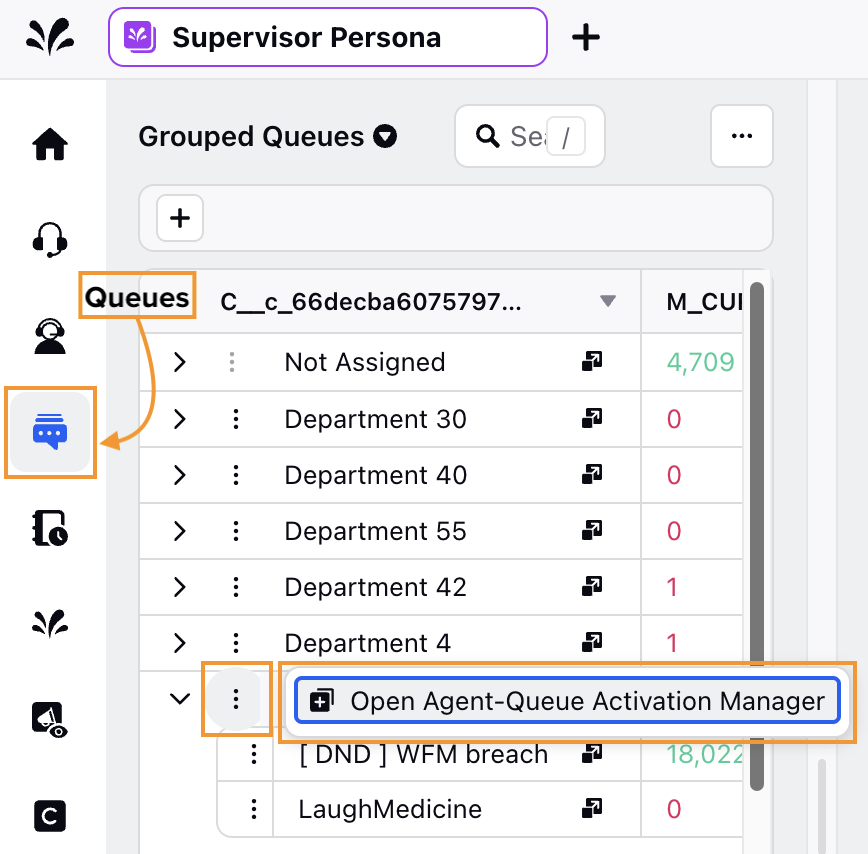
2. Select Queues from the Left Pane to open the Queues homepage.
3. Hover over the vertical ellipsis (⋮) icon corresponding to the relevant Queue Group. This will show the Open Agent Queue-Activation Manager option.
4. Select the Open Agent Queue-Activation Manager option to open the Agent Queue-Activation Manager. By default, all the agents and the assigned Work Queues are displayed in Agent Queue-Activation Manager screen.
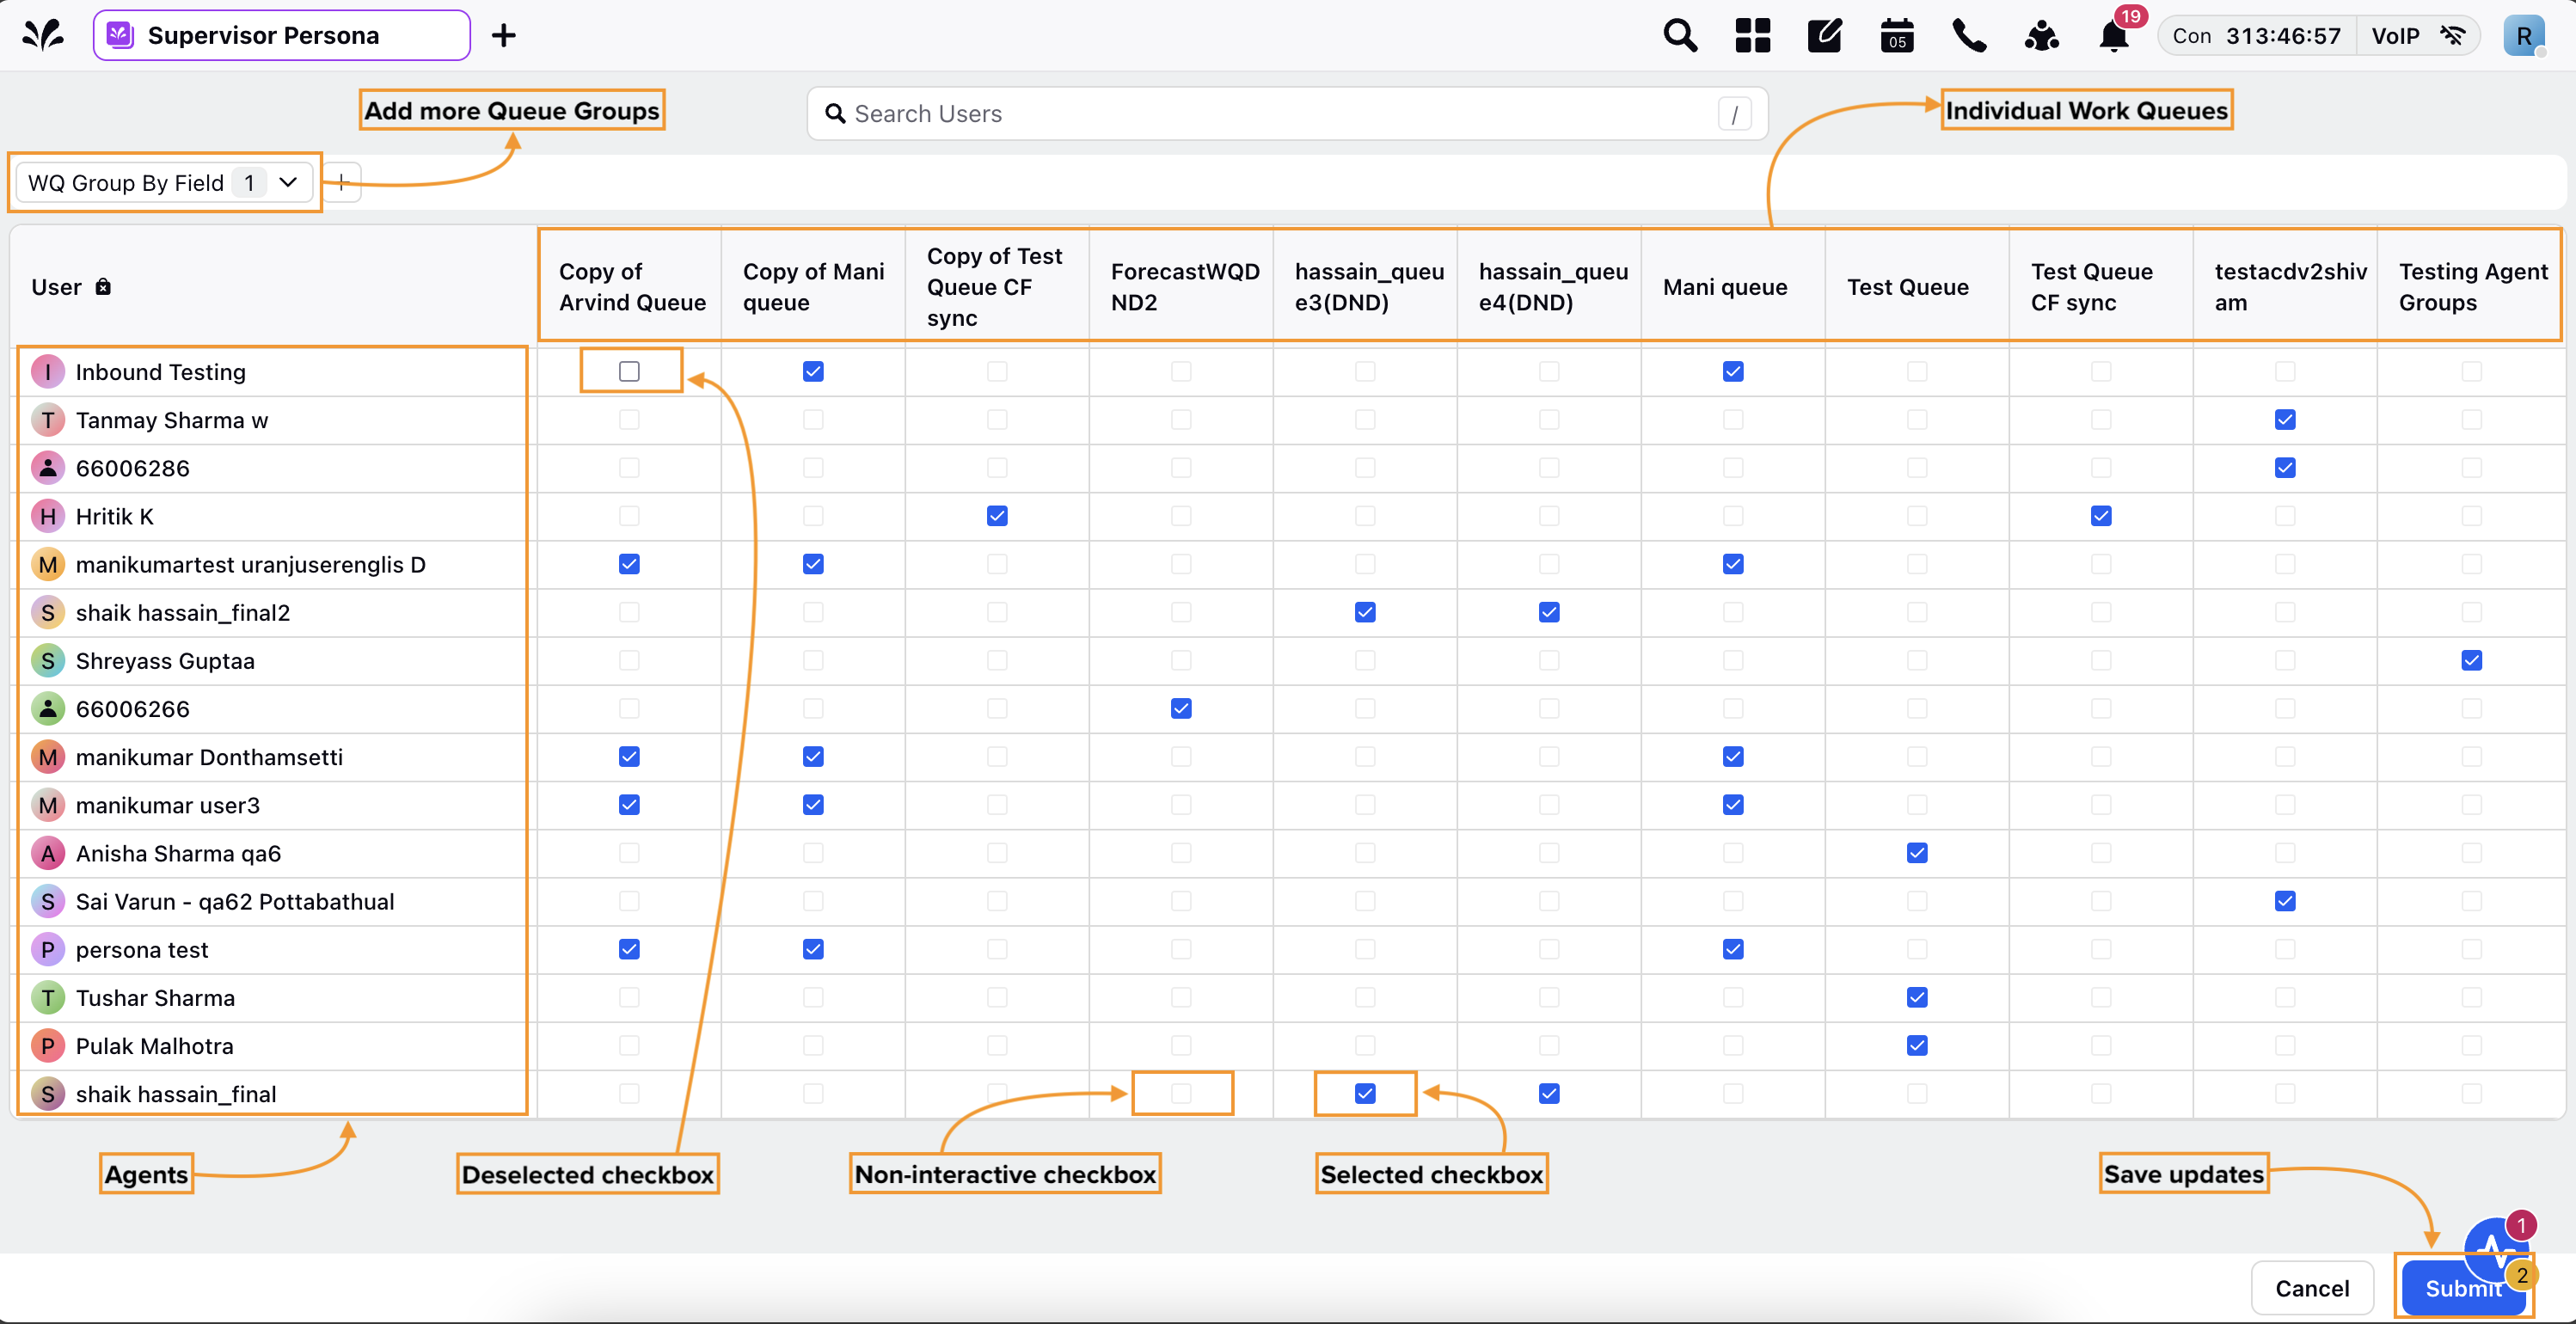
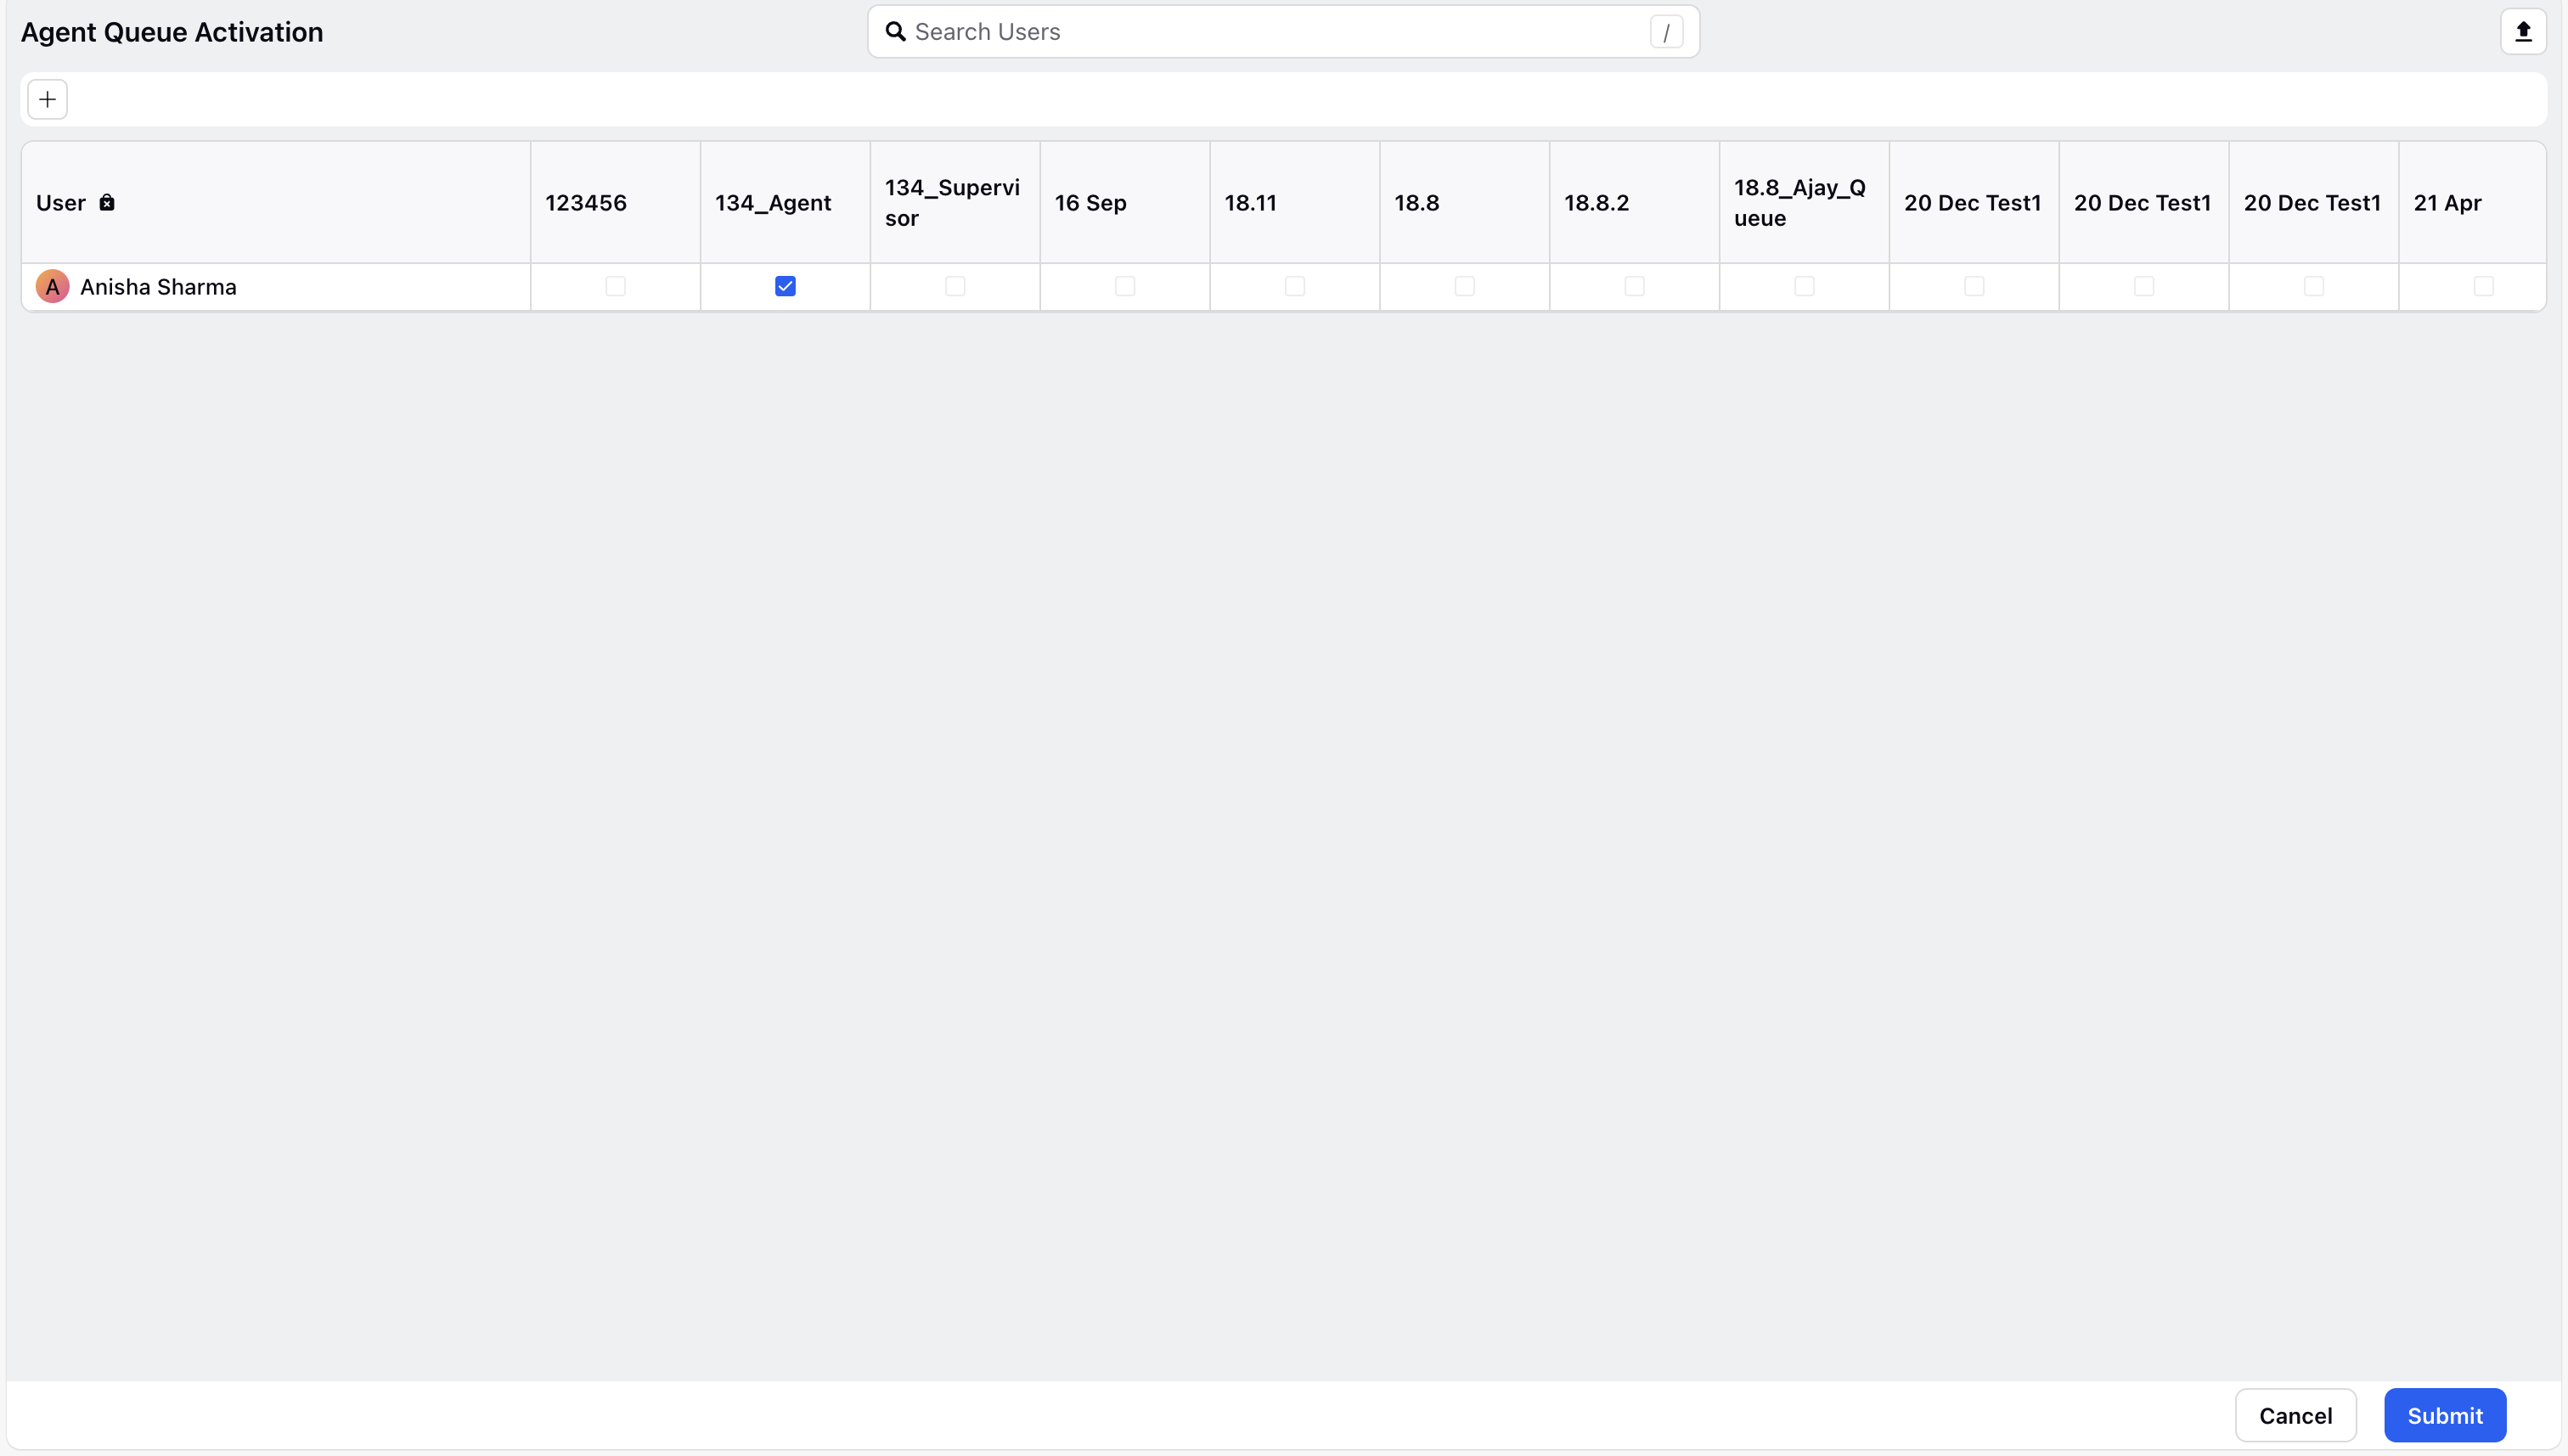
The Agent Queue-Activation Manager screen can be configured with user-contextual filters to display only the agents and their associated work queues relevant to a particular supervisor. This enhances data security by restricting access to relevant agents, improves usability, and ensures consistent governance across queue-related monitoring screens.
Note: The user-contextual filters feature is currently in Limited Availability. To enable this feature in your environment, reach out to your Success Manager. Alternatively, you can submit a request at tickets@sprinklr.com.
The following screenshot shows only the agent and their associated work queues relevant to the supervisor:
5. Activate or deactivate agents from Work Queues from this page by selecting or deselecting the checkbox.
Selecting the checkbox will activate the agent for those Work Queues while deselecting it will deactivate the agent for those Work Queues. Click the Submit button at the bottom right of the page to save the changes.
Note: You can activate or deactivate an agent in Work Queues only if the agent is part of the relevant Work Queues. Otherwise, the checkbox will be greyed out and non-interactive.
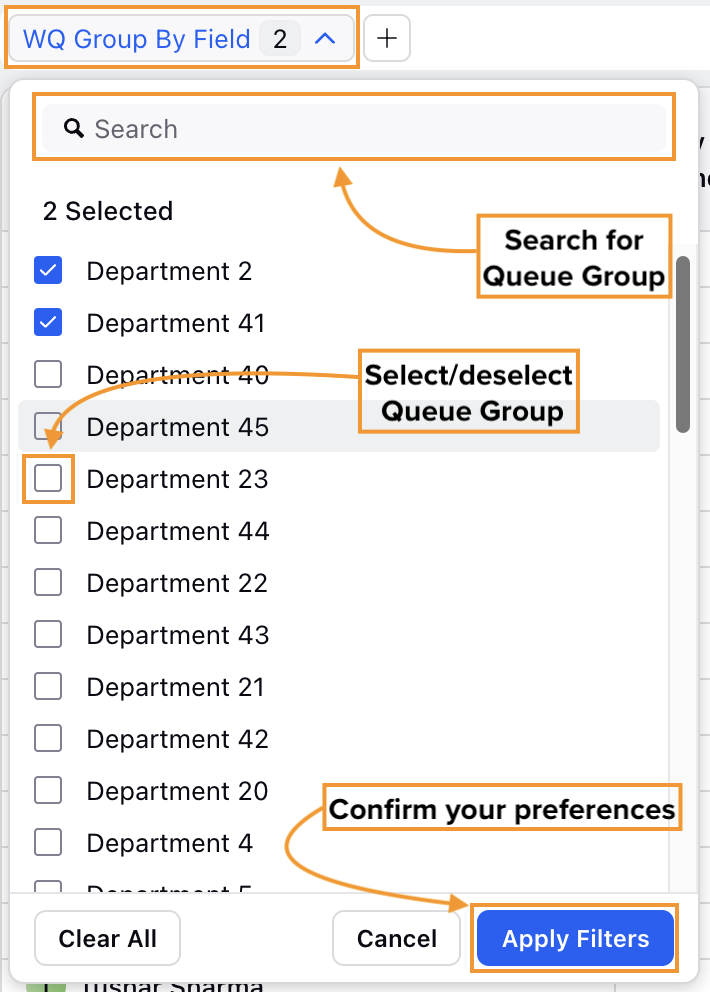
By default, this page displays only the Work Queues that are part of the selected Queue Group. However, you can add additional Queue Groups and their respective Queues. To do this, click the WQ Group By Field at the top left of the page, select the desired Queue Group(s) from the list, and then click the Apply Filters button.