Target Metrics
Updated
Within Social Listening, Benchmarking, Reporting, and Ads Reporting, you can designate Target Metrics which will be displayed on a widget graph alongside the actual metrics. Target Metrics allow you to compare the actual performance of a metric against a pre-set goal. It also helps you set targets and performs reporting to check whether the performance goals have been achieved or not. Target Metrics are also used to define quantitative measurements for the quality of your posts and campaigns.
The visualization of setting Target Metrics in the Listening dashboard helps you make an informed change in the budget allocation of a campaign to achieve its objectives.
As always, care must be taken while defining the Target Metrics –
Limit the metrics to a set that can be realistically monitored.
If set too high, they may be completely unattainable.
Ensure that they can be repeatedly and consistently measured.
Provide balance across the different factors being measured.
Prioritize the metrics according to their significance to the posts and campaigns.
![]() Note: If you select the Workspace name, Target Metrics will be visible to all users who are either Global Admin or Global User. For users who are either Workspace Admin or Workspace User, you need to select both Workspace Name and User/User Groups.
Note: If you select the Workspace name, Target Metrics will be visible to all users who are either Global Admin or Global User. For users who are either Workspace Admin or Workspace User, you need to select both Workspace Name and User/User Groups.
To access Target Metrics
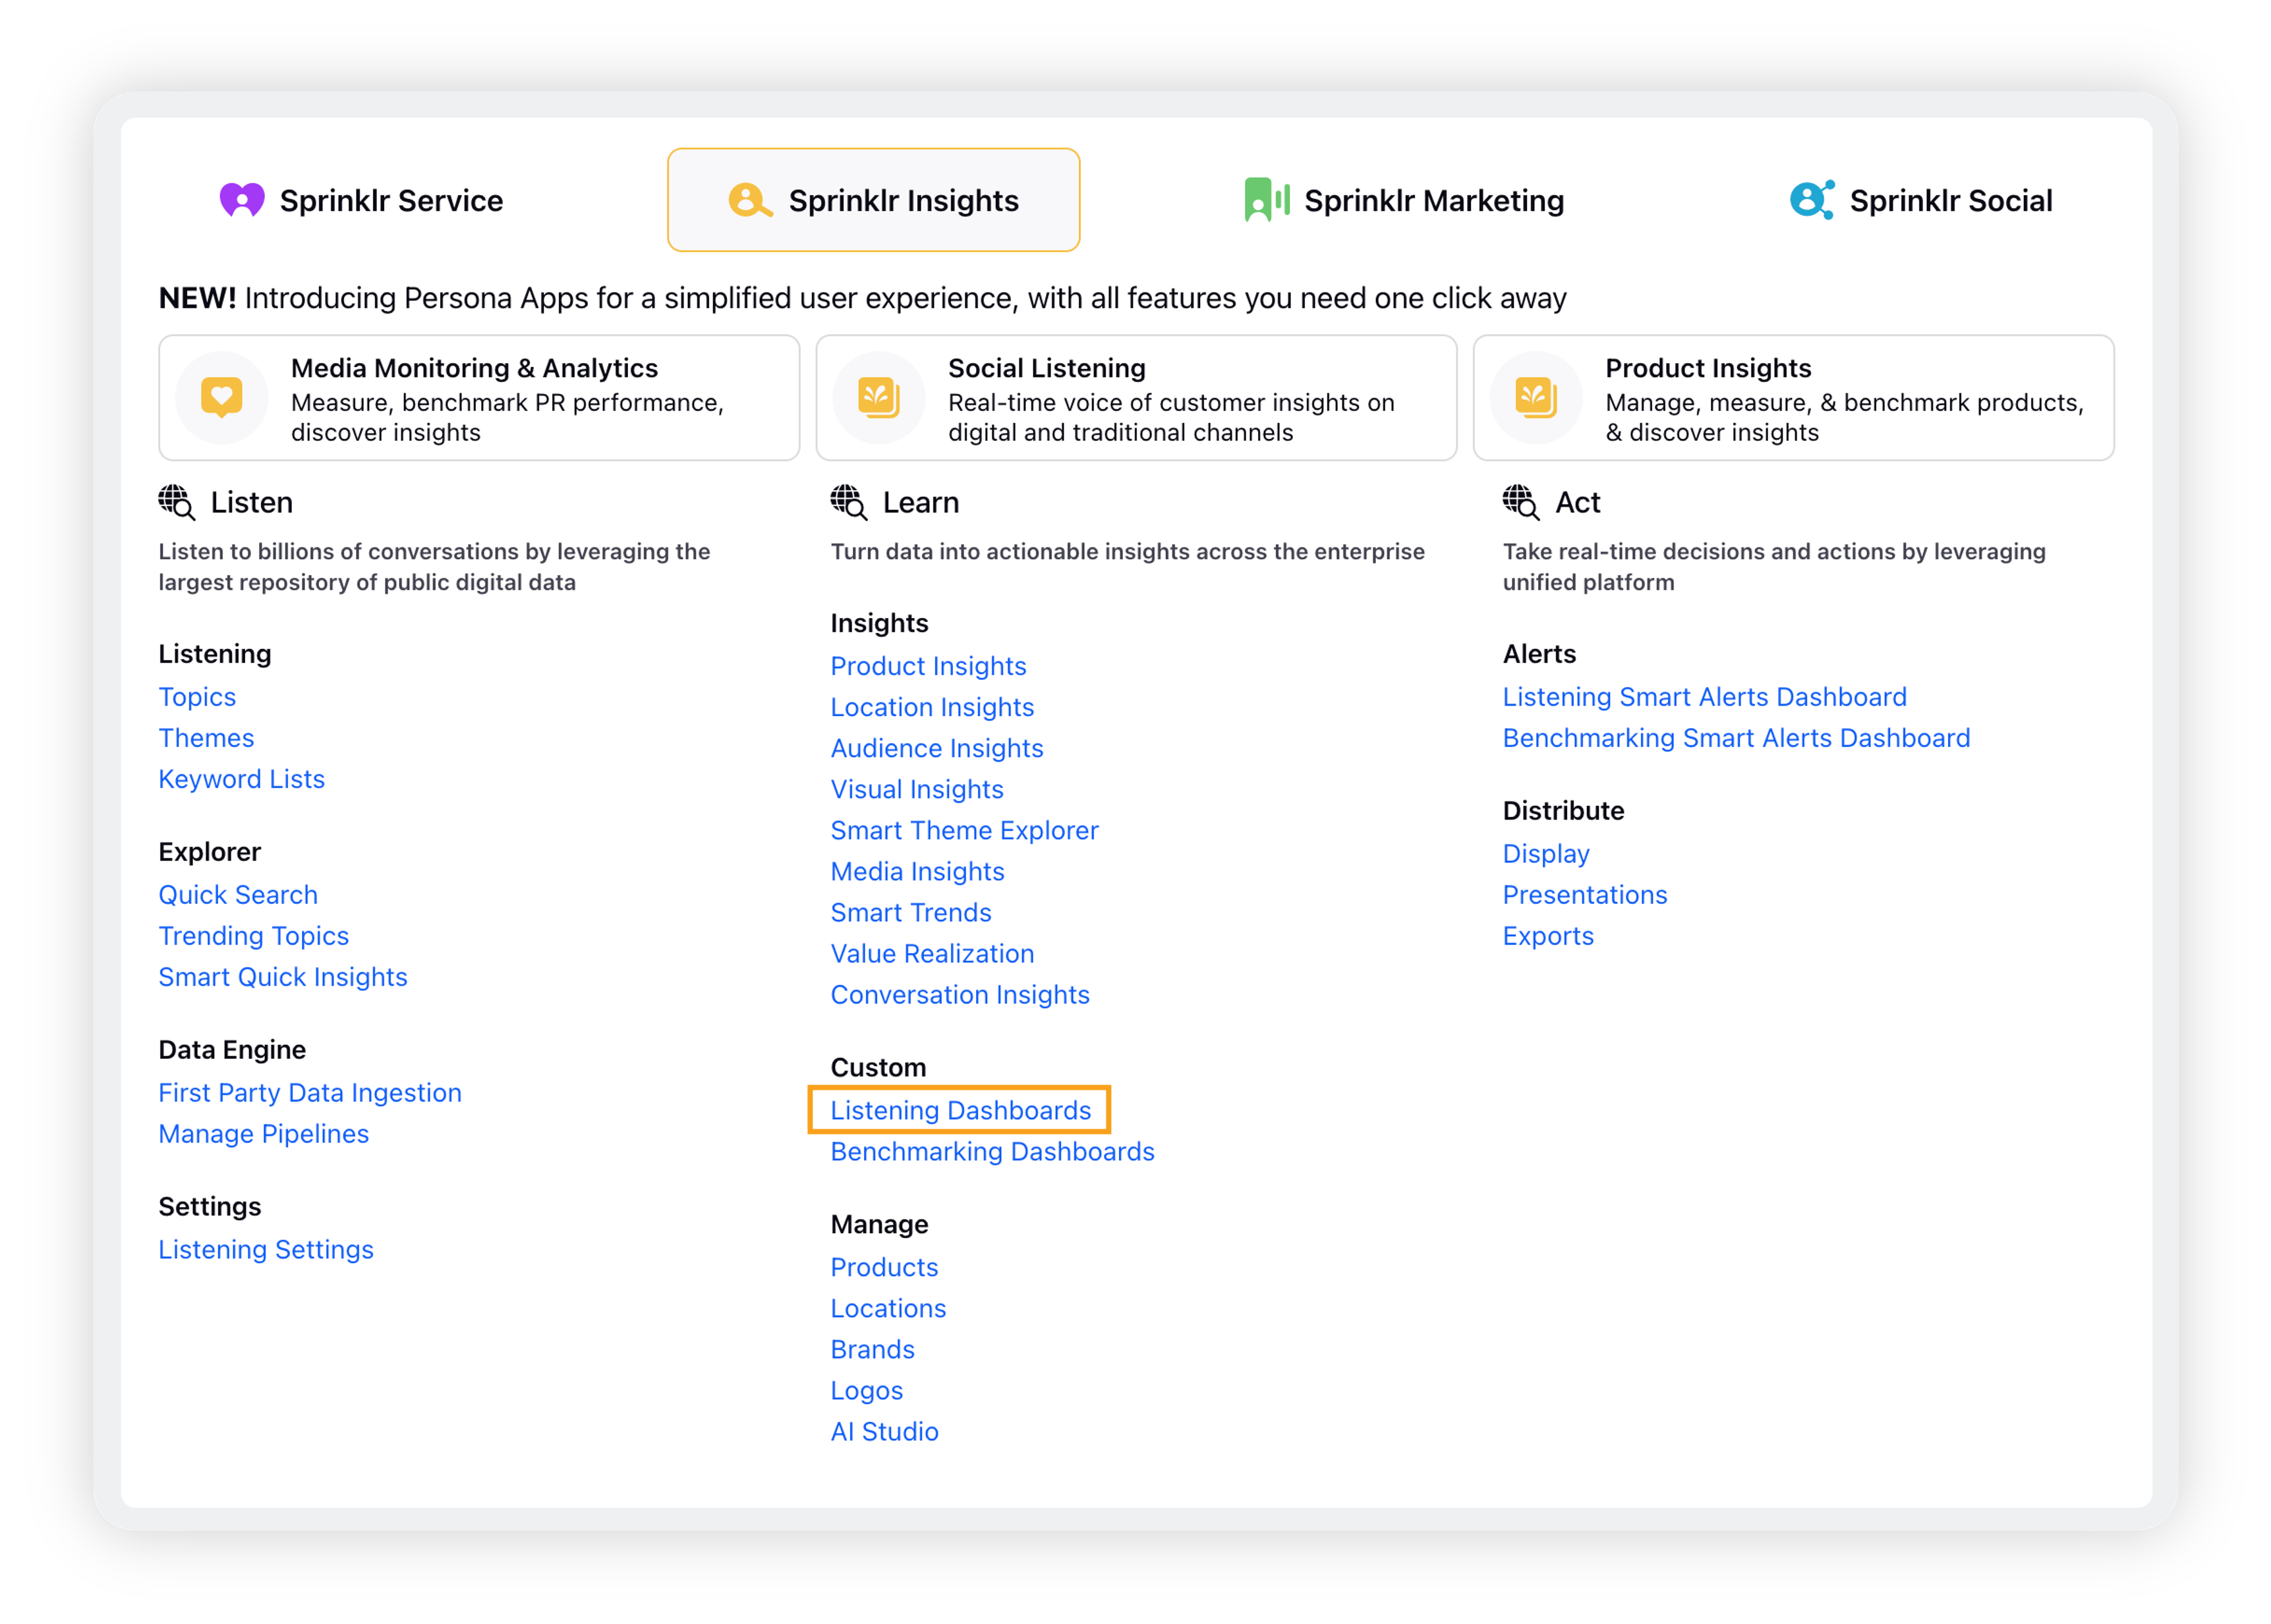
Through Listening dashboards
Click the New Tab icon. Under Sprinklr Insights tab, click Listening Dashboards within Learn.
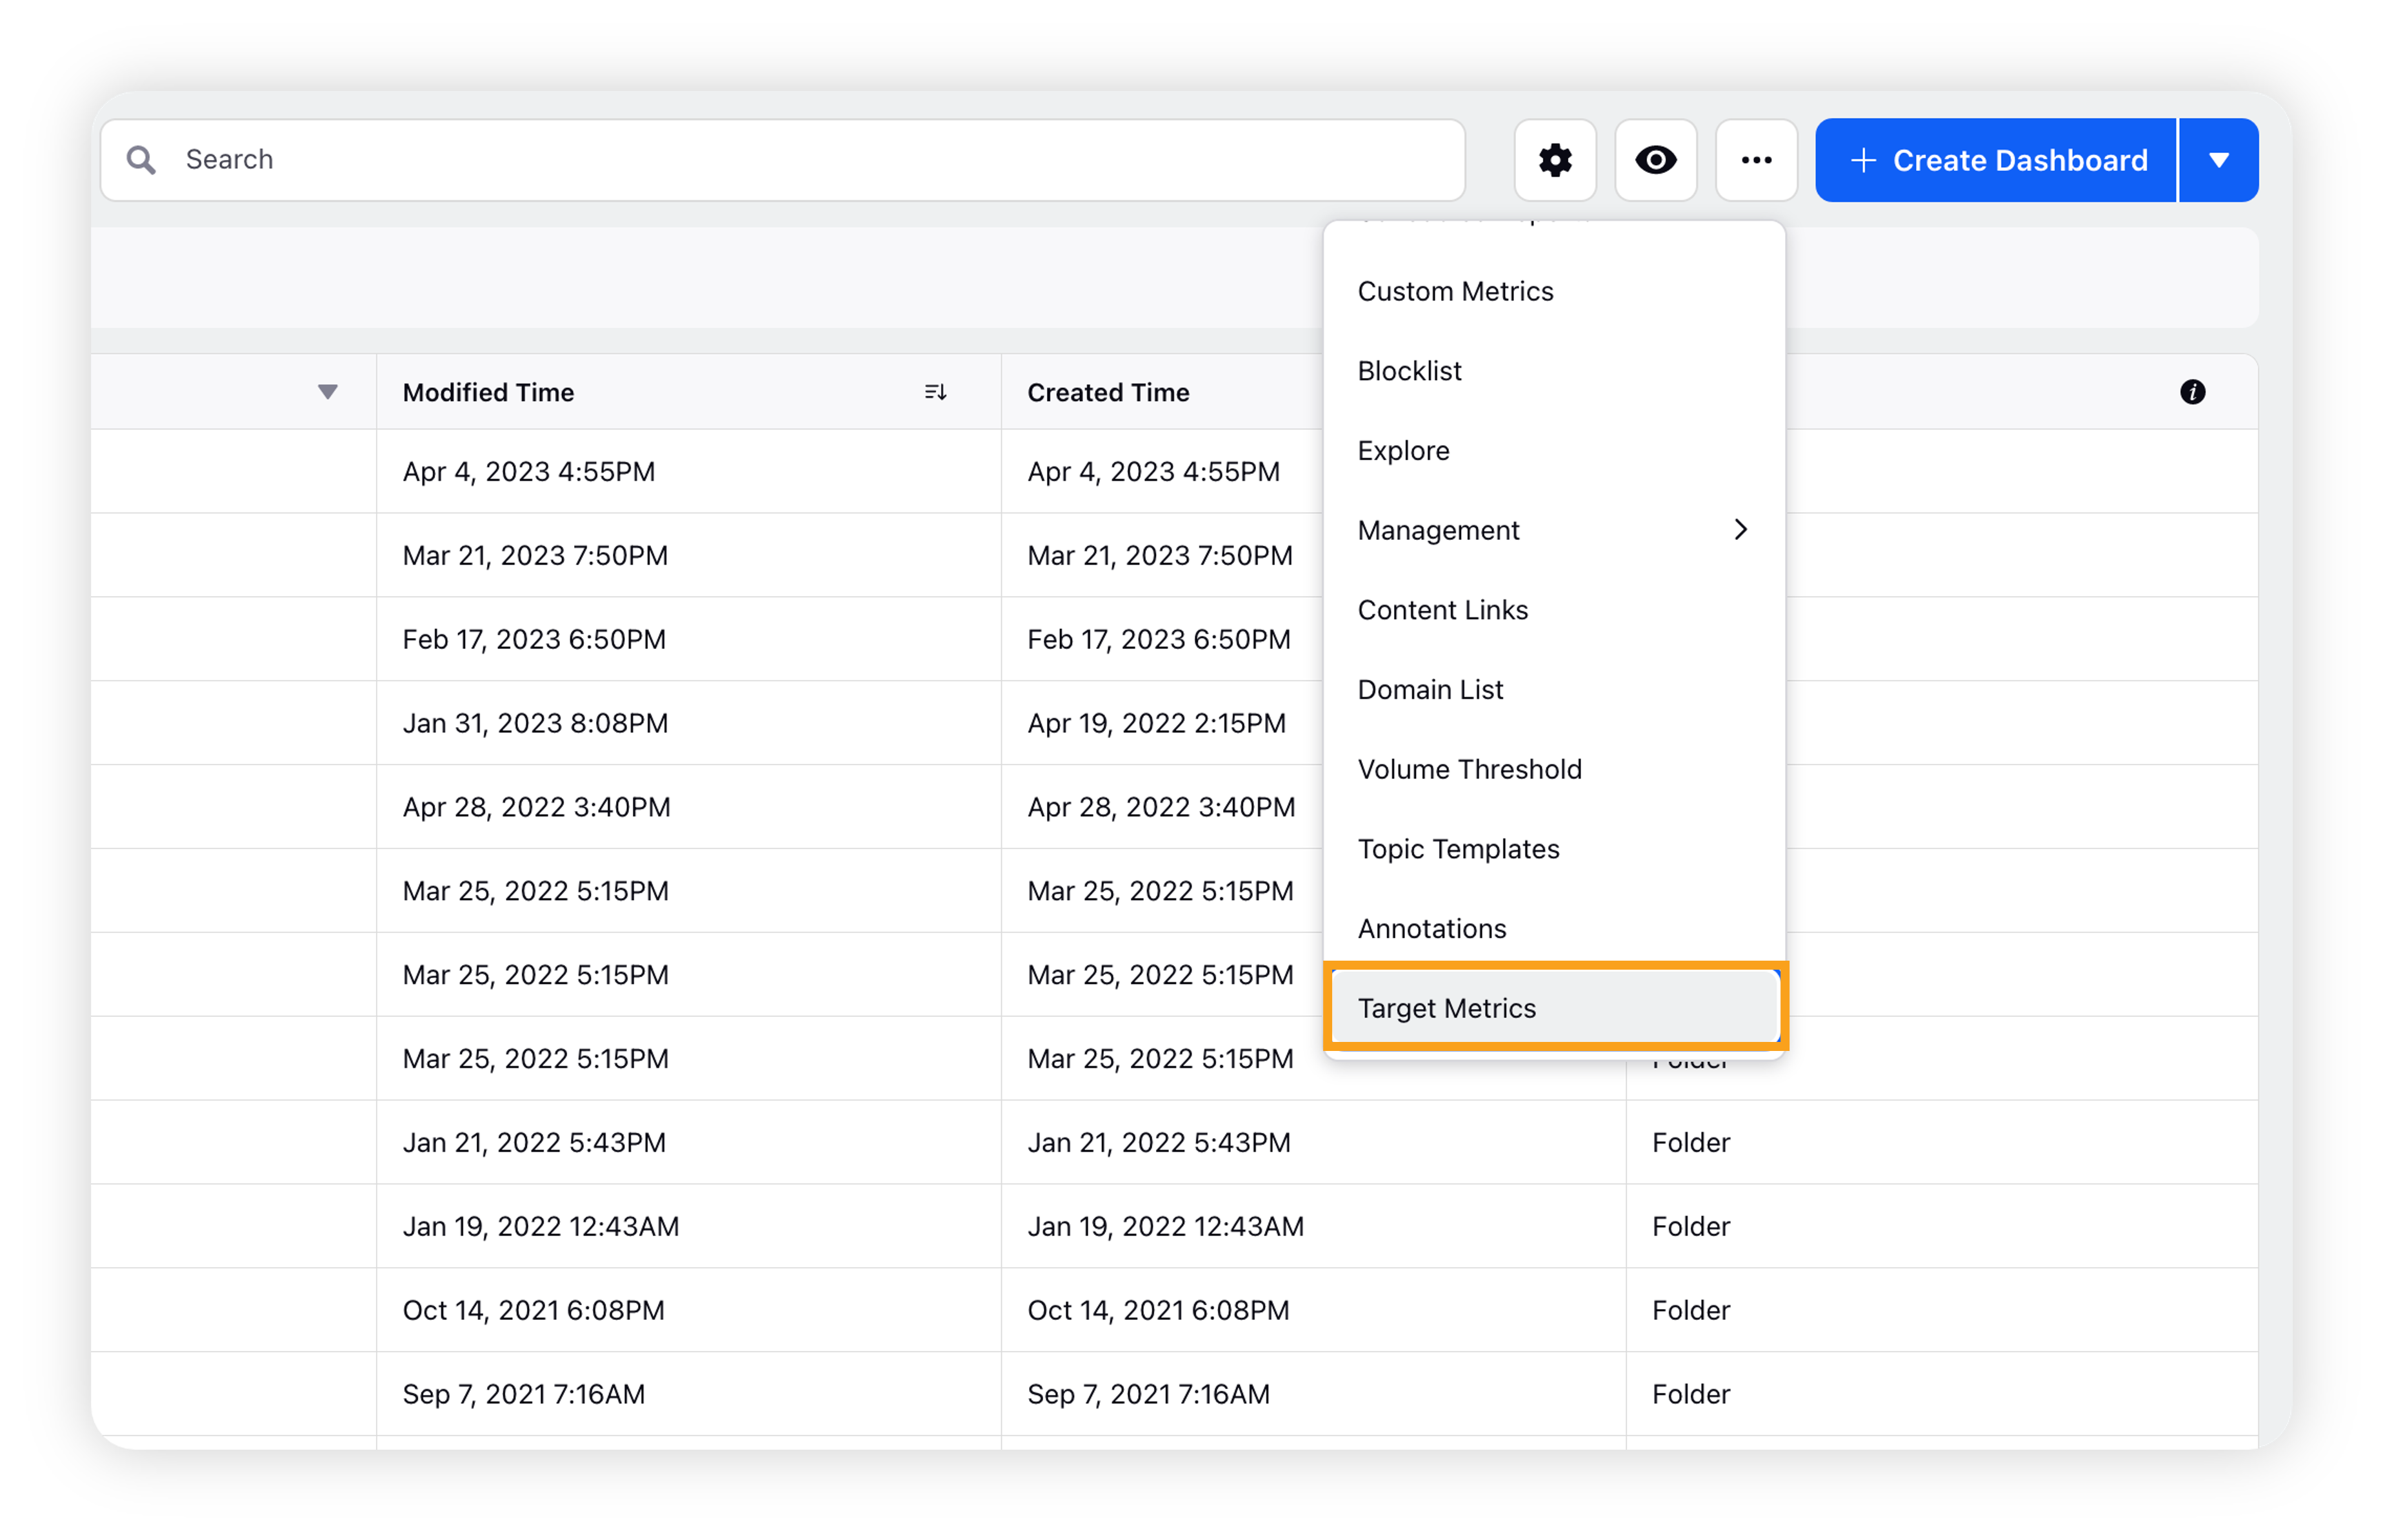
On the Listening Dashboards homepage, click the Settings icon in the top-right corner and select Target Metrics.
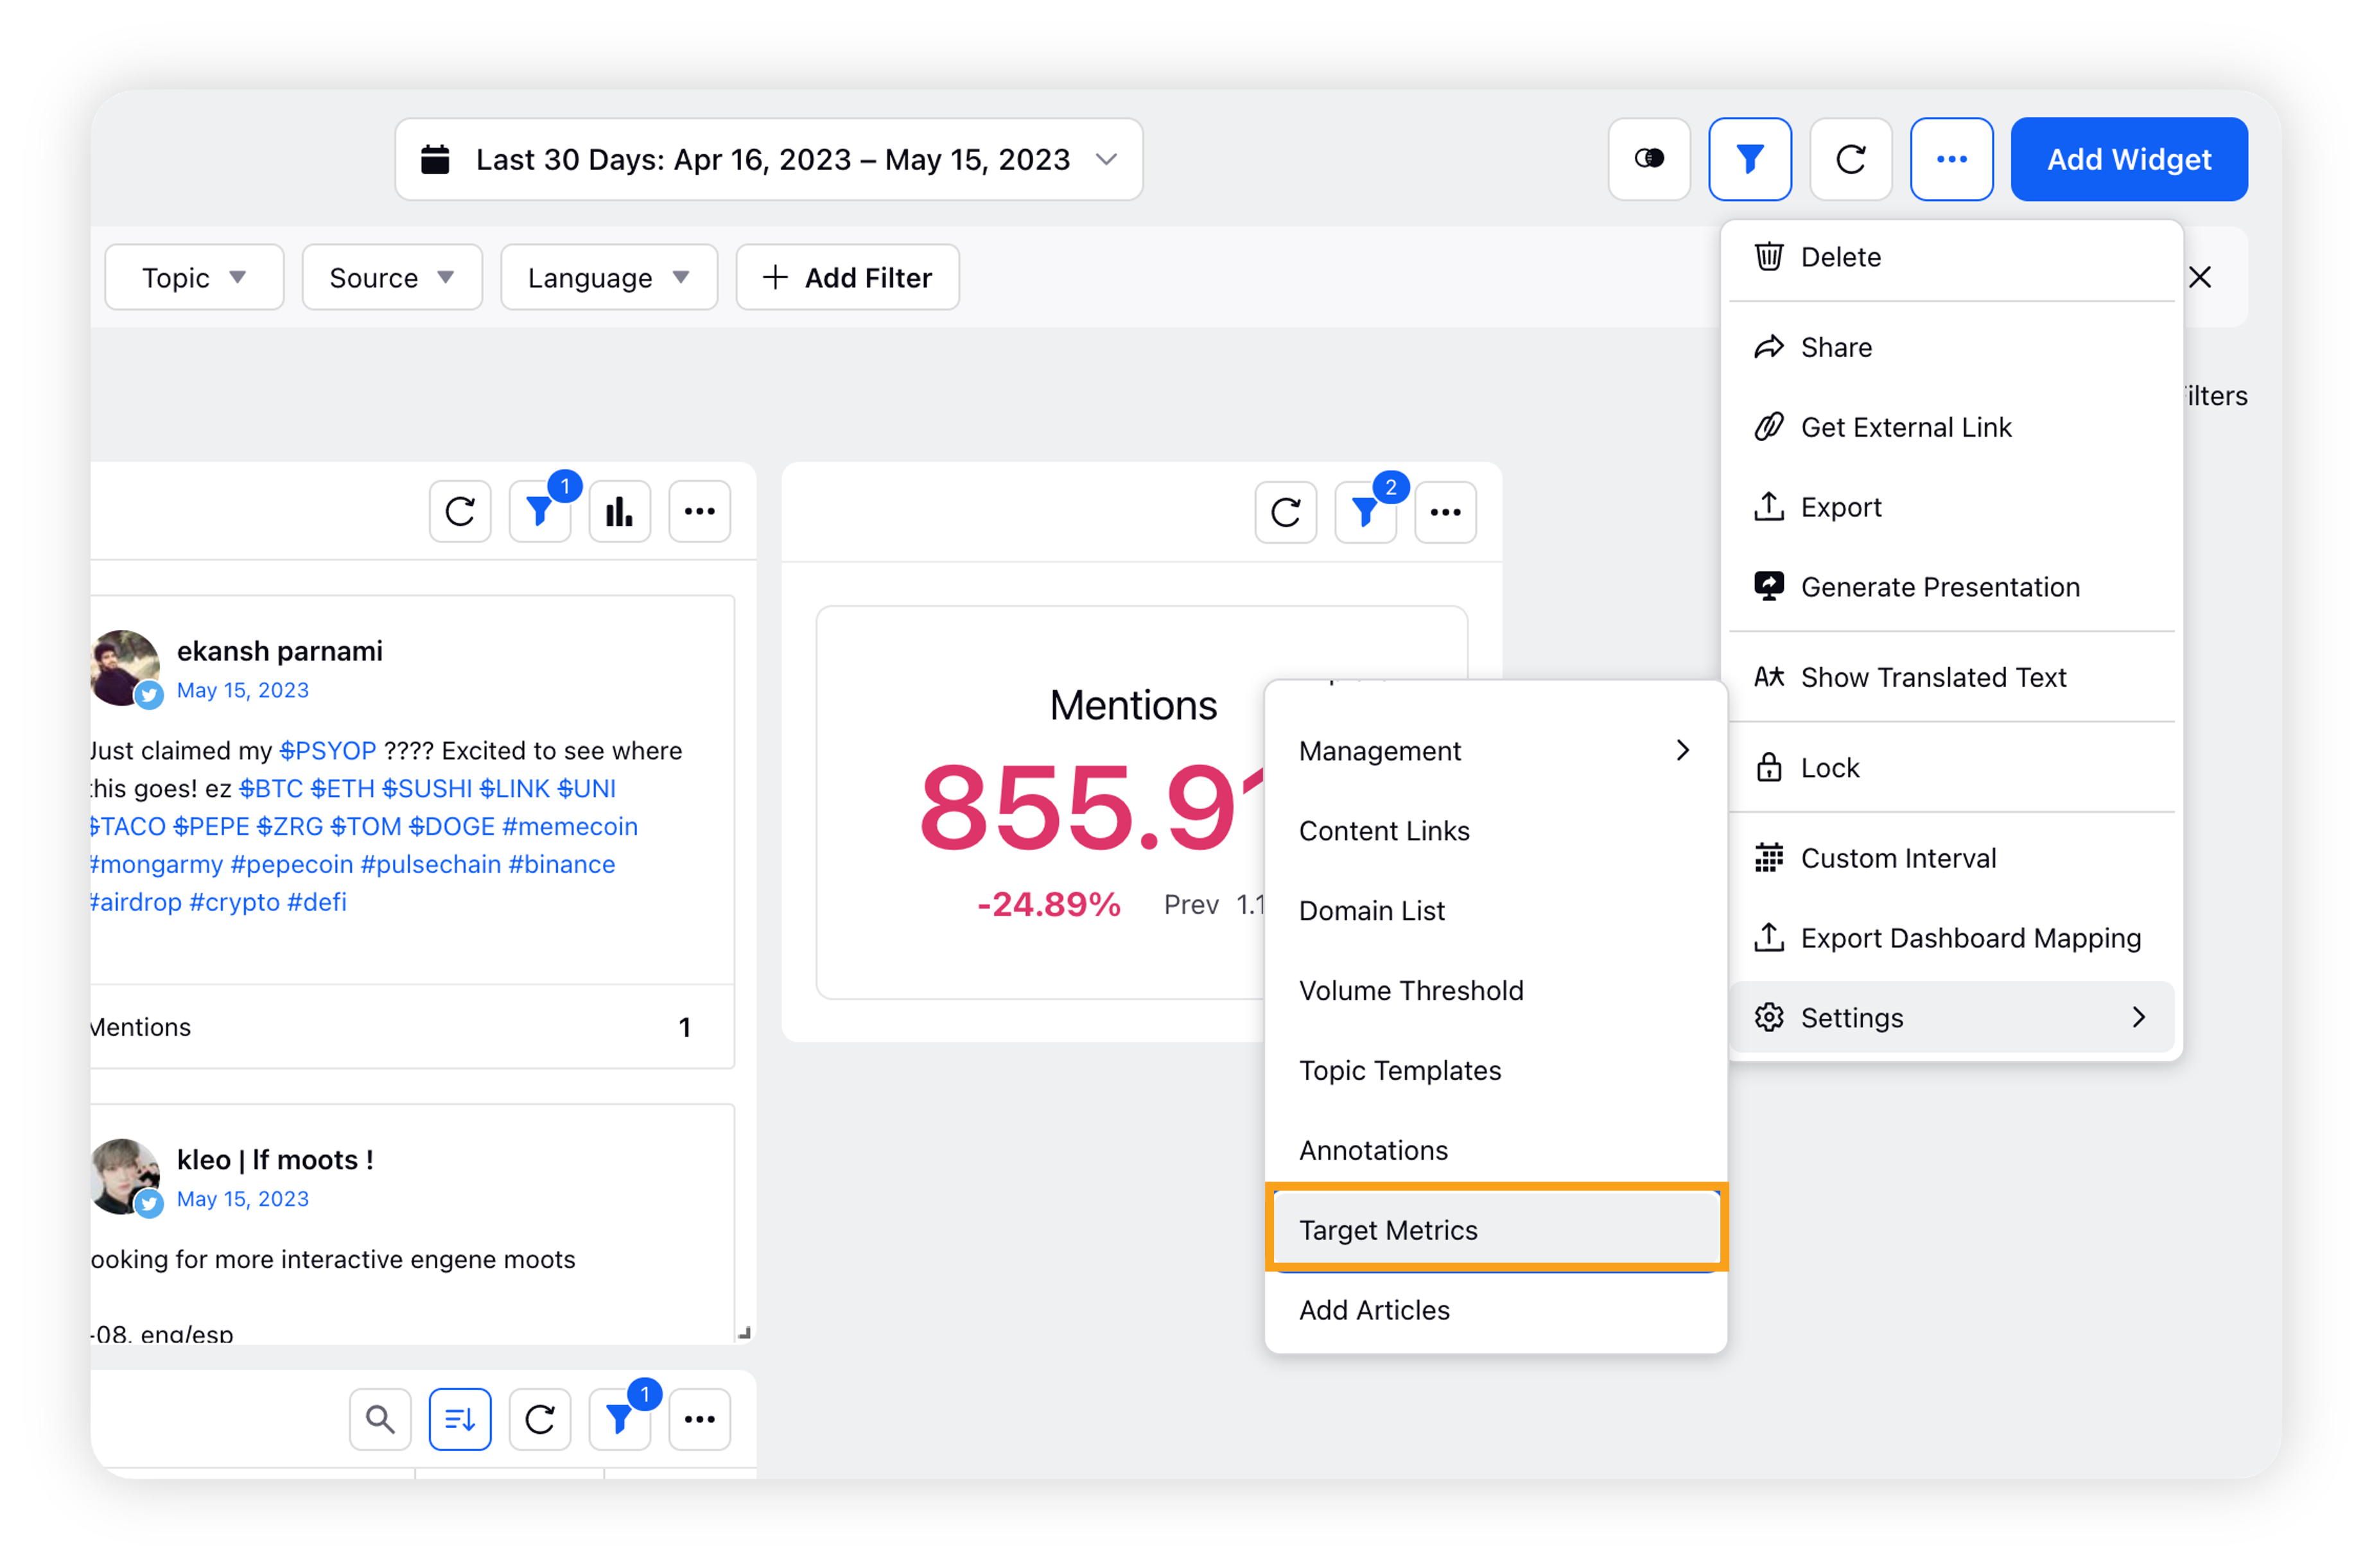
If you are on a Listening dashboard, click the Options icon in the top-right corner and scroll down to Settings.
Hover over Settings and select Target Metrics.
Through Listening Settings
Click the New Tab icon . Under Sprinklr Insights, click Listening Settings within Listen.
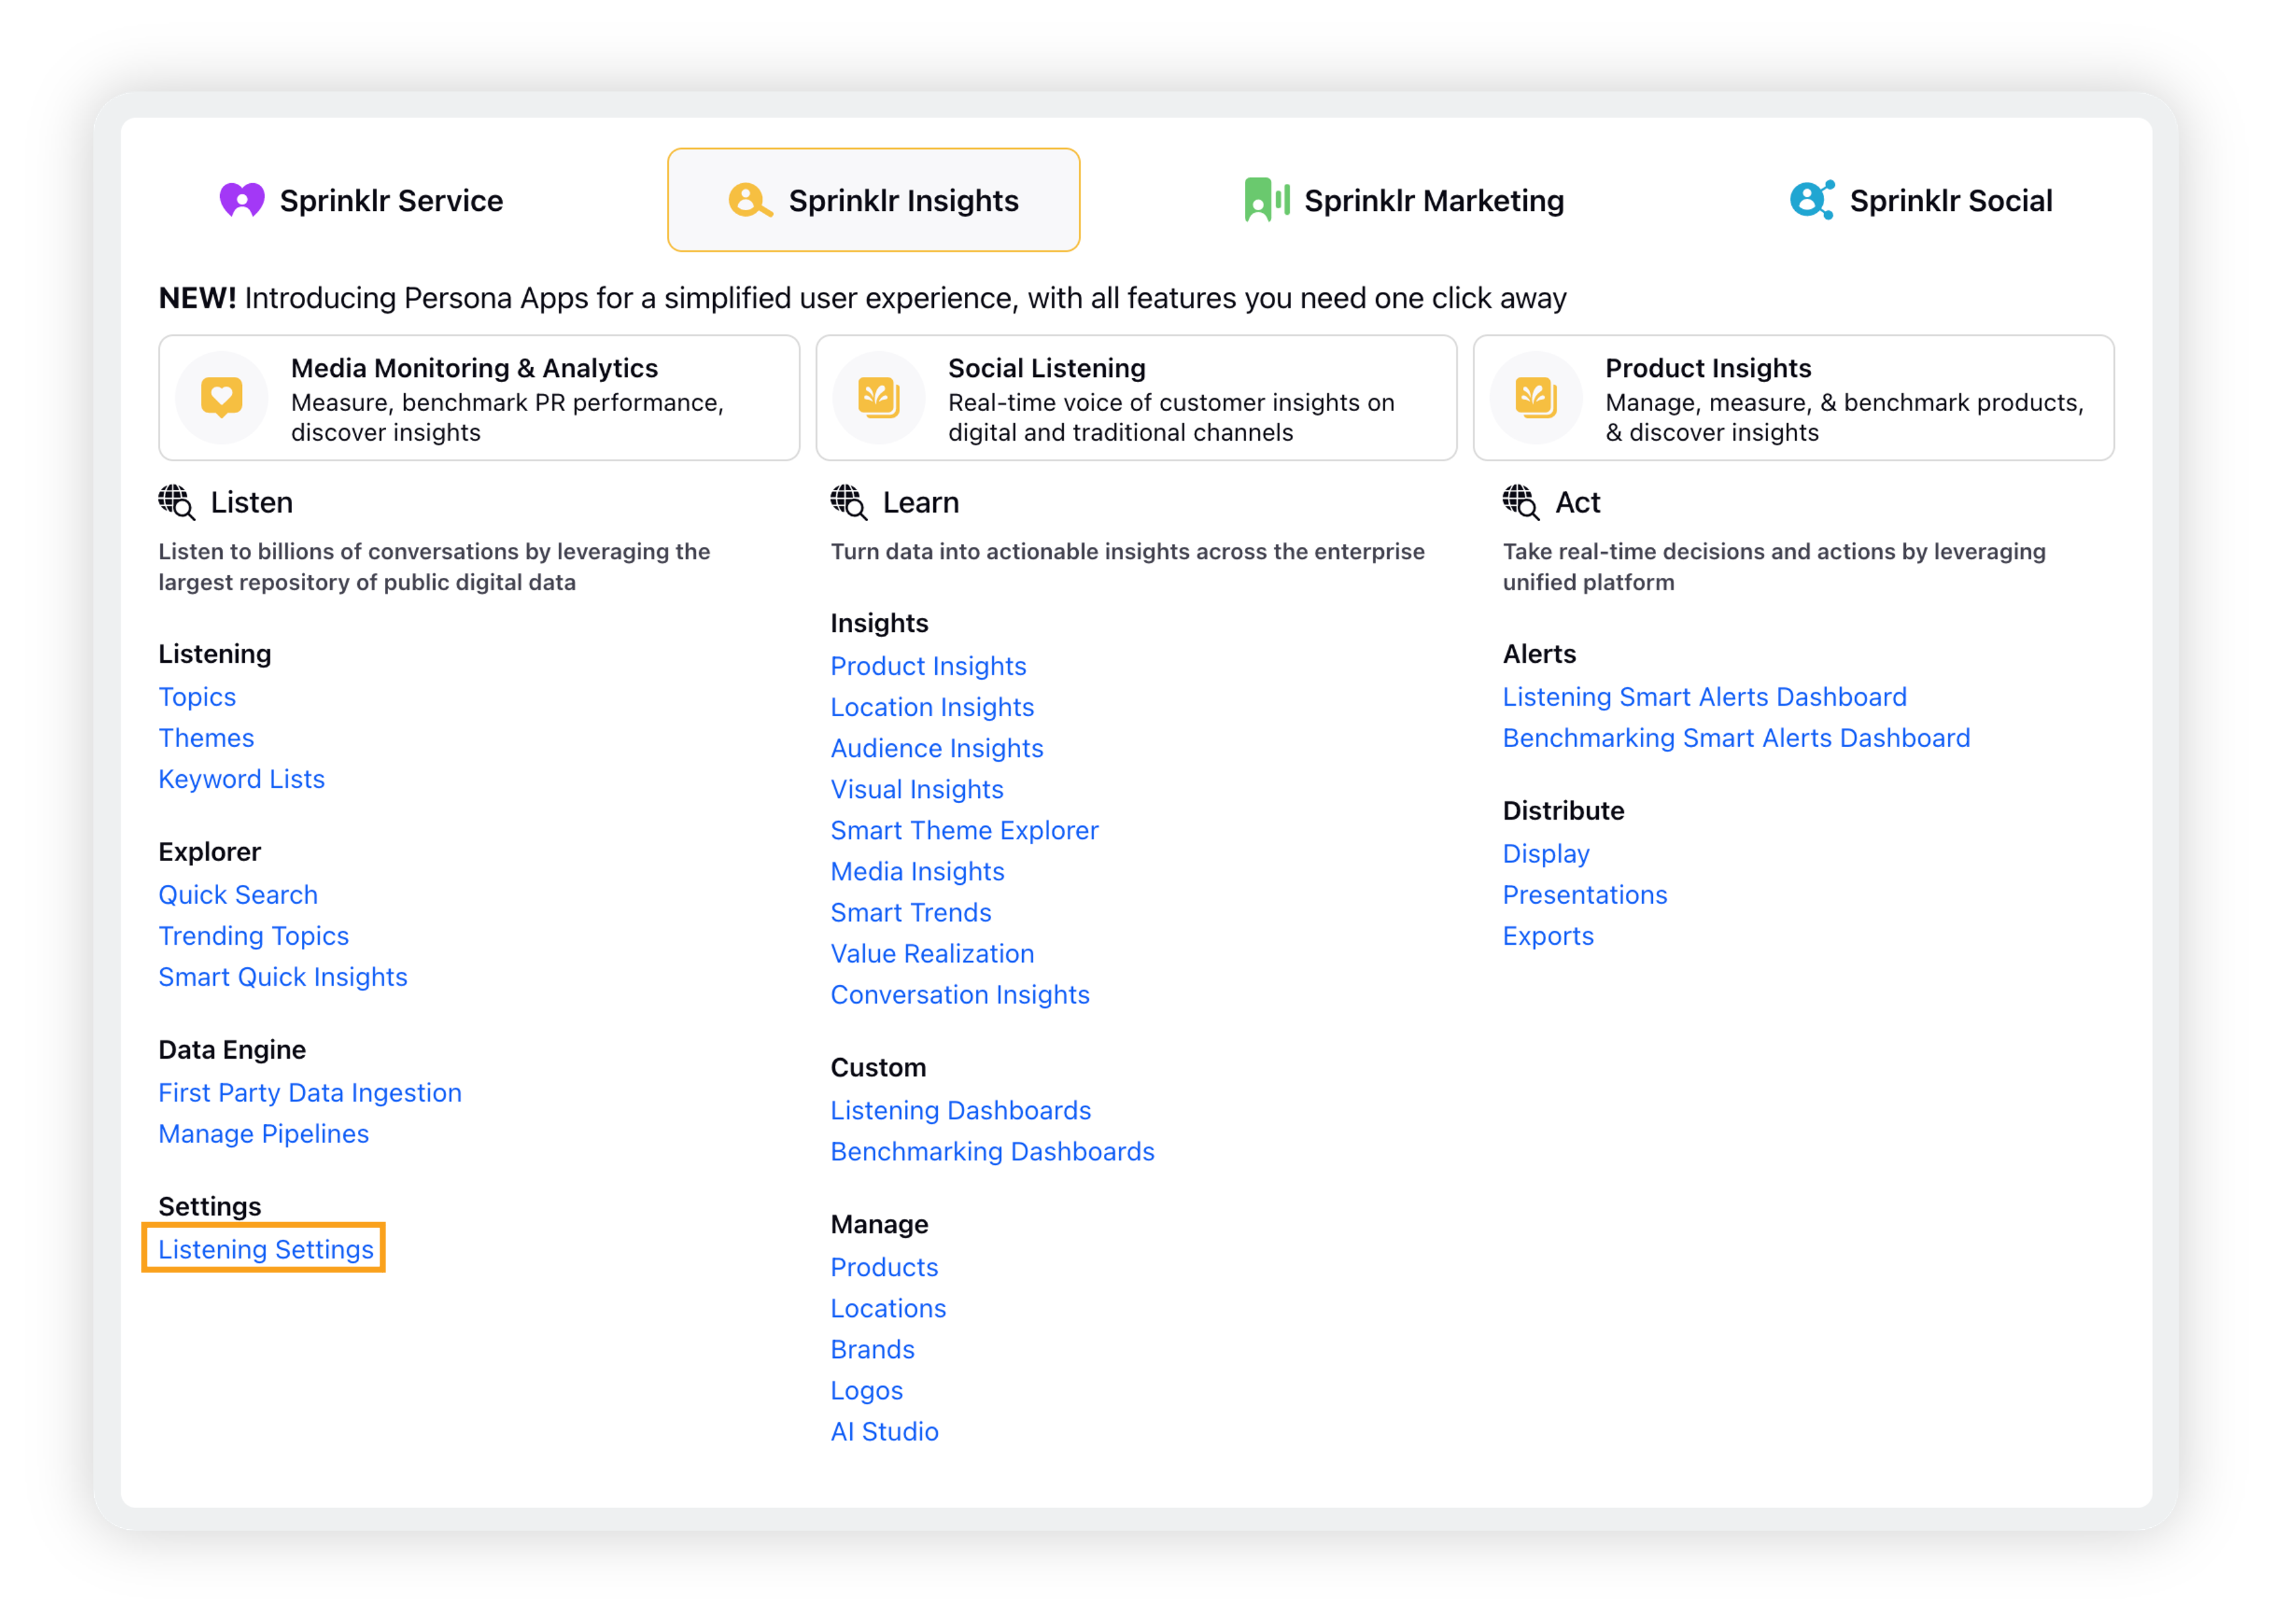
On the Listening Settings page, search for Target Metrics and click it.
To add Target Metrics in Listening
On the Target Metrics window, click Add Target Metric in the top right corner.
Enter the Target Metric details and click Create in the bottom right corner.
For more information, see Add Target Metric — Field Descriptions.
Add Target Metric — Field & descriptions
Term | Description |
Name | Enter a descriptive name. |
Metric Color | Select a color from the color palette. |
Type | Select the type of reporting that you want to target. |
Metric | Select the standard or custom metric you want to set a target for. |
Aggregation Unit/Aggregation | This determines how the value you chose will aggregate. For example, you can choose Value 100 every "1 minute" or "3 Months". |
Category | Select if you want the target to be broken out for a category as opposed to an aggregate. |
Target | Enter a Numeric Target Value. |
To share Target Metrics
On the Target Metrics window, hover over the Options icon next to the desired target metric and click Governance.
On the Share Target Metric popup window, select the Workspaces and User / User groups you want to give access to. You can also check the box alongside Share with everyone to share the metrics globally.
Click Share in the bottom right corner.
To build an applicable widget with Target Metrics
Target Metrics are only available for an applicable widget. Ensure that the widget and Target Metric are matching in the following ways:
Metric
Category — Category in the Target metric settings corresponds to the widget Dimension used in the widgets (e.g. Date, Account, etc.)
Value Calculation
For example, if you have added a Target Metric for 25 Followers Change per 1 Day, that Target would not be available for a widget for Engagement Rate % Change because the Metric & Value Calculation are not compatible.
If you have added a Target Metric or the Account, (category type) which have met the Total (sum) of 20 K (value), where Total Engagements (Metric) over a total period of 2 (aggregate Unit) weeks (aggregation Unit), then while creating the widget select Category as Account, Value as the sum of 20K and Metric as Earned Engagement.
You can select multiple Target Metrics to be assigned to a given widget. While doing so, you must designate a default Target Metric to appear when the widget loads — within the widget's Options menu, you can switch between Target Metrics you have assigned.
![]() Note: You can only use Target Metrics for X-Y axis graphs.
Note: You can only use Target Metrics for X-Y axis graphs.
In order to be able to select a target metric in a widget, the filters applied to the widget and the target metric itself must match. For example, if the widget has a filter for specific accounts applied, but the target metric does not, even if the configuration is otherwise the same, you will not be able to select the target metric until the same account filter is applied to it as well.
To create a widget with Target Metrics
Click the New Tab icon. Under Sprinklr Insights, click Listening Dashboards within Learn.
On the Listening Dashboards homepage, click on a custom dashboard where you want to add widgets.
On the Listening dashboard, click Add Widget in the top-right corner.
On the Create Custom Widget window, enter the details as required and select the supported visualization type for your Target Metrics. For more information, see – List of widget types supported for Target Metrics.
Mention the parameters that follow the Target Metrics you have created. (For example, if you have selected Date, Earned Engagements options while creating your Target Metrics, you need to select the same parameters while selecting widget type).
Under the Target Metrics section, from the Target Metric dropdown menu, select the Target Metric that you want to apply.
 Note: You can add more than one target to a widget but only one can be displayed at a time (the Default Target)
Click Save in the bottom right corner to finalize your widget.
List of widget types supported for Target Metrics
You can use the target metrics with the following visualization types within the widget –
Area
Area Spline
Bar
Bubble
Column
Combination
Line
Spline
Stacked Bar
Stacked Column