All Cases
Updated
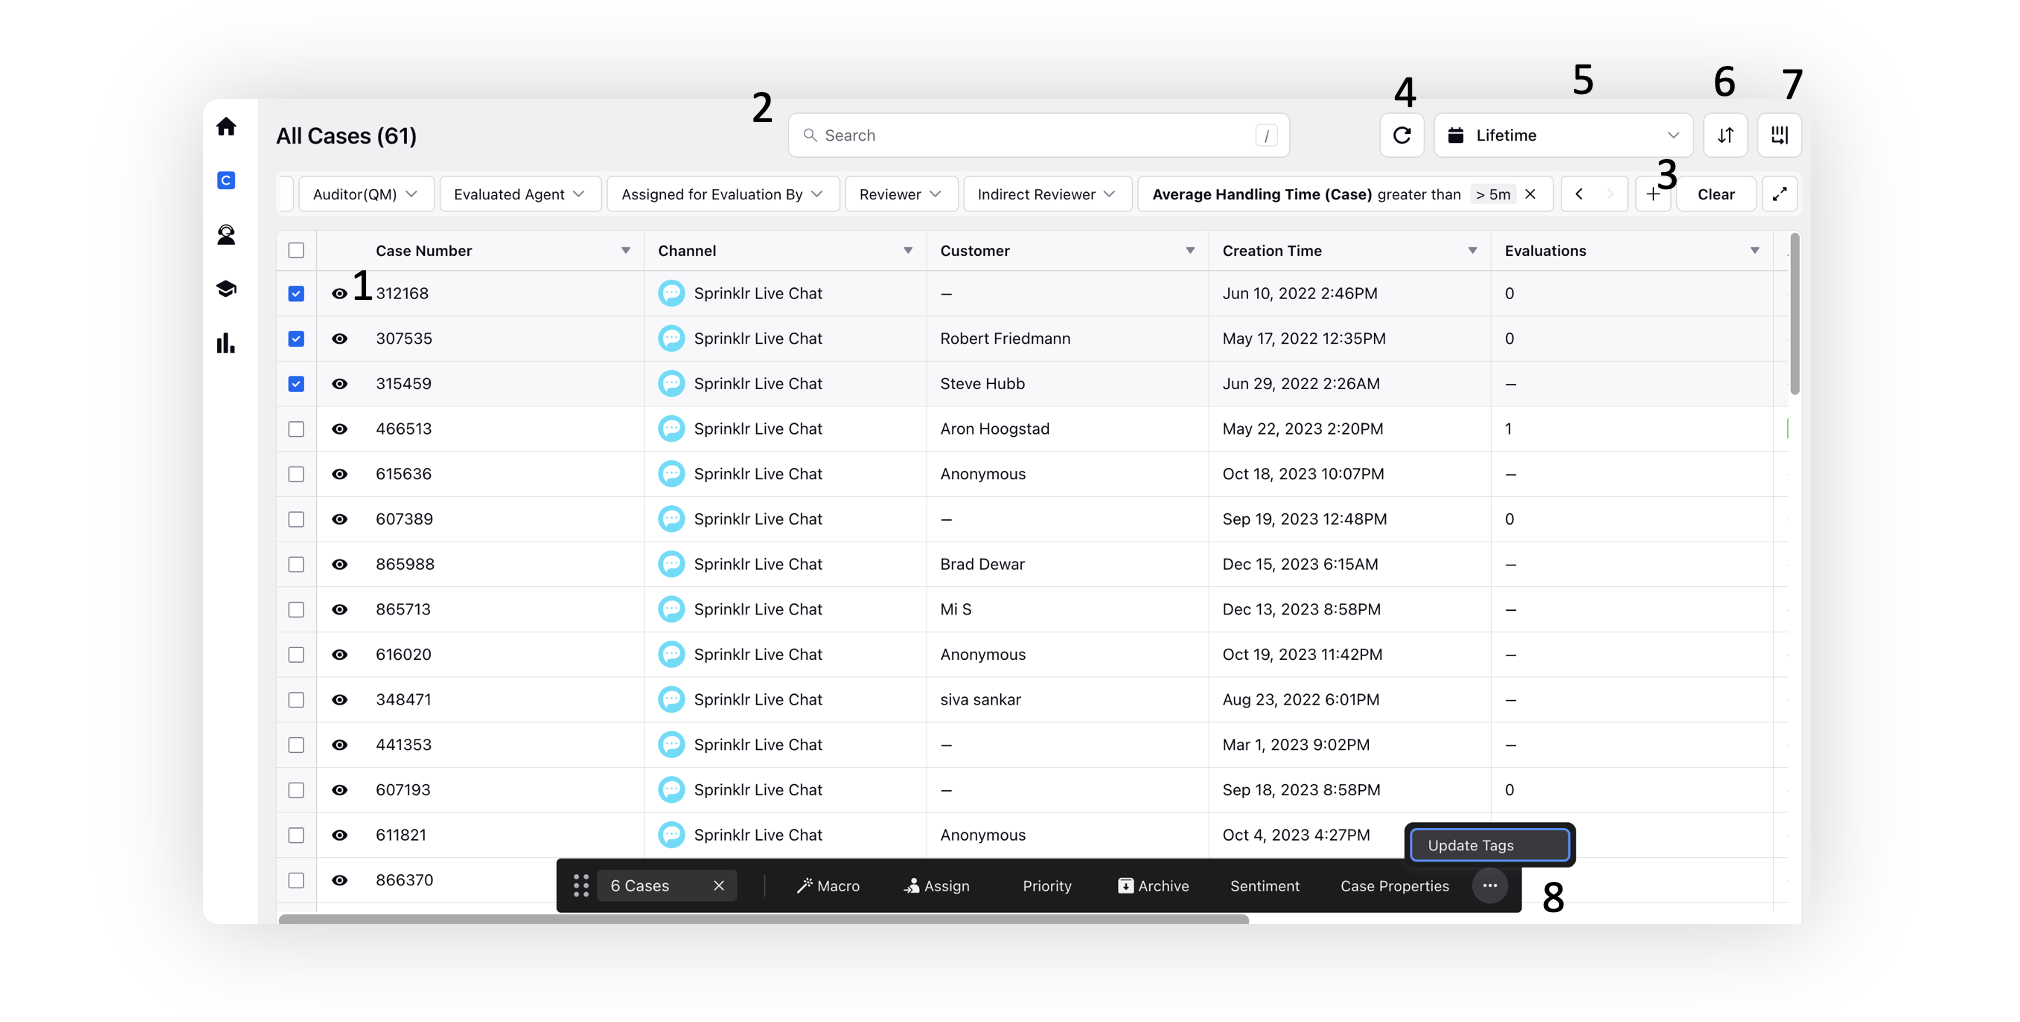
The “All Cases” tab consists of all the cases created in the platform, which the Quality Managers can access for manual evaluation. On the top right corner are the time interval and other filters that are used to sort and view cases based on the filter selected.

Navigating to Case Analytics View - Click the Overview icon adjacent to the case number to navigate to the Case Analytics page.
Search - Look for cases using case numbers, customer contact numbers, and other fields.
Add Filter - This button gives the flexibility to add various filters to filter the cases in the all cases tab. You can also apply operations like less than, greater than while filtering using measurement type fields, such as filtering cases where the associated brand message count is greater than 30.
Standard Filters - The standard filters displayed at the top of the page include:
From User Social Network: Filters cases based on the social channel from which they originated.
Auditor (QM): Filters cases based on the evaluator, such as Quality Manager.
Evaluated Agent: Filters cases based on agents who are evaluated, either manually or through automated processes.
Assigned for Evaluation By: Filters cases based on the user who assigned them for evaluation. Selecting "Sprinklr System" filters cases assigned via rules.
Reviewer: Allows the user to view cases that are directly reviewed by your immediate manager or supervisor. It helps in identifying cases that have undergone evaluation at the first manager level.
Indirect Reviewer: This filter, on the other hand, enables users to see cases that are reviewed by the manager's manager, that is, at a higher hierarchical level. It provides insight to cases evaluated by a higher authority within the managerial structure.
Keyword Search: Using keyword searches, you can check for the presence or absence of specific keywords in case conversations. This applies to both fan and brand (bot and agent) messages.
Enablement note:
To learn more about getting this capability enabled in your environment, please work with your Success Manager.
Note: Choose to restrict filters like Auditor, Evaluated Agent Manager, and User Manager to a particular set of users based on their Role ID. Also, set your favorite standard filters to get displayed at the top. Additionally, lock filter values, hide the filter option and add the contextual filters support at the partner level by reaching out to Sprinklr support at tickets@sprinklr.com.
Custom field: You can add Custom Field to the filters. In Custom Field you can add Controlling fields which governs the value in a Custom Field based on other Custom Field Value. This results in having a restricted set of the options available when you try to filter in the reporting dashboard.
Sort By - Sort the cases based on different dimensions (limited to 1) in either ascending or descending order.
Refresh - Refreshing the All Cases page to check the latest data.
Manage Columns - Add or remove columns that the user wants to see in All Cases tab.
In the Channels column, all channels associated with a case are listed. This ensures that for cases involving multiple channel interactions, every channel through which the case was handled is displayed.
Note: You have the option to set default columns to display by reaching out to Sprinklr support at tickets@sprinklr.com.
Time Range - Select date range to filter cases based on the case creation time. Different options like today, yesterday, past 30 days, past 60 days, custom range and so on are present for easy user interaction.
Bulk Actions - Choose multiple cases to perform bulk actions, including applying macros, assigning them for evaluation, setting priorities, etc.
Note: You have the option to limit users to a specific set of users in the macro actions such as assigning to Auditor, Evaluated Agent Manager, and User Manager. This prevents the challenge of searching through a long list of numerous users. To implement this restriction, kindly contact Sprinklr support at tickets@sprinklr.com.
Export Data - You have the option to export data to Excel in the same format as displayed, including the columns that were plotted at that specific moment. You get platform and email notifications for both successful and failed exports.
Note: You can get the Export option enabled by reaching out to Sprinklr support at tickets@sprinklr.com.
.png)