Create a new model training project for Text Classifier
Updated
This section aims to provide a comprehensive guide on creating a new model training project for Sprinklr's Text Classifier, which can filter out irrelevant terms for your brand or industry without any manual rule implementation or keyword maintenance. The article will walk you through the entire workflow.
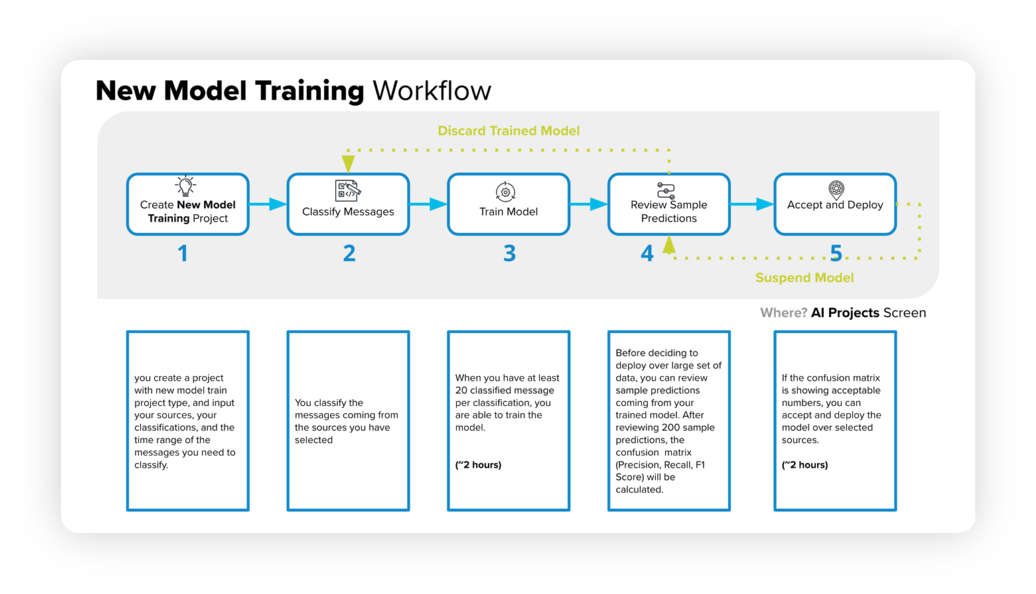
The below diagram will help you understand the New Model Training Workflow –
![]() Enablement note: Use of this feature requires that AI Studio be enabled in your environment. AI Studio is a paid module, available on demand. To learn more about getting this capability enabled in your environment, please work with your Success Manager.
Enablement note: Use of this feature requires that AI Studio be enabled in your environment. AI Studio is a paid module, available on demand. To learn more about getting this capability enabled in your environment, please work with your Success Manager.
The model training workflow consists of several steps that we will discuss in the following sections –
Begin by creating a new project, specifying sources, classifications, and a time range.
Classify messages from the chosen sources.
Train the model using a minimum of 20 classified messages per classification, which can take around 2 hours.
Examine sample predictions to generate a confusion matrix, including precision, recall, and F1 score.
If the confusion matrix meets the desired criteria, approve and deploy the model, which can take approximately 2 hours.
If the matrix is unsatisfactory, cancel and re-classify the messages.
To create a new project
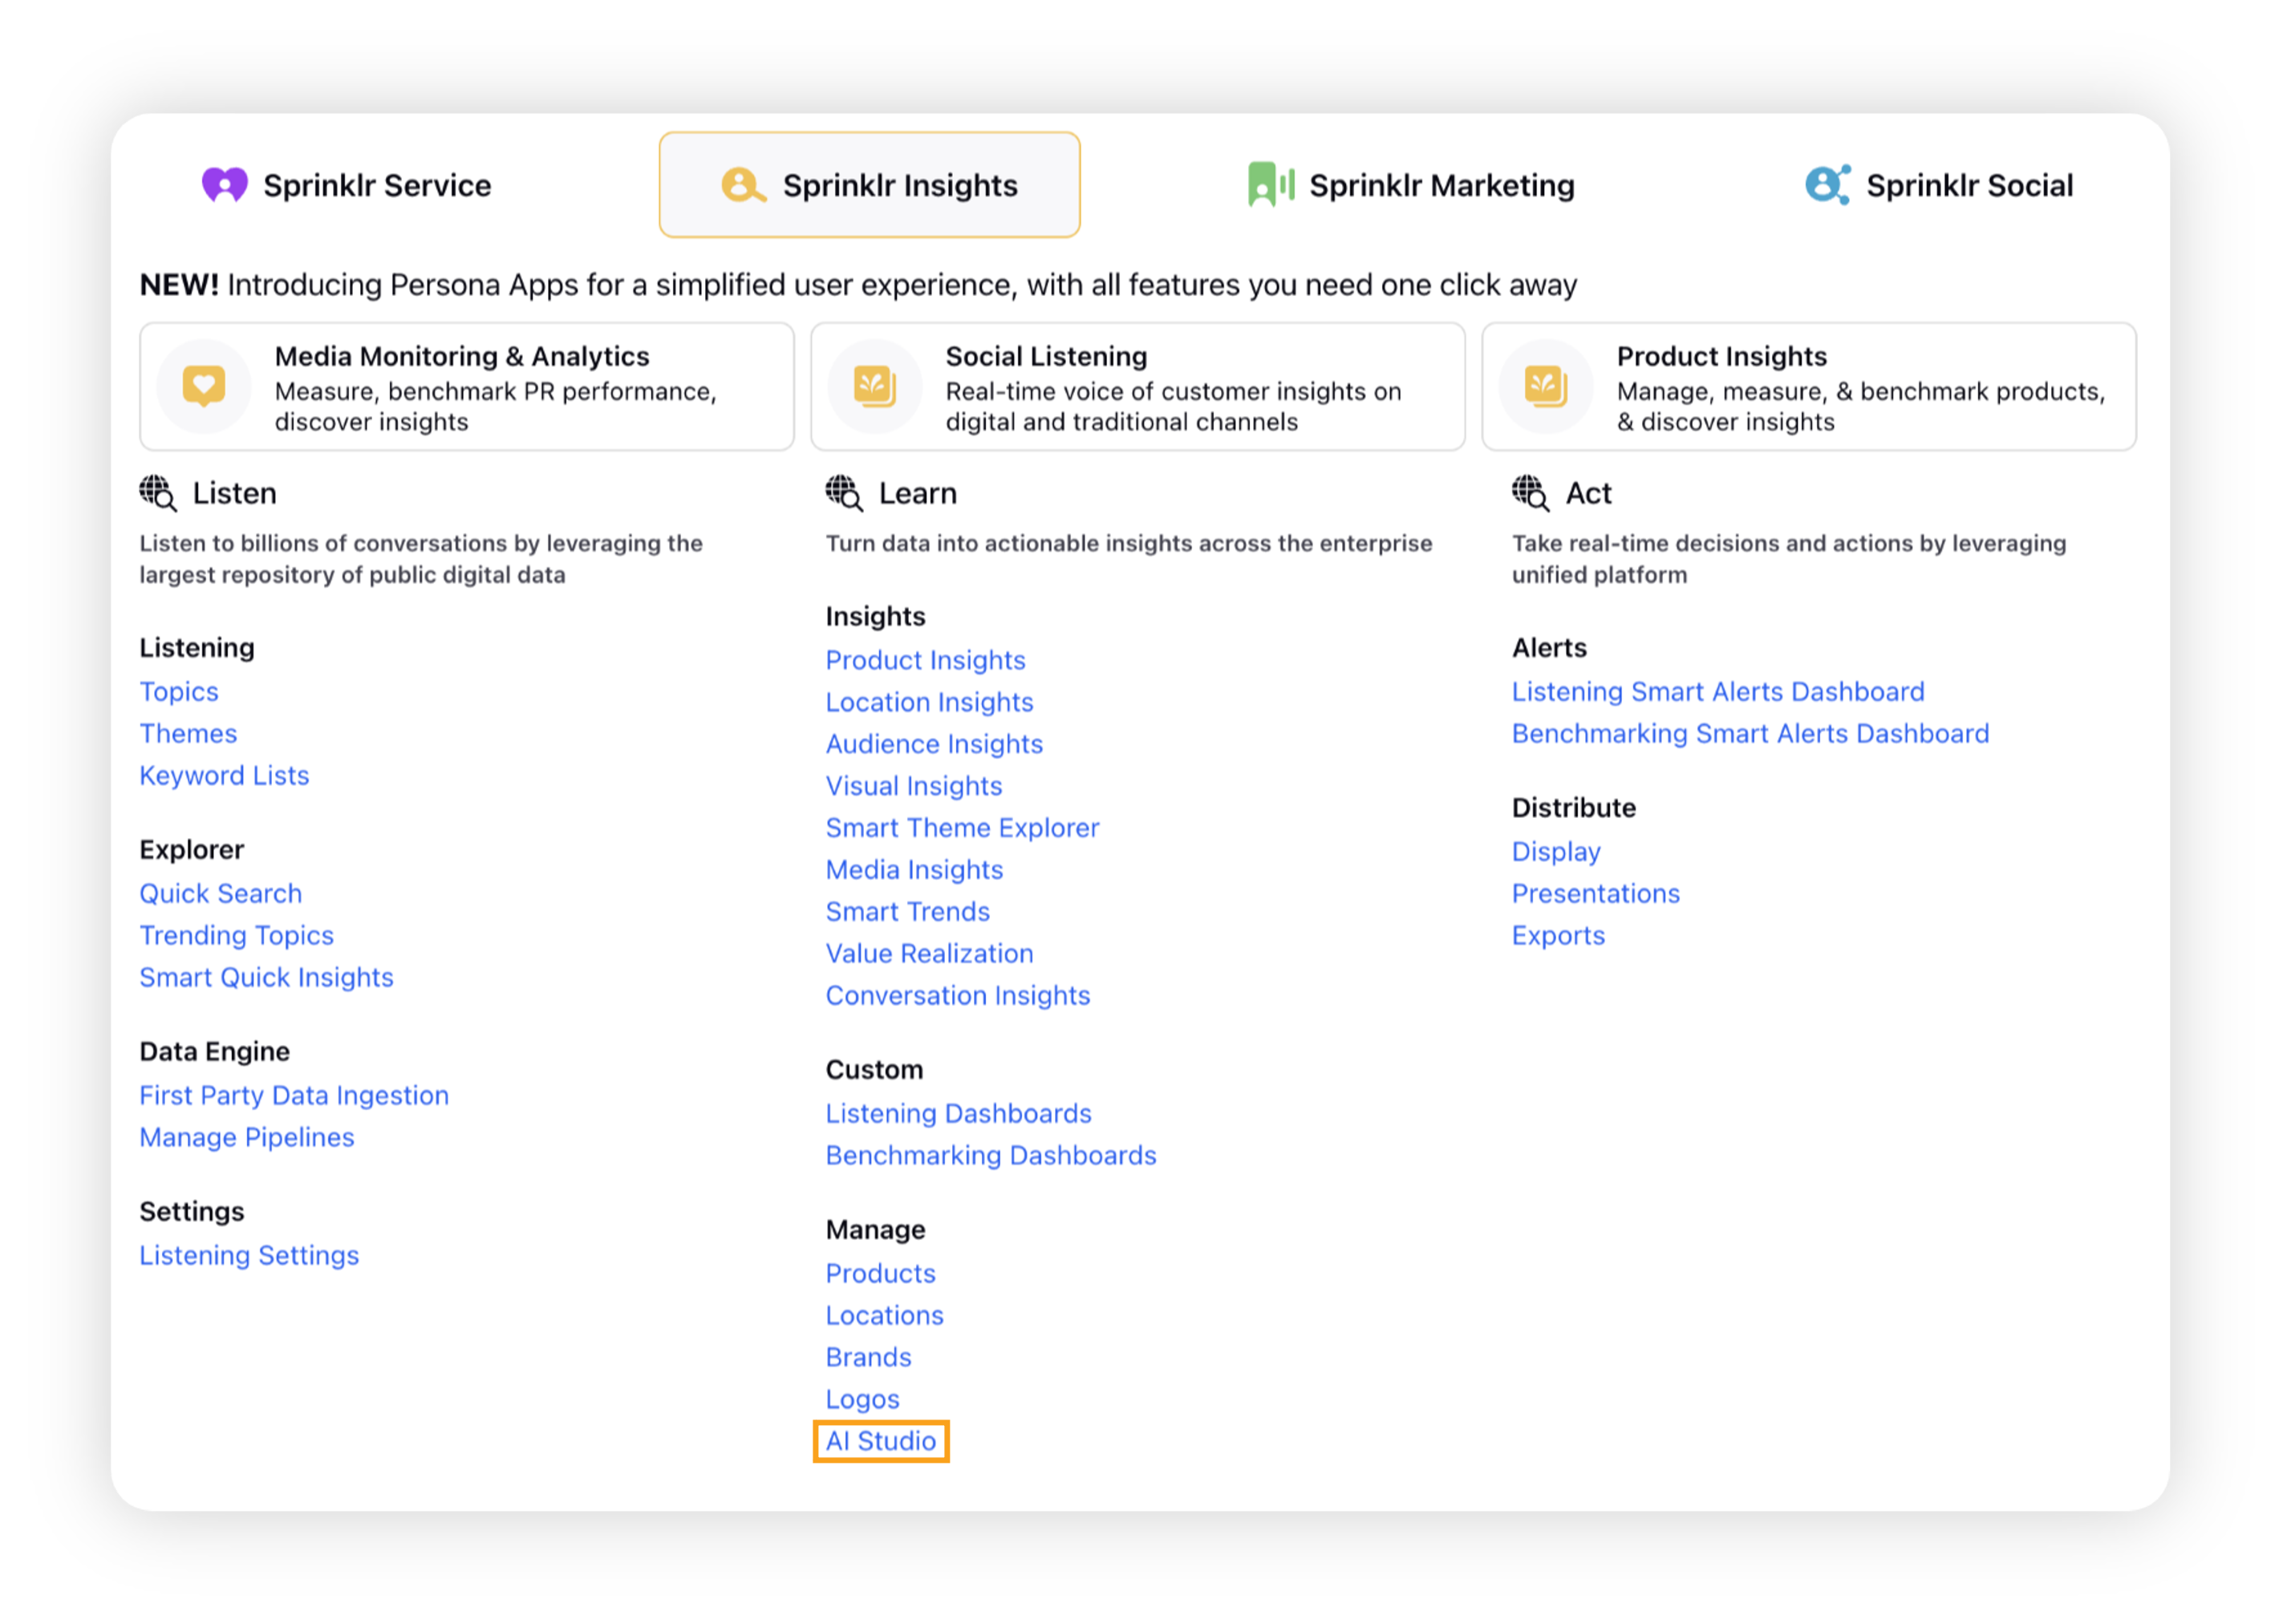
Click the New Tab icon. Under Sprinklr Insights, click AI Studio within Learn.
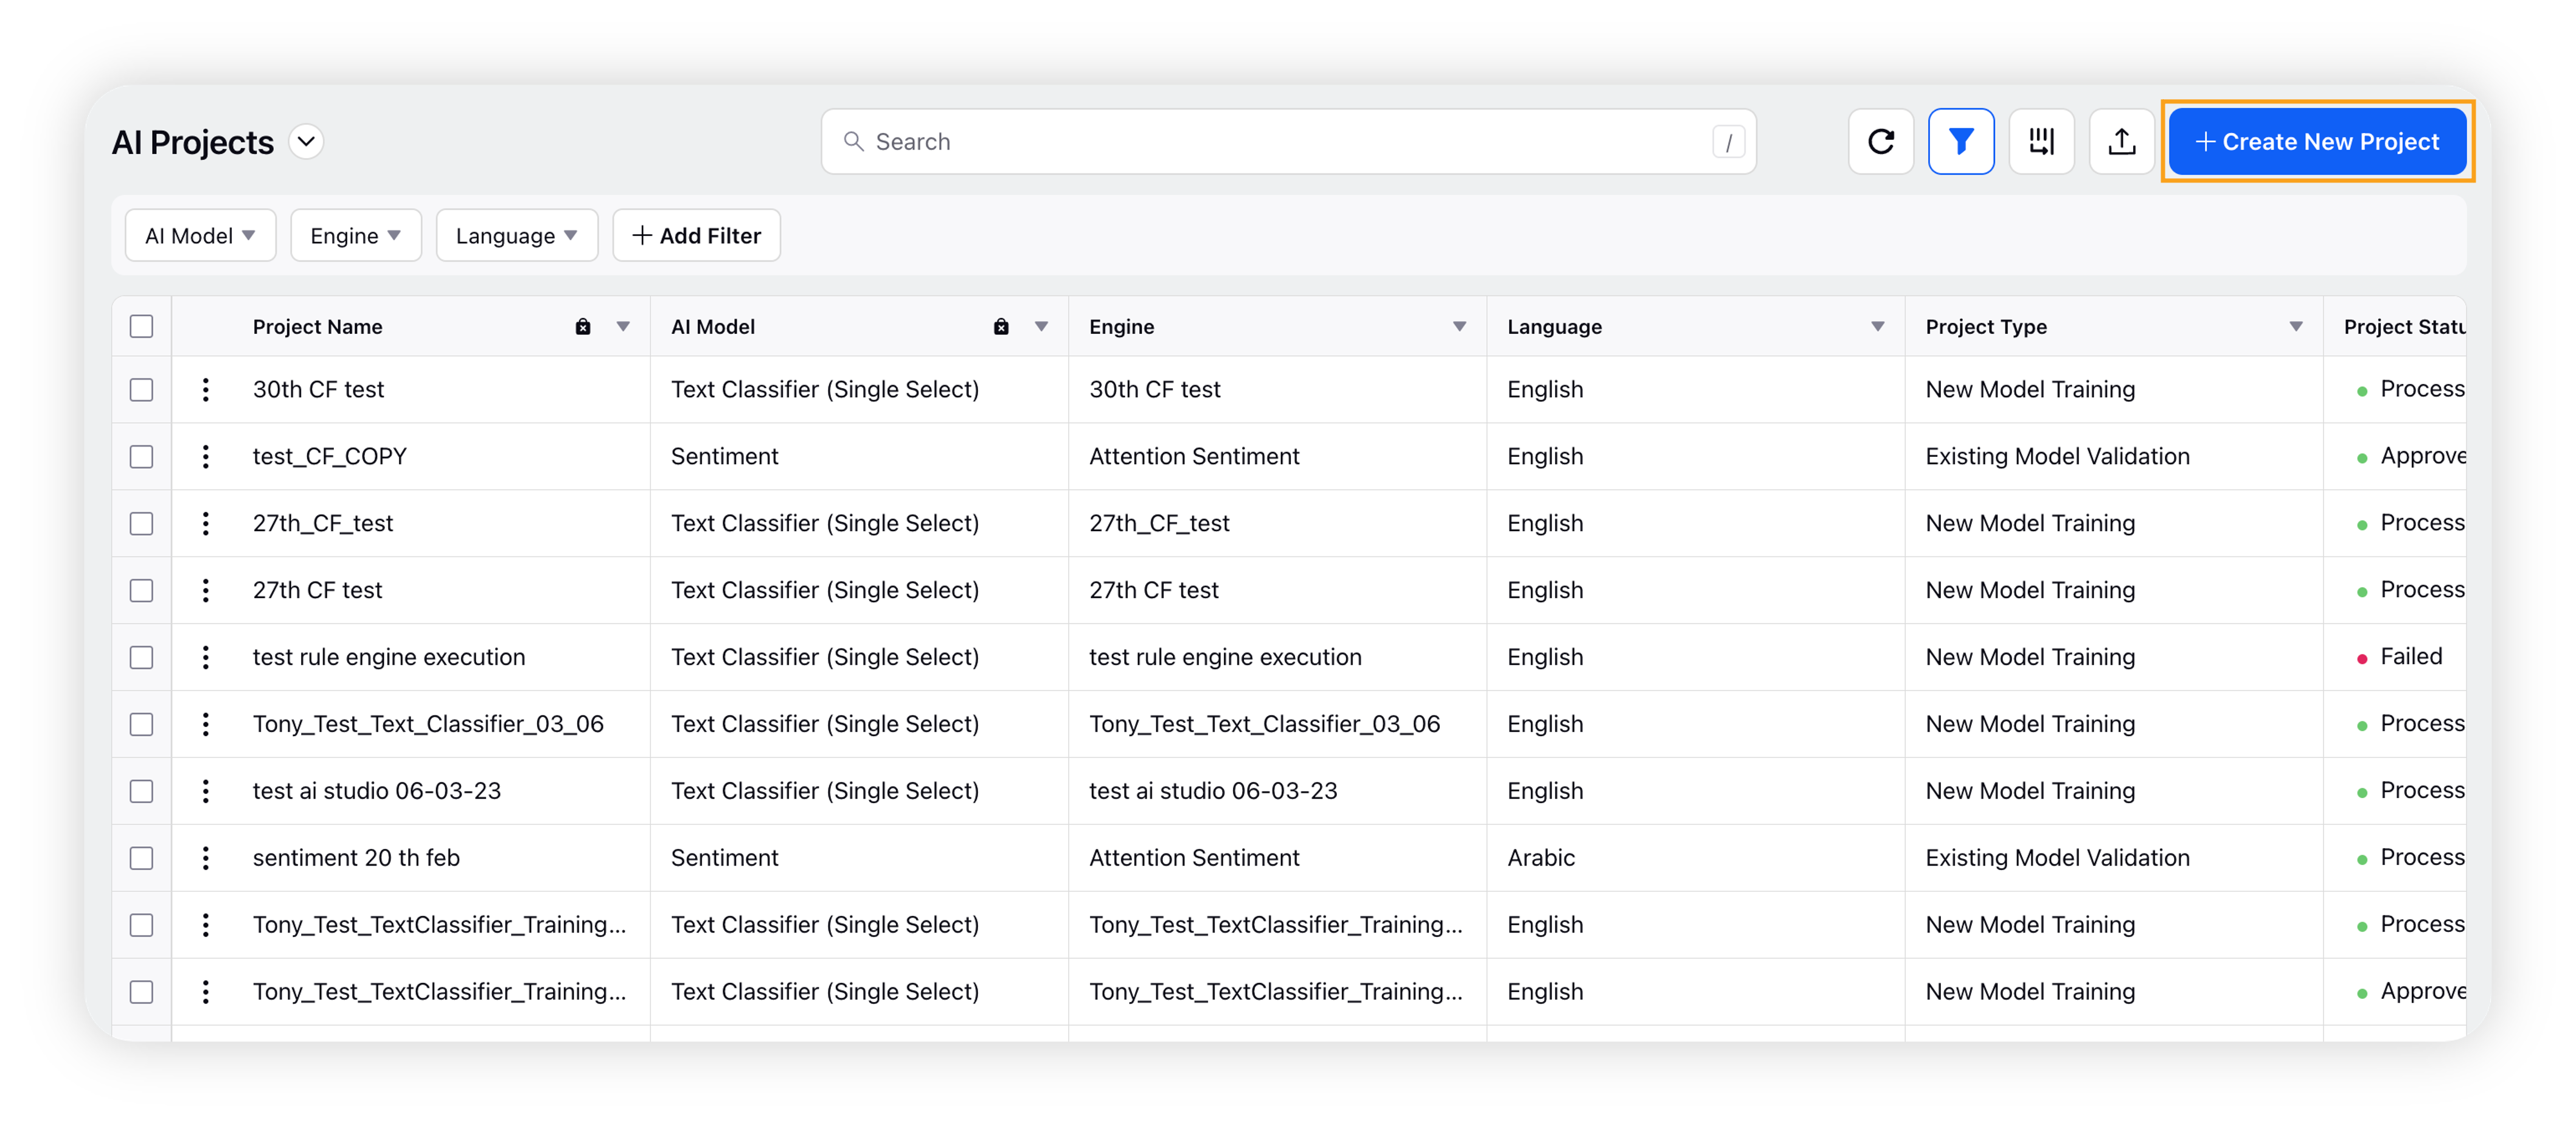
On the AI Projects window, click Create New Project in the top right corner.
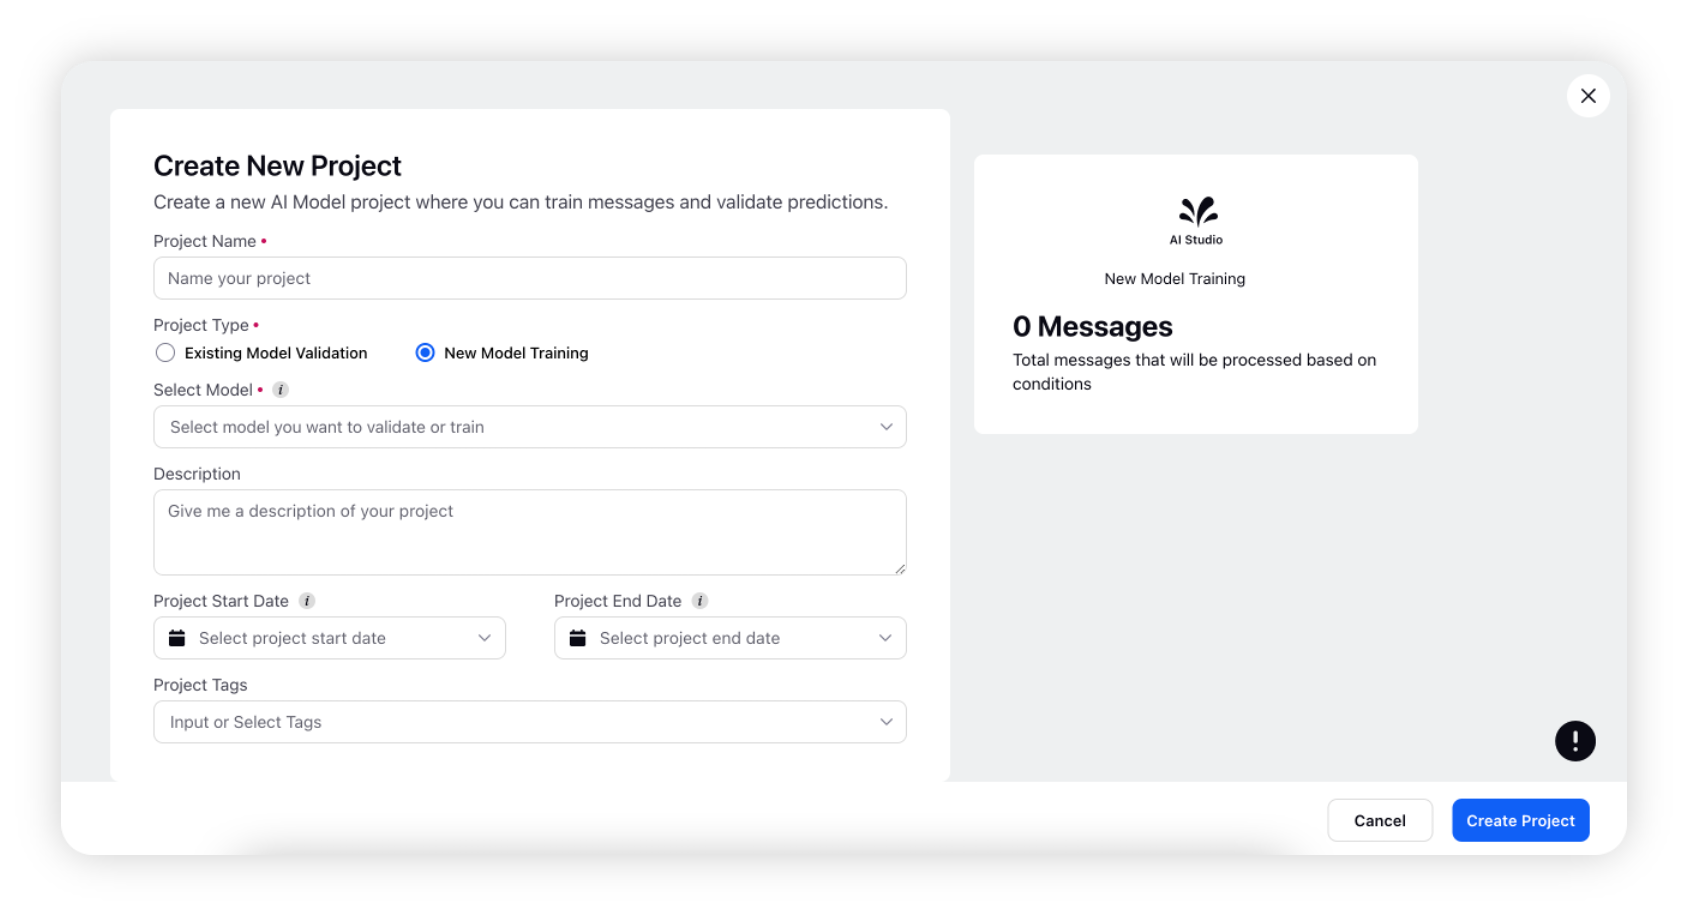
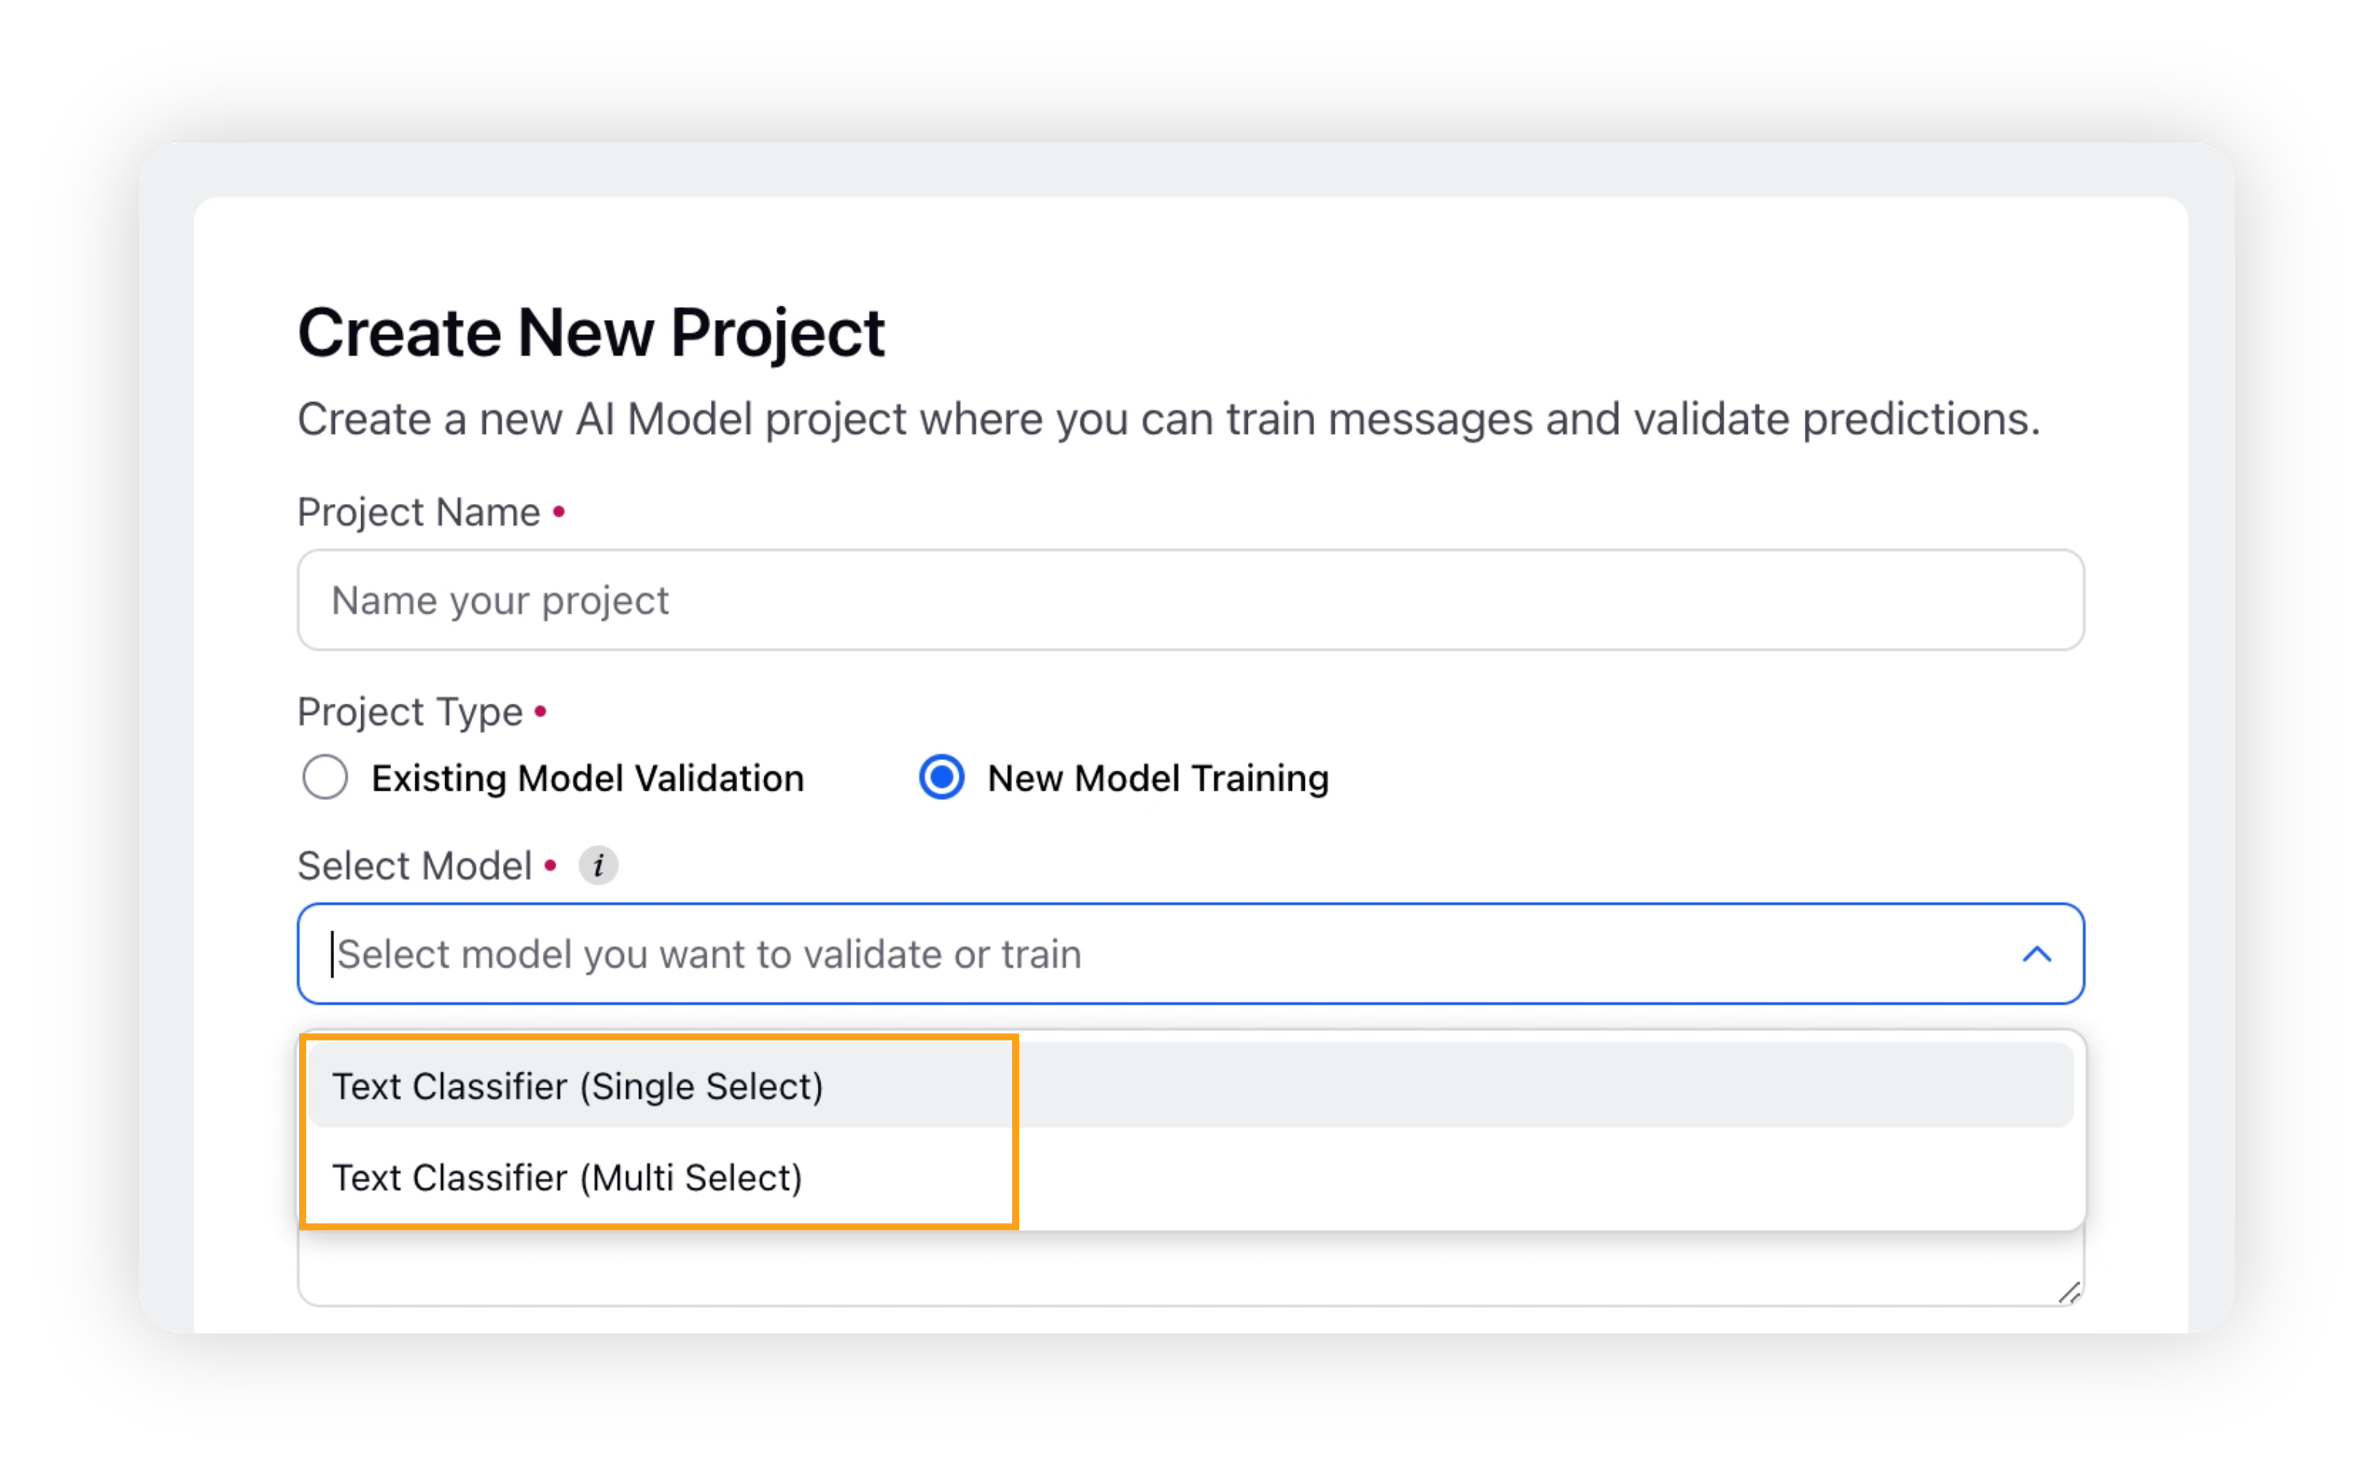
On the Create New Project window, enter a name for your project and select New Model Training as the project type.
After selecting the project type, you need to select Text Classifier as your model. You will have two options: Text Classifier (Single Select) and Text Classifier (Multi Select).
Choosing the Text Classifier (Single Select) option supports only one classification on each message.
Choosing the Text Classifier (Multi Select) option supports more than one classification on each message.
Enter a description of your project. This step is optional.
Select the Start Date and End Date for your project.
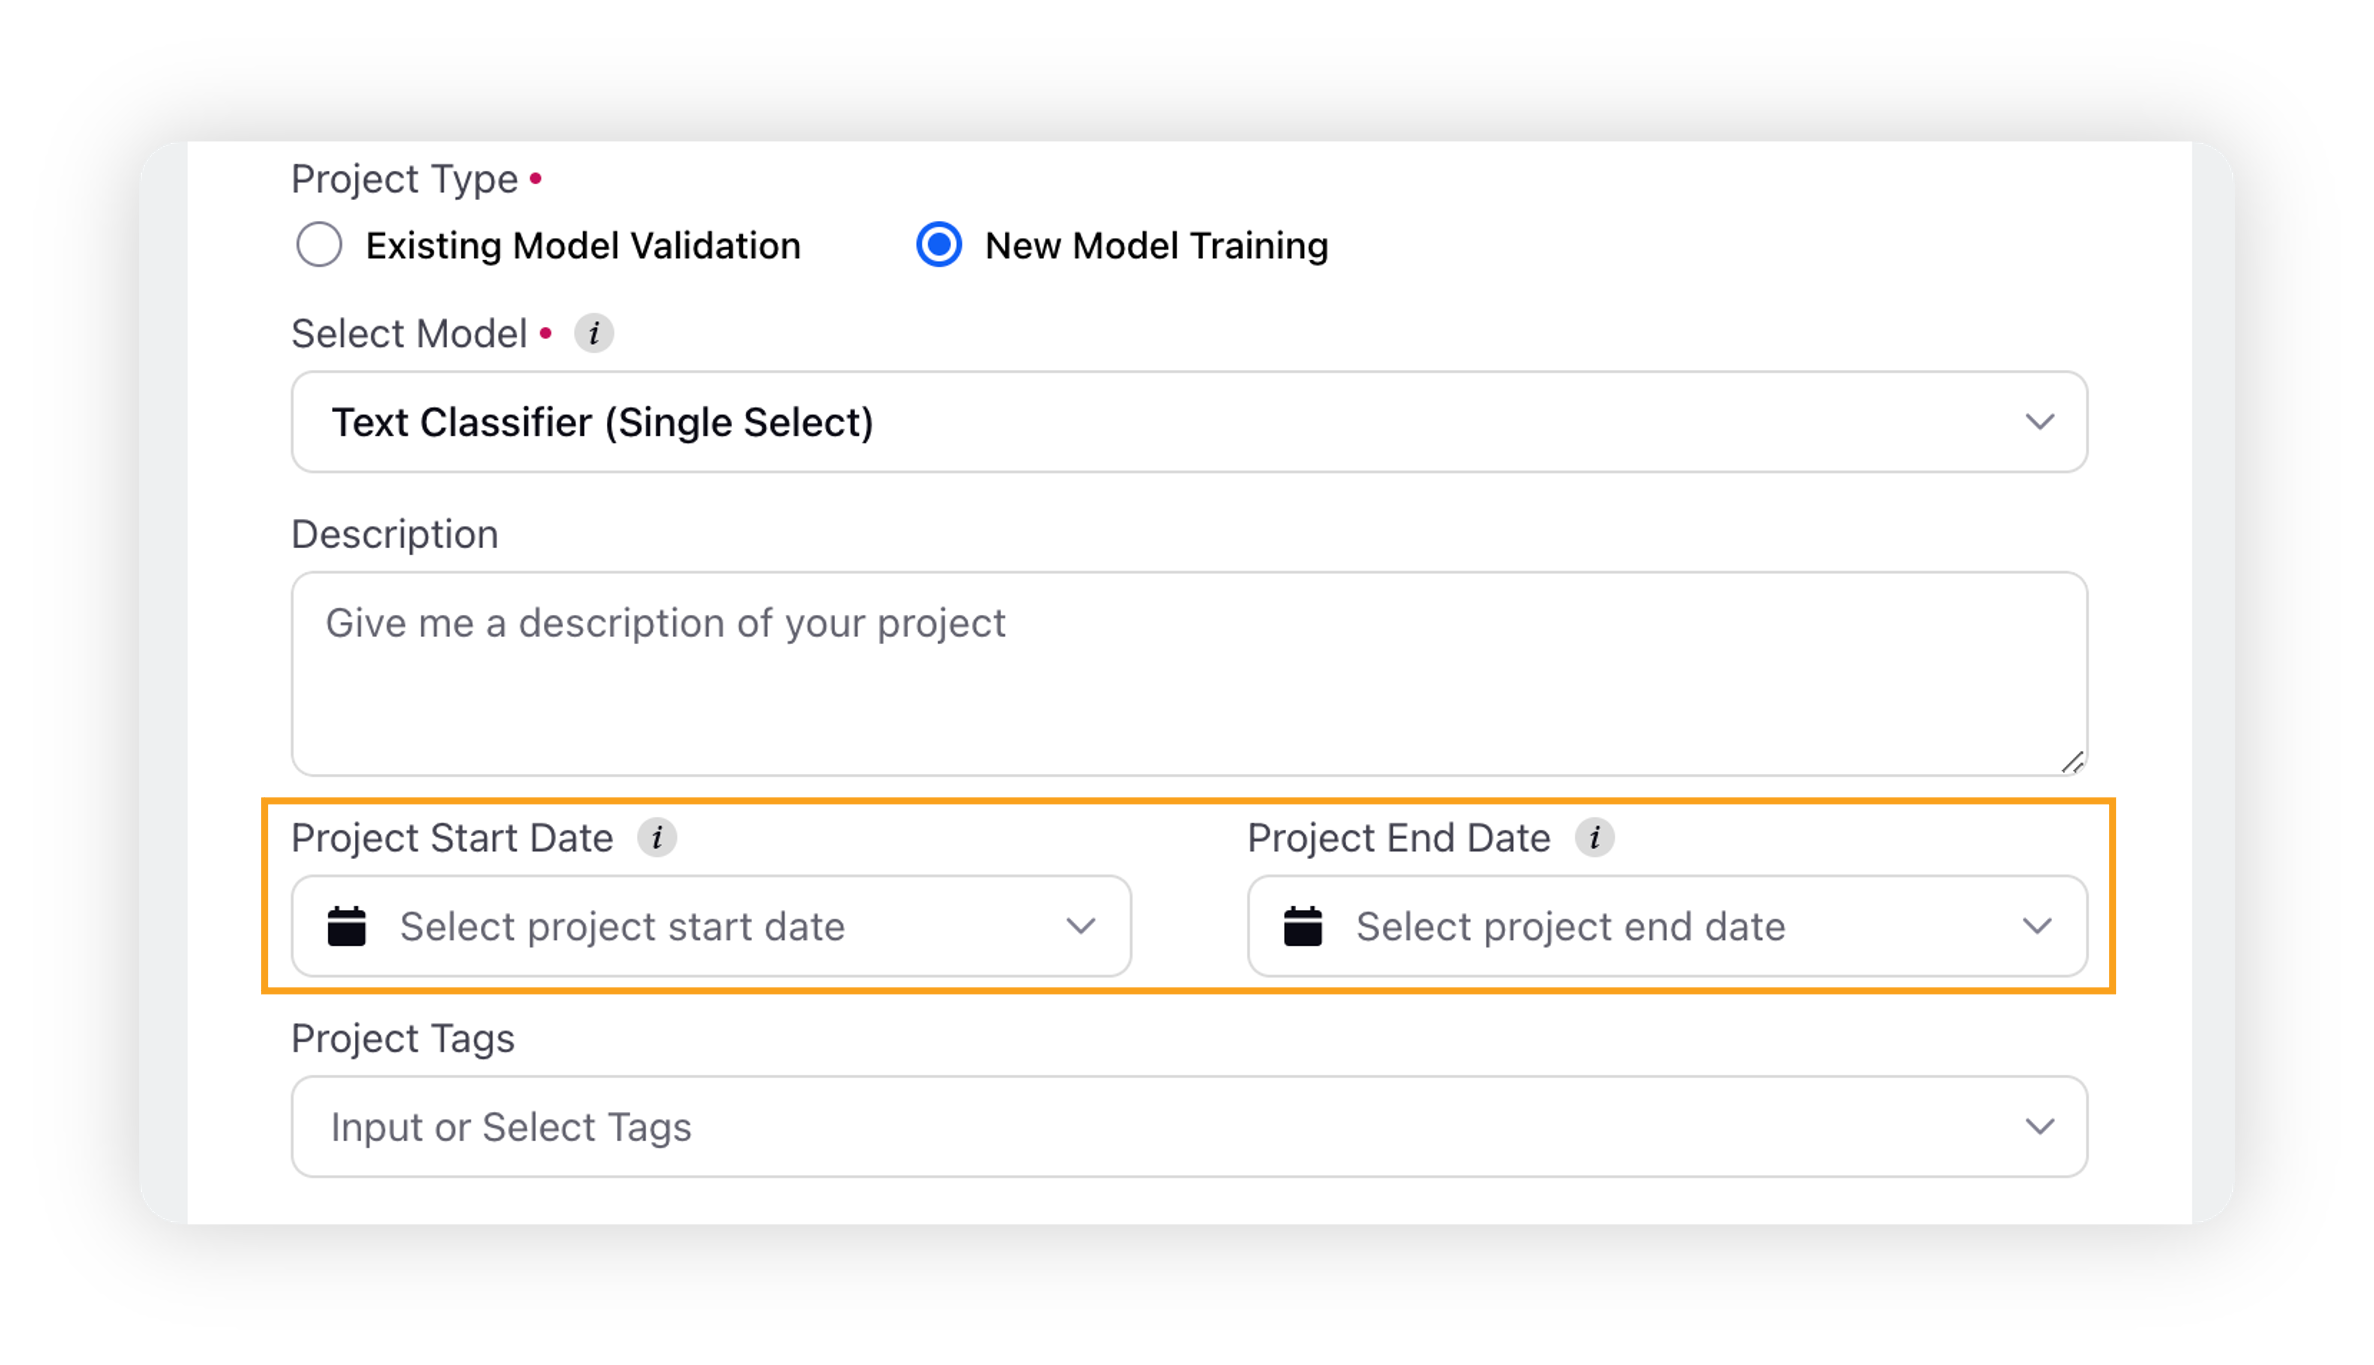
Start Date: The project will become active at this date.
End Date: Validation and Training on project will be disabled after this date. This is optional.
As an optional step, you can either select Project tags from the dropdown or enter new tags you want to add to your project.
After you select the Text Classifier Model in the Select Model option, you will get additional Messages and Classifications related options which you would need to fill.
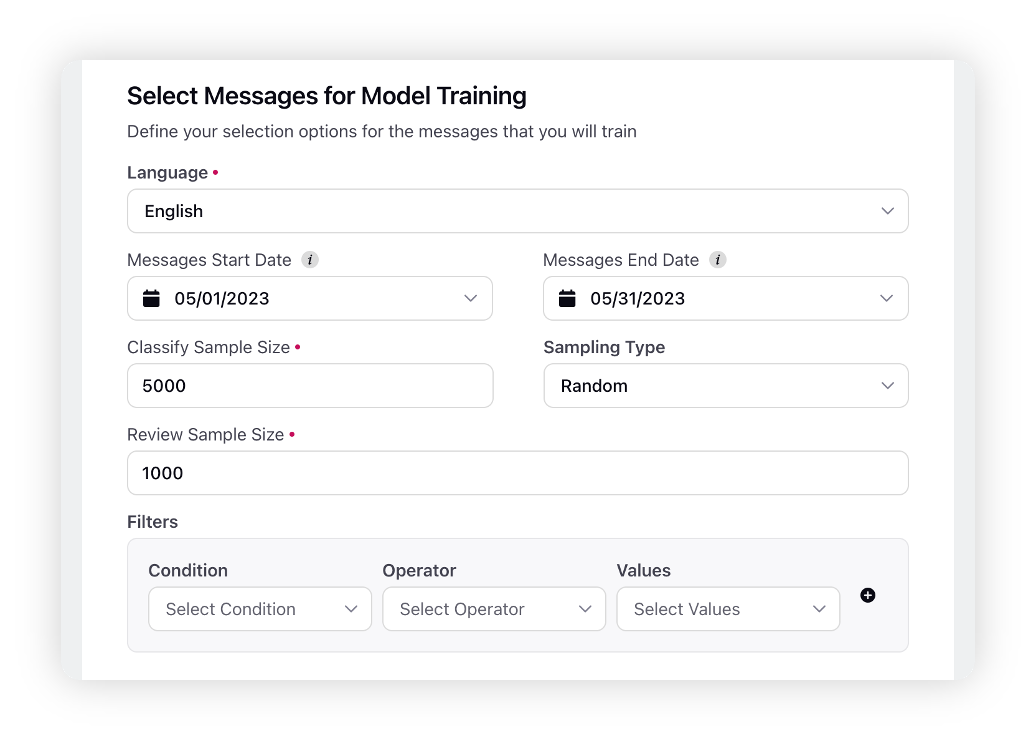
Under the Select Messages for Model Training section, you can define your selection options for the messages that you will train. For more information, see Data Source of Messages – Terms & Descriptions.
Under the Classification section, you can set your input values which includes either creating a new custom field or utilising an existing custom field. This custom field can be used across the platform.
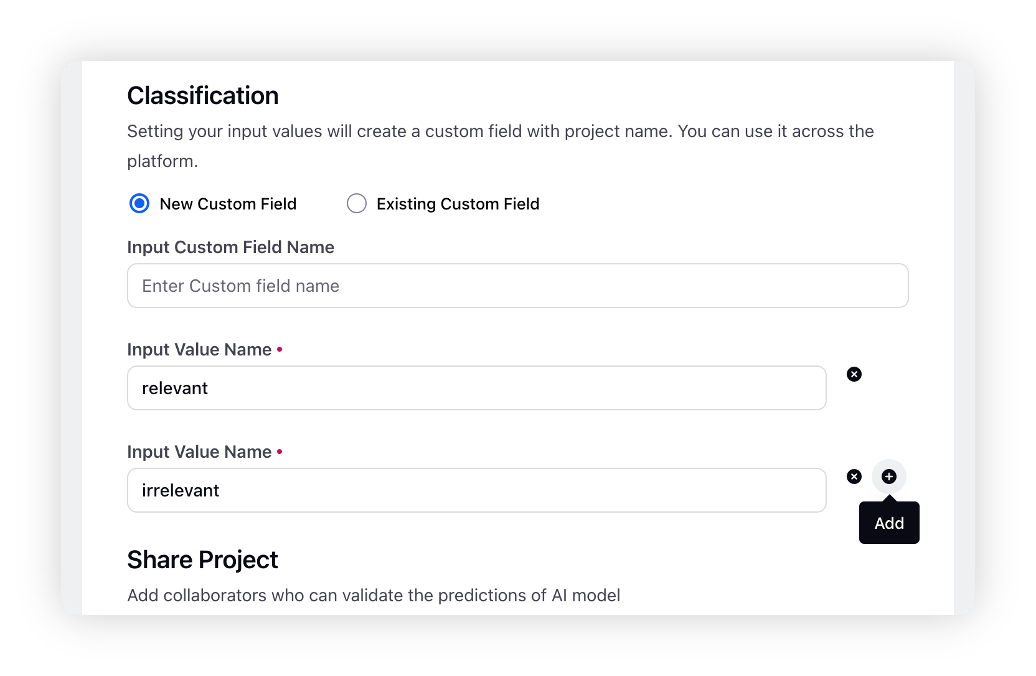
New Custom Field: You can create a new custom field by simply entering its name and the input classification.
Existing Custom Field: You can also select existing custom fields for your classification.
 Note:
Note: If the model is Single Select, only Pick List custom fields will be created or shown in the dropdown.
If the model is Multi Select, only Pick List multiselect custom fields will be created or shown in the dropdown.
You must add at least 2 input classification fields. You can add up to 20 classifications using the +/Add button.
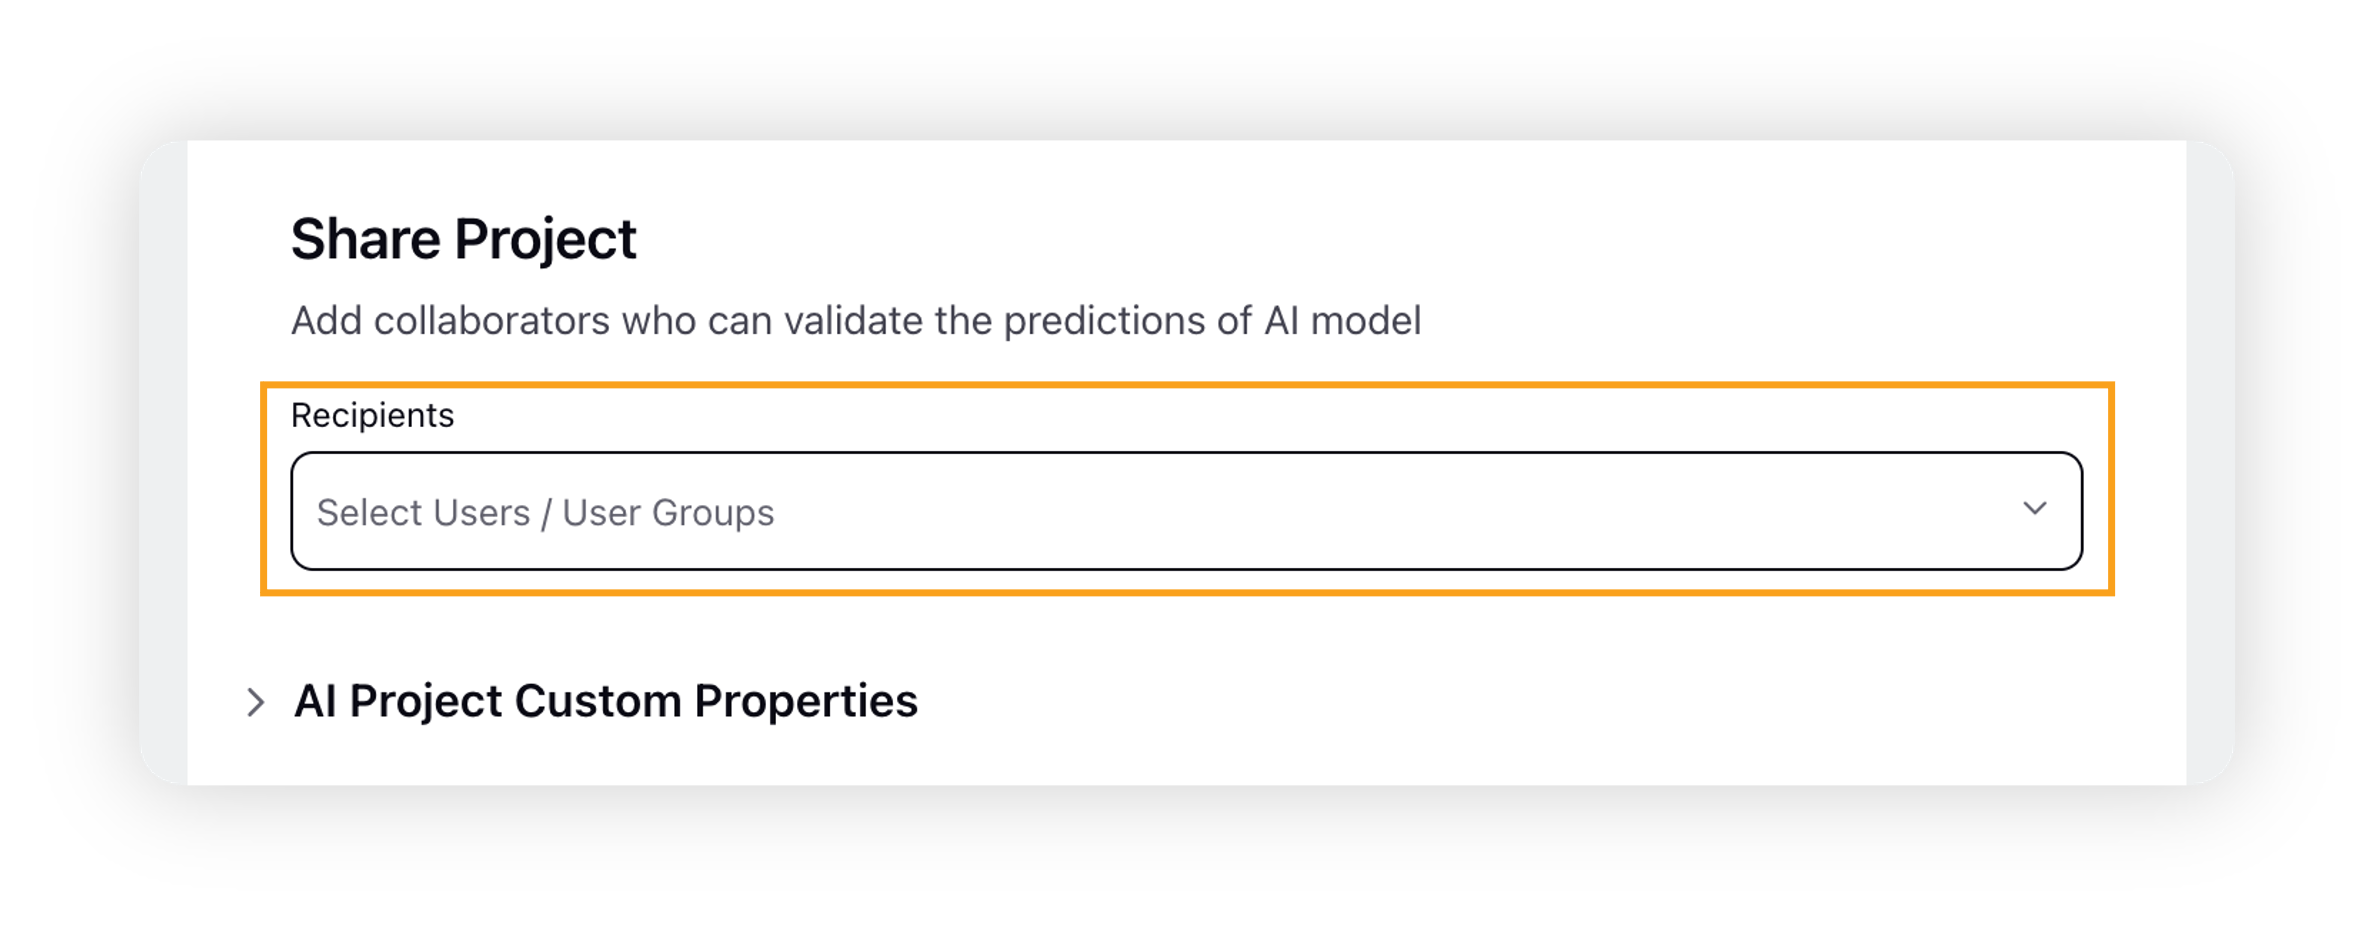
Under the Share Project section, add collaborators who can classify the messages for training and validate the predictions of the AI Model. To do that, select the user(s) and user group(s) as recipients.
Under the Message Custom Properties section, define your custom fields' selection options for the messages that you will train (if any).
Click Create Project in the bottom right corner, after verifying the input for all options.
A new Text Classification Project will be created as per the defined criterion. This can be accessed via the AI Projects Record Manager. If the new project is not reflected, click on the refresh icon.
![]() Note: You must wait for the project to be processed. Once the project status is updated from Processing to Processed, you can start classifying the text messages.
Note: You must wait for the project to be processed. Once the project status is updated from Processing to Processed, you can start classifying the text messages.
Data source of Messages – Terms & Descriptions
Data Source | Description |
Language | Select the desired language in which you want to train your model. Refer to the list of supported languages. |
Message Start Date | Select the start date for your classified messages. The project will only propose messages that were created after this date to classify. |
Message End Date | Select the end date for your classified messages. The project will not propose messages that were created after this date to classify. |
Classify Sample Size | This is the number of messages that will be fetched to the classify messages form (defaulted to 5000, maximum of 9000 messages). |
Sampling Type | The sampling type is always Random. |
Filter | First, select the condition, and then select the values. For example, if you want to filter the messages by Topics, select Topics as condition and then select Topic(s) as the values. The available conditions are – Review Source, Topics, Topic Groups, Topic Tags, Themes, Theme Tags, Domain Lists, Domain List Tags, Keyword Lists, Channels, Account, Account Group, Message Type, Media Type, Post Type, Data Ingestion File Name, and Data Ingestion Import Tag.
|
Message Custom Properties | Select the custom field values as available in your environment.
|
List of languages supported in Text Classifier
|
|
|
|
|
Best practices
Here are some recommended best practices to follow –
Utilize the First Party Data Ingestion (FPDI) feature to efficiently classify messages in bulk.
Aim to classify a diverse range of messages that are not too like one another. For instance, messages that contain identical text but different emojis are not considered unique for training purposes.
Keep in mind that AI Studio can only train or predict messages in one language at a time. Therefore, it is advisable to create multiple projects when dealing with large-scale multilingual datasets.
Carefully choose the sample size for your project, as it should not be too close to the total number of classified or ingested messages. This is to ensure we have enough messages remaining after Pre-Processing* steps.
When creating a new project, ensure that message-level custom properties are entered correctly. Note that these properties cannot be edited later when modifying project details.
The fields that you can edit are Messages Start Date, Messages End Date, Sample Size, and Source.
Pre-Processing*: It is worth noting that the system performs several pre-processing tasks on the backend to clean and standardize the messages. These tasks typically involve removing hashtags, emojis, multiple spaces, and punctuation marks, among other things.
Once the pre-processing tasks are complete, the system then removes any duplicate messages. This means that two distinct messages that have the same text but different emojis, for example, will eventually be considered duplicates after pre-processing and removed from the dataset. Examples are given below –
Saving for a trip to Disney! $AmazonFindOfTheMonth #savings 🥰😘
Saving for a trip to Disney! $AmazonFindOfTheMonth #savings 😇😍
It is important to keep this in mind when classifying the data, as the removal of duplicates can impact the final set of messages. However, by removing duplicates, we can ensure that the data is clean and standardized, which is essential for accurate analysis and modelling.