Access validation reports and feedback in AI Studio
Updated
In this article, we will guide you through the process of validating insights for a model in Sprinklr's AI Studio.
If you want to create a new training project for the Text Classifier model, please refer to the article AI Studio (Text Classifier) - Create New Model Training Project.
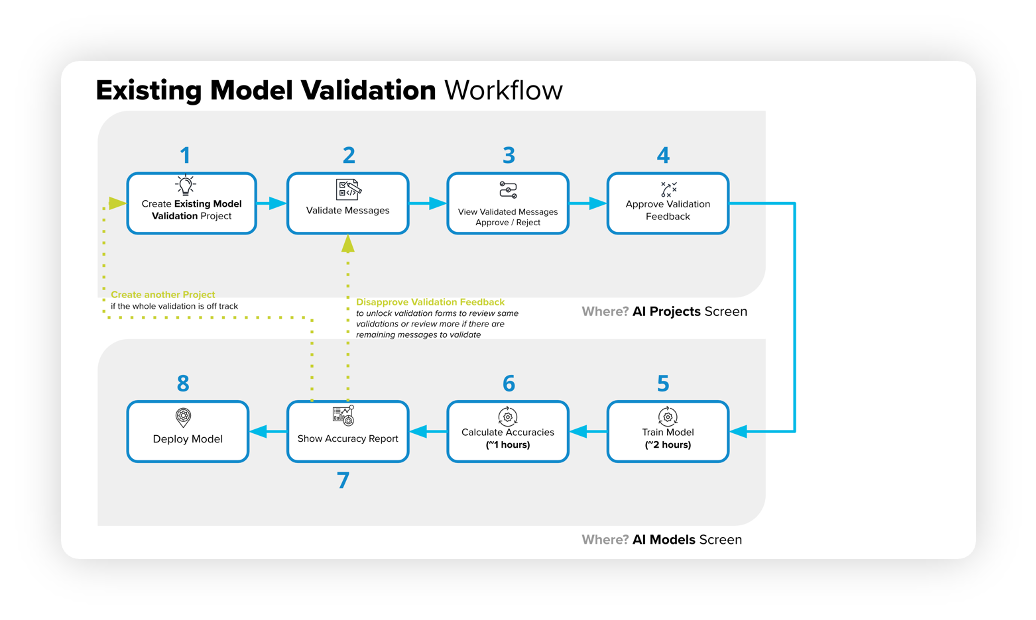
The following diagram illustrates the workflow for validating an existing model.
![]() Enablement note: Use of this feature requires that AI Studio be enabled in your environment. AI Studio is a paid module, available on demand. To learn more about getting this capability enabled in your environment, please work with your Success Manager.
Enablement note: Use of this feature requires that AI Studio be enabled in your environment. AI Studio is a paid module, available on demand. To learn more about getting this capability enabled in your environment, please work with your Success Manager.
How to approve/reject validated messages?
If you are managing a team of validators, you can check their validations and decide to approve, edit, and reject their validations.
On the AI Projects window, hover over the Options icon next to the AI project you have created earlier and select Show Validated Messages.

This will take you to the Review Validated Messages window. Here, being an approver, you can reject, approve and edit validated messages.
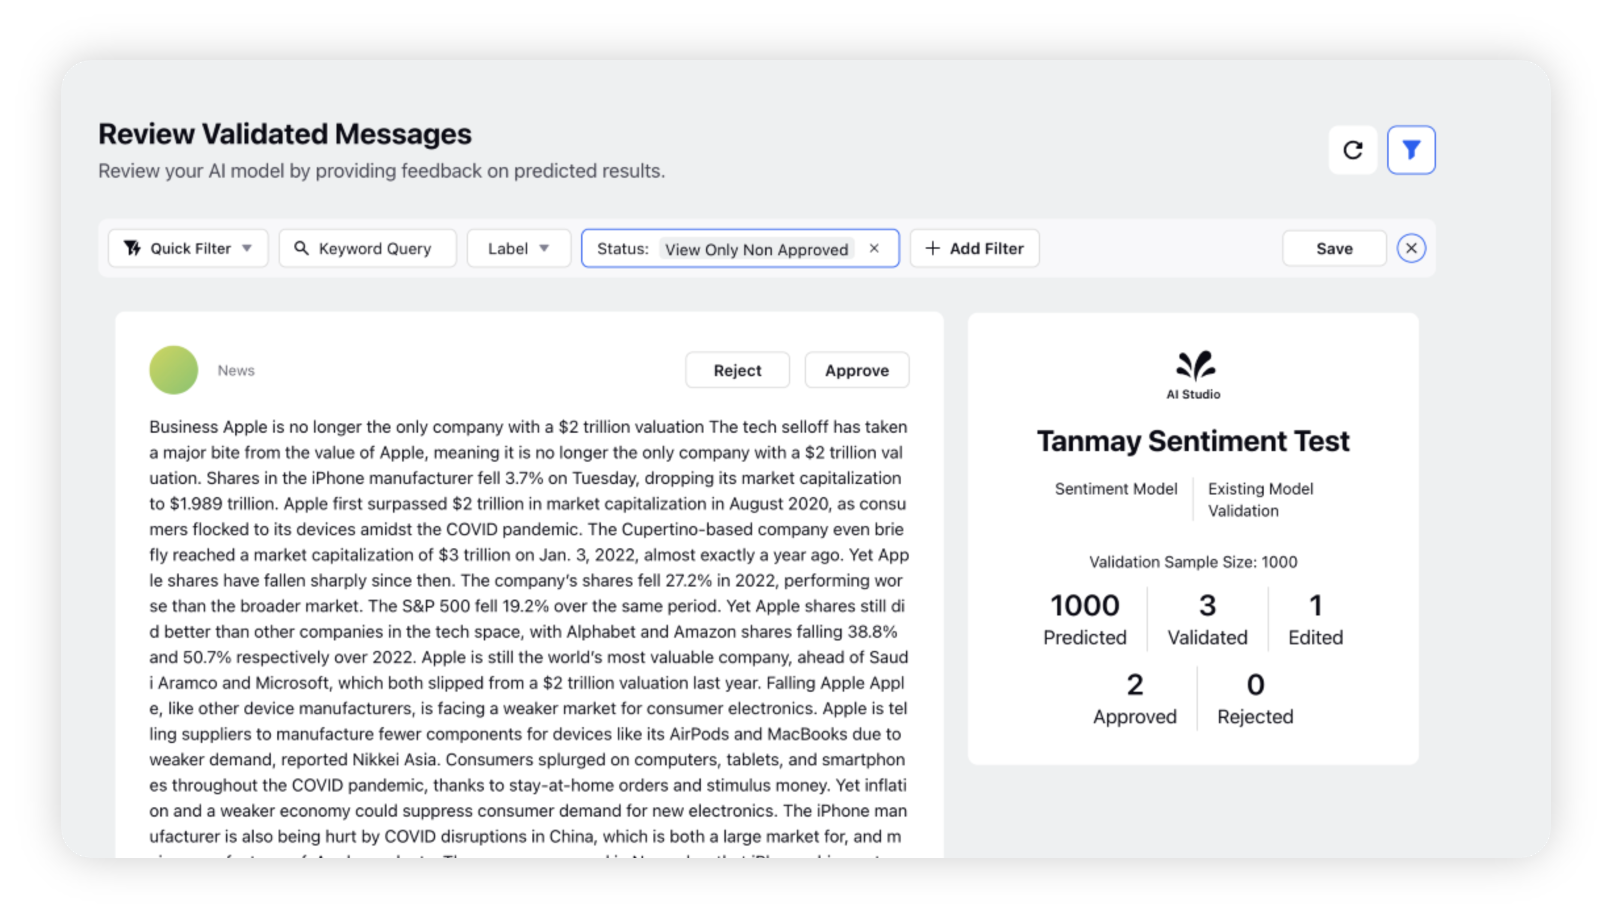
If the validation feedback for a message seems to be correct, click Approve.
If the validation feedback seems to be incorrect, you can either reject the validation or edit the classification by yourself and then approve the message.
Do the same for other validated messages.
Whatever action you take for any validated messages, will get updated under the respective category (shown on the right side of the window).
You can also use the filter bar to filter out relevant messages. For example, if you want to see only the approved validations, simply select View Only Approved. In the same way, you can choose the relevant option to see the desired validations.
How to view the validation report?
On the AI Projects window, hover over the Options icon next to the AI project you have created earlier and select View Validation Report.

This will take you to the Project Validation Report window.
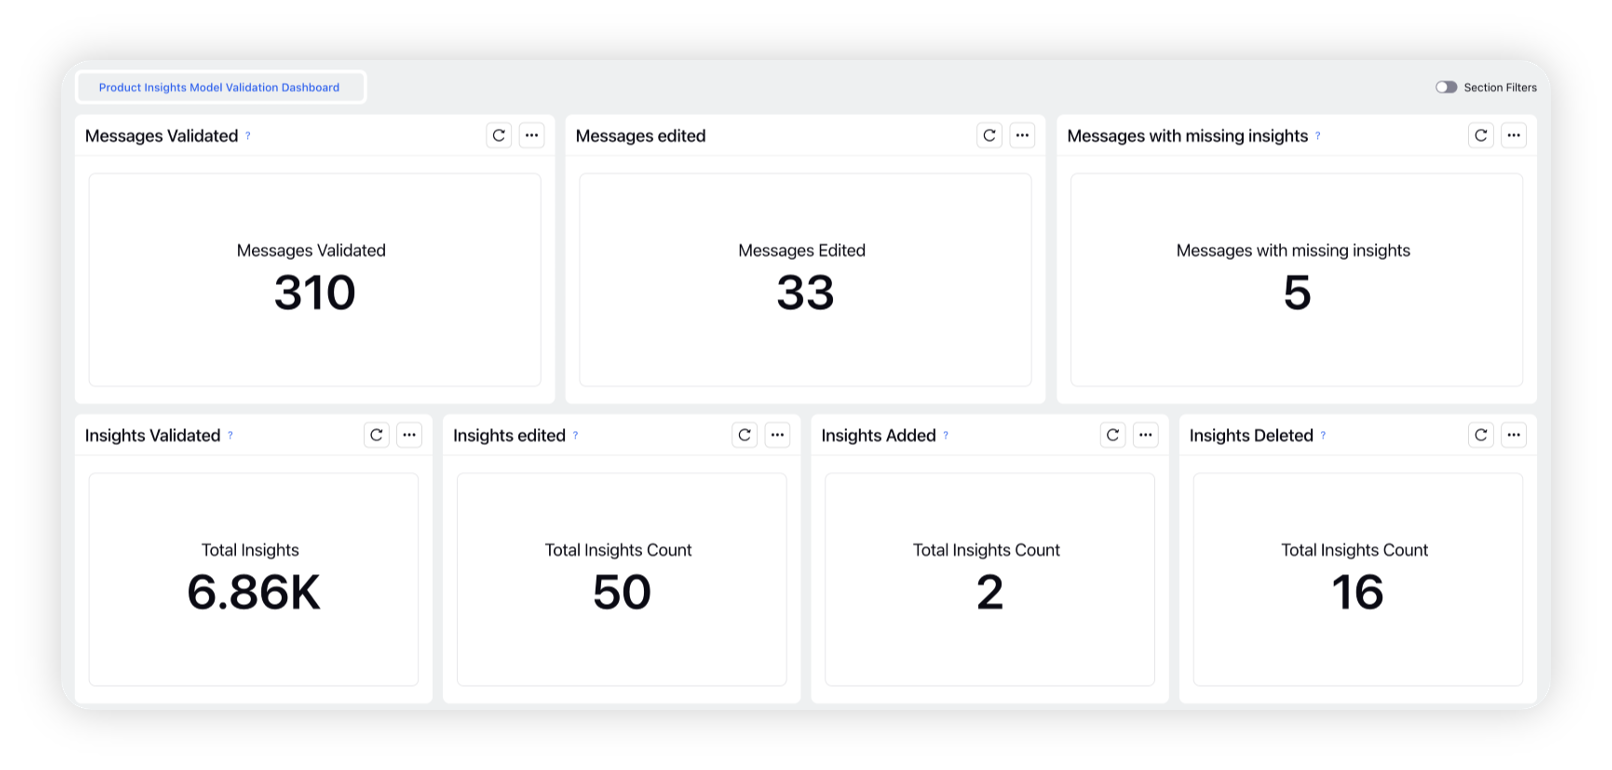
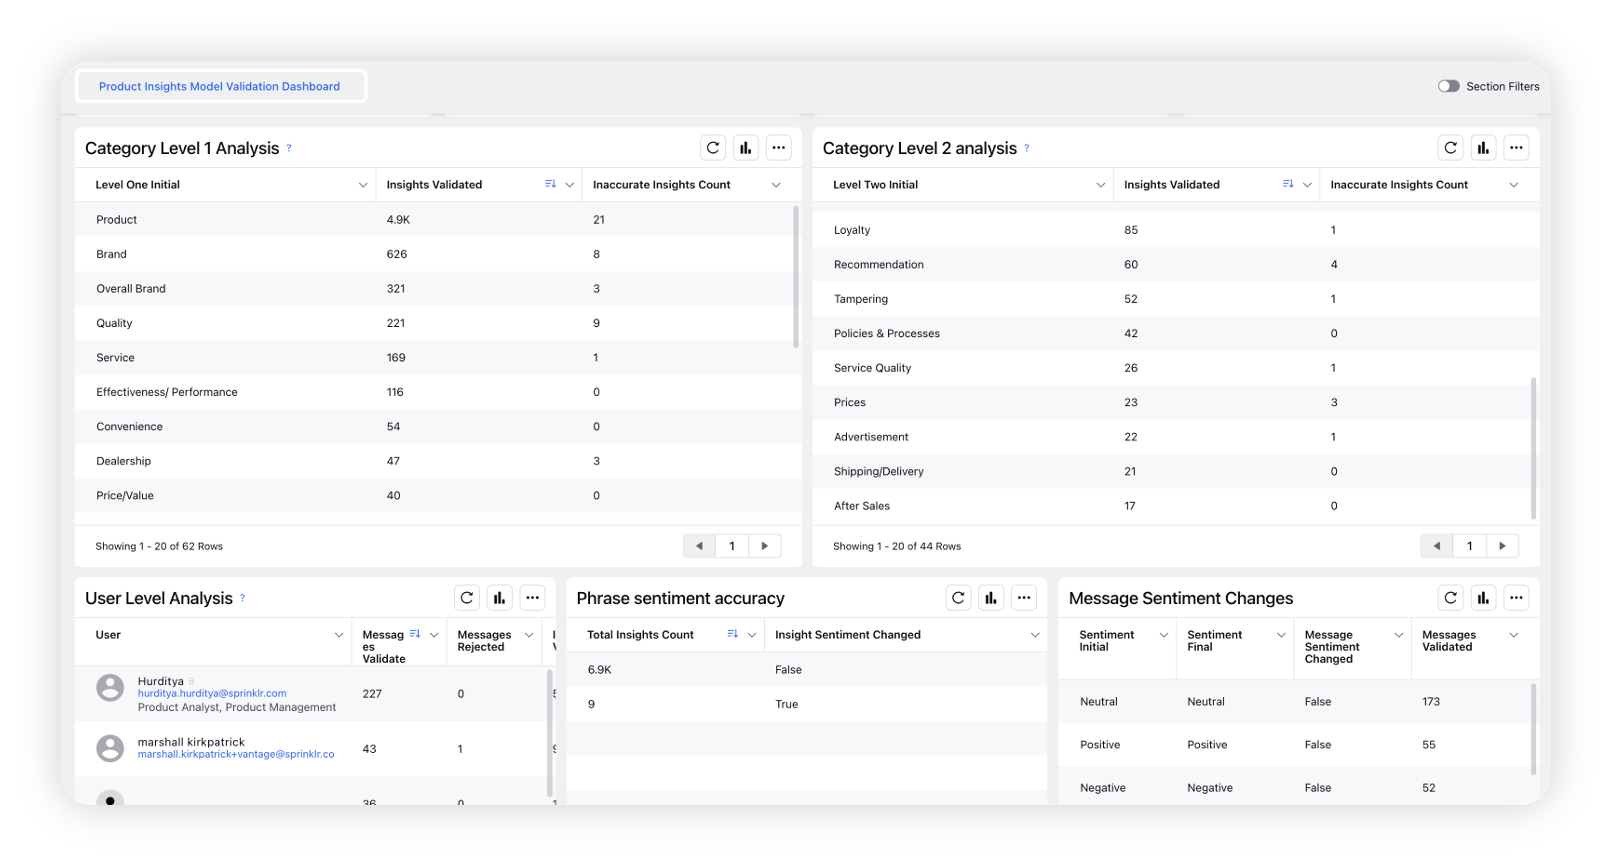
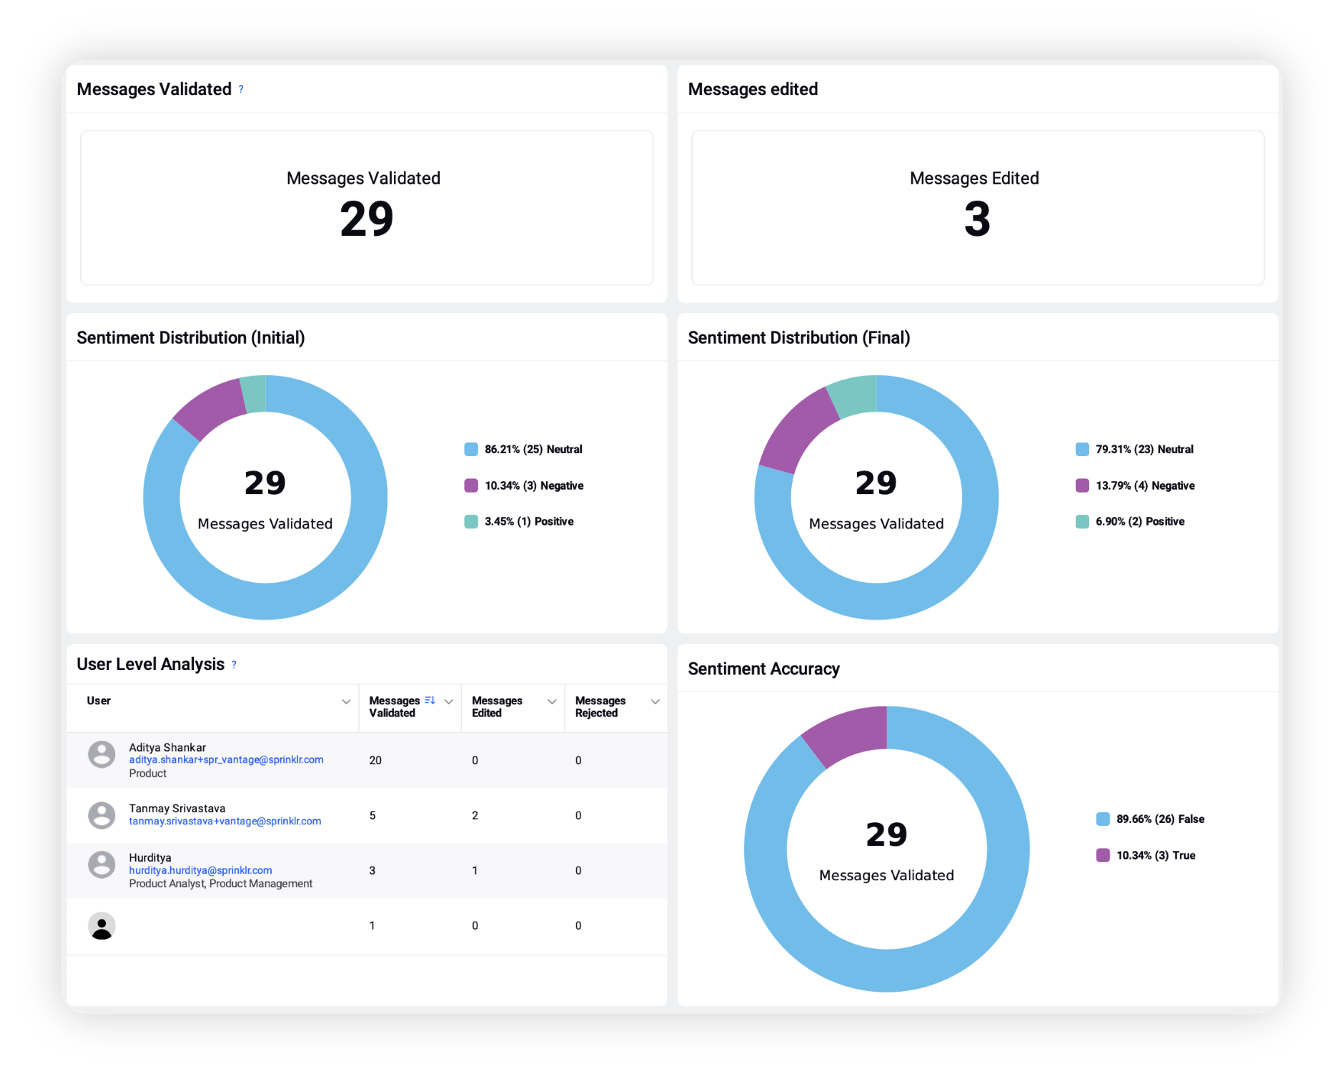
Here you can check the complete validation report that includes Messages Validated, Messages Edited, Initial Classification Distribution, Final Classification Distribution, User Level Analysis, and Classification Accuracy.
Sentiment validation reports provide message level statistics, sentiment accuracies and user level analysis, whereas PI/LI models' validation reports provide users with metrics at the message and insights level, as well as at the user level. This allows for a comprehensive analysis of performance, with insights available at multiple levels to inform strategic decision-making.
PI Validation Report
Sentiment Validation Report
Messages/Insights Validated – The number of messages/insights predictions validated by the user.
Messages/Insights Edited – The number of messages/insights where the user changed the predicted classification.
Messages with Missing Insights – The number of messages where the insights were not provided as tagged by the user.
Initial Classification Distribution – Initial distribution as predicted by the model.
Final Classification Distribution – Distribution of classifications after review when the user edits the messages classifications
User Level Analysis – This widget gives the above metrics for every user in the environment.
Classification Accuracy – The accuracy of classifications depending on how many message insights were edited.
Insights Count – The total count of insights identified. Basis on what action the user takes, we can also measure insights deleted, insights added, and insights edited.
Sentiment Distribution (initial) – The distribution of sentiment across the three categories, as predicted by the model.
Sentiment Distribution (final) – The distribution of sentiment across the three categories, after the user edits or approves them.
Sentiment Accuracy – The accuracy of sentiment classifications depending on how many message insights were edited.
How to approve validation feedback?
When you are done with approving/rejecting messages and checking your Project Validation Report, return to the AI Projects window.
Hover over the Options icon next to the AI project you have created earlier and then click Approve Validation Feedback.

This will lock validation forms to move to the next steps: Training and Deploying the Model, considering what you have validated.
If the model has not been retrained and deployed, you will be able to Disapprove Validation Feedback in the more menu options if you wish to review more messages.
Approving the Validation Feedback will make the model ready for training. The admin can initiate the training of the model as described below:
Hover over the Options icon alongside the desired AI Project and select Train Model from the list of options to train the selected model.
Once the model is trained, you can click the Options icon alongside the desired AI Project and select Calculate Accuracies.
Once the accuracies are calculated, you can hover over the Options icon and click Show Accuracy Report. This will take you to a window where you can compare the accuracy numbers (F1 score, Precision, Recall) of the old model with the newly trained model. To check definitions, refer to Golden Dataset and Accuracy Metrics.
If you are satisfied with the accuracy of the new model, you can deploy the model with a single click. To deploy the model, hover over the Options icon and select Deploy Model.
If you are not satisfied with the new model's performance, you can re-validate your validations or create a new validation project.