Validate predictions of a new model and deploy
Updated
This article aims to provide a comprehensive guide on creating a new model training project for Sprinklr's Text Classifier, which can filter out irrelevant terms for your brand or industry without any manual rule implementation or keyword maintenance. The article will walk you through the entire workflow.
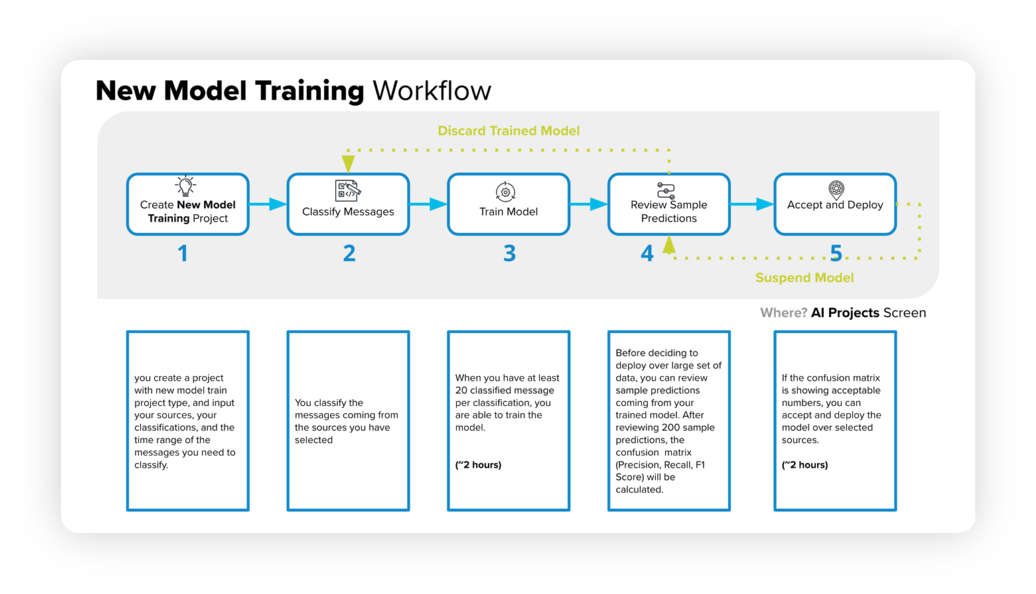
The below diagram will help you understand the New Model Training Workflow –
![]() Enablement note: Use of this feature requires that AI Studio be enabled in your environment. AI Studio is a paid module, available on demand. To learn more about getting this capability enabled in your environment, please work with your Success Manager.
Enablement note: Use of this feature requires that AI Studio be enabled in your environment. AI Studio is a paid module, available on demand. To learn more about getting this capability enabled in your environment, please work with your Success Manager.
The model training workflow consists of several steps that we will discuss in the following sections –
Begin by creating a new project, specifying sources, classifications, and a time range.
Classify messages from the chosen sources.
Train the model using a minimum of 20 classified messages per classification, which can take around 2 hours.
Examine sample predictions to generate a confusion matrix, including precision, recall, and F1 score.
If the confusion matrix meets the desired criteria, approve and deploy the model, which can take approximately 2 hours.
If the matrix is unsatisfactory, cancel and re-classify the messages.
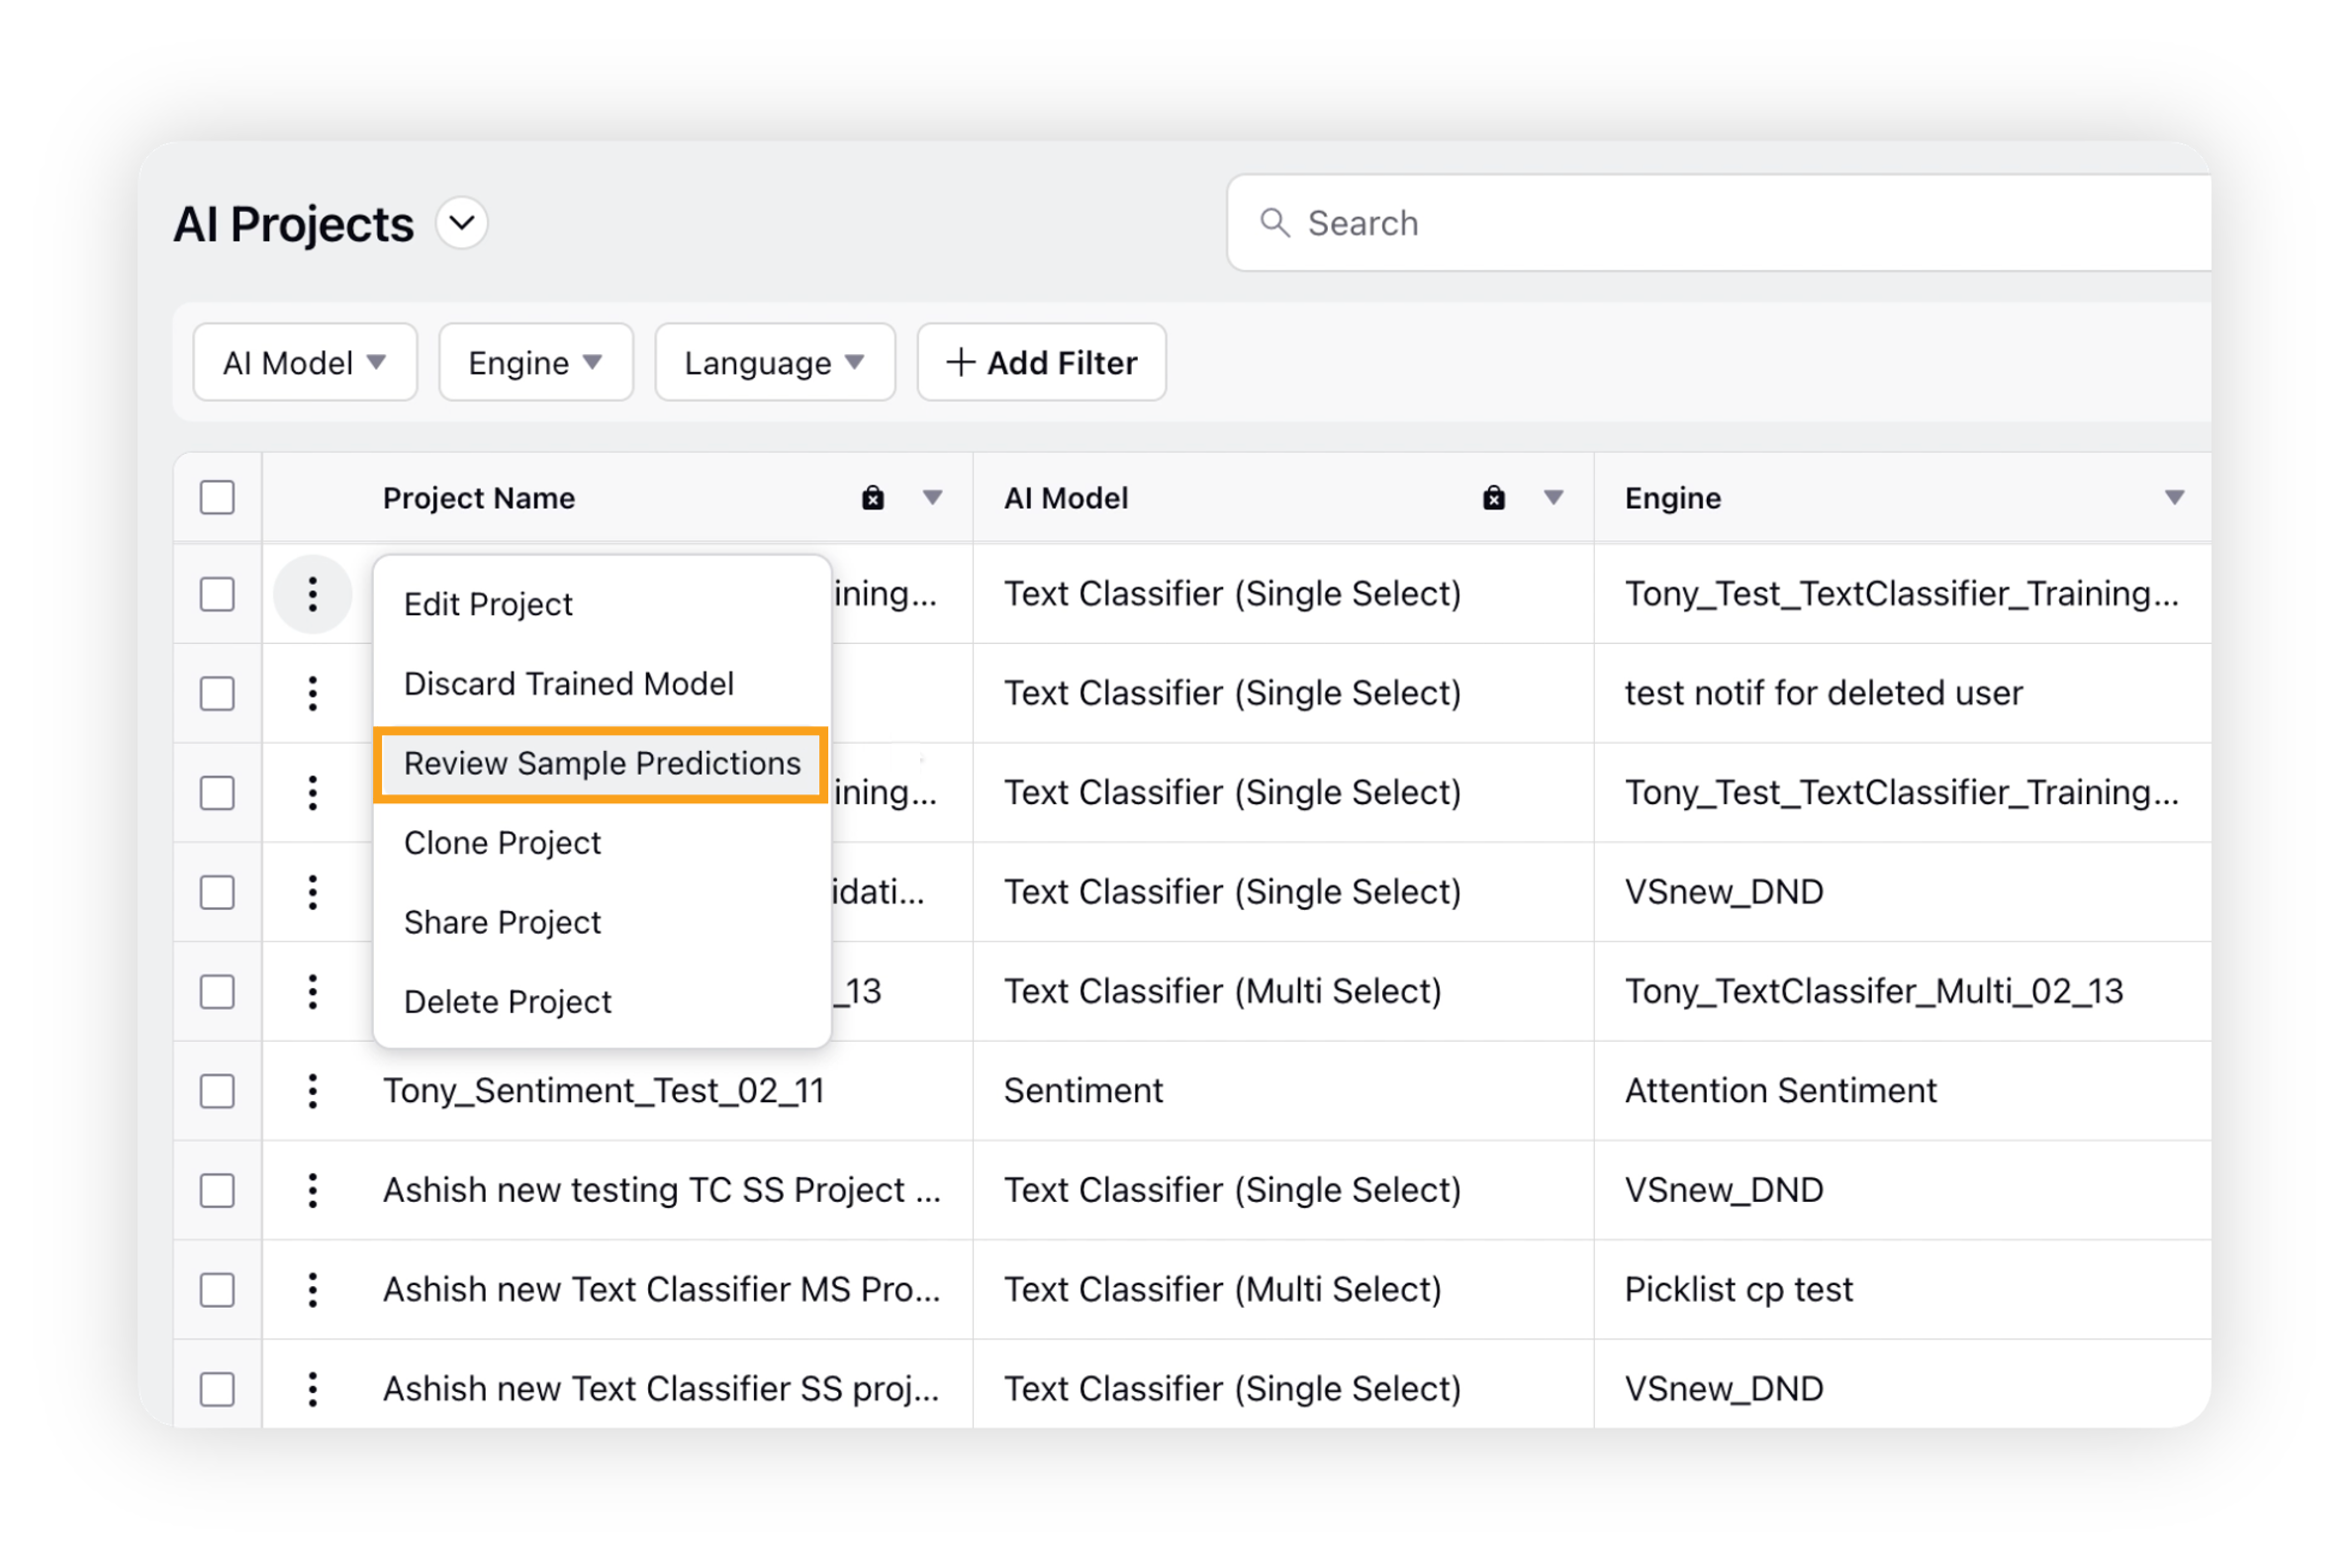
To review and approve sample predictions
Navigate to the AI Projects window. Hover over the Options icon next to your AI project, and then choose Review Sample Predictions from the dropdown menu.
On the Review and Approve Sample Predictions window, you can evaluate the AI model's predicted results by providing feedback on the accuracy of each message's classification.
You can use the filter bar to filter messages by their status, such as View All, View Only Approved, and View Only Non Aapproved.
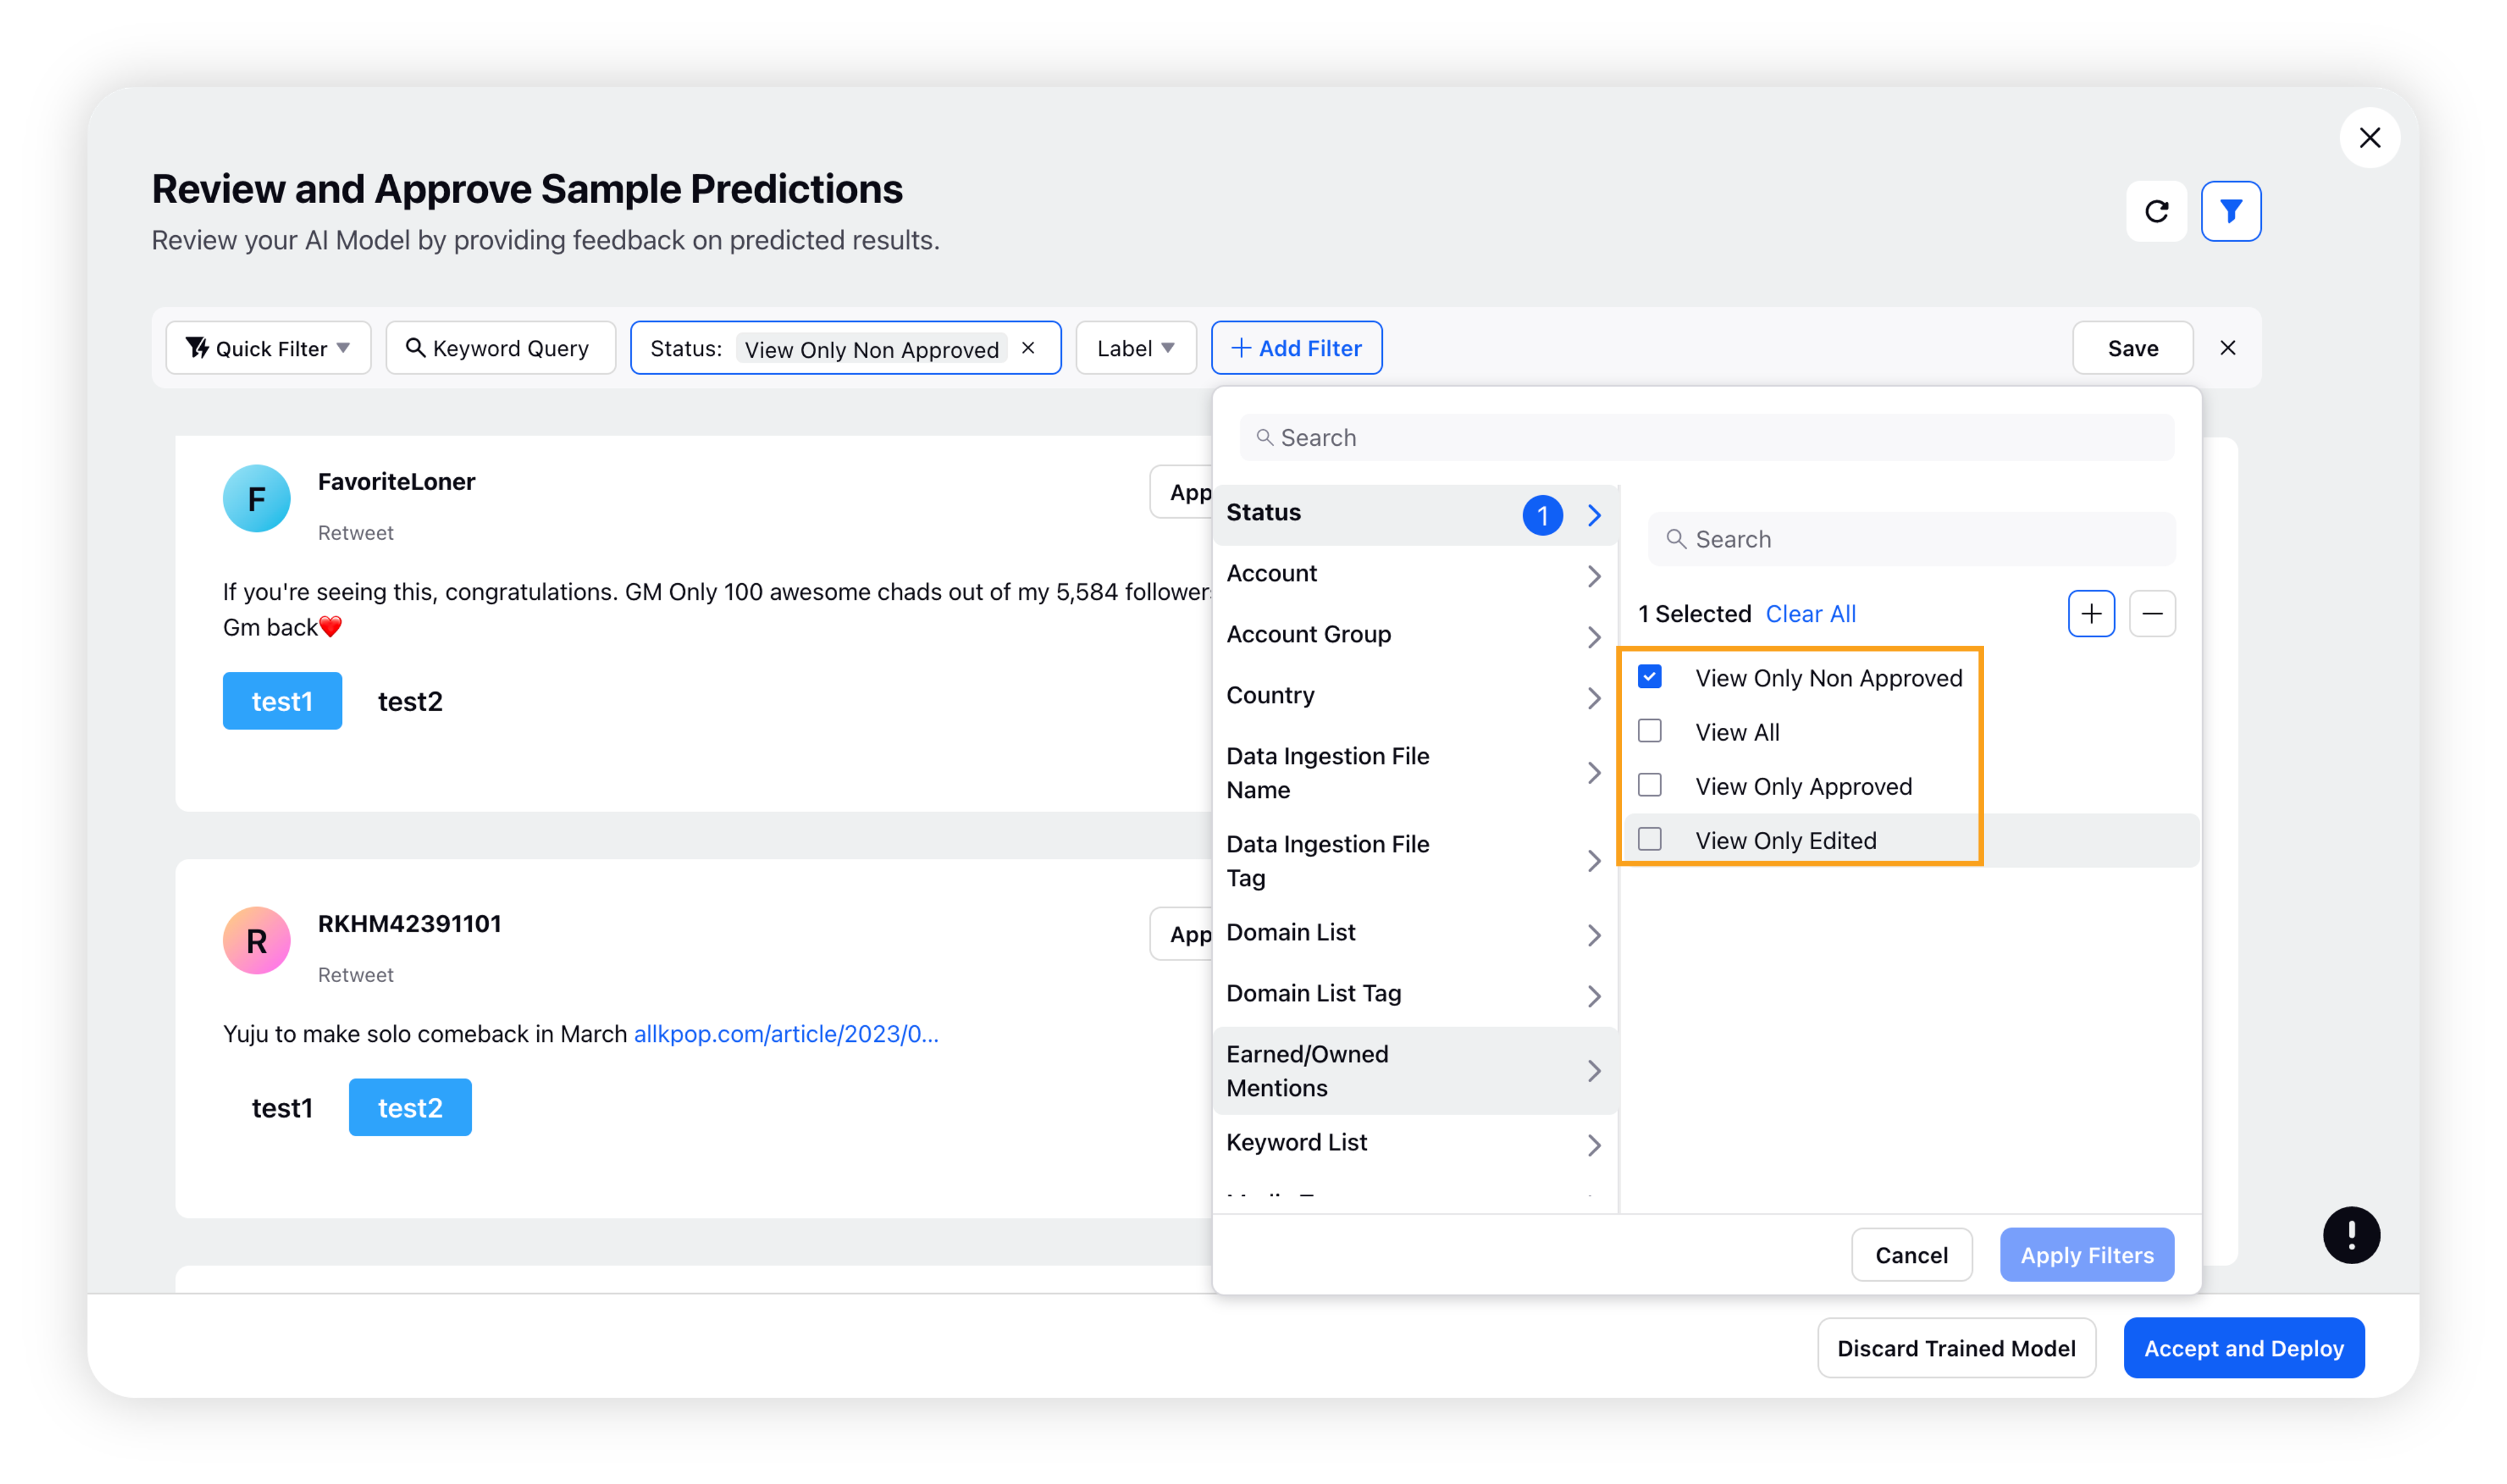
If you believe the prediction is correct, click the Approve button. If you think the classification is incorrect, choose the correct label for the message and click Approve.
 Note: To ensure accurate results, you should review and approve at least 200 messages.
 You can use filters to choose messages based on categories or prediction approval status.
The label-level insights section shows you the Approved Messages, Edited Messages, Precision, Recall, and F1 for each label in real-time. Please check Accuracy Metrics section to understand these metrics.

Once you have approved at least 200 messages, the Accept and Deploy button will appear. Click it to deploy the trained model.
If you are not satisfied with the predicted results, you can discard the trained model and classify more messages to improve its performance.
Note: Your previously approved messages will be saved even if you discard the model.
After clicking Accept and Deploy, you will be directed to the Select Sources for Model Deployment window where you can choose the sources where you want to deploy your model and check the expected monthly/annual consumed predictions.
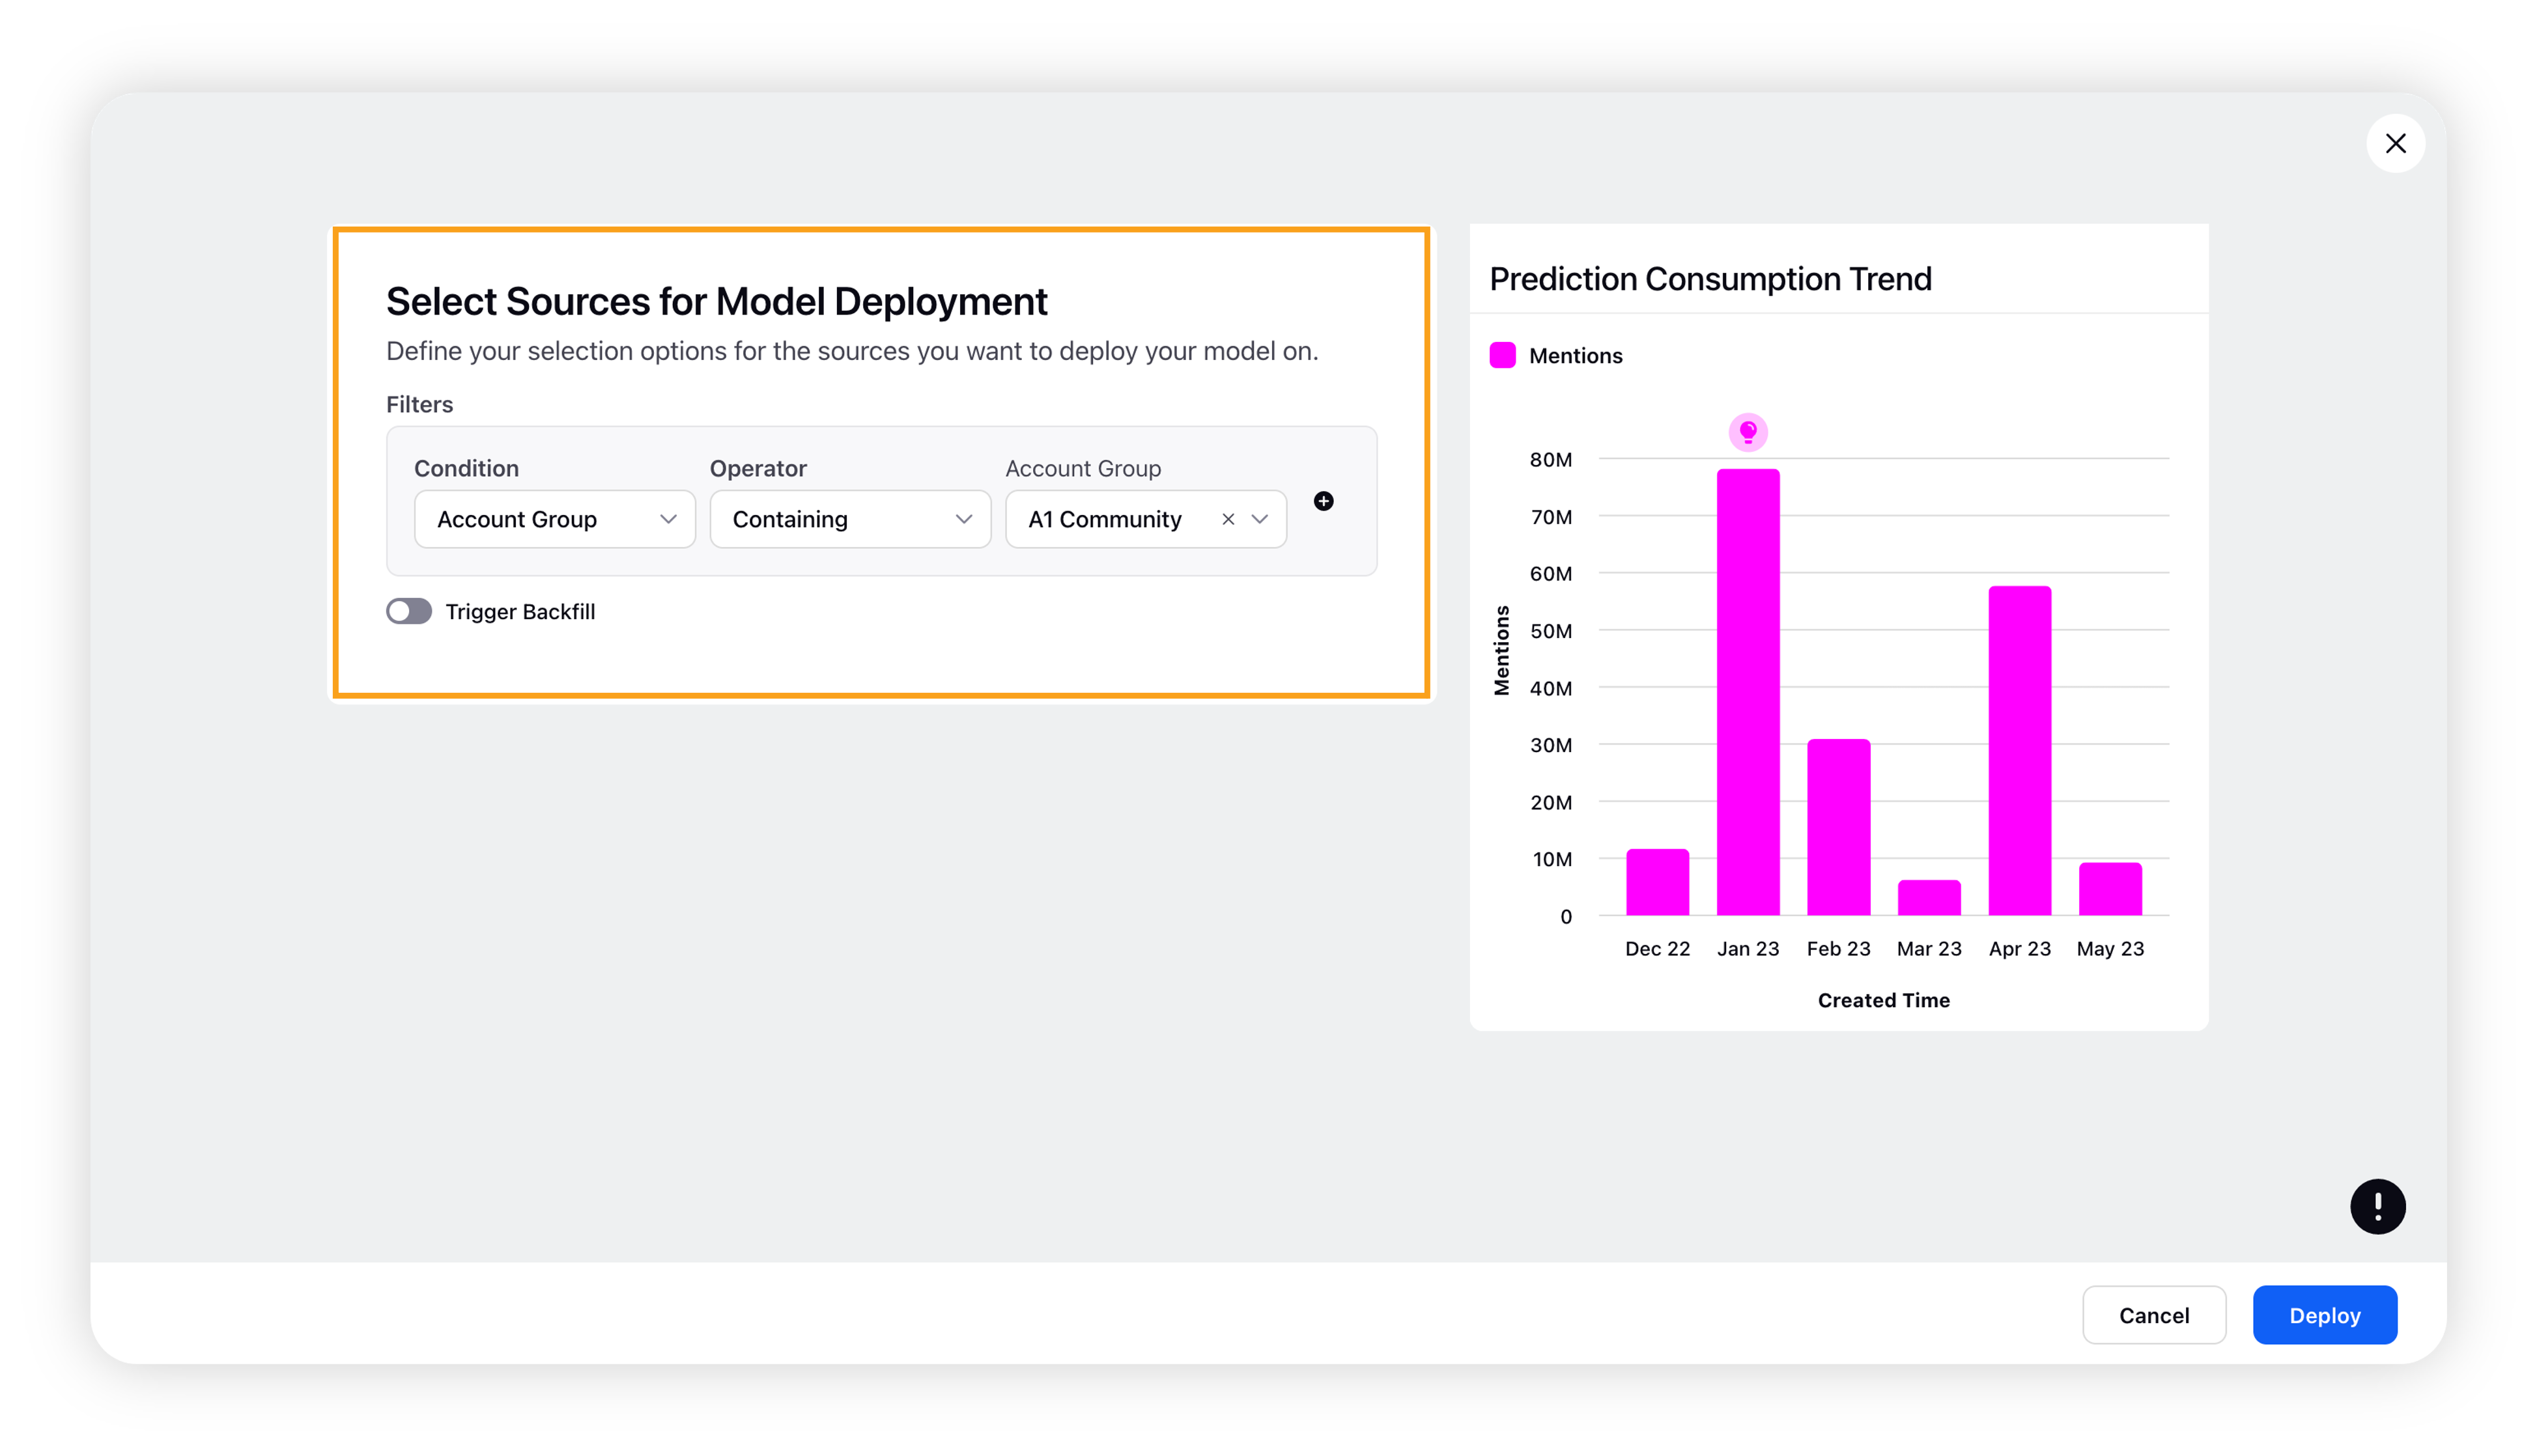
You can also trigger backfill for a selected time range.
Note: To enable Trigger Backfill capability, please contact your Success Manager.
Once the model is successfully deployed, it will start processing new messages. You can use the Custom field to filter and analyse results in different areas of the platform or use it as a dimension in reporting and conditions in Rules.
The name of the custom field will be "Project Name [AI Studio]" if you choose the New Custom Field option in the classification section.
Golden Dataset in Text Classifier
The Golden Dataset serves as a baseline for calculating accuracy metrics, such as Precision, Recall, and F1 Score. See definitions in the Accuracy Metrics section.
When training the model, you can compare it to the Golden Dataset to plot accuracy metrics for both the currently deployed and trained models. If the trained model's accuracy is higher, it is recommended to deploy it.
When using Text Classifier models in AI Studio, the 200 or more approved messages in the Review Sample Predictions screen will serve as a Golden Dataset for your first validation project with the corresponding text classifier model. However, you can still modify, download, and replace the dataset as needed.
To learn more working with Golden Datasets, refer to Create Golden Datasets in AI Studio to calculate your accuracy metrics.
Accuracy Metrics
When evaluating the performance of a new model, there are several important parameters to consider. These include Accuracy, Precision, Recall, and the F1 Score. Understanding these parameters can help you determine whether the model is performing well and identify areas for improvement.
True Positives (TP) are cases where the actual value is positive and the predicted value is also positive.
True Negatives (TN) are cases where the actual value is negative and the predicted value is also negative.
False Positives (FP) are cases where the actual value is negative but the predicted value is positive.
False Negatives (FN) are cases where the actual value is positive but the predicted value is negative.
List of parameters
Accuracy: Accuracy is the proportion of correct predictions out of the total number of examples. It is calculated as (TP + TN) / Total Number of Examples.
Precision: Precision is the proportion of true positive predictions out of all predicted positives. It is calculated as TP / (TP + FP).
Recall: Recall is the proportion of true positive predictions out of all actual positives. It is calculated as TP / (TP + FN).
F1 Score: The F1 Score is a weighted average of Precision and Recall, with a higher score indicating better performance. It is calculated as 2 * (Precision * Recall) / (Precision + Recall).
All of these parameters are measured on a scale of 0 to 1, with 1 indicating perfect performance. By evaluating these parameters, you can get a comprehensive understanding of how well the model is performing and identify any areas for improvement.